


Displaying your booking calendar on a custom page instead of the standard product page is one of the best ways to streamline the user experience and boost conversions. By taking this approach, you get a dedicated landing page that focuses entirely on getting customers to book a service, consultation, or rental, without the distractions of a typical product layout.
In this guide, we’ll walk you through how to easily display a WooCommerce Booking Calendar on a custom page, using the Bookings and Appointments for WooCommerce plugin by PluginHive.
Table of Contents
- Why Display a WooCommerce Booking Calendar on a Custom Page?
- What You Need Before Adding the Booking Calendar in WooCommerce
- How to Add a WooCommerce Booking Calendar to a Custom Page
- How to Customize the WooCommerce Booking Calendar
- Best Practices for Using a WooCommerce Booking Calendar
- Conclusion
- FAQs
Why Display a WooCommerce Booking Calendar on a Custom Page?
By default, the booking calendar is displayed on the standard product page layout, which includes the product image, description, related products, and sidebar. While this works for some stores, there are distinct advantages to moving your WooCommerce Booking Calendar to a custom page:
- Distraction-Free Booking: A custom landing page removes unnecessary clutter, like related products or sidebar widgets, keeping the customer’s focus entirely on selecting their preferred date and time.
- Better Design Flexibility: Placing the calendar on a custom page lets you use page builders like Elementor, Divi, or Gutenberg to design the page exactly how you want it.
- Dedicated Landing Pages: If you’re running ad campaigns for specific services, a dedicated custom page with just a booking calendar performs much better than a standard store page.
- Seamless User Flow: You can embed the calendar inside your “Contact Us” or “Book a Consultation” pages, making the booking journey feel native to your website.
Simply put, a custom page gives you the freedom to design a booking experience built around conversions, not just a default WooCommerce layout.
What You Need Before Adding the Booking Calendar in WooCommerce
Before we dive into the steps, make sure you have the following ready on your WordPress website:
- WooCommerce installed: Your store must have the base WooCommerce plugin installed and activated.
- PluginHive’s Bookings plugin: You’ll need the Bookings and Appointments for WooCommerce plugin installed and activated.
- A bookable product: Create at least one bookable product or service in your store. If this is your first time, our setup guide will help you get started.
- The product ID of your bookable product: You’ll need this to generate the shortcode. You can find it by hovering over the product in your WordPress product list, or by opening the product and checking the URL.
- A custom page in WordPress: Create the page where you want the WooCommerce Booking Calendar to appear.
Once these are in place, you can add the calendar to your WooCommerce custom page.
How to Add a WooCommerce Booking Calendar to a Custom Page
Adding the calendar to your page takes just a few minutes. The Bookings and Appointments for WooCommerce plugin gives you a shortcode that displays your bookable product’s calendar wherever you place it, so there’s no coding involved.
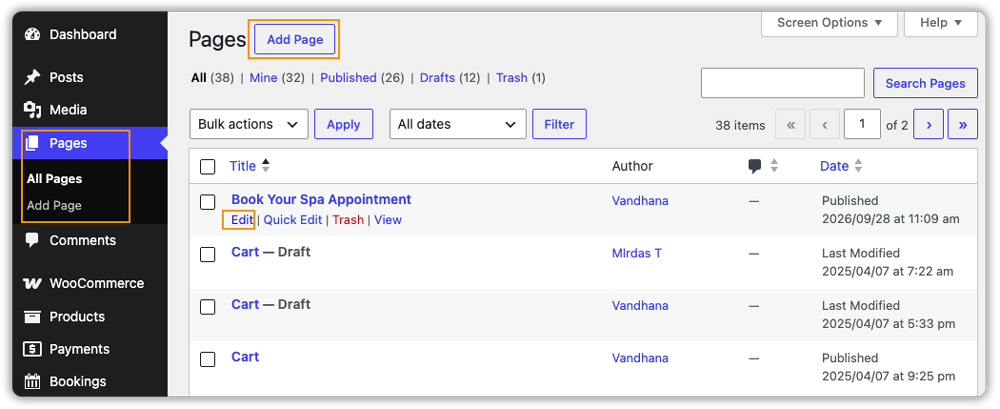
Step 1: Open Your Custom Page
Go to Pages in your WordPress dashboard and open the page where you want the calendar to appear. You can also click Add New to create a fresh page.
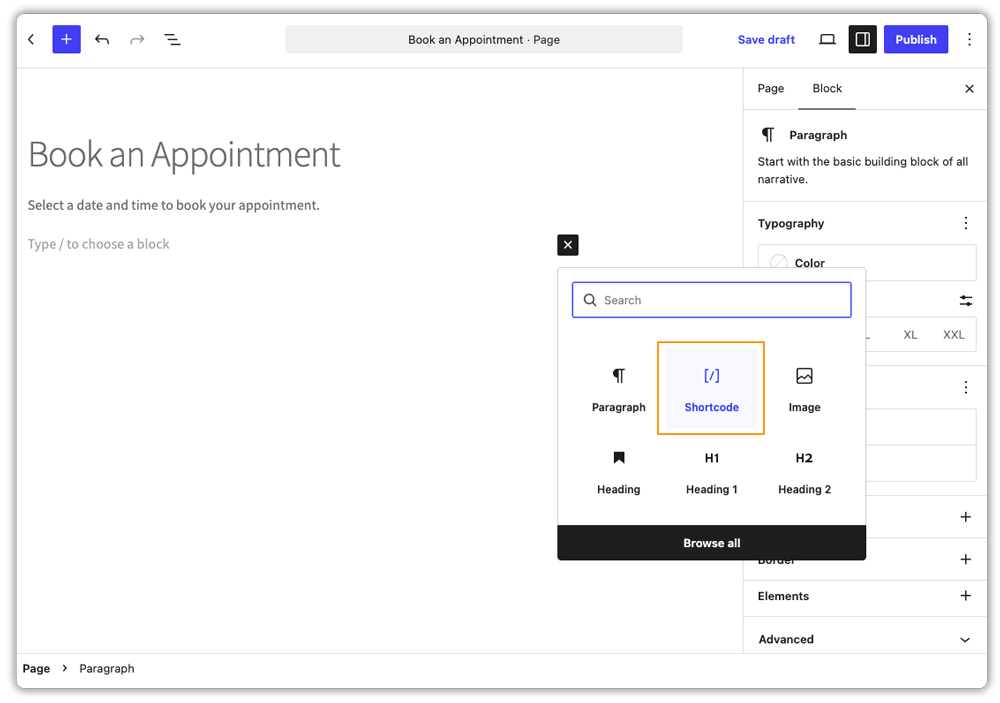
Step 2: Add a Shortcode Block
In the block editor, click the + icon and search for the Shortcode block. If you use a page builder, add its shortcode element to the spot where you want the calendar.
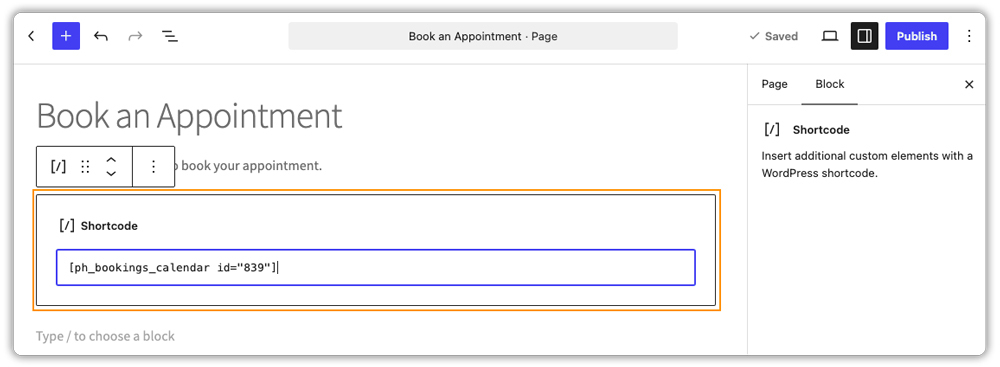
Step 3: Paste the Booking Calendar Shortcode
Paste the following shortcode into the block and replace the number with your bookable product’s ID: [ph_bookings_calendar id=”839″]. Here, “839” is only an example.
Step 4: Publish and Preview the Page
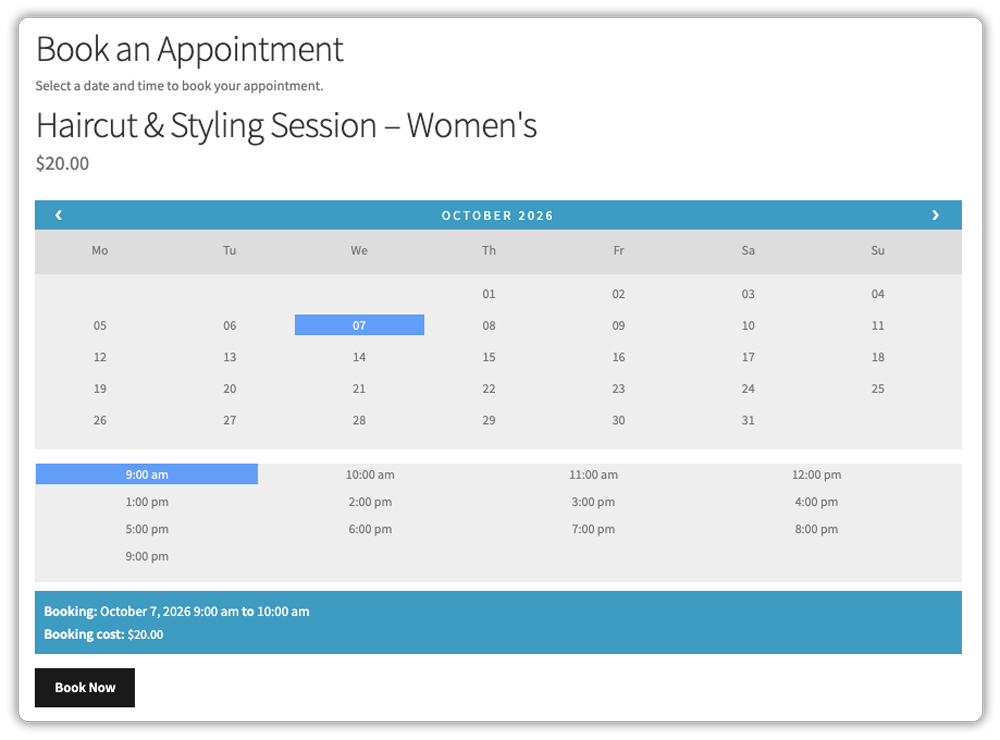
Click Publish (or Update if the page already exists) and open the page on the front end. Your WooCommerce Booking Calendar will now appear on the custom page, ready for customers to pick a date or time slot.
Step 5: Test the Booking Flow
Select a date or time slot and click Book Now to confirm the booking is added to your cart. This quick check helps you catch any issues before customers start booking.
That’s all it takes to get your booking calendar live on a custom page. Next, let’s look at how you can customize its design to match your website.
How to Customize the WooCommerce Booking Calendar
Once your calendar is live, you can easily tweak its appearance and features right from the plugin settings. This ensures your WooCommerce Booking Calendar feels like a natural part of your custom page.
- Choose Your Favorite Layout: Pick from three ready-made designs. The first two keep the calendar always visible, while the third keeps it hidden until customers click the date field.
- Match the Colors to Your Brand: Change the color of any calendar element, like available dates, booked slots, or the “Book Now” button, using a simple color picker. A quick “Reset to Default” brings back the original look.
- Personalize the Customer Experience: Rewrite the text labels, choose which day the week starts on, and show time slots in the customer’s local time zone. You can also decide if the booking’s end time appears in the cart and confirmation emails.
- Set Your Date and Time Format: The calendar follows the date and time format from your main WordPress settings, so everything stays consistent across your website.
With these simple options, you can tailor the booking calendar to your brand and give customers a smooth booking experience.
Best Practices for Using a WooCommerce Booking Calendar
To get the most out of your WooCommerce Booking Calendar on a custom page, keep these best practices in mind:
- Keep the Page Clutter-Free: Since the goal is to get visitors to book, avoid adding heavy graphics, sidebars, or unrelated links on this page.
- Add Clear Instructions: Place a short, welcoming line right above the calendar. For example: “Select an available date and time from the calendar below to secure your consultation.”
- Give Each Service Its Own Page: Since a page supports only one calendar, create a separate custom page for each bookable service so customers land exactly where they need to.
- Check How It Looks on Mobile: The plugin’s booking interface is mobile-friendly, but it’s still a good idea to preview your custom page on a smartphone to make sure your page layout hasn’t squeezed the calendar too tightly.
- Collect the Details You Need: If you need more information before an appointment, such as special requirements, use the booking form fields the plugin offers, like an additional notes box or resource options. For extra fields, you can pair the plugin with Product Add-ons for WooCommerce.
Following these tips helps your custom booking page stay simple for customers and effective for your business.
Conclusion
Adding a WooCommerce Booking Calendar to a custom page is one of the smartest ways to optimize your booking flow. It removes distractions, fits seamlessly into your site’s design, and ultimately helps drive more bookings for your business.
With the Bookings and Appointments for WooCommerce plugin by PluginHive, all it takes is a quick shortcode and a few minutes of your time. If you have any questions or need help setting up the calendar on your store, feel free to contact our support team. We’ll be happy to help.
FAQs
Q: What is the best calendar booking software?
Look for software that is easy for customers to use, lets you control your availability, and works smoothly with your website. If you run a WooCommerce store, a booking plugin like PluginHive’s keeps everything, from bookings to payments, in one place.
Q: What is the best booking calendar plugin for WordPress?
The right booking calendar plugin depends on your website’s requirements. For WooCommerce stores, the Bookings and Appointments for WooCommerce plugin lets you create bookable products and manage their availability, bookings, and calendars.
Q: How can I embed a booking calendar on my website?
On a WooCommerce store, you can embed a booking calendar using the Bookings and Appointments for WooCommerce plugin. Create a bookable product, then paste the plugin’s shortcode, with your product ID, on the page where you want the calendar to appear.
Q: How do I add a booking calendar?
Install the plugin, create a bookable product, and add the shortcode [ph_bookings_calendar id=”3131″] to your page, replacing the number with your product ID. Only one shortcode is supported per page.
