



Running a growing WooCommerce store means keeping up with carrier requirements. If you ship with Canada Post, you may need to generate Canada Post shipping manifests as part of your daily fulfillment process. Creating them before pickup helps keep your shipments organized and reduces manual work.
This is where the Canada Post Shipping Plugin for WooCommerce with Print Label helps by generating your manifest directly from WooCommerce. In this article, you’ll learn what a Canada Post manifest is, what you need before you can generate one, and the exact steps to create it from your store.
On This Page
- What Is a Canada Post Manifest?
- Requirements to Generate a Canada Post Manifest in WooCommerce
- How to Generate a Canada Post Manifest in WooCommerce
- Benefits of Generating Canada Post Manifests Directly in WooCommerce
- Important Things to Remember When Generating Canada Post Manifests
- Conclusion
- FAQs
What Is a Canada Post Manifest?
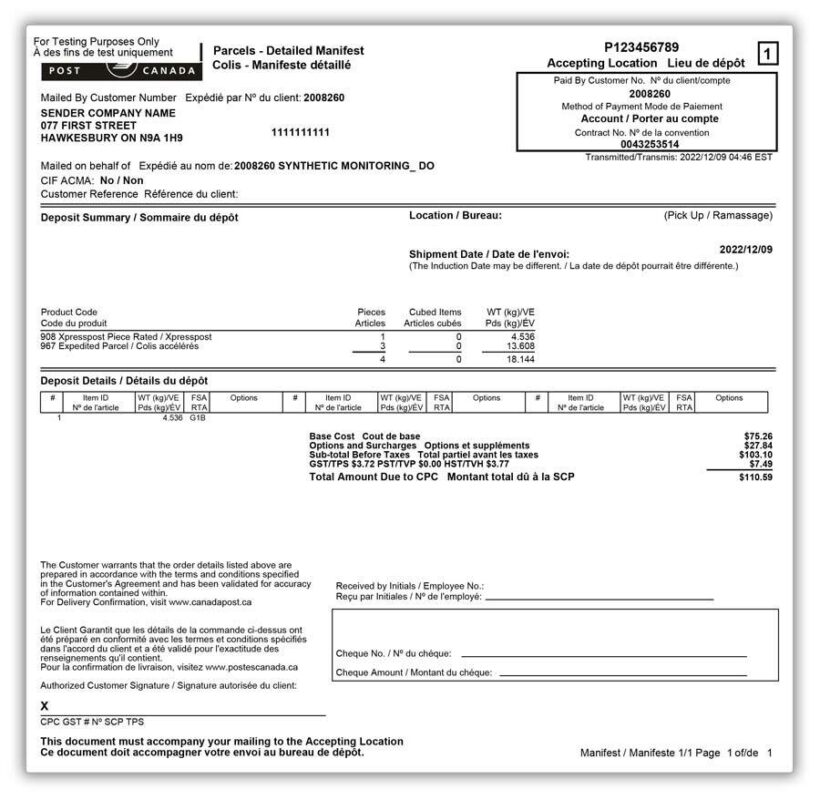
A Canada Post manifest lists the packages that are ready for pickup and shipping. Store owners using Canada Post Contract Shipping must provide a manifest when they hand over their packages.
Here is what you need to know about how it works:
- What it tracks: The manifest lists every outbound package and includes its weight, quantity, and service type.
- What it excludes: Cancelled and unfulfilled orders do not appear on the manifest. Only shipments with generated shipping labels are included.
- The paperwork: Print two physical copies. Give one to the Canada Post representative and keep the other for your records.
- Verification: Canada Post checks your physical parcels against the manifest. Canada Post may adjust your billing if the weight or service details don’t match.
- The discount: Submitting manifest data electronically can help you qualify for commercial shipping discounts.
For stores that ship dozens of orders each day, creating this document manually for every pickup takes time. The Canada Post Shipping Plugin for WooCommerce with Print Label generates the manifest from the shipping labels you create in WooCommerce..
Requirements to Generate a Canada Post Manifest in WooCommerce
ToBefore you generate a Canada Post manifest directly from WooCommerce, make sure you have the following:
- An active Canada Post account: You need a registered Canada Post Contract account to access the manifest feature.
- A working WooCommerce store: Install WooCommerce and add accurate product weights and dimensions.
- The Canada Post Shipping Plugin installed and activated: The plugin connects your WooCommerce store to Canada Post. Enter your Contract Number in the plugin settings to link your account. If you’re setting it up for the first time, follow this step-by-step setup guide.
Once you connect your account and add your Contract Number, you can start generating shipments and manifests.
How to Generate a Canada Post Manifest in WooCommerce
Generating your manifest using the WooCommerce Canada Post Shipping Plugin is incredibly straightforward.
- Process orders and generate shipping labels: Before you can generate a manifest, you need to prepare your packages. Navigate to your WooCommerce > Orders page. Select the new orders you are ready to ship and generate their Canada Post shipping labels.
- Click Transmit Shipment: Once your labels are printed and tracking numbers assigned, use the Transmit Shipment action on the Orders page to tell Canada Post your labelled orders are ready to go.
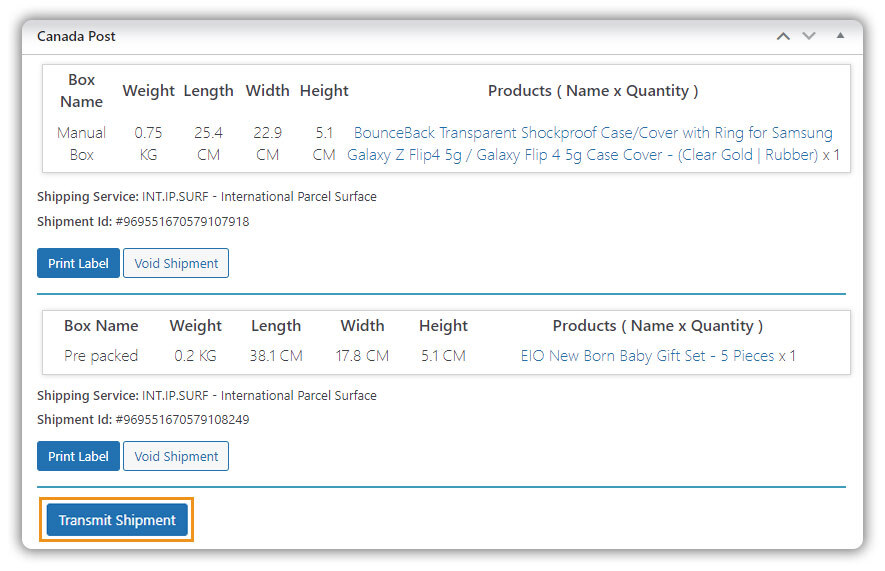
- The manifest is generated automatically: The plugin communicates with Canada Post’s API and compiles every order that’s had a label generated since your last Transmit Shipment.
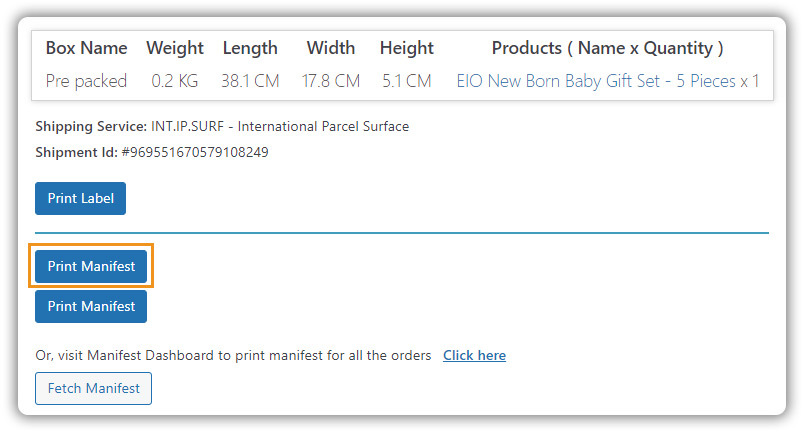
- Print two copies: Hand one copy to the Canada Post representative or driver at pickup, and keep the second for your records.
Generating Separate Manifests for Domestic and International Shipments
International shipping involves additional requirements because of customs regulations. If your daily batch includes domestic and international shipments, generate separate manifests for each.
The Canada Post Shipping Plugin for WooCommerce with Print Label handles this automatically. When you click Transmit Shipment, the plugin separates domestic and international shipment data. It then creates one manifest for domestic shipments and another for international shipments.
The plugin offers an efficient way to manage this process from WooCommerce. However, you can also generate manifests in batches.
Other Ways to Generate Canada Post Manifests in WooCommerce
You’re not limited to transmitting shipments one round at a time. The plugin also supports batch manifest generation: you can select the last order for which you created a shipping label, and the plugin will pull in every shipment made after your previous manifest into a single request.
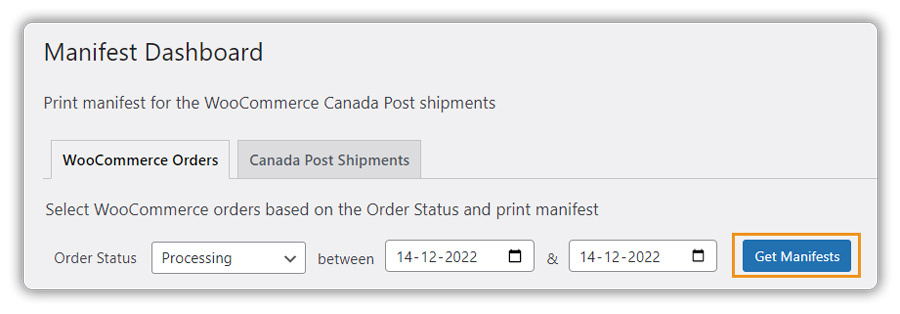
This is useful if you ship throughout the day and only want to generate one manifest before your scheduled Canada Post pickup, rather than transmitting shipments every time you print a label.
Benefits of Generating Canada Post Manifests Directly in WooCommerce
You can technically create a manifest through Canada Post’s own online tools, but doing it from your WooCommerce dashboard has some clear advantages for store owners:
- No switching between systems: You generate labels and manifests in the same place you manage orders, instead of logging into a separate Canada Post portal.
- Nothing gets left off by accident: Since the manifest pulls directly from your labeled shipments, you don’t have to manually check which orders still need to be included.
- Less paperwork at pickup: With your manifest ready and printed ahead of time, handing off packages to your Canada Post driver or facility takes less time.
- Works the same way as your regular order fulfillment: There’s no separate manifest workflow to learn, since it’s built into the same label-printing process you already use.
Bringing manifest generation into your everyday order workflow turns a clunky administrative chore into a single, automated step
Important Things to Remember When Generating Canada Post Manifests
To ensure your shipping operations run without hiccups and to maintain your good standing with Canada Post, keep these best practices in mind:
- Timing is Everything (End of Day): Always submit your shipments and generate your manifest at the end of your fulfillment day. Canada Post explicitly states that failure to submit shipments electronically by the end of the day will result in a surcharge for the impacted packages.
- No Going Back After Transmission: Make sure that the packages are packed, labelled, and ready to go before you click Transmit Shipment. Once the data is transmitted electronically, it cannot be undone or easily edited.
- Always Keep Copies: Do not skip printing the physical copies. Even though the data is transmitted electronically, the Canada Post driver still requires the physical paperwork to sign off on the package collection.
- Accuracy in Weight and Dimensions: Ensure your products have accurate weights and dimensions entered in WooCommerce. Inaccurate data on your manifest can lead to post-shipment price adjustments and manual billing penalties.
Keeping these critical points in mind will protect your commercial shipping discounts and ensure a flawless fulfillment process as your e-commerce business scales.
Conclusion
Canada Post manifests are a mandatory part of Contract Shipping, but they don’t have to mean extra manual work for your WooCommerce store. Once your Canada Post account and Contract Number are set up in the Canada Post Shipping Plugin for WooCommerce with Print Label, generating a manifest is as simple as transmitting your labelled shipments, whether that’s order by order or in a single daily batch. If you run into any issues setting this up on your store, PluginHive’s support team is available to help.
FAQs
Q: What is a manifest in parcel delivery?
A manifest is a document that lists every package being handed over for shipping, along with details like weight, quantity, and service type. Carriers use it to confirm what they’re picking up before accepting a shipment.
Q: Is a manifest required for Canada Post shipments?
Yes, if you’re on Canada Post’s Contract Shipping service. Canada Post requires a manifest to be submitted at the time of package pickup, and shipments won’t be accepted without one.
Q: Do I need a Canada Post Contract account to generate manifests in WooCommerce?
Yes. Manifests are tied to Canada Post’s Contract Shipping service, so store owners on a Non-Contract or Solutions for Small Business account won’t see this option in the plugin. You can check your account setup in the plugin’s setup guide.
