
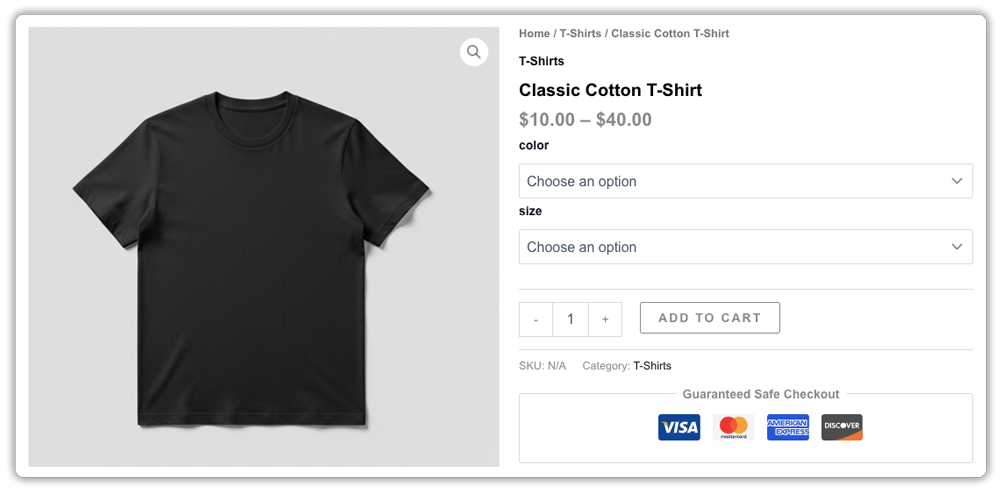
When customers visit a WooCommerce product page, they often need to choose variations like size, color, or style. By default, WooCommerce displays these options using dropdown menus. While dropdowns work, they add extra clicks and hide available choices, which can slow down the buying process and affect user experience.
Replacing variation dropdowns with radio buttons makes product selection faster and clearer. Radio buttons display all options directly on the page, helping customers make decisions quickly, especially on mobile devices. With PH Product Add-ons for WooCommerce, you can easily change dropdowns into radio buttons without any coding. In this guide, you’ll learn why radio buttons improve WooCommerce product pages and how to set them up step by step.
Table of Contents
- Why Replace WooCommerce Variation Dropdowns with Radio Buttons
- How to Replace Variation Dropdowns with Radio Buttons in WooCommerce
- How WooCommerce Stores Use Radio Buttons in Real Situations
- Best Practices for Using Radio Buttons in WooCommerce
- Conclusion
- FAQs
Why Replace WooCommerce Variation Dropdowns with Radio Buttons
The default WooCommerce dropdown works, but it doesn’t always provide the best shopping experience. Here’s why radio buttons are often a better choice for your customers.
- Instant visibility: All options are displayed at once, so customers don’t need to click to see what’s available.
- Fewer steps to purchase: Shoppers can select an option and add the product to the cart in one smooth action.
- Better for mobile: Radio buttons are easier to tap and navigate on smaller screens compared to dropdown menus.
- Reduces decision fatigue: Viewing options side-by-side helps customers make quicker decisions.
- More professional appearance: A clean set of radio buttons looks more modern and user-friendly than a standard dropdown.
Small UX improvements like this can make a big difference. When the buying process feels simple, customers are more likely to complete their purchase and return to your store again.
How to Replace Variation Dropdowns with Radio Buttons in WooCommerce
The easiest way to do this, without touching any code, is with the PH Product Add-ons for WooCommerce plugin by PluginHive. It lets you add custom fields to any product page, including radio buttons, with full support for pricing per option, conditional logic, and mandatory selections.
Before you begin, make sure the PH Product Add-ons plugin is installed and activated on your WordPress site. Refer to the setup guide for detailed instructions: Set Up WooCommerce Product Add-ons .
Here’s how to set it up:
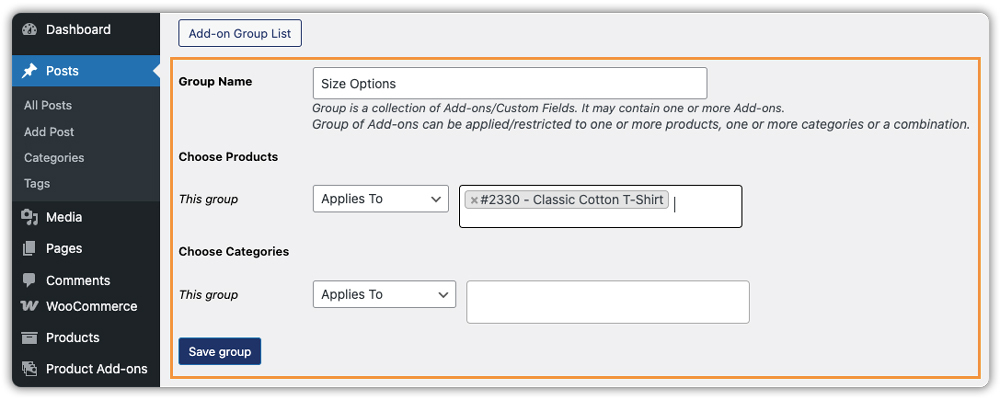
- Create and assign a new add-on group: Go to Product Add-ons in your WordPress dashboard and click Add New Group.

Give it a clear name, such as Size Options or Color Selection. Then scroll to Assign to Products or Assign to Categories, choose where the options should appear, and save your changes.
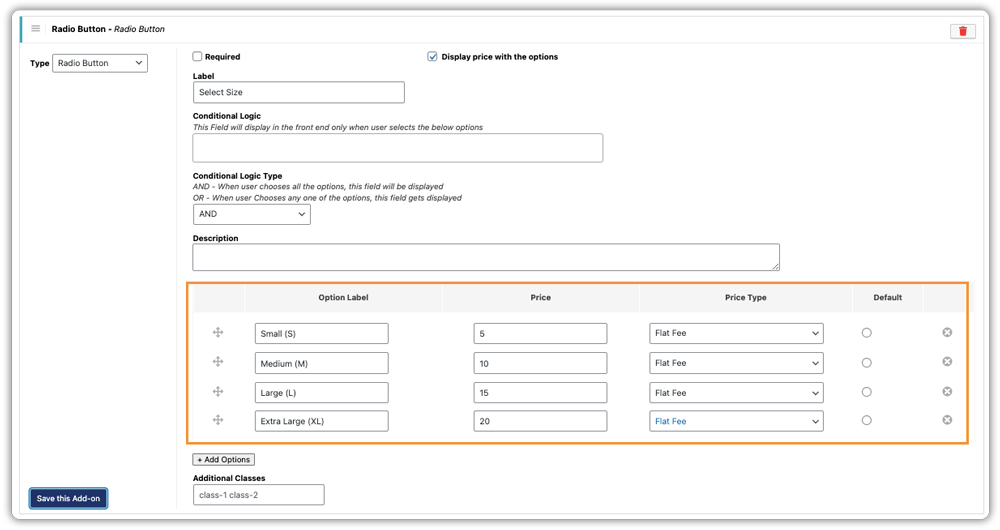
- Add a Radio Button Field: Inside your group, click ‘Add Field’ and select ‘Radio Button’. Enter a label (e.g., ‘Select Size’) and add each option: Small, Medium, Large, etc. Add a price to each option if needed; otherwise, leave it at $0.
- Preview and Test: Visit the product page on the frontend and confirm your radio buttons appear correctly. Test on both desktop and mobile before going live.
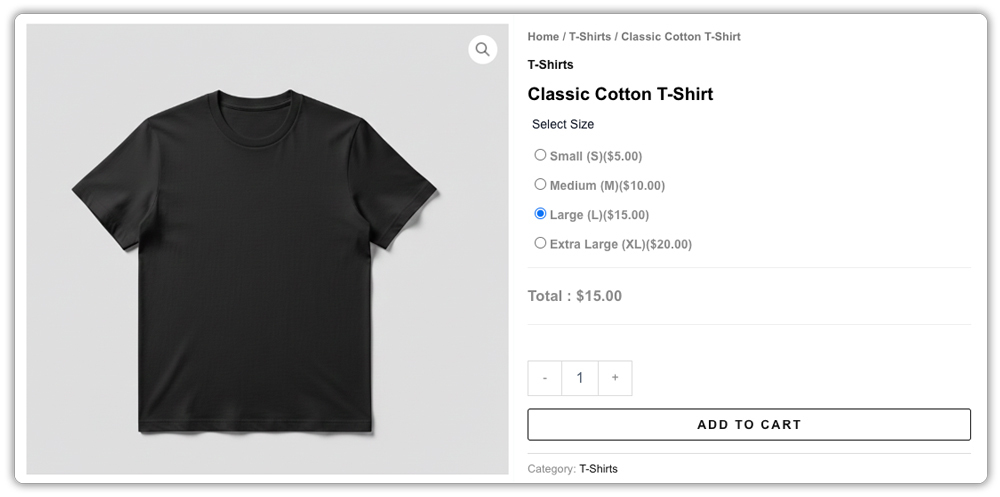
Once done, your customers will see all variation options clearly on the product page.
How WooCommerce Stores Use Radio Buttons in Real Situations
Radio buttons aren’t just a design preference; different WooCommerce stores use them to solve real, everyday problems.
| Store Type | Variation Options | Why Radio Buttons Work |
|---|---|---|
| Clothing Stores | Size (XS, S, M, L, XL), Gender | Shoppers pick their size instantly without opening a dropdown |
| Custom Print Shops | Paper finish (Matte, Glossy, Satin) | Each option has a different price, displayed clearly next to the button |
| Food & Beverage Stores | Meal sizes, Flavors, Portions | Quick selection matters when options look similar but differ in price |
| Gift Shops | Wrapping style, Card type, Ribbon color | Customers decide fast during high-traffic seasons like holidays |
| Electronics Accessories | Storage size, Color, Compatibility | Pricing differences displayed clearly next to each radio button |
When all options are visible at once, shoppers spend less time deciding and more time buying; that’s the real value radio buttons bring to any store.
Best Practices for Using Radio Buttons in WooCommerce
Getting radio buttons in place is just the start. Here’s how to make sure they work as well as possible.
- Keep option labels short and clear: Use ‘Small’, ‘Medium’, ‘Large’, not ‘Size Option 1’. Clarity reduces hesitation.
- Limit options to 6 or fewer: Too many radio buttons on one page can feel overwhelming. Use dropdowns when you have 7+ choices.
- Use Visual Swatches for Colors: While radio buttons are great for text, if you are selling clothing or decor, you might want to add color swatches to your products instead for an even better visual experience.
- Use conditional logic for complex products: Show certain options only when a specific choice is made first – keeps the page clean and relevant.
- Mark required fields: Use the ‘Mandatory’ setting so customers can’t skip an important choice before checkout.
These small optimizations make a real difference. A radio button setup that’s clean, clear, and easy to use gives your store a professional edge and keeps customers moving toward checkout.
Conclusion
Switching from dropdown menus to radio buttons is a simple change that delivers real results. It removes unnecessary friction from the buying process, makes your product pages easier to use on any device, and gives customers a clearer view of their options, all of which push them closer to hitting ‘Add to Cart’. With PH Product Add-ons for WooCommerce, this upgrade is quick to implement, requires no coding, and offers flexible pricing options, conditional logic, and full WooCommerce compatibility.
Whether you’re running a small boutique or a large catalogue store, improving how customers interact with product variations is always worth the effort. Better UX leads to better conversions; it’s that straightforward. If you need help setting up this in your WooCommerce store, the PluginHive support team is ready to assist you with configuration and guidance.
FAQs
- How do I show variations as radio buttons in WooCommerce?
You can show WooCommerce variations as radio buttons by using a product options plugin like PH Product Add-ons for WooCommerce. Create a radio button field, add your variation options, and assign it to the product. - Are radio buttons better than dropdowns in WooCommerce?
Radio buttons are better when you have a small number of options because customers can see all choices at once. This reduces clicks, improves usability, and helps shoppers make faster decisions compared to dropdown menus. - Can I replace WooCommerce variation dropdowns without coding?
Yes. Plugins like PH Product Add-ons allow you to replace dropdowns with radio buttons without editing code. You can configure everything directly from the WooCommerce dashboard. - WooCommerce variations vs. product add-ons: which is better?
WooCommerce variations are best for managing stock for options like size or color. Product add-ons are better for adding extra choices or customization without creating multiple variations. Learn more here: WooCommerce Product Add-ons vs WooCommerce Variations.