
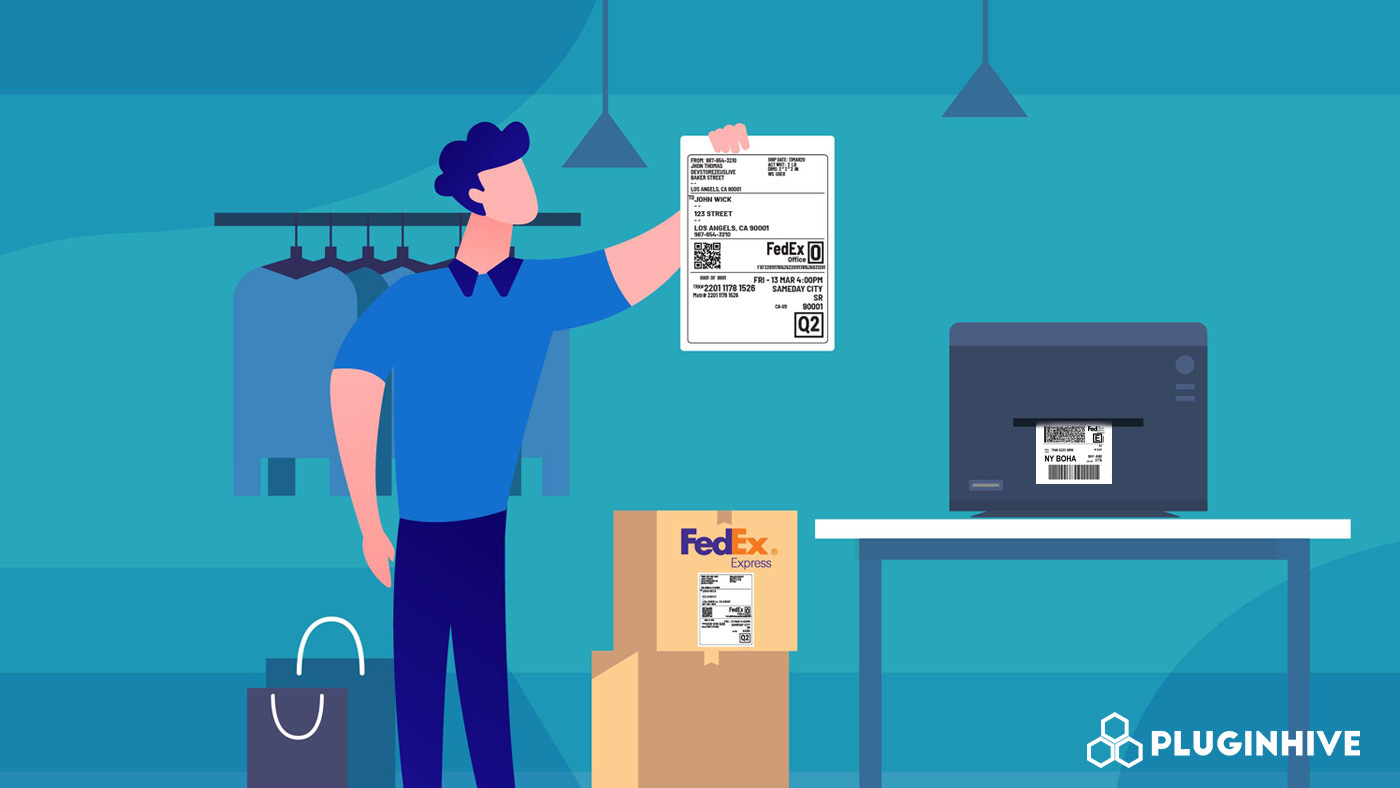
This guide will help you create a FedEx shipping label from your online store. We will explore the available label printing options on platforms like WooCommerce and Shopify. In particular, we will see the various FedEx label types, commercial invoices, international shipping, and more.
Shipping an item isn’t as easy as delivering mail across your neighborhood. A delivery agent has to pick up the package, move it to the nearest hub, run through barcode readers, and move it again to a hub near the destination. There’s just a lot to follow.
But what is much simpler to understand is FedEx shipping. Over the years, FedEx has fine-tuned its shipping process, making delivering items a cakewalk for small business owners. They have made almost every resource accessible online with FedEx APIs.


E-commerce shipping solutions like the WooCommerce Shipping Plugin for FedEx with Print Label and Shopify Ship, Rate, and Track for FedEx App are a result of the increase in demand for online FedEx shipping. They both provide end-to-end shipping facilities to ensure store owners can maximize their business potential.
Article Contains
- What is a FedEx label?
- What is a FedEx commercial invoice?
- A few tips for store owners planning to ship overseas
- How to clear customs?
- How to print shipping labels using FedEx Ship Manager?
- Do you need labels for FedEx SmartPost shipments?
- How to generate a FedEx shipping label in WooCommerce?
- How to create a FedEx shipping label in Shopify?
- Conclusion
What is a FedEx label?
FedEx Shipping label, in general, provides key information to FedEx agents who deliver packages to customers. Let’s learn some more about the FedEx shipping label.
Important details:
- A shipping label contains vital information like from and to addresses, shipment details, package weight, item type, shipping service name, etc. Moreover, there’s a lot of other shipping-related information hidden in the barcodes.
- Labels are used at every checkpoint of FedEx’s shipping process. Starting from the pickup point (warehouse or FedEx location), FedEx uses the label to identify the packages and assign them to the correct delivery vans.
- FedEx designs its labels in a way that the packages are optimized with its process, at the routing center, and the storage warehouse.
Keep in mind that these labels are designed to be read by both machines and humans. Each area of the label is being used along the way to inform specific partners of the supply chain.
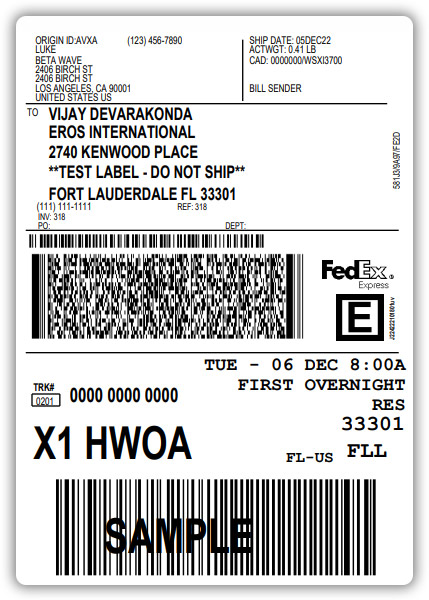
Specifications of a FedEx shipping label
A simple-looking FedEx shipping label contains a lot of information. And since you’re going to use it to ship your items, you should understand a few important parameters used along with it. Here’s the sample FedEx label from before. Observe the details.
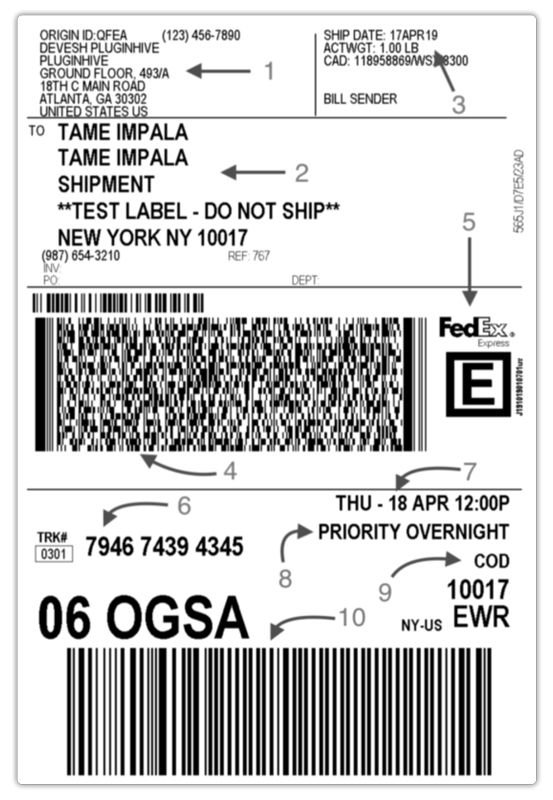
1. Sender address
This area indicates the location/address from where the shipment originates. You could also notice the phone number and the name of the shipper tagged along with it.
2. Destination address
As the name suggests, this area indicates the location/address where the shipment has to be delivered. And again, the phone number and the name of the recipient are also mentioned in this area.
3. Shipment information
This section of the label contains important information, including the weight of the shipment and the shipping date. The CAD (cash against documents) is the invoice number, which indicates the payment details. In addition, the BILL SENDER indicates that the payment for the shipping label is made by the sender, which is you, in this case.
4. 2-Dimensional Barcode
The 2-dimensional barcode is a special type of barcode that consists of a series of stacked linear barcodes. The symbology is capable of encoding the entire 255-character ASCII data set. FedEx’s machines use this barcode to understand essential information.
5. FedEx Network
This area indicates which FedEx network is responsible for handling the shipment. FedEx has created a network of multiple services that are responsible for delivering all kinds of shipments. In addition, shipping services like FedEx Priority Overnight and FedEx Ground fall under FedEx Express and FedEx Ground, respectively.
6. FedEx tracking number
Tracking is a big part of FedEx shipping, so FedEx places the order tracking number next to the TRK# sign. Both you and your customers could use this FedEx Shipment Tracking number to track shipments.
7. Estimated delivery date and time
FedEx determines the delivery date and time based on the type of shipment and shipping service used. For instance, FedEx Priority Overnight, which is a next-day delivery service, delivers items to locations around 10:30 AM or noon to most areas in the U.S.
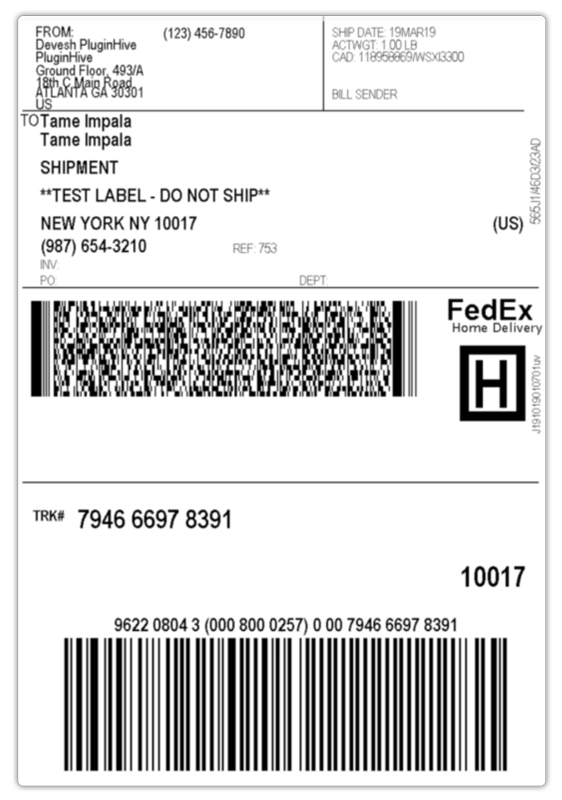
However, some of the services, like FedEx Home Delivery(FedEx Ground for residential addresses), do not have a fixed delivery date and time. As a result, the delivery date and time of such shipments are not mentioned on the shipping label. Have a look at the sample label below.
8. FedEx shipping service name
Here, you will be able to see the name of the FedEx shipping service used. In the sample FedEx label shown above, the service used is FedEx Priority Overnight.
9. FedEx Collect On Delivery
This indicates that the order amount has to be paid by the customer to the FedEx delivery agent. FedEx Ground designates the amount of money that a FedEx driver collects from the recipient when a package is delivered. However, FedEx Ground Collect On Delivery is not available with FedEx Home Delivery.
10. SSCC—18 Barcode
To provide shippers with a more convenient way of tracking their packages, FedEx Ground incorporated support for the SSCC-18 bar code into its bar code strategy.
The SSCC-18 is used to identify a shipping container for both the shipper and the recipient. FedEx Ground supports the use of the SSCC-18 as package identification for all systems.
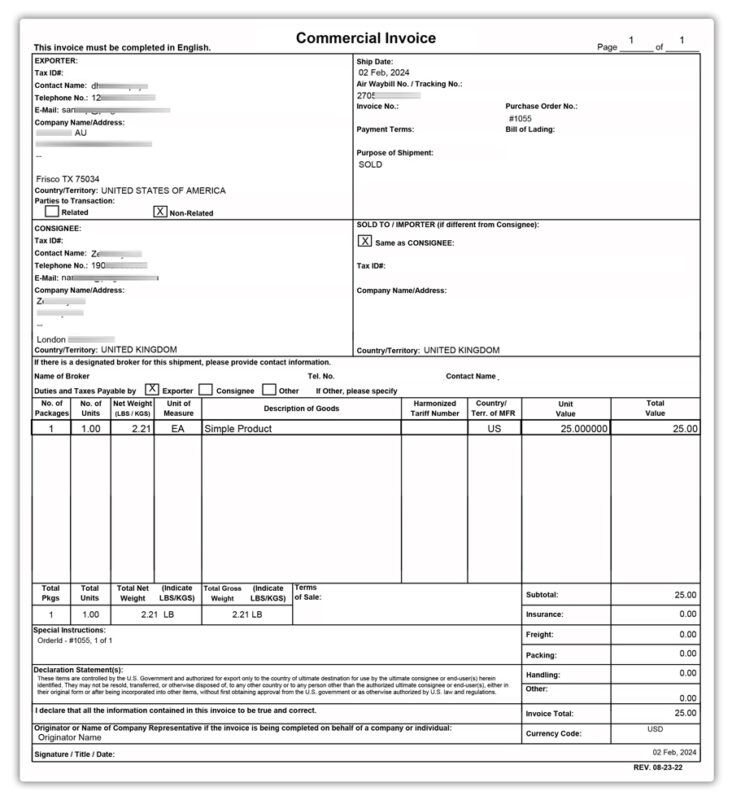
What is a FedEx commercial invoice?
A commercial invoice is one of the most important documents involved in FedEx international shipping. It is essential for the clearance process used by customs officers, as it helps them classify the packages. Commercial invoices also help them assess the necessary duties and taxes.
If you’re planning to ship overseas, then you would have to follow the right template. Doing otherwise would prevent the shipment from going any further.
Specifications of a commercial invoice
Here’s a sample commercial invoice generally used along with international FedEx shipments. Have a look.

Your commercial invoice should include the following information:
1. Shipper/Exporter
This section displays the contact name, company name, full address, and VAT number. It identifies the exporter who is responsible for the shipment and provides customs with the origin details of the goods being shipped.
2. FedEx International Air Waybill number
The FedEx International Air Waybill number is a unique number that plays an important role in shipping. You must mention this number in the required area since it links the invoice with the shipment tracking and customs documentation.
3. Importer
You can even mention the importer details here. This section can be used if the shipment will be handled by an importer who is not the recipient. As you can see, you have to add a full name and address here so customs authorities know who is responsible for receiving and clearing the shipment.
4. Ship To Information
This section includes the details of the recipient who will physically receive the goods. You must provide the contact name, complete delivery address, and phone number to ensure the package reaches the correct destination without delays.
5. Commodity description
There are a lot of restrictions when it comes to exporting products overseas. You must check what items are allowed to be shipped in a country and what are strictly not allowed. In the commercial invoice, you must mention the details of the items you are shipping.
Here are the things your commercial invoice must contain:
- Full description with product details
- Harmonized code (where possible)
- Reason for the export/intended use
- Any part or serial numbers
- Country of manufacture for the goods
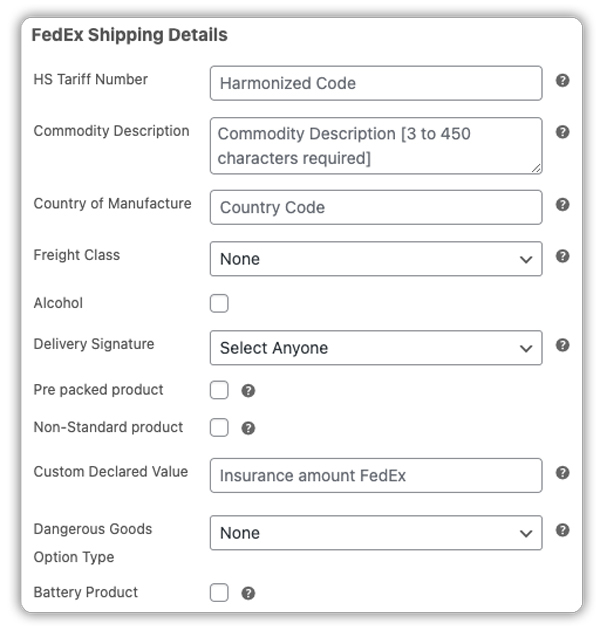
The WooCommerce Shipping Plugin for FedEx with Print Label has a feature that lets you add the commodity description on the FedEx shipping label. However, if you don’t mention anything in the description box, then, by default, the corresponding product name would appear on the label.
6. Invoice Totals
This section shows the breakdown of all costs in the shipment. It includes product line total, any discounts, sub-total, freight, insurance, or other charges. The final total invoice amount is what customs uses to calculate duties and taxes.
7. Total Packages and Weight
Mention the total number of packages in the shipment and the overall shipment weight. This is important for customs and logistics, as it confirms both the quantity of packages and the actual shipping weight for processing.
8. Country of Manufacture
The country in which each of the commodities in your shipment was originally manufactured or produced. Customs authorities rely on this information to apply the correct tariffs, duty rates, or preferential trade treatments.
9. Sign the declaration
Ensure that the declaration is signed by the shipper/exporter. A signed declaration validates that all the details mentioned in the invoice are accurate, and helps customs to clear the goods without unnecessary inspections or delays.
A few tips for store owners planning to ship overseas
Although people consider international shipping tricky and sometimes dangerous, following the necessary rules and steps would ensure safe delivery. It’s sort of like driving; it’s dangerous, but once you get the hang of it, everything seems pretty safe and under control.
You have to ensure your packages are eligible for delivery. There are a few forms and documents that you have to fulfill to do so. Here are some of the commonly required forms that should be fulfilled.
- Certificate of Origin
- Pro Forma Invoice
- Packing List
- Electronic Export Information (EEI) – Only if your shipment value is > $2,500 USD or qualifies under other EEI guidelines.
FedEx International Shipping Assist is a simple, free service to help businesses and individuals easily get the customs documents they need to ship internationally. All you have to do is complete a simple form with details about what you’re shipping and provide FedEx with the documents you need.
For a smoother customs clearance process, transmit your customs documentation electronically with FedEx Electronic Trade Documents (ETD). This simple, efficient, and reliable solution helps you avoid customs delays and ensure the timely delivery of your international packages. You can enable FedEx Electronic Trade Documents in FedEx Ship Manager at fedex.com.
How to clear customs?
Getting a shipment through customs in any country can seem complicated, but if you stick to these best practices, you can minimize delays and maximize efficiency. Here are some of the best practices followed.
- Declare the accurate value of your item, even if it’s being provided to the recipient at no charge (i.e., sample or not for resale). The value will be used to assess duties and taxes
- Keep multiple-piece shipments together, and label each piece of the shipment individually
- Correctly complete all necessary documents. Keep your answers specific, accurate, and free of spelling errors
- Make sure information is consistent across all documents
- List each commodity separately, and provide a detailed, accurate description of each one, including what it’s made of and how it will be used
- Legibly print the commodity’s country of origin/manufacture to indicate where your commodity was manufactured, grown, or produced
- If you’re using your broker, please include their complete contact information
- Provide a phone number or fax information for both the sender and the consignee
How to print shipping labels using FedEx Ship Manager?
FedEx Ship Manager is a good choice for store owners who don’t want to have a dedicated shipping solution. They can manually print the shipping labels for their shipments.
But keep in mind that if you start getting more and more orders, you would probably want to have a dedicated FedEx shipping solution. In any case, you will have to first log in to FedEx.com to access the dashboard. Let’s have a look at the steps required to do so.
Step 1
You need to first ensure your ‘From‘ address is correct. This is just a first-time thing, and your ‘From’ address will automatically prepopulate in the future. You may ‘Edit’ the address if you ever have to change the ‘Ship From’ location.
Step 2
Now you will have to enter your customer’s information, like name, address, etc. If you have recurring customer,s then you may even save their profiles under your Contact list, which you could use in the future under the Contact Name. It’s like using the Contact App on any smartphone.
Step 3
In this step, you will have to define your shipment. You can define the number of packages, the weight of the shipment, the shipping service type, and the packaging type. Here, you may also choose between FedEx One Rate and FedEx Standard Rate. For those who don’t know about FedEx One Rate, it’s flat-rate pricing for shipments less than 50 pounds.
Learn about FedEx One Rate and FedEx Packaging.
Step 4
Once you’ve defined the shipment, you will have to choose who gets to pay for the bill. You, the recipient, or a third party? Click one of the Edit buttons to choose other options like adding a signature requirement (under Special Services), entering pickup or dropoff details, and shipment notifications for you or the recipient.
When you click Calculate under Rates & Transit Times, you’ll be shown a list of prices and delivery dates to choose from. That way, you can perfectly balance the budget and delivery speed.
Step 5
Lastly, click Ship to generate and print your label, or Save For Later to ship at a later time. To ship without a printer, first click Send a Mobile Shipping Label, check the box, and enter your email address. You’ll receive an email with a barcode. Just take it with you when you drop off your shipment at any FedEx Office location or FedEx World Service Center.
If you create the same kind of shipment a lot, check the box to create a Shipment Profile. Next time, you can create the same shipment in just a couple of clicks.
Do you need labels for FedEx SmartPost shipments?
Yes. You need to attach the FedEx SmartPost Shipping label along with your SmartPost shipments.
FedEx SmartPost uses both FedEx and USPS services, where USPS is the one to perform the final delivery. As a result, many users are doubtful about whether they should attach a shipping label or not.
The FedEx shipping label will specify the origin and destination, the weight of what is being shipped, and the relevant tracking numbers for both carriers. Here’s a sample FedEx shipping label for a FedEx SmartPost shipment.
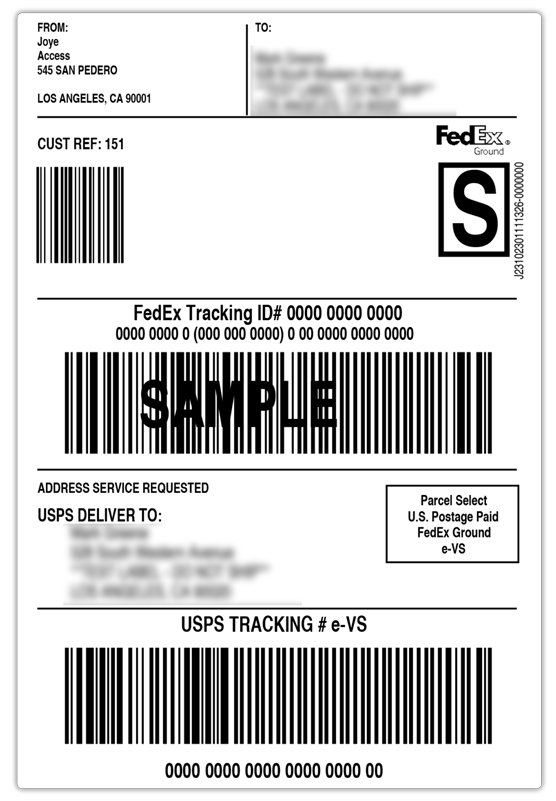
The label comes pre-loaded with both the FedEx tracking number as well as the USPS eVS (Electronic verification system). You will also be notified on the label about who will carry out the delivery during the final leg of the shipment, be it FedEx or USPS.
How to generate a FedEx shipping label in WooCommerce?
Running an online business requires a lot from you. One of the many tasks a traditional business owner performs is printing FedEx shipping labels. They visit FedEx.com and log in to their account to create a FedEx shipping label every time. The process is tedious and consumes a lot of your time and energy while doing so.
WooCommerce Shipping plugin for FedEx with Print Label
As mentioned earlier, there are a few online solutions available to help you with FedEx shipping. They not only help manage your FedEx shipments, but they also help you print FedEx labels right off your online store. One of the prime examples is the WooCommerce FedEx Shipping Plugin.
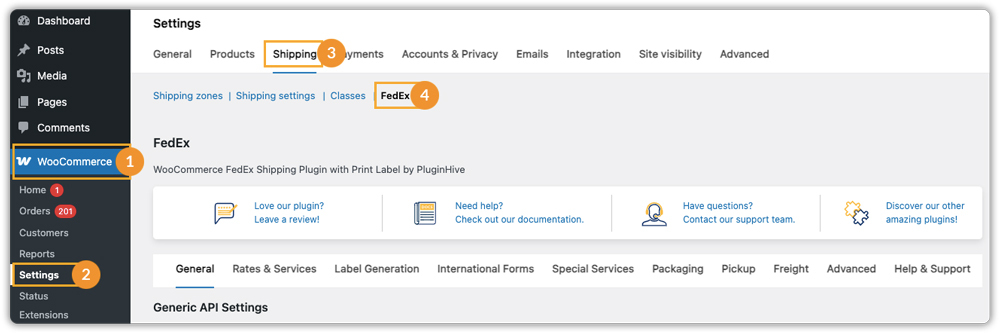
If you’re new to the plugin, start with these setup guides for a quick integration: FedEx Plugin Setup for WooCommerce
Generate FedEx shipping labels from WooCommerce
The printing of the shipping label will require your manual authorization. Meaning, as soon as you receive a new order on your WooCommerce store and if you are ready to accept the order, you would have to allow the plugin to generate the package’s shipping label.
You can do that by clicking on the Create Shipment button, as shown in the image below. You can also change the FedEx shipping services before creating the shipment.
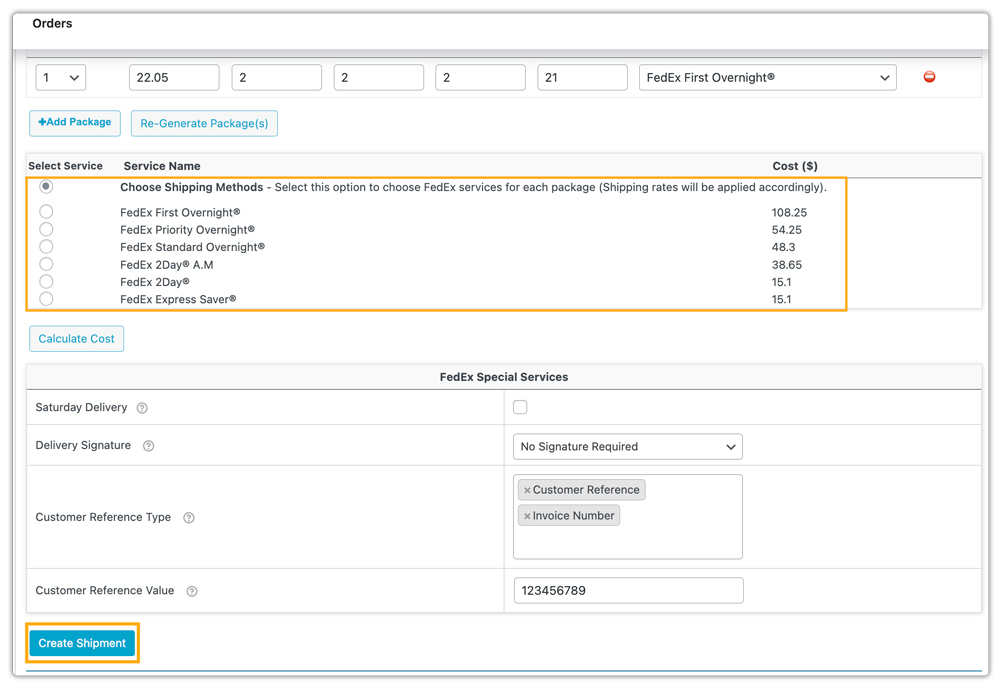
By doing this, the page refreshes, new options appear, and the system generates the shipping label, making it ready for download.
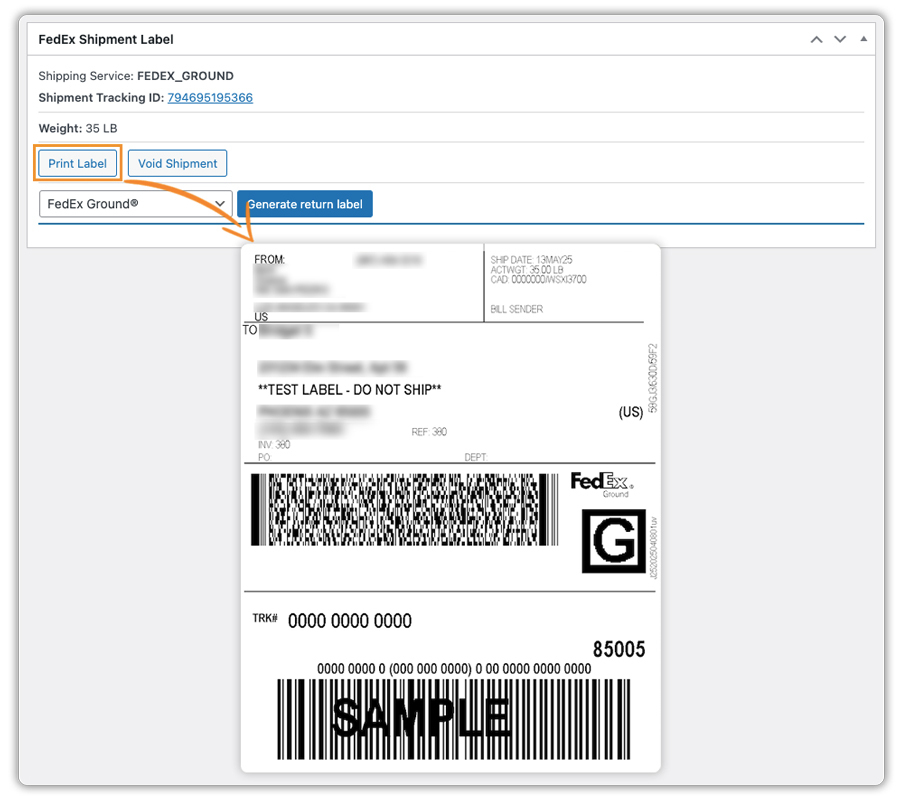
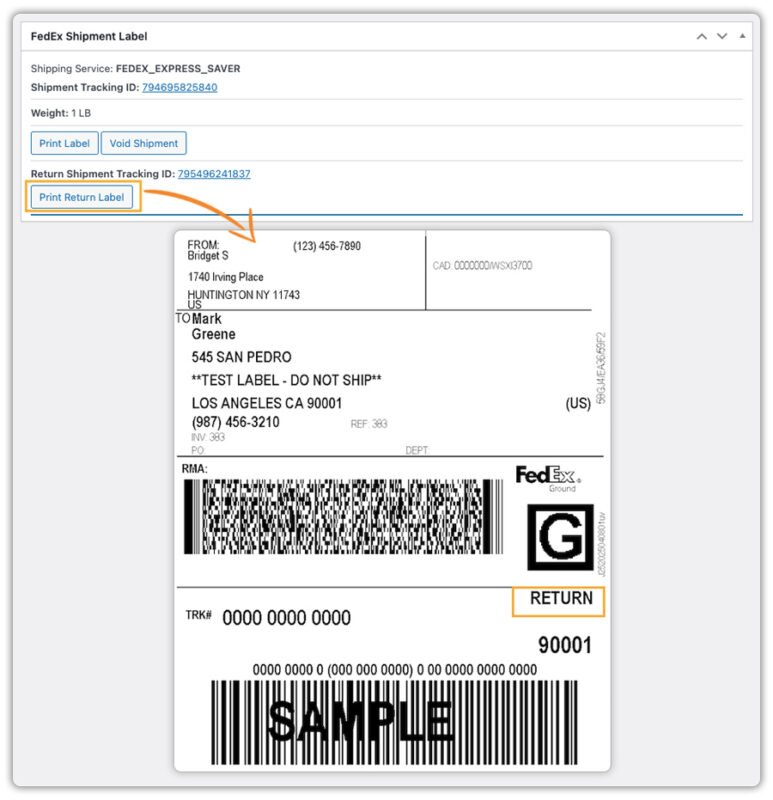
Generating return shipping label
Using this plugin, you can even generate the FedEx return label as well. Below is one of the samples of a return FedEx shipping label. As you can see in the screenshot sample, the addresses are reversed in the return shipping label.
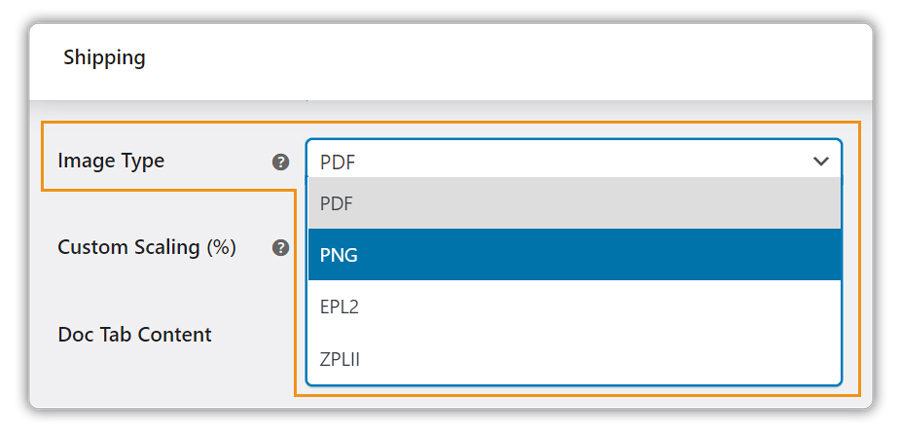
Print FedEx label settings
You can even download the label according to the choice of the Image type. You can choose the appropriate image format based on your choice, and this option is present in FedEx’s settings under the Shipping option of the WooCommerce settings.
The following are the image format options that you can choose from,
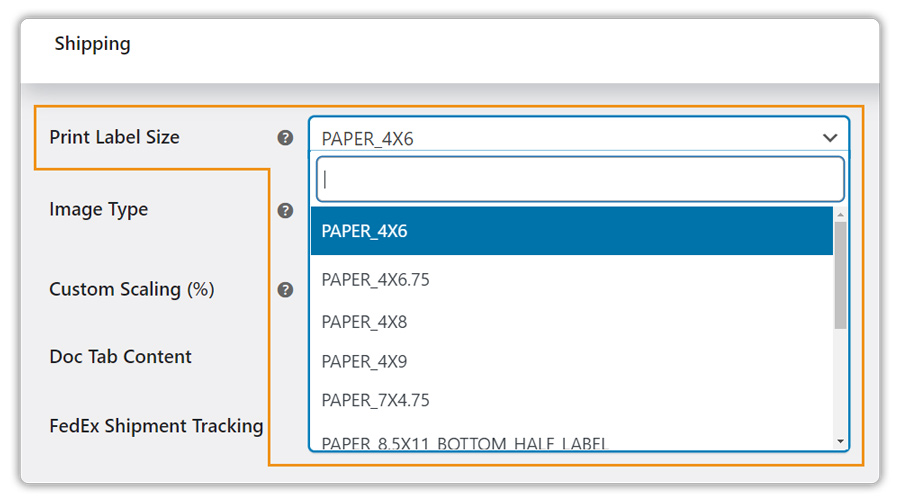
The plugin also supports printing labels in different sizes according to your specific requirements. Below are the available options:
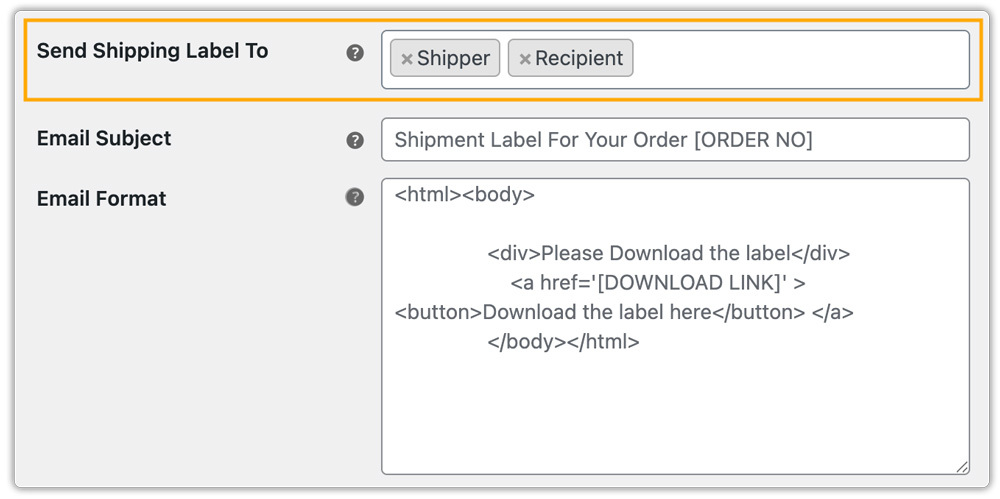
Now, if you want to send the generated shipping label to your customer via email, this plugin will let you do that. Moreover, you can even allow users to download their shipping labels by checking the other option.
How to create a FedEx shipping label in Shopify?
Shopify is a great e-commerce platform to run an online business. With Shopify shipping, you can set up basic shipping capabilities by displaying flat-rate shipping and shipping rates from carriers like UPS, USPS, and DHL. However, you don’t have FedEx shipping, so you won’t be able to handle FedEx SmartPost by default.
Shopify FedEx App
For Shopify users, you have the Shopify Ship, Rate, and Track for the FedEx App to handle all your FedEx shipments. You can provide real-time FedEx shipping rates, print FedEx labels, schedule FedEx pickups, and offer FedEx SmartPost shipping.
The Shopify FedEx App works directly with the FedEx API, and the shipping rates are fetched from FedEx. So, in order to use FedEx SmartPost, you need to have the FedEx Production credentials with you. Check out the FedEx Production Credential guide.
First, let us see how to create a shipping label for a single order. In order to generate the FedEx shipping label for a single order, there are two methods: Manual and Automatic.
Creating FedEx shipping labels manually
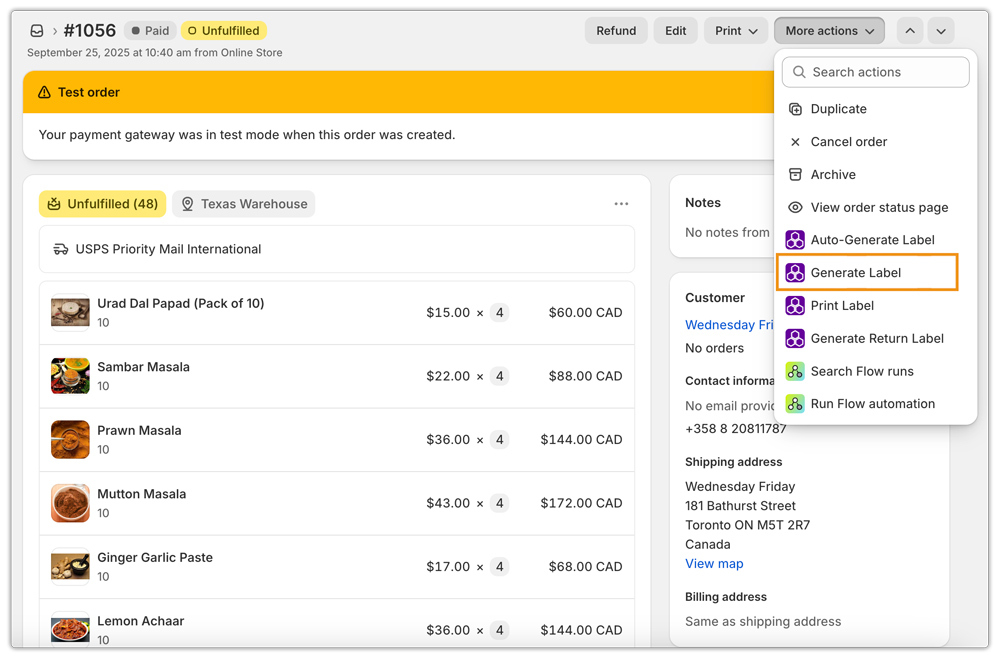
Go to the Order selection and go to the “details” of the order for which you want to generate a FedEx label. Then, click on More Actions and then on Generate Labels to manually generate FedEx shipping labels for the selected order.
The page will redirect to the label generation page, where you do the following.
- Select the correct From Address for the FedEx label. For stores with a single location, there will be a single address available.
- The packages will be generated based on the Packaging Method created in the app settings page.
For creating the label using Automatic Mode, you need to go to the Orders. Then select the order for which you want to create the FedEx shipping label. You will have to click on Actions and then on Auto-Generate Labels to generate FedEx shipping labels for the required order.

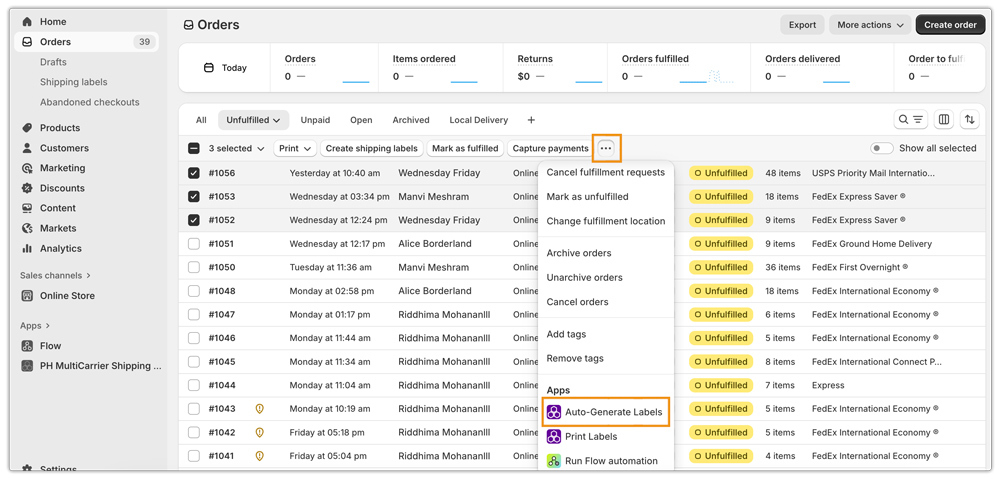
Creating Shipping Labels for Shopify Orders in bulk
You can even print multiple shipping labels in one go. To do that, you would have to go to the Orders under the dashboard of your Shopify store. Select all the orders for which you want the FedEx shipping labels and then click on Actions. And then click on Auto-Generate Labels to generate FedEx shipping labels for all the orders.
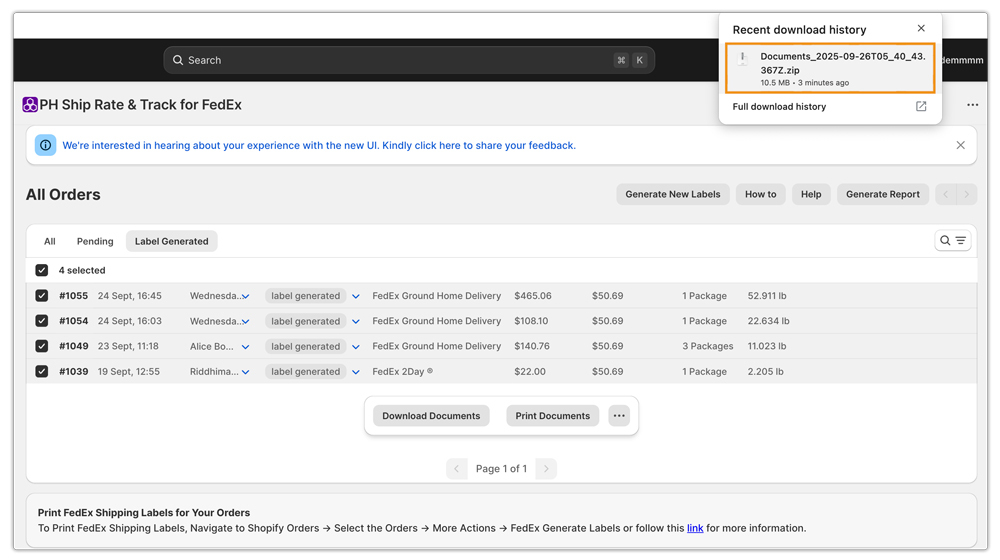
This will redirect orders to the “shipping” page of the app, which will have the options to download documents and print documents, along with the option to perform more actions on the order. Now, in the bottom section, you should be able to see the “Download Documents” option. Click on it.

Once clicked, the Shopify FedEx App will download the FedEx shipping labels for all your orders in a Zip file. Have a look at the image below.
You would find all of your shipping labels in this Zip file. Here’s a sample FedEx shipping label for you.
This app also prints a commercial invoice for all the Shopify international shipping services, as shown below.
Conclusion
This guide shows you how you can create and print FedEx labels for your orders. on your online store. Both the WooCommerce FedEx Shipping plugin and the Shopify FedEx App are wonderful FedEx shipping solutions that could help you print shipping labels for all your orders.
If you have any queries regarding this guide, then feel free to contact our customer support. They should be able to help you out.
Happy selling!