
The technological advancements in the eCommerce sector have enabled sellers to print shipping labels in their back-office. Especially in case of WooCommerce, where store owners now log in to their Dashboard, select the order(s), and click on the print label—it’s that simple. Many WooCommerce shipping plugins now allow you to print labels in bulk which of course, will save a lot of your time.I think it’s foolish to say you need to use a shipping carrier in the first place before you print the labels. And indeed, carriers like UPS and FedEx have now enabled a gateway to allow plugins to print the labels, ergo; WooCommerce UPS and WooCommerce FedEx shipping plugins. The crazy thing is you’d probably assume that it’s difficult to do so but it’s not. Moreover, these plugins are inexpensive and do not require any specialized knowledge or equipment.I assume it’s high time I tell you everything about printing shipping labels on your WooCommerce-based website. So here it goes.
What are some myths about printing your own labels?
- You need a special account or membership. All that you need to pay for shipping through PayPal and print your own labels is a PayPal account-nothing more.
- You need an expensive shipper’s scale. In fact, e-commerce sites like eBay or Amazon can supply the required sort of scale for between $10 and $20. Just search either site for “postal scale” and sort by price. Given the time and effort savings, a scale is a worthwhile investment.
- You have to have special knowledge or skills. Nope once again; in fact, in the simplest case you simply fill out a simple one-page web form, providing a destination name and address, package weight, and package dimensions-things you’ll know about your packages anyway in most cases.
- You need special labels and a special printer. You can print postage using your own standard inkjet or laser printer and basic copy paper if that’s what you have, then tape or stretch-wrap the labels onto the package. Yes, if you do a large volume it can be more convenient to buy pre-sized peel-and-stick labels and/or an appropriate printer, but it’s certainly not required.
- It’s embarrassing or complicated to ship prepaid packages. In fact, you just drop them off at a carrier location. They’re accustomed already to accepting a large volume of shipping-prepaid packages. You get to avoid the line and the hassle and just leave them quickly and go.
- There are no benefits apart from saving time when shipping. In fact, this isn’t true; by printing and paying for yourself and having to use the web-based forms involved, you can compare shipping prices for different dimensions, types of packaging, and service levels to find what works best for you. And if you ship using the per-item links on eBay for your sales, eBay will automatically mark your packages as shipped, notify your buyers, and provide them with a tracking number-all in all, a much bigger time and convenience savings.
How to print your labels manually?
Since most people not yet paying for and printing shipping labels on their own have hesitated because of a fear of difficulty or complexity, we’re going to give the easiest possible way to go about doing this but it may be surprising to you just how easy it actually is.
List your items with free shipping
Don’t worry about the cost; either list your items using the auction format, where free shipping items earn a bidding premium or price your fixed-price listing accordingly to accommodate the difference. Listing with free shipping using the “Expedited shipping” method on eBay’s selling form gives you maximum flexibility when it comes time to package and print.Get ahold of a stack of appropriate boxes
The easiest possible way to do this is to go to your local USPS location and get free Priority Mail boxes in the size and quantity that you need. Yes, Priority Mail is slightly more expensive than Parcel Post via USPS, but for most types and sizes of items the free boxes make up for much of the difference in cost and the fact that eBay’s seller performance rating is based in part on delivery speed makes up for the rest.Pack the item and weigh if necessary
Once the item has sold, package it up one of the boxes you obtained. Note that you can often save a little bit on shipping fees by using a non-flat rate box (though for very heavy items, you can also save a great deal of money on shipping costs by using a “flat rate” box). If you haven’t used a “flat rate” box, weigh it on your postal scale. (Trial and error leading to experience, or a bit of experimentation at the next step, can help you to decide between flat rate and non-flat rate boxes.)Visit the USPS shipping form
Log into your eBay account, visit your list of recent sales in My eBay, and choose “Print shipping label” from the action drop-down list for the item you’re shipping. (In most cases, this will be the pre-selected link.)Fill out the form completely
Happily, there’s not much to do here. eBay automatically fills in your address and the buyer’s destination address. This is primarily where you list the kind of packaging you’re using, the package weight (if you’ve not used a “flat rate box”), and the package dimensions (if you’ve not used standard Priority Mail packaging). You can see the advantages of using a flat rate Priority mail box now; you just choose “small,” “medium,” or “large” flat rate box and you’re done, without having to weigh or measure a thing!Submit payment and print
When you finish the form, buy the postage. The value will automatically be deducted from your PayPal balance (using the funds you received from the sale of the item-nice and streamlined) and you’ll be given the chance to print your label.Affix the label to your package
Attach the printed label to the package in a safe way. If you’ve printed on peel-and-stick paper or labels, peel and stick to the package. On standard paper, use clear tape to attach to the box and simply apply enough tape to cover the entire label with at least one layer of tape so that the paper and ink don’t suffer if the package gets rained on or snags the corner of another package in the truck.Alternatively, your local office supply store will have a stock of inexpensive clear peel-and-stick pouches that can also be used to affix labels to packages. Be sure that the entire label is visible and lays flat (so that its bar and QR-style codes can easily be scanned).Deliver or schedule a pickup
Take the package with the affixed label to your local USPS office and simply leave it at the counter (making sure that someone has seen you do this and acknowledged your drop-off). If you have a few parcels, visit the carrier website and schedule a pickup. A driver will come by to collect them, and off they go. That’s all there is to it-the postage is pre-paid, so you don’t need to wait in line or do any paperwork.Enjoy the automation benefits
After you do this, your package will have been automatically marked as shipped so that your buyer can see that it’s on its way; they will have been sent an email message confirming shipment; and they and eBay will be able to easily track the package via the tracking number that automatically appears in the system.It looks like a long list, but as you read through it (and carry it out), you’ll find out just how easy paying for and printing your own shipping can be-and that there’s really no reason these days not to do it.

What it’s like printing shipping labels for FedEx?
Before we jump right in, you should understand what is a shipping label and the information it contains. A shipping label (FedEx label in this case) provides the key information at every checkpoint of your supply chain to move your package from your warehouse to your customer’s doorstep. FedEx uses a specific template for its shipping labels.They design their labels in a way that the packages are optimized with their own process, at the routing center, and at the storage warehouse. These labels are designed to be read by both machines and humans. Each area of the label is being used along the way to inform specific partners of the supply chain.In WooCommerce, the entire process of generating the shipping label can be automated using the WooCommerce FedEx Shipping Plugin. It consists of two major steps,- Generating the FedEx shipping label
- Printing the FedEx shipping label
Generating the FedEx shipping label
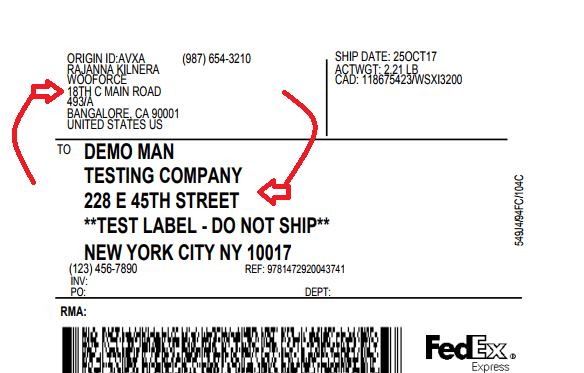
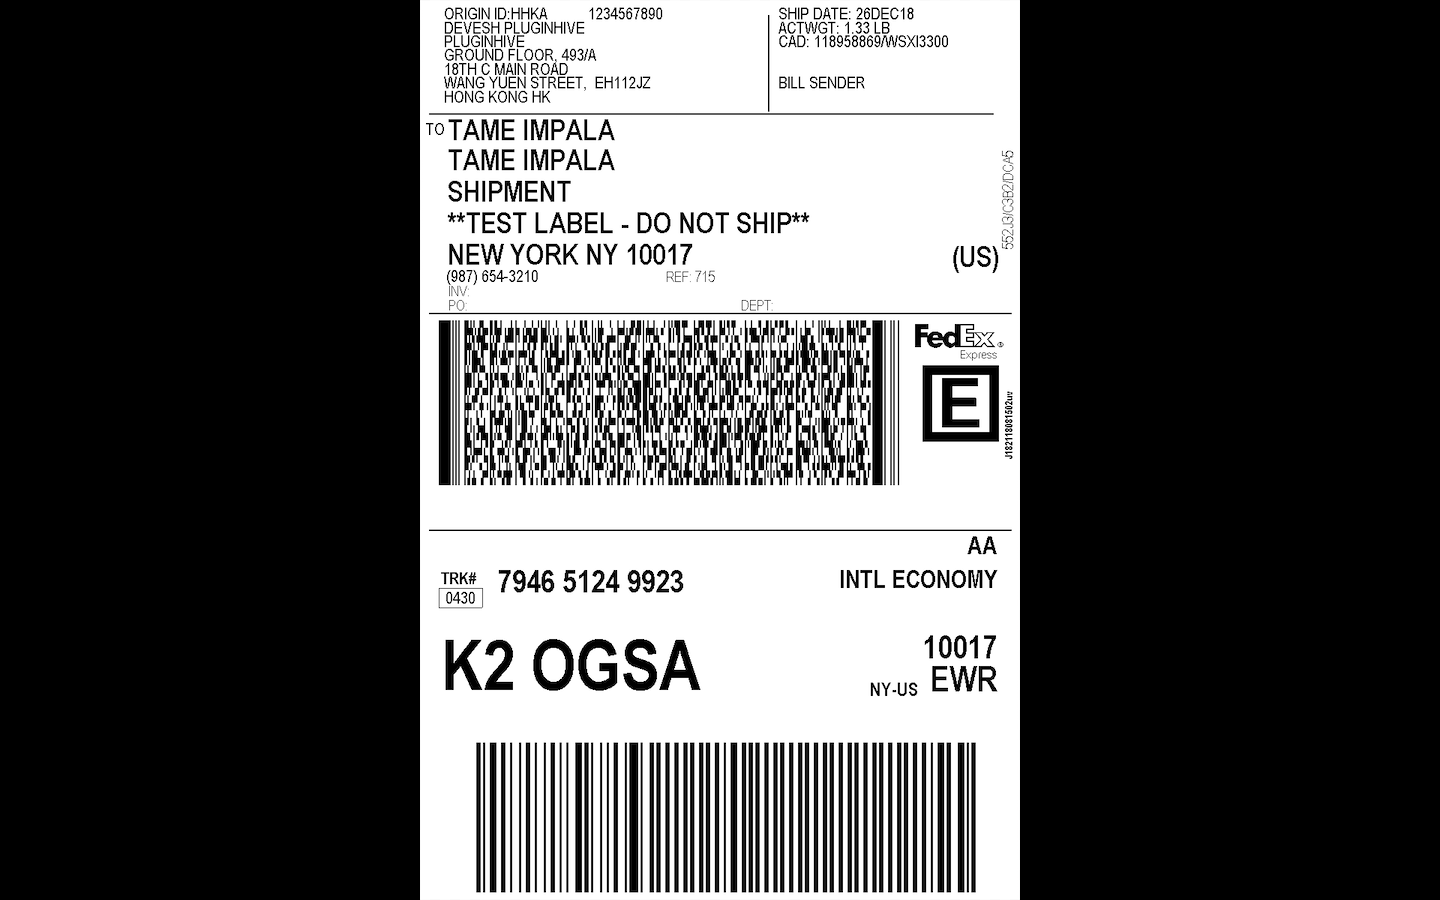
Generation of the shipping labels is completely invisible. This means that you don’t have to do anything in order to create the label. Moreover, you won’t be able to see how the labels are generated. As soon as you receive the order on your WooCommerce store, this plugin automatically fetches the data from the order and sends the shipment details to your online FedEx account. From there, the generated shipping label is ready for download. The postage for this label is automatically paid from your FedEx account.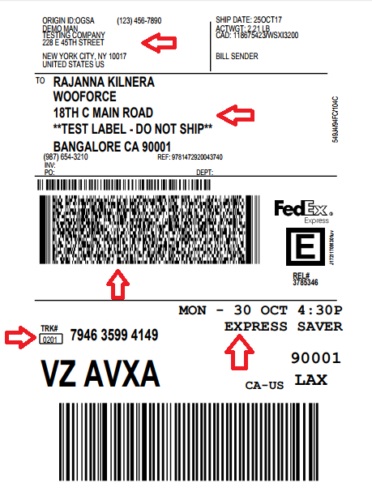 This generated label contains the customer’s shipping address, order’s origin address, and the delivery information. You can see a screenshot of a sample FedEx shipping label on the right. Starting from the top, the destination address, the receiver’s address, the package barcode, on the left is the tracking ID and on the bottom right is the delivery date & time (all are highlighted by red arrows). If you look carefully, along with the delivery date & time, the type of FedEx shipment is also mentioned. As you can see in the sample image, the EXPRESS SAVER is clearly mentioned below the delivery date.These set of information is very important for the FedEx delivery agents. It helps them to deliver the package to the exact location without much effort and confusion. With the introduction of so many barcodes reading apps, it has become even easier for the customers to check out the basic information regarding the shipment tracking. For example, if you share this shipping label with your customer as soon as the label is generated, they can scan the barcode and find out their shipment status.Using this plugin, you can even generate the return label as well. Above is one of the samples of a return FedEx shipping label. As you can see in the screenshot sample, the addresses are reversed in the return shipping label.In addition to the FedEx label generation, you can even change the shipping service manually before the label is generated. You have the option to choose the shipping methods from the list of services according to your wish. For example, if your customer has requested to deliver the package via FedEx First Overnight and you want to deliver via FedEx 2-Day service, you can do that here. Moreover, you can even change the physical dimension of your package or parcel before generating the shipping label.
Printing the FedEx shipping label
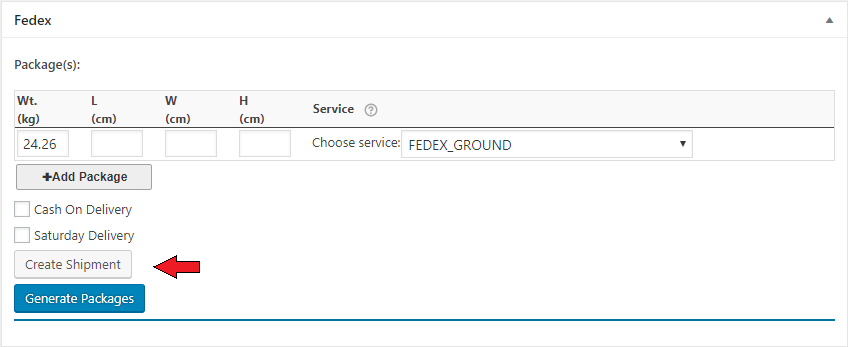
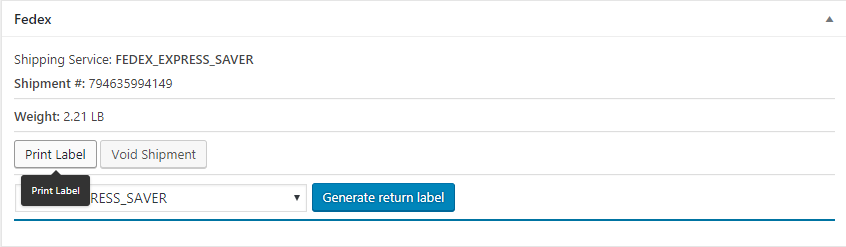
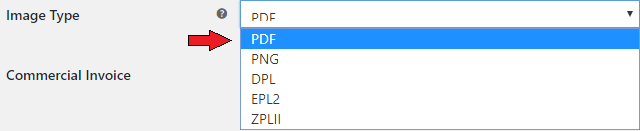
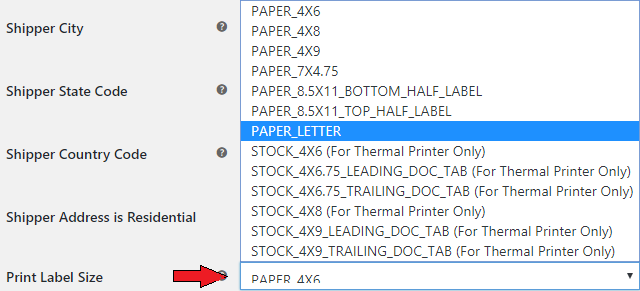
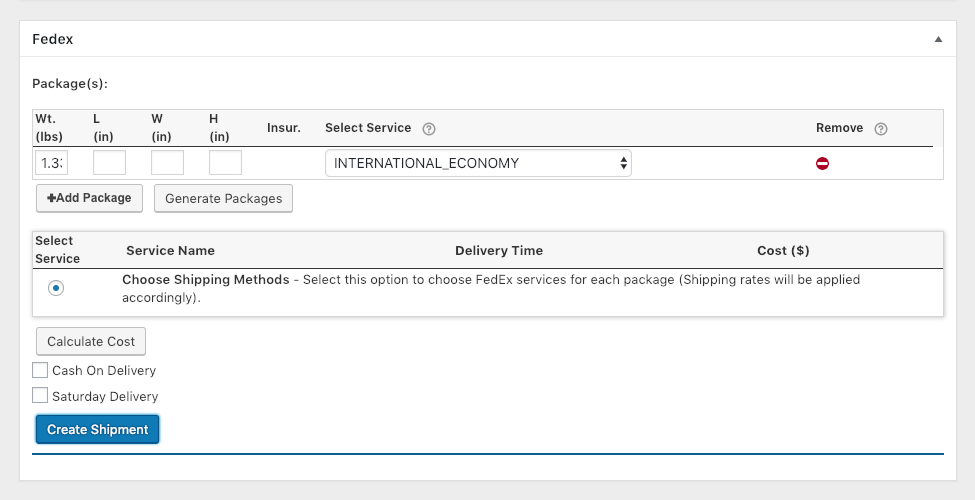
The printing of the shipping label will require your manual authorization. Meaning, as soon as you receive a new order on your WooCommerce store and if you are ready to accept the order, you would have to allow the plugin to generate the package’s shipping label. You can do that by clicking on the Create Shipment button as shown in the image below.By doing this the page is refreshed and some new options appear. At this stage, the shipping label is generated and is ready to be downloaded.You can even download the label according to the choice of the Image type. You can choose the appropriate image format based on your choice and this option is present inside the FedEx’s settings that are under Shipping option of the WooCommerce settings. Following are the image format options that you can choose from,The plugin also supports printing label in different sizes according to your specific requirements. Below are the available options:As we mentioned in the label generation section earlier, this plugin also allows you to print the return shipping label. You can click on the Generate return label button in order to do that.Using this plugin for your WooCommerce FedEx orders, you can even set a default service for printing the label. This plugin integrates with FedEx Label APIs to print domestic or international shipping labels with a tracking barcode.Steps to activate the label printing option
There are two ways to enter the WooCommerce FedEx plugin settings. One of the methods is,- Go to the WooCommerce option on the Dashboard and then click on it
- Click on the Settings options under the WooCommerce option
- On the new page, click on the Shipping tab – this will open another tab under the Shipping page
- You can now see the FedEx option below the main tabs- click on it
How’s the printing process in case of UPS?
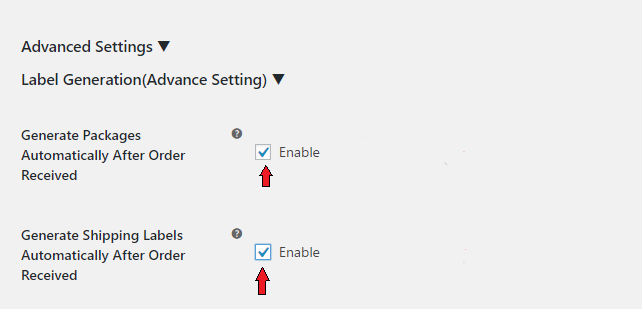
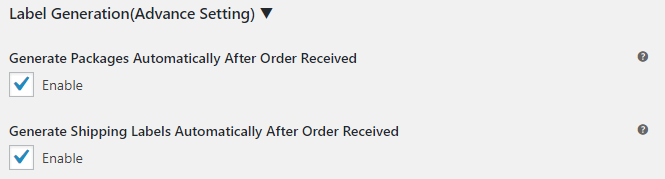
Well, there’s not much of a difference here. You will experience a similar process where you click the necessary options and print the label at the end. However, I would like to show you how you can automate the label generation process, which is also present in the FedEx shipping plugins.WooCommerce UPS Shipping Plugin offers a lot of features that make it one of the most popular shipping plugin for your online store. Among those features is the automatic package generation and shipping label generation.Consider the case of Jack, the owner of an online art gallery. Since his gallery offers customers to buy paintings and posters, he is very concerned about the package and delivery of his products. Moreover, he wants to automatically generate packaging (based on dimensions) as well as a UPS Shipping Label.By using the UPS Plugin, he will not only save a lot of time but the extra cost over the packaging too. All he needs to do is enable these two settings:- Generate Packages Automatically After Order is Received
- Generate Shipping Labels Automatically After Order is Received