


Giving your customers choices is one of the best ways to increase sales in your online store. Whether you are selling t-shirts in different sizes, smartphones with varying storage capacities, or furniture in multiple finishes, shoppers expect to pick the version that suits them. However, listing every size, colour, or finish as a separate product quickly clutters your catalogue and makes it harder for customers to find what they want.
Knowing how to create a product variation in WooCommerce solves this by letting you present all these options neatly on a single product page. In this guide, we will walk you through setting up product variations, managing them effectively, and exploring when a dedicated WooCommerce Product Add-Ons plugin is a smarter choice for your business.
Table of Contents
- What Are Product Variations in WooCommerce?
- When to Use Product Variations in WooCommerce
- How to Create Product Variations in WooCommerce
- How to Manage WooCommerce Product Variations
- WooCommerce Product Variations vs Product Add-Ons
- Best Practices for WooCommerce Product Variations
- Conclusion
- FAQs
What Are Product Variations in WooCommerce?
A product variation in WooCommerce allows you to offer a single product in different formats, colors, sizes, or styles. Instead of creating a brand-new product listing for a “Small Red T-Shirt” and another for a “Large Blue T-Shirt,” variations let you group them under one parent product.
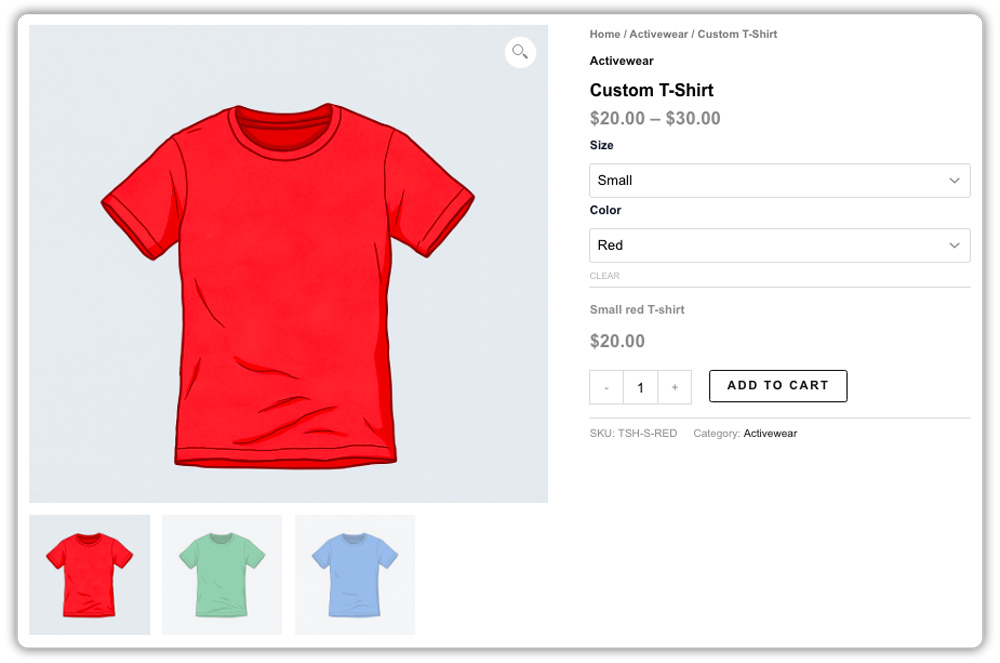
When customers visit this product page, they simply select their preferred attributes from a dropdown menu before adding the item to their cart. Each variation can have its own unique price, stock level, SKU, and product image.
When to Use Product Variations in WooCommerce
Variations work best when customers choose between options of the same product, and each choice affects the price, stock, or image. Here are some common situations:
- Fashion and footwear: Different sizes and colours, each with its own stock count.
- Electronics and gadgets: Storage capacities or model versions sold at different prices.
- Food and grocery: Pack sizes or flavours of the same item.
- Home and furniture: Fabrics, finishes, or dimensions that change the price.
- Digital products: Licence types, such as a single-site and a multi-site licence, each with its own price.
If your product has predefined options that customers can select before purchasing, WooCommerce variations let you manage those options from a single product page. This makes it easier to organize the product and manage each version separately.
How to Create Product Variations in WooCommerce
You can create product variations using WooCommerce’s built-in features, with no extra plugin required. The steps below use a product sold in different sizes and colours as an example.
Step 1: Set the Product Type to Variable Product
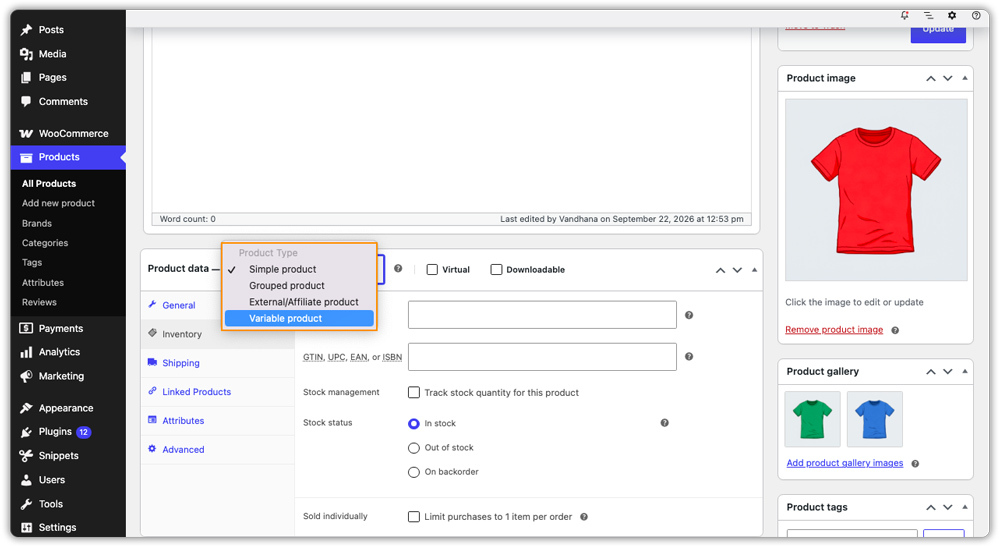
Head over to Products > Add New in your WordPress dashboard and enter the product name, description, and main image. In the Product data box, change the product type from Simple product to Variable product. The Attributes and Variations tabs appear right after.
Step 2: Add Attributes Like Size and Colour
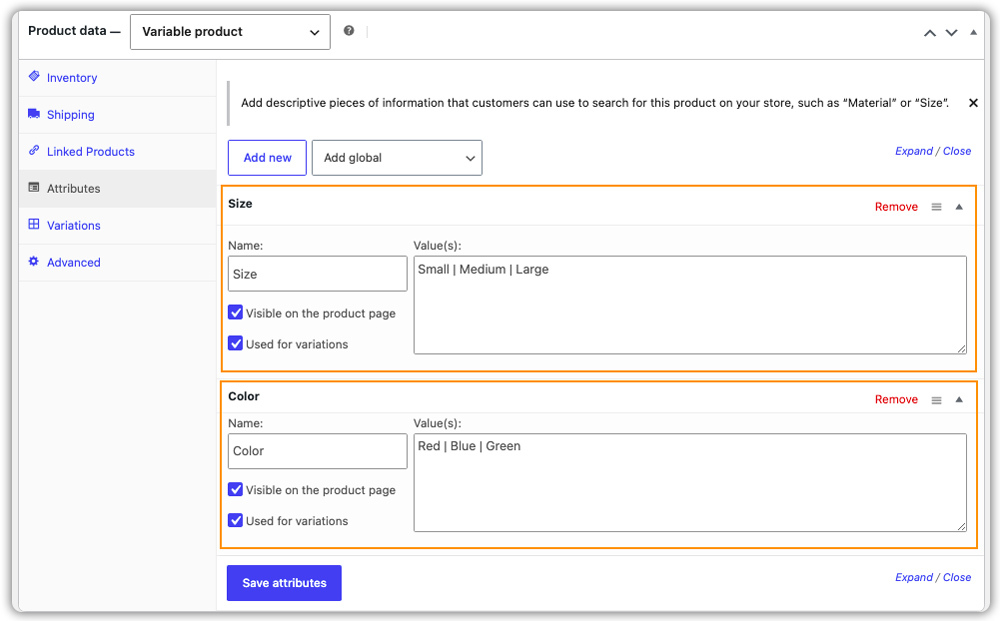
Open the Attributes tab and click Add new. Enter the attribute name, such as Size, and add its values separated by a vertical bar, for example, Small | Medium | Large. Tick the Used for variations checkbox and click Save attributes. Repeat the same process for your next attribute, such as Colour, with values like Red | Blue | Black.
Step 3: Generate Variations from Your Attributes
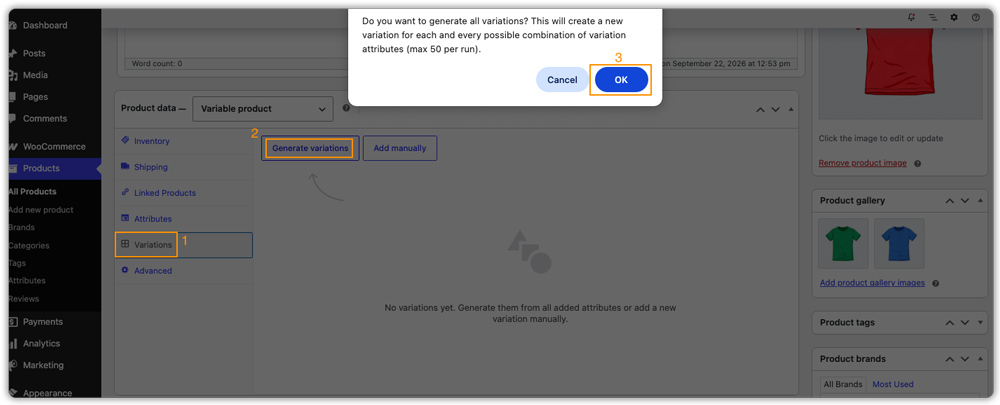
Switch to the Variations tab, select Generate Variations, click Go, and confirm the prompt. WooCommerce creates every possible combination for you, so three sizes and three colours give you nine variations. If you only sell a few combinations, choose Add Manually instead and select the options manually.
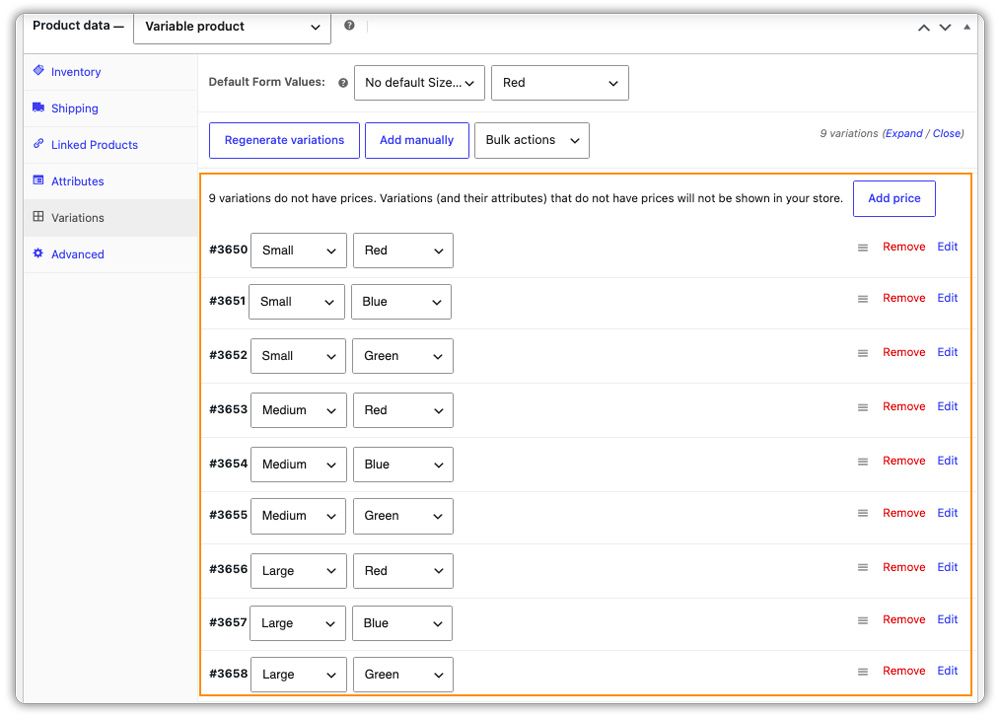
Step 4: Add Price, Stock, and Image to Each Variation
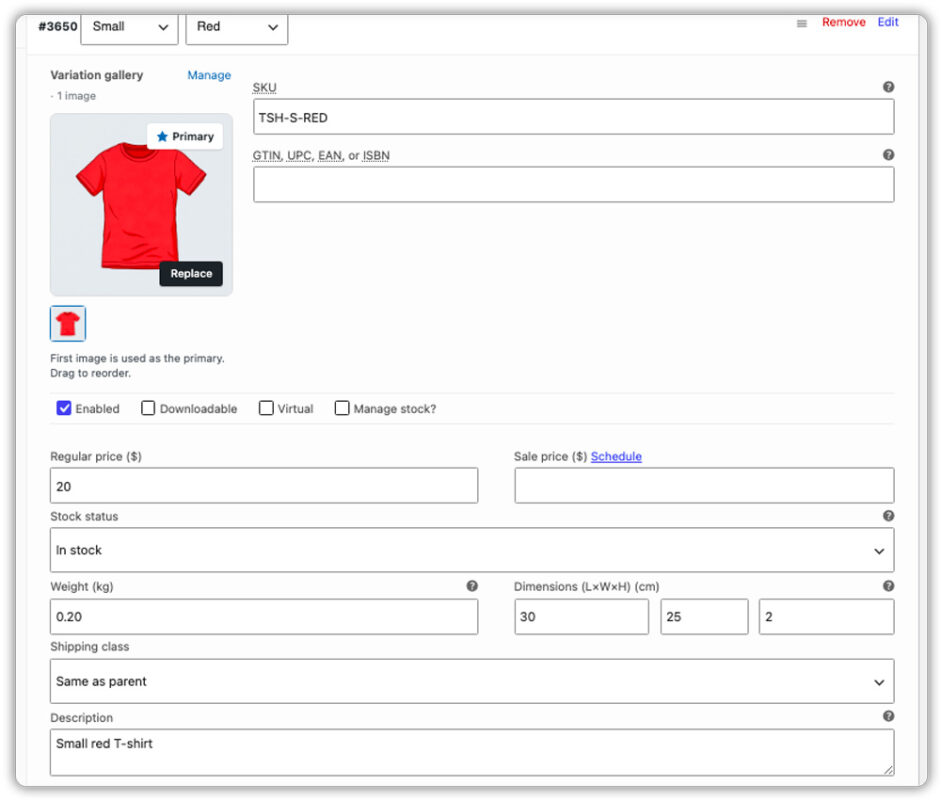
Each variation is created empty, so click one to expand it and fill in its details:
- Image: Upload a photo that matches the option, so customers see the right product when they pick it. With WooCommerce 11.1, you can also add a gallery of images to each variation natively, and it is turned on automatically.
- SKU: Enter a unique code to track that specific version.
- Regular and sale price: Add a price for every variation, as a variation without a price cannot be purchased.
- Manage stock: Tick this option and enter the quantity available for that variation.
- Weight, dimensions, and shipping class: Add these when a variation ships differently from the others.
- Enabled: Keep this ticked so the variation appears on your store.
Click Save changes and then Publish. Customers can now choose their options from the dropdowns on the product page.
How to Manage WooCommerce Product Variations
Variable products change over time as you add new options, adjust prices, or retire old stock. These tasks help you keep them up to date without rebuilding anything.
- Edit a single variation: Open the product, go to the Variations tab, and expand the variation you want to change.
- Update many variations at once: Use the Bulk actions dropdown to set or increase prices and stock for all variations in one go.
- Add a new option later: Add the new value in the Attributes tab, save, and run Create variations from all attributes again. WooCommerce adds only the combinations that are missing.
- Hide or remove a variation: Untick Enabled to hide a variation temporarily, or use Remove to delete it for good.
- Pre-select a default option: Use the Default Form Values dropdowns so your most popular option is already selected when the page loads.
With these few controls, you can keep your variable products current as your catalogue grows.
WooCommerce Product Variations vs Product Add-Ons
Variations and add-ons both appear as choices on the product page, but they solve different problems. A variation changes the product itself. An add-on adds something extra to it, such as engraved text, gift wrapping, or an uploaded photo.
| Aspect | Product Variations | Product Add-Ons |
|---|---|---|
| Purpose | Offer different versions of the same product | Let customers personalise or add extras to the product |
| SKU and Stock | Each variation has its own | Not needed for each option |
| Pricing | Each variation has its own price | An extra charge added on top of the product price |
| Typical Examples | Size, colour, storage capacity | Custom text, gift wrap, file upload, delivery date |
| Availability | Built into WooCommerce | Needs a plugin such as PH Product Add-ons |
You can also use variations and add-ons together. For example, a customer can select a T-shirt size and color as a variation and then add custom text as an extra option.
Add Product Add-Ons to Specific WooCommerce Product Variations
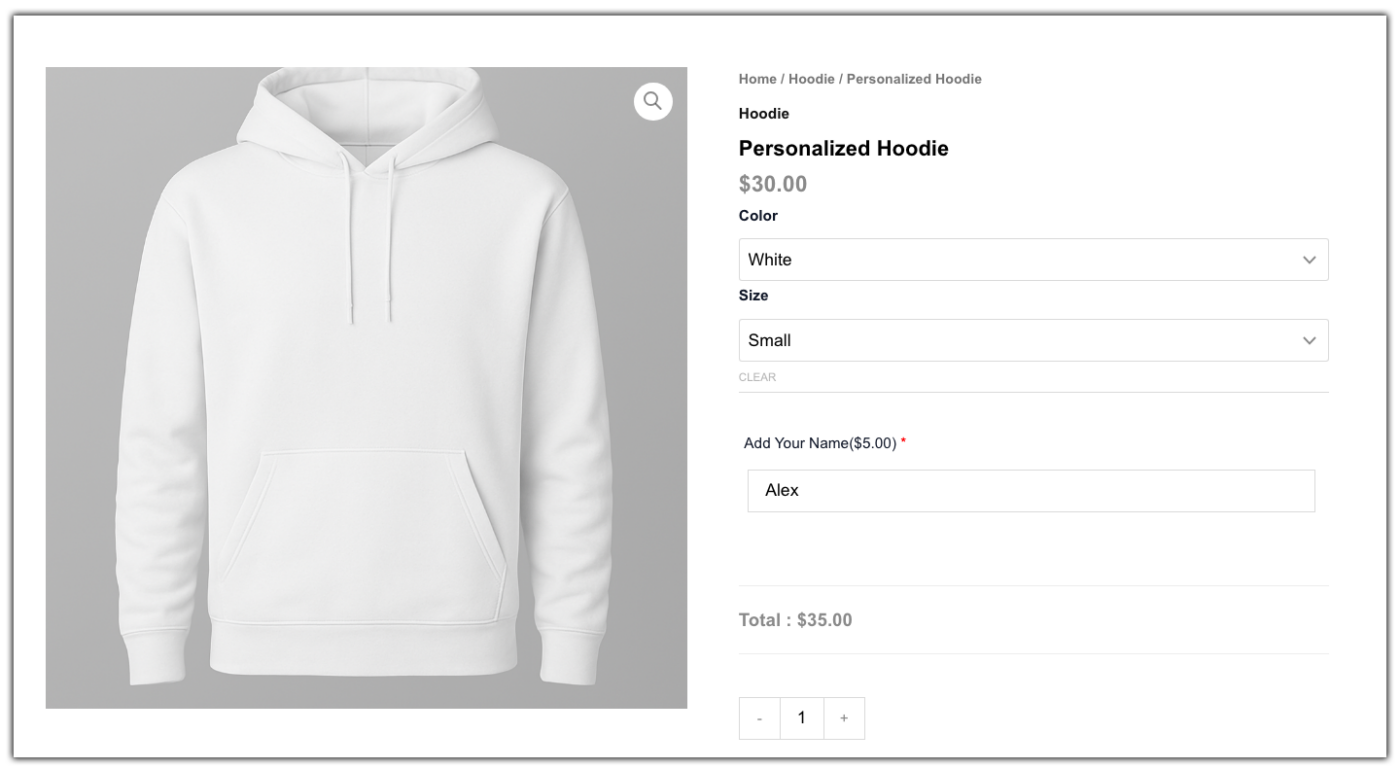
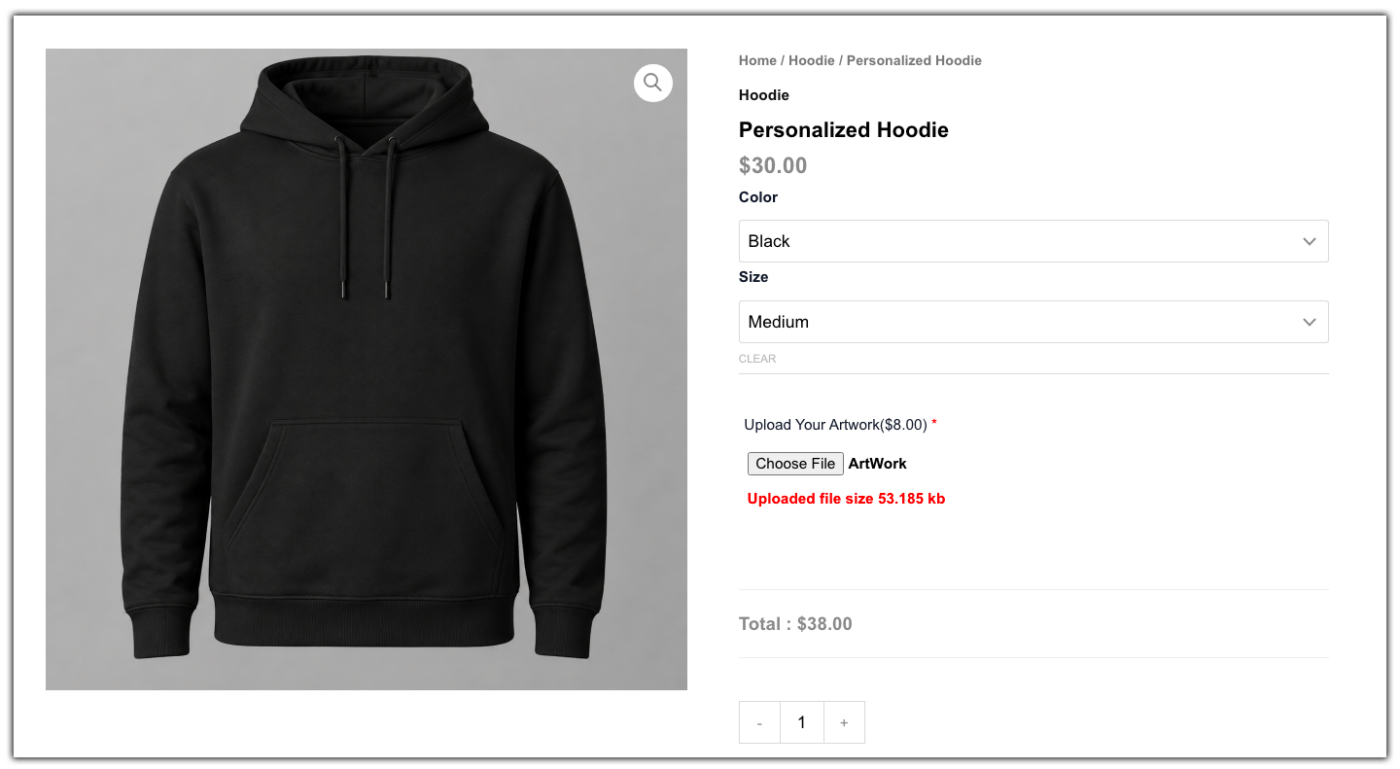
The PH Product Add-Ons for WooCommerce plugin lets you add fields such as text boxes, dropdowns, checkboxes, and file uploads to your products. You can also add an extra charge for these options and assign them to specific product variations or all variations of a product.
For example, suppose you sell a hoodie in Black and White. You can show an “Add Your Name” text field for the White variation and an “Upload Your Artwork” field for the Black variation. Customers will see only the field assigned to the variation they select.
This makes it easier to collect variation-specific information without creating separate products for each option.
Best Practices for WooCommerce Product Variations
A well-built variable product is easy for you to manage and easy for customers to buy from. These habits help you get there.
- Use global attributes for shared options: If many products use the same sizes or colours, create them once under Products > Attributes and reuse them. This keeps naming consistent across your store.
- Keep the number of variations manageable: Every extra attribute multiplies your combinations. Only add options that customers genuinely choose between.
- Use clear, customer-friendly names: Labels like Size and Colour are easier to understand than Option 1 and Option 2.
- Match images to options: When the photo changes with the colour or style, customers feel more confident about what they are ordering.
- Test before you publish: Visit the product page, select every option, and check that the price, image, and stock update correctly, including on mobile.
Following these habits keeps your variable products reliable as your store grows.
Conclusion
Product variation in WooCommerce lets you sell many versions of a product from a single listing. You create a variable product, add attributes, generate variations, and fill in the details for each one. After that, regular upkeep keeps everything accurate.
When customers need more than a size or colour, such as custom text or an uploaded file, the PH Product Add-Ons for WooCommerce fills that gap and can be linked to individual variations. If you need help setting this up on your store, the PluginHive support team is ready to assist you.
FAQs
Q: How to set up product variations in WooCommerce?
Go to Products > Add New and change the product type to Variable product. Add attributes like size and colour, generate the variations from the Variations tab, and set the price, stock, and image for each one.
Q: What is a variable product in WooCommerce?
A variable product is a single product with multiple versions, such as different sizes or colours. Each version, called a variation, can have its own price, SKU, stock, and image.
Q: What are advanced product fields in WooCommerce?
Advanced product fields are extra fields on the product page, such as text boxes, dropdowns, checkboxes, and file uploads, that let customers enter details or choose options. You can add them with a plugin like PH Product Add-ons for WooCommerce.
Q: How can I customize my WooCommerce product page?
You can edit the product details, images, and variations from the product editor, and change the page layout with your theme’s editor or a page builder. To collect extra information from customers, such as engraved text or an uploaded design, add custom fields to your product page.
