
WooCommerce shipping label generation is always a stressful task for store owners. Whichever shipping carrier you use, you have to log in to the carrier’s website and enter the details of the shipment one by one to generate the respective labels. It makes the whole shipping process really tiring and annoying. So, it is important to have a shipping solution that will help you automate the label generation process. In this article, we will point out how automatic label generation is useful for your business, and using WooCommerce UPS Shipping Plugin, we will explain how you can automate the UPS shipping label generation process. We will also give a clear idea of how to ensure seamless automatic label generation.
How is Automatic Label Generation Helpful?
When you want to get your order fulfillment process going, the best way is to automate the shipping label process. By automating this process, you will be able to save a lot of time and effort, which will, in turn, help you spend time on more important things for your business. Now, let’s take a look at the benefits of automating the label-generation process for your online business.
- Decreases Manual Effort
To fulfill an order, the main step is printing labels and shipping the product to the customer. This requires a lot of manual effort which begins with logging into the carrier account, filling in the order details, and then printing the labels. Once the label is printed, the packing has to be done and then it has to be sent to the customer. The complete process is time taking. Now, if you are using multiple carriers, the process becomes more complex and consumes even more time. You have to log in to each of the carrier accounts and then print labels for the orders. If the label printing process is automated by using shipping plugins like WooCommerce UPS Shipping Plugin, half of your work is done. You just have to select the orders and then generate labels for the orders from within your WooCommemrce.
- Helps in Managing Multiple Orders
For store owners having few orders per day, manually printing labels by logging into the carrier website doesn’t seem to be a hectic task. But, for stores with a large number of orders, this is practically impossible. Automating label generation is a must-required feature for these store owners so that they can just select all orders at a time and then generate labels for all those orders.
- Saves Time and Reduces Workload
The whole process of order fulfillment which includes manually printing the shipping label, packing, confirming the order, and sending it to the customers is a restless task for the store owners. So, completing all these tasks on time and sending the package to the customers is not easy for them. Now, if the label generation process is automated, the store owner can generate the labels for all the orders with ease which helps save time, so that they can give more attention to other aspects of order fulfillment like managing the packing and scheduling pickup for the orders.
How to Automate Shipping Label Printing Using WooCommerce?
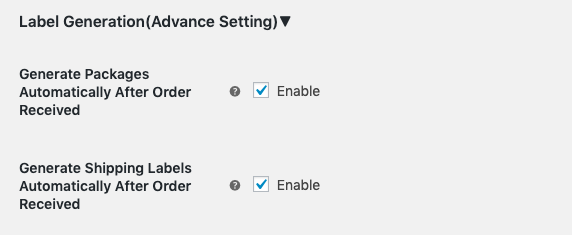
Automating the process of Label printing can be done easily by using the WooCommerce UPS Shipping Plugin. This plugin seamlessly integrates with your WooCommerce Store and it offers a lot of features that make it one of the most popular shipping plugins. Using the UPS Plugin, the store owner not only saves a lot of time by automating the label printing but also saves the extra cost incurred in packaging using the Automatic Package Generation feature. As a first step, you have to install the WooCommerce UPS Shipping Plugin and set up the plugin on your WooCommerce store. Now, to automate the label generation process using the UPS Plugin, all you have to do is enable these two settings:
- Generate Packages Automatically After the Order is Received
- Generate Shipping Labels Automatically After the Order is Received
You can enable this in the UPS Shipping Plugin advanced settings. Also, select the packing method of your preference.
How to Ensure Seamless Automatic Label Generation?
Now that you know how to automate the process of label generation for your UPS shipments, let’s see how to ensure seamless automatic label generation. Below are some of the points to be noted for seamless label generation.
Recheck the UPS Account Settings
The first point to be taken care of is the UPS account settings. Under the WooCommerce UPS Plugin settings, make sure that you have entered all the details which include:
- UPS User ID
- UPS Password
- UPS Access Key
- UPS Account Number
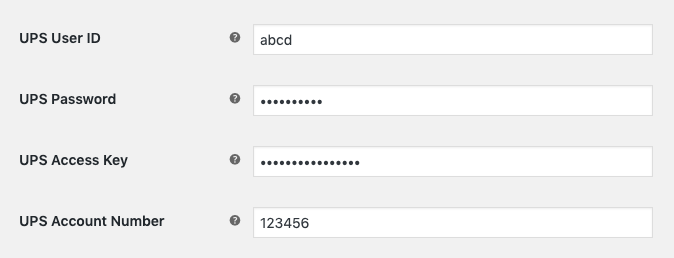
If you do not enter any one of the above details, you won’t be able to print the UPS Shipping labels.
Ensure that you have enabled the Automatic Label Generation Settings
As explained in the above section, you have to enable two options to automate the UPS shipping label generation, which is:
- Generate Packages Automatically After the Order is Received
- Generate Shipping Labels Automatically After the Order is Received
If you do not enable these options, the automation of label generation would not happen.
Do Not Miss Out on Add Weight and Dimensions to Your Products
It is very important to add the weight and dimensions to each of your products. If you miss out to add the weight and dimensions to your products, then you will have to add the details manually, confirm the shipments and then generate the labels. In such cases, automatic label generation won’t work and you will have to manually generate the labels.
Confirm the Unit of Measurement from Your UPS Account
Not all countries use the same unit of measurement. For example, in the US, the unit is Pounds/Inches (LB/IN) and in India, it is Kilograms/Centimetres (KG/CM). So, while enabling the units, it is important to make sure that you are giving the correct units. You can select the unit under the UPS Plugin settings.

UPS Shipping made Simpler
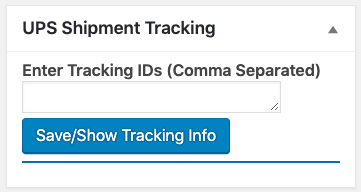
WooCommerce UPS Shipping Plugin helps you completely automate UPS shipping by displaying real-time rates on the cart/checkout page, printing labels from within your WooCommerce store, choosing boxes automatically for packing, and enabling tracking. This plugin allows fetching shipping rates directly from UPS so that you do not have to go to the carrier’s website each time and check the shipping rates manually. As already explained, using this plugin, you can print labels for each order as an automatic process. The store owner does not have to go to the UPS website and manually enter all the details for generating labels. The customer address details will automatically be fetched from the order details when printing the shipping label. Tracking an order can be easily done using this plugin. The tracking ID generated during the label printing is provided in the UPS Shipment tracking box. As soon as you press the “Save/Show Tracking info”, you get the tracking information.
Check out “How the WooCommerce UPS Shipping Plugin works?” to know more about its working. So, if you are a store owner who handles the shipping using UPS Carrier, then the WooCommerce UPS Shipping Plugin would be the perfect solution, which would help you handle the UPS shipping process with ease.
Conclusion
So, in this article, we explained how automatic label generation is useful for your business. Using WooCommerce UPS Shipping Plugin, we explained how you can automate the UPS shipping label generation process. Also, we gave a clear idea of how to ensure seamless automatic label generation for your orders and other features that the WooCommerce UPS Plugin handles. We hope this article was able to help you get an idea of how to ensure seamless automatic label generation. If you have any queries regarding automating the label generation process using the UPS Plugin, please do contact us. Our team will be able to help you out.