


WooCommerce Deposits vs BNPL is a common comparison for WooCommerce store owners looking to offer pay later options. If you sell higher-value products, you’ve likely come across BNPL services like Afterpay or Klarna and deposit-based payments using the PH Deposits for WooCommerce plugin. While both let customers avoid paying the full amount upfront, they work very differently. This article explains how each model works, where they differ, and which option fits your WooCommerce store best.
This article breaks down how each model works, where they differ, and which one fits your store better.
On This Page
- How BNPL Works in WooCommerce
- How WooCommerce Deposits Work
- Key Differences Between BNPL and WooCommerce Deposits
- When BNPL Makes Sense for Your WooCommerce Store
- When WooCommerce Deposits Make More Sense
- Offer Pay Later Options in WooCommerce
- Conclusion
- FAQs
How BNPL Works in WooCommerce
BNPL stands for Buy Now Pay Later. Services like Afterpay, Klarna, and Zip act as a middleman between you and your customer at checkout.
Here is what actually happens when a customer uses BNPL:
- The customer selects a BNPL option at checkout and gets approved instantly
- The BNPL provider pays you the full order amount upfront
- The customer repays the BNPL provider in fixed instalments – typically four equal payments over six weeks
- You pay the BNPL provider a transaction fee, usually between 3 – 6% per order, for taking on the repayment risk
As a result, from your side, the sale is complete the moment the order is placed. Meanwhile, the BNPL provider handles approvals, collections, and any defaults. You get paid in full but give up a percentage of every sale to make that happen.
How WooCommerce Deposits Work
In contrast, WooCommerce Deposits work differently because there is no middleman. With the PH Deposits for WooCommerce plugin, the payment relationship stays entirely between you and your customer.
Here is how it works:
- The customer pays a deposit – a fixed amount or a percentage of the order total – directly to you at checkout
- You receive that deposit immediately through your existing payment gateway
- Customers pay the remaining balance later, either as a single payment or through a scheduled instalment plan.
- You set the deposit amount, the payment timeline, and which products it applies to
Instead, you keep the payment relationship entirely with your customer and do not transfer any credit risk to an external provider. Additionally, there are no per-transaction fees beyond your standard payment gateway charges. For a closer look at how simple deposits differ from structured payment plans within the plugin, this guide on WooCommerce Deposits vs Payment Plans explains it clearly.
Key Differences Between BNPL and WooCommerce Deposits
| Feature | BNPL (Afterpay / Klarna) | WooCommerce Deposits |
|---|---|---|
| Who Pays You | BNPL provider, upfront in full | Customer, in parts directly |
| Who Collects Instalments | BNPL provider | You |
| Transaction Fees | Yes – 3 to 6% per order | No external fees |
| Credit Risk | Carried by BNPL provider | Carried by you |
| Payment Schedule | Fixed by the BNPL provider | You decide |
| Works for Services and Bookings | Limited | Yes |
| Payment Window | Typically 6 weeks | Days, weeks, months, or years |
When BNPL Makes Sense for Your WooCommerce Store
For example, BNPL works well in the following situations:
- Products ship immediately after purchase – no deposit is needed before fulfilment, so the BNPL provider paying you upfront fits the order flow naturally
- Average order value sits in the $50–$300 range – at this price point, the provider fee is a reasonable trade-off for reducing checkout friction and increasing conversions
- Credit risk needs to stay off your plate – the BNPL provider handles all approvals, repayments, and defaults without any involvement from your store
- Products are standard and off-the-shelf – no customisation, no lead time, no reason to hold back fulfilment until a deposit is confirmed
When WooCommerce Deposits Make More Sense
On the other hand, the PH Deposits for WooCommerce plugin is a better fit when:
- Custom or made-to-order products are involved – a deposit secures the customer’s commitment before materials are ordered or production begins
- Margins matter on high-value orders – a 5% BNPL fee on a $1,000 sale is $50 gone per transaction. Deposits carry no provider fee, so the full order value stays with your store
- Products aren’t standard retail items – BNPL is built for physical product checkouts. Deposits work across services, rentals, and WooCommerce bookings with partial payments without compatibility issues
- Longer payment windows are needed – BNPL locks customers into a fixed 4 – 6 week repayment schedule. Deposits support monthly, quarterly, or fully custom timelines set by the store
- Per-product payment terms matter – deposit amounts, whether mandatory or optional, and payment schedules can all be configured individually per product, not just applied store-wide
Offer Pay Later Options in WooCommerce
Once you’ve decided which model fits your store, the next step is to configure it correctly. Here’s how to set each one up.
Using the PH Deposits for WooCommerce Plugin
1. Deposit Settings: Open the Deposit Settings tab and set Enable Deposits to Yes. Choose whether the deposit is mandatory or optional at checkout, then set the Deposit Type – a flat fixed amount, a percentage of the order total, or a scheduled payment plan. You can also customise the button text and add a message above the Add to Cart button to set clear expectations for customers.

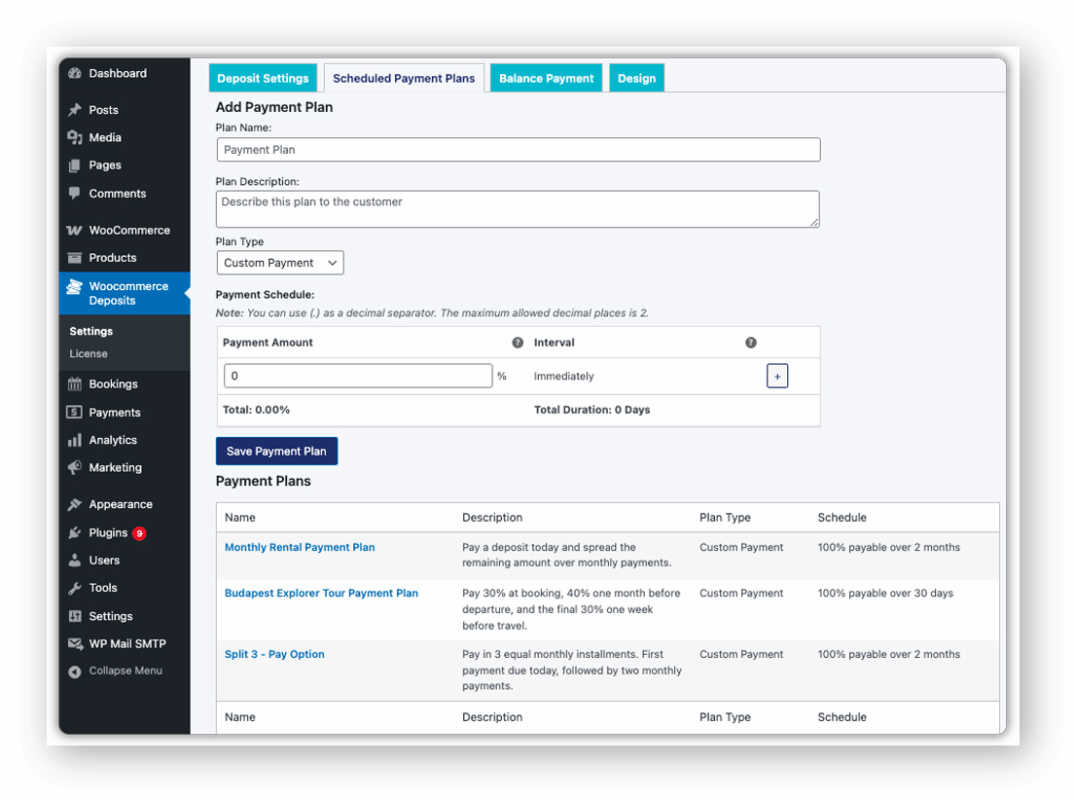
2. Scheduled Payment Plans: After you select the Scheduled Payment Plan, open the Scheduled Payment Plans tab. Set the plan name, payment amount, and interval – daily, weekly, monthly, or yearly. As a result, you can offer payment plans without relying on a subscription model.Once saved, assign the plan under Deposit Type in the Deposit Settings tab.
3. Balance Payment and Reminder Email: Open the Balance Payment tab to control how the remaining amount is collected. Enable automated reminder emails, set how many days before the due date the reminder goes out, and customize the email template. This way, every reminder includes a direct payment link so customers can complete their balance in one click.

4. Apply to Specific Products (Optional): To limit deposits to certain products, go to the product edit page and open the Deposits tab. Set custom deposit rules for that product or inherit the store-wide settings. Meanwhile, this keeps your standard checkout intact for products that don’t need deposits.
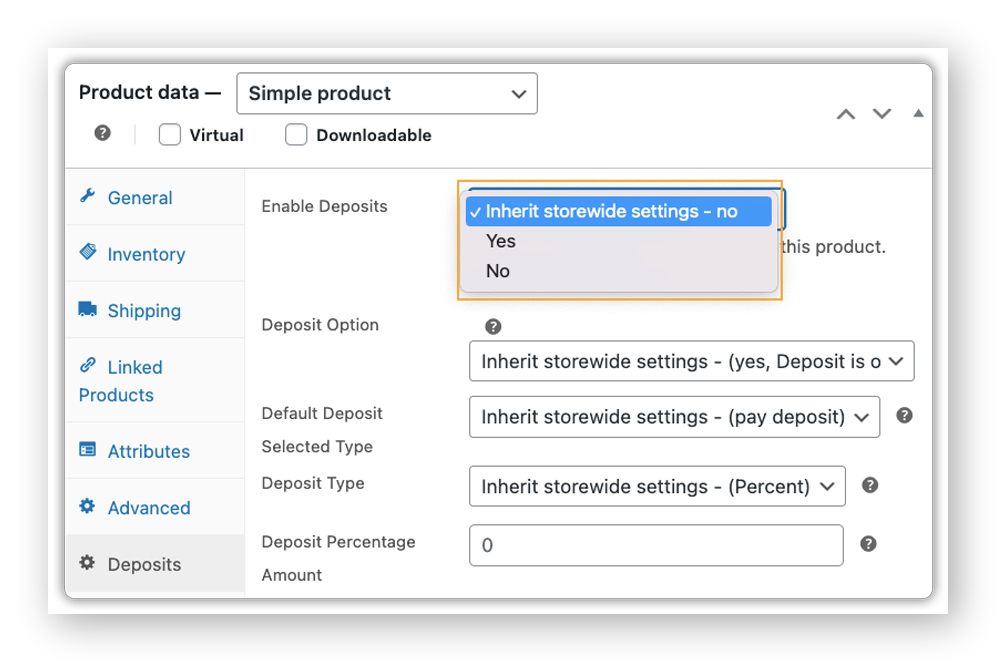
After you configure the settings, visit a product page to confirm that the deposit option displays correctly – your store is ready to accept WooCommerce deposit payments.

Adding a BNPL Provider
Fortunately, most BNPL providers offer a dedicated WooCommerce plugin or extension that connects your store to their payment network. The general process looks like this:
- Create a merchant account: sign up with your chosen provider (Afterpay, Klarna, or Zip are the most widely used). Approval is required and varies by provider, country, and business type
- Install the provider’s plugin: available from the WordPress plugin directory or directly from the provider’s website
- Connect your merchant account: enter your API credentials inside the plugin settings to link your store to the provider’s payment network
- Enable BNPL at checkout: once connected, the option appears automatically alongside your existing payment methods
- Set order value limits: most providers let you define minimum and maximum order values that qualify for BNPL at checkout
Note: Each BNPL provider has its own eligibility requirements, supported countries, and fee structure. Check these before applying, as approval is not guaranteed for all store types or markets.
Conclusion
When comparing WooCommerce Deposits vs BNPL, there’s no single winner. BNPL suits standard retail where getting paid immediately outweighs the transaction fee. WooCommerce Deposits works better for stores that need upfront commitment, flexible payment schedules, or higher margins. . If the Deposits model fits your store, contact PluginHive support to get help with your setup.
FAQs
Q: Is WooCommerce Deposits the same as BNPL?
No. With BNPL, an external provider pays you in full and collects from your customer directly. With WooCommerce Deposits, your customer pays you in parts with no middleman involved and no external transaction fee.
Q: Can I offer both BNPL and Deposits in the same WooCommerce store?
Yes. You can use a BNPL integration for standard products and the PH Deposits for WooCommerce plugin for custom or high-value items. Since deposits apply at the product level, the two can run alongside each other without conflict.
Q: Does the Deposits plugin work for services and bookings?
Yes. Unlike BNPL, which is designed for physical retail, the Deposits plugin works across any product type – including services, bookings, and rentals.
