Shopify Ship, Rate & Track for FedEx app reduces your efforts by automating shipping on your Shopify store with FedEx. The app allows you to display real-time FedEx shipping rates on your Shopify checkout, print FedEx shipping labels, and enable FedEx tracking from within your Shopify store.
FedEx and PluginHive have partnered to offer shipping discounts of up to 83% on shipping costs when you sign up for a new FedEx account in the Asia Pacific, Middle East, India, and Africa regions.
On This Page
- Download, Install & Activate the app
- Add your FedEx Business/Personal Account to the app
- Verify Address for Shipper and Customers
- Verify Your Shopify Products With FedEx App
- Add product weight, dimensions and verify store units
- Add price to your Shopify products
- Check product stock for store location(s)
- Products shipped Internationally
- Products that require Delivery Confirmation with Signature
- Products that require Shipping Insurance
- Products containing Alcohol/Wine
- Products considered Hazardous or Dangerous Goods
- Perishable products that require Dry Ice
- Products containing Batteries
- Configure Parcel Packaging
- Configure FedEx Shipping Service(s)
- Display live shipping rates on the Shopify checkout page
- Print FedEx shipping labels
- Request for a FedEx Pickup and handle FedEx tracking
- Frequently Asked Questions
- Troubleshooting the Shopify FedEx App
Download, Install & Activate the app
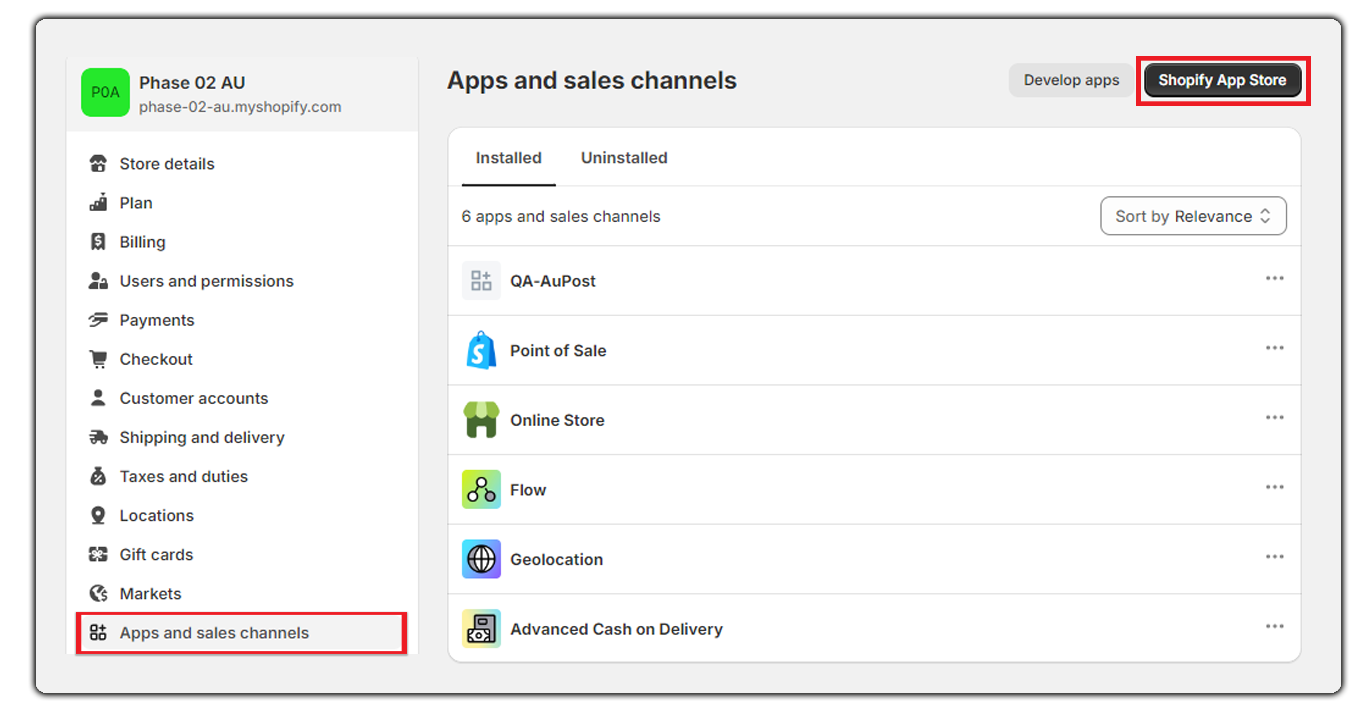
Navigate to Shopify Settings → Apps and sales channels → Shopify App Store as shown below:
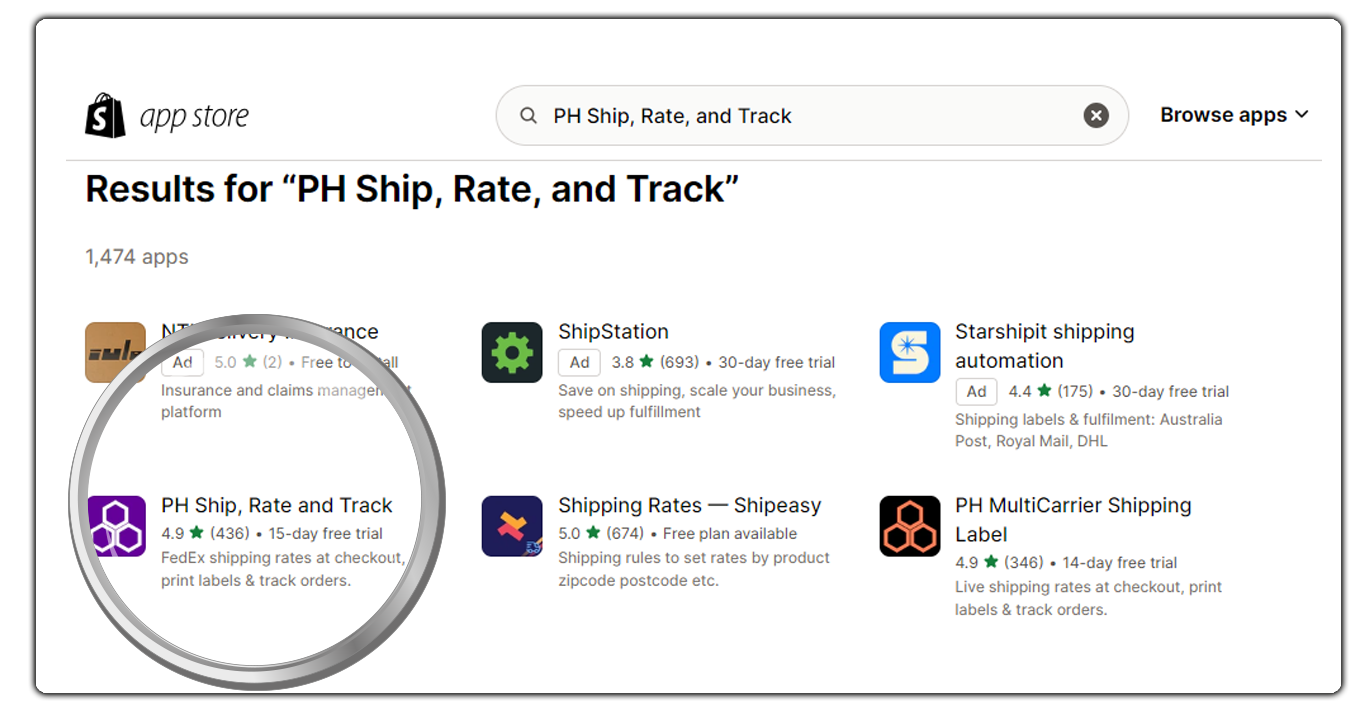
Search for PH Ship, Rate, and Track as shown in the below image and Install the app.
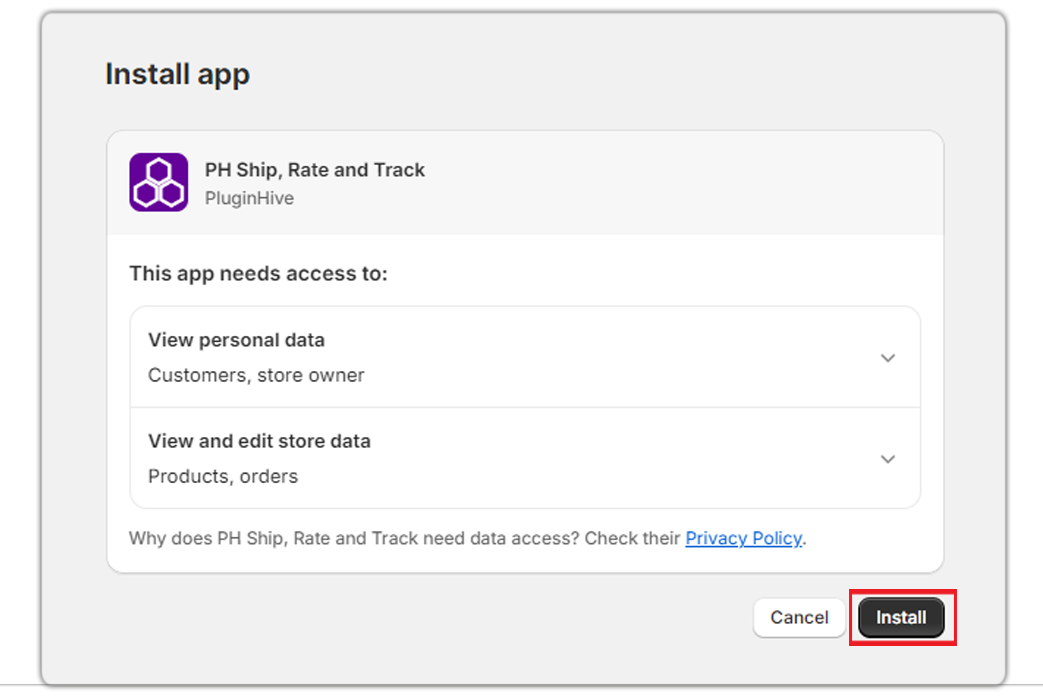
Once the app is added to your Shopify, click on Install to start the setup process as shown below:
After the installation is done, the page will redirect to the Approve Subscription page. Click on Approve as shown below:
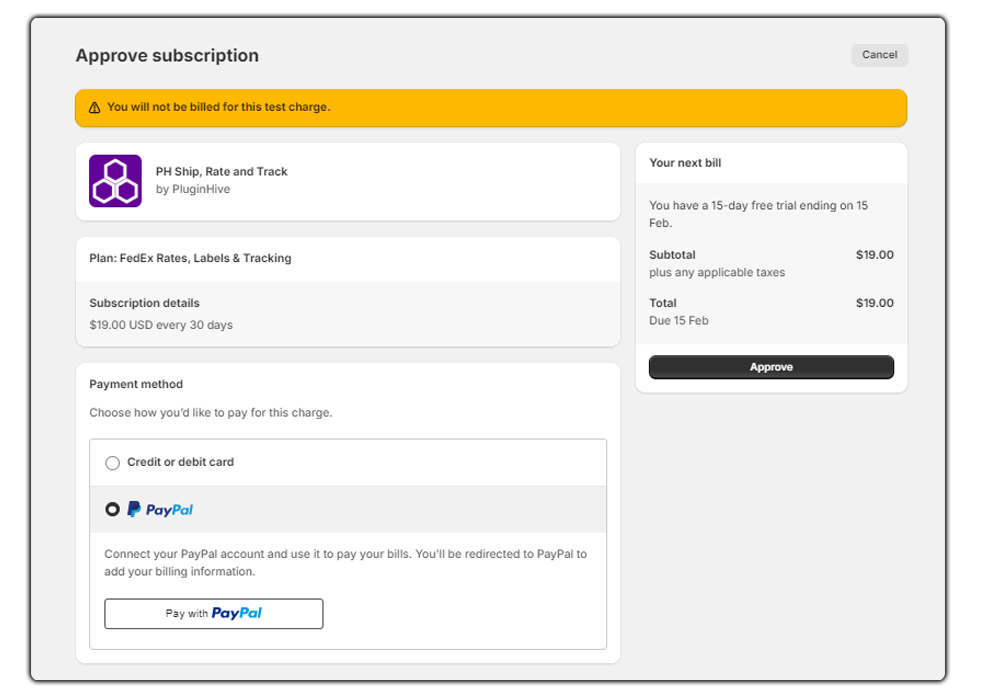
After clicking on Approve, you will be redirected to the App Installation page.
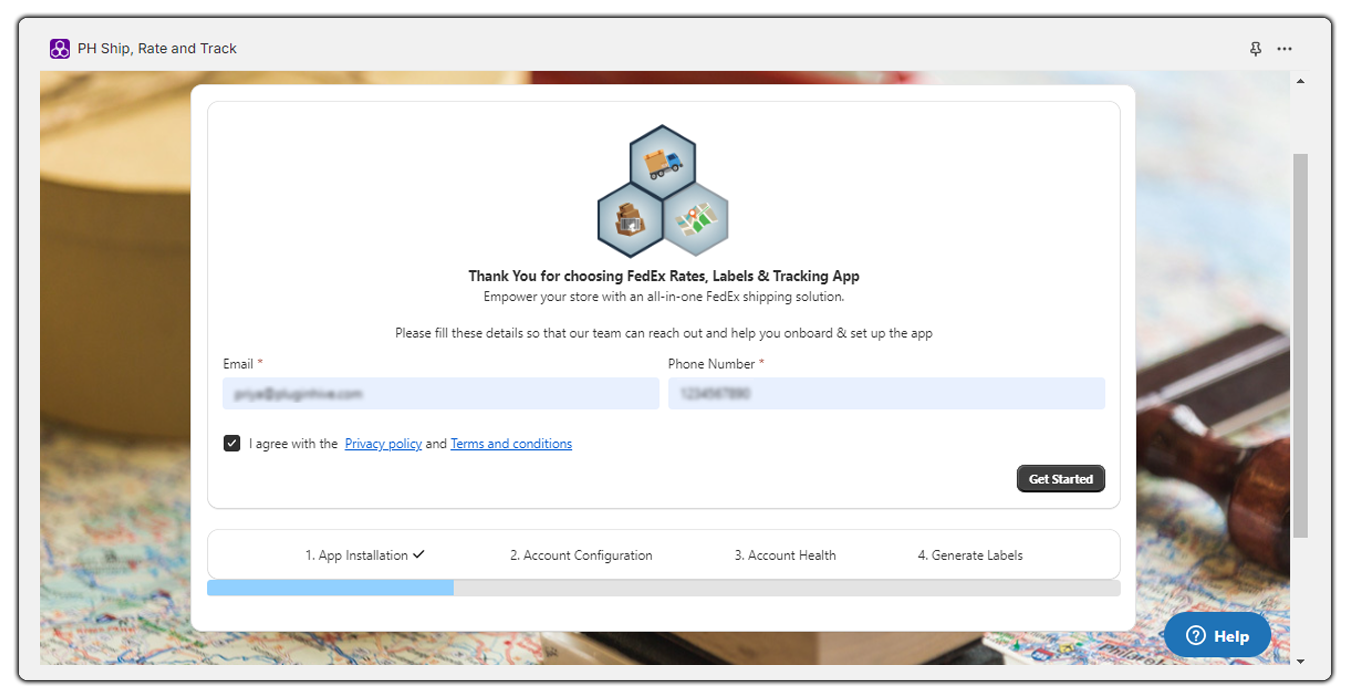
On the App Installation page, fill in your email and phone number and check that I agree with the Terms and Conditions and Privacy Policy.
Now, click on Get Started and proceed with the setup wizard as shown below:
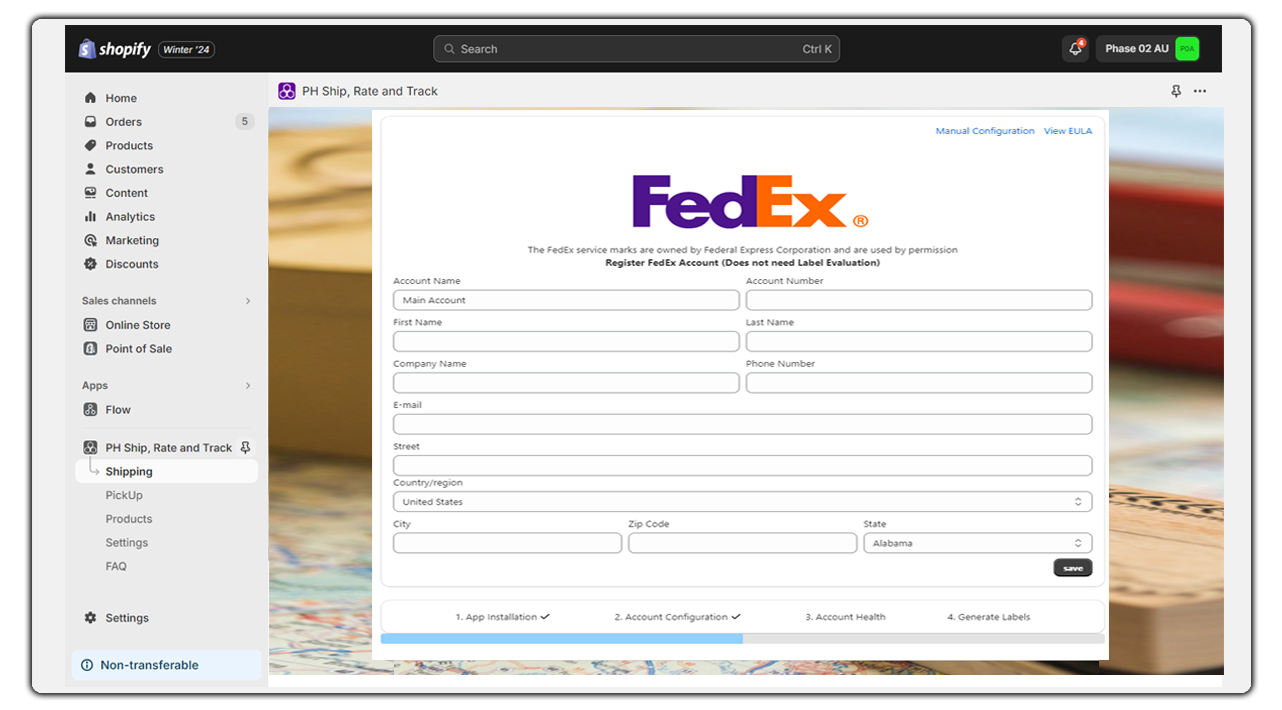
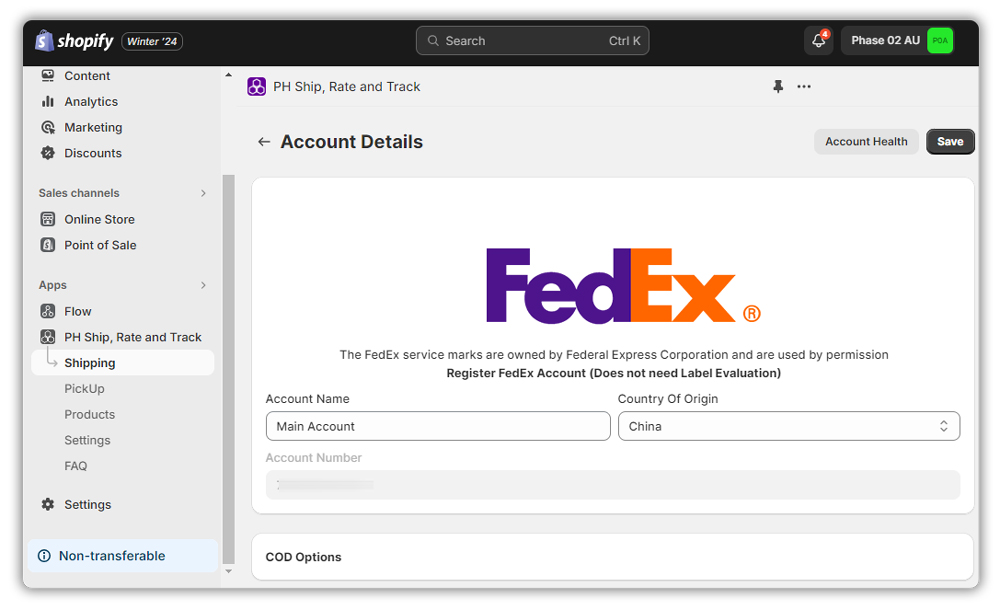
Now you need to add your FedEx Account Name, FedEx Account Number, and other details and click Save as shown below:
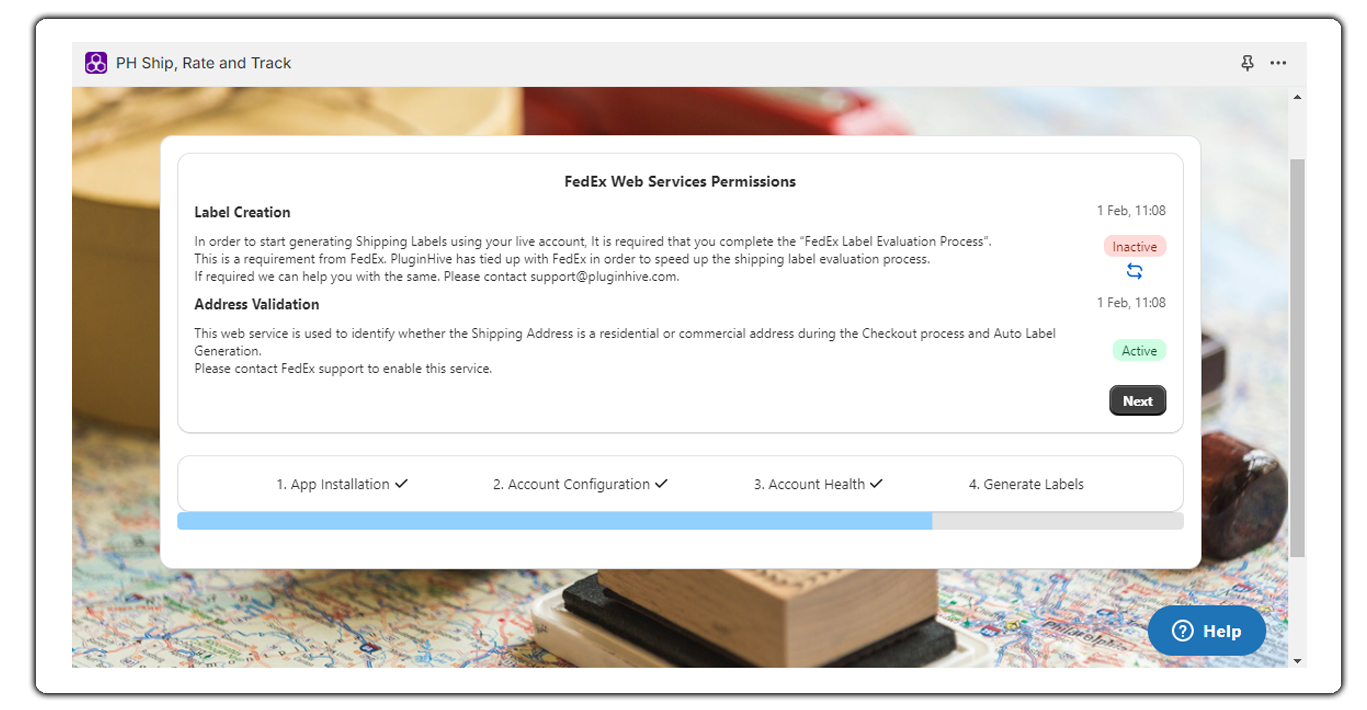
After you fill out the Account Details section, you will get redirected to FedEx Web Services Permissions. Read and click on Next as shown below:
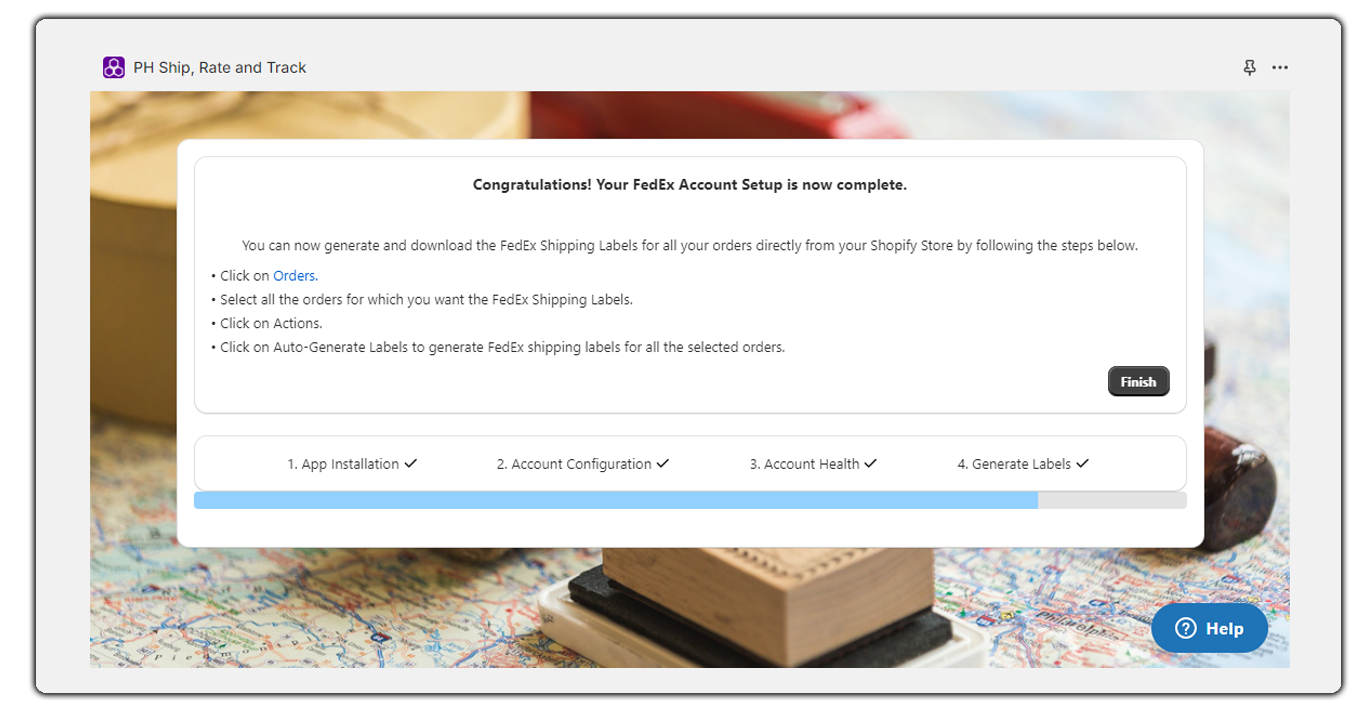
Now, click on Finish to complete your Shopify FedEx account setup as shown below:
If you face any issues or have any queries about the app’s setup, feel free to contact our
Add your FedEx Business/Personal Account to the app
The Ship, Rate & Track app requires merchants to have their own FedEx accounts to have complete control of their shipments. You will get shipping discounts from FedEx using your account details.

PluginHive has partnered with FedEx to make account registration simpler and more convenient for merchants. All you need to do is enter the FedEx Account Name, FedEx Account Number, and the shipper address associated with the account, as shown below.
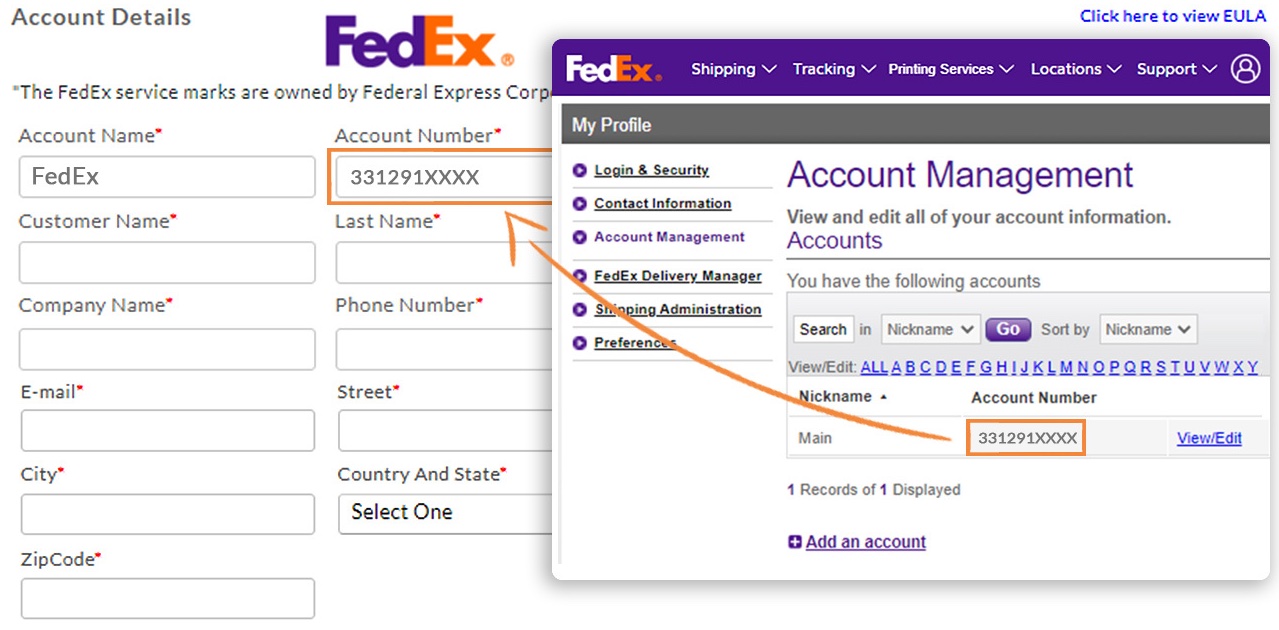
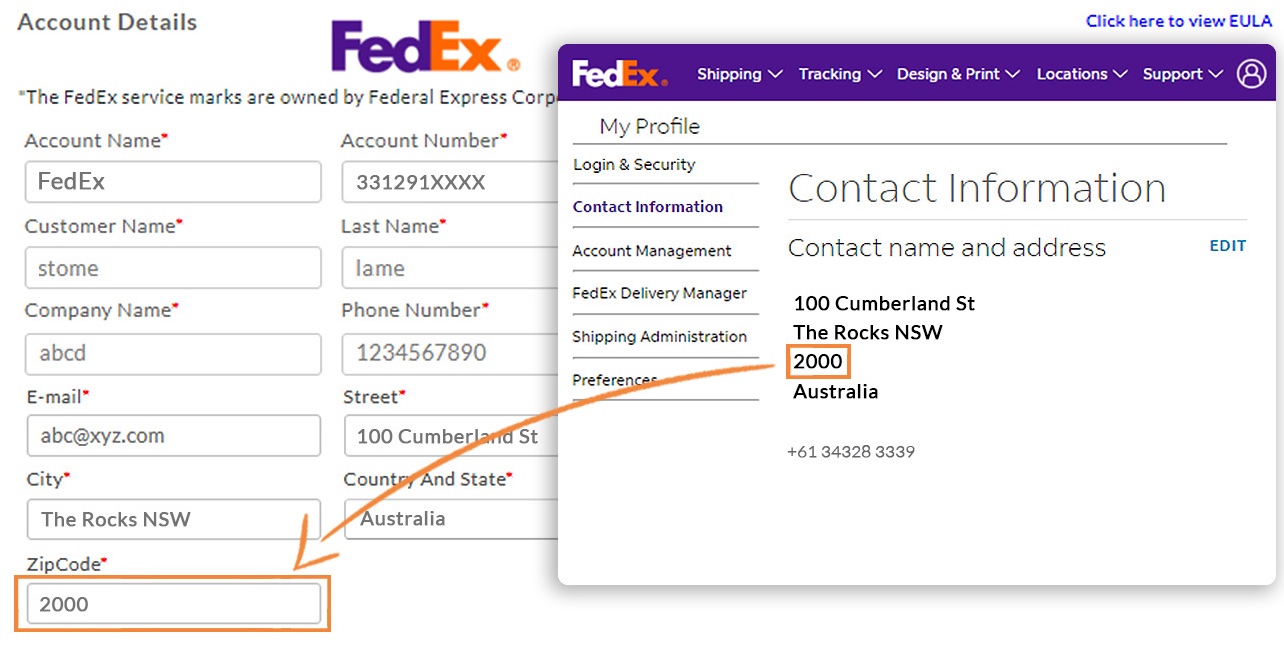
* Please make sure the shipper address & postal code is exactly the same as those added to your FedEx account.
* For shippers from Argentina, Brunei, Canada, Ireland, Kazakhstan, Malta, the Netherlands, Peru, Somalia, the United Kingdom, and Swaziland, please make sure to match the postal code format.
Click on Save and the app will automatically get the FedEx account details required to display live shipping rates, print labels, and generate tracking numbers for your orders.
* If you are already having a meter number from FedEx, it will change after registering with the application.
* As per FedEx, one account number can have multiple meter numbers and FedEx uses the meter number to only identify from where the shipping labels are being generated.
Verify Shipper and Customer Address
To get the most accurate shipping rates, you need to make sure the shipper and customer addresses are correct.
1. Verify the Shipper’s Address
Verify the ship-from address under App Settings → Location. You can modify the address if required.
- Your Shopify store’s first address will be marked as Default and used for processing shipments.
- You can add multiple locations within your Shopify store and set any of the addresses as Default.
FedEx does not recognize special characters other than the English language. Please make sure that non-English characters are not used in the address.
FedEx uses your Name to print the shipper’s details on the shipping label.
If you don’t want your name on the label, remove it by navigating to Location settings within the app, as shown below:
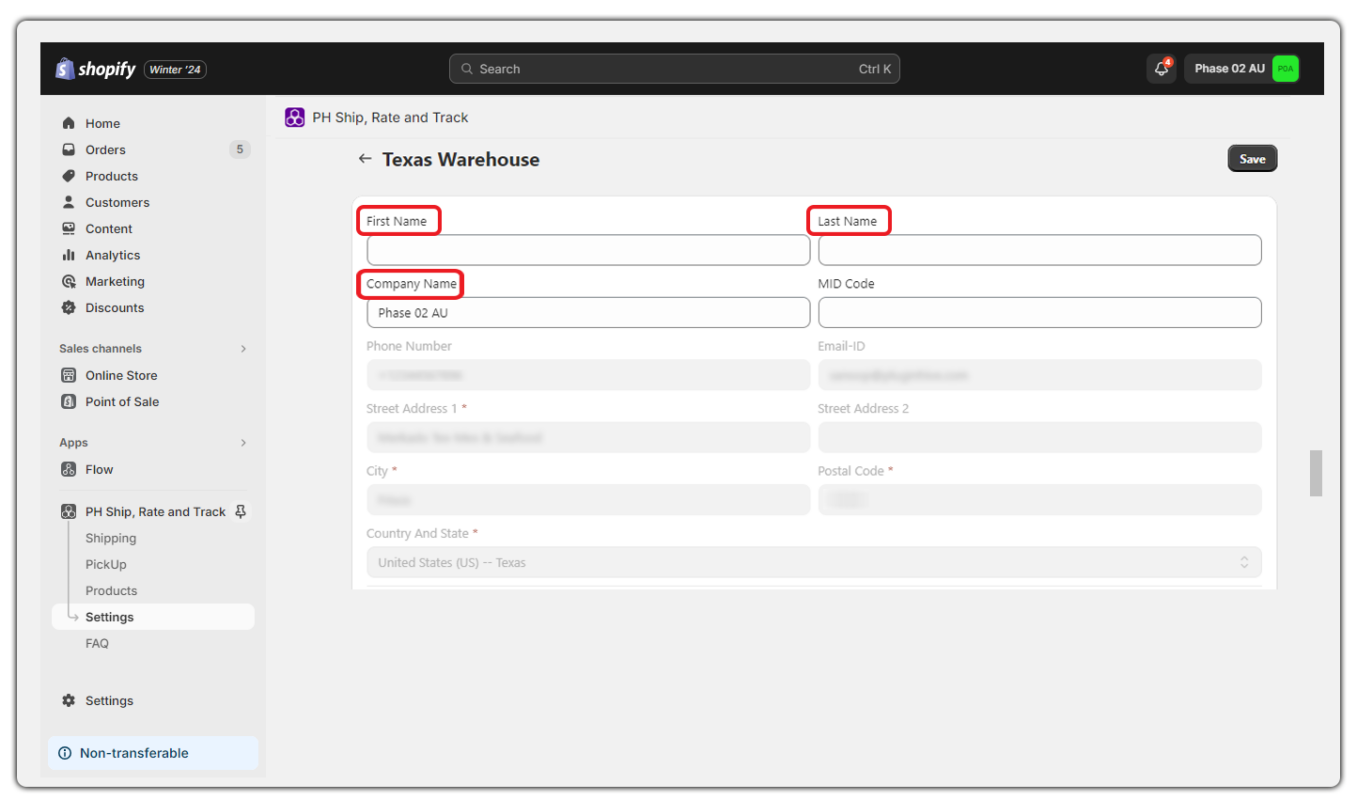
Any one of the First & Last Names or the Company Name is mandatory in order to ship with FedEx.
Please make sure either the First & Last Name or the Company Name is added in the app location settings.
2. Setup FedEx Address Validation for the Customer’s Address
FedEx Address Validation is used to automatically confirm if the address entered by the customer is categorized as a Residential Address or a Commercial Address.
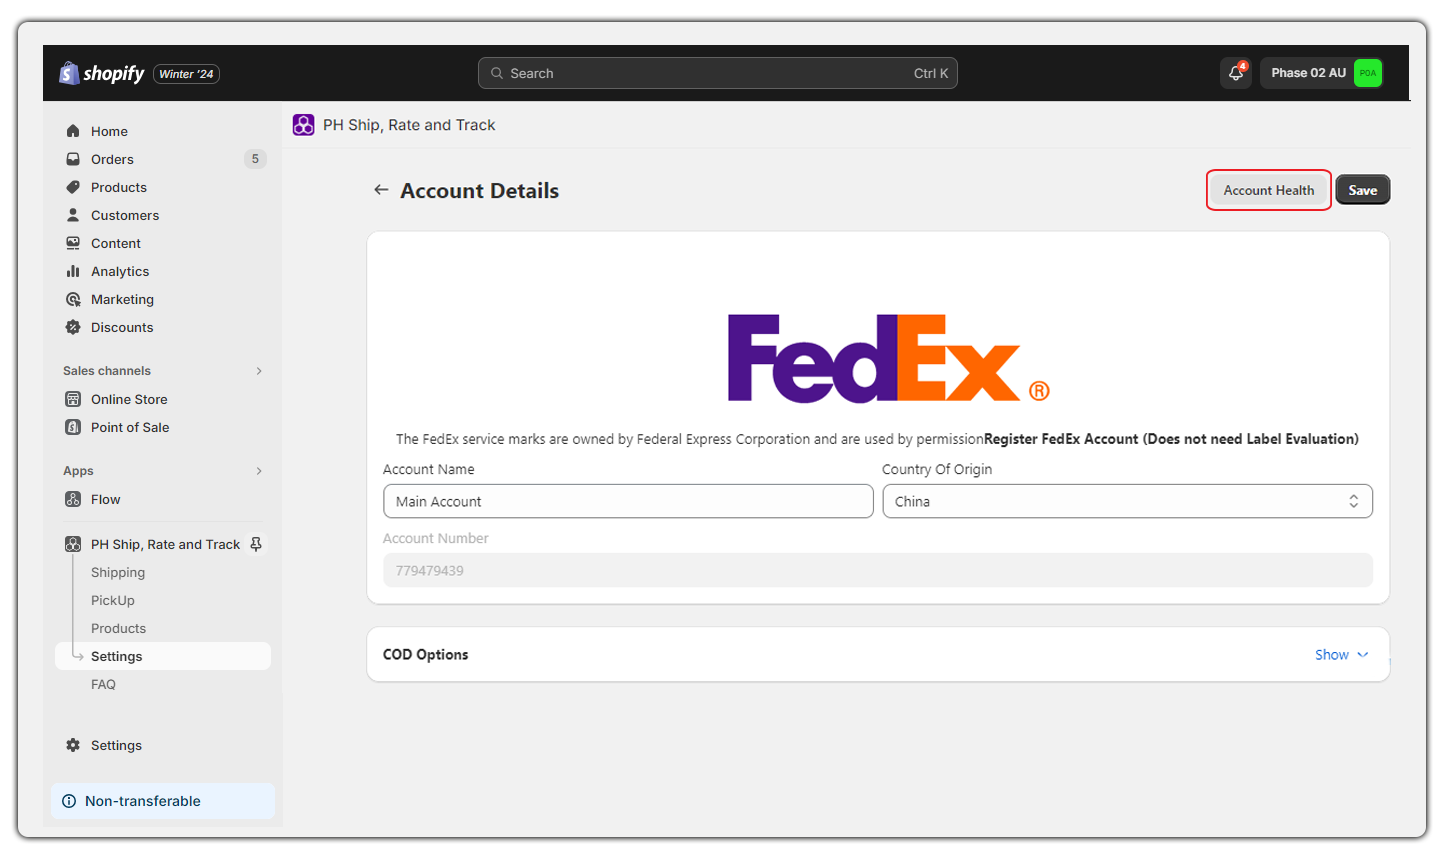
To check if your account has the FedEx Address Validation service enabled, visit the Account Settings and click on Account Health, as shown below:
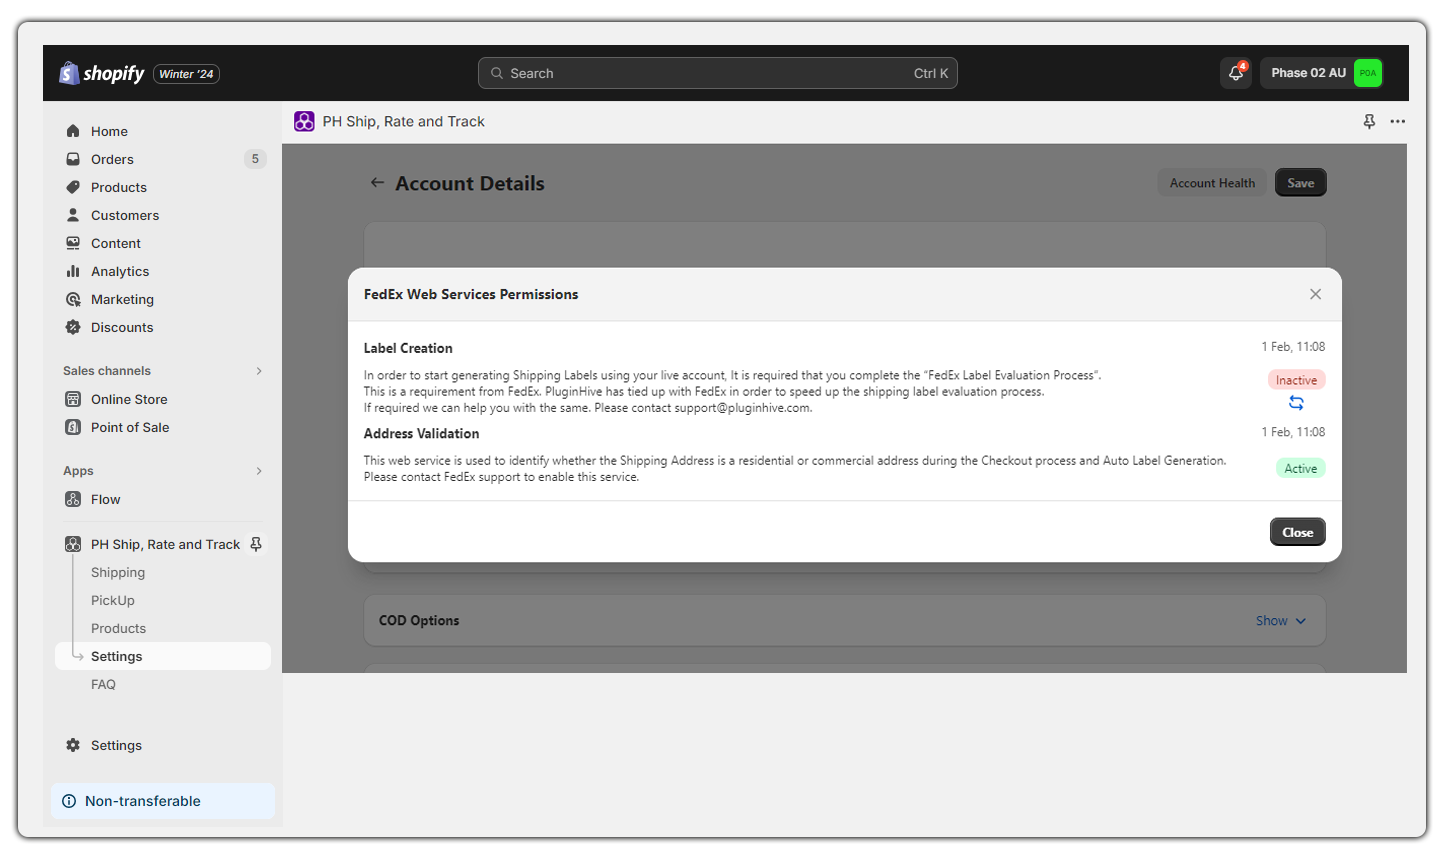
If your account has Address Validation enabled, it will be displayed as Active as shown below:
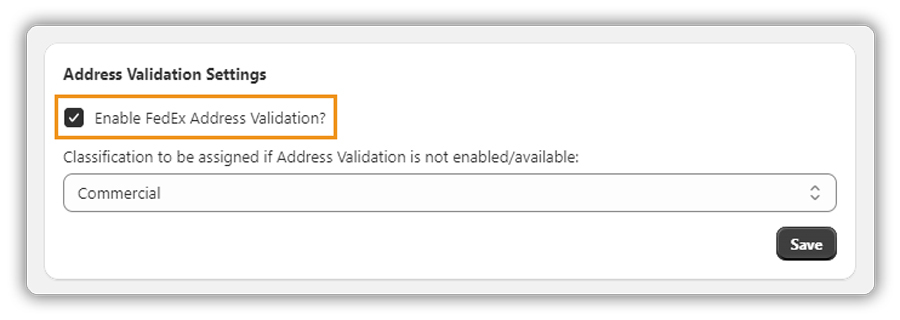
The app has a toggle to set your customer’s address if your account doesn’t have Address Validation enabled.
Visit the App Settings → Auto Settings → Address Validation Settings.
Enable the FedEx Address Validation and set it as per your requirements to Residential or Commercial as shown below:
To get the most accurate rates based on your customer’s address, we recommend you enable the Address Validation service for your FedEx account.
Please reach out to your FedEx Account Manager for more details on how to enable the service for your account.
If you face any issues or have any queries about verifying the shipper and customer address, feel free to contact our customer support.
Verify Your Shopify Products With FedEx App
Shipping rates will differ depending on the type of products you are shipping. Check the below-given product details to get the most accurate rates:
- Add product weight and dimensions, and verify store units
- Add price to your products
- Check product stock for store location(s)
- Products shipped internationally
- Products that require Delivery Confirmation with Signature
- Products that require Shipping Insurance
- Products containing Alcohol / Wine
- Products considered Hazardous or Dangerous Goods
- Perishable products that require Dry Ice
- Products containing Batteries
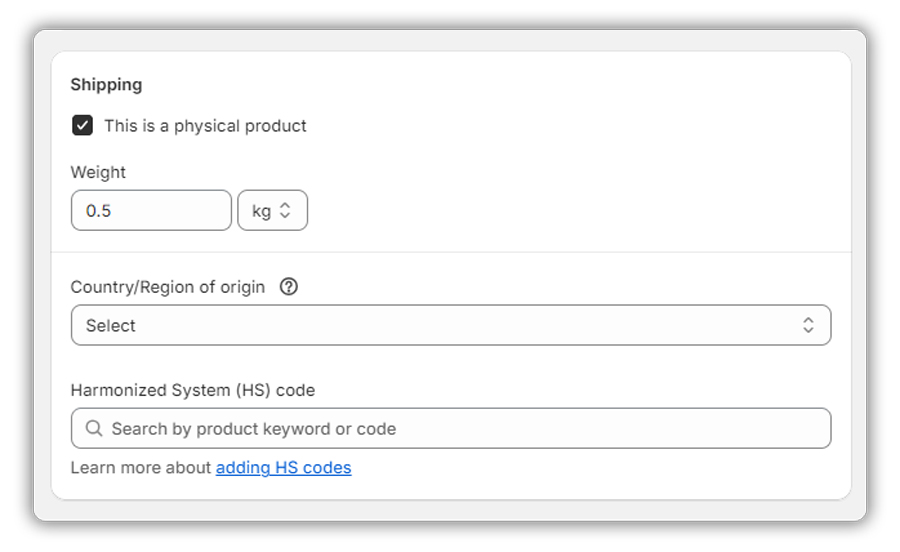
1. Add Product Weight, Dimensions, and Verify Store Units
To get the most accurate shipping rates, the product weight and dimensions must be provided.
Make sure to add weights to the Shopify products. The app will use the weight and dimensions to calculate the shipping cost and display it on the Shopify checkout page.
Navigate to Shopify → Products and enter the weight under the Shipping tab, as shown below:

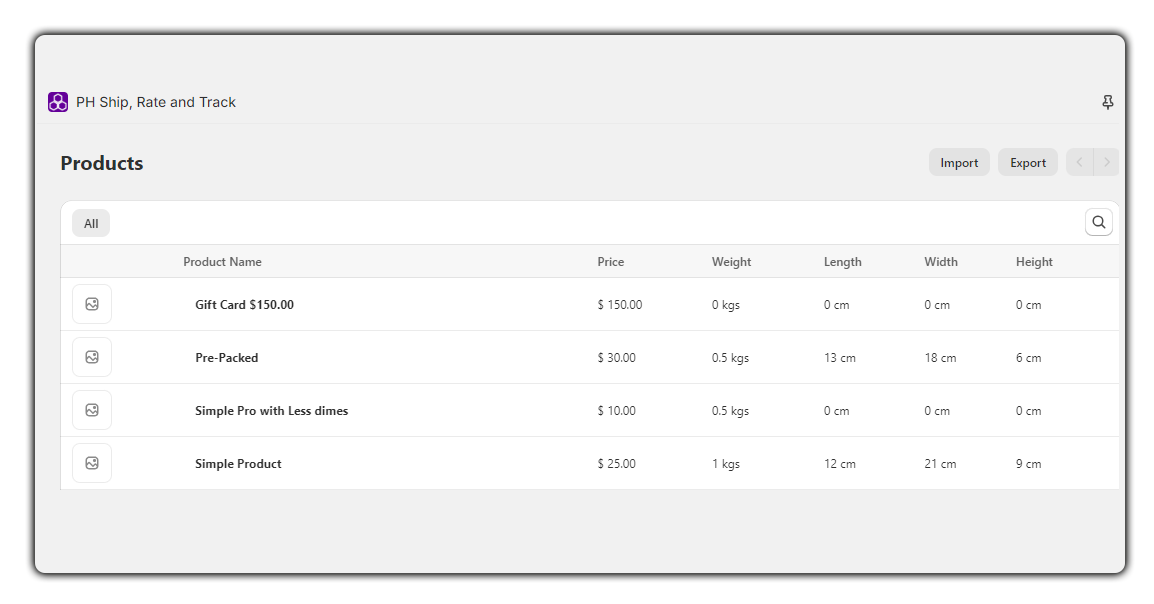
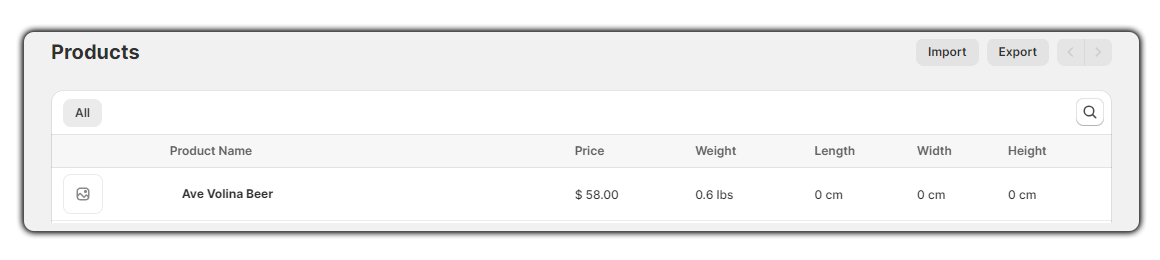
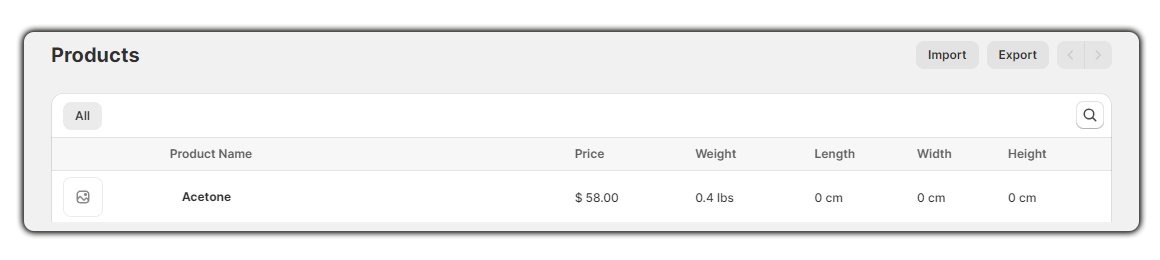
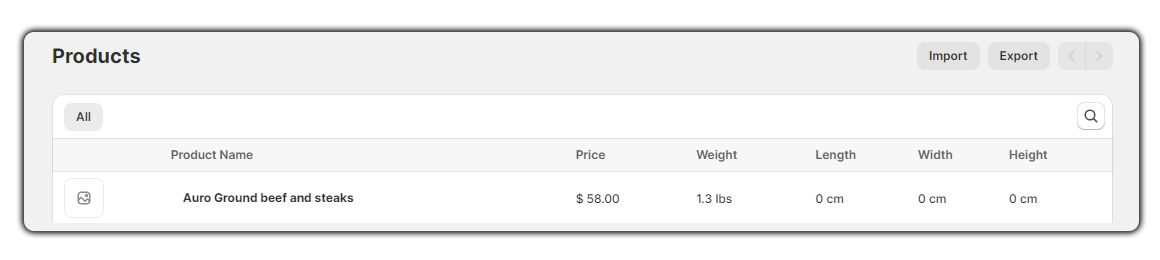
Navigate to Shopify FedEx App → Products. This section will display all the products with their price, weight, and dimensions as shown below:
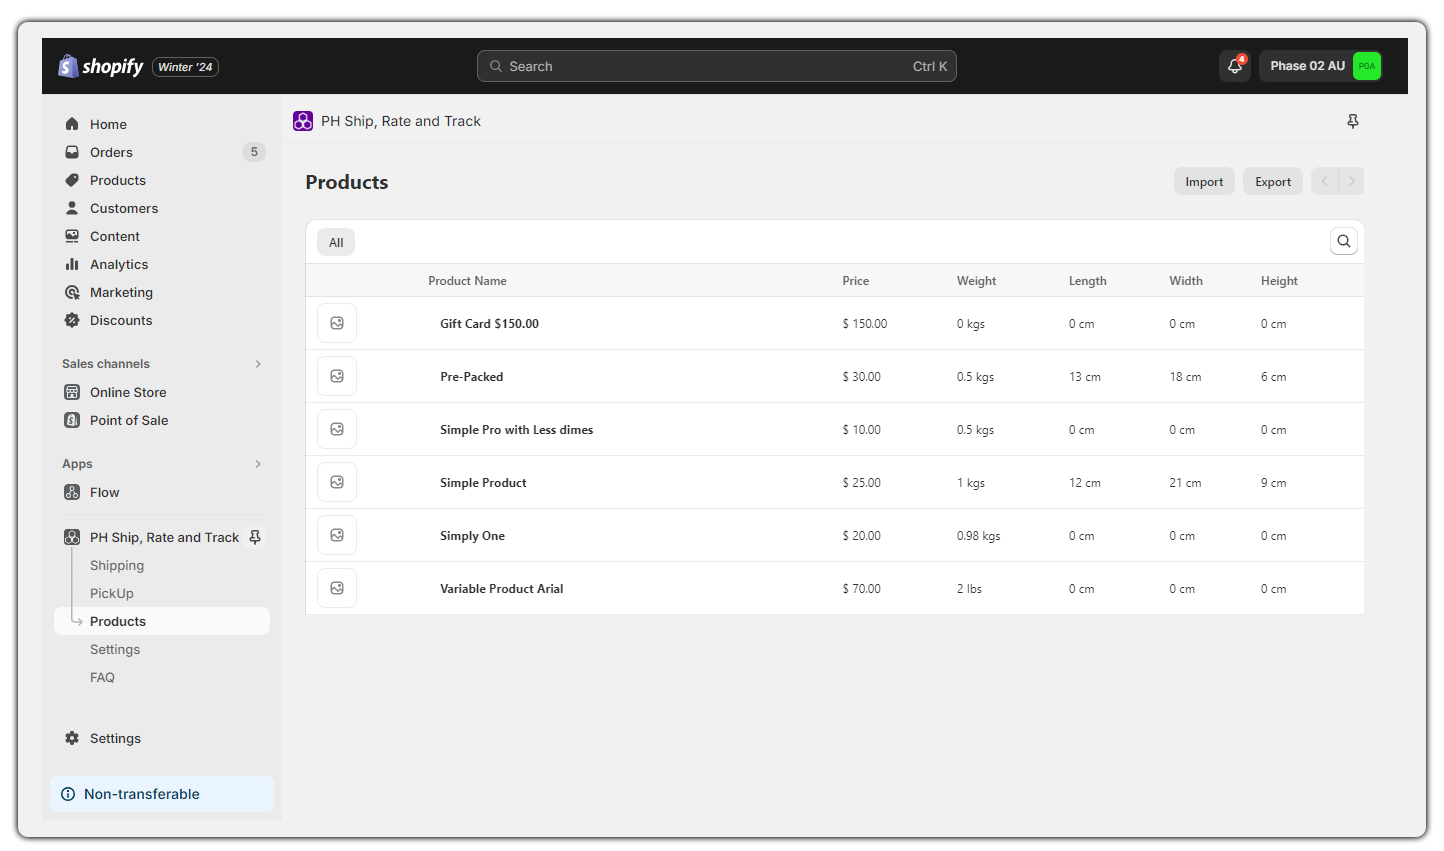
Now, click on the products to add dimensions as shown below:
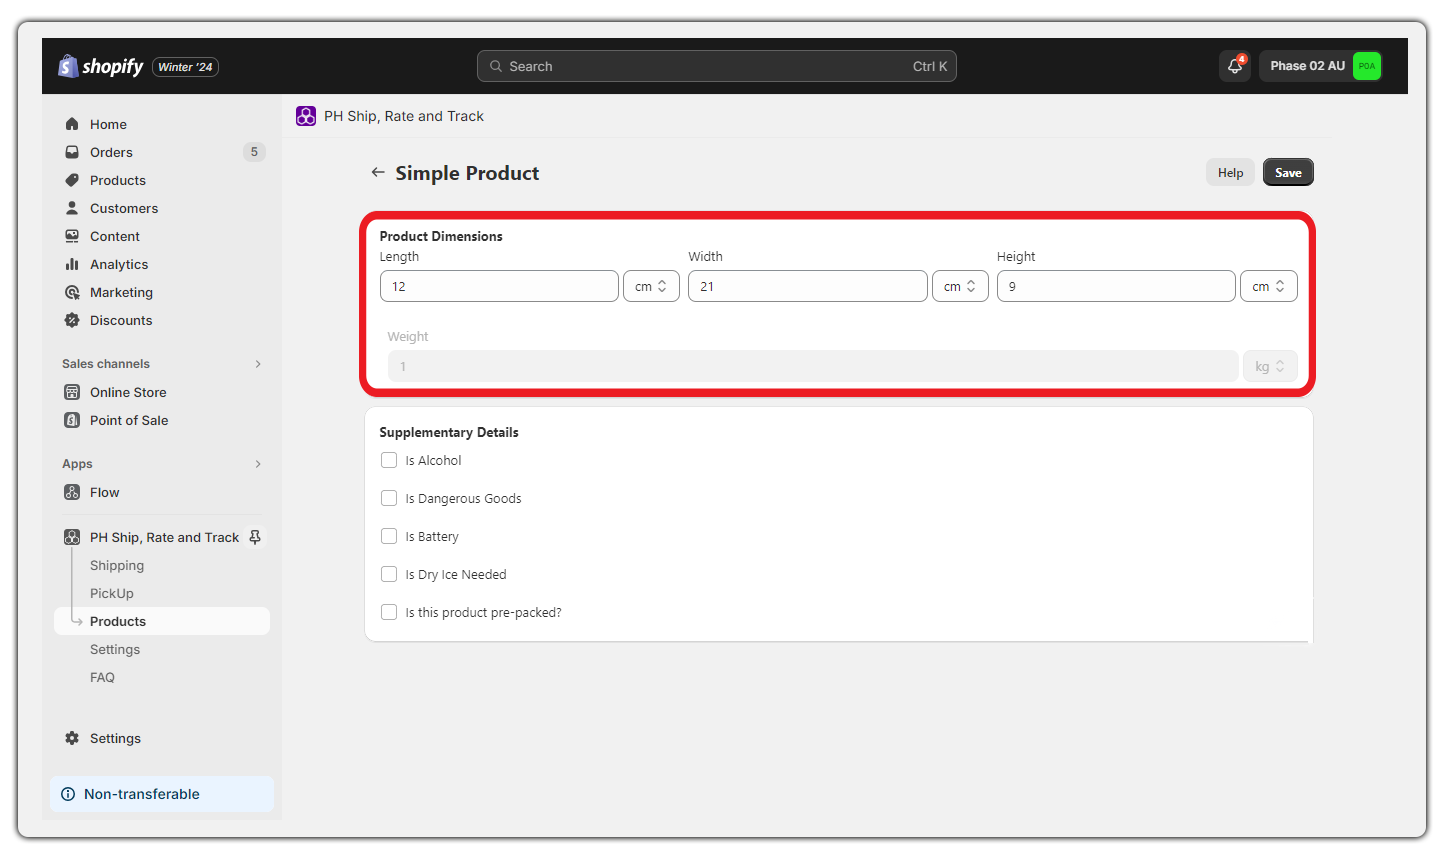
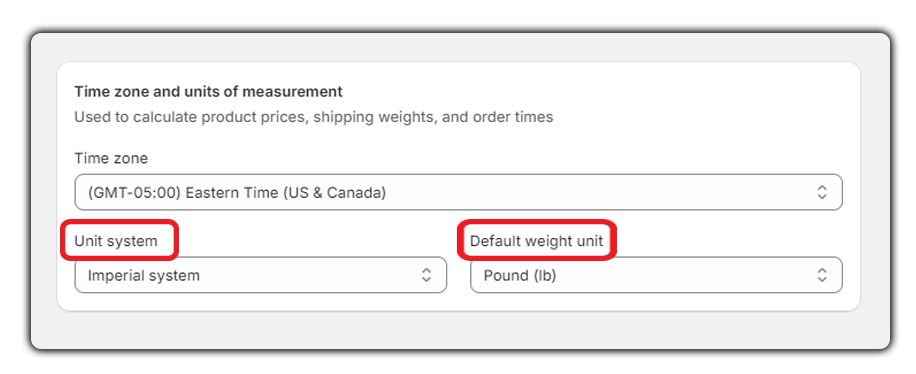
Make sure the store’s units are as per your shipper’s address, as shown below:
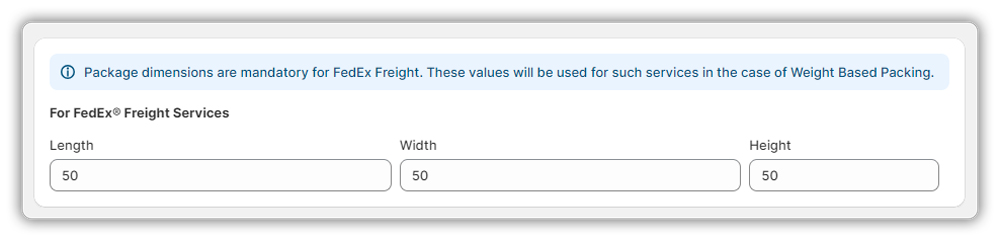
For FedEx Freight, package dimensions are mandatory. Navigate to Packaging Settings and set up default dimensions for FedEx Freight Services as shown below:
If your products do not have weight configured, we recommend utilizing Shopify Product Import & Export functionality.
Read More – Importing and Exporting Shopify Products
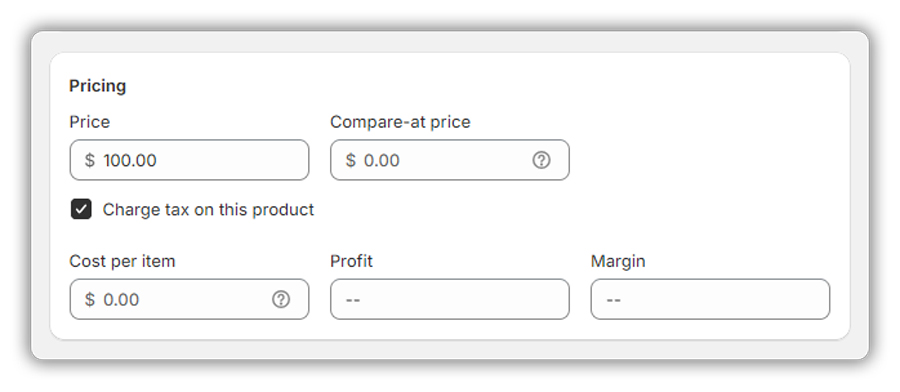
2. Add Price to Your Shopify Products
To add price to your products, navigate to Shopify Store → Products and enter the price under the Pricing tab, as shown below:
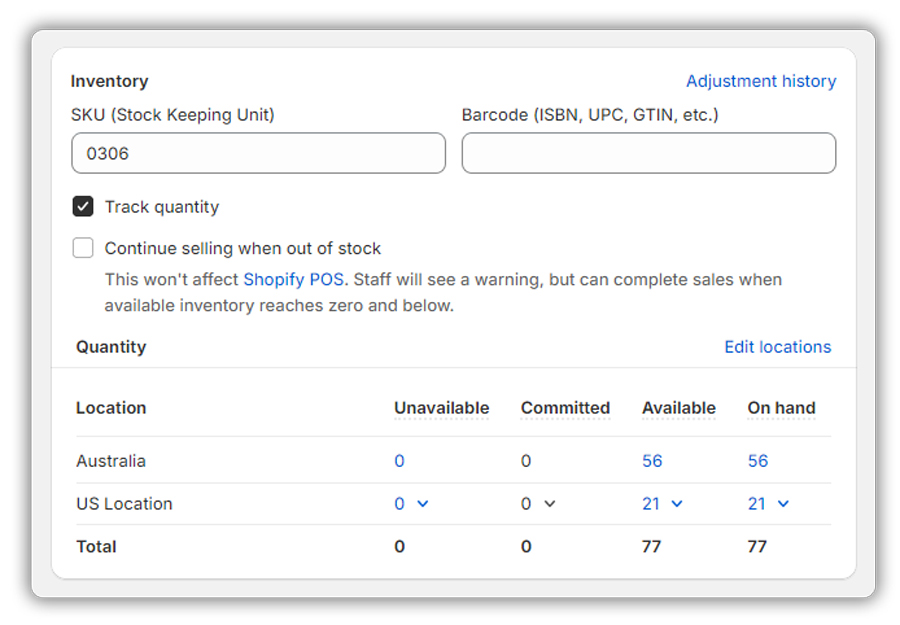
3. Check Product Stock for Store Location(s)
After adding the price, check your product inventory in the Inventory tab and make sure your product inventory is in stock for your store location(s) as shown below:
4. Products Shipped Internationally
If you need to ship internationally for overseas customers, shipping carriers require you to fill in additional details like,
- HS Tariff Code
- Country Of Manufacture
For International shipments, Product names should not contain special characters. An alternative option is to update the Customs description without a special character.
Fill in the details under the Shipping tab, as shown below:
5. Products That Require Delivery Confirmation With Signature
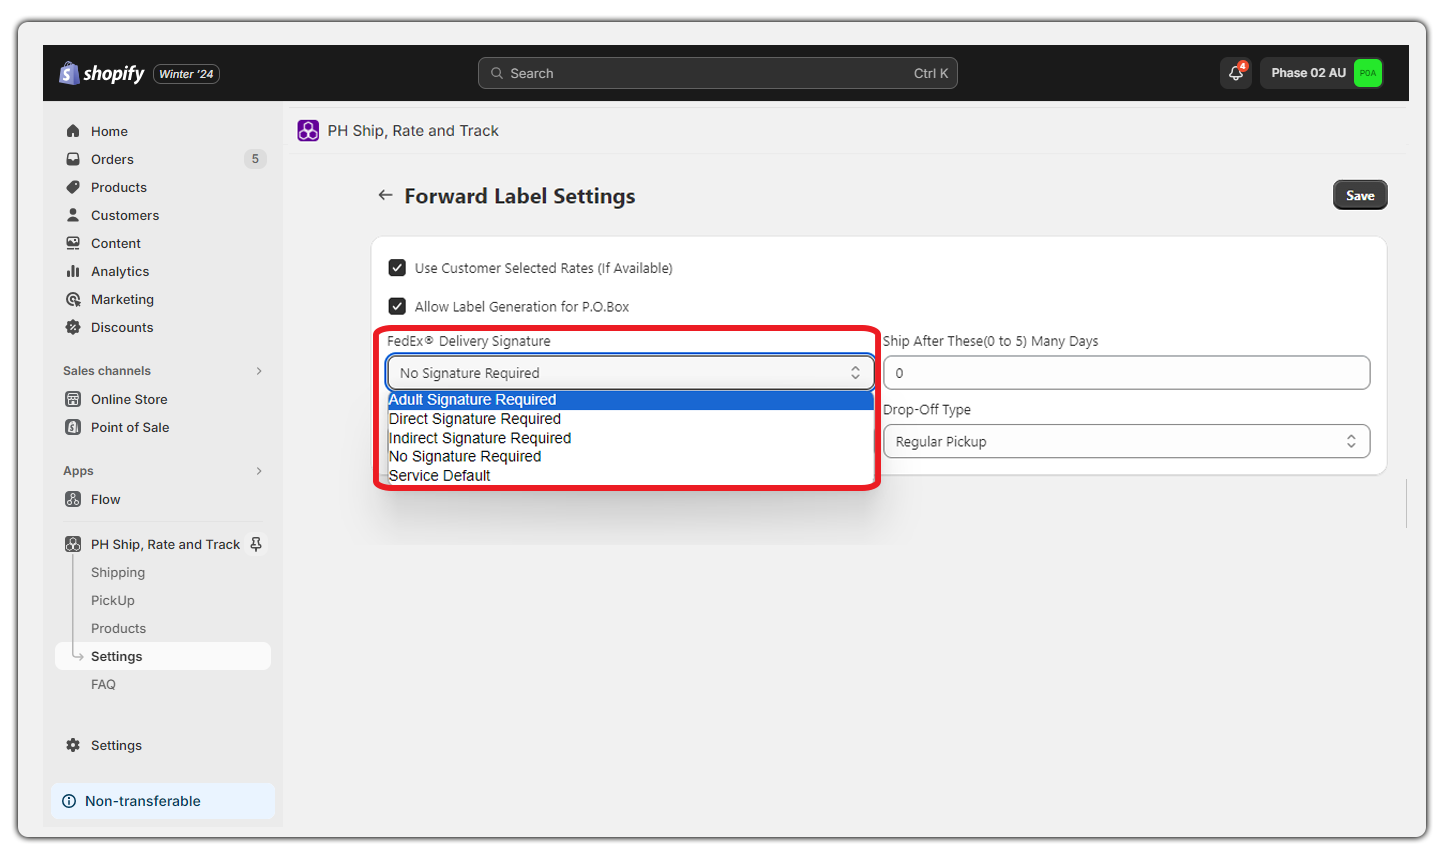
If you are looking for a delivery confirmation for your orders, you can enable FedEx Delivery Confirmation with Signature within the app.
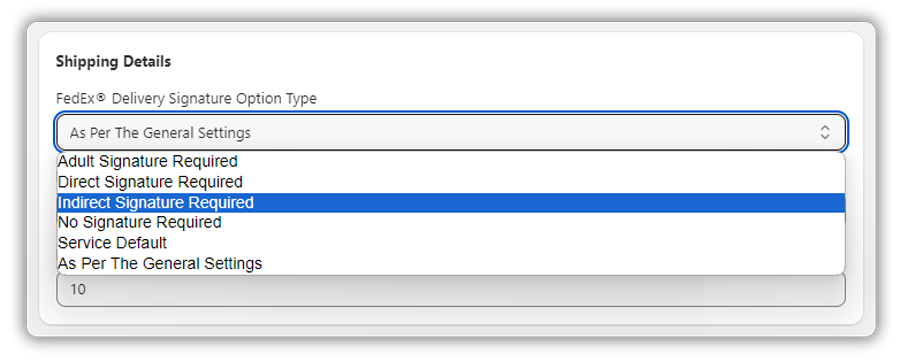
Navigate to Auto Settings and select your preferred option under the FedEx® Delivery Signature, as shown below.
If you require delivery confirmation for only a particular product, visit Products settings and click on your product, as shown below:
Select your preferred delivery confirmation option for a particular product under Shipping Details as shown below:
6. Products That Require Shipping Insurance
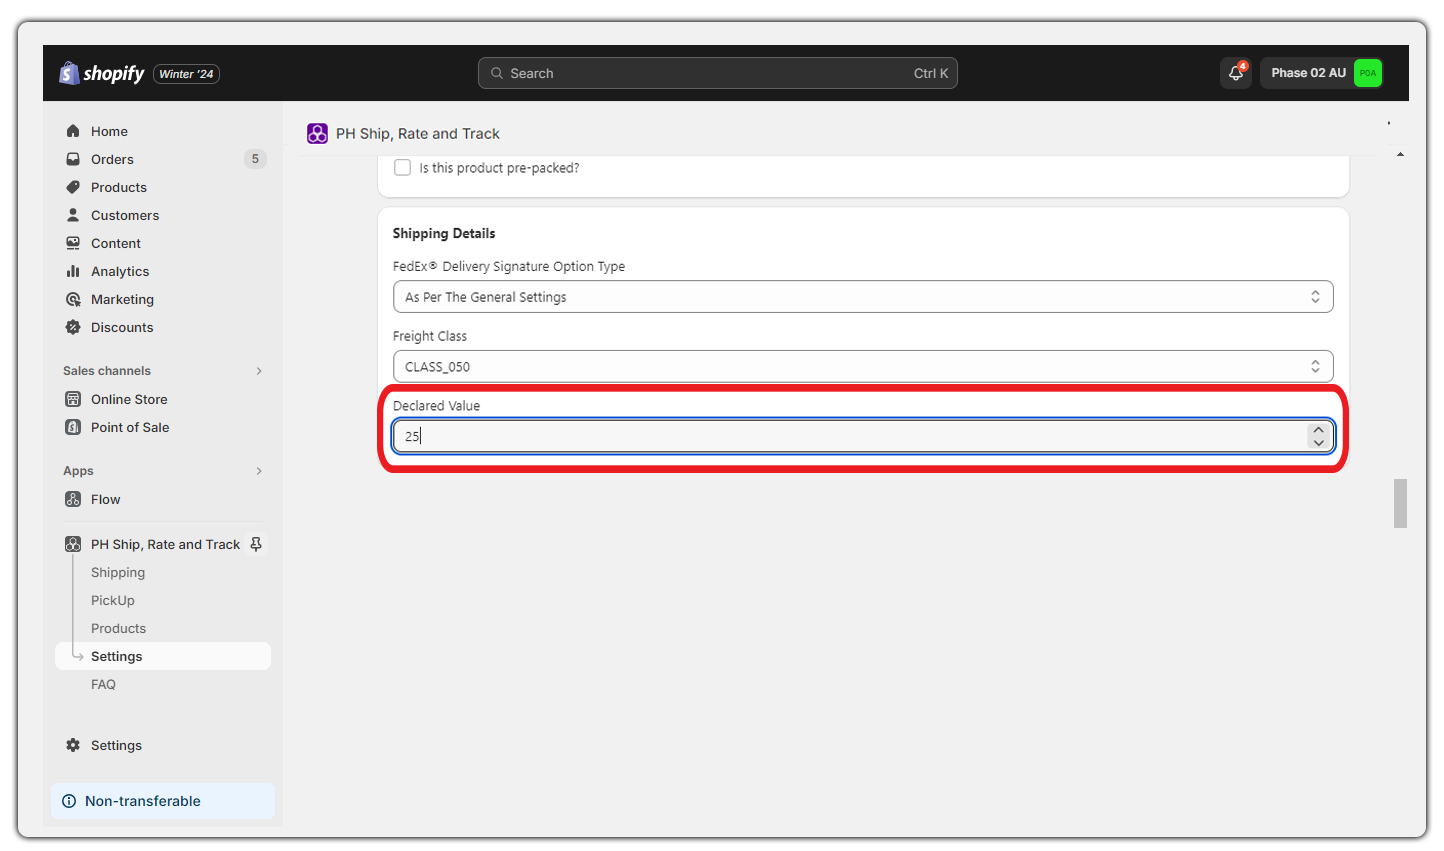
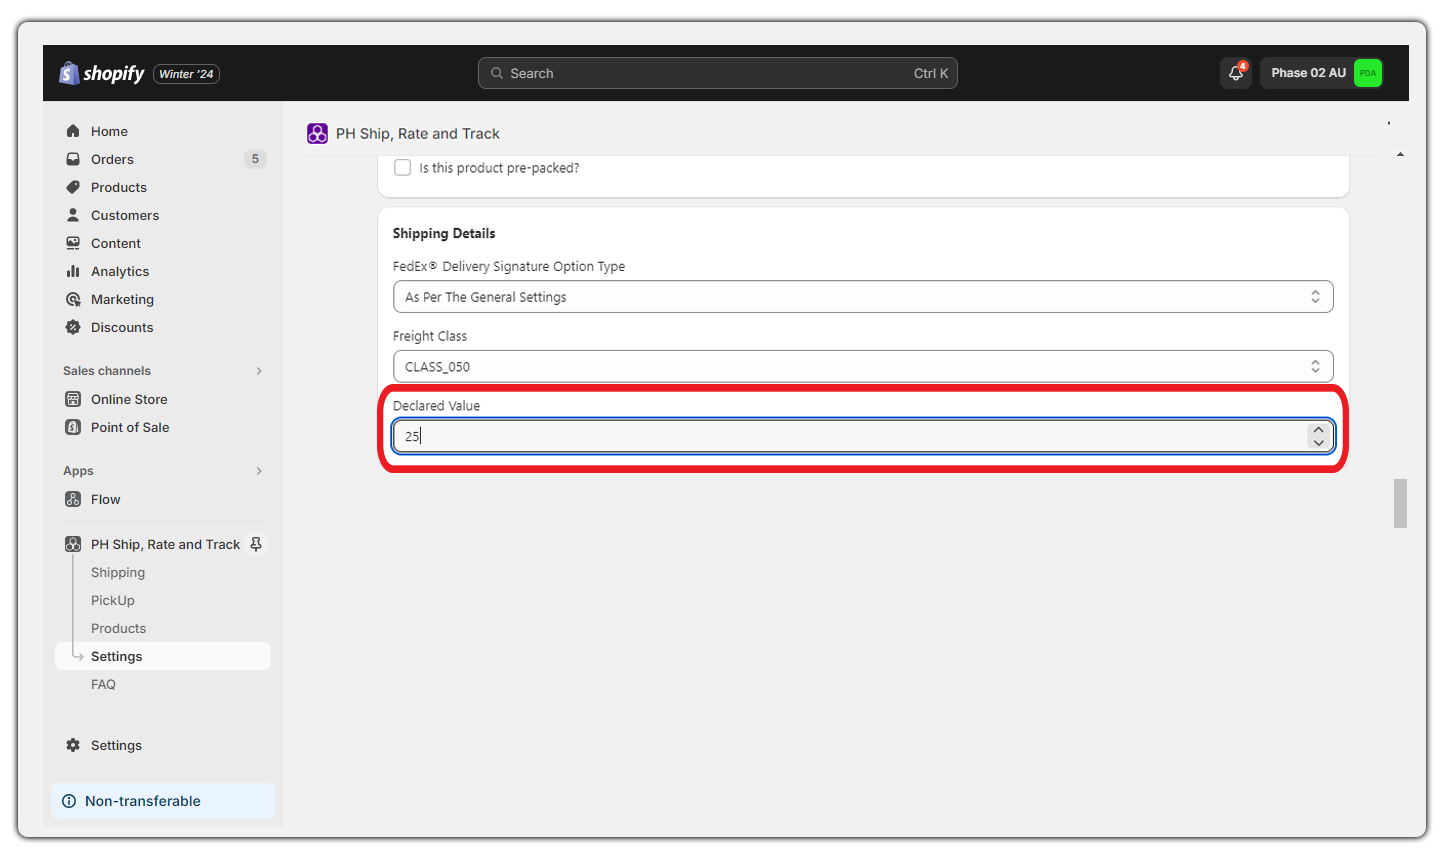
If you want to make sure your shipment is safe from loss, delay, damage, or misdelivery, you get the option to set a declared value for the shipments.
You can set the declared value for each product under the Products section and set up a custom-declared value, as shown below:
Navigate to Auto Settings → Third Party Insurance Settings and enable Is Third Party Insurance required for Forward Shipments? option, as shown below:
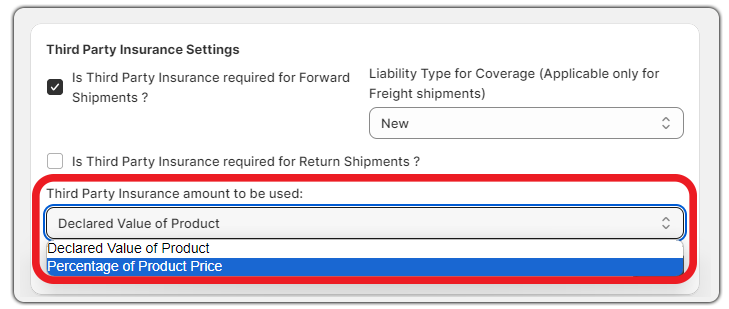
The insurance amount to be used for your shipments can be added as:
- Declared Value of Product: The amount you set as declared value in the product will be used as the insurance amount for your shipment.
- Percentage of Product Price: You can specify the percentage of the product price to be used as the insurance amount for your shipment.
7. Products Containing Alcohol/Wine
If you sell products that contain alcohol, you can ship them directly to customers or a licensee.
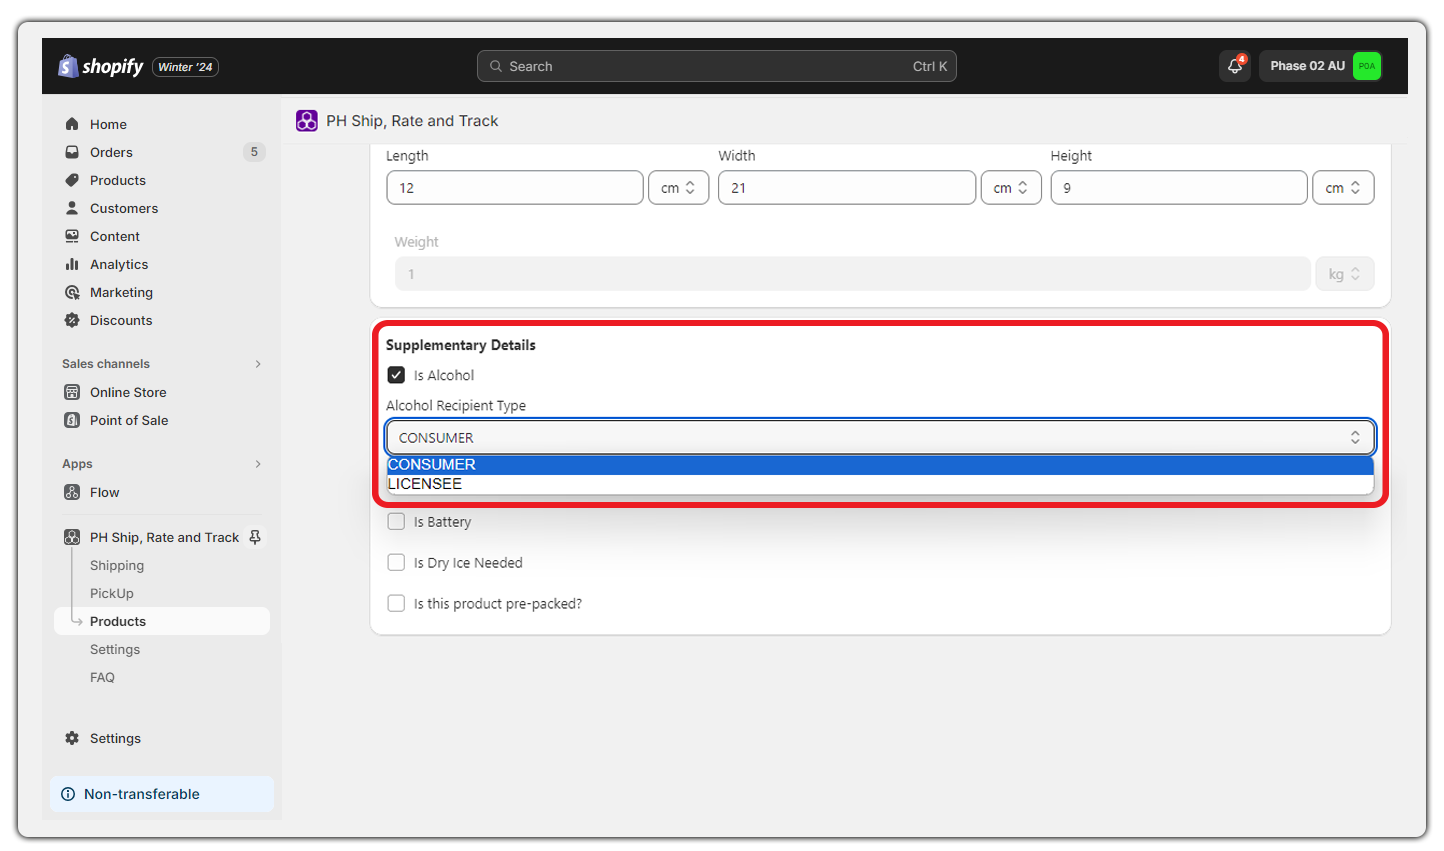
Navigate to the Products settings and click on the product that you want to specify as containing alcohol as shown below:
Under the Product Summary, visit Supplementary Details and enable Is Alcohol for the product. You can choose between a Consumer or a Licensee based on the requirement, as shown below:
8. Products Considered Hazardous or Dangerous Goods
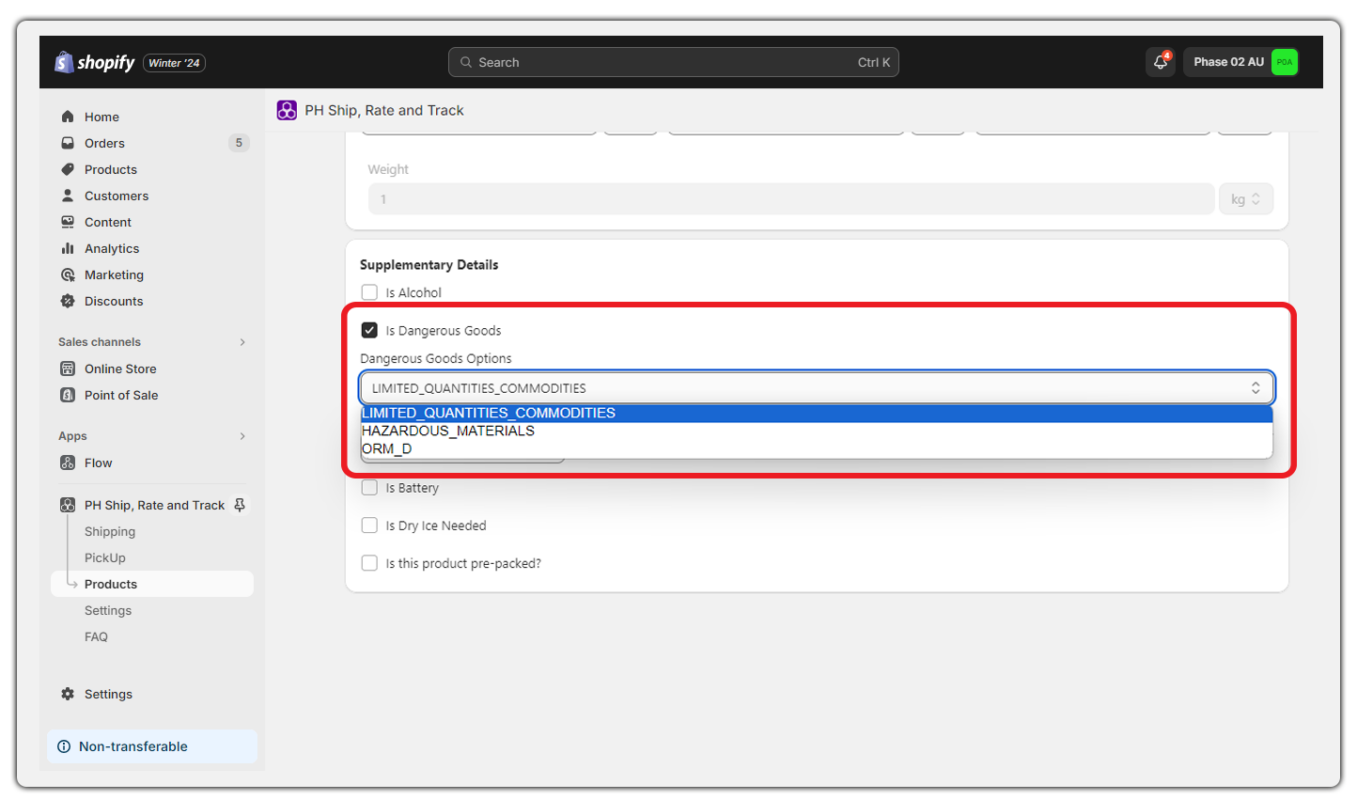
FedEx supports the shipment of products considered Hazardous Materials or Dangerous Goods. Within the app, Navigate to the Products settings and select your product as shown below:
Enable Is Dangerous Goods option under the Supplementary Details to specify the product as a hazardous material.
After enabling you can select the dangerous goods option to specify the goods type as shown below:
9. Perishable Products That Require Dry Ice
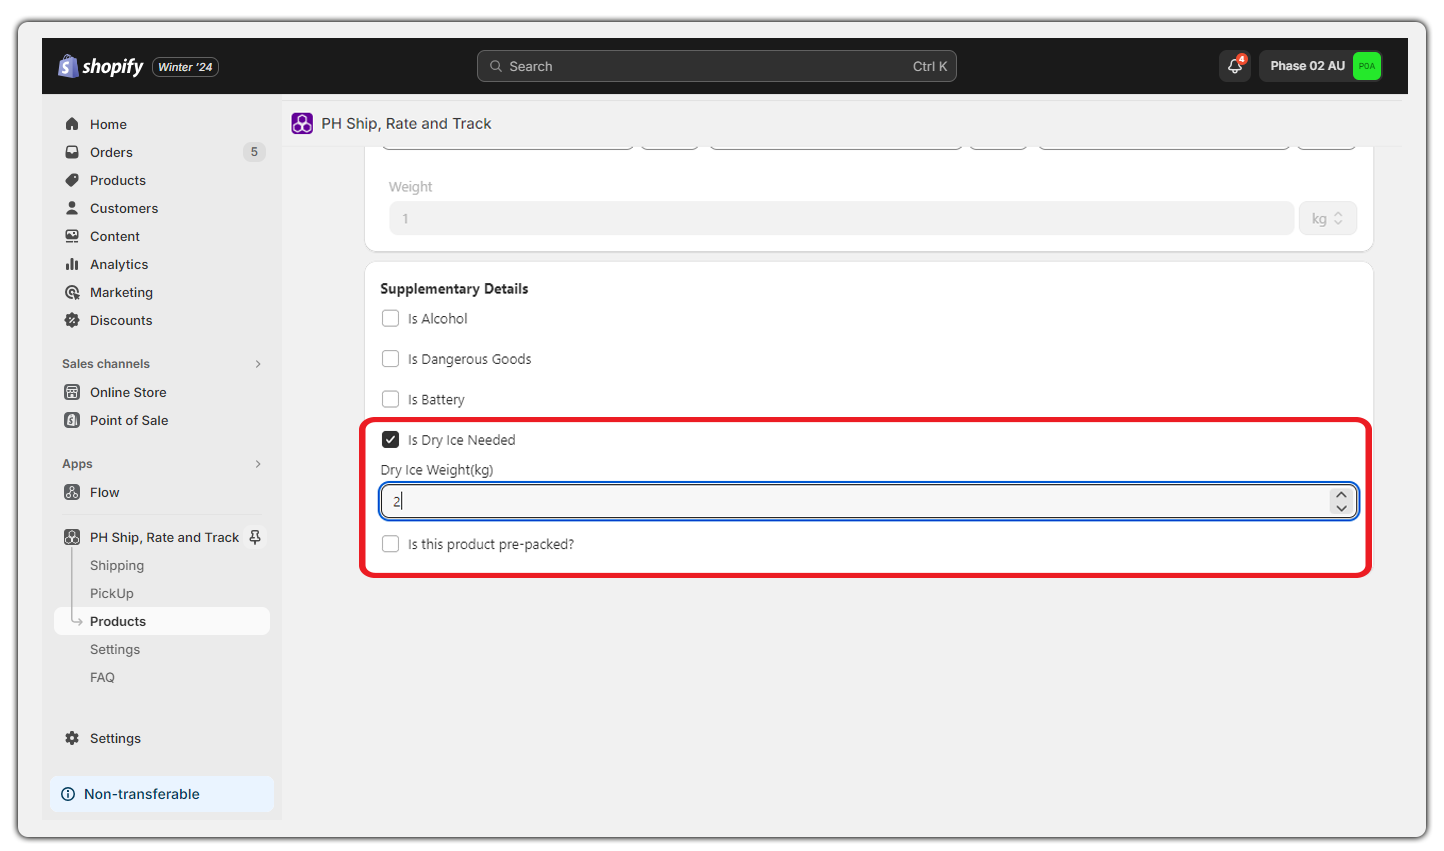
FedEx allows you to ship perishables that are time-sensitive with dry ice. Navigate to the Products settings and select the product that you want to ship with Dry Ice as shown below:
Under the Supplementary Details, enable Is Dry Needed option.
Now, add the weight of the dry ice required for the product, as shown below:
10. Products Containing Batteries
If you are shipping products that contain batteries, FedEx requires you to declare the shipment as “Containing a Battery”.
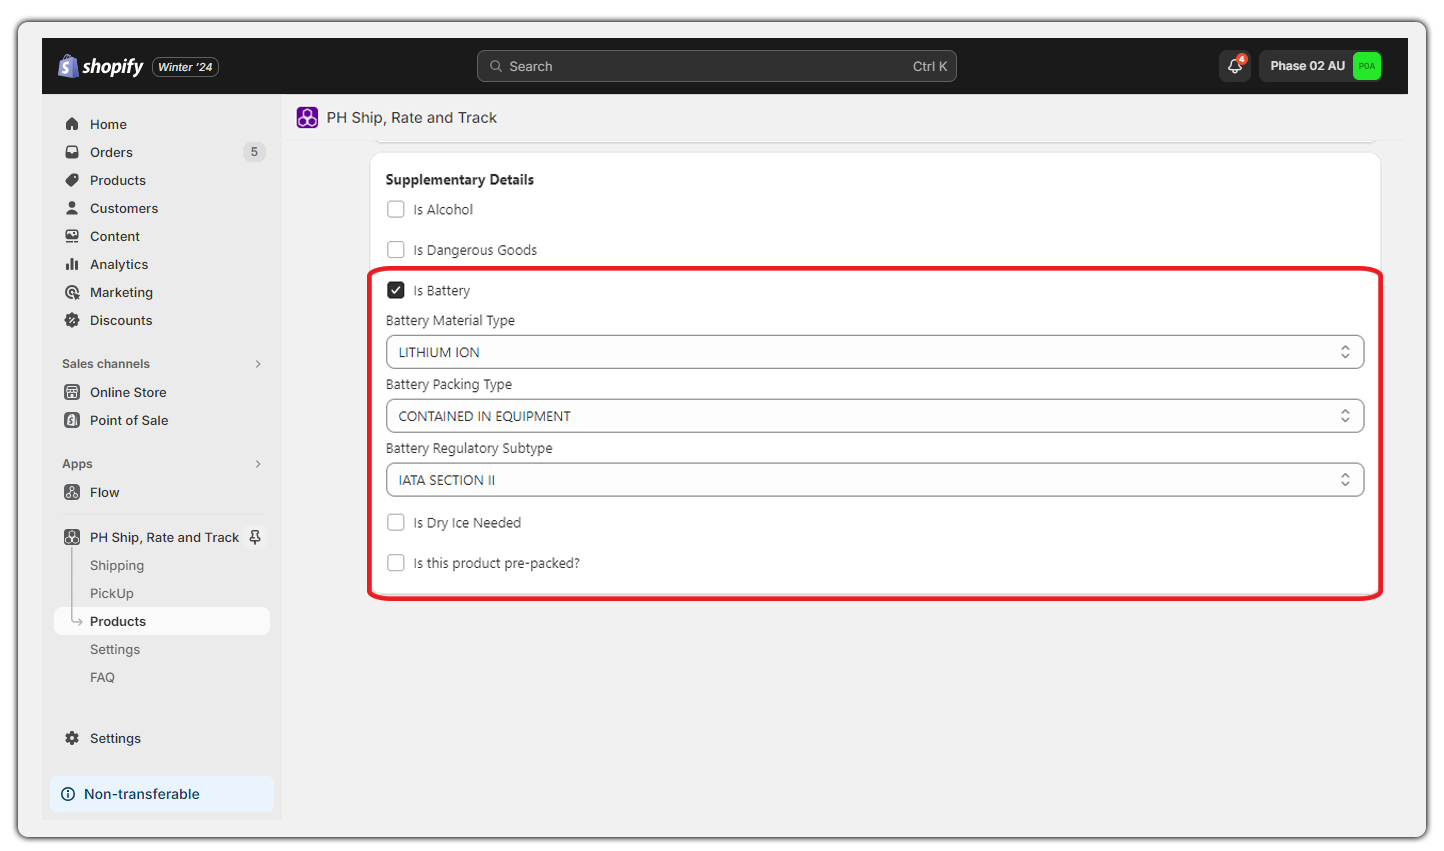
Navigate to Product settings and select the product you want to declare as containing a battery as shown below:

Under the Supplementary Details option, enable Is Battery. This will allow you to set the battery material type, packaging type & regulatory subtype for your product, as shown below:
If you face any issues or have any queries about the app product settings, feel free to contact our customer support.
Configure Parcel Packaging
The Shopify FedEx Ship, Rate & Track helps you efficiently pack your products. The app has a packing option for almost every business need as follows:
- Prepacked products
- Packing with your own boxes (Your Packaging)
- Packing with FedEx flat-rate boxes
- Weight-based packing
- Volumetric weight-based packing
- Pack item individually
- Packaging used for Dangerous Goods
1. Prepacked Products
Some products, like electronics, shoes, etc., typically come in their own packing boxes; those products are called Prepacked Products.
If you sell products that have their own packing boxes, the application lets you set up packaging in one quick step.
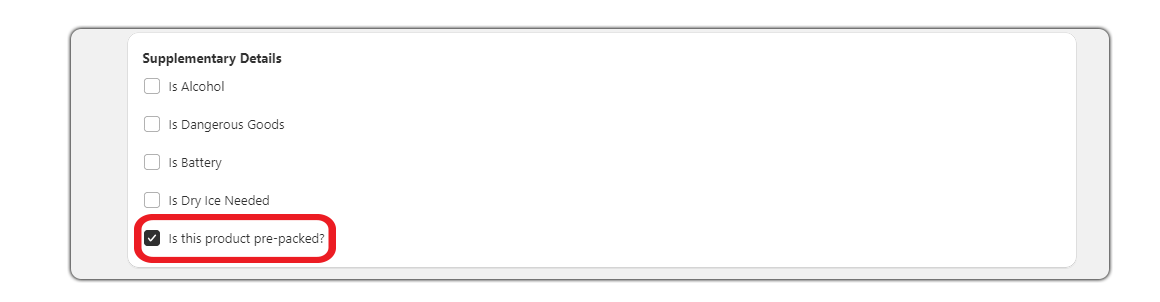
Navigate to the Products settings and select the product that uses its own box as shown below:
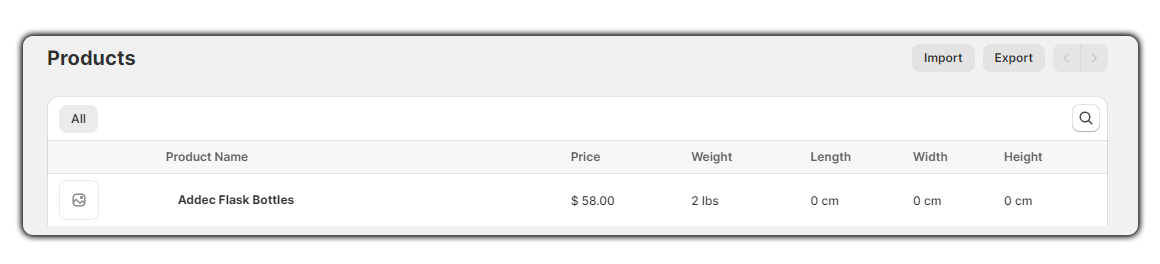
Under the Supplementary Details option, enable Is this product pre-packed?
This will allow you to set the product as a pre-packed product as shown below:
2. Packaging With Your Own Boxes (Your Packaging)
For merchants that have their custom boxes for shipping, the app lets you add the weight & dimensions of the custom boxes. The app automatically matches the products that can fit inside the boxes.
To add your box weight and dimensions, navigate to the app settings, click on the Packaging Settings, and select “Box Packing” under the packing methods, as shown below:
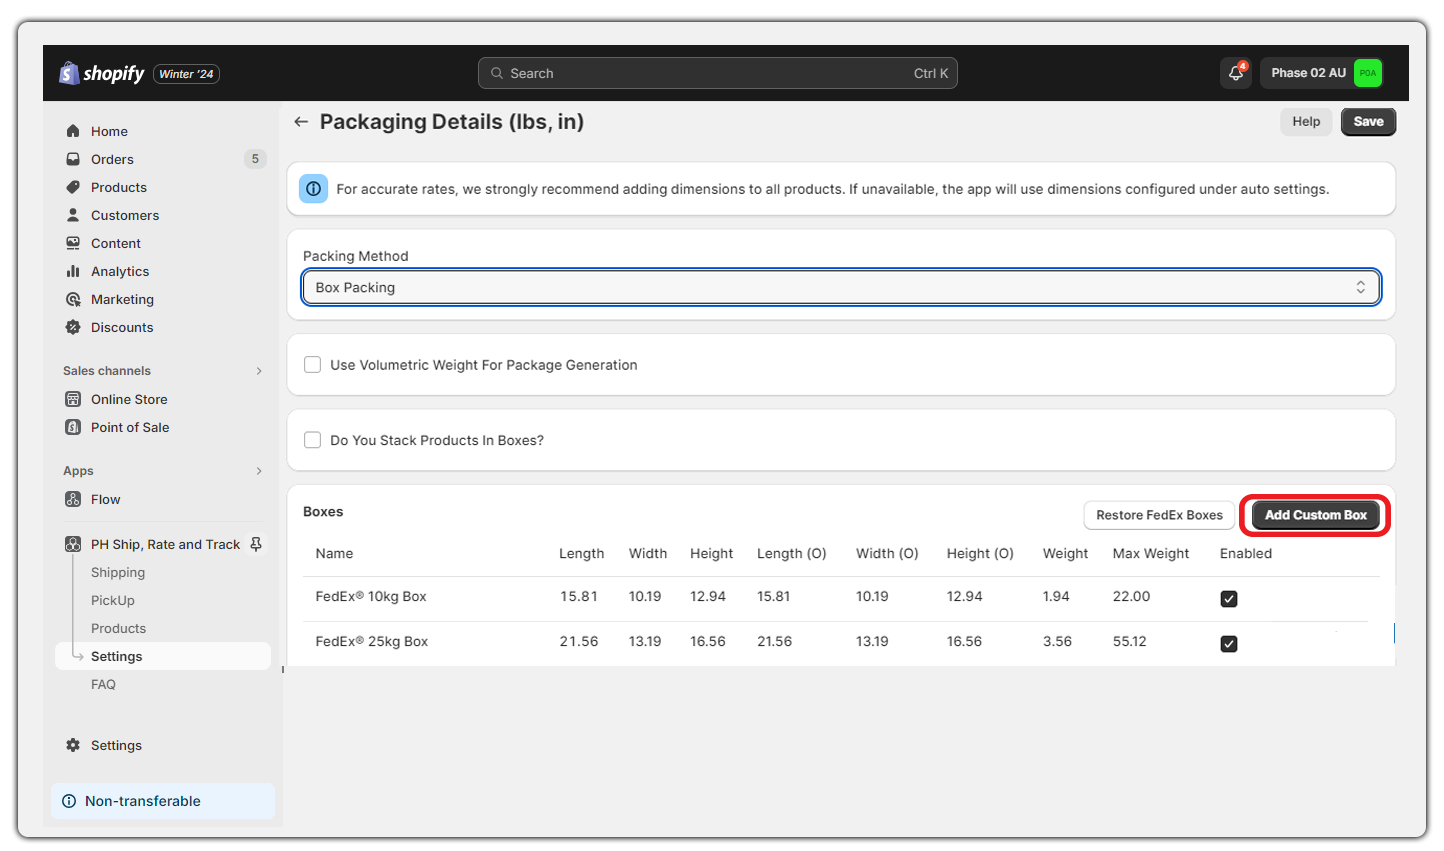
Click on Add Custom Box.
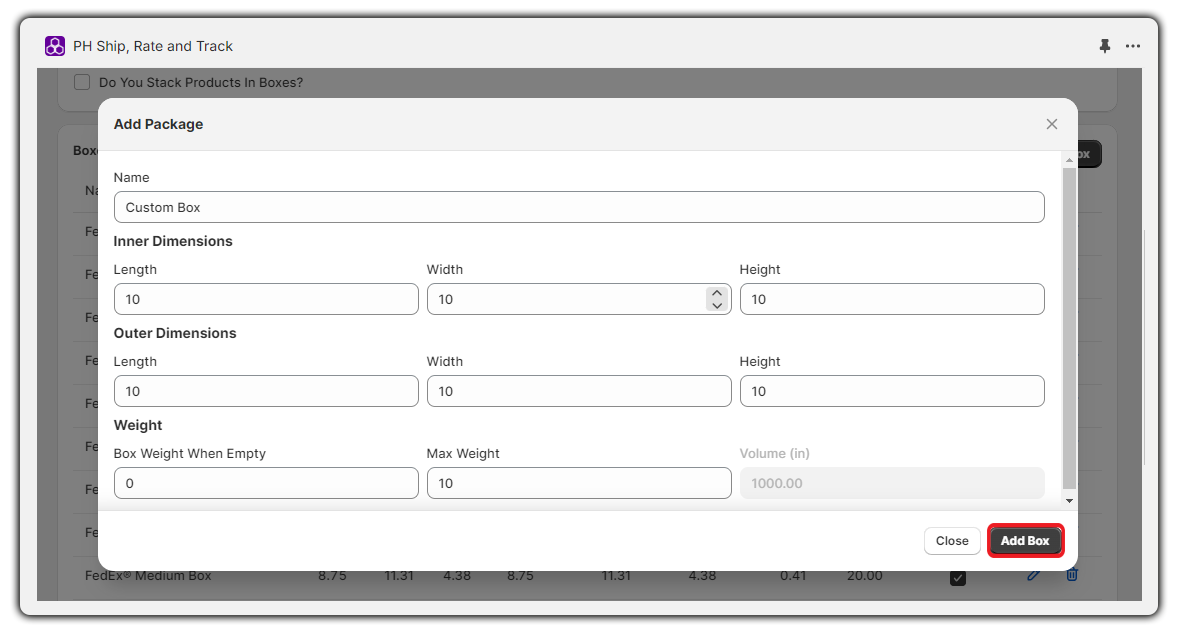
Add the below details:
- Name – enter the box name
- Inner Dimensions – enter the inner dimensions of the box
- Outer Dimensions – enter the outer dimensions of the box
- Weight – enter the box weight & the maximum weight the box can hold
Click on Add Box as shown below:
3. Packing With FedEx Flat-Rate Boxes
Using FedEx flat-rate boxes is one of the best ways to save money on shipping. Flat Rate Boxes offered by FedEx are:
- FedEx 10 Kg box
- FedEx 25 Kg box
- FedEx Envelope
- FedEx Small Box
- FedEx Medium Box
- FedEx Large Box
- FedEx Extra Large Box
- FedEx Pak
- FedEx Tube
- FedEx Standard Freight Box
You can use any of these boxes to save shipping costs or use them along with FedEx One Rate.
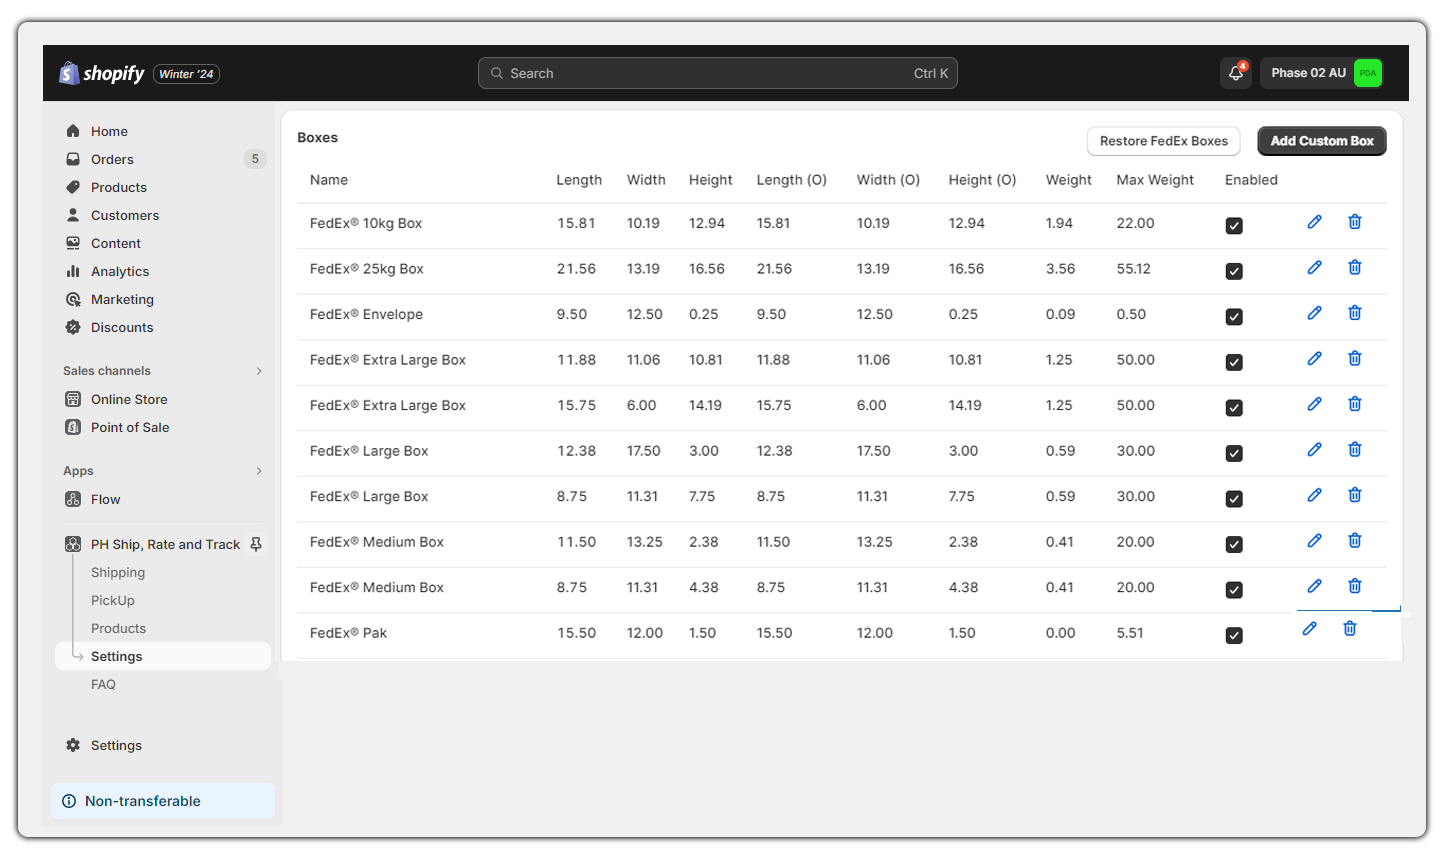
To use FedEx flat rate boxes, Navigate to Packaging Settings and set the Packing Method as Box Packing.
Enable the FedEx flat rate boxes as per your requirement and the boxes will be used to calculate shipping rates for your shipments, as shown below:
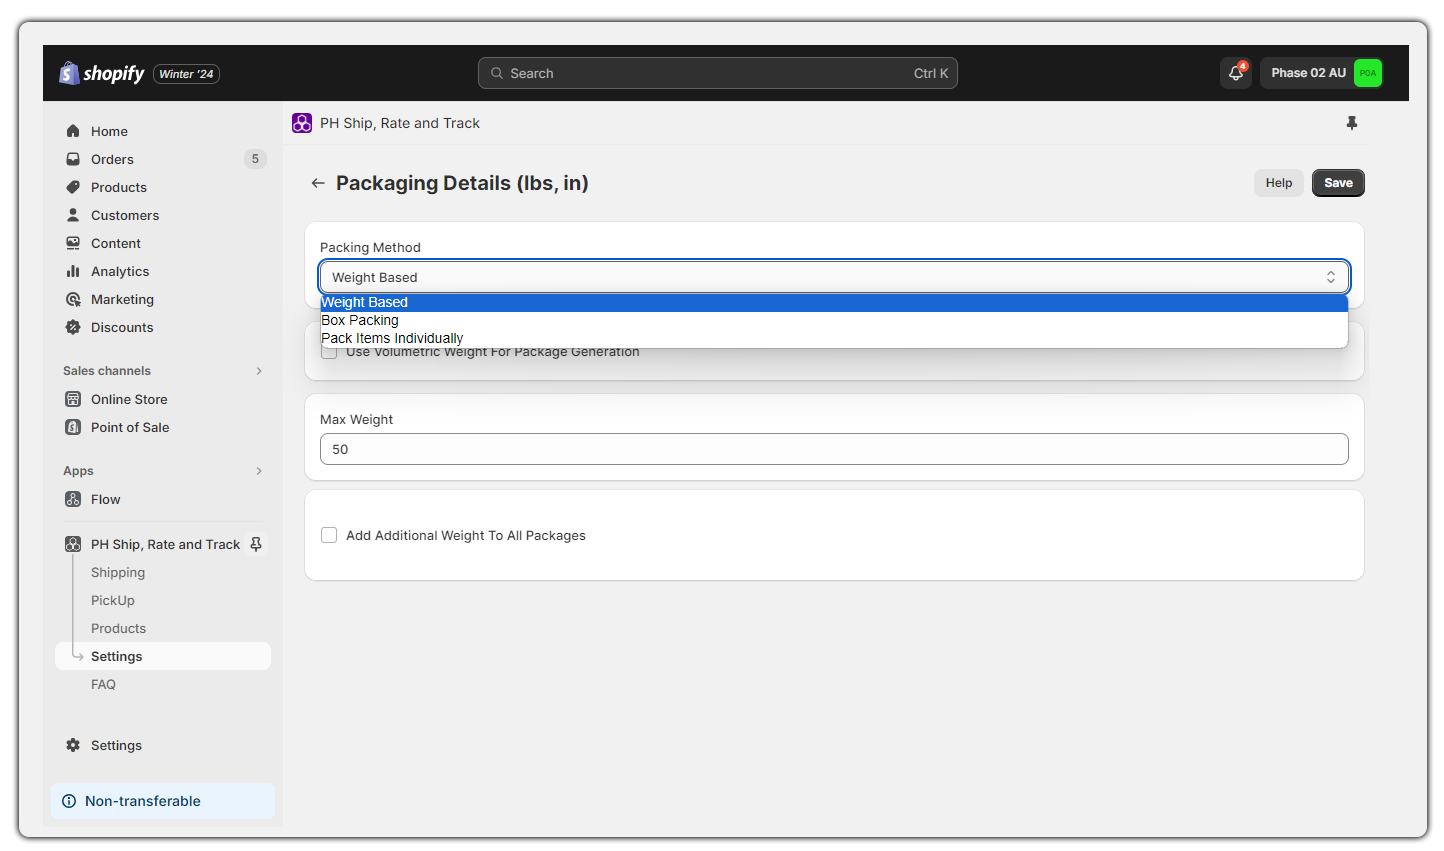
4. Weight-Based Packing
Select the weight-based packing method if you want to pack the products purely based on their weight.
Navigate to the app settings, click on the Packaging Settings, and select Weight Based Packing under the packing methods, as shown below:
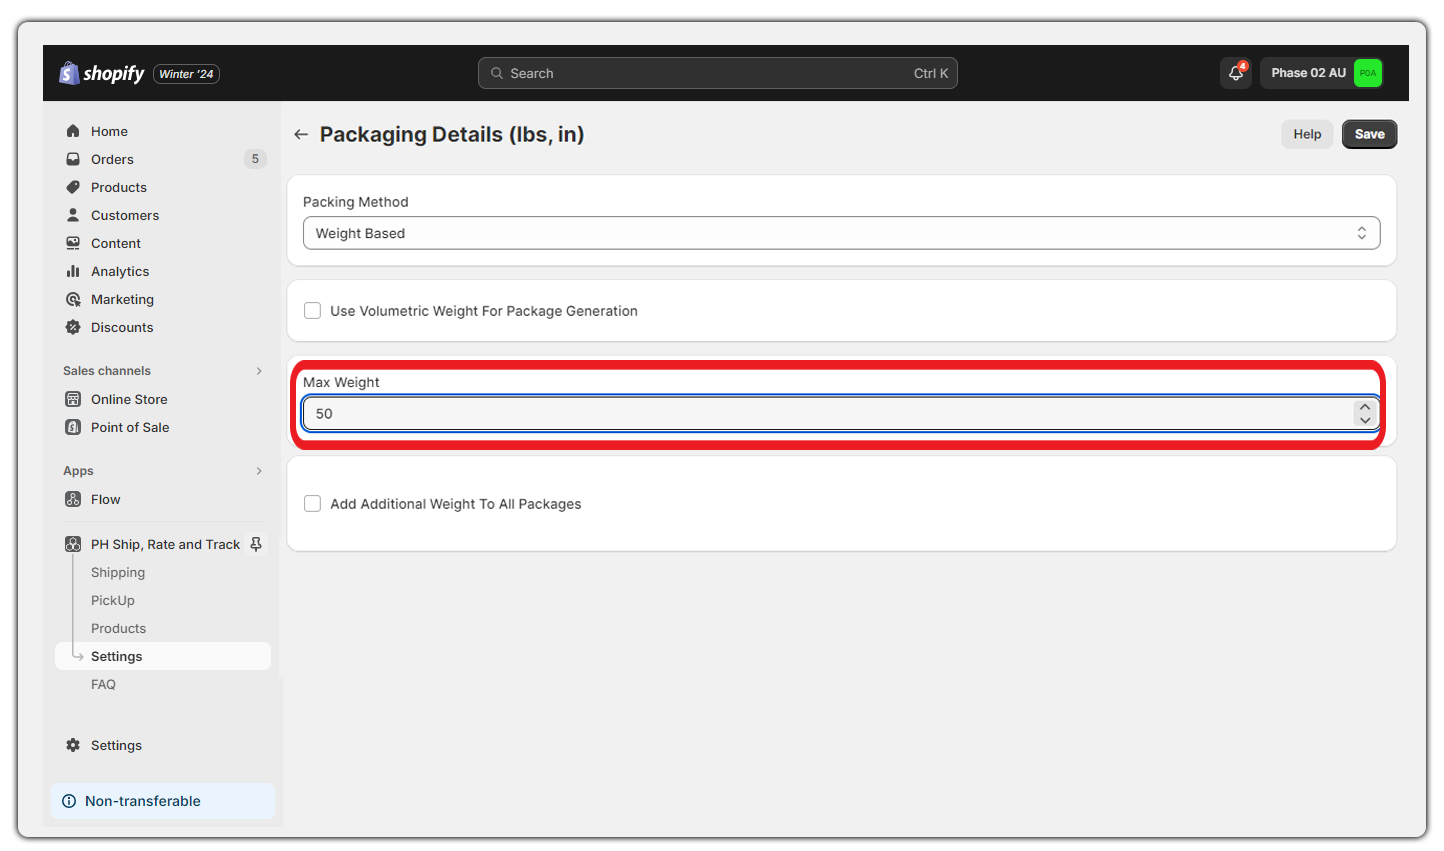
Now add Max Weight which will be the maximum weight that you can pack in a single box as shown in the below image. If the weight of the products exceeds this Max Weight the app will pack the remaining products into the next package.
To know which parcel packing method works best for you, read – How to Pack Products Optimally & Save Shipping Costs
To include the weight of the packaging box in shipping calculations, enable the Add Additional Weight To All Packages option as shown in the image below:
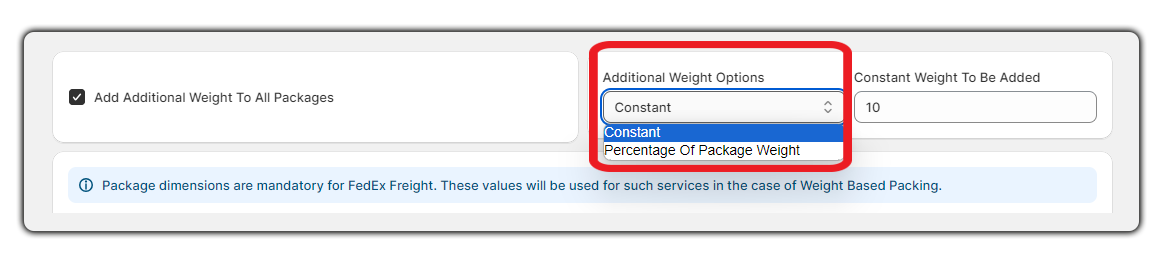
You can add the additional weight using one of two options under Additional weight options:
- Constant – add the value under Constant Weight to be Added
- Percentage of Package Weight – add the percentage under Percentage Of Package Weight To Be Added
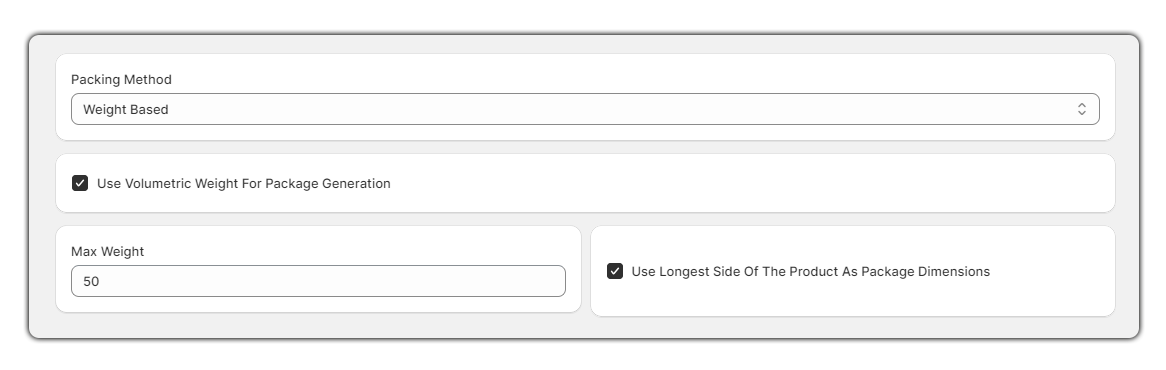
5. Volumetric Weight-Based Packing
For products that take more space yet weigh comparatively less, FedEx calculates the shipping rates based on the volumetric/dimensional weight instead of the actual weight of the shipment.
To consider Volumetric Weight to get the most accurate shipping rates, enable Volumetric Weights by navigating to Packaging Settings as shown below:
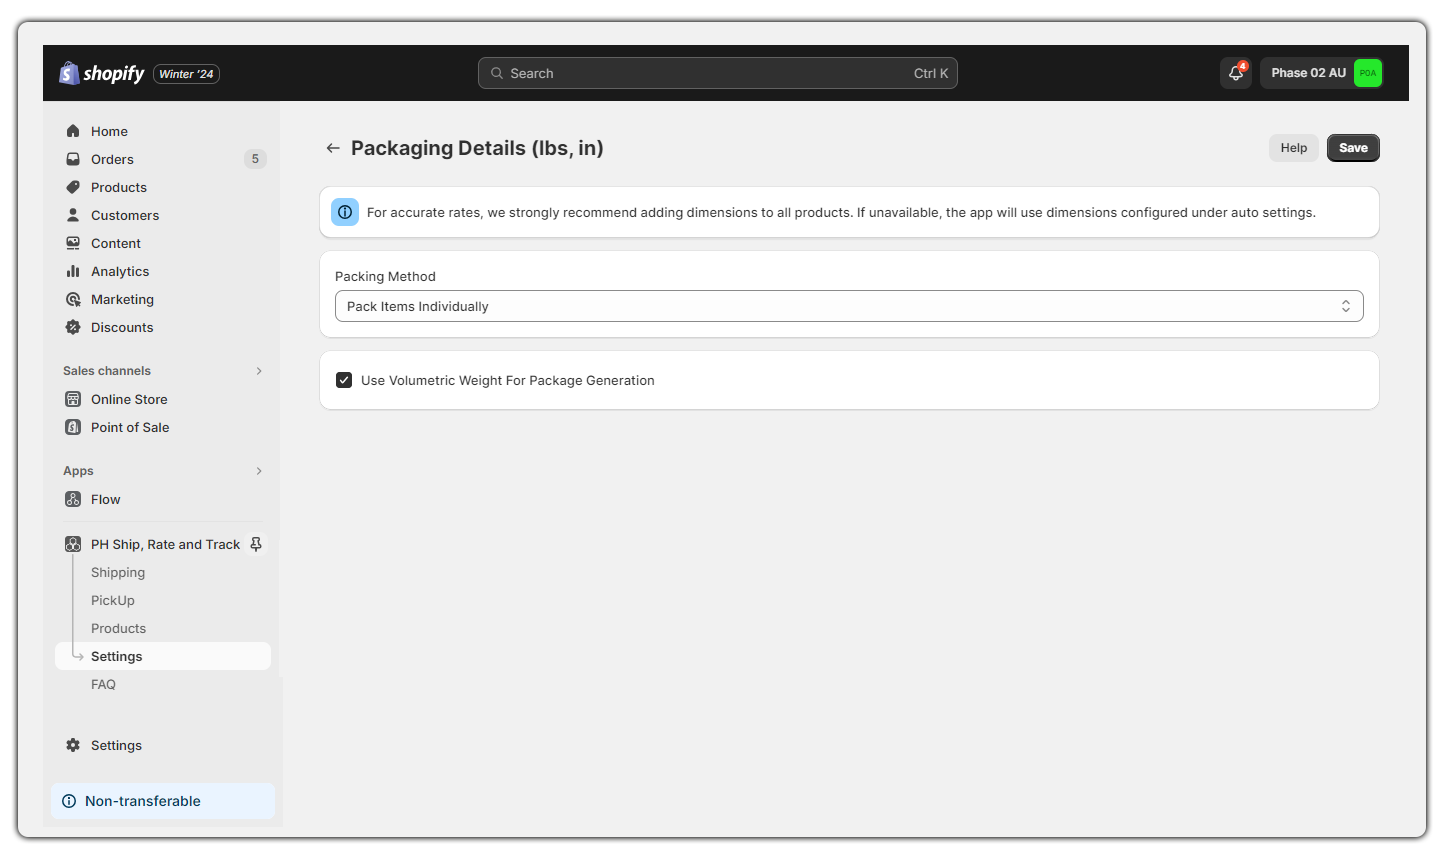
6. Pack Items Individually
If you want to pack each item separately, navigate to Packaging Settings and select Pack Items Individually as shown in the image below:
7. Packaging used for Dangerous Goods
FedEx requires specific packaging to ship dangerous goods. Navigate to Auto Setting → Special Services as shown below:
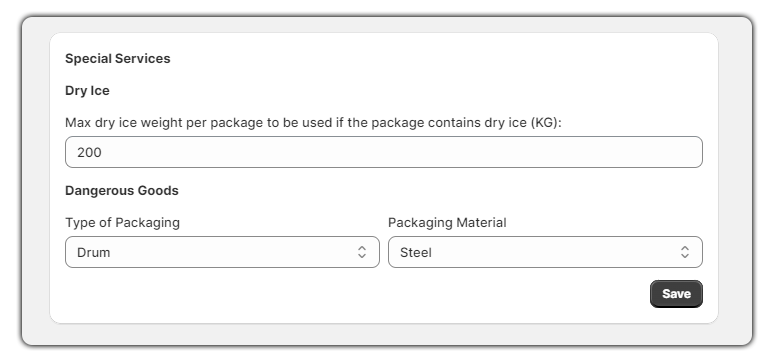
You can specify the following special services:
- Dry Ice – add maximum dry ice weight per package to be used if the package contains dry ice (KG)
- Dangerous Goods – add the type and packaging material used for dangerous goods
If you face any issues or have any queries about the packaging, feel free to contact our customer support.
Configure FedEx Shipping Service(s)
Under the Rates tab, you can see the different services supported by the app. You can “enable” the services according to your requirements and the same will be reflected at the Shopify checkout.
By default, the app supports FedEx shipping services including,
- FedEx Domestic Services
- FedEx International Services
- FedEx Freight Services
- FedEx Saturday Delivery
- FedEx Special Services
1. FedEx Domestic Services
The app supports the following FedEx domestic shipping services:
- FedEx First Overnight
- FedEx Priority Overnight
- FedEx Standard Overnight
- FedEx 2Day A.M
- FedEx 2Day
- FedEx Express Saver
- FedEx Ground
- FedEx Home Delivery
- FedEx Ground Economy
To use any of these services, navigate to Carrier Service and Fallback Service Settings and enable the shipping services under the Carrier Services section, as shown below:

Also, if required, you can add an Adjustment value or an Adjustment (%) for the shipping services. This allows you to add a charge over the shipping costs. Visit Understanding FedEx shipping rates in your Shopify store to know more.
NOTE: By default, all the services will be enabled. You can disable the services that are not required.
2. FedEx International Services
The app supports the following FedEx international shipping services:
- FedEx International Economy
- FedEx International First
- FedEx International Priority
- FedEx Europe First International Priority
- FedEx International Ground
To use any of these services, navigate to Carrier Service and Fallback Service Settings and enable the shipping services under the Carrier Services section, as shown below:

3. FedEx Freight Services
The app supports the following FedEx Freight shipping services:
- FedEx 1Day Freight
- FedEx 2Day Freight
- FedEx 3Day Freight
- FedEx International Economy Freight
- FedEx International Priority Freight
- FedEx Freight
- FedEx National Freight
- FedEx Freight Priority
- FedEx Freight Economy
- FedEx First Freight
To enable the FedEx Freight Services option, navigate to App settings → Account Details → Enable “FedEx Freight”, as shown below:
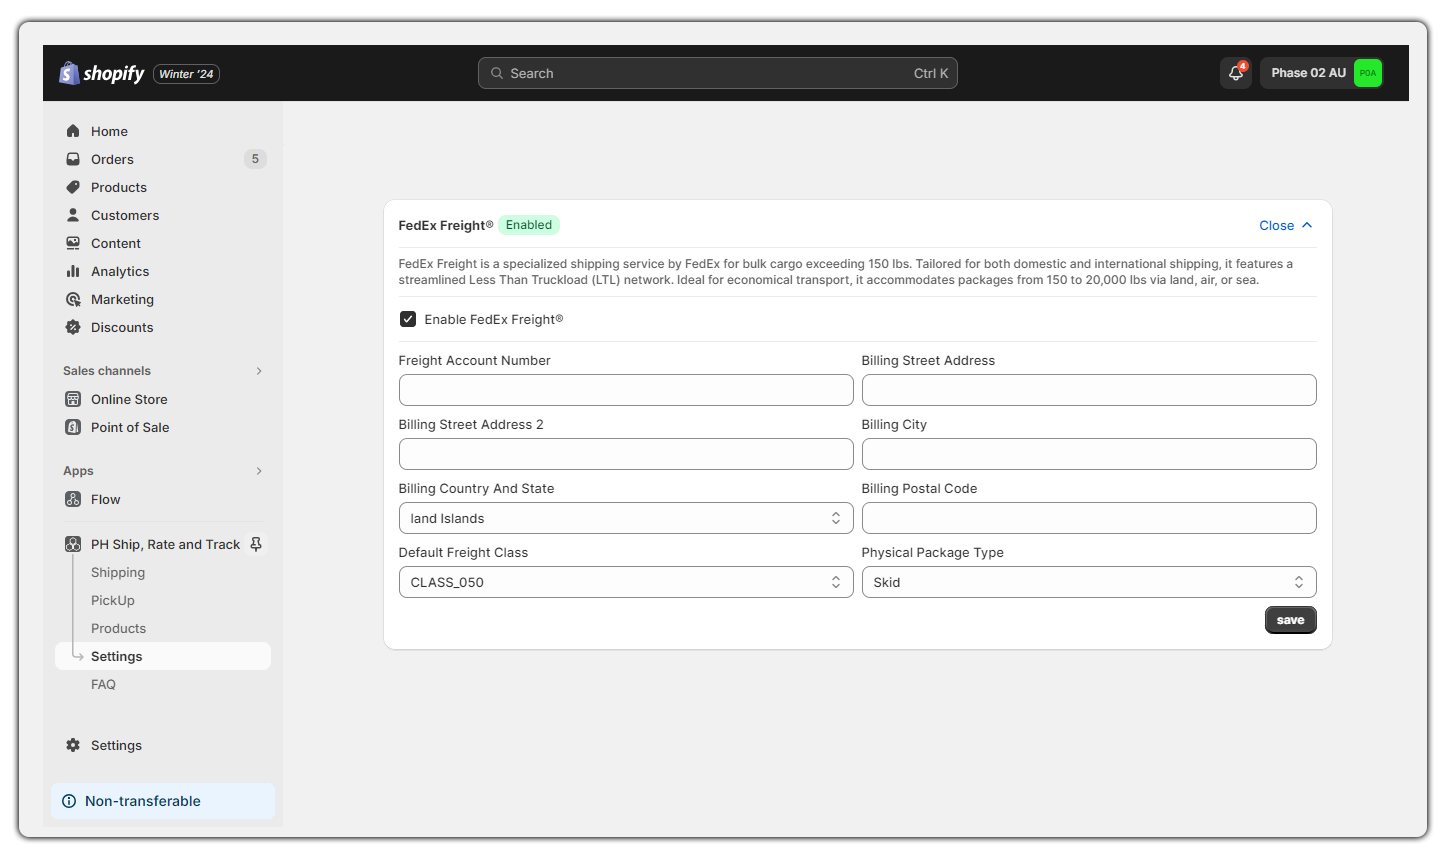
Add the following details:
- Freight Account Number
- Billing Address
- Default Freight Class
- Physical Package Type
Once added the details click on Save.
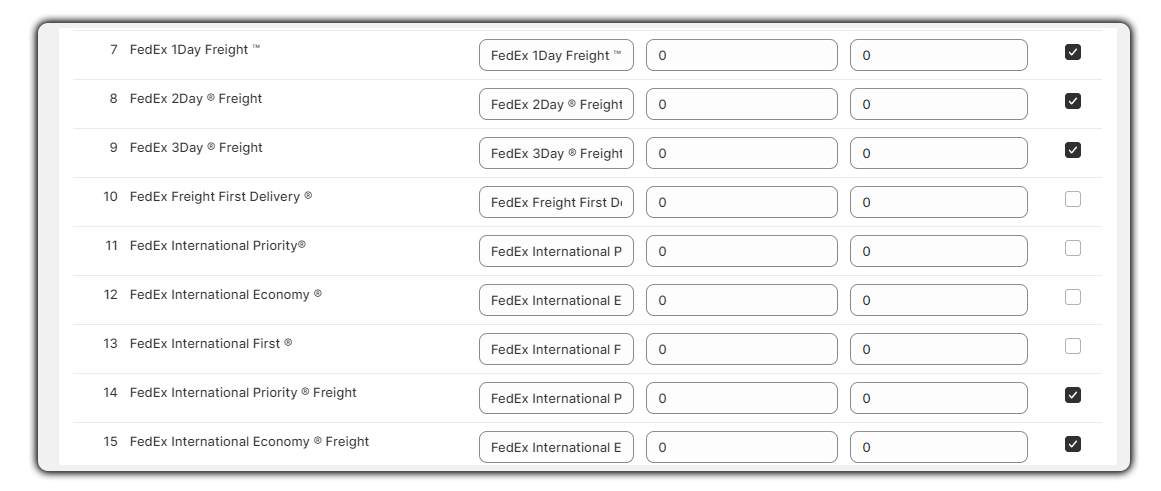
To use freight services, navigate to Carrier Service and Fallback Service Settings and enable the shipping services under the Carrier Services section, as shown below:
Read more to know about how to fulfill an order using FedEx Freight Services – FedEx Freight Shipping for Shopify
4. FedEx Saturday Delivery
To enable the FedEx Saturday Delivery option, head to App settings Account Details Enable “FedEx Saturday Delivery”, as shown below:
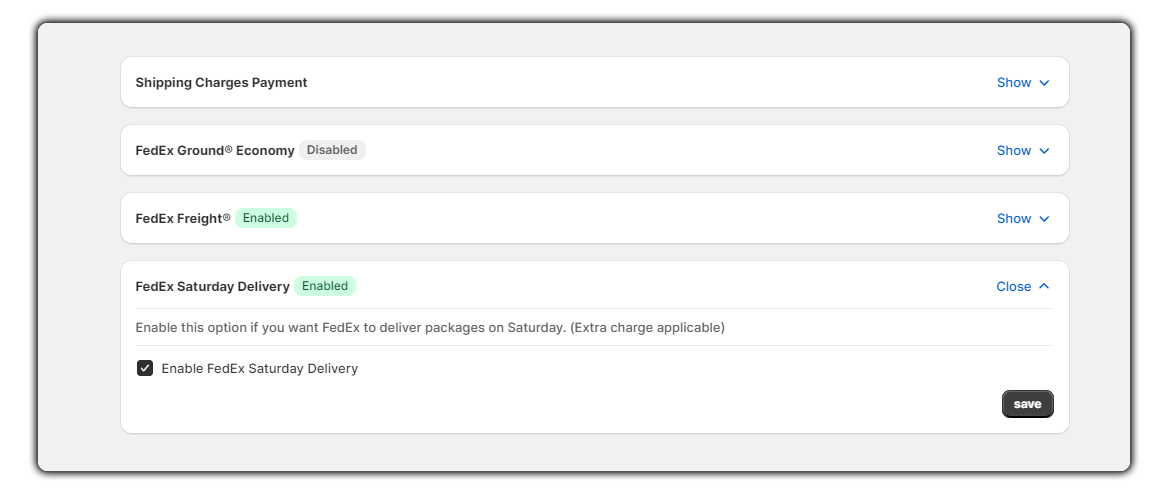
Using the FedEx Saturday Delivery option will lead to a surcharge that will increase the shipping cost as shown below:
* $16 per package for FedEx Priority Overnight, FedEx 2Day & FedEx First Overnight
* $16 per package for FedEx International Priority Express & FedEx International Priority
* $210 per package for FedEx 1Day Freight, FedEx 2Day Freight, FedEx First Overnight Freight & FedEx International Priority Overnight Freight
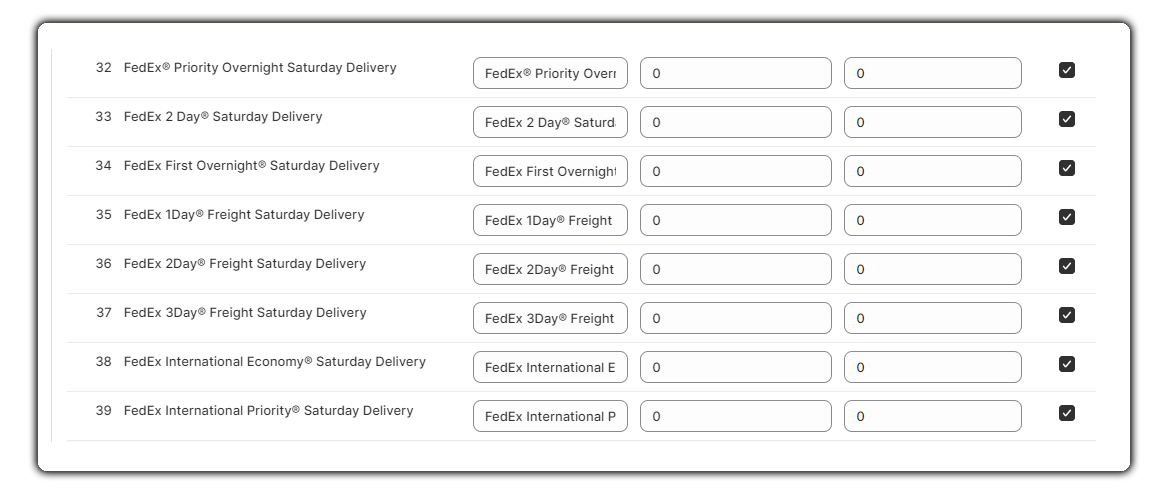
Now, you need to choose the required FedEx Saturday Delivery services.
Navigate to App settings → Carrier Service and Fallback Service Settings. Under this section, you will be able to see all the FedEx Saturday Delivery services supported by the app as shown below:
5. Estimated Delivery Time & Buffer Time for Estimated Delivery in Hours
The estimated time of delivery is the time and date that a shipment is expected to be delivered at the final destination.
To show FedEx’s estimated delivery time at Shopify checkout then navigate to Settings → Checkout Page Rates Settings → Display Estimated Delivery Time for FedEx Services as shown below:
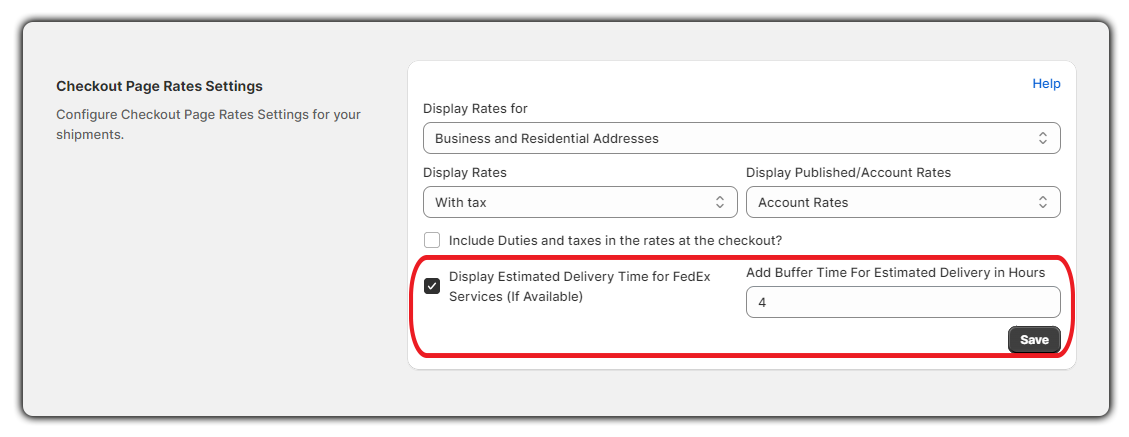
If you want to extend the delivery days you can add buffer time under Add Buffer Time For Estimated Delivery in Hours.
6. FedEx Special Services
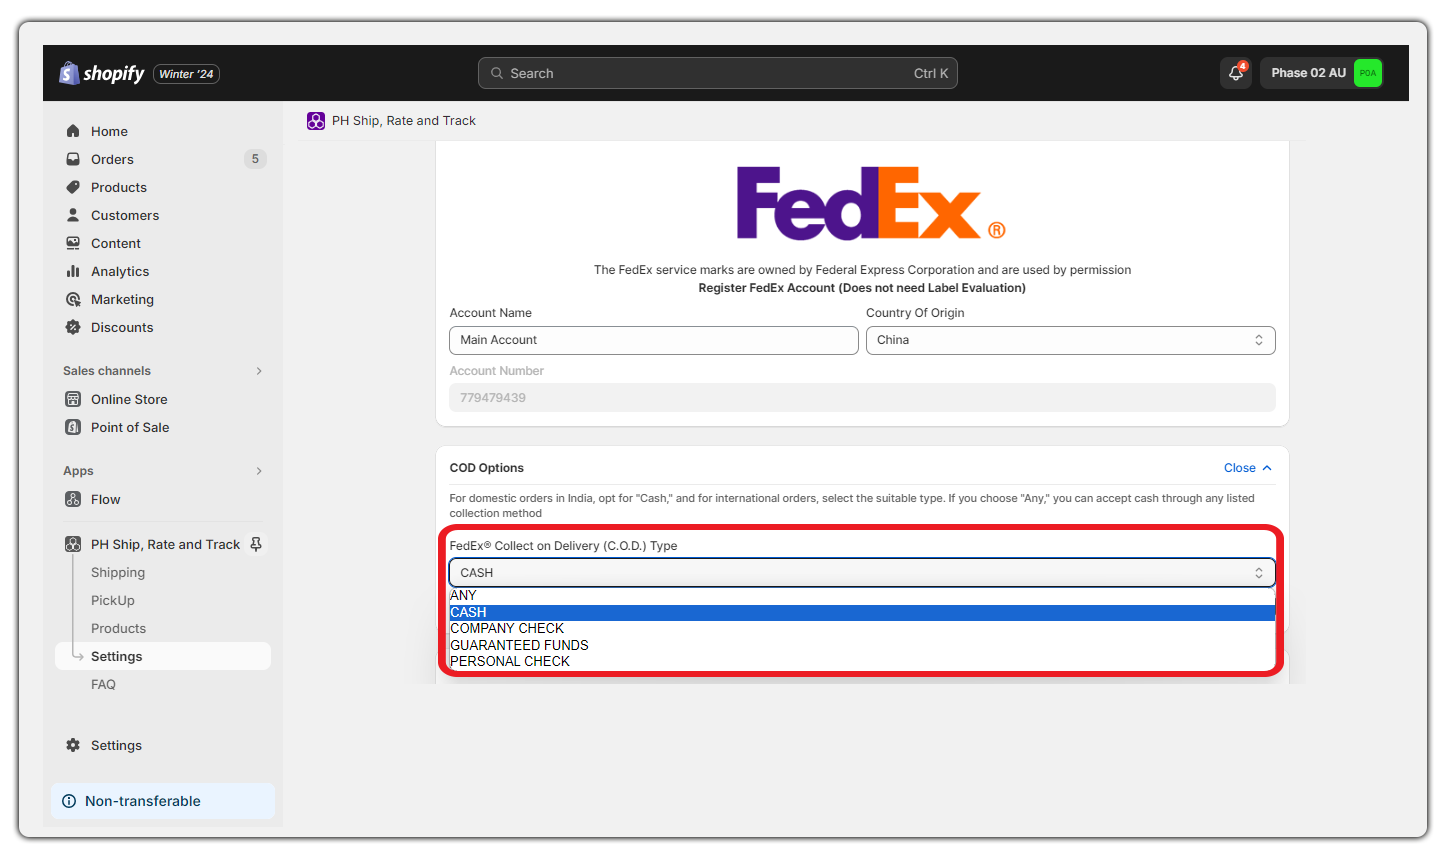
FedEx® Collect on Delivery (C.O.D.) Type
FedEx® Collect on Delivery allows the merchant to collect the ‘Invoice value of goods’ when goods are delivered.
It allows payment of the consignment from the Recipient through Cash / Cheque / Demand Draft / Pays Order in favor of the Shipper/merchant, which is returned to the merchant within 10 working days.
To choose the FedEx COD Type navigate to Accounts Details → COD Options as shown below:
If you face any issues or have any queries about configuring the FedEx shipping services, feel free to contact our customer support.
Display Live Shipping Rates on the Shopify Checkout Page
In order to display shipping rates at checkout, you have to enable the following:
* Carrier-Calculated Shipping on your Shopify store
* Ship Rate & Track app under your Shopify Shipping Profile
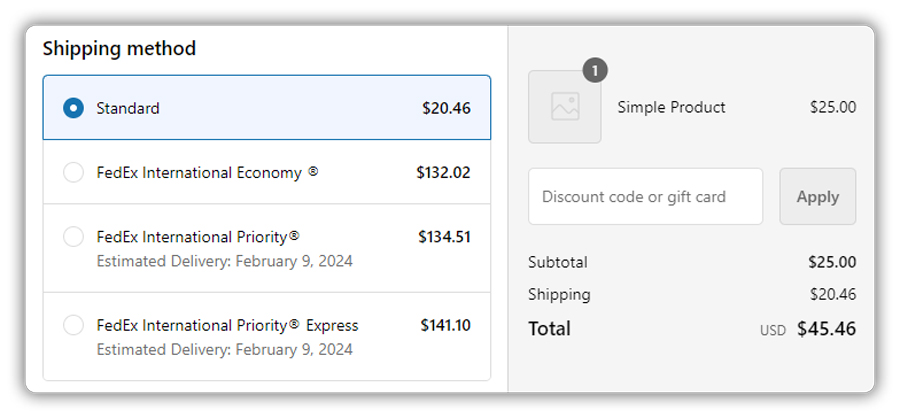
Visit the Shop page, add a product to the cart and proceed to checkout.
After filling in the shipping address, the app will display FedEx shipping rates on the Shopify checkout page as shown below:
To know more about the measures to be taken before you print the FedEx shipping labels in bulk, follow the best practice for printing live FedEx shipping labels using the Shopify FedEx app.
Print FedEx Shipping Labels
Before printing your first shipping label using the application:
* Make sure your orders are marked as “Unfulfilled”.
* You will not be able to print the shipping labels for orders marked as “Fulfilled”, “Draft”, “Archived”, etc.
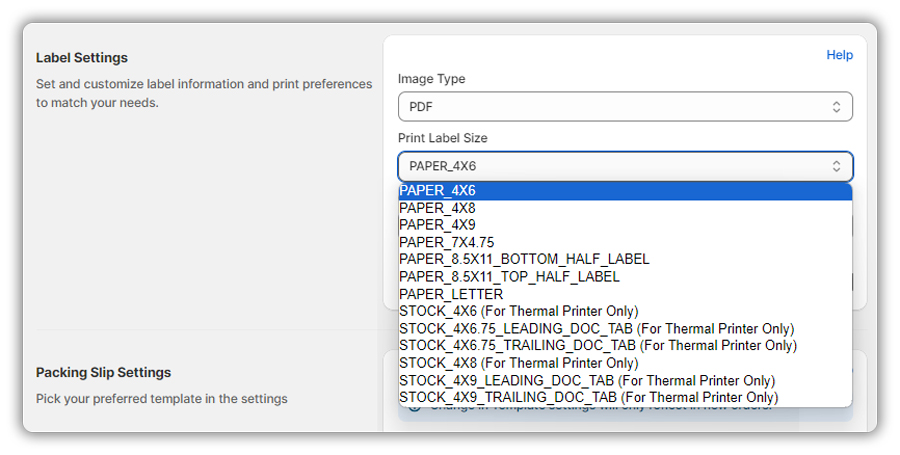
Before printing your FedEx shipping label, configure the label settings under the Documents tab.
- Choose the Print Label Size & select “Paper 4 x 6” or “Paper 4 x 8” if you are using the label printer to print shipping labels as shown below:
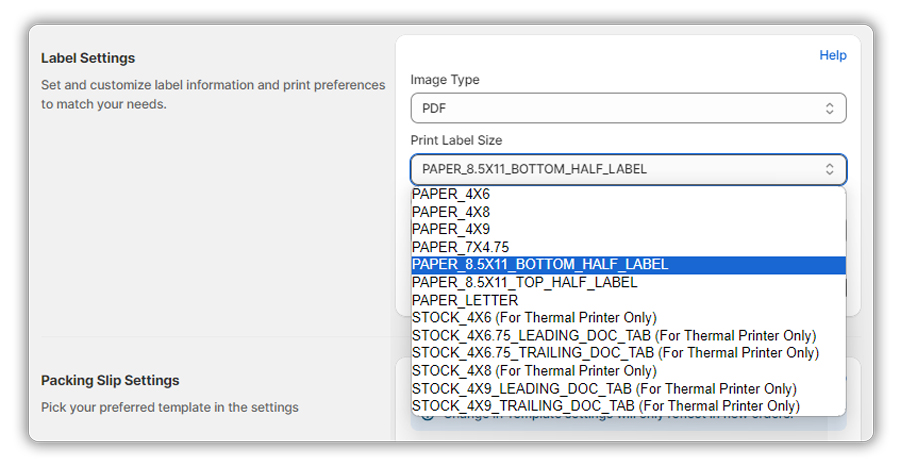
- Or, select “Paper 8.5 x 11 Bottom Half Label” if you are using a conventional printer to print shipping labels on a full-size (A4) page as shown below:
Set the number of copies that you want to print for each label type. Currently, the app supports a maximum of 5 copies for each label.
Navigate to Settings → Label Settings → Print Settings as shown below:

1. Print FedEx Shipping Labels for Multiple Shopify Orders With a Single Click
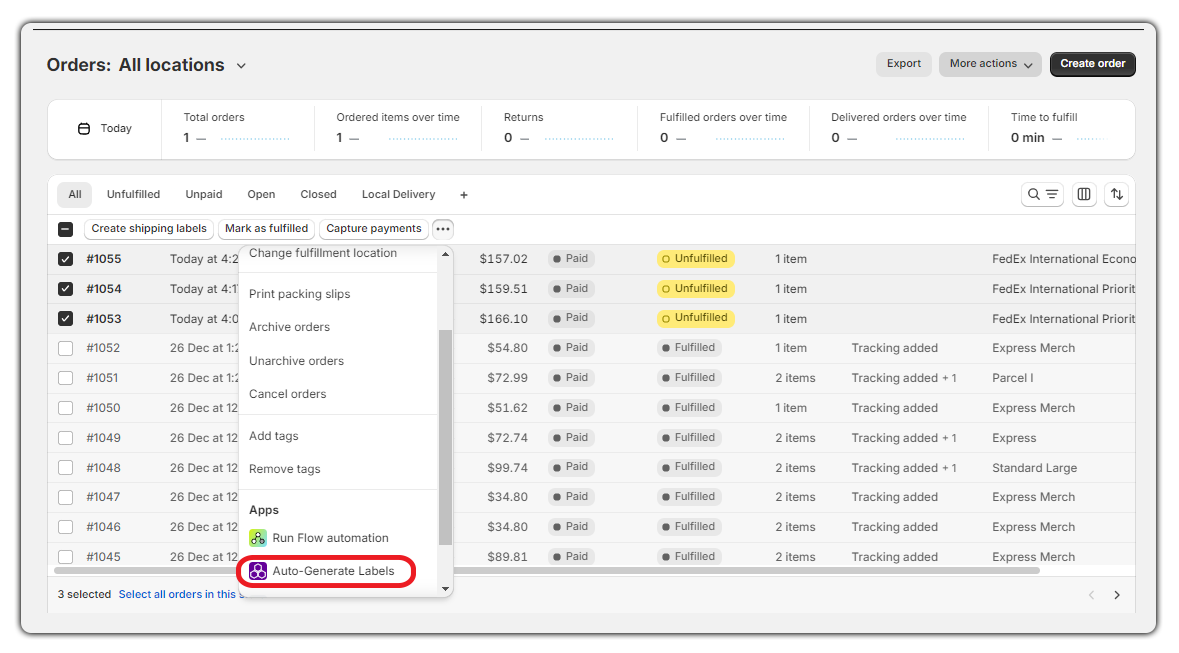
To print FedEx shipping labels for multiple orders from your Shopify, follow the steps below:
- Go to the Shopify Order details page.
- Select the order for which you want to generate a FedEx shipping label.
- Under More Actions, click on Auto-Generate Labels, as shown below:
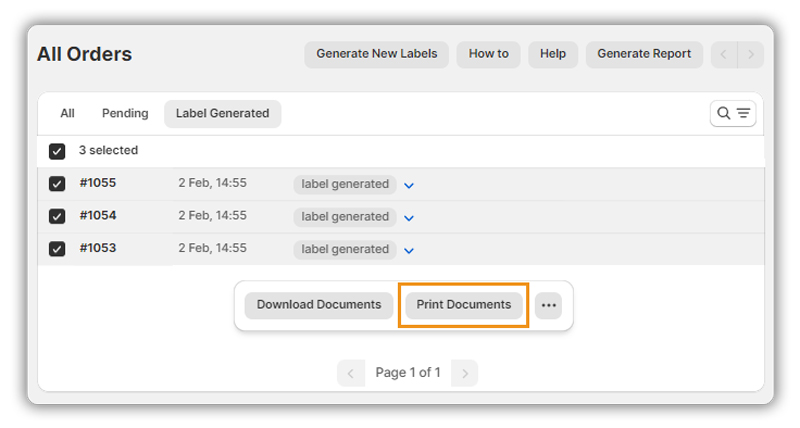
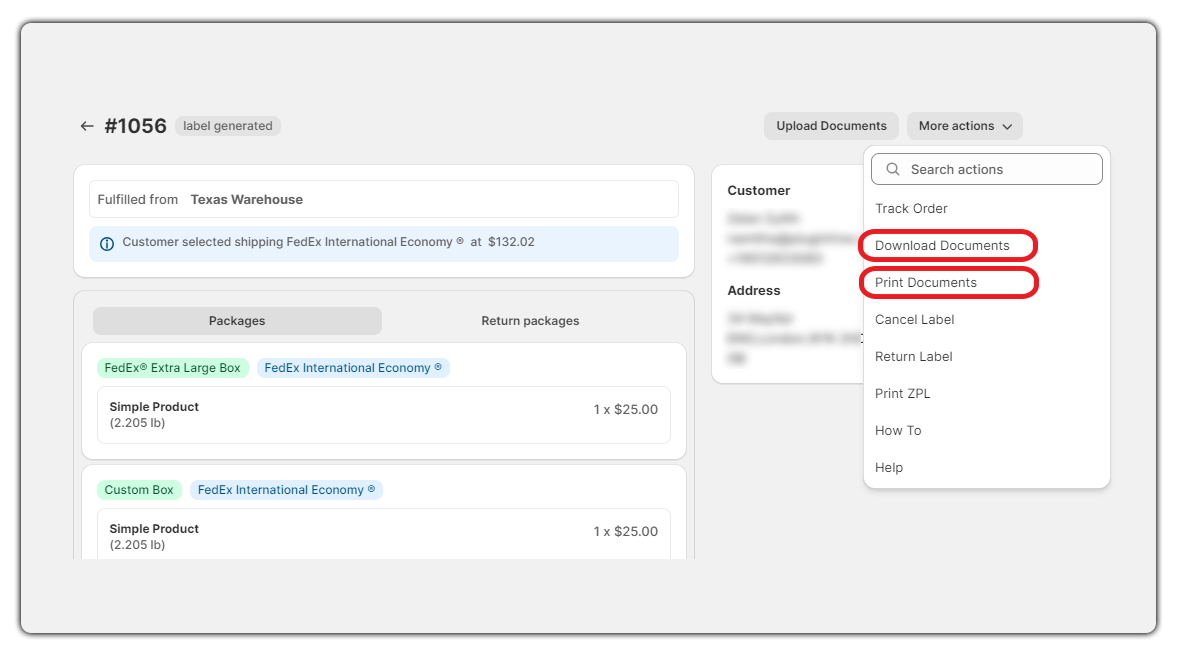
- This will redirect you to the Shipping section. Under the Label Generated section, print FedEx shipping labels for all the orders by clicking on the Print Documents option as shown below:
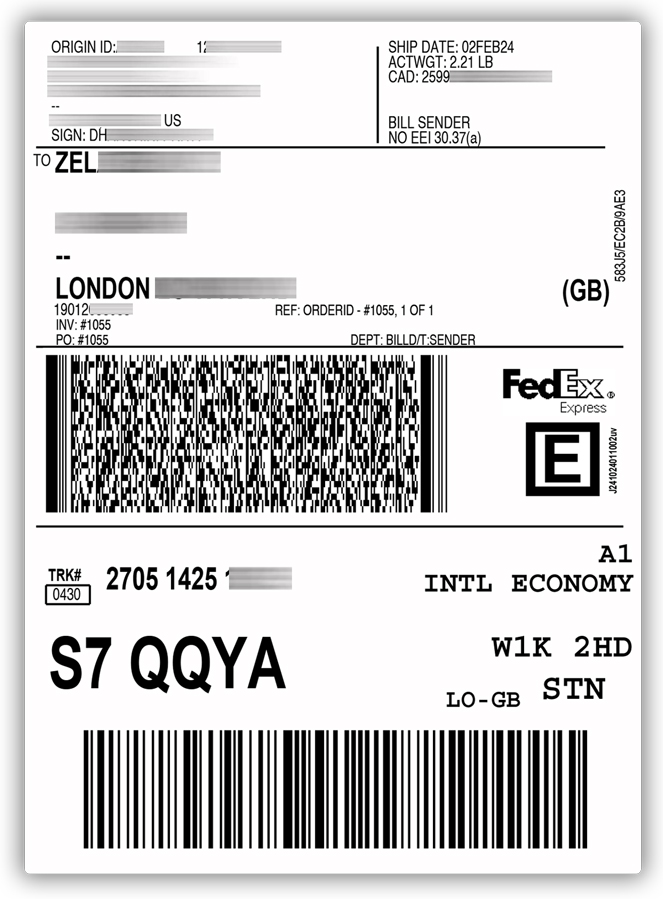
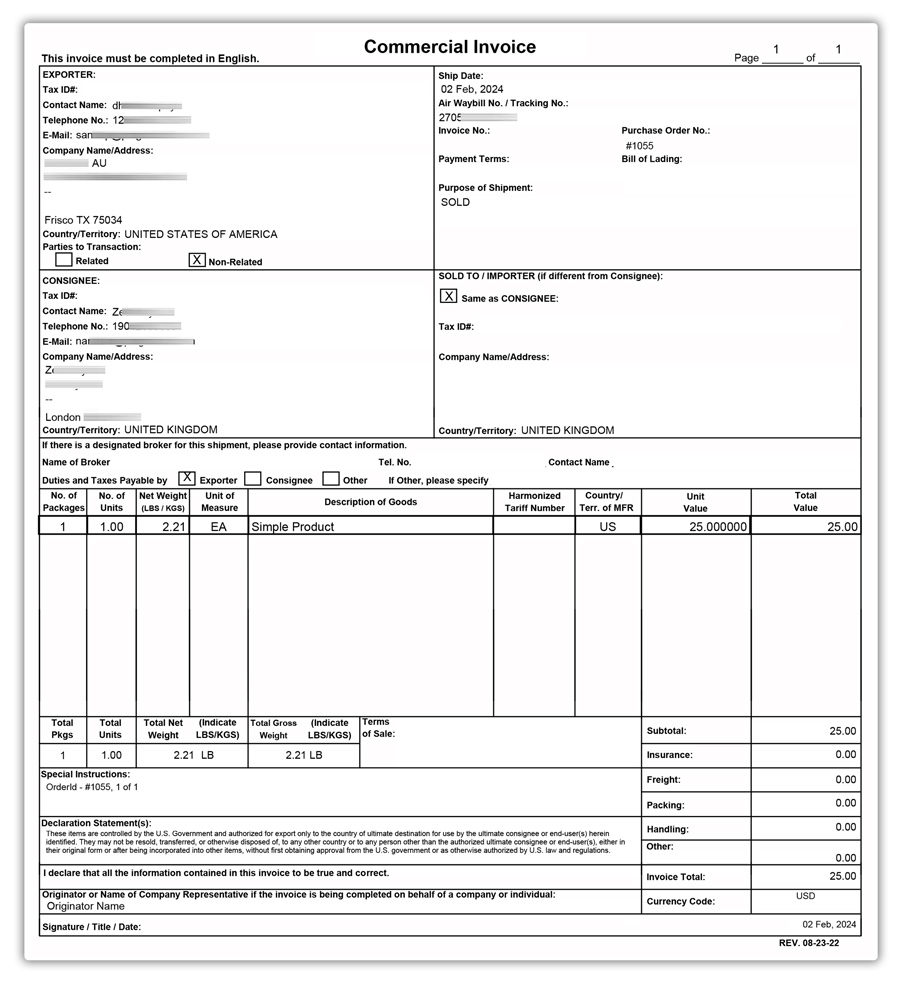
Sample FedEx shipping label and Commercial Invoice is shown below:
2. Print FedEx Shipping Labels With Custom Options
To print the FedEx shipping label for a single order with custom options, follow the steps below:
- Go to the Shopify Order details page.
- Select the order for which you want to generate a FedEx shipping label.
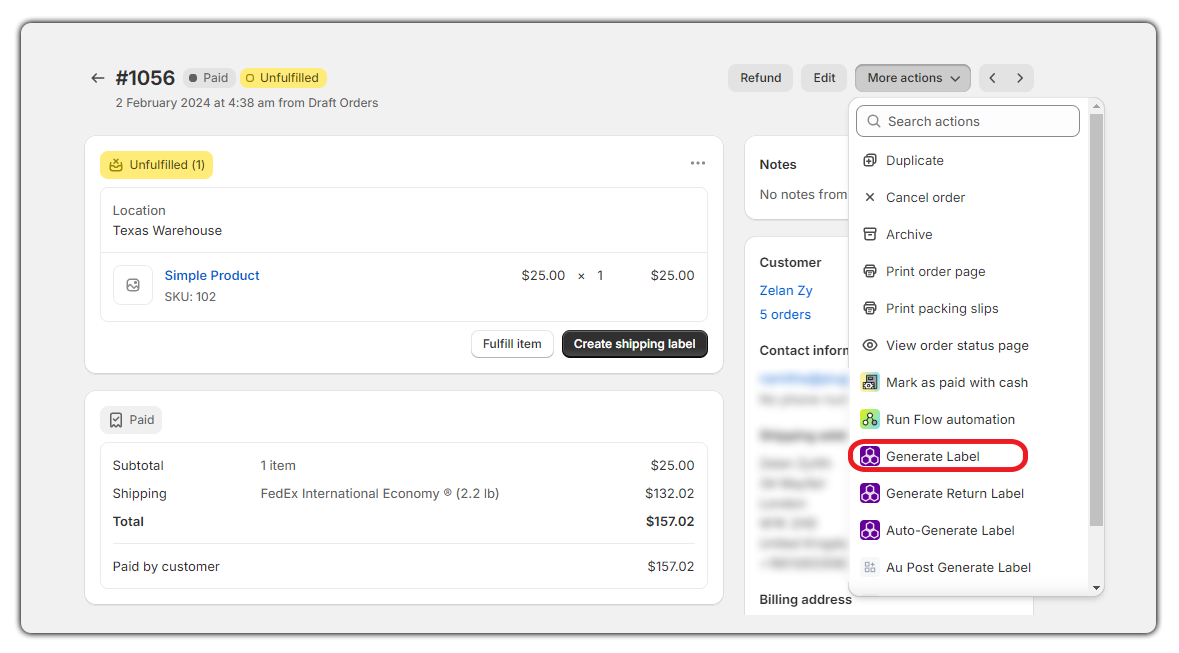
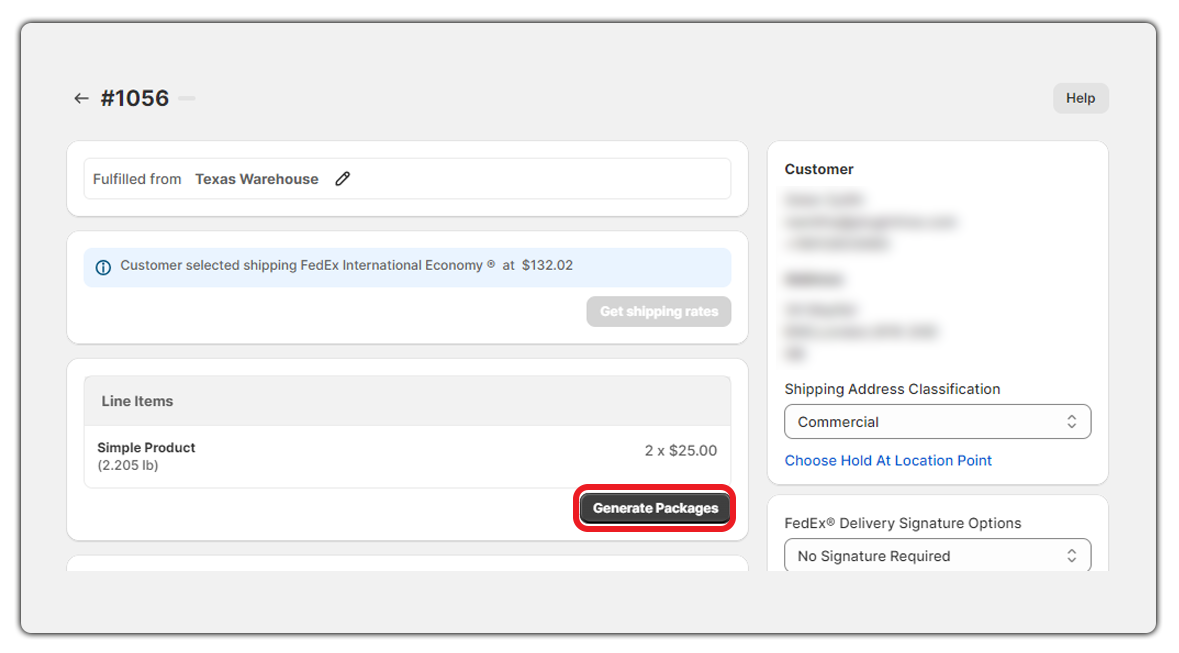
- Under More actions, click on Generate Label to manually generate FedEx shipping labels for the selected order as shown below:
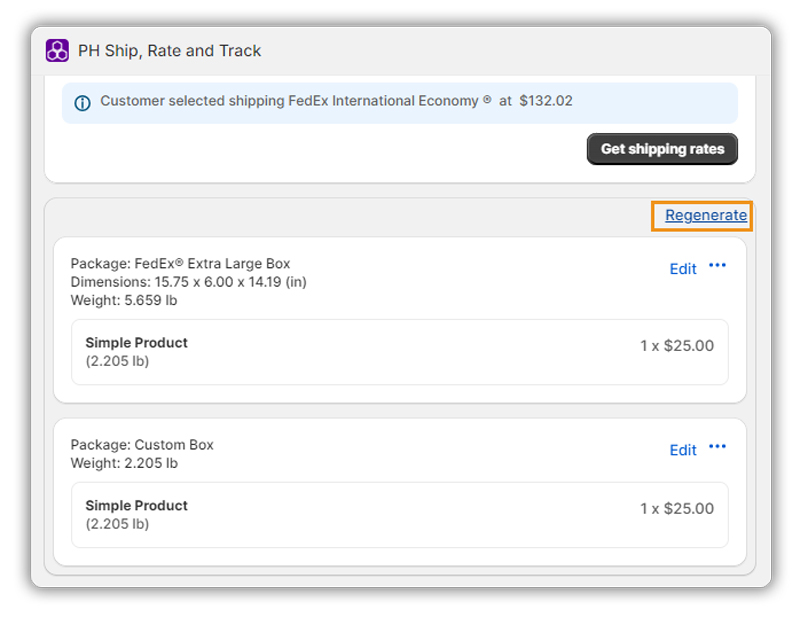
Click on Generate Package to generate the packages as shown below:
Now you can edit, split, remove, or regenerate the packages according to your requirements as shown below:
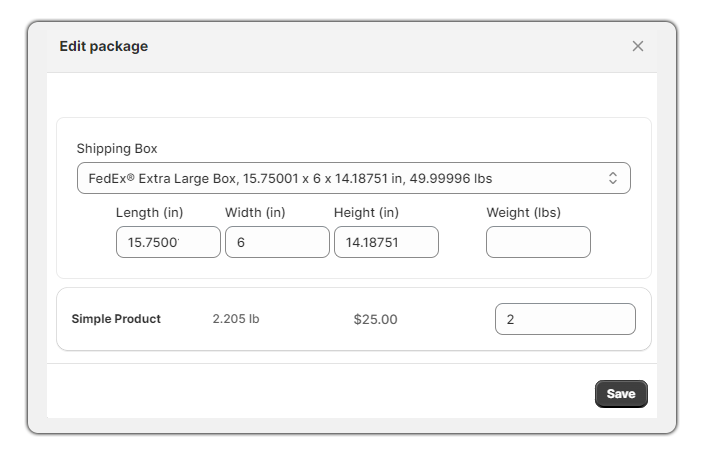
- Edit A Package: By clicking on Edit, you can select the shipping box and the number of products to be added to the box as shown below:
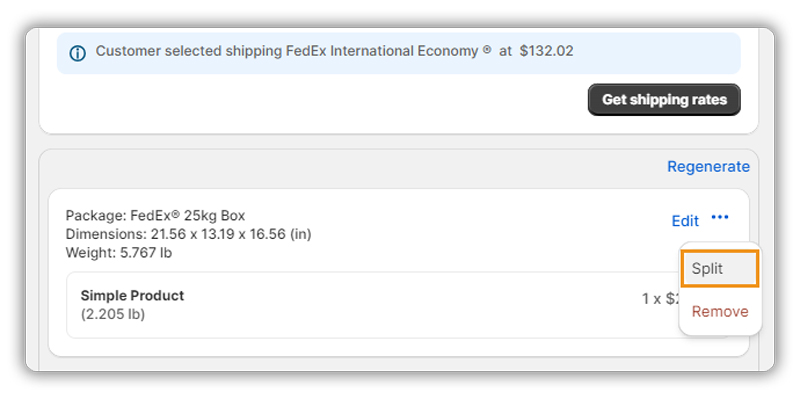
- Split A Package: You can split a package into the required number of boxes using the Split option. To use this option, you need to ensure that only a single product is packed into a box.
- Click on Split as shown below:
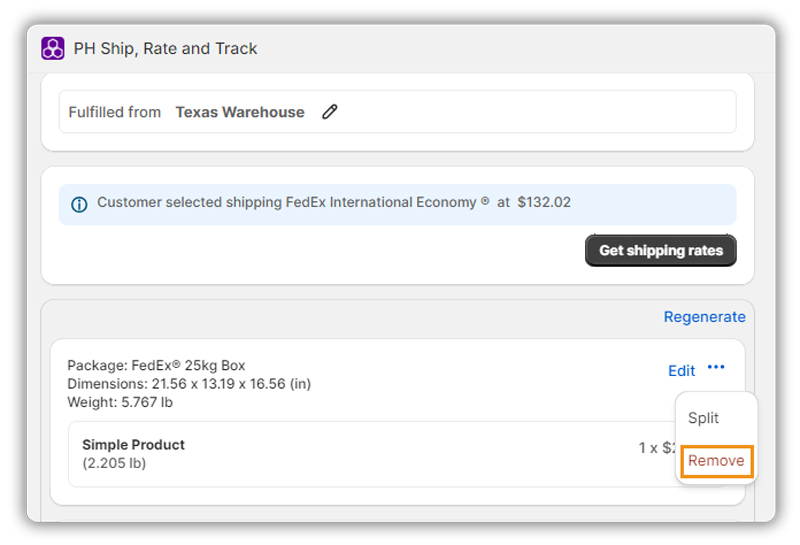
- Remove a package: Now, if you want to remove the existing package click on Remove as shown below:
- Regenerate A Package: Click on Regenerate to regenerate the package as shown below:
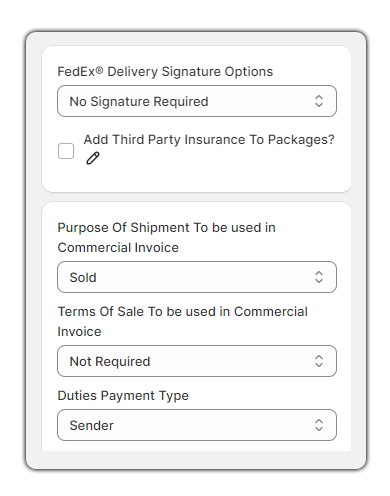
- Insurance (if applicable): To add insurance for your packages enable Add Third Party Insurance To Packages.
- Signature: To add the signature on delivery click on FedEx® Delivery Signature Options and select one from the dropdown.
- Customs duties payer & terms of the sale: For international shipments choose the Duties Payment Type from the dropdown.
Refer to the below image for the options:
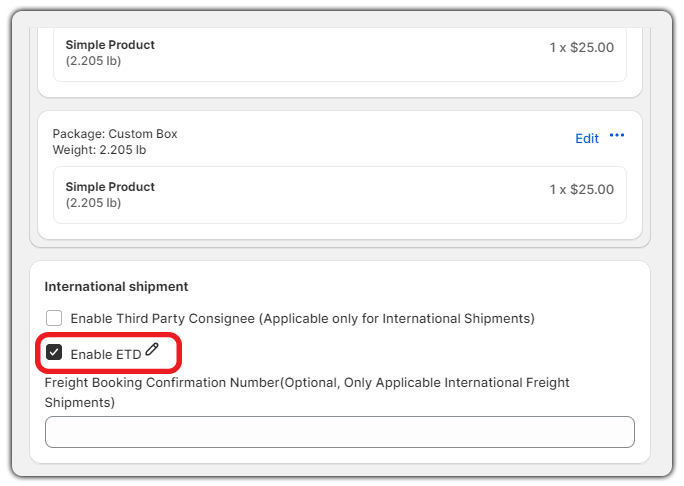
Check the Enable ETD to Electronically Trade Documents as shown below:
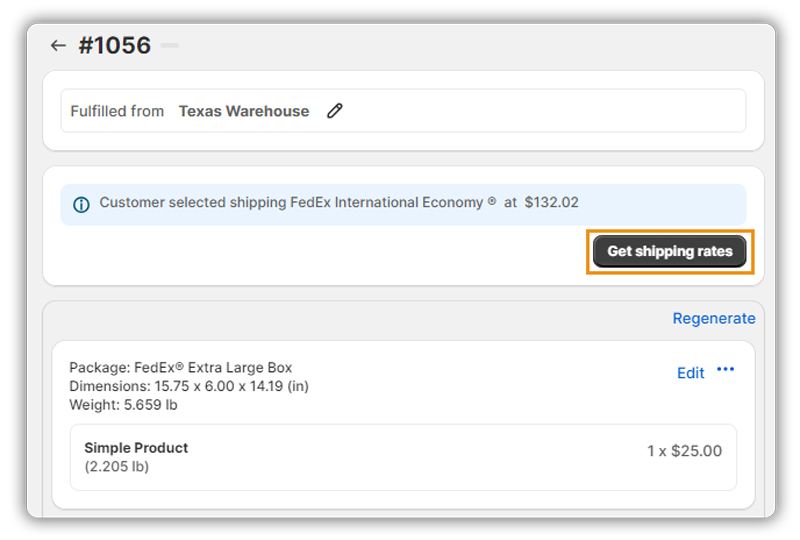
Click Get FedEx Shipping Rates to get shipping rates as shown below:
Now choose a service and click on Generate Label as shown below:

You will be redirected to the order summary page. Click on More Action to print or download documents.
3. Cancel the FedEx Shipping Label
To cancel the FedEx shipping label follow the steps below:
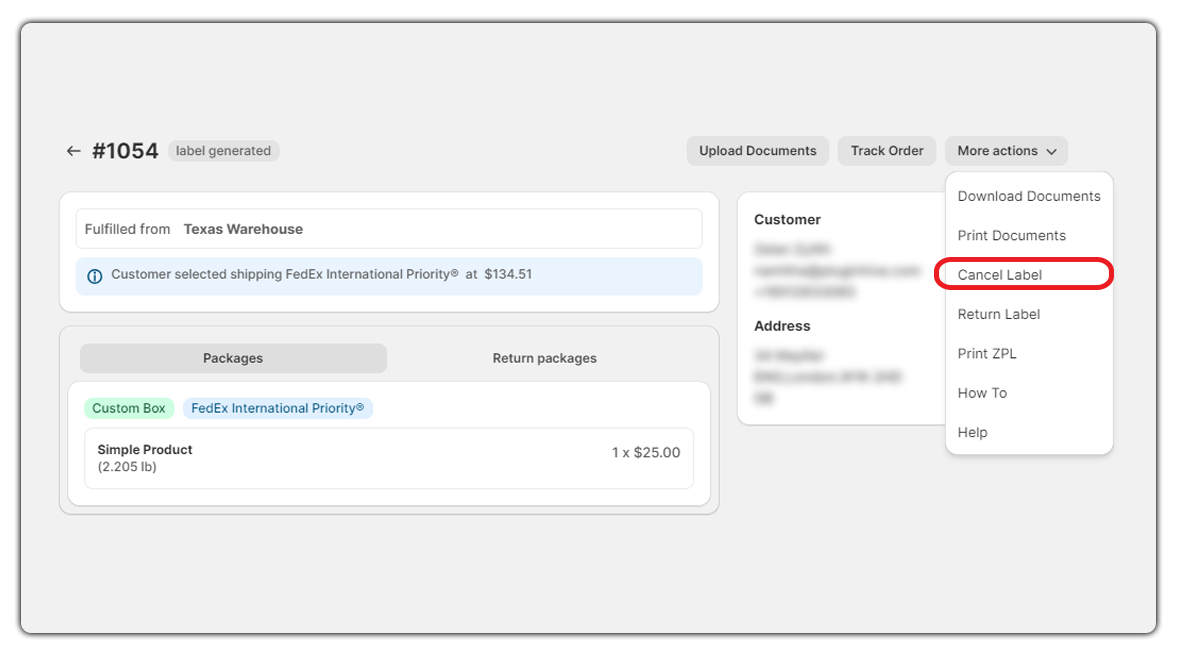
- Go to the Shipping tab under the FedEx Rates, Labels & Tracking App.
- Navigate to the Label Generated section. Click on the order and select More Actions → Cancel Label as shown below:
You will not be able to cancel the following labels using the application:
1. The shipping labels that are generated past 24 hours
2. FedEx LTL Freight shipping labels (Freight Economy & Freight Priority)
To know more on how to cancel these labels, please reach out to your FedEx Account Representative.
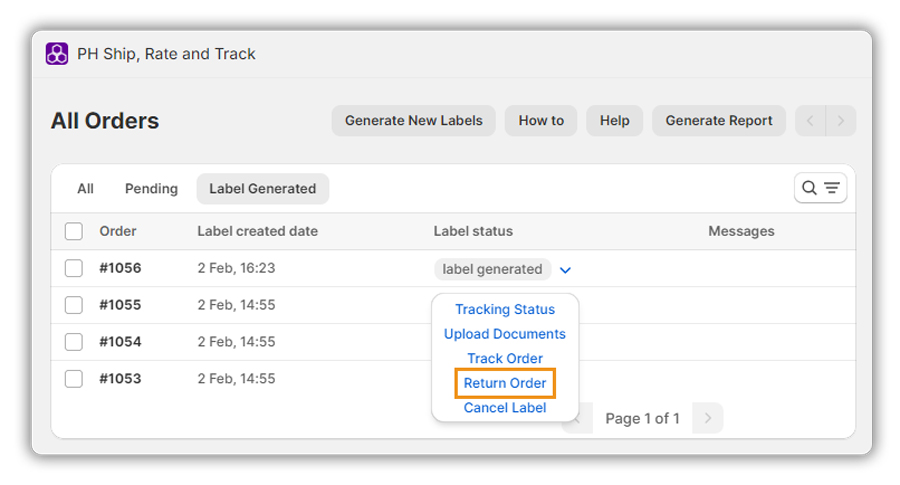
4. FedEx Return Label
To print a return label, navigate to the Shipping → Label Generated. Click on the Label Generated dropdown and select Return Order as shown below:
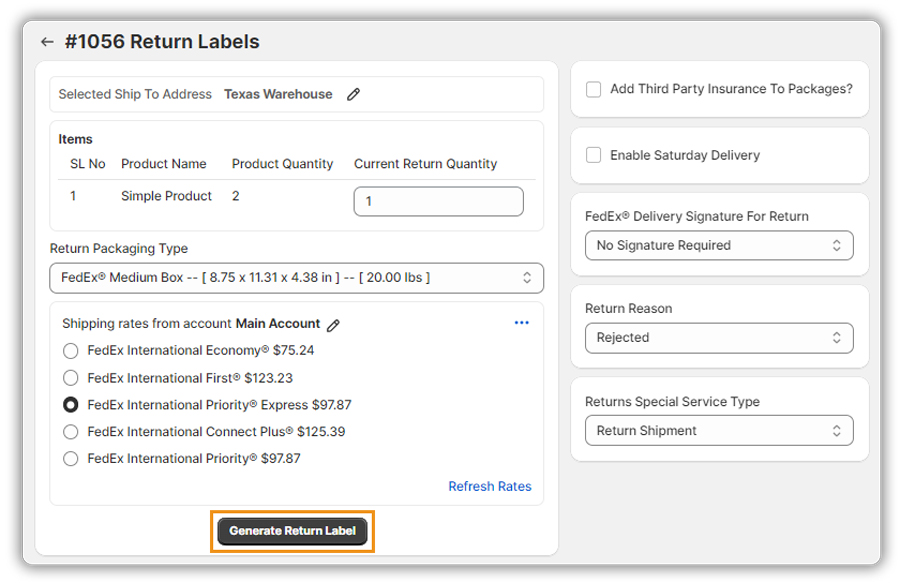
Enter the quantity of products for return and select the packaging type. Click on Refresh Rates to get shipping rates as shown below:
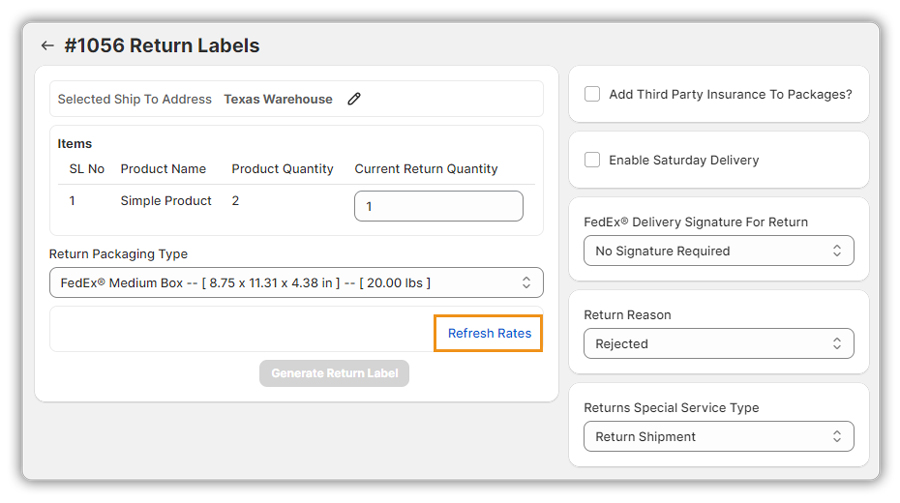
Click on Generate Return Label as shown below:
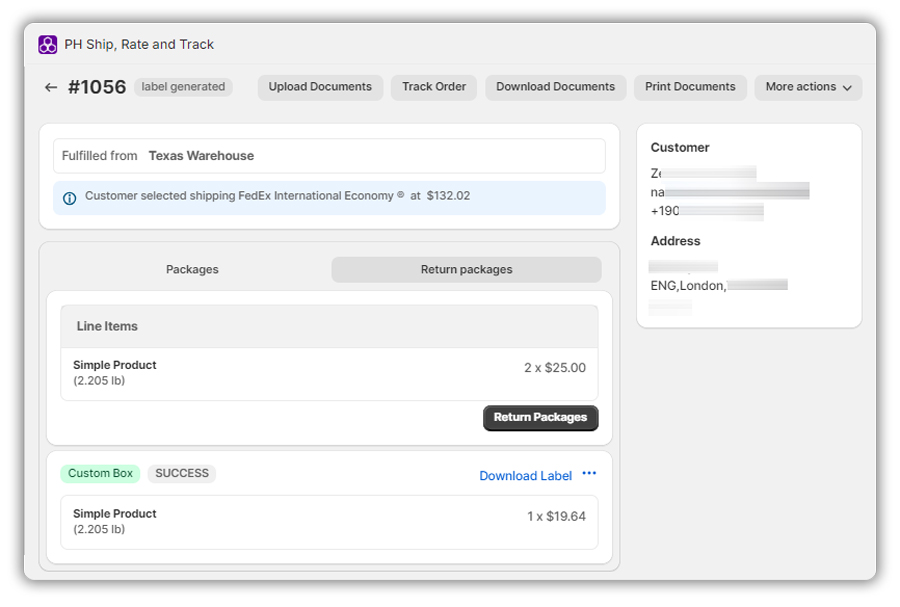
The return label is now generated as shown in the below image.
If you face any difficulty or error while generating the shipping labels, you can contact our support.
Request for a FedEx Pickup and Handle FedEx Tracking
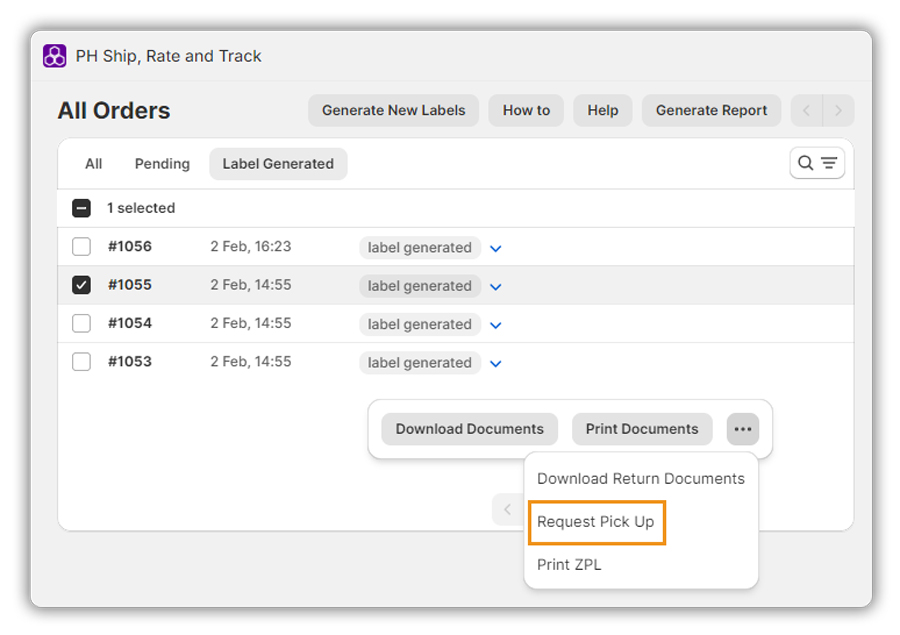
To request FedEx Pickup, navigate to the Shipping tab under the app settings and select the orders you want to request.
Click on Request Pickup to initiate the request for FedEx Pickup as shown below:
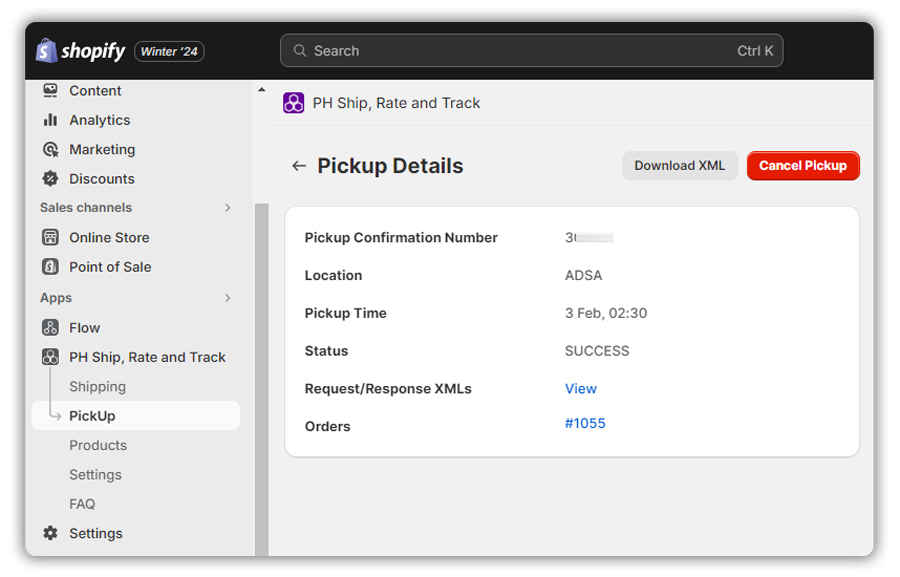
The Pickup page displays the current pickup status along with the pickup number, location, and order number as shown below:
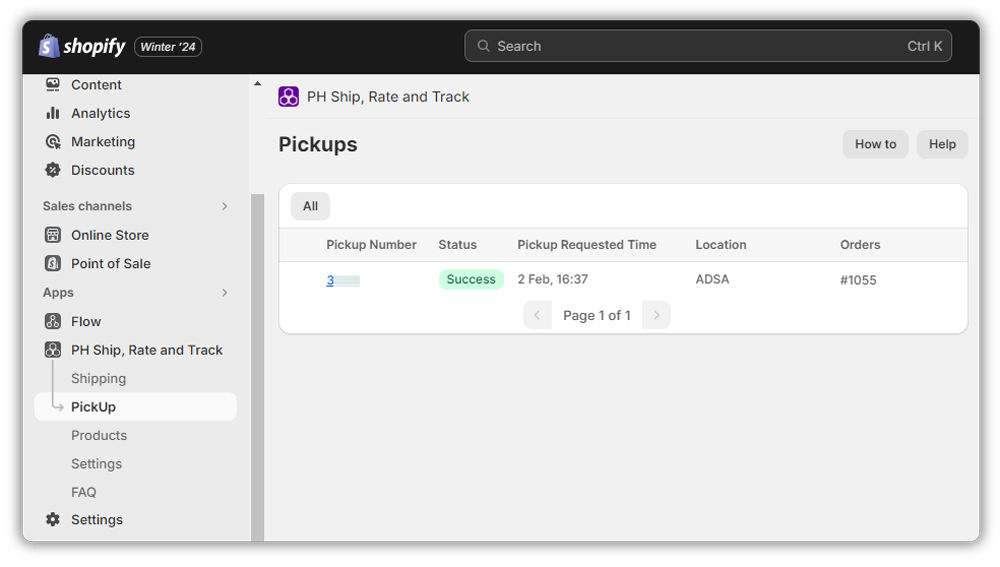
Click on the Pickup Number, to see the Pickup Details as shown below:
When the FedEx agent picks up the package, you can start tracking your orders.
To know the tracking details, click on the Label Generated dropdown, and select Track Shipment as shown below.
To understand the complete process of FedEx pickup and tracking, visit Shopify FedEx shipment tracking and scheduling Pickups
If you face any issues or have any queries, feel free to contact our customer support.
Frequently Asked Questions
- Will I be able to print all customs documents required for international shipments?
- I sell expensive products. Can I make sure the shipment is safe from loss, damage, delay, or misdelivery?
- Will I be able to use the app to print return shipping labels along with the forward shipping labels?
- Is there a way to notify customers directly about the shipment status using the app?
- Can I send shipment tracking updates to customers from my business email ID?
- Can I add more than one FedEx account as I am shipping from multiple warehouses and need separate rates?
- How can I ship from my multiple warehouses using the app?
- I am shipping internationally but I am unable to print shipping labels. What do I need to check for printing FedEx labels?
- My business specializes in manufacturing, exporting, and trading goods. How can I add my Tax Identification Number and TIN Type?
- Can I print Doc Tab Shipping labels with the Shopify FedEx Ship, Rate and Track app?
- Can I display a different address instead of my company’s address on the shipping label?
- Can I generate a Pro Forma Invoice with the app?
- Can I print USMCA Trade Agreement Certificate within the app?
- Can I choose not to show the Company Name on the shipping label as my buyer has a residential address?
- Is there any way to show Flat rates for Domestic and International shipping separately if the FedEx rates are down?
- I want to generate the labels today but want to ship the packages after 3 days. Is it possible with the app?
Q. Will I be able to print all customs documents required for international shipments?
Yes, the app will let you print all customs documents for international shipments.
These documents include,
- FedEx shipping label
- Commercial Invoice
- Tax Invoice
- Packing Slip
If you are looking for any additional documents or facing any issues while printing the above documents, feel free to contact our team.
Check out the Commercial Invoice settings.
Q. I sell expensive products. Can I make sure the shipment is safe from loss, damage, delay, or misdelivery?
Yes, you can use the FedEx Declared Value within the app.
The app lets you set up the declared value for your products. By default, the app sets the declared value of the products as the retail price.
However, you can edit it under the Products section and set up a custom-declared value, as shown below:
The declared value represents the maximum liability of FedEx in case of any loss, damage, delay, or misdelivery, of the shipment.
Read More – Send Declared Value for your shipments to FedEx
Q. Will I be able to use the app to print return shipping labels along with the forward shipping labels?
Yes, the app lets you print both forward and return shipping labels.
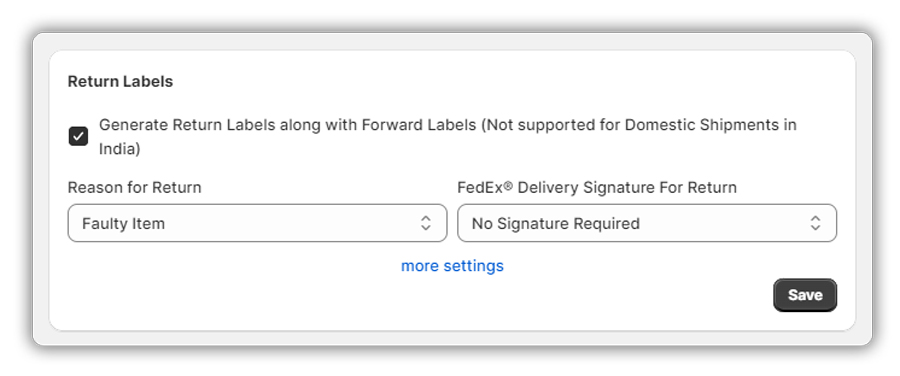
You can print return shipping labels at the same time as printing the forward shipping labels. Or, you can print a return shipping label at the customer’s request.
Make sure to set up the return shipment settings under the app Auto Settings, as shown below:
Read More – How to print FedEx return labels using the app
Q. Is there a way to notify customers directly about the shipment status using the app?
Yes, you can use the FedEx shipment notifications functionality within the app.
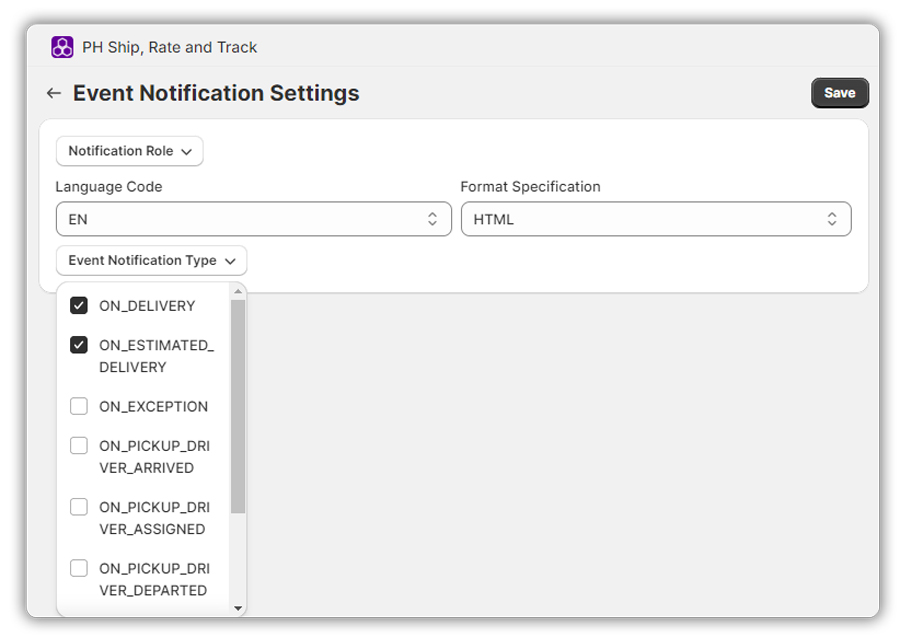
Using FedEx Notifications, the customers will be automatically notified via emails as soon as the shipment status is updated by FedEx. As of now, the email notifications are supported in English and French language.
You can navigate to the app Auto Settings and set up FedEx Event Notifications to send email notifications to your customer automatically, as shown below:
Q. Can I send shipment tracking updates to customers from my business email ID?
Yes, the app lets you send emails to your customers directly from your business email ID.
You are required to set up the SMTP details within the app’s Settings → SMTP Settings, as shown below:
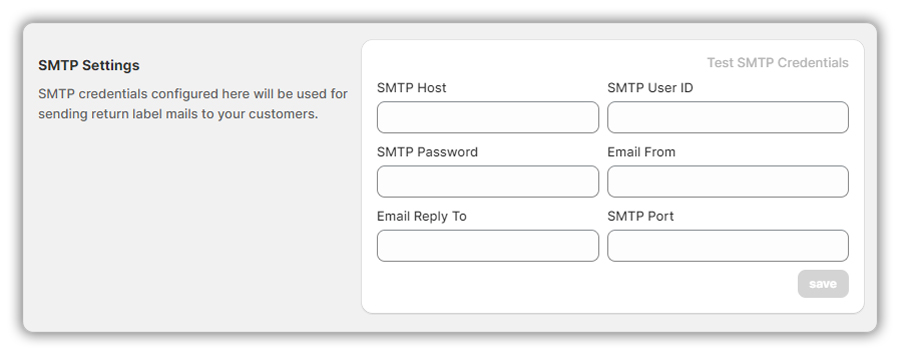
Read More – Configure the SendGrid SMTP credentials & send emails from your email ID
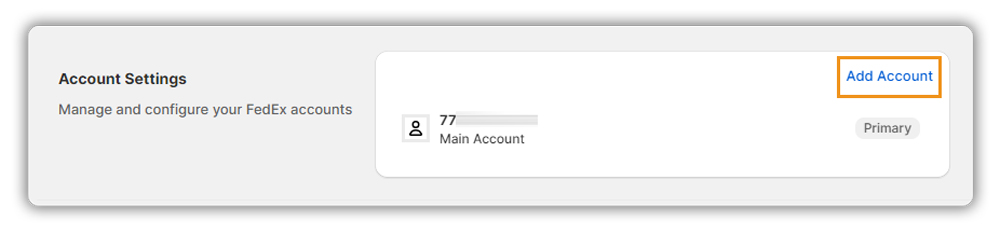
Q. Can I add more than one FedEx account as I am shipping from multiple warehouses and need separate rates?
Yes, you can add multiple FedEx accounts in the Ship, Rate and Track app.
To add additional accounts navigate to Settings → Account Details → Add Account as shown below:
After adding another account, you can also set the Ship To Countries for which you want the checkout rates and print labels with the additional accounts as shown below:
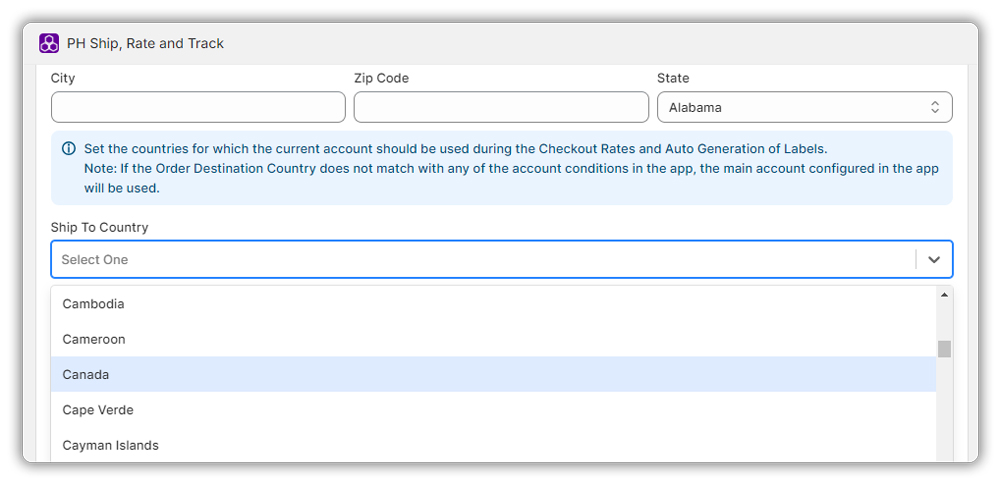
Note: If the Order Destination Country does not match any of the account conditions in the app, the main account configured in the app will be used.
Q. How can I ship from my multiple warehouses using the app?
Yes, the app allows you to use multiple warehouses.
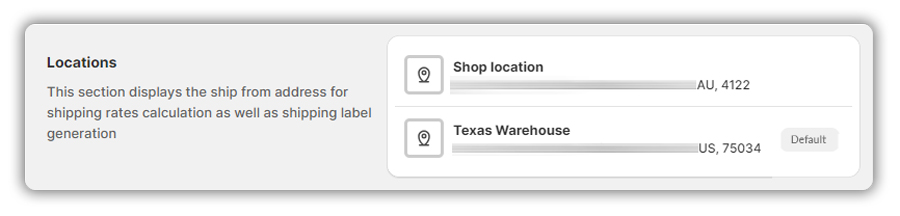
To add the location of your warehouses first add it under Shopify Settings → Locations → Add location as shown below:
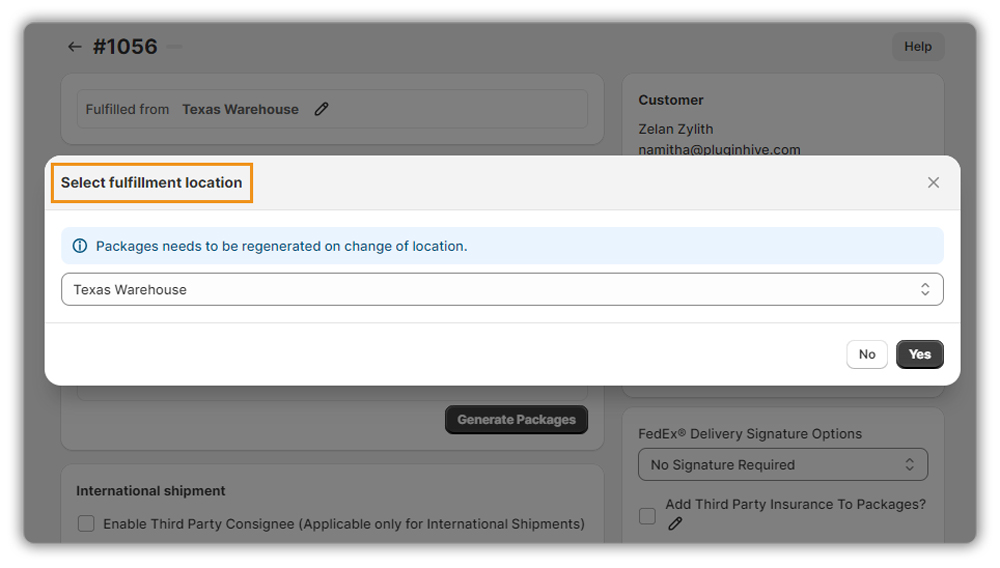
Once added, it will be listed in the app. To check navigate to Settings → Locations as shown below.
Q. I am shipping internationally but I am unable to print shipping labels. What do I need to check for printing FedEx labels?
If you’re unable to print your FedEx shipping labels, there are a few things you can check to resolve the issue:
- Check the app’s Print Settings: Ensure that you have the correct print settings selected in the app. Make sure that you have selected the correct printer and label format.
- Verify the printer is properly configured: Check that your printer is properly set up and connected to your device. Ensure that it has enough paper and ink or toner.
- Check the FedEx-mandated minimum value: FedEx has a minimum value required for international shipments. To process the shipments internationally and print labels, FedEx has mandated that the Product have a minimum value of $1. Ensure that the minimum value is configured correctly in your settings.
To add Minimum value navigate to Settings → Commercial Invoice Settings → More Settings → Minimum Price Per Product as shown below:

Read More – Handle International shipment with product price as zero
Q. My business specializes in manufacturing, exporting, and trading goods. How can I add my Tax Identification Number and TIN Type?
Add your Tax Identification Number under Settings → Account → Tax Identification Number as shown below:
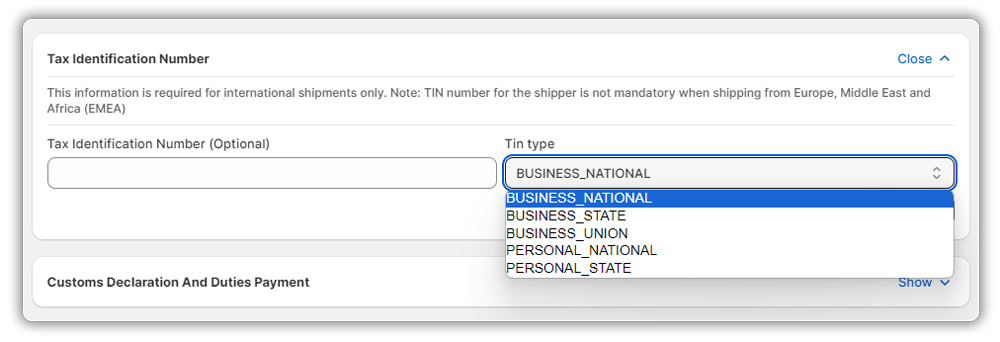
Set the Tax Identification Number Type which indicates how the recipient locale handles the tax numbers. You can choose the type from the Tin Type drop-down as shown above based on your requirement:
Business National: Used in the US and other countries. Indicate the Tax number is a business Tax number at the Country (National) level, as opposed for example an EU-wide tax number such as an IOSS number.
Business State: Used in the US and other countries to indicate the Tax Number is a business Tax number issued at the local or State level for the collection of local or state taxes, as opposed to a National Tax number.
Business Union: Used in the EU and similar multi-country Trade zones to identify a Tax number that is recognized within that group of countries. E.g. An IOSS number is recognized within the nation-states of the EU, thus the IOSS number is a Business Union tintype.
Personal State: Used mainly in the US, or similar countries, where local or State taxes apply to an individual. Identifies the TIN as a local or State tax number and not a national number.
Personal Union: Used mainly in the US, or similar countries, where separate national and local taxes can be applied to individuals. Identifies the TIN as a National tax number.
Q. Can I print Doc Tab Shipping labels with the Shopify FedEx Ship, Rate and Track app?
Yes, you can print Doc Tab labels within the app by heading over to Settings → Label Settings → Print Label Size as shown below:
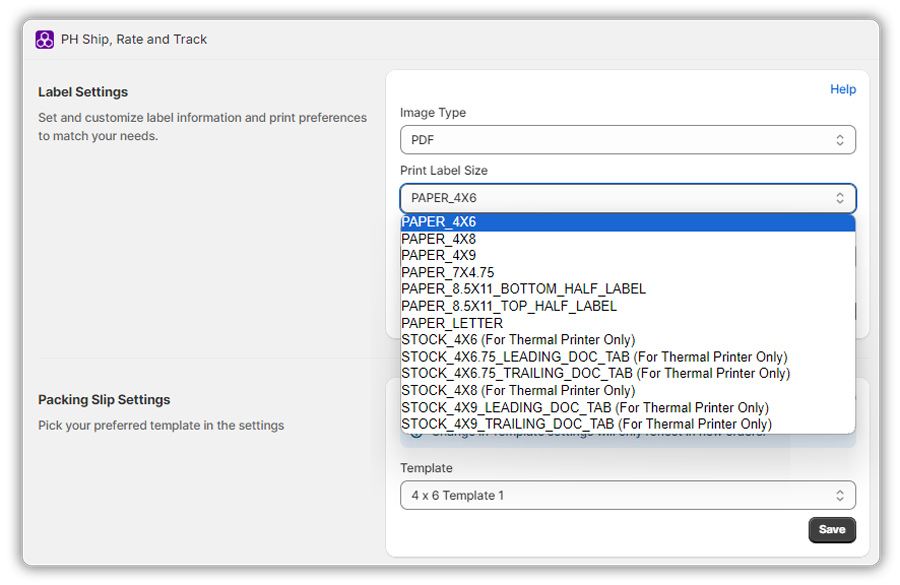
You can print these labels only with Thermal Printers. You can choose where you want to place the additional information, at the top or the bottom of the label by choosing LEADING DOC_TAB and TRAILING DOC_TAB respectively.
Q. Can I display a different address instead of my company’s address on the shipping label?
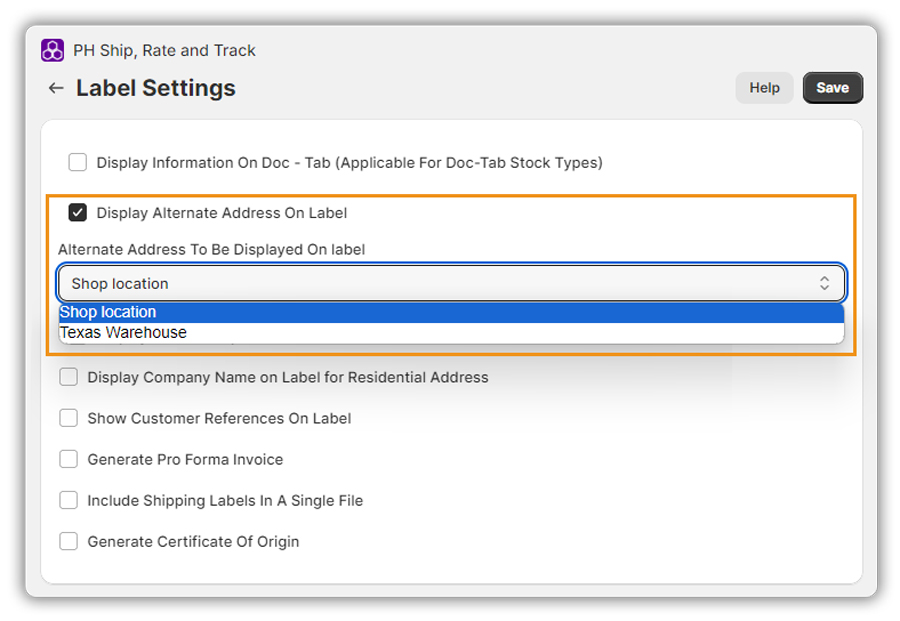
Yes, the app allows you to display a different address on the shipping label. To do that navigate to Settings → Label Settings → Enable “Display Alternate Address On Label”. Now, choose the address that you want to show on the label from the drop-down as shown below:
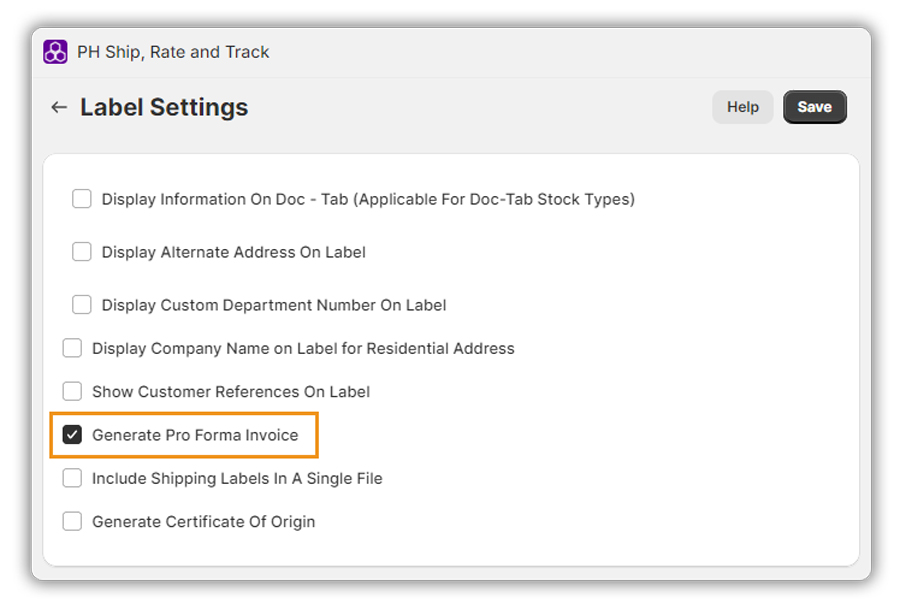
Q. Can I generate a Pro Forma Invoice with the app?
Yes, you can generate the Pro Forma Invoice by heading over to Settings → Documents → Enable “Generate Pro Forma Invoice” as shown below:
Q. Can I print USMCA Trade Agreement Certificate within the app?
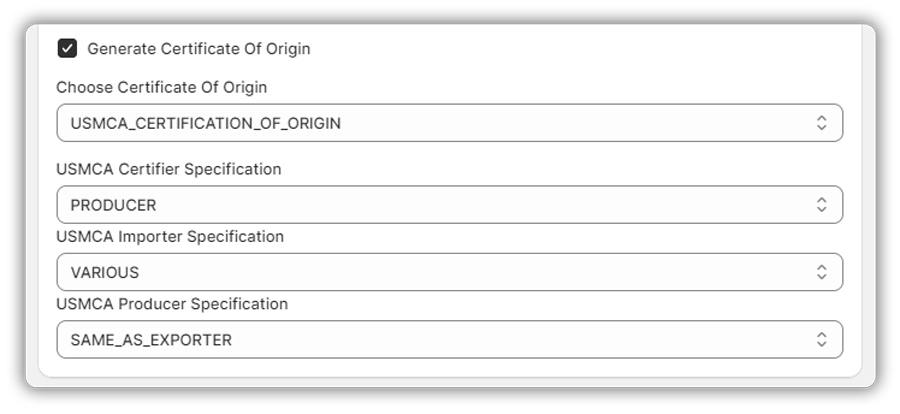
Yes, you can print the USMCA Certificate of Origin. Navigate to Settings → Document → Enable “Generate Certificate Of Origin” as shown in the below image and configure the following three options:
- USMCA Certifier Specification: Indicate whether the certifier is the Exporter, Producer, or Importer.
- USMCA Importer Specification: If the identity of the importer is unknown, or there are various importers, select ‘UNKNOWN’ or ‘VARIOUS’.
- USMCA Producer Specification: If same as an exporter select ‘SAME_AS_EXPORTER’, or if there are multiple producers, state ‘Various’ or if you want this information to remain confidential select ‘AVAILABLE_UPON_REQUEST.’
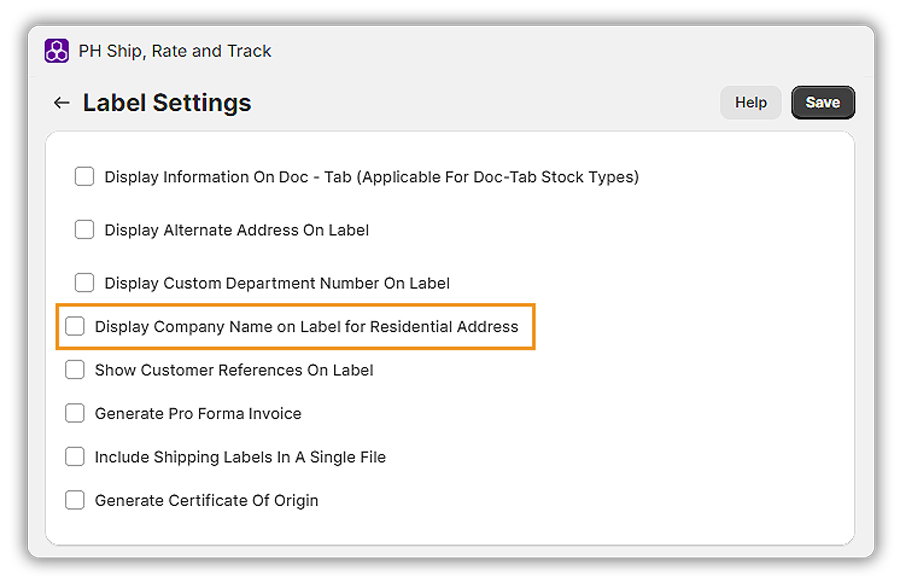
Q. Can I choose not to show the Company Name on the shipping label as my buyer has a residential address?
Yes, if the buyer has a residential address, the company name will be avoided in the shipping label if you disable Display Company Name on Label for Residential Address under Settings → Label Settings as shown below:
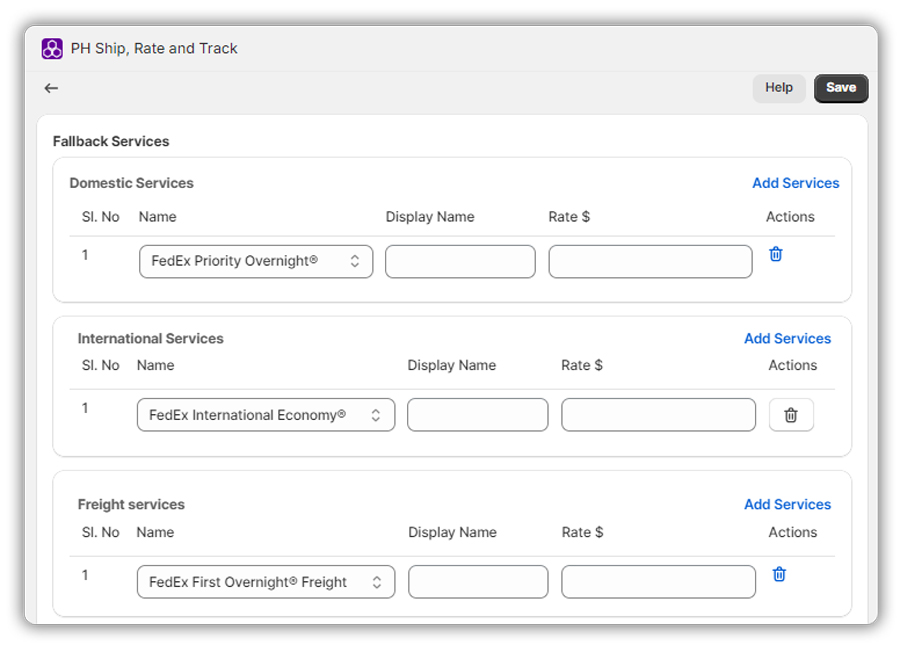
Q. Is there any way to show Flat rates for Domestic and International shipping separately if the FedEx rates are down?
Yes, using the app you can set up Fallback rates for Domestic, International & Freight shipments separately. To add these, navigate to Settings → Carrier Service and Fallback Service Settings → Fallback Services as shown below:
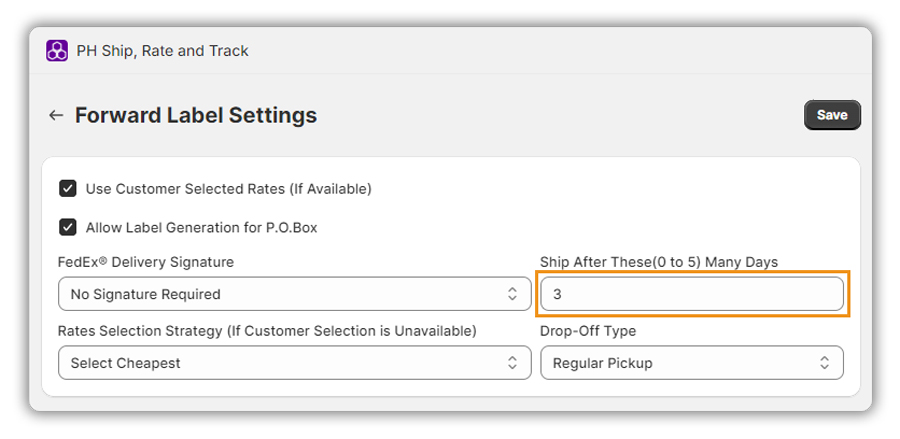
Q. I want to generate the labels today but want to ship the packages after 3 days. Is it possible with the app?
Yes, it is possible with the Shopify FedEx app. You can set the ship after days between 0 and 5 days.
To set it up navigate to Settings → Auto Settings → Forward Label Settings → Ship After These (0 to 5) Many Days as shown below:
Troubleshooting the Shopify FedEx App
If you face any issues or have any queries with setting up the app, please refer to the troubleshooting guide below. For more assistance do contact our team of experts.
Read More – Complete Troubleshooting Guide for Shopify Ship, Rate & Track for FedEx
We hope this guide has helped you in setting up the Shopify Ship, Rate & Track for FedEx based on your shipping requirements. You will now be able to display FedEx rates at checkout, print FedEx shipping labels, and automate the FedEx tracking process.