


-
WooCommerce Bookings and Appointments
-
- Setup Guide for Bookings and Appointments for WooCommerce
- Set Booking Cost with WooCommerce Bookings and Appointments
- Set Booking Participants with Bookings and Appointments for WooCommerce
- Setup Google Calendar with WooCommerce Bookings and Appointments
- Set up Buffer Time in WooCommerce Bookings and Appointments
- Set Booking Availability with Bookings and Appointments for WooCommerce
- Set Booking Resources with WooCommerce Bookings and Appointments
- Set Booking Assets with WooCommerce Bookings and Appointments
- How To Use 2 Way Google Calendar Sync with WooCommerce Bookings and Appointments plugin?
- Set Up Discount for WooCommerce Bookings - An Ultimate Guide
- Set Up Booking Costs Based on Different Seasons in WooCommerce
- How To Set Up a Multilingual WooCommerce Bookings Store?
- WooCommerce Bookings Email Notification
- WooCommerce Bookings Confirmation & Payment on Approval
- WooCommerce Bookings Cancellation
- Bookings And Appointments for WooCommerce plugin FAQs
- Export WooCommerce Bookings and Appointments to a CSV File
- How to Export WooCommerce Bookings to iCalendar
- How to Sync WooCommerce Bookings to Microsoft Outlook Calendar
- How to Display WooCommerce Bookings Search Availability Widget on your store
- Setting Up WooCommerce Zoom Meetings with Bookings Plugin
- Customize Calendar Designs with Bookings and Appointments for WooCommerce
- Show all articles ( 7 ) Collapse Articles
-
- Book Online Diving Adventure with Additional Services using Bookings And Appointments for WooCommerce
- Set up Event Booking with WooCommerce Bookings Plugin
- Farmhouse Accommodation Setup Using Bookings And Appointments for WooCommerce and Product Add-Ons
- How to Book Gaming Slots Online with Bookings and Appointments for WooCommerce Plugin
- Book Meal Slots & Provide Multiple Meal Selections to Customers
- How to Reserve Meeting Rooms with Bookings and Appointments for WooCommerce plugin
- How to Set up Bike Rental using WooCommerce Bookings and Appointments plugin
- How to Set up Bookings for Wine Tasting Session using WooCommerce Bookings Plugin
- Set Up Community Hall Availabilities and Pricing with Bookings and Appointments for WooCommerce
- How to Set Up Online Boat-Rental using WooCommerce Bookings and Appointments
- How to Set up Weaving and Fibre Arts Studio using WooCommerce Bookings and Appointments
- How to Share a Service with Multiple Bookable products using Bookings And Appointments for WooCommerce
- Indoor Arena Rentals — Set up using Bookings and Appointments for WooCommerce Plugin
- Offer Online Booking for Music Lessons With the WooCommerce Bookings and Appointments plugin
- Online Dog Walking & Overnight Pet Care with WooCommerce Bookings
- Create a Motorbike Rental Website with Multiple Engine Capacities
- Online Tour Booking — Set up using Bookings and Appointments for WooCommerce Plugin
- Set up Recurring Online Courses with WooCommerce Bookings
- Set up an Equipment Rental Website with WooCommerce Bookings
- Set Up Online Hotel Booking with WooCommerce Bookings
- Staff Management with WooCommerce Bookings Plugin
- Subscription-Based Booking for Fitness Centers in WooCommerce
- Customize Your Booking Duration to 2, 11, or 47 Hours in WooCommerce
- How to set up museum tours using Bookings and Appointments for WooCommerce
- WooCommerce Equipment Rental with Dynamic Discounts
- How to Setup an eLearning Store using WooCommerce Bookings and Appointments plugin?
- Show all articles ( 11 ) Collapse Articles
-
- Advanced Add-ons to Extend Bookings And Appointments for WooCommerce Functionality
- Set up Discounted Rates for Different Seasons with WooCommerce Bookings and Cost Adjustment Add-on
- Recurring Bookings - How to set up using WooCommerce Bookings and Appointments plugin?
- WooCommerce Bookings Add-ons - Set Minimum/Maximum Booking Duration based on Date
- WooCommerce Bookings Add-ons - Conditional Discount based on Participants
- Accept WooCommerce Bookings in Groups of People, Families & Team Members
- WooCommerce Bookings Availability Search Widget
- Set Up Custom Booking Interval using WooCommerce Bookings and Appointment plugin
- WooCommerce Bookings Add-ons – Book Dates Across Unavailable Days
- WooCommerce Bookings Add-ons – Select First Available Time of the Day
- WooCommerce Bookings Add-ons – Auto-Select Available Date for Customer
- Add-ons for Bookings And Appointments for WooCommerce – Skip Cart & Checkout
- WooCommerce Bookings Add-ons – Block Product Availability Based on Other Bookings
- WooCommerce Bookings Add-ons - Allow store owners to make last-minute Bookings
- WooCommerce Bookings Add-ons – Customise Maximum Bookings Per Slot
- WooCommerce Bookings addons - Resource quantity & availability
- WooCommerce Bookings for Custom Order Status
- WooCommerce Bookings Add-ons – Customize Maximum Bookings Per Slot for All Week
- Bookings and Appointments for WooCommerce Add-ons - Set and manage resource quantity
- Show all articles ( 4 ) Collapse Articles
-
WooCommerce Shipping Plugin for FedEx with Print Label
-
- How to Ship WooCommerce Custom Product Boxes via FedEx
- Volumetric Weight-Based Shipping with WooCommerce FedEx Shipping Plugin
- Handle FedEx Non-Standard Packages on WooCommerce
- Understand the Packing Methods of WooCommerce FedEx Plugin
- Print FedEx Shipping Labels in Bulk for WooCommerce
- WPML & FedEx shipping - WooCommerce store translation
- Extend the Estimated Delivery Day in WooCommerce FedEx Plugin
- Troubleshoot - Different FedEx Shipping Rates in Cart/Checkout
- Convert WooCommerce FedEx Shipping Rates to Base Currency
- Specify Dangerous Goods with WooCommerce FedEx Plugin
- Why FedEx option is not under WooCommerce shipping zones
- Print FedEx Shipping Labels using Zebra Thermal Printers
- FedEx Home Delivery for Residential Addresses
- FedEx Box or Custom Boxes for Packing WooCommerce Orders
- Use WooCommerce Shipping Plugin to Print FedEx Labels
- Fix "Invalid Country Code" Error with WooCommerce FedEx Plugin
- I need a WooCommerce Shipping Plugin so that my Vendors can Print their Labels with Postage Paid
- Exclude WooCommerce Shipping Costs from Tax Calculations
- Where can I find the Web Services Password for FedEx?
- How to Resolve Authentication Error with FedEx Production Keys
- It always seems to overlook the FedEx Ground and not include it as an option at checkout
- Debug Error: [HighestSeverity] => ERROR
- When I try to create a label for my orders, error message I get: FedEx Create Shipment Error: Severity: ERROR
- Add handling fees to FedEX shipping services in WooCommerce
- How to solve Error: SoapFault Object ( [message:protected] => Could not connect to host when using WooCommerce FedEx Shipping Plugin?
- Debug Error: “Authentication Failed"
- FedEx Address Validation & Residential Shipping for WooCommerce
- Why does FedEx overnight deliveries shows Delivery - TUE instead of next business day, Monday?
- I have an issue with printing the FedEx Shipping label
- Print FedEx Labels & Commercial Invoices on WooCommerce
- Add FedEx WooCommerce Tracking Number to Order Completion Email
- WooCommerce FedEx Plugin: Calculate Rates by Weight & Dimensions
- Debug Error: Product # is missing weight. Aborting.
- Fix the error message “There are no valid services available” for FedEx Mexico
- How to exclude certain product variations from the FedEx shipping calculation
- Create two FedEx Pak shipments, for two different FedEx Pak orders
- Integrate FedEx Shipping Calculator with WooCommerce website
- Print Order number on the WooCommerce Shipping Label
- I have input the Postal code and City into the checkout cart form and it still doesn’t show the FedEx info
- Configure FedEx International Shipping with WooCommerce
- During the test mode, should I use my FedEx account number or test account number?
- Manage Return Shipments with FedEx Plugin for WooCommerce
- Weight-based Packing with WooCommerce FedEx Shipping Plugin
- How to Generate Packages Automatically using WooCommerce Shipping Plugin for FedEx
- Display Delivery Date with WooCommerce FedEx Shipping plugin
- Adjust WooCommerce FedEx Shipping Rates by Shipping Class
- How to Generate FedEx B13A Document for Canada Exports using WooCommerce Shipping FedEx Plugin
- How to Display other Domestic Services apart from FedEx Ground using WooCommerce Shipping plugin for FedEx
- Ship Certain Items with FedEx and Provide Flat-Rate Shipping for others with WooCommerce FedEx Shipping Plugin
- How to Ship Frozen Food With WooCommerce FedEx Plugin
- WooCommerce FedEx Shipping Rates in Multiple Currencies
- Debug Error: FedEx ADDRESS VALIDATION RESPONSE
- FedEx Hold At Location at WooCommerce Checkout
- "There are no shipping methods available" on WooCommerce
- WooCommerce Currency Conversion - FedEx Europe
- Show all articles ( 40 ) Collapse Articles
-
- WooCommerce PDF Invoices with FedEx Shipping Plugin
- Shipping Cost Optimization: WooCommerce FedEx Shipping Plugin
- Packaging Cost by Product Quantity for Shopify & WooCommerce
- Send Prepaid FedEx Labels to WooCommerce Customers
- Print Multiple WooCommerce FedEx Labels for Single Orders
- A Guide to Ship Perishable Items with WooCommerce FedEx
- WooCommerce FedEx Shipping with Measurement Price Calculator Plugin
- Best way to Ship Food items along with Dry Ice and using Efficient FedEx Shipping Services
- How to Ship Frozen Items with Dry Ice via FedEx
- How to Legally Ship Alcohol Products via FedEx
- WooCommerce FedEx Shipping Plugin 4.0.3: Alcohol Support & Improvements
- WooCommerce Automated Emails and Shipment Delivery Updates
- Auto-Send WooCommerce Fedex Labels to Multiple Vendors
- Choose Right FedEx Shipping Method for WooCommerce Store
- How to Print WooCommerce FedEx Shipping Labels: Guide
- Why is FedEx Integration Good for your WooCommerce Store
- Print FedEx Shipping Labels in Multiple Sizes in WooCommerce
- Enable FedEx as the only Shipping Method for WooCommerce
- Insights into the FedEx Boxes for WooCommerce
- Create Multiple FedEx Shipments in WooCommerce for Multiple Orders
- FedEx Tracking & Schedule FedEx Pickups in WooCommerce
- FedEx Shipping Rates for WooCommerce and Shopify
- Optimize FedEx Packages for Better Shipments in WooCommerce
- Print FedEx Shipping Labels Directly from WooCommerce Store
- How to Save Shipping Cost using FedEx One Rate
- WooCommerce Shipping with FedEx: GST Implementation in India
- WooCommerce FedEx Shipping- Pack Some Items Separately & the Rest Together in a Box
- WooCommerce FedEx Shipping - Broker for handling customs clearance
- WooCommerce FedEx Shipping: Choose Warehouse Based on Destination
- Auto-Printing WooCommerce Shipping Labels for UPS and FedEx
- Ship from a Warehouse located in a Different country with WooCommerce FedEx Shipping Plugin
- WooCommerce Bookings- Shipping Rented Items Via FedEx
- Will WooCommerce FedEx Shipping Plugin work with Country Colombia and currency Colombian Peso?
- Great Tips to Sale in WooCommerce Store during Holiday Season
- WooCommerce Order Fulfilment -Carriers Model vs Dropshipping.
- Display Delivery Date with WooCommerce FedEx Shipping plugin
- Adjust WooCommerce FedEx Shipping Rates by Shipping Class
- Ship Products from Multiple Warehouses with WooCommerce FedEx Shipping Plugin
- Show all articles ( 23 ) Collapse Articles
-
- Set Minimum Shipping Cost for WooCommerce Shipping Methods
- Set up WooCommerce Shipping by Product Weight and Size
- Hide UPS Services for Shipments Weighing more than 10lbs and Show only FedEx
- Customize Delivery Date formats in WooCommerce FedEx plugin
- WooCommerce Shipping - Set a particular service as default in Cart
- Add Purchase Order(PO), Invoice, Customer Reference, and Department numbers to your WooCommerce Shipping Labels
- Hide 'FedEx Ground' for specific zip code
- Code snippet to display the Shipping phone number on the WooCommerce Shipping label instead of the Billing phone number
- WooCommerce Shipping for FedEx - Change Customs Duty Payer based on the Destination country
- How to Add Custom Text in Delivery Estimates Format using PluginHive Plugin for FedEx Shipping?
-
WooCommerce UPS Shipping Plugin with Print Label
-
- WooCommerce UPS Freight Shipping based on Product's Weight
- UPS Boxes for WooCommerce Shipping
- UPS Packaging Charges with WooCommerce UPS Shipping Plugin
- Auto-Print WooCommerce Shipping Labels for UPS Shipments
- Configure WooCommerce UPS Shipping Methods by Country Code
- Decoding Debug Data of WooCommerce UPS Plugin
- WooCommerce UPS Shipping Plugin [Error Code 10001] -The XML document is not well formed
- How to resolve differences between rates returned by the plugin and the UPS shipping calculator
- How to resolve printing issue with Dymo label printer?
- Enable Delivery Signature for WooCommerce Shipments with UPS
- Do I need to Set Product Weight and Dimensions for the WooCommerce UPS Shipping Plugin to work?
- [Error Code:120053] - Shippers UPS Account is in SurePost test mode
- Can I set Free UPS SurePost Shipping for orders above $30 in WooCommerce?
- How to print the label correctly on a thermal printer?
- Can I pack multiple units of the same product together with WooCommerce UPS Shipping Plugin?
- WooCommerce Shipping from the United States -Product Weight Units in Pounds
- How to get the UPS Access Key?
- How to get a product key from UPS?
- Display tax-inclusive WooCommerce UPS Rates at Checkout
- Efficient Parcel Packing with WooCommerce UPS Plugin
- UPS Box Packing - Calculation of shipping rates based on weights and dimensions
- Add WooCommerce Tracking Number in the Order Completion Email
- Print UPS Shipping Labels with Thermal Printers from WooCommerce & Shopify
- Use UPS Negotiated Rates with WooCommerce Shipping
- [Error Code: 120100] - "Missing or invalid shipper number"
- Does UPS Deliver On Saturday? – Provide Estimated Delivery Dates on WooCommerce
- WooCommerce UPS Plugin v.3.9.15: Estimated Delivery Options, Bulk Label Printing
- UPS Collect-On-Delivery with WooCommerce UPS Shipping plugin
- WooCommerce Minimum Order Amount for UPS Shipping
- Pack & Ship WooCommerce Product Bundles with UPS
- Simplify Product Packaging with WooCommerce UPS Plugin
- Print Shipping Labels in Bulk with WooCommerce UPS Plugin
- Dokan Integration with WooCommerce UPS Shipping Plugin
- WPML Compatibility with WooCommerce UPS Shipping Plugin
- WPML WooCommerce Shipping Solutions for Multilingual Sites
- Why is My Paypal not Receiving Shipping Cost ?
- Add Handling Charges to WooCommerce UPS Shipment
- Troubleshoot - Invalid Service for Shipment Origin [ Error Code:121100]
- Print UPS Shipping Label for WooCommerce Orders
- Optimize UPS Shipping plugin based on your UPS Account Currency
- Packing a Product that Ships in Two Boxes using UPS Box Packing
- Troubleshoot - No Option to Print Return Shipping Label!
- Residential or Commercial Address in WooCommerce UPS Plugin
- UPS Shipping Plugin for Label Printing & Order Tracking in WooCommerce
- How to Adjust the Size of UPS Shipping Label?
- Print UPS Return Label for WooCommerce & Shopify Shipments
- UPS Access Point in WooCommerce Shipments
- Ship from the US to Puerto Rico with WooCommerce UPS Plugin
- UPS Paperless Invoice for WooCommerce International Shipping
- Attach UPS MRN (Movement Reference Number) with WooCommerce Order
- Customize Product Description on Label with WooCommerce UPS Plugin
- WooCommerce Address Validation With UPS Shipping Plugin
- WooCommerce UPS Shipping - Create NAFTA Certificate of Origin
- Control Log and Recipient Tax Identification Number with WooCommerce UPS Shipping plugin
- Pack a Product into Multiple Packages: WooCommerce UPS Shipping Plugin
- Display UPS Shipping Rates Based On WooCommerce Shipping Zones
- Exclude Gift Products from being Charged for UPS Shipping on your WooCommerce Store
- WooCommerce UPS Shipping – Can a Third-Party’s UPS account pay the Shipping Charges?
- Blind Shipping with UPS for WooCommerce
- Show all articles ( 44 ) Collapse Articles
-
- How to Show/Hide UPS Negotiated Rates?
- Weight-based Packing with WooCommerce UPS Shipping plugin
- Troubleshoot- Getting Higher Rates in UPS Shipping Plugin..!
- Why UPS Shipping Methods are not listed under WooCommerce Shipping Zones?
- WooCommerce UPS Tracking Guide
- What to do when my country doesn't have a zip/postal code?
- Enable Delivery Signature for WooCommerce Shipments with UPS
- UPS Insurance Policy with WooCommerce UPS Shipping plugin
- WooCommerce UPS Shipping Plugin Frequently Asked Questions
-
- A radical shift from physical invoices to paperless shipping!
- Add Pallet and Special Padding cost to UPS LTL Freight shipments for Woocommerce
- UPS Collect-On-Delivery with WooCommerce UPS Shipping plugin
- WooCommerce UPS Shipping Rate for US-US & Europe-Europe
- Configure WooCommerce UPS Shipping Methods by Country Code
- Create UPS Ground Shipment from your WooCommerce store
- Effectively handling pre-packaged products in WooCommerce using UPS shipping carrier
- Generate Return Label & Drop Package at the UPS Access Point
- WooCommerce UPS Rates & Free Shipping Based on the Product Category
- How to Get the Best Shipping Rates for WooCommerce Orders
- Pre-Paid UPS Return Label for WooCommerce Store
- Package Tracking and Returns with WooCommerce UPS Plugin
- Restrict WooCommerce Shipping by State for Products like Ammunition and Alcohol
- Scheduling UPS Pickup for WooCommerce Shipments
- Secure Shipping: Choose UPS Direct Delivery for Precious Items
- Send WooCommerce UPS Shipping Label via Email
- Set Up Freight Shipping with WooCommerce UPS
- Ship Physical Products along with WooCommerce Subscription Products with the WooCommerce UPS plugin
- Adjust WooCommerce UPS Rates based on Destination Country
- WooCommerce Shipping - Managing Units of Measurement
- WPML WooCommerce Shipping Solutions for Multilingual Sites
- UPS Label Format Supported by WooCommerce UPS plugin
- WooCommerce UPS COD for Europe - Automatically convert the currency into Euro
- Ship your Products from Multiple Warehouses in WooCommerce
- How to allow Customers to Download UPS labels from an Online Repair Shop
- Set Up WooCommerce Flat-Rate Shipping with Live UPS Ground Rates for Different Types of Products
- Are the dimensions of the boxes taken into account or is it going by volume when calculating how many products fit in one box using WooCommerce UPS Shipping Plugin?
- WooCommerce UPS Tracking Number for Free Shipping Orders
- Show all articles ( 13 ) Collapse Articles
-
- Set Minimum Shipping Cost for WooCommerce Shipping Methods
- Hide UPS Services for Shipments Weighing more than 10lbs and Show only FedEx
- WooCommerce UPS Shipping Rate for US-US & Europe-Europe
- Adjust WooCommerce UPS Rates based on Destination Country
- Add an Additional Cost to the Shipping Service based on WooCommerce Shipping Class
-
WooCommerce Canada Post Shipping Plugin
-
- Set Minimum Shipping Cost for WooCommerce Shipping Methods
- Set up WooCommerce Shipping by Product Weight and Size
- WooCommerce Canada Post Shipping Plugin with WPML Support
- WPML & WooCommerce Canada Post Shipping for Multilingual Sites
- WooCommerce Canada Post Plugin compatible with XStore Theme
- An Insight into Canada Post Manifest for WooCommerce Orders
- The only label that prints are a testing one even though I have switched to live
- I have downloaded this plugin and it seems to be working fine. The only thing that isn't showing up is the letter mail option
- Can I have shipments go out from my contractor's factory but the shipping costs are charged on my commercial account?
- WooCommerce Canada Post Shipping Plugin 2.1.0: Now with return shipping labels
- Find Pickup Point ID for Canada Post Deposits on WooCommerce
-
- WooCommerce Canada Post Manifests for Domestic & International Shipments
- Does WooCommerce Canada Post Shipping Plugin Supports Different Weights for Variable Products?
- Offer Free Shipping to Customers and still allow them to Track their Shipment using the WooCommerce Canada Post Shipping plugin
- Print Canada Post Shipping Labels for Orders with Multiple Products
- Canada Post Labels for Multiple Packages with WooCommerce
- Sell both WooCommerce Digital products and Physical goods
- Ship Canada Post Lettermail & Parcel together on WooCommerce
- Add WooCommerce Canada Post Insurance cost to Shipping Rates
- Best WooCommerce Canada Post Shipping plugin
- Does WooCommerce Canada Post Shipping plugin works with Currency USD?
-
WooCommerce Shipment Tracking Pro
-
- Efficient WooCommerce Shipment Tracking: Top Methodologies
- Choose The Best WooCommerce Shipment Tracking Plugin
- WooCommerce Basic Order Numbers Plugin: Streamline Order Tracking
- WPML Compatibility with WooCommerce Shipment Tracking Pro
- Using WPML with WooCommerce Shipment Tracking Pro plugin for Multilingual Sites
- Import WooCommerce Order Tracking Details via FTP & CSV
- Bulk Import WooCommerce Shipment Tracking Details via CSV
- WooCommerce Shipment Tracking: Send Shipping IDs via Email
-
WooCommerce Table Rate Shipping Pro Plugin
-
- WooCommerce Shipping Pro - Chapter 2: Solving Business Case
- Setting Up WooCommerce Per Product Shipping Add-on
- WooCommerce Weight-Based Shipping with Table Rate Shipping Plugin
- WooCommerce Shipping Pro - Chapter 8 : Business cases handled by WooCommerce Weight and Country based shipping
- WooCommerce Shipping Pro- Chapter 7: Extend using Add-ons
- WooCommerce Shipping Pro- Chapter 6: Per Shipping Class
- WooCommerce Shipping Pro- Chapter 5: United Kingdom Counties/States
- WooCommerce Shipping Pro - Chapter 4: Usability Features
- WooCommerce Table Rate Shipping Pro - Chapter 3: Bundle Rate Shipping
- WooCommerce Shipping Pro Chapter-1: Setting Up
- Set up WooCommerce Shipping Methods for Different Product Categories with WooCommerce Table Rate Shipping Pro
- Advanced Addons for WooCommerce Table Rate Shipping Pro
-
- Set Minimum Shipping Cost for WooCommerce Shipping Methods
- Set up WooCommerce Shipping by Product Weight and Size
- WooCommerce Measurement Price Calculator with Table Rate Shipping
- WooCommerce Table Rate Shipping: Pickup & Shipping Choices
- WooCommerce Table Rate Shipping Pro plugin With WPML for Multilingual sites
- Is it possible to Configure Two Shipping Carriers, La Poste and UPS, for each Packaging and Product?
- How to configure WooCommerce shipping cost by weight for different zones in the Netherlands?
- Set up WooCommerce Table Rate Shipping with Divi Theme
- WooCommerce Free Shipping only for Some of the Products
- Setting up Weight Based Shipping Rates using Shipping Pro
- Troubleshoot - Getting Multiple Shipping Options with No Price!
- I added 36 line and when I try to add more rows I'm faced with this error "action failed
- I need a Plugin that allows our store to Calculate WooCommerce Shipping based on Weight and Destination City
- La Poste Colissimo Shipping for WooCommerce
- Steps to configure La Poste Colissimo with WooCommerce Table Rate Shipping
- Universal Shipping Calculator for La Poste Colissimo on WooCommerce
- La Poste Add-on: Weight-Based Shipping for La Poste Colissimo
- Shipping Pro - Case based on weight and price
- What are the default units of weight, dimensions, and price for Shipping Pro?
- Per Product Shipping Plugin for WooCommerce
- My concern is that it's going to take 1,500 rules since it goes off per pound up to 150#
- Can I allow the pickup items to remain in the order, while charging for the dump truck items?
- How can I set “All the World” instead of typing all the countries names?
- WPML Compatibility with WooCommerce Table Rate Shipping
- WooCommerce Table Rate Shipping: Set up Shipping Rates Based On Order Quantity and Price
- WooCommerce UPS Shipping - Provide Live Rates and Free Shipping for Some Products based on Cart Subtotal
- Set up WooCommerce Shipping by State and Shipping Class using Table Rate Shipping plugin
- How to Configure State-based Rules Manually Using the WooCommerce Table Rate Shipping Plugin
- How to Set Shipping Rates based on Product Categories Using the WooCommerce Table Rate Shipping Plugin?
- Show all articles ( 14 ) Collapse Articles
-
- Calculate Price Based and Per Item Shipping Rates using WooCommerce Table Rate Shipping Pro
- Calculate Shipping Cost Per Quantity of Products- WooCommerce Table Rate Shipping Pro
- Calculate Shipping Rates for Different Types of Products in the Cart
- Calculate Shipping Rates for Pickup and Non Pickup Products
- Configure Normal & Priority shipping rates for Swiss Post with WooCommerce Table Rate Shipping Pro
- Coupon Behavior During Calculation of Shipping Charges
- How to Change the Order of WooCommerce Calculated Shipping Options and Pickup on the Cart page?
- Kalium Theme Compatible with WooCommerce Table Rate Shipping
- Per Product Shipping Plugin for WooCommerce
- Recover Postage Expenses by including the UK Postal-Code Surcharges to your Shipping Rates using WooCommerce Table Rate Shipping Pro
- Flat Rate Shipping based on Product Quantity - WooCommerce Multi Carrier plugin
- WooCommerce Free Shipping Based on Quantity- Table Rate Shipping
- WooCommerce Table Rate Shipping - Setup Costs based on Shipping Class & Quantity
- WooCommerce Multiple Shipping options with Table Rate Shipping
- I need $5 for shipping the first item and $1 per additional item. How to setup WooCommerce Shipping?
-
Multi Carrier Shipping Plugin for WooCommerce
-
- How to setup Multi-Carrier Shipping Plugin for WooCommerce?
- How to get DHL Account Number?
- Setting up Stamps.com Account
- Setting up USPS Account
- How to set up a UPS Account?
- Setting up FedEx Account
- UPS and USPS - Display WooCommerce Shipping Rates with Price Adjustment
- WooCommerce Shipping - Configure Shipping Area Management for Multiple Carriers
-
- WooCommerce Shipping Plugins Comparison Chart - Multiple vs. Individual Carrier-Integration
- WPML Support with WooCommerce Multi Carrier Shipping Plugin
- Dokan Integration With WooCommerce Multi-Carrier Shipping
- Shipping Rates Calculator: Get Rates from Multiple Carriers and Services
- Customise your WooCommerce Shipping by Providing Flat Rates on Some Products and Ship Others via UPS and USPS
-
- Using WPML with WooCommerce Multi-Carrier Shipping plugin for Multilingual Sites
- Offer WooCommerce Shipping Options from Different Carriers
- Add Extra Charges to the Shipping Rates in WooCommerce
- Difference between WooCommerce Multi Carrier & Woo UPS plugin
- Select a shipping method based on the total weight of the cart, USPS for under 10 LBS and UPS for the rest
- WooCommerce Conditional Shipping with Multi-Carrier Shipping Plugin
- Set Shipping Rates in WooCommerce with Multi-Carrier Shipping Plugin
- Shipping Prohibited Items in WooCommerce
- How does Multi-Carrier Shipping Plugin for WooCommerce work?
- Does WooCommerce Multi Carrier Shipping support DHL & FedEx in Mexico?
- Most Common Shipping Mistakes You Need To Avoid
- Customise your WooCommerce Shipping by Providing Flat Rates on Some Products and Ship Others via UPS and USPS
-
Estimated Delivery Date Plugin for WooCommerce
-
- WooCommerce Estimated Delivery Date plugin with WPML Support
- Using WPML with WooCommerce Estimated Delivery Date plugin for Multilingual Sites
- How to Show Weekends as Non-Delivery Days using Estimated Delivery Date and Time Plugin for WooCommerce
- Set Estimated Delivery Dates for Different WooCommerce Shipping Zones
- WooCommerce: Set Estimated Delivery Dates for Multiple Methods
- Provide Standard or Priority Shipping with Different Shipping Cost and Delivery Time on your WooCommerce store
- Offer Local Delivery Date Estimates to Three different Shipping Zones with WooCommerce Estimated Delivery Date plugin
-
- Estimated Shipping Date for WooCommerce Product Variations
- Display Estimated Delivery Date Formats in WooCommerce
- Display Delivery Estimates on your WooCommerce Store
- Set Up the Estimated Delivery Date for Products Shiping from Different Locations
- Show WooCommerce Estimated Delivery Date on the Product Page
- Will the WooCommerce Estimated Delivery Date plugin work with Shipping Classes and Shipping Zones, both at a time?
-
WooCommerce Royal Mail Shipping with Tracking
-
WooCommerce Multi Vendor Shipping Addon
-
- WooCommerce Marketplace with Multiple Shipping Carriers using Product Vendors
- FedEx Multi Vendor Shipping with WooCommerce Product Vendors
- WooCommerce Multi Vendor FedEx Shipping Guide with WCFM Marketplace
- UPS Shipping for WooCommerce Multi Vendor with WCFM Marketplace
- UPS Shipping Guide for Multi Vendor using WooCommerce Product Vendors
- FedEx Shipping Guide for WooCommerce Multi-Vendor with Dokan
- WooCommerce Multi Vendor Shipping with Dokan
- UPS Shipping Guide for WooCommerce Multi Vendor with Dokan
- Set up a Multi-Vendor store with WooCommerce DHL Express & Dokan
- UPS Shipping Guide for WooCommerce Multi Vendor with WC Vendors
- FedEx Shipping with WC Vendors Marketplace for WooCommerce
-
PH WooCommerce Product Addons
-
PH WooCommerce Deposits
-
Shopify Australia Post Shipping App with Rates, Label & Tracking
-
- Australia Post Automatic Shipping Label Printing for Shopify
- Display Real-time Australia Post Shipping Rates on Shopify Store
- Shopify Australia Post Shipment Tracking and Scheduling Pickups
- Print Shipping Labels With Shopify Australia Post App
- Pack Products Optimally with the Shopify Australia Post App
- Shopify Australia Post Shipping Label Printing Preferences
- Shopify Australia Post International Shipping - Simplified
-
Shopify Ship, Rate, and Track for FedEx
-
- FedEx Tracking and Schedule FedEx Pickups in Shopify
- Understanding FedEx Shipping Rates in your Shopify Store
- Bulk FedEx Shipping Label Generation for Shopify
- Display FedEx Shipping Methods With Real-Time Rates on Shopify Store
- Print Shipping Labels with Shopify FedEx App
- How to Pack Products Optimally and Save Shipping Costs with Shopify Ship, Rate and Track for FedEx
- How to set up Shopify Shipping for FedEx Special Shipments
- Setting up FedEx SameDay City on Shopify
- Print FedEx Shipping Labels for the Shopify Store
- Print FedEx CSB-V label for Shopify
- Box Packing Methods with Shopify FedEx App
- FedEx Freight shipping with Shopify
- FedEx Saturday Delivery on your Shopify store
- FedEx SmartPost/Ground Economy shipping with Shopify
- FedEx One Rate shipping with Shopify
- FedEx Return Shipping on Shopify store
- Show all articles ( 1 ) Collapse Articles
-
Shopify Shipment Tracking & Notifications App
-
WooCommerce Shipping Services
-
Shopify Multi Carrier Shipping Label App
-
- Setting up Shopify Multi Carrier Shipping Label App
- Set up Shopify Purolator Shipping with Multi Carrier Shipping Label App
- Setting Up Shopify Carrier Calculated Shipping Rates
- Open a Free UPS Account and Get Exclusive Shipping Discounts in Europe
- Shopify UPS Shipping Guide
- Shopify USPS Shipping Guide
- FedEx Hold at Location at Shopify Checkout
- Shopify Stamps.com Shipping Guide
- Integrating USPS Via EasyPost on Shopify
- How to Create a USPS Account and Integrate With Shopify
- Shopify Amazon Shipping Guide
- Shopify Order Fulfilment Made Easy with Touchless Label Printing
-
- How to configure carrier account in the Shopify Multi Carrier Shipping Label app?
- Packing Methods in the Shopify Multi-Carrier Shipping Label App
- Calculate shipping costs based on Shopify shipping zones
- Accurate Customs Amount on Commercial Invoice for Easy Customs Clearance
- Product Descriptions on Commercial Invoice for Easy Customs Clearance
- Print Shipping Labels for Shopify Flat Rate Shipping
- Postnord Service Point for Shopify
- Shopify Alcohol Shipping with Adult Signature
- How to Split and Partially Fulfil Shopify Orders
- Create and Ship Custom Items in Shopify
-
-
Multi Carrier Shipping Label for Magento
-
FedEx Ship, Rate & Track App for BigCommerce
-
WooCommerce Mobile App
-
Stamps.com USPS Shipping Extension with Postage for Magento
-
WordPress Tips and Tricks
-
PostNord WooCommerce Shipping Plugin with Print Label
-
WooCommerce Amazon Shipping
-
WooCommerce Australia Post MyPost Business Plugin
-
PH ODFL Shipping Plugin for WooCommerce
-
Multi Carrier Shipping Label for PrestaShop
-
TForce Freight Shipping for WooCommerce
-
Hide Shipping Methods & Rate Adjustment for WooCommerce
-
Multi Carrier Shipping Label for BigCommerce
-
PH USPS Shipping Plugin for WooCommerce with Print Label
WooCommerce Amazon Shipping Guide
This guide will help you integrate your Amazon Shipping account with your WooCommerce store using the WooCommerce Shipping Services Plugin by PluginHive. Once you have successfully integrated Amazon Shipping with WooCommerce, you will be able to automatically display Amazon Shipping rates at checkout, print shipping labels, and easily track your shipments.
Add, Install, and Activate WooCommerce Shipping Services Plugin
Install the WooCommerce Shipping Services Plugin.
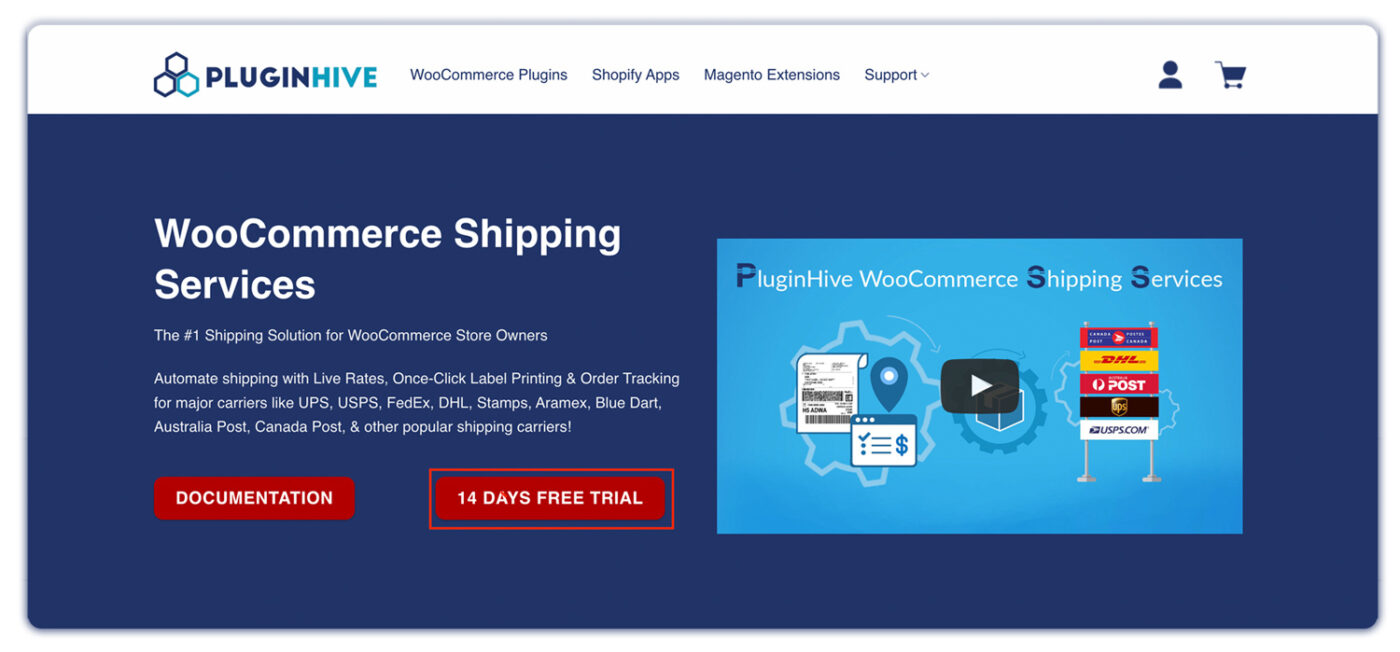
Reference: How to install and activate the WooCommerce Shipping Services Plugin
Add your Amazon Shipping Account
Go to the Plugin Settings → Carrier (+) icon as shown below:

Select the carrier “Amazon Shipping” & Click on “Add Account” as shown below.
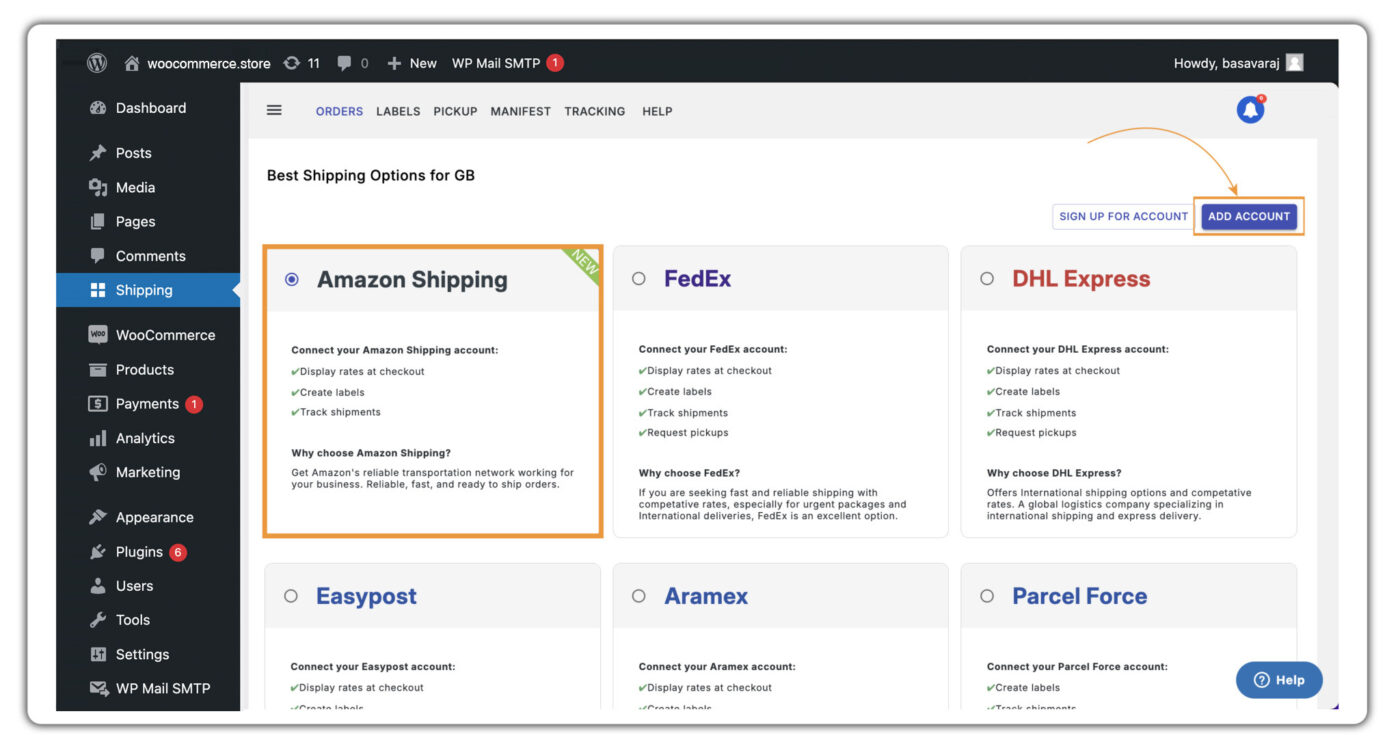
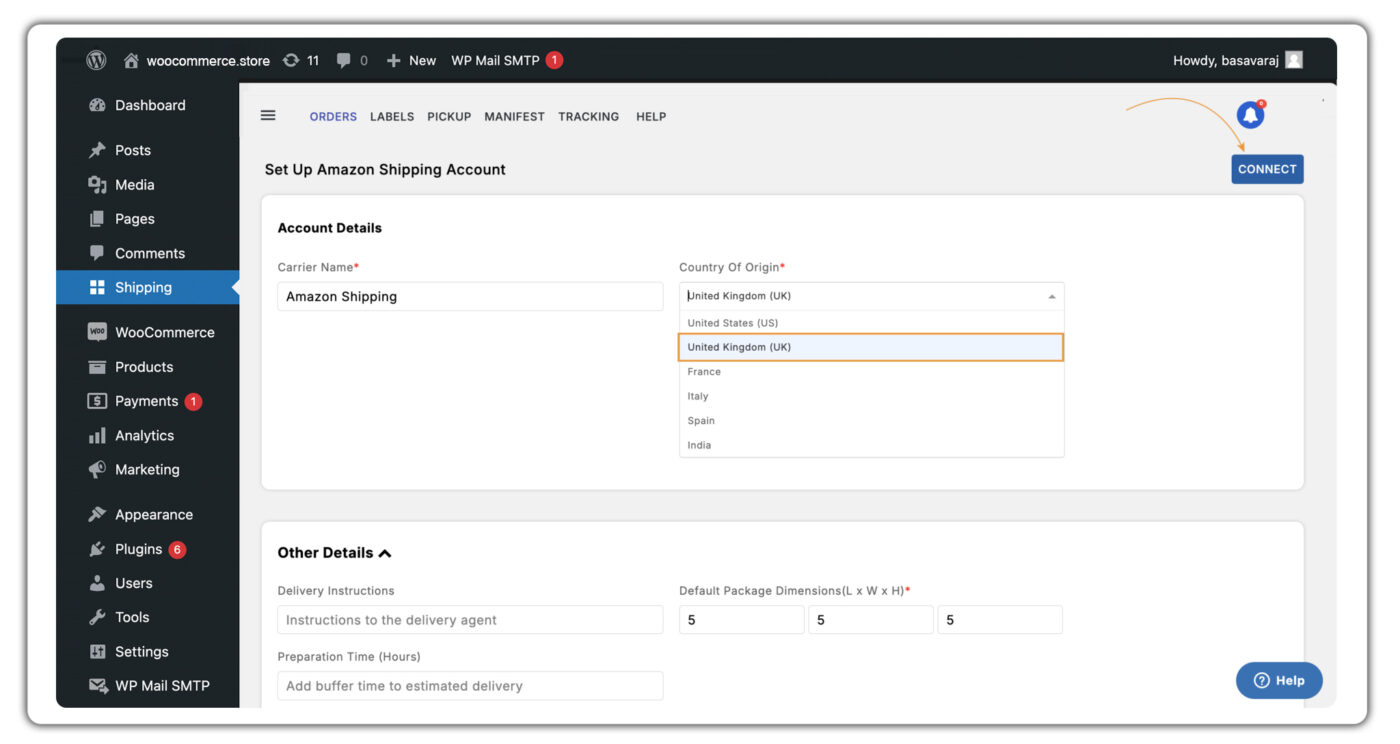
In the Account Details, select the “Country of Origin” from the drop-down menu and click on the Connect button to connect your Amazon Shipping account with the WooCommerce Shipping Services Plugin.
You will be redirected to the Amazon Shipping Sign-in page. Enter your Amazon Shipping registered email ID or phone number below and click on ‘Continue’.
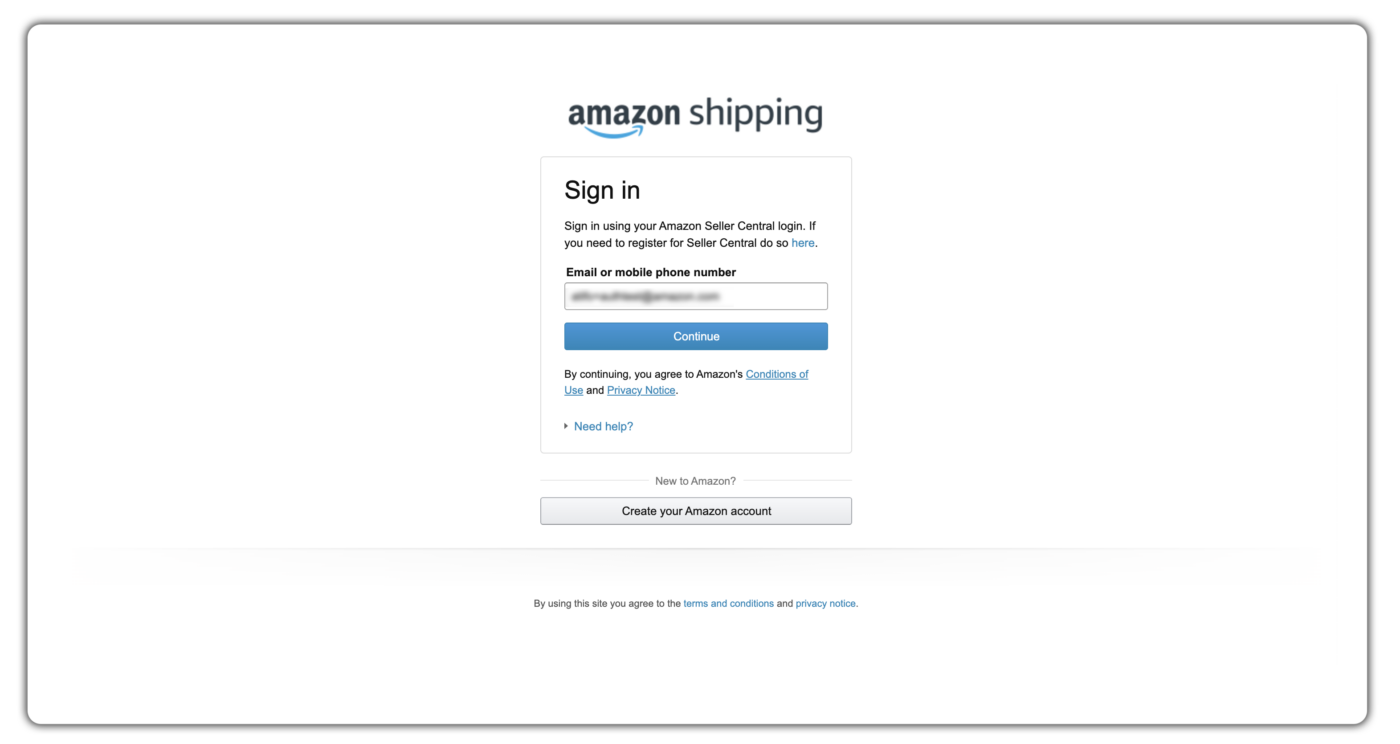
Enter the password and click on ‘Sign in’.
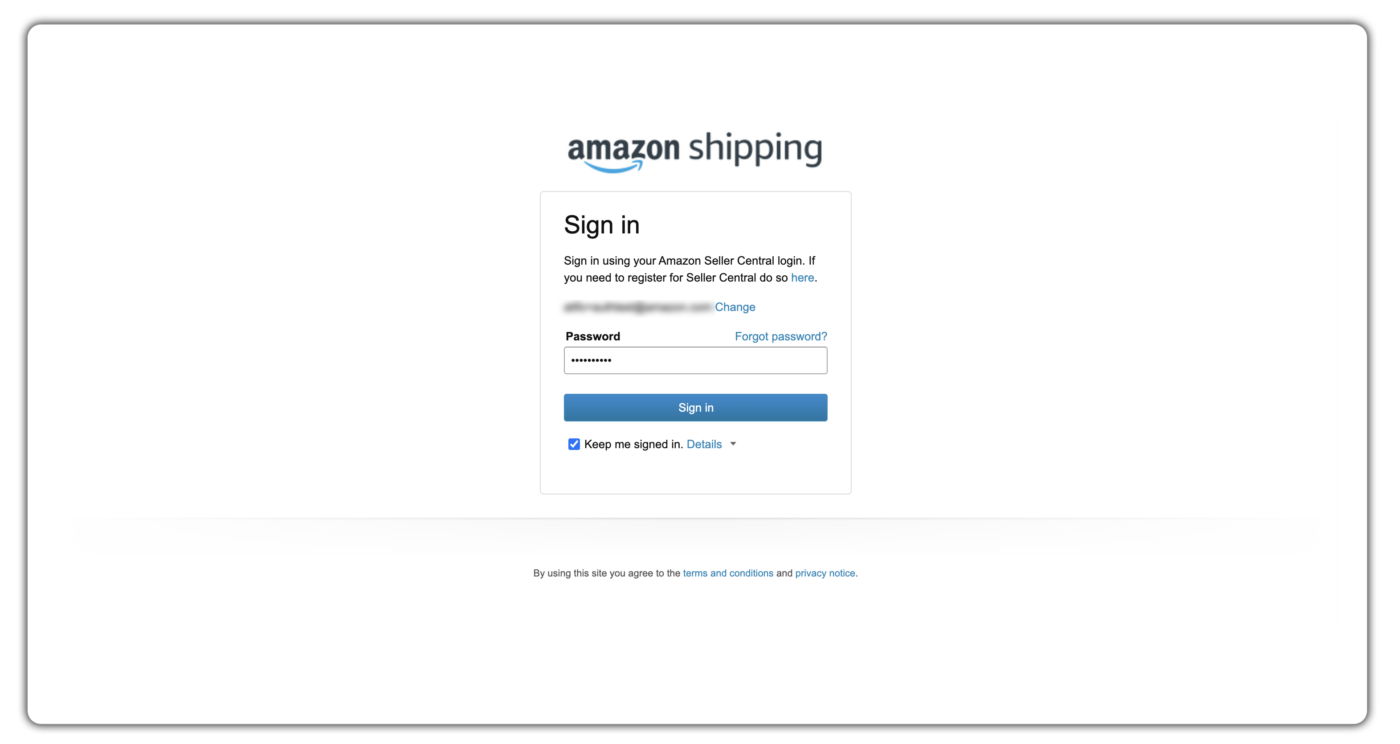
If you don’t have Amazon Seller Central login credentials, then you need to register for Shipper Central:
- For India: Register here
- For the US: Register here
- For the UK: Register here
- For France: Register here
- For Italy: Register here
- For Spain: Register here
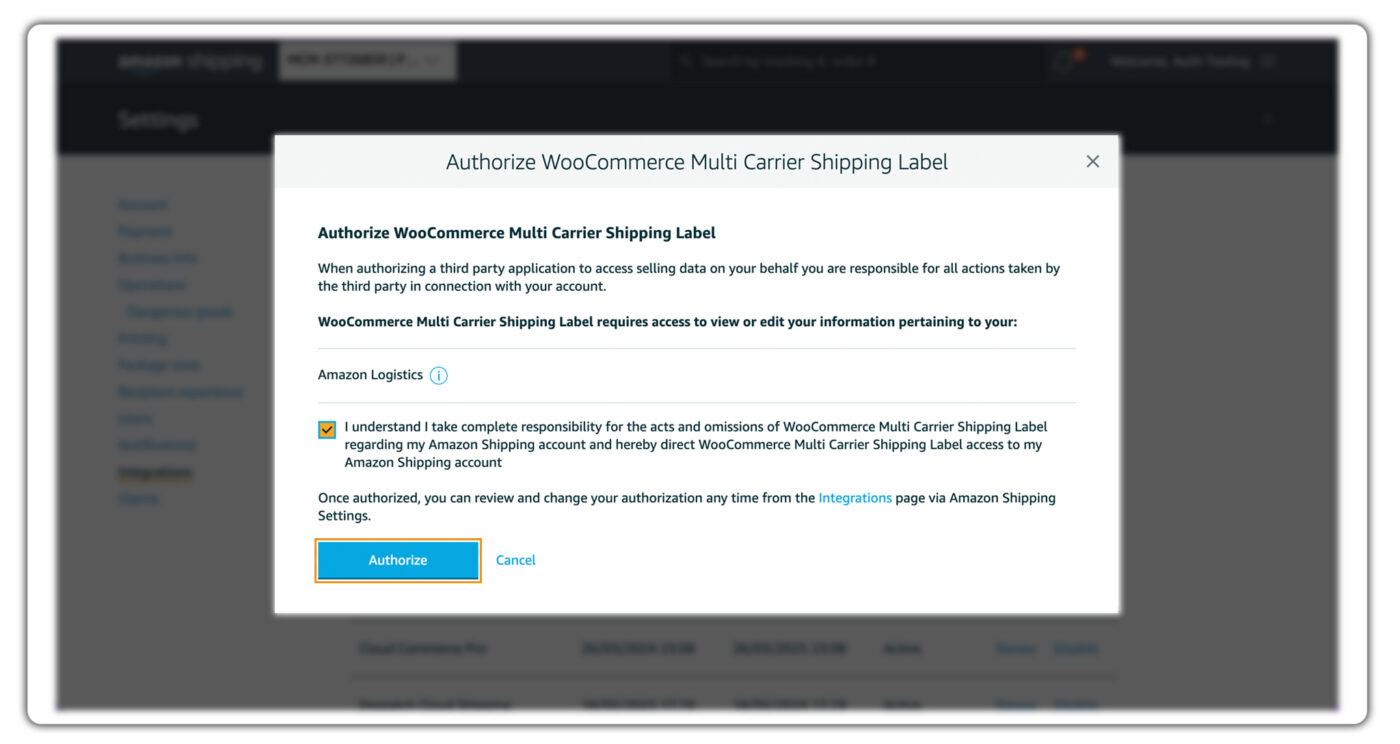
Click the checkbox to allow WooCommerce Multi Carrier Shipping Label to access your Amazon Shipping account, then click ‘Authorize‘
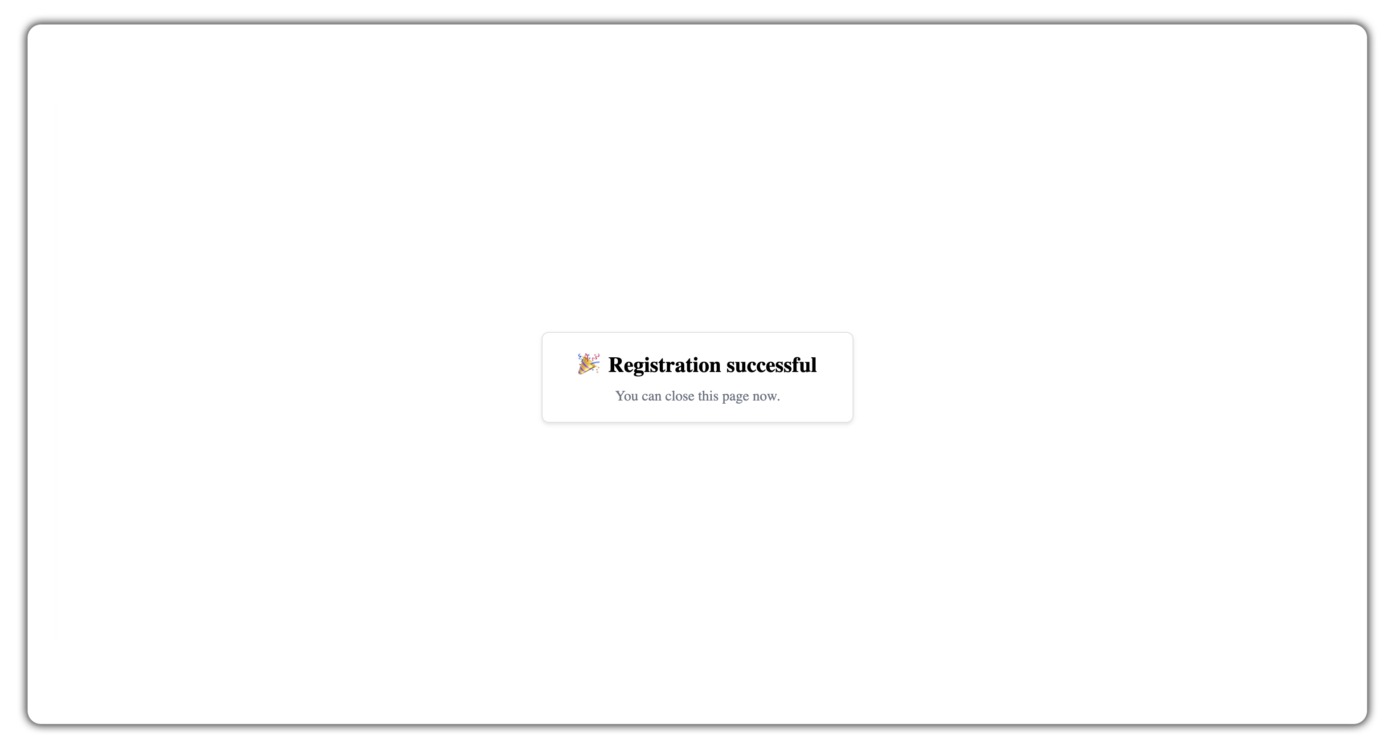
Upon successful registration, you will see the Registration successful message displayed below.
Once the registration is successful, the carrier account number automatically gets added to the carrier account details.

Now you can access Amazon Shipping services using the plugin. The plugin allows you to display Amazon Shipping rates, generate and print shipping labels in bulk, and track Amazon Shipping in real time.
Verify the Shipper or Warehouse Address
Once you add the Amazon Shipping account, verify the shipper address details. Ensure your warehouse address matches the one you set up in your Amazon Shipping Shipper Central account.
The address must be within the respective country to where you’re shipping. Amazon Shipping currently doesn’t support cross-border shipments
Click on the (≡) icon and visit Settings > Address and your store name will be listed there.

Click on the store name and you can see the shipper address and other details as shown below.
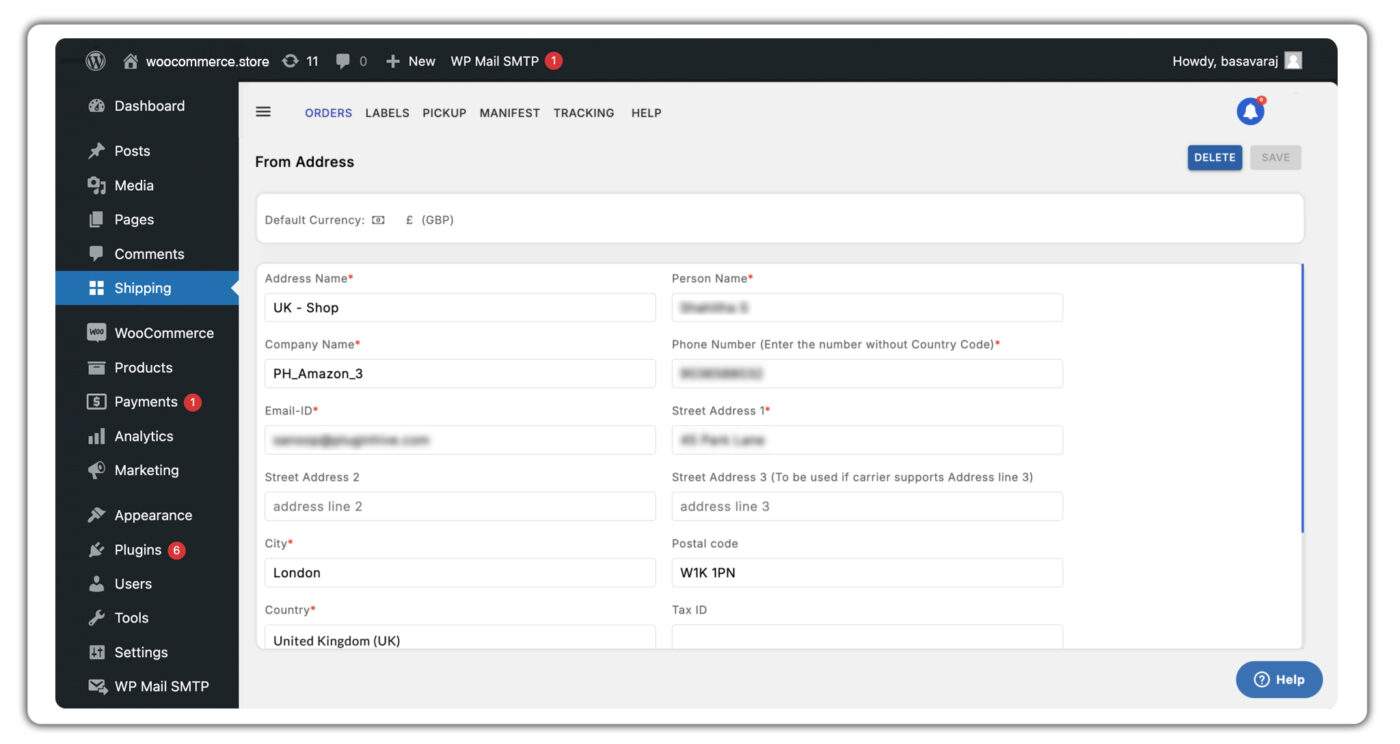
Review the shipper details. If changes are needed, make them and click “Save.“
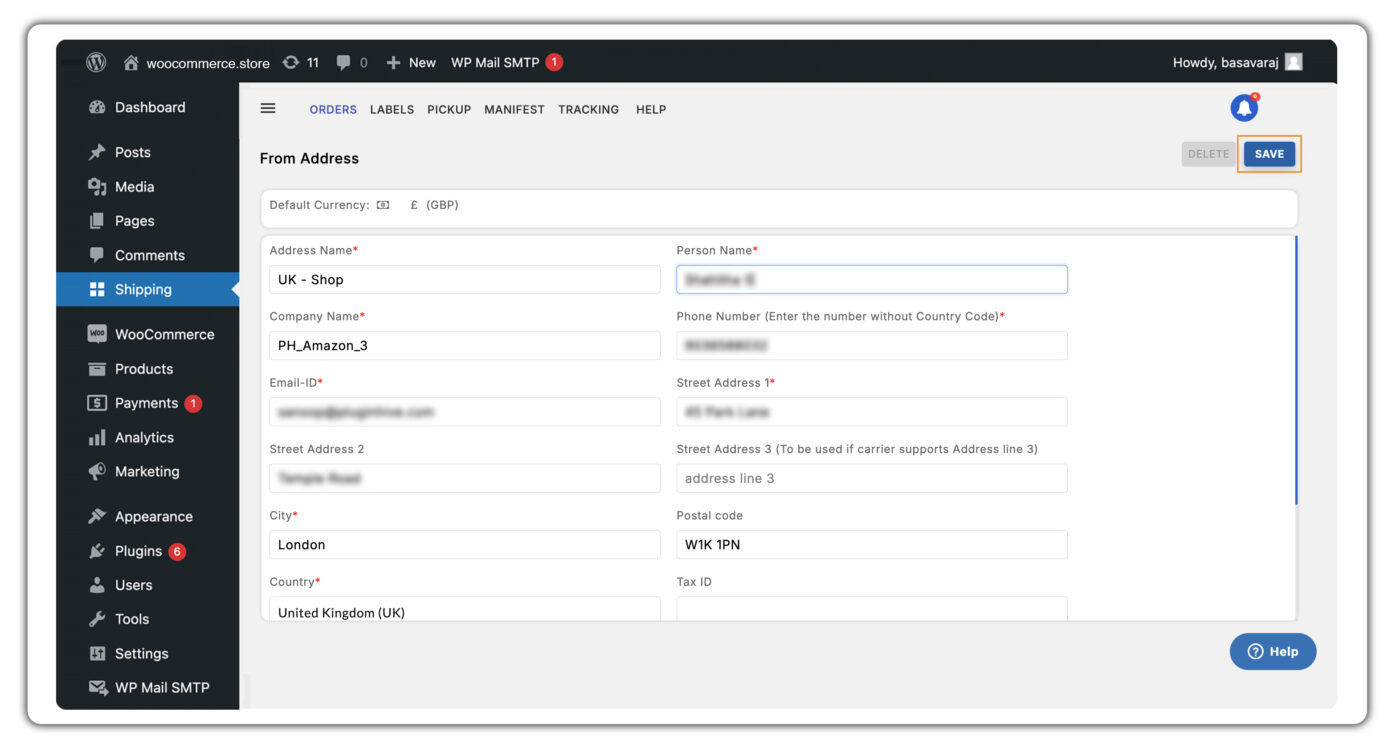
Please ensure the address entered is accurate, as it will be used to calculate shipping rates at the checkout page. Additionally, make sure to include the “Company Name” field, as Amazon Shipping uses this information to display your company name on the tracking portal and in any email communication related to your shipments.
Configure Weight & Dimensions for Your Products and Choose the Right Packaging Method
To calculate the accurate shipping rate for an order, you must configure the product’s weight correctly.
Reference: How to Configure the weight & dimensions for products and choose the right packaging method
Opt for the Preferred Amazon Shipping Services to be Displayed at the WooCommerce Checkout
The plugin automatically displays all the available Amazon Shipping rates on the WooCommerce checkout page. However, if you want to display shipping rates for a particular Amazon Shipping service on your WooCommerce checkout, you can do so using the Rate Automation functionality.
Click on the (≡) icon and visit Settings > Shipping Rates > Rate Automation, as shown below.

The plugin automatically creates rules for the shipping carriers that you add to help you choose the services that will be displayed on the WooCommerce store. Click on Edit to customize the shipping automation rules based on your preferences.
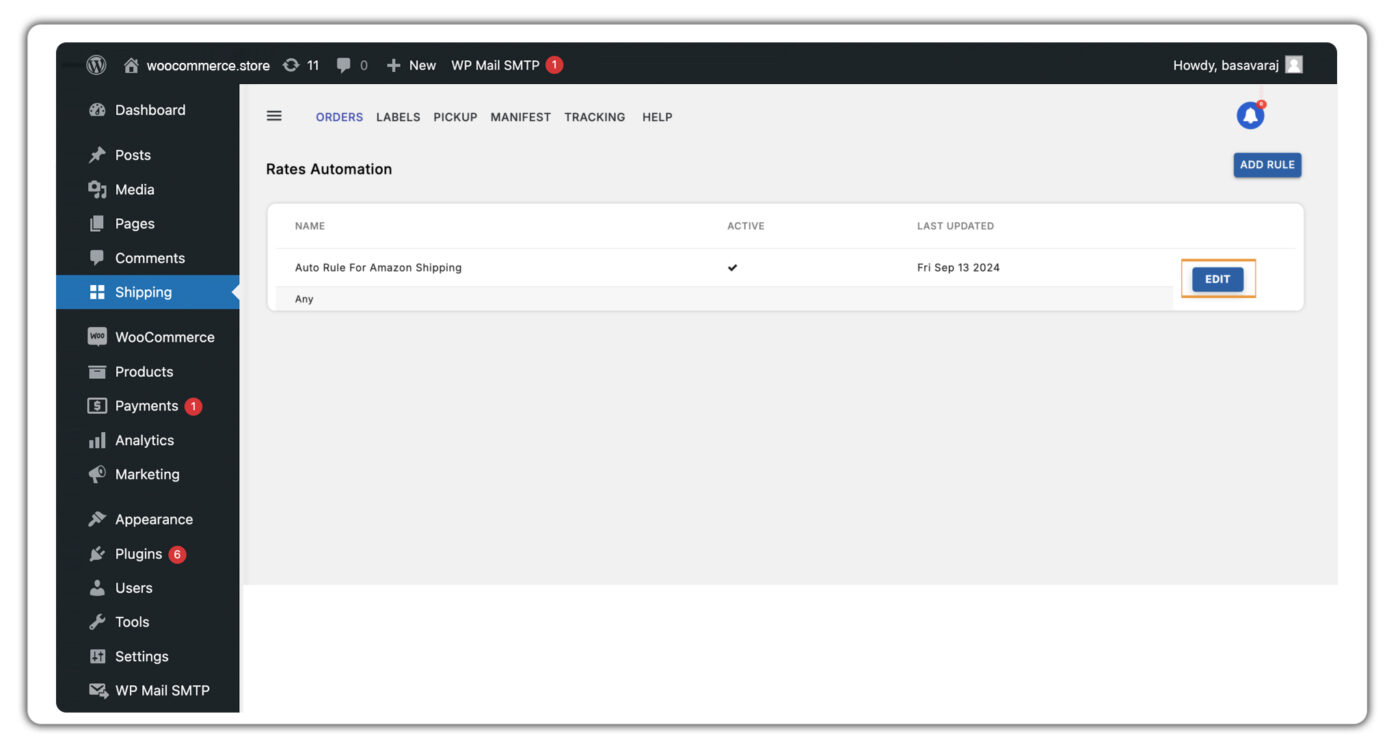
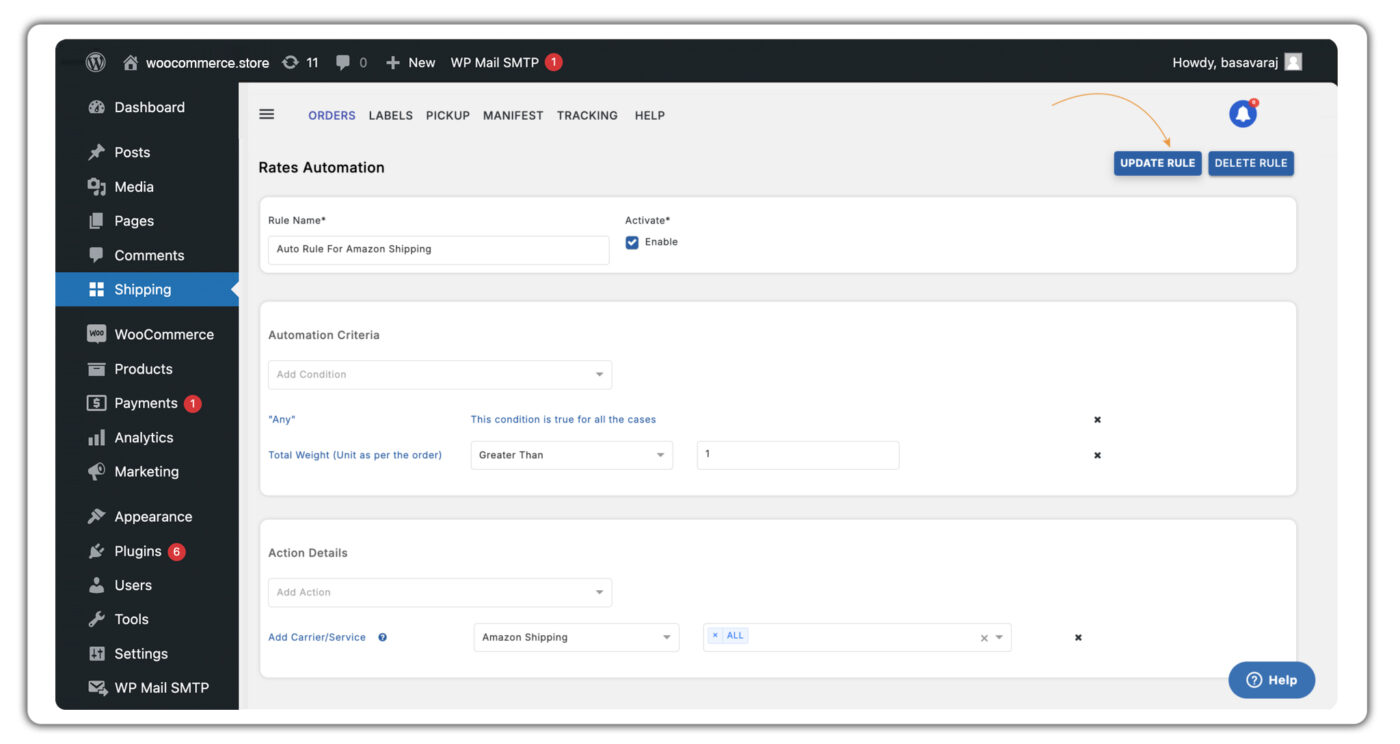
By default, the “Any” condition is selected in the automation criteria, which applies to all cases. Under the Action Details tab, the respective carrier, along with “All” services, will be selected by default.
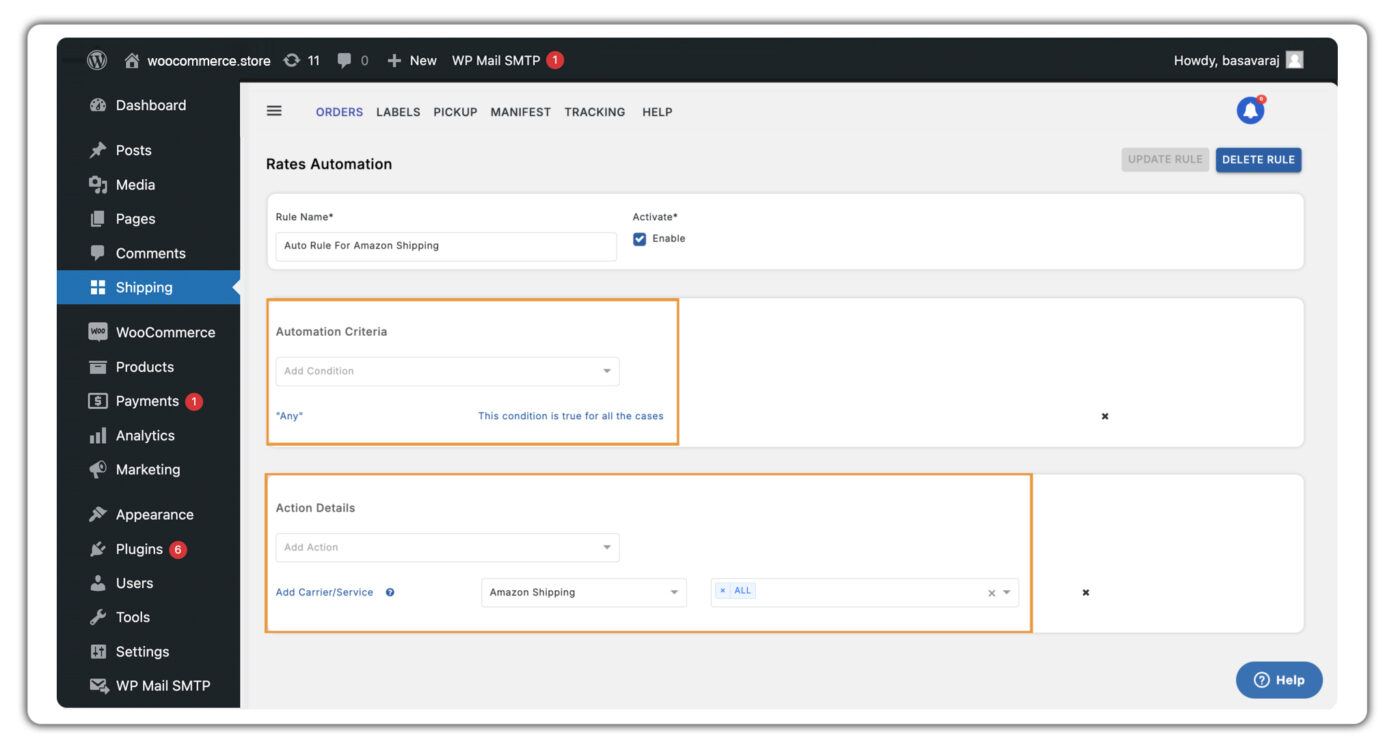
However, if you want to select your preferred Amazon Shipping service(s) that you want to display to your customers, then you may do as shown below:

However, you can always choose to calculate and display shipping rates for the above-selected shipping service(s) based on various conditions, such as,
- WooCommerce Shipping Zones
- The product quantity that the customer chooses
- Total weight of all the products
- Cart sub-total amount
- Shipping Classes
- Time of order placement
- Total weight range
- Total price range
Based on your preference, you can select any conditions and the plugin will calculate the shipping rates only if the conditions are matched.
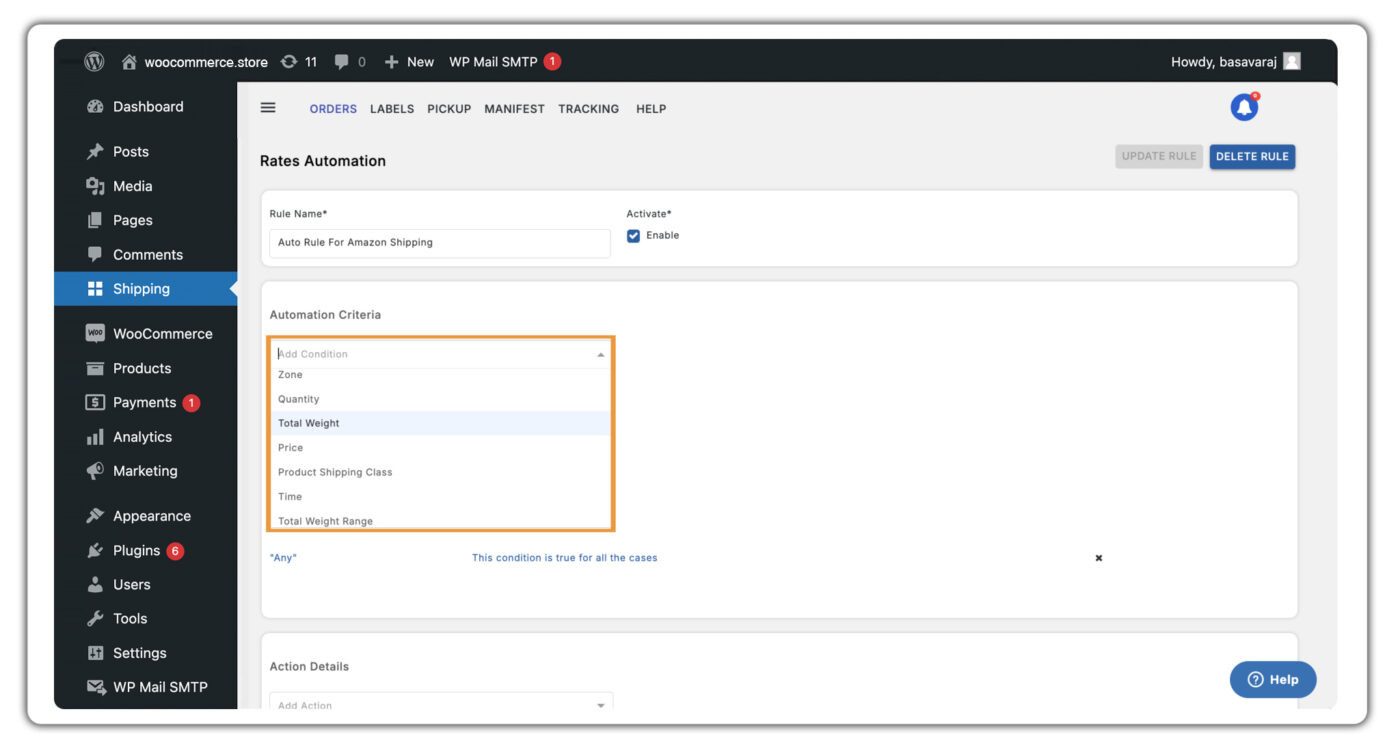
Click on the “Update Rule” once the required changes are made, as shown below.
Display Amazon Shipping rates on the WooCommerce checkout
Visit the store and add a product to the cart. Enter a shipping address and calculate the shipping cost. The Plugin will display the shipping cost for all the available Amazon Shipping services or the shipping services that you have selected based on your preference at WooCommerce checkout.
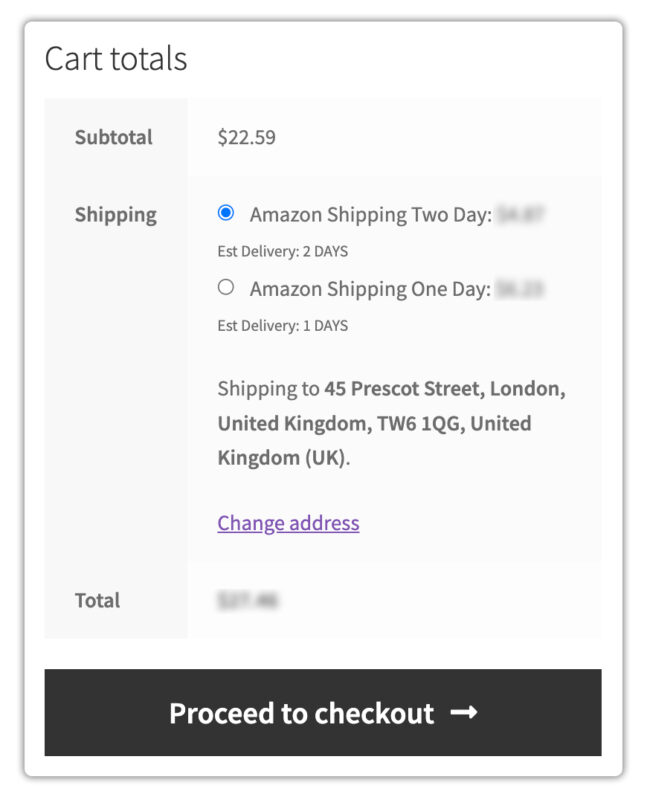
- Shipping rates are calculated based on product weight, dimensions, shipping origin and destination, packaging type, and selected special services (if any).
- Here’s a summary of the Amazon Shipping services available in different countries:
| Country | Service ID | Service Name | Carrier ID | Carrier Name |
|---|---|---|---|---|
| United States | std-us-swa-mfn | Amazon Shipping Ground | AMZN_US | Amazon Shipping |
| United Kingdom | SWA-UK-PREM | Amazon Shipping One Day | AMZN_UK | Amazon Shipping |
| United Kingdom | SWA-UK-2D | Amazon Shipping Two Day | AMZN_UK | Amazon Shipping |
| Spain | SWA-ES-PRIME-PREM | Amazon Shipping Express | AMZN_ES | Amazon Shipping |
| Italy | SWA-IT-PRIME-PREM | Spedizione nazionale express | AMZN_IT | Amazon Shipping |
| France | SWA-FR-PRIME-PREM | Amazon Shipping One Day | AMZN_FR | Amazon Shipping |
| India | SWA-IN-OA | Amazon Shipping Standard | ATS | Amazon Shipping |
Verify the Shipping Cost Displayed on the WooCommerce Checkout Page
If you encounter any issues, review the logs for more information. If a deeper investigation is needed, you can share the logs with Amazon Shipping support. You can check the logs by going to Settings > Shipping Rates > Request Log.

Click on the (i) icon in front of the most recent Shipping Rate Request, as shown below.

After viewing the request log, you can verify the Items, Package Details & Shipping Methods under this section:

Print the Amazon Shipping Labels for your WooCommerce Orders
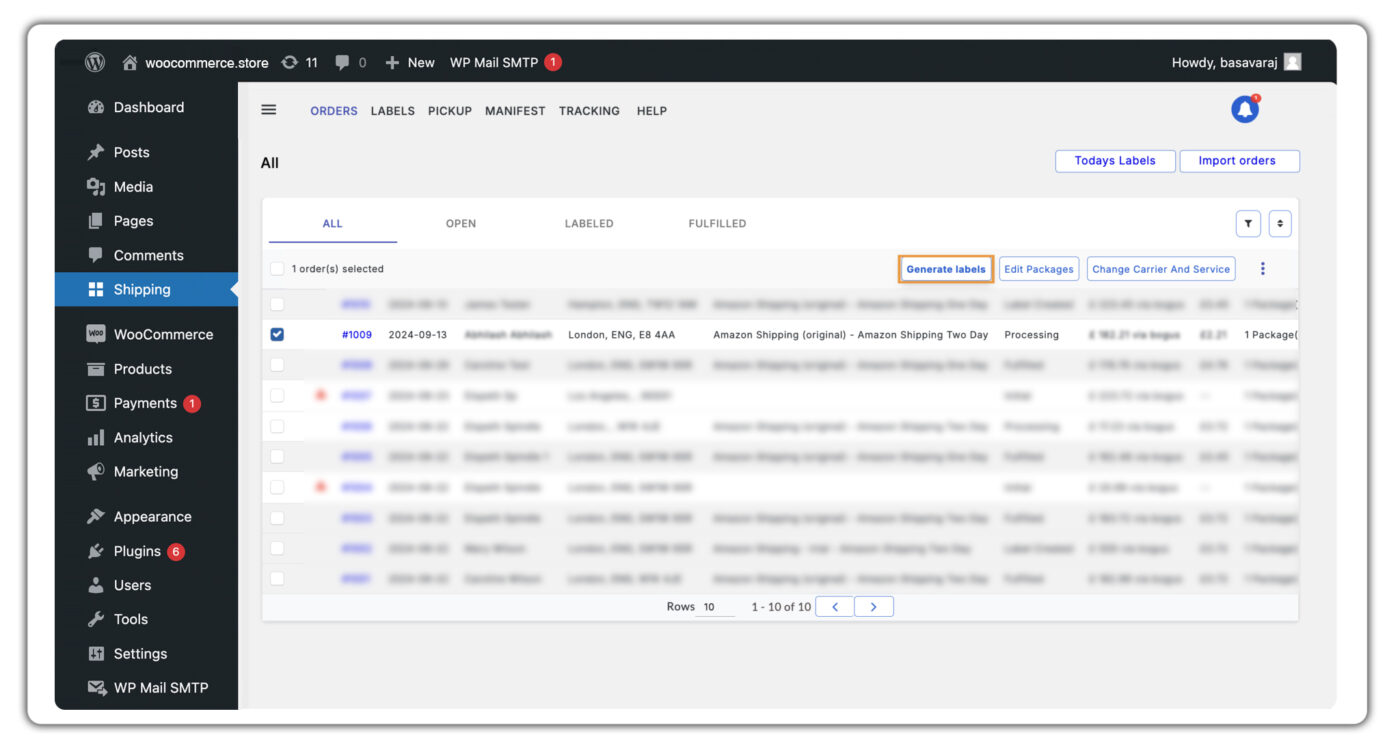
Visit the Orders tab and select the order(s) for which you want to generate and print a shipping label, and click on Generate Labels, as shown below.
Select the order(s) again and click on Print Labels to get the shipping labels for your orders, as shown below.
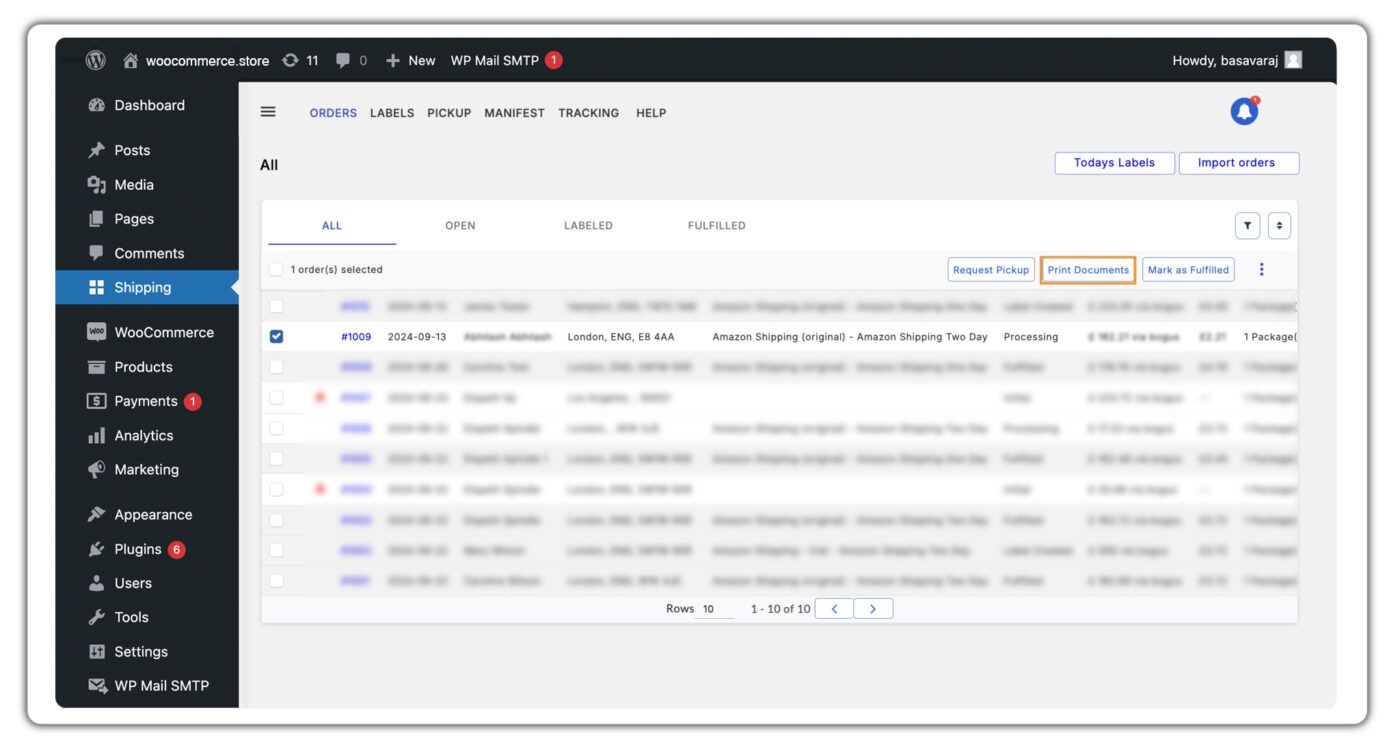
The plugin will automatically redirect you to another page to print the shipping labels along with other documents like the tax invoice as shown below.
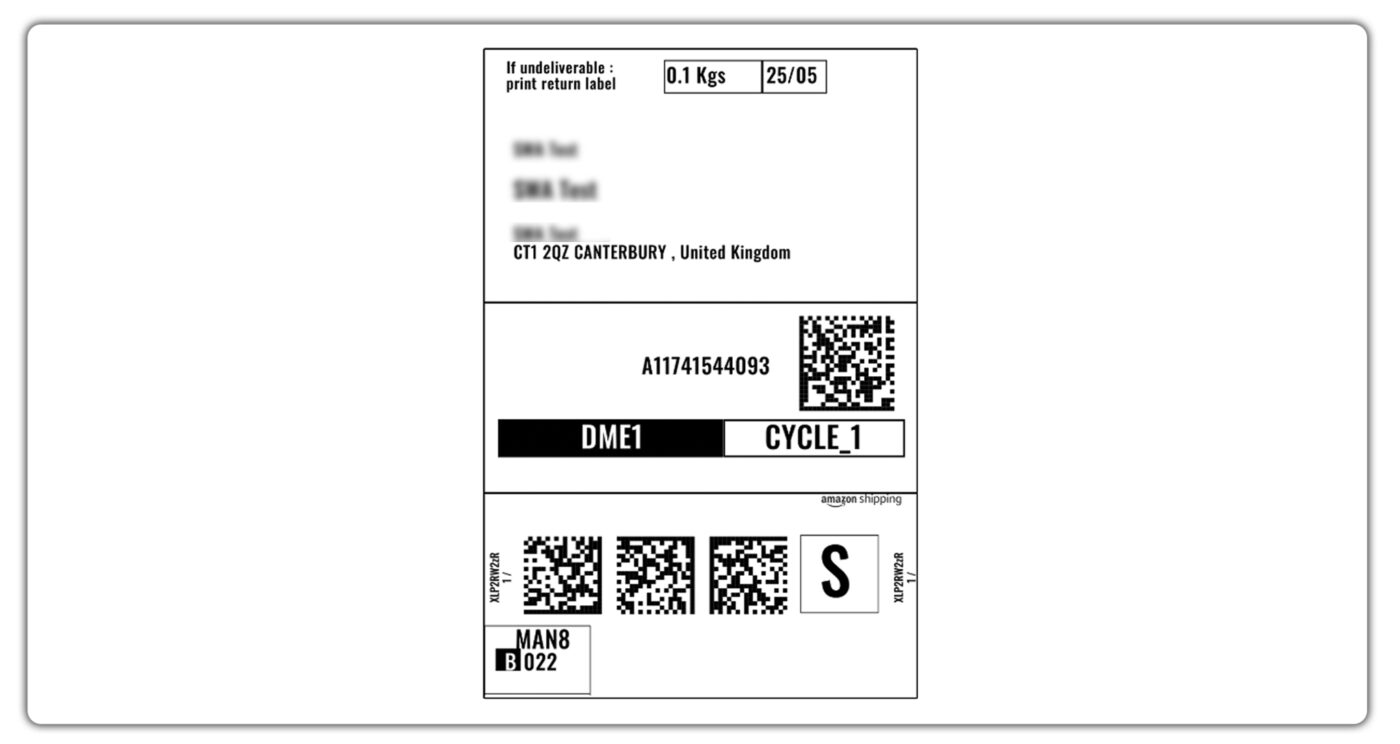
Pickup window should be pre-scheduled before attempting to generating a shipping label. In case of any issues in setting up the pickup window in Amazon Shipping Shipper Central, please contact Amazon Shipping support using your Shipper Central help pages.
Mark Orders as Fulfilled and Automatically Send Amazon Shipping Tracking Details to your Customers via Email
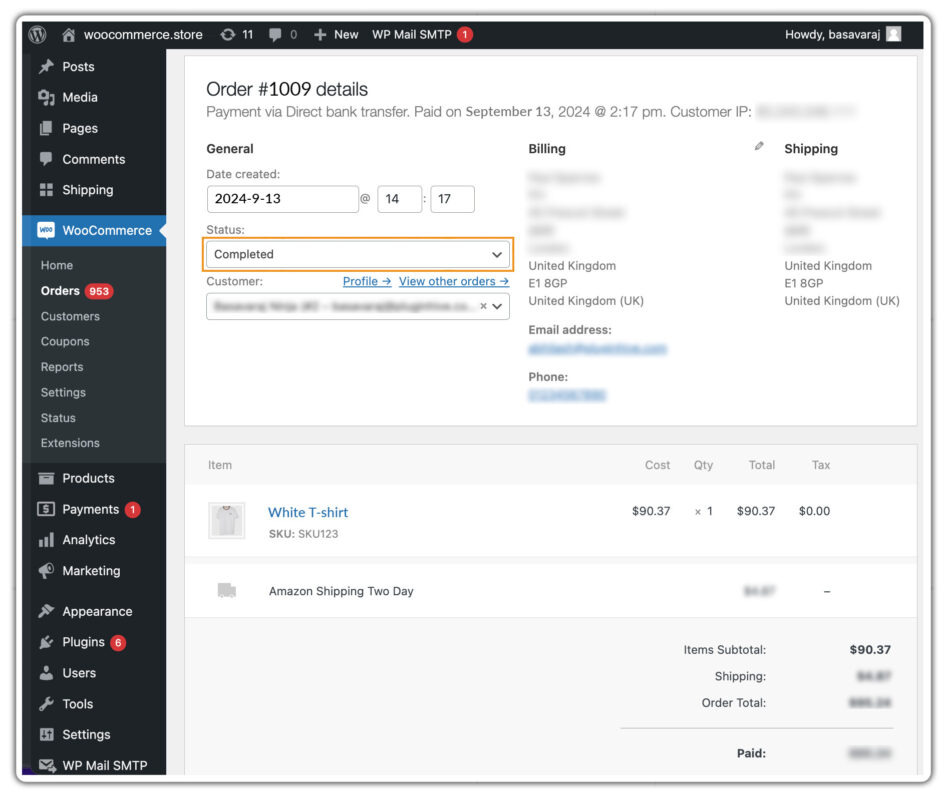
After generating and printing the label(s), you can visit the Orders tab & select all the orders that are ready to be shipped, and click on Mark As Fulfilled to fulfill these orders.

Once you mark the orders as fulfilled in the plugin, your WooCommerce orders will be automatically marked as completed. You can visit the WooCommerce > Orders page to check the order status and click on the order. In the image below, you can see the order is automatically marked as completed. Also, the shipment tracking details are automatically updated for the WooCommerce orders.
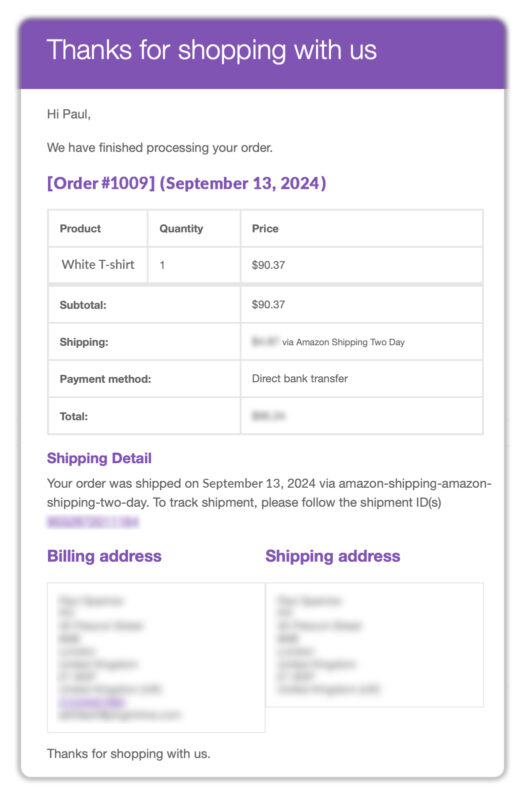
For the customers: The WooCommerce Shipping Services plugin automatically sends the tracking details to the customer via the WooCommerce Order Shipped Email, as shown in the image below.
Track your Amazon Shipping Orders
To track your orders, select the orders that are shipped and click on Track Your Orders. Or, you can track all the orders by visiting the Tracking tab, where the plugin will display the live tracking status of all the shipments, as shown below.

If you face any issues or have any queries on setting up the plugin, feel free to contact our support.