


How to Set Up PH India Post Shipping for WooCommerce
This step-by-step guide explains how to set up PH India Post Shipping for WooCommerce with Print Label plugin to display real-time India Post shipping rates, generate shipping labels, and enable order tracking directly from your WooCommerce store. You can follow the complete setup process or jump to a specific section based on your requirements.
In This Guide
- Download, Install, and Activate the Plugin
- Activate the Plugin License
- Navigate to Plugin Settings
- Configure API Credentials
- Add Shipper Address Details
- Verify Your Product Settings
- Display India Post Shipping Rates
- Configure India Post Shipping Services
- Configure Packaging Settings
- Configure Label Settings
- Printing India Post Shipping Labels
- Set Up India Post Shipment Tracking
- Advanced Settings
1. Download, Install, and Activate the Plugin
After purchasing the PH India Post Shipping for WooCommerce with Print Label plugin, download the ZIP file from your PluginHive account.
Log in to your PluginHive account and go to My Account > API Downloads. Download the plugin ZIP file. Then,
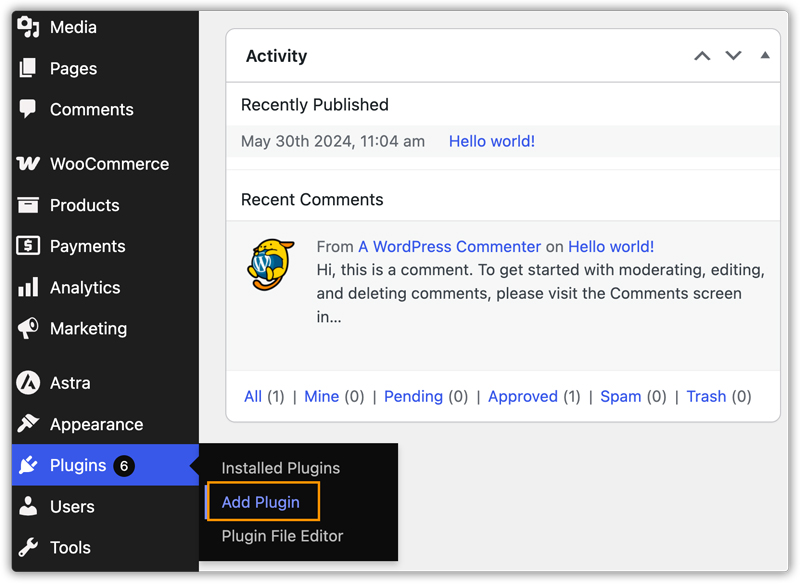
- Log in as the WordPress Admin of your online store. Navigate to Plugins > Add Plugin in your WordPress dashboard.
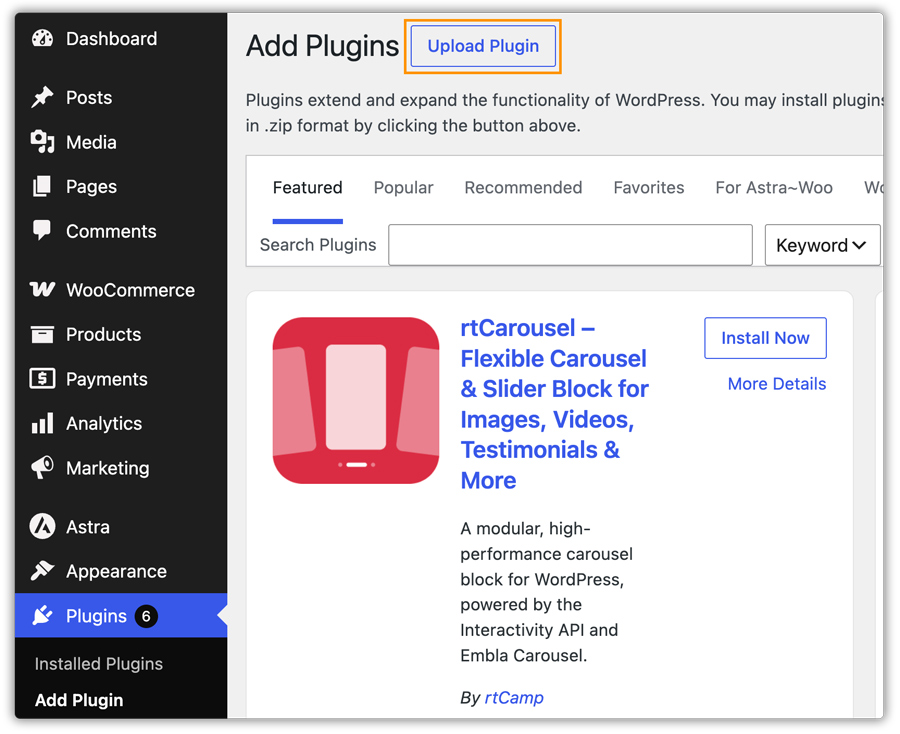
- Click Upload Plugin to upload the downloaded ZIP file.
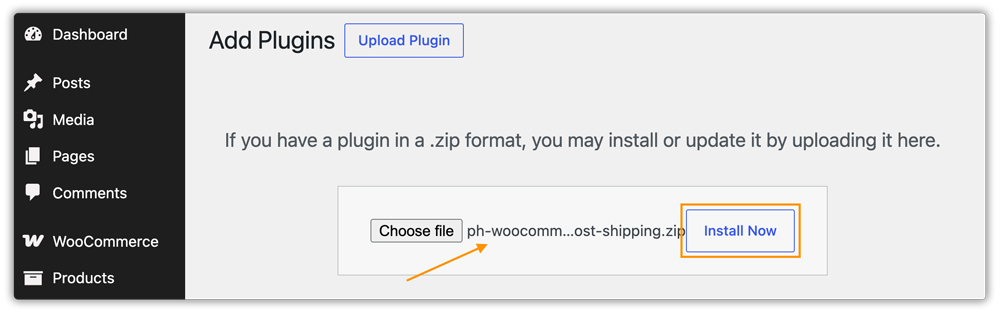
- Choose the file, and click Install Now.
- Once installation is complete, click Activate Plugin.

2. Activate the Plugin License
After installing and activating the plugin, you must activate your license to unlock all plugin features.
To get your license details, log in to your PluginHive Account and navigate to My Account > API Keys. Copy your Product Order API Key.
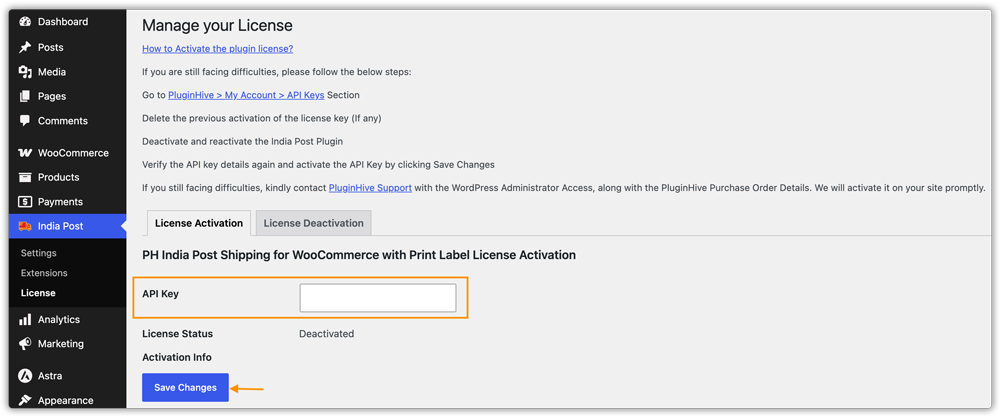
- Next, in your WordPress dashboard, go to: India Post > License
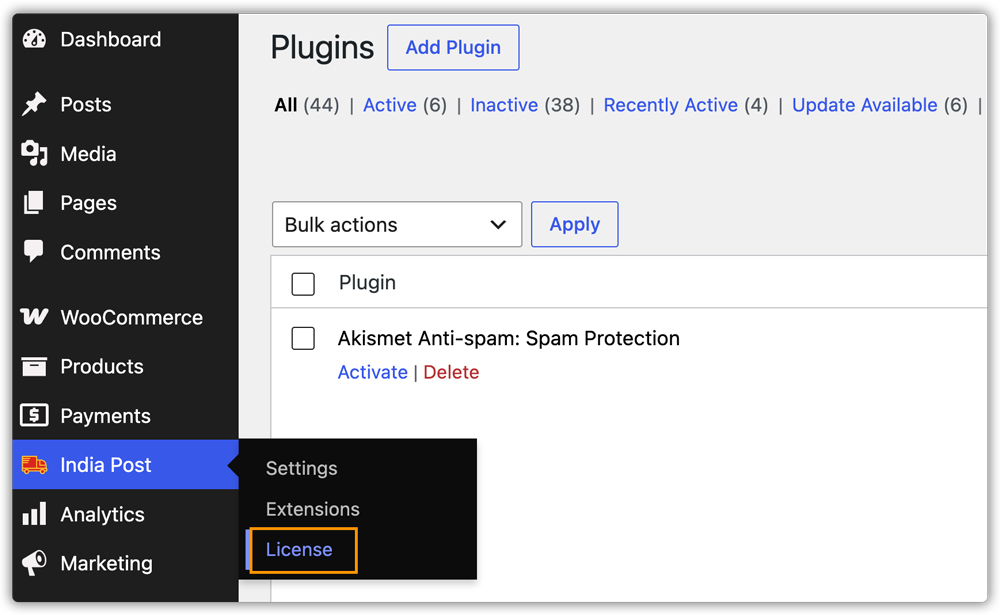
- Under License Activation, enter your Product Order API Key in the respective fields, then click Save Changes.
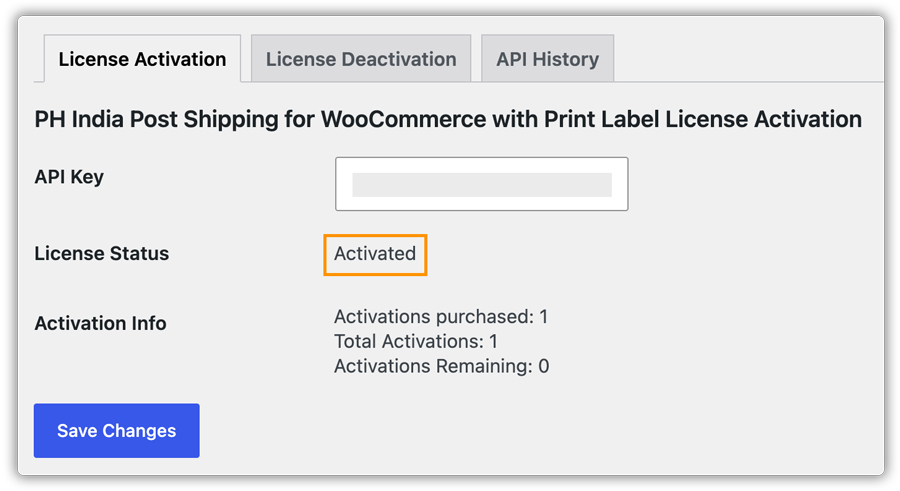
- Once the you activate the license, the API Key Status will display Activated, indicating that the plugin is fully licensed.
An active plugin license is required to access all plugin features and receive updates and support. While live India Post shipping rates will continue to be displayed after the license expires, features such as shipping label generation and other licensed functionality will no longer be available. To avoid interruptions, keep your license active and renew it before it expires.
3. Navigate to Plugin Settings
Once you activate the plugin, WooCommerce adds India Post Shipping as a new shipping method. You can access the plugin settings in two ways:
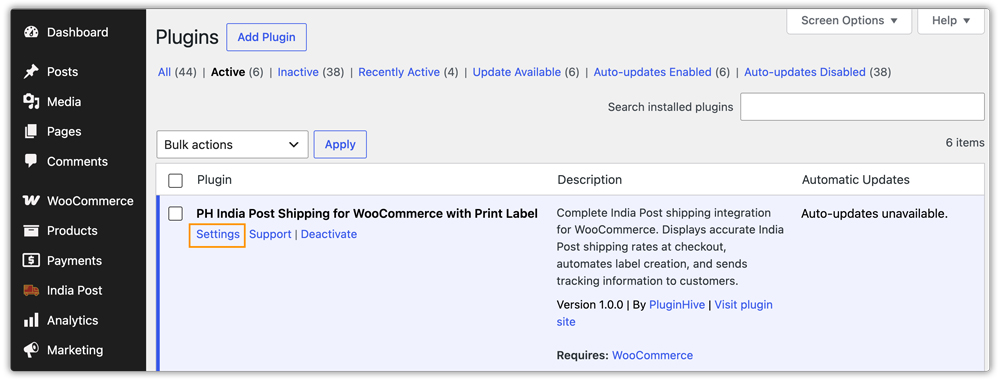
- Navigate to Plugins > Installed Plugins > PH India Post Shipping for WooCommerce with Print Label > Settings.
- Or navigate to WooCommerce > Settings > Shipping > India Post.
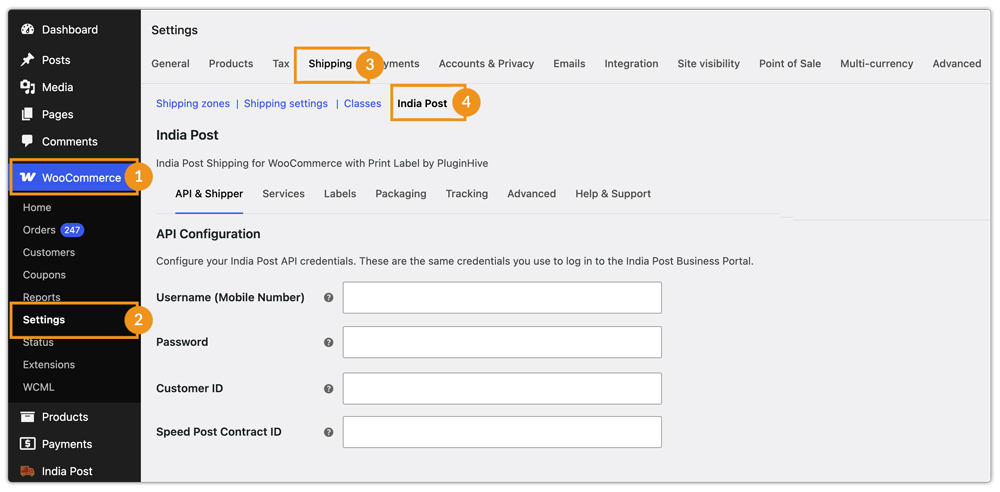
After opening the plugin settings, you will find the following tabs: API & Shipper, Services, Labels, Packaging, Tracking, Advanced, and Help & Support.
4. Configure API Credentials
Go to WooCommerce > Settings > Shipping > India Post. At the top of the API & Shipper tab, you will find the API Configuration section. These are the same credentials you use to log in to the India Post Business Portal.
- Username: Your India Post API username, which is your registered mobile number.
- Password: Your India Post API password.
- Customer ID: Your India Post Customer ID (e.g. 3000064781). Required for booking articles and generating labels.
- Speed Post Contract ID: Your India Post Speed Post contract ID. Required for Speed Post bookings.
- Business Parcel Contract ID: Your India Post Business Parcel contract ID. Required for Business Parcel bookings.
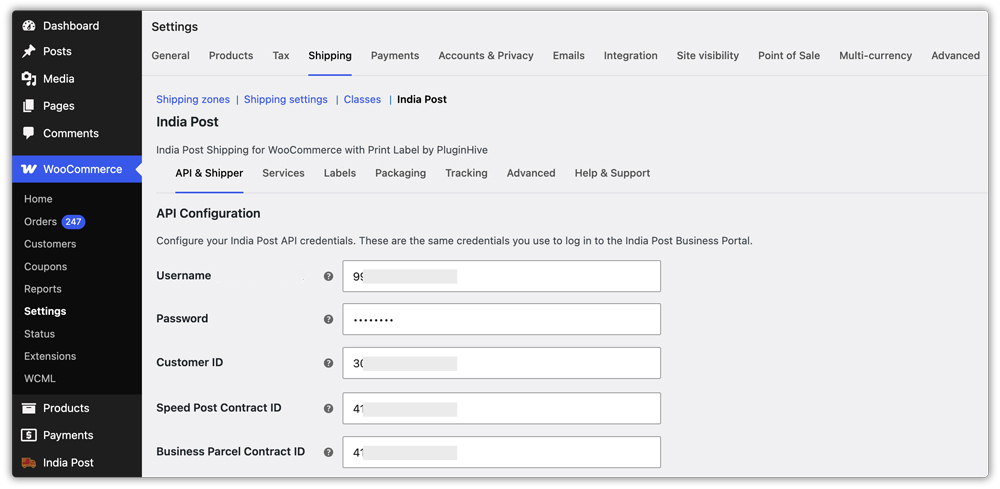
You need separate Contract IDs for Speed Post and Business Parcel. Contact India Post to obtain these if you do not have them already.
5. Add Shipper Address Details
Below the API details, you will find the Shipper Settings. Enter the address from which you will dispatch your orders. This can be your store address, warehouse, or any other dispatch location.
- Shipper Name: The name associated with your India Post account. Used for rate calculation and label printing. Required (3–40 characters).
- Company Name: Your company name as it should appear on shipments.
- Email: Your contact email address (max 50 characters).
- Phone Number: Your contact phone number. Required by India Post for shipping and shipment communication.
- Shipper Address Line 1: Primary street address of the shipment origin. Required (max 40 characters).
- Address Line 2 (Optional): Additional address information such as a floor or suite number (max 40 characters).
- City: Shipment origin city. Required (max 40 characters).
- State: Select the shipment origin state from the dropdown. Required.
- Sender PIN Code: Your 6-digit India Post PIN code. Used for rate calculation and label generation. Required.
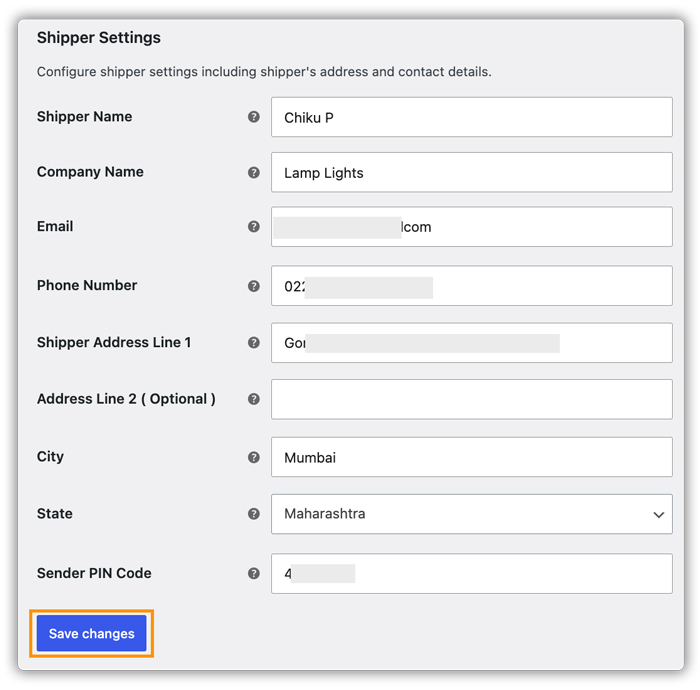
Click Save Changes after filling in all required fields.
6. Verify Your Product Settings
To get accurate India Post shipping rates and generate valid labels, your products must have correct weight and dimension values set in WooCommerce.
Add Product Weight and Dimensions
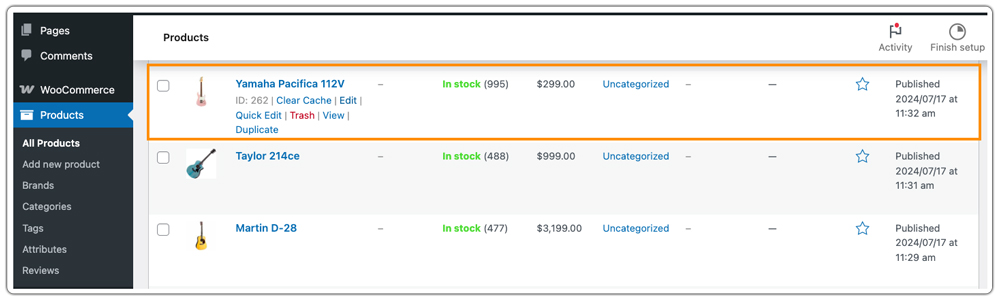
- Go to WooCommerce > Products and open the product you want to configure.
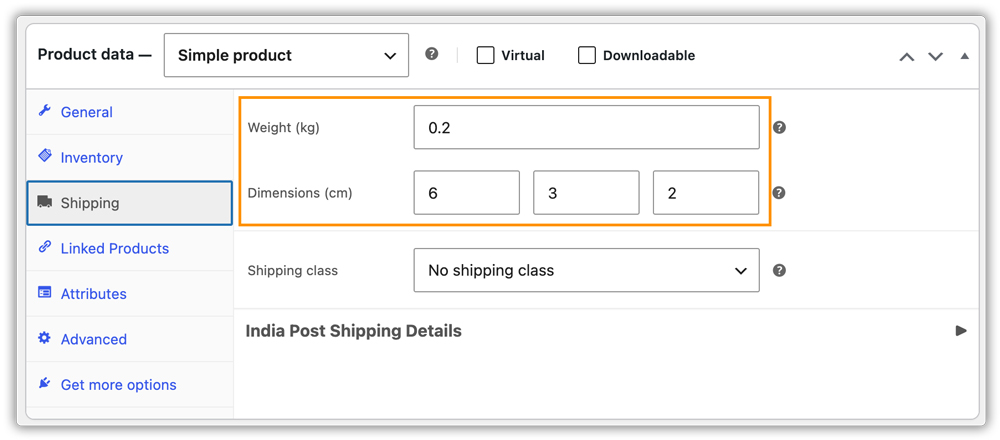
- Under Product Data, click the Shipping tab and enter the product’s Weight, Length, Width, and Height.
- Assign a Shipping Class if applicable.
Add India Post Shipping Details at Product Level
In the same Shipping tab, scroll down to the India Post Shipping Details section and configure the following:
- Pre-Packed Product: Enable if this item ships in its own pre-packed box. The plugin treats it as an individual package regardless of the packing method set in the plugin’s Packaging settings.
- Proof of Delivery (POD): Enable if this product requires proof of delivery. If any product in a package has POD enabled, the entire package will use POD.
- Insurance Value: The insured value (in INR) for this product. This field is only visible when you have enabled the Insurance in the Services tab.
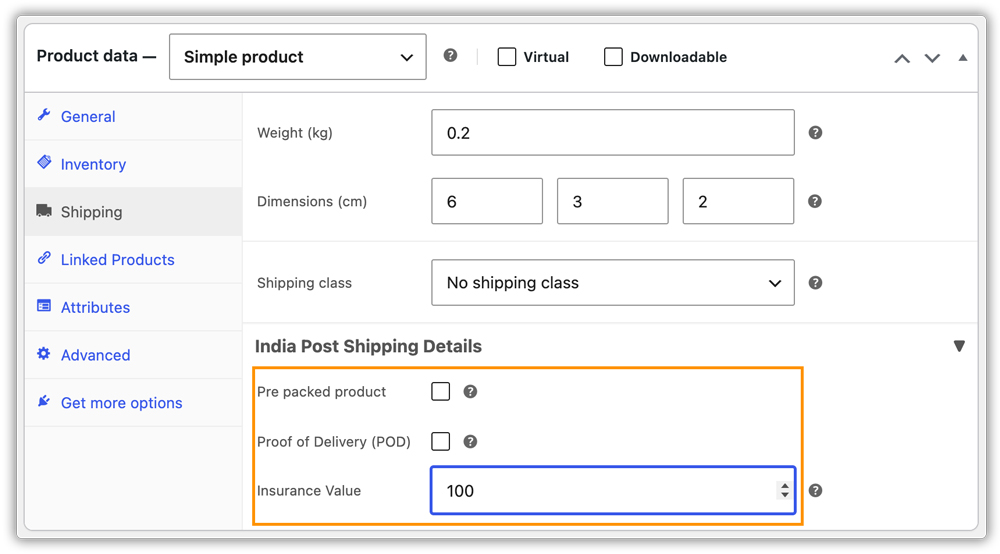
The India Post Shipping Details fields are also available at the variation level for variable products.
Set Minimum Product Weight and Dimensions
India Post requires product weight and dimensions to meet certain minimum values for rate calculation. Go to WooCommerce > Settings > Shipping > India Post > Packaging tab and set the Minimum Product Weight and Minimum Dimensions values.
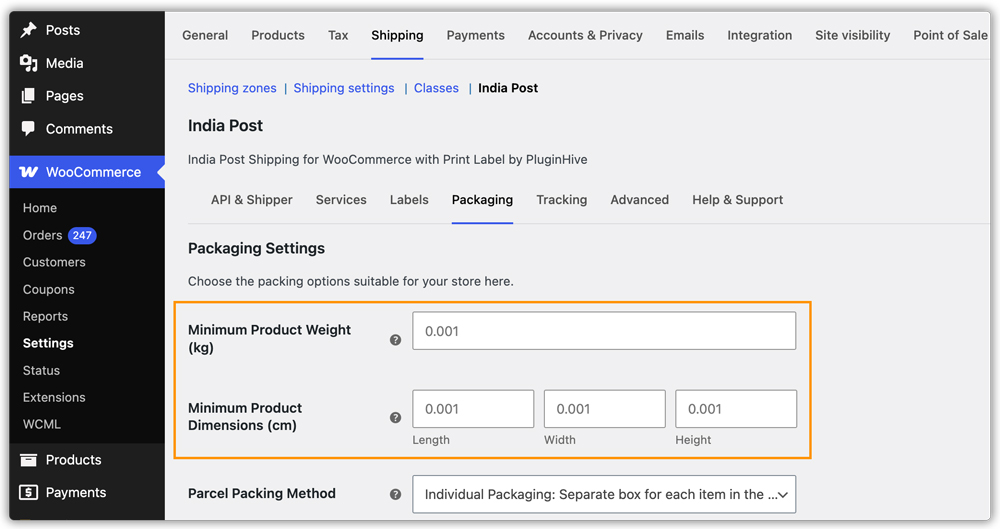
If you do not configure product dimensions, the plugin uses the minimum values configured here as fallback values. It also automatically adjusts any dimensions below the configured minimum before fetching shipping rates from India Post.
7. Display India Post Shipping Rates
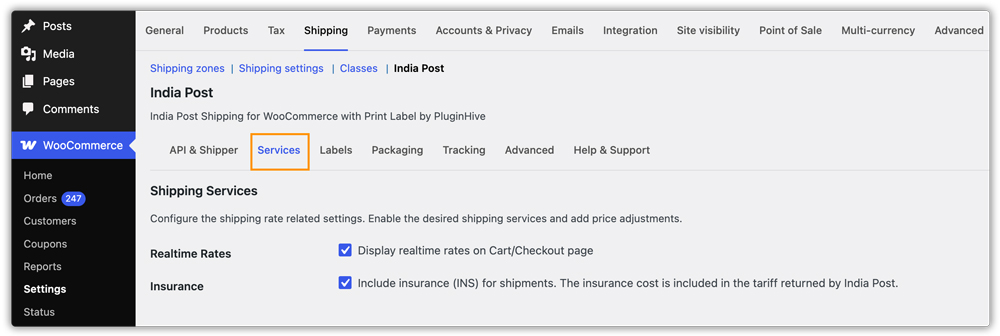
Go to WooCommerce > Settings > Shipping > India Post > Services tab to configure how shipping rates are fetched and displayed at checkout.
Enable Real-Time Rates
Tick the Real-Time Rates checkbox to fetch live India Post shipping rates and display them on the Cart and Checkout pages. This option is enabled by default.

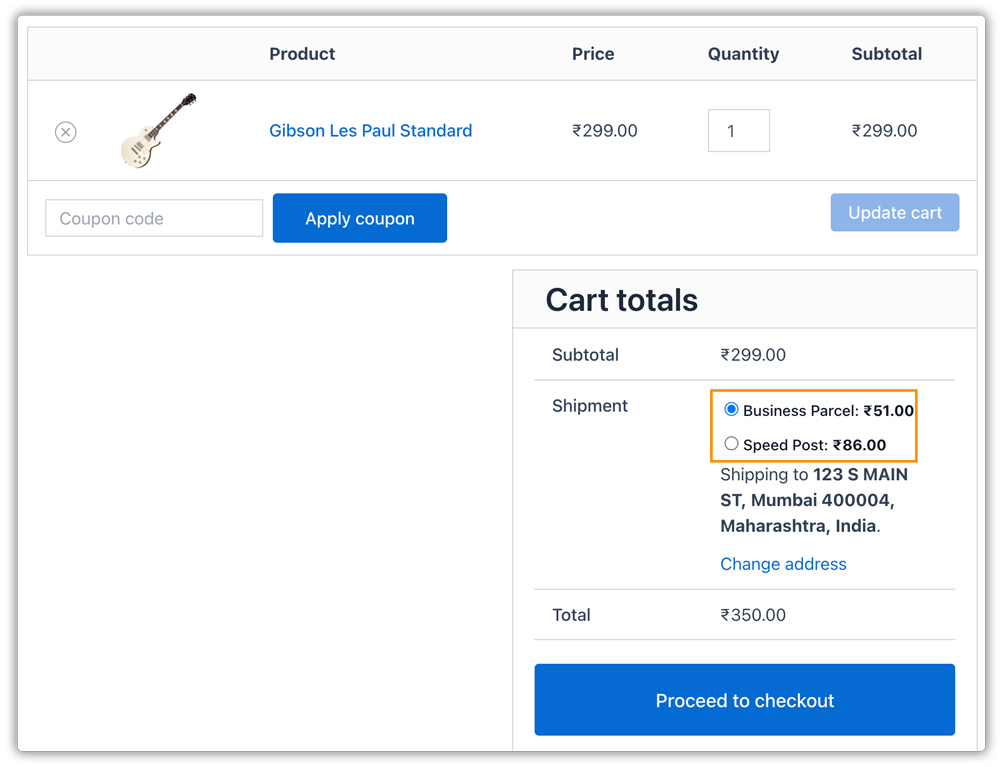
Once enabled, real-time rates will appear at checkout for customers to choose from.
Enable Insurance
Enable Insurance to automatically include shipping insurance (INS) on all shipments. The insurance cost is included in the tariff returned by India Post and added to the rate displayed at checkout. When enabled, an Insurance Value field also becomes available on each product’s Shipping tab.

Enable Proof of Delivery (POD)
Enable Proof of Delivery to request POD for all shipments. India Post adds the POD cost to the returned tariff. You can also enable POD for individual products from the India Post Shipping Details section on the product edit page.

Add Fallback Rate
You can disolay the Fallback Rate at checkout if India Post does not return any rates for an order — for example, during an API timeout. This ensures customers can still complete checkout. Enter the flat rate amount in INR in the Fallback Rate field.

Leave this field blank to disable the fallback.
Add Currency Conversion Rate
If your WooCommerce store uses a currency other than INR, enter the conversion rate from your store currency to Indian Rupee in the WooCommerce Currency to INR Conversion Rate field. The plugin uses this value to send correctly converted amounts to India Post for rate calculation. It will be set to 1 if your store already uses INR.
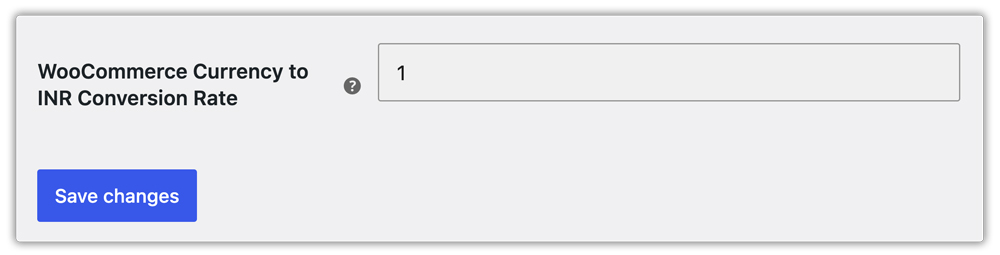
Click Save Changes.
8. Configure India Post Shipping Services
In the Rates & Services tab, below the general rate settings, you will find the Shipping Services section. Enable the services you want to offer and customise how they appear to customers.
Available Services
The plugin supports the following India Post domestic shipping services:
- Speed Post (SP): India Post’s express tracked delivery service. Requires a Speed Post Contract ID in the API Configuration section.
- Business Parcel (BP): India Post’s standard business parcel service. Requires a Business Parcel Contract ID in the API Configuration section.
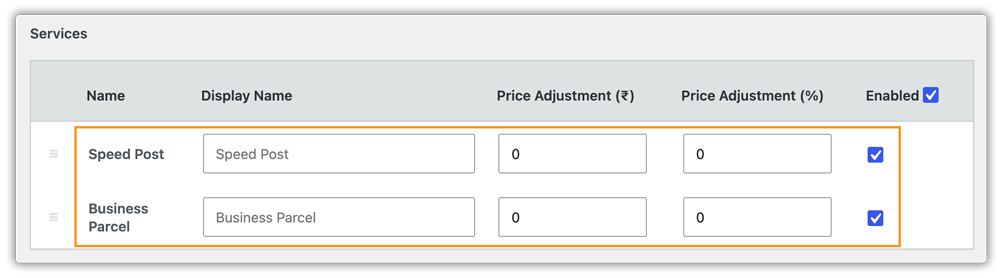
Enable the services you want to offer at checkout. You can also set a custom Display Name for each service — this is the label shown to customers at checkout instead of the default service name.
Adjust Shipping Rates
For each service, you can increase or decrease the rate displayed at checkout. Two adjustment types are available and can be used independently or in combination:
- Price Adjustment (INR): A fixed rupee amount added to or subtracted from the India Post rate. Use a minus sign (–) to subtract.
- Price Adjustment (%): A percentage of the base rate added to or subtracted from it. Use a minus sign (–) to subtract.
When both are used together, the fixed amount is applied first, and the percentage is then calculated on the resulting value.
Example: If the Speed Post rate is ₹100, a fixed adjustment of ₹20 and a percentage adjustment of 10% gives a displayed rate of ₹132 (₹100 + ₹20 = ₹120, then 10% of ₹120 = ₹12, total ₹132).

Display India Post Services Based on Shipping Zones
To show specific India Post services only to customers in certain regions, use WooCommerce Shipping Zones.
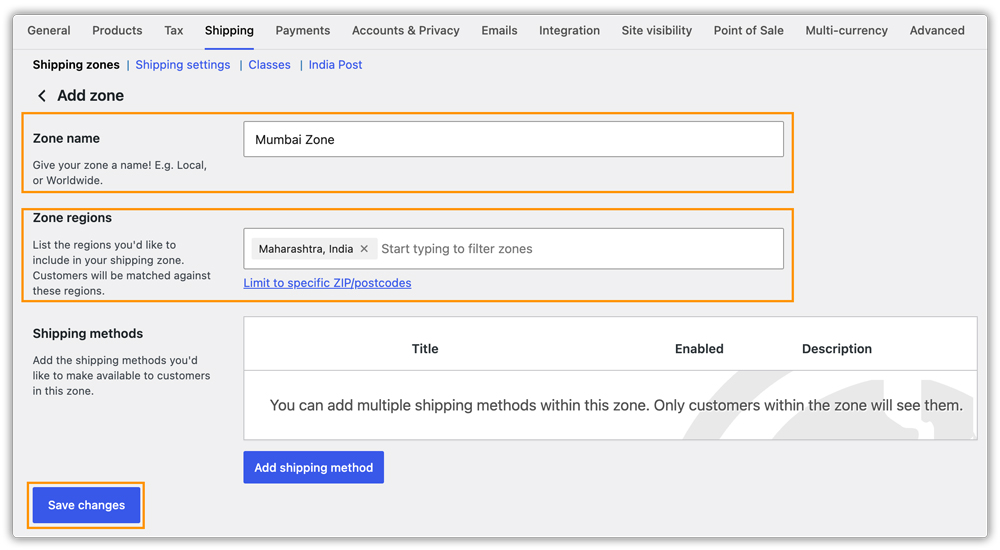
- Go to WooCommerce > Settings > Shipping > Shipping Zones.
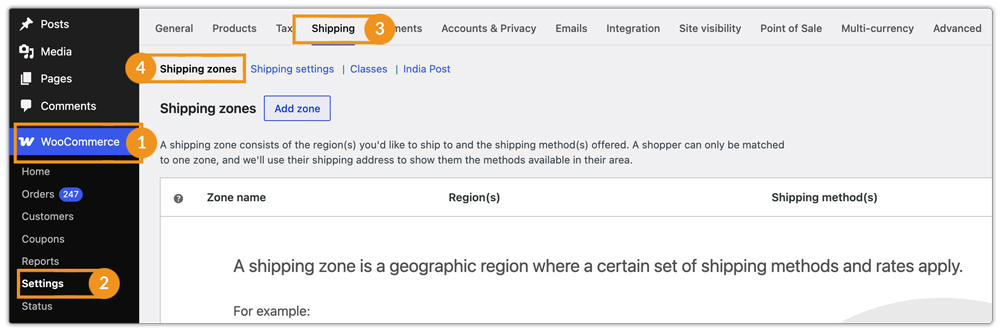
- You can edit the existing zone, or click Add Zone to create a new one.
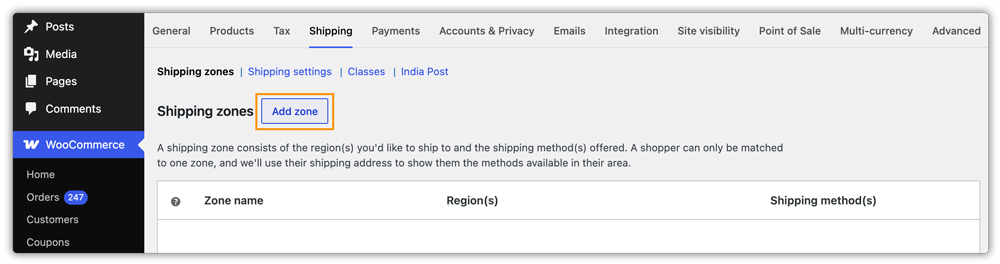
- Name the zone, select the relevant region(s), and click Save Changes.
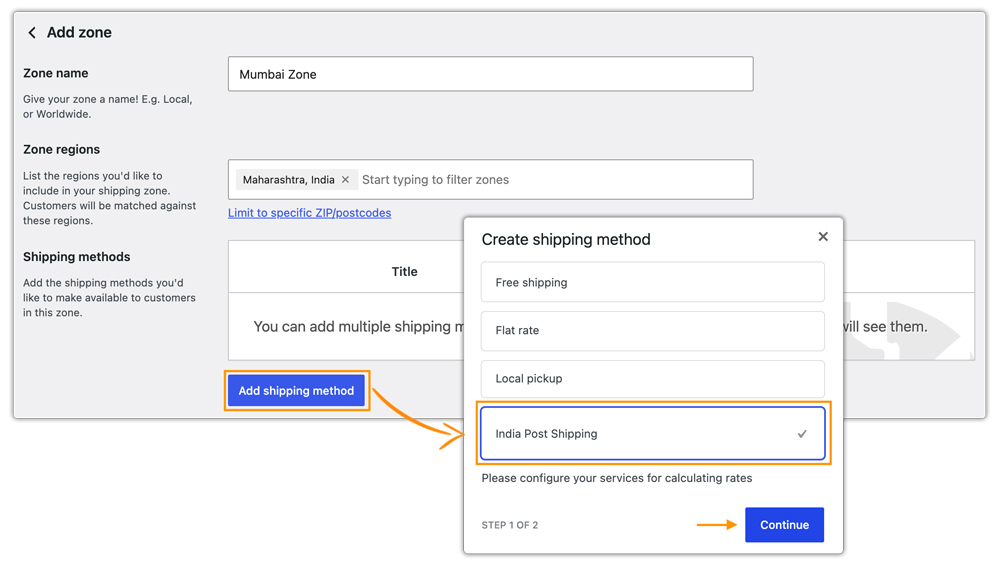
- Click Add Shipping Method, select India Post Shipping, and click Continue.
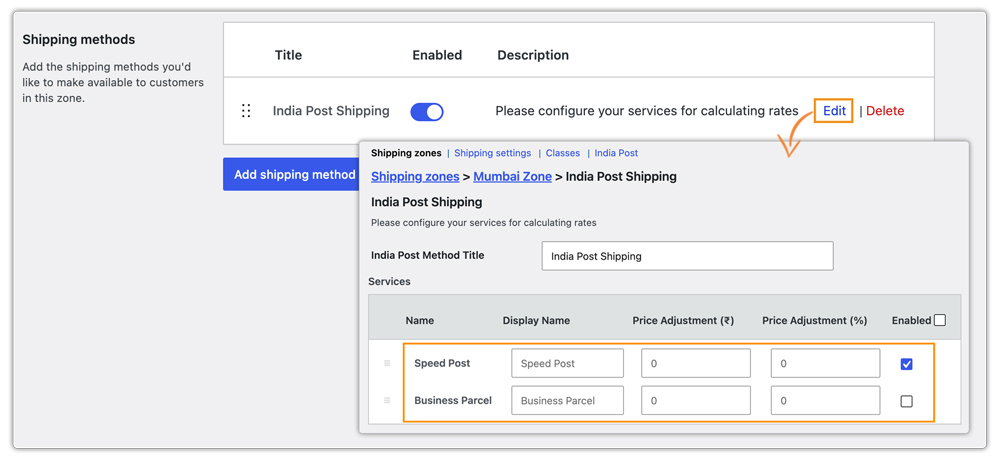
- Click Edit next to the India Post Shipping method in the zone. Enable the method, select the services for that zone, and click Save Changes.
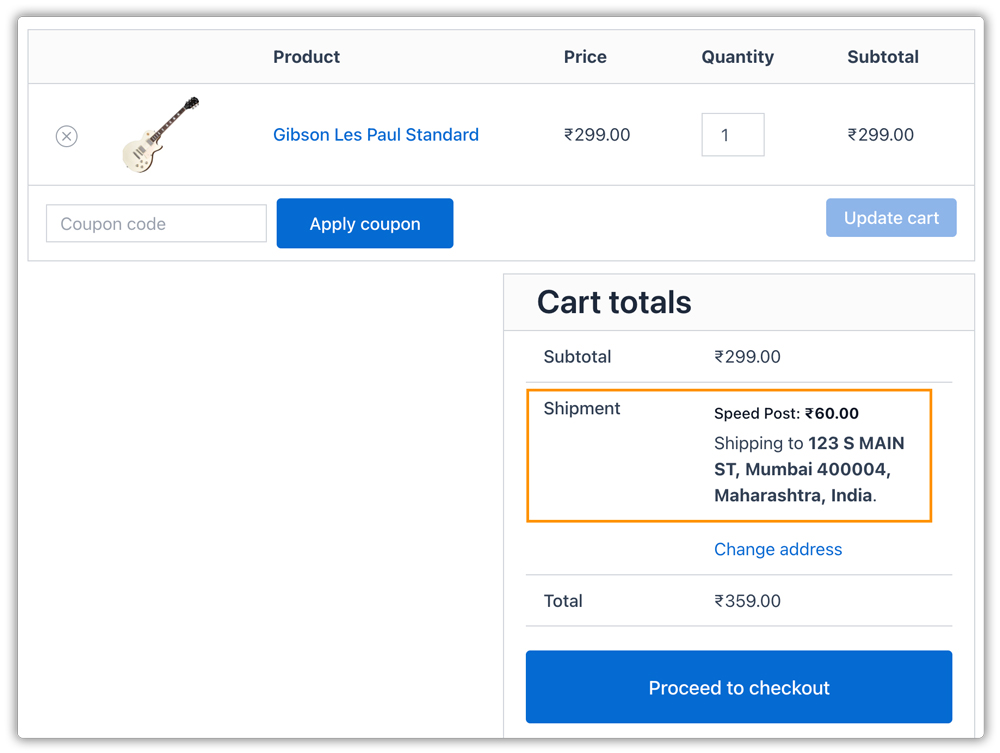
Customers whose shipping address falls within that shipping zone will see only the India Post services you’ve enabled for that zone, provided those services are available for their destination.
When India Post services are configured inside a Shipping Zone, make sure the same services are disabled in the global Rates & Services settings. Otherwise, the same services may appear from both configurations, resulting in duplicate rates at checkout.
9. Configure Packaging Settings
Go to WooCommerce > Settings > Shipping > India Post > Packaging tab. This tab controls how cart items are grouped into packages before shipping rates are calculated and labels are generated.
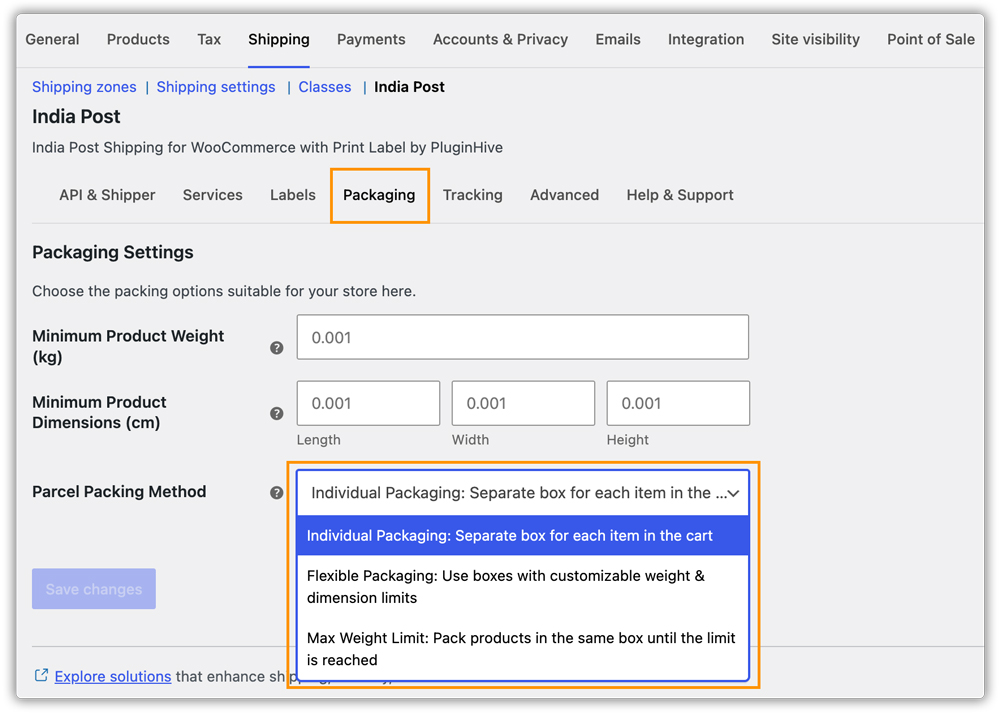
Individual Packaging
Each item in the order is packed into its own separate package. Shipping costs are calculated per item, and a separate label is generated for each product.

Example: If a customer orders 2 units of a product, each unit ships in its own box and two separate labels are generated.
Flexible Packaging
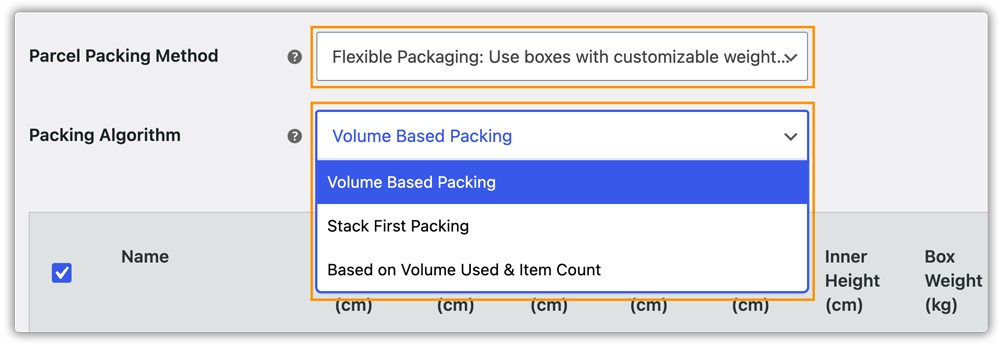
Items are packed into custom boxes that you define. The plugin selects the best-fitting box automatically based on product dimensions and weight. When this method is selected, a Packing Algorithm setting appears. Choose how items are fitted into boxes:
- Volume-Based Packing: Packs items based purely on available box volume. This is the default algorithm.
- Stack First Packing: Stacks items vertically before filling the remaining space.
- Based on Volume Used & Item Count: Balances both volume utilisation and item count to avoid overfilling boxes.
A Box Details table appears below where you can define your custom boxes. Click Add Box to add new boxes. For each box, enter a name, outer dimensions (Length, Width, Height), inner dimensions, empty box weight, maximum item quantity, and maximum weight per box.
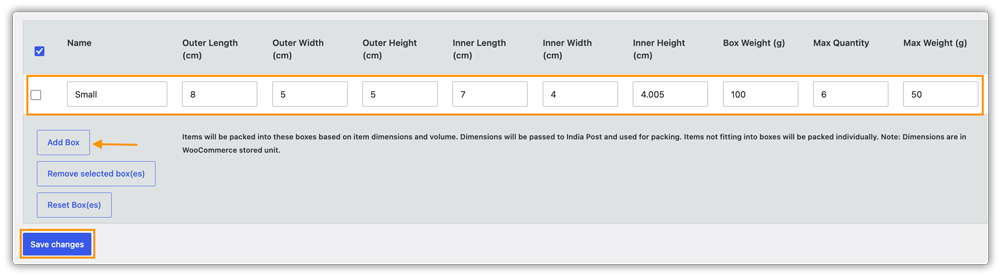
You can remove and reset the boxes by selecting and clicking the respective buttons. Click Save Changes to save your boxes.
India Post does not publish standard box sizes, so no pre-defined boxes are loaded. You must add your own custom boxes when using Flexible Packaging.
Max Weight Limit
The plugin packs items into a single box until the maximum package weight is reached, then starts a new box for the remaining items. This is the default packing method and requires only product weights, not product dimensions.
- Box Weight: The weight of the empty box itself in your store’s configured weight unit. Default is 0.
- Max Package Weight: The maximum total weight (items + box weight) allowed per package. Default is 10.
- Max Package Quantity: Maximum number of items allowed per package. Set to 0 for no item count limit.
- Packing Process: Pack heavier items first (descending order) or pack lighter items first (ascending order).
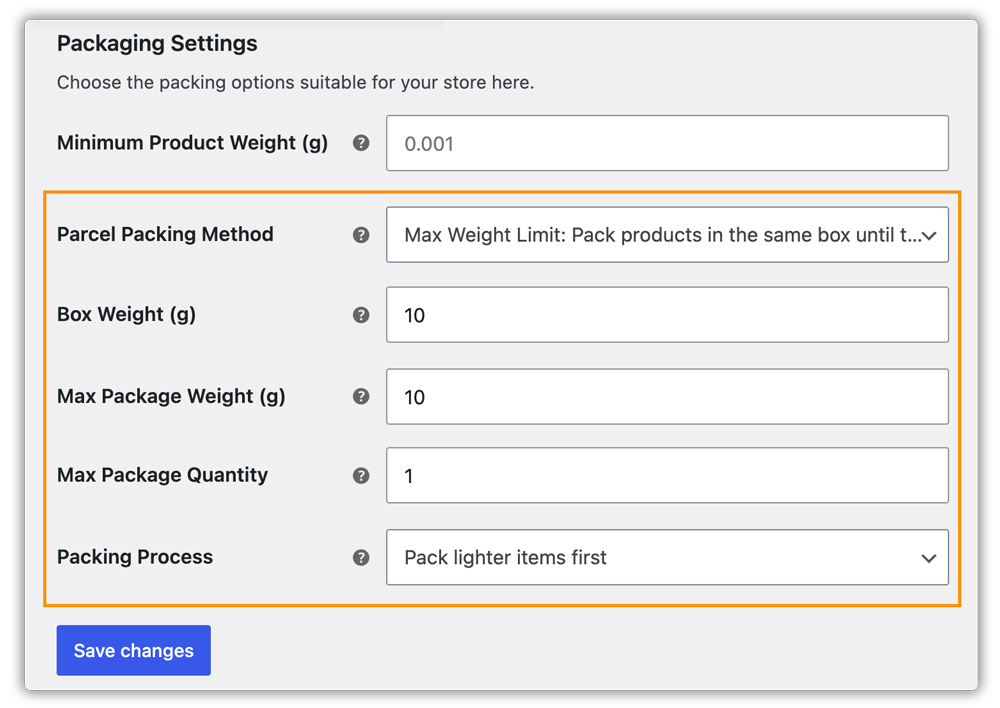
Make sure all products have accurate weights set on the product page. Incorrect or missing weights will cause inaccurate package generation and shipping rates.
10. Configure Label Settings
Go to WooCommerce > Settings > Shipping > India Post > Labels tab. This tab controls the label format, size, barcode range, and the default service used when generating labels from the order page.
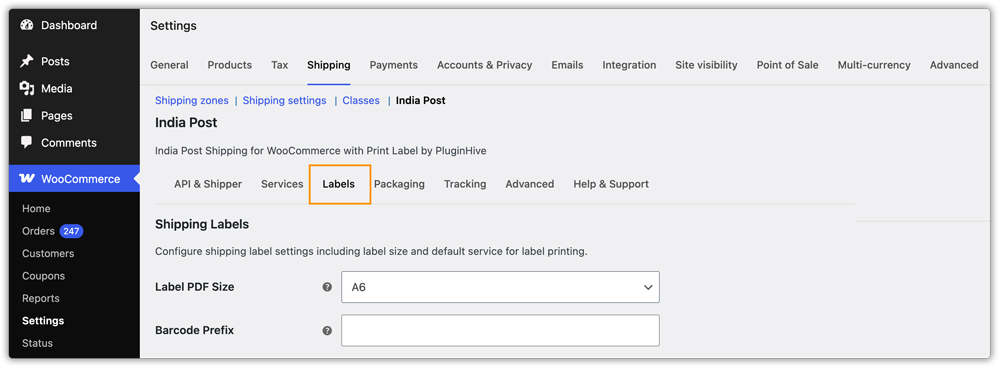
Label Size
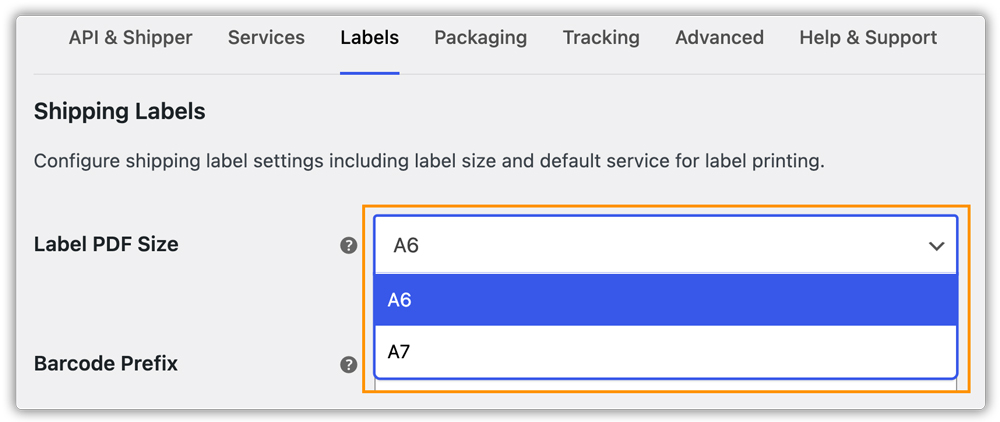
India Post labels are generated in PDF format. Choose the label paper size from the Label Size dropdown:
- A6 (Default): Standard A6 label size. Recommended for most dedicated label printers.
- A7: Smaller A7 label size.
Barcode Settings
India Post uses a pre-allocated barcode range assigned to your account. You must configure this before you can generate any labels. Contact India Post to obtain your allocated barcode range.
- Barcode Prefix: The two-letter prefix allocated by India Post for your barcode range (e.g. EB, RK). Barcodes follow the format: PREFIX + 9 digits + IN. For example, EB468827001IN.
- Barcode Range Start: The first 9-digit number in your pre-allocated barcode range (e.g. 468827001).
- Barcode Range End: The last 9-digit number in your pre-allocated range (e.g. 468827999).
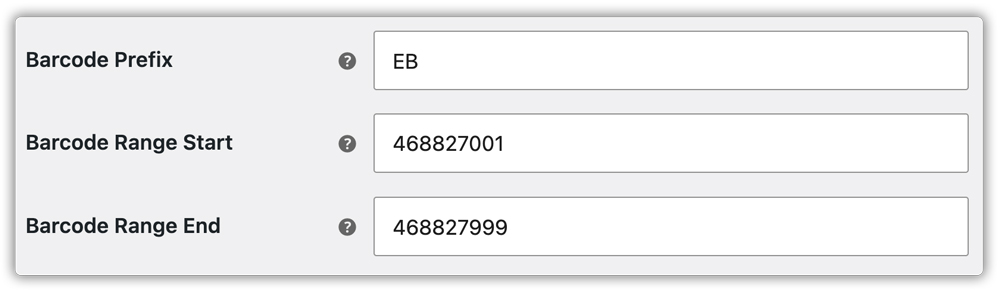
Label creation will fail once this range is exhausted — request a new range from India Post before it runs out.
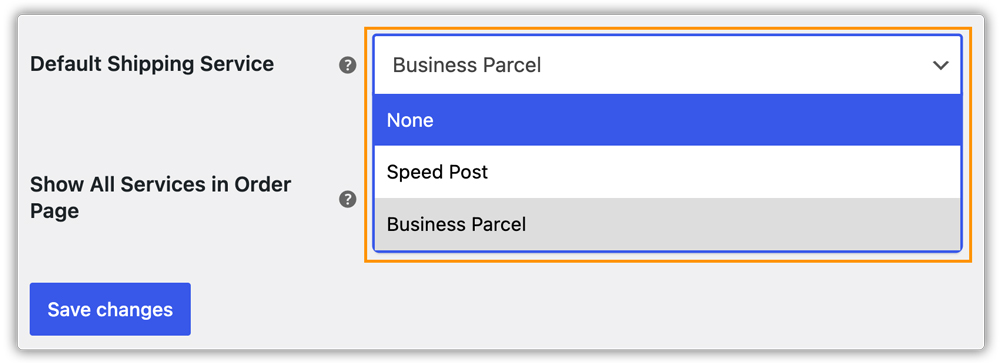
Default Domestic Shipping Service
Select the India Post service — Speed Post or Business Parcel — that will be pre-selected in the Create Shipment dropdown on the order edit page. This saves time during manual label creation by skipping the service selection step each time.
Show All Services in Order Page
Enable this option to display all available India Post services in the Create Shipment dropdown on the order edit page, not just the services enabled in the Rates & Services tab. This is useful when you want to use a different service for label generation than what is shown at checkout.

Click Save Changes.
11. Printing India Post Shipping Labels
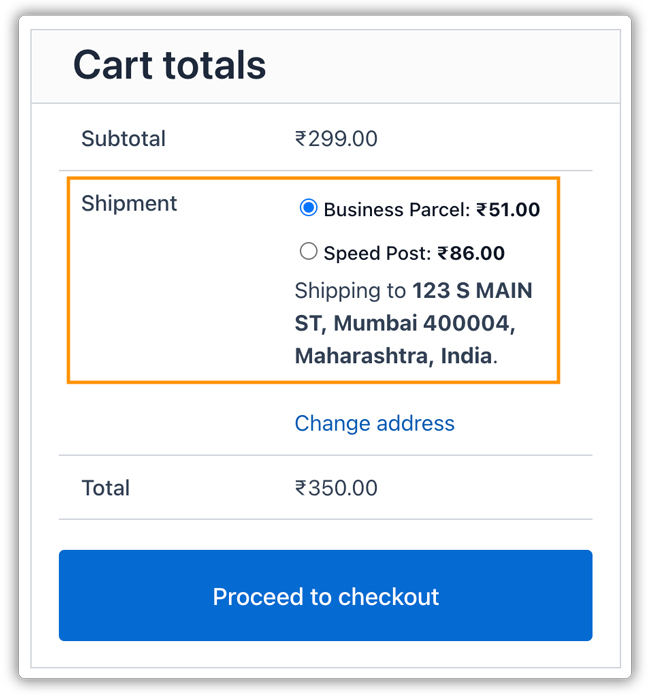
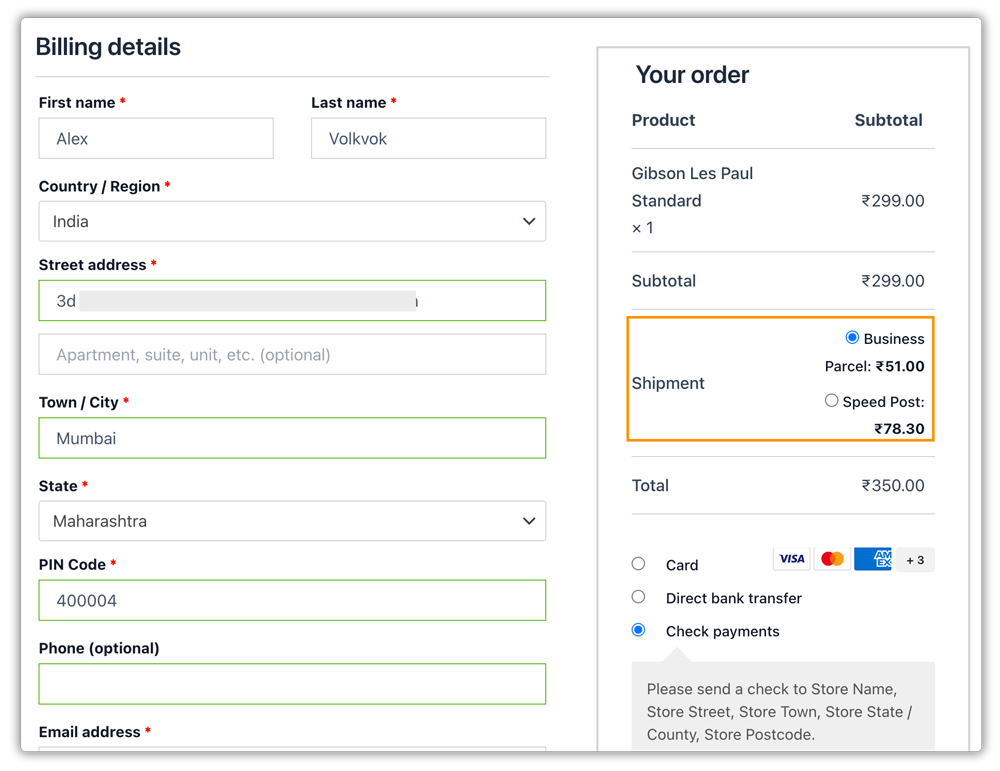
After configuring the plugin, customers can view the available India Post shipping services on the Cart and Checkout pages, select their preferred service, and place the order.
Cart page:
Checkout page:
Printing Your First India Post Label
Once an order is placed, generate and print the shipping label from the WooCommerce order page:
Go to WooCommerce > Orders and open the relevant order.
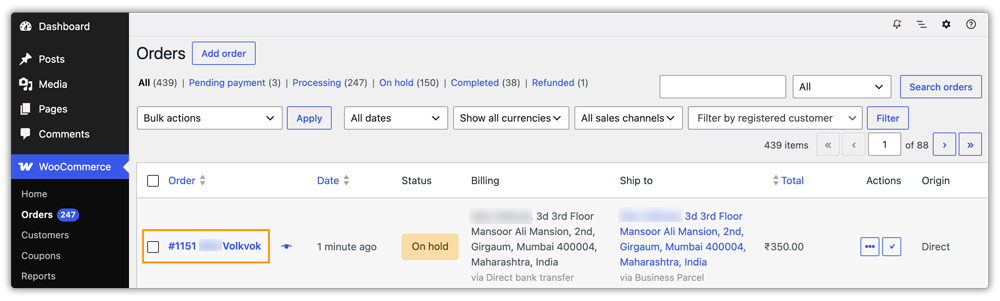
In the India Post Shipment Label metabox on the order edit page, click Generate Packages. The plugin creates packages based on your Packaging settings.
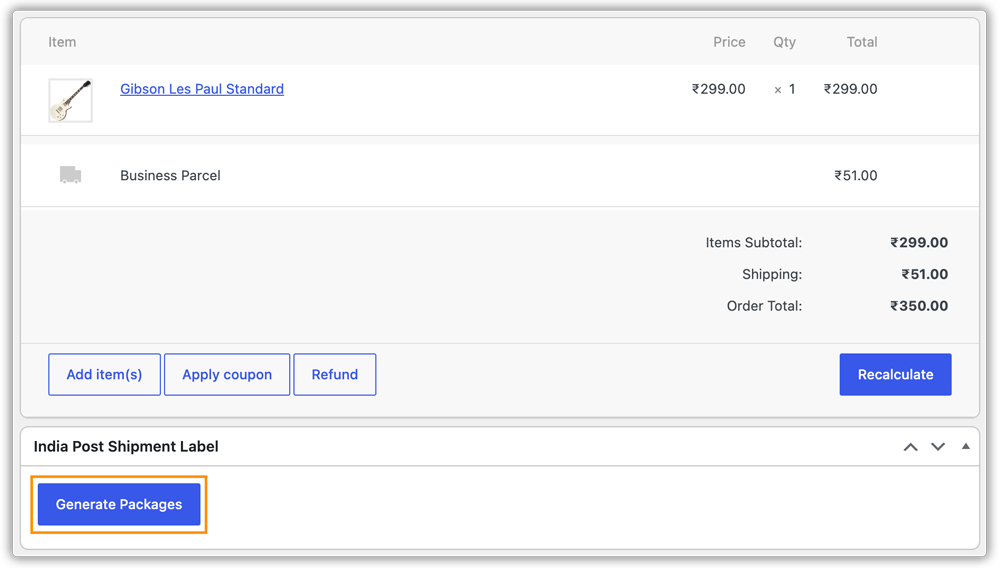
Once the package is created, you’ll have the following options:
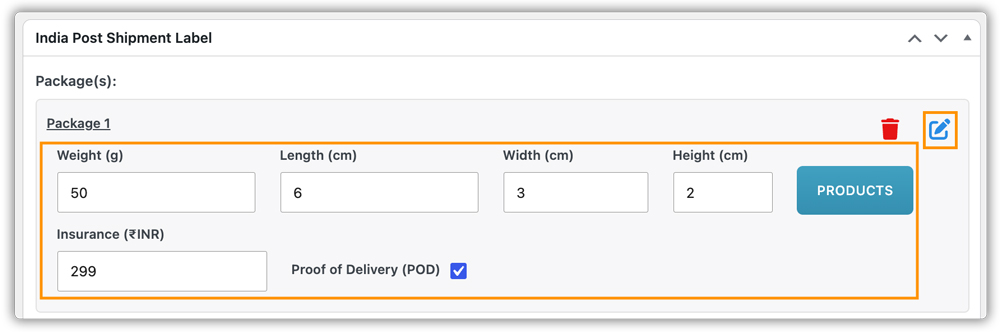
- Edit Package: Click on the edit icon to edit the package, including the weight, dimensions, insurance amount, and Proof of Delivery (POD) option. You can also click Products to add or remove items from the package.
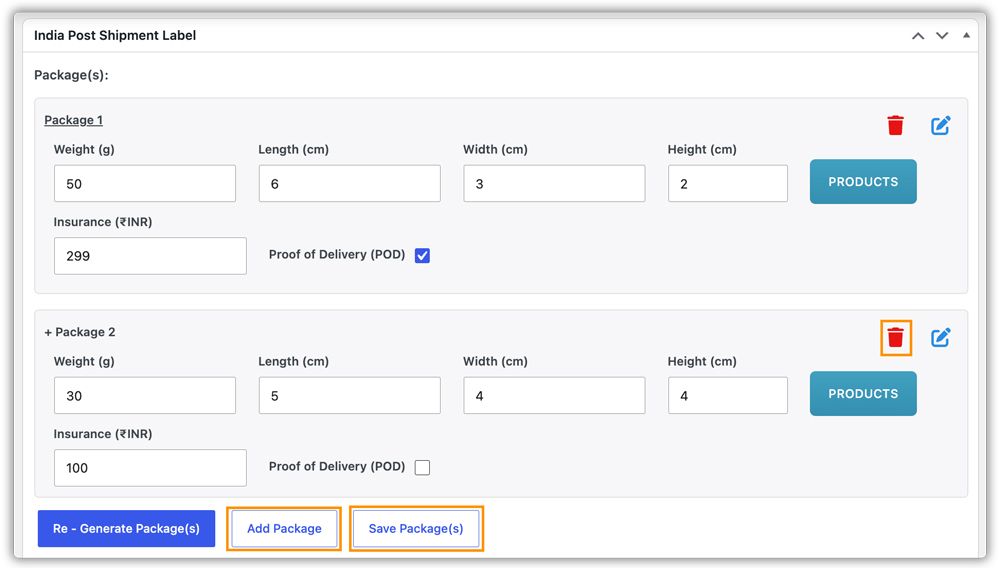
- Add Package: Click Add Package to create additional packages for the order and click Save Package(s) to save it. Make sure products have been assigned for each package before creating the shipment.
Simply click the delete icon if you want to delete any package.
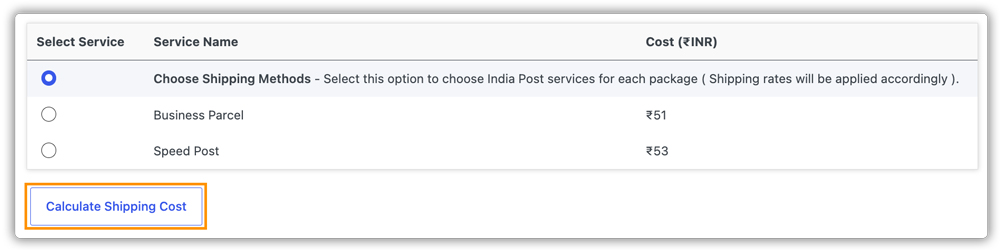
- Calculate Shipping Cost: Click Calculate Shipping Cost to retrieve the latest India Post shipping rates based on the package details and destination. If multiple services are available, you can compare their rates before selecting one.
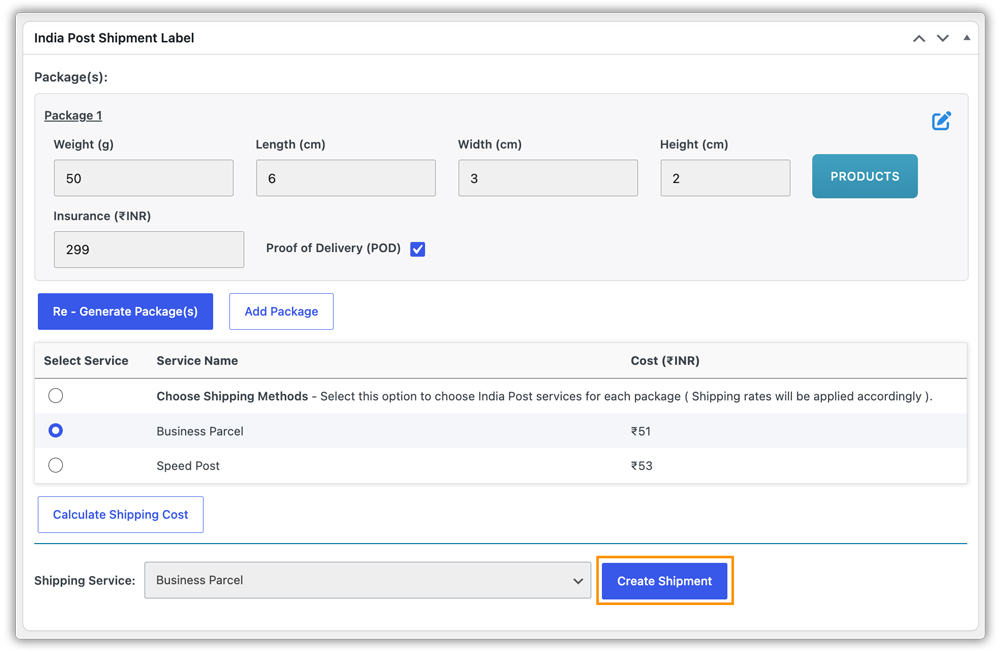
After you’ve finalized the package details and selected the shipping service, click Create Shipment to generate the India Post shipment and shipping label for the order.
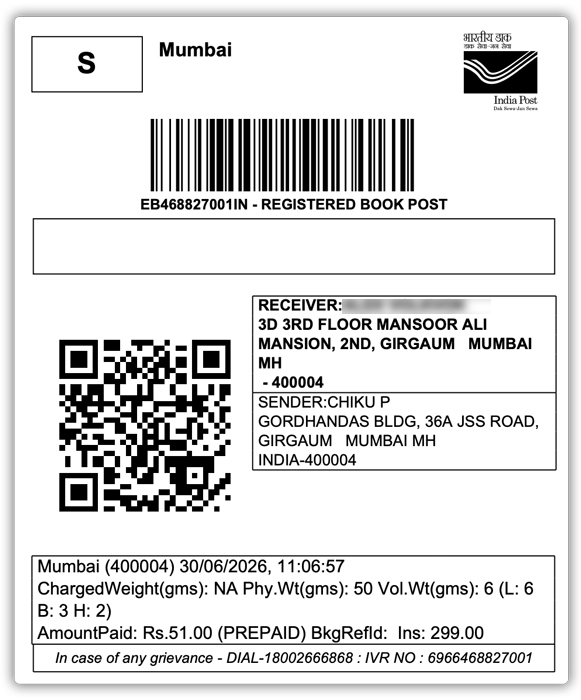
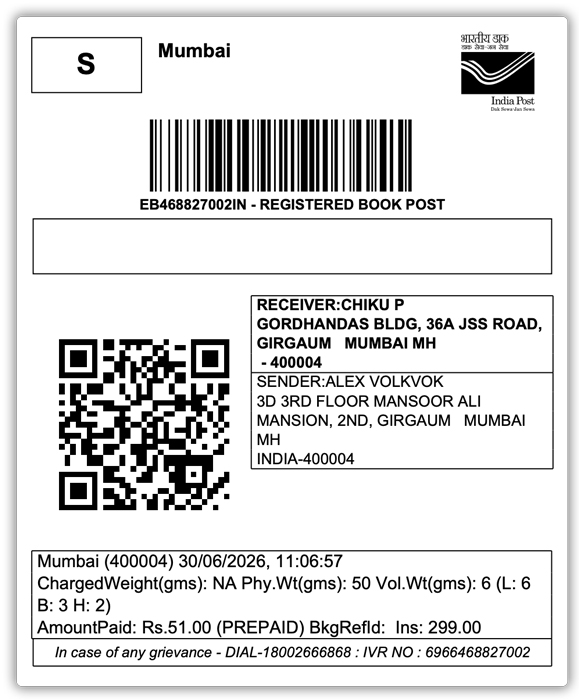
Once the shipment is booked, click Print Label to download and print the shipping label PDF.
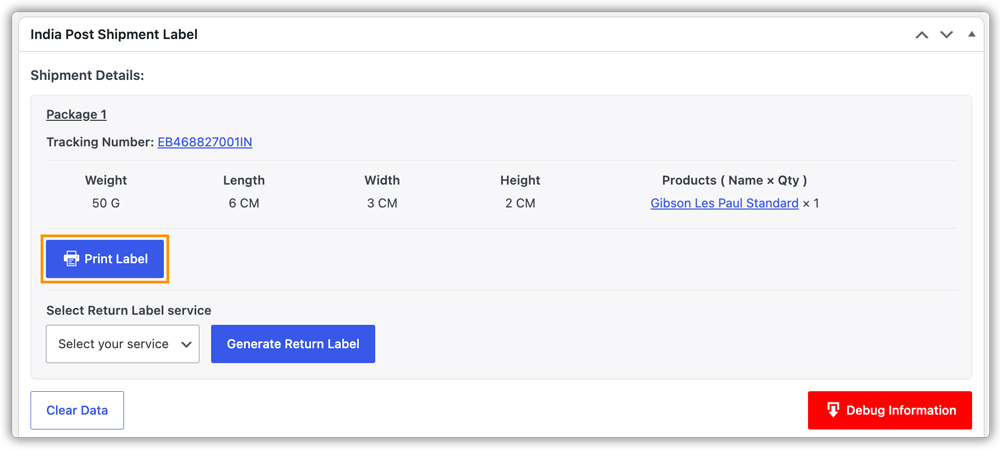
Print the label and securely attach it to your package before handing it over to India Post for shipment.
Print India Post Return Label
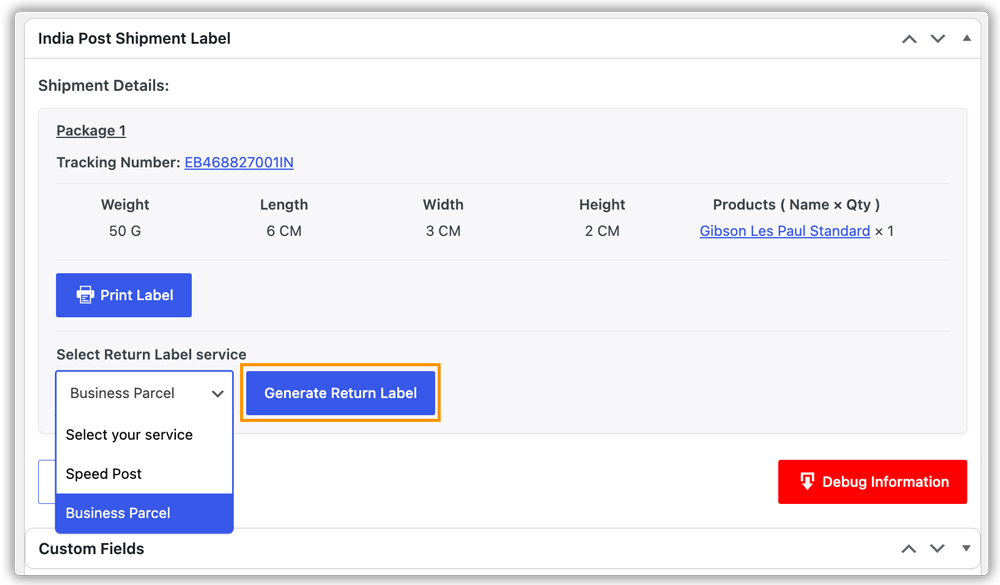
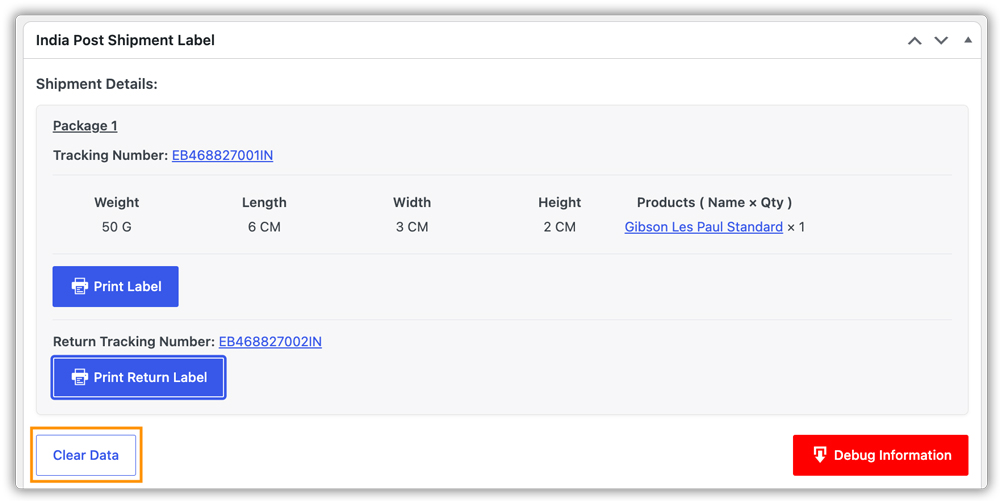
Once an outbound label has been generated for an order, you can generate a return label from the same metabox on the order edit page.
- Open the order and scroll to the India Post Shipment Label metabox and click Generate Return Label by selecting the appropriate service.
- Once generated, the return tracking number appears. Click Print Return Label to download and print it.
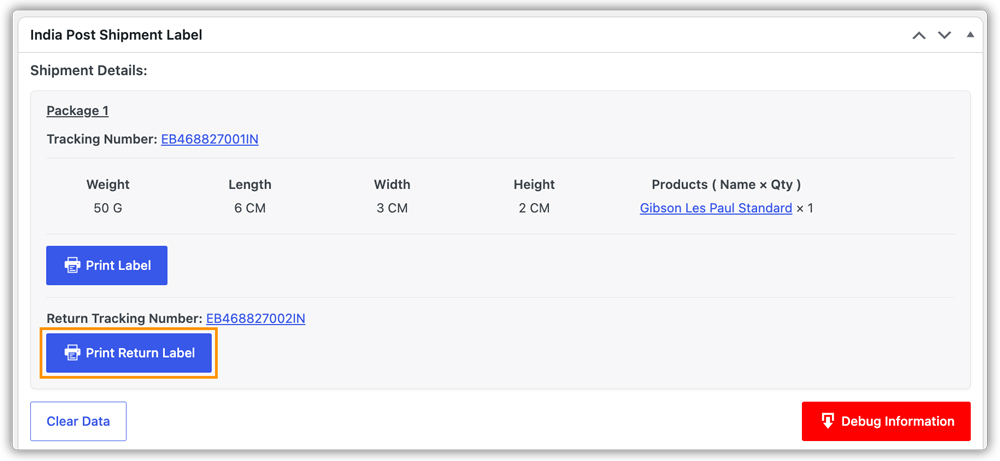
Print the return label and either include it inside the package or share it with the customer, depending on your return process. The customer can then attach the return label to the package and use it to ship the item back through India Post.
Clear Label Data
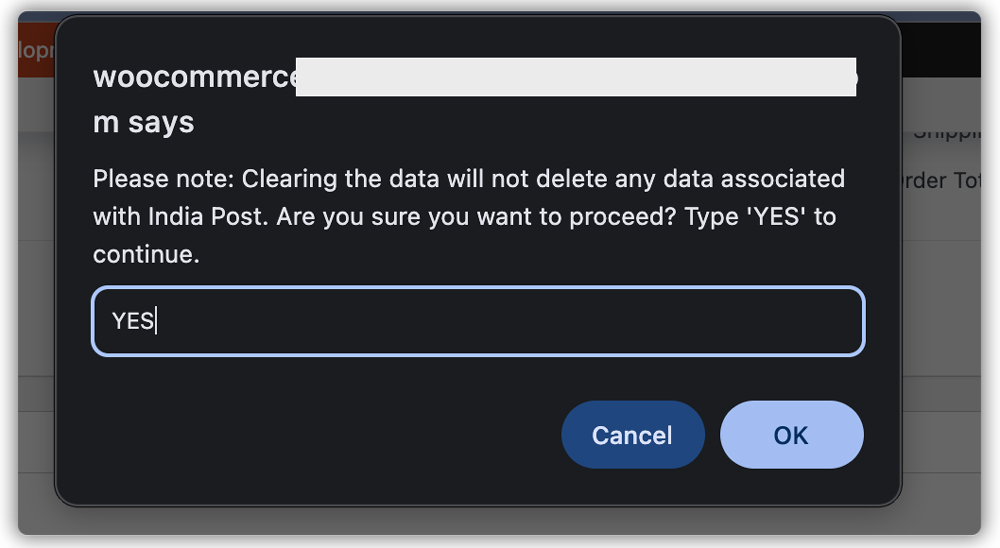
If you need to remove label data from an order, click the Clear Data button in the India Post Shipment Label metabox. This removes the label information from WooCommerce only — it does not cancel the shipment with India Post.
Confirm by typing YES and click on Ok to clear the data.
To cancel an actual shipment, contact India Post directly or use the India Post Business Portal. Clear Data only clears the data stored within WooCommerce.
12. Set Up India Post Shipment Tracking
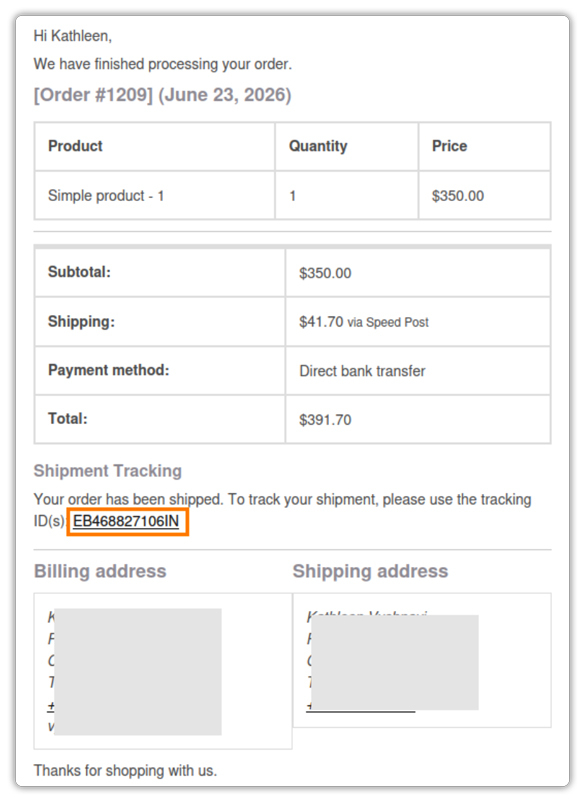
The plugin generates a tracking number with every shipping label. You can include the tracking information in the WooCommerce order completion email and displayed on the customer’s My Account page.
Go to WooCommerce > Settings > Shipping > India Post > Tracking tab.
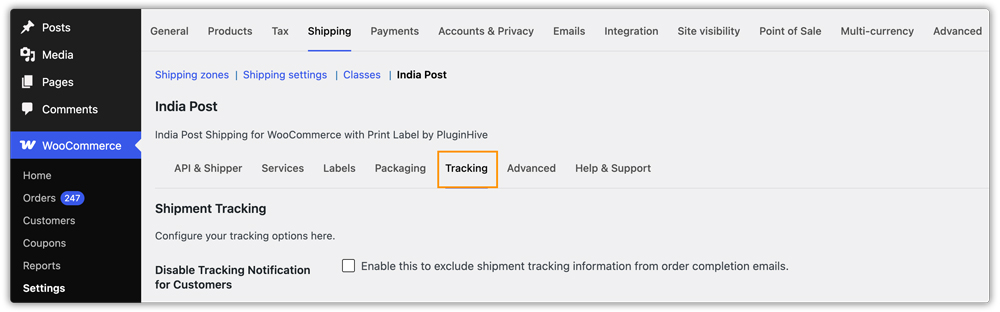
Disable Tracking Notification for Customers
By default, the plugin includes shipment tracking information in the WooCommerce Order Completed email sent to customers. Enable Disable Tracking Notification for Customers if you do not want to include tracking details in these emails.

When you disable this option(default), the plugin sends customers an email with their tracking number and tracking link after shipping their order.
Customise the Tracking Message
You can also customize the tracking information displayed in the email using the options below.
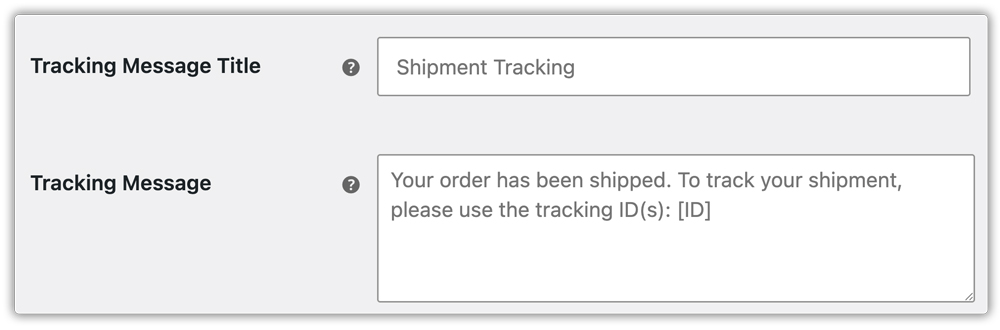
- Tracking Message Title: The heading shown above the tracking section in order completion emails and on the My Account page. The default placeholder is Shipment Tracking.
- Tracking Message: The message body sent to customers alongside their tracking number. Use [ID] as a placeholder. The plugin replaces it with the actual tracking number(s) when it sends the email.
Default: Your order has been shipped. To track your shipment, please use the tracking ID(s): [ID].
Hide Tracking in My Account
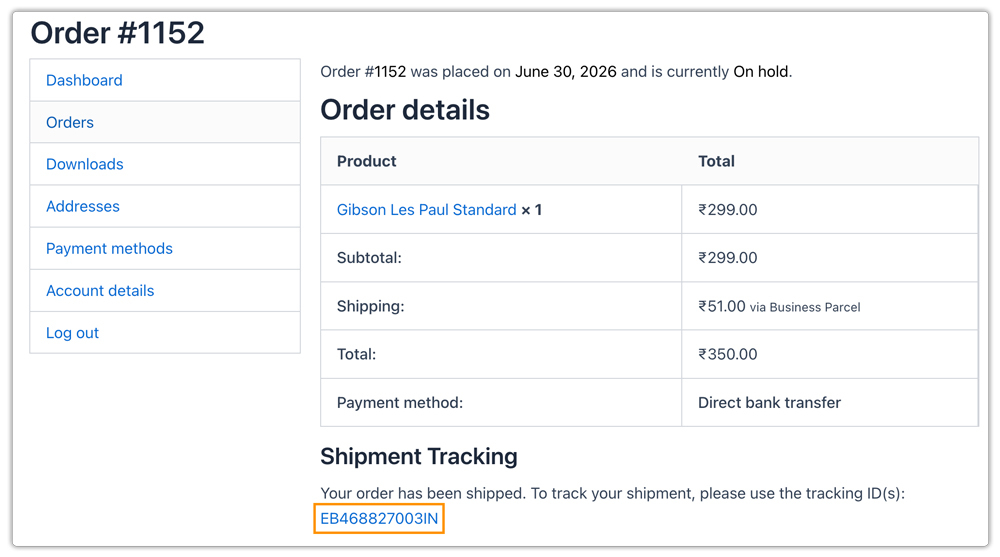
Enable Hide Tracking in My Account to prevent tracking information from appearing on the My Account page. Customers will not see tracking numbers or shipment details in their account order history.

When this option is disabled (default), customers can view their India Post tracking number and tracking link directly from My Account > Orders. They can simply click the tracking link to open the India Post tracking page and monitor their shipment status.
13. Advanced Settings
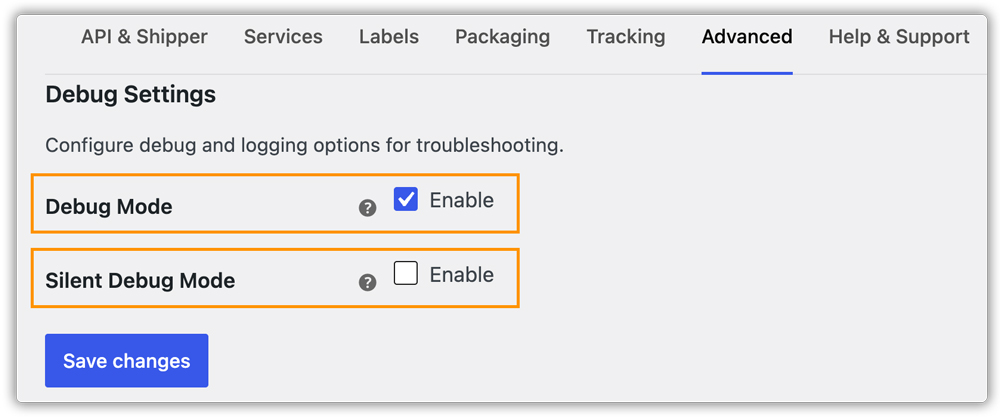
Go to WooCommerce > Settings > Shipping > India Post Shipping > Advanced tab.
- Debug Mode: Enable Debug Mode to display detailed API request and response information directly on the Cart and Checkout pages. Use this temporarily to diagnose rate calculation or connectivity issues. Disable it once troubleshooting is complete.
- Silent Debug Mode: Enable Silent Debug Mode to log debug information in the background without displaying anything to customers on the Cart or Checkout pages. This is the preferred option for troubleshooting on a live store. Logs can be reviewed under WooCommerce > Status > Logs.
Click Save Changes.
Disable Debug Mode on your live store once troubleshooting is complete. Leaving it enabled exposes API response data on your frontend pages.
Need Help?
If you have any questions about setting up the PH India Post Shipping for WooCommerce with Print Label plugin or run into any issues, reach out to the PluginHive support team. We are happy to help you get everything configured correctly.