



How to Set Up PH Aramex Shipping for WooCommerce
This step-by-step guide explains how to set up the PH Aramex Shipping for WooCommerce plugin to display real-time Aramex shipping rates, generate shipping labels, and enable order tracking directly from your WooCommerce store. You can follow the complete setup process or jump to a specific section based on your requirements.
In This Guide
- Download, Install, and Activate the Plugin
- Activate the Plugin License
- Navigate to Plugin Settings
- Configure API Credentials
- Add Shipper Address Details
- Verify Your Product Settings
- Display Aramex Shipping Rates
- Configure Aramex Shipping Services
- Configure Packaging Settings
- Configure Label Settings
- Printing Aramex Shipping Labels
- How to Set Up Aramex International Shipping
- Set Up Aramex Special Services
- Set Up Aramex Shipment Tracking
- Advanced Settings
1. Download, Install, and Activate the Plugin
After purchasing the PH Aramex Shipping for WooCommerce plugin, download the ZIP file from your PluginHive account.
Log in to your PluginHive account and go to My Account > API Downloads. Download the plugin ZIP file. Then,
- Log in as the WordPress Admin of your online store. Navigate to Plugins > Add Plugin in your WordPress dashboard.
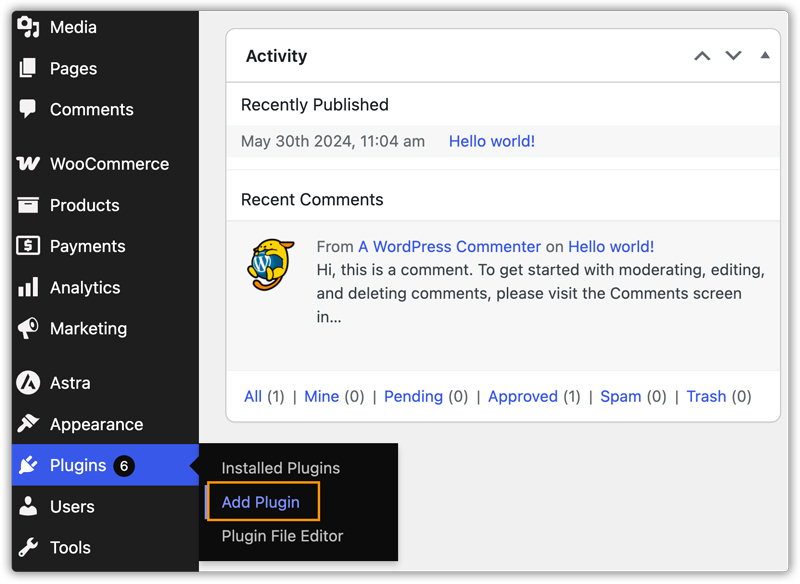
- Click Upload to upload the plugin.
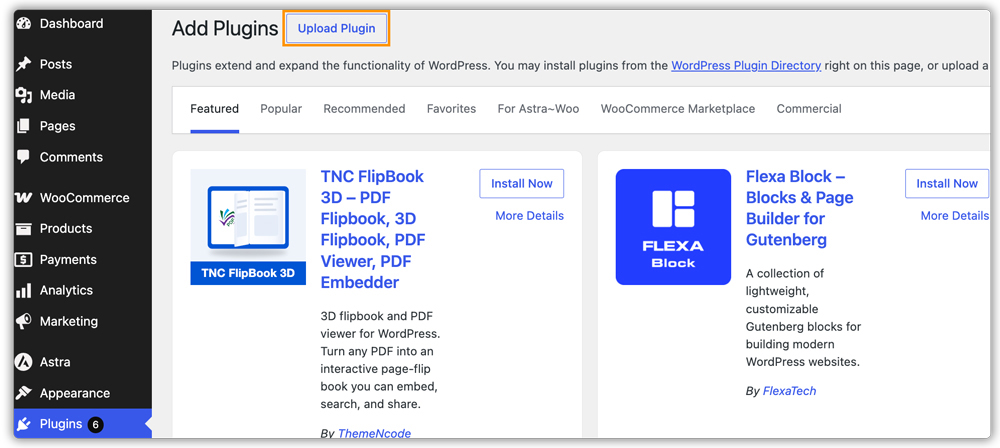
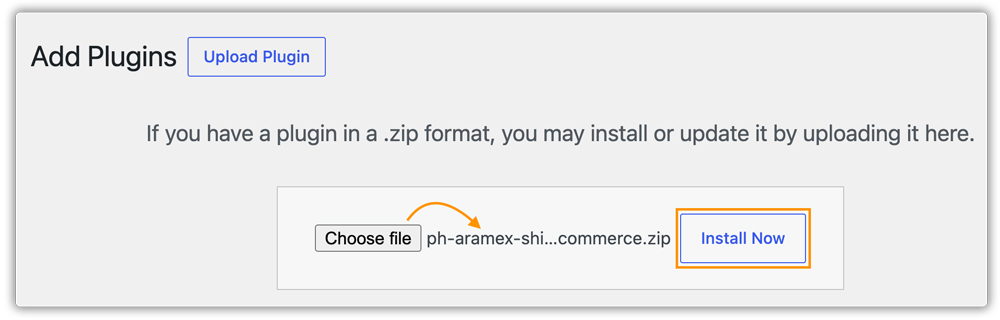
- Select the downloaded ZIP file, and click Install Now.
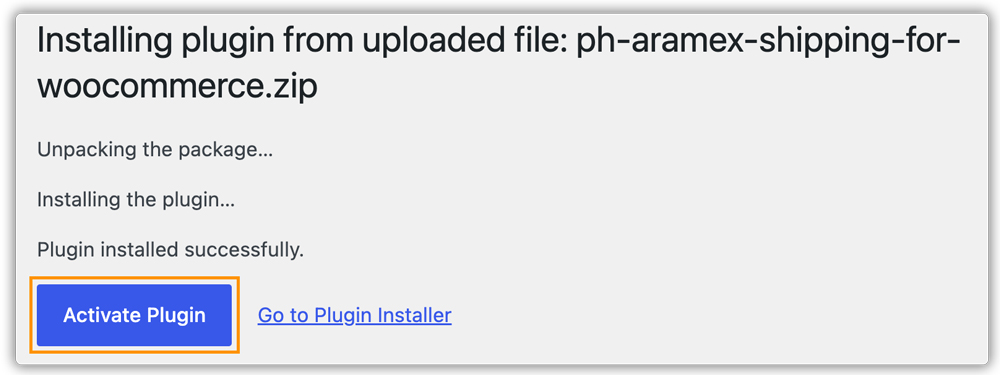
- Once installation is complete, click Activate Plugin.
2. Activate the Plugin License
After installing and activating the plugin, you must activate your license to unlock all plugin features.
Log in to your PluginHive account and go to My Account > API Keys. Copy your Product Order API Key.
- In your WordPress dashboard, go to Aramex > License.
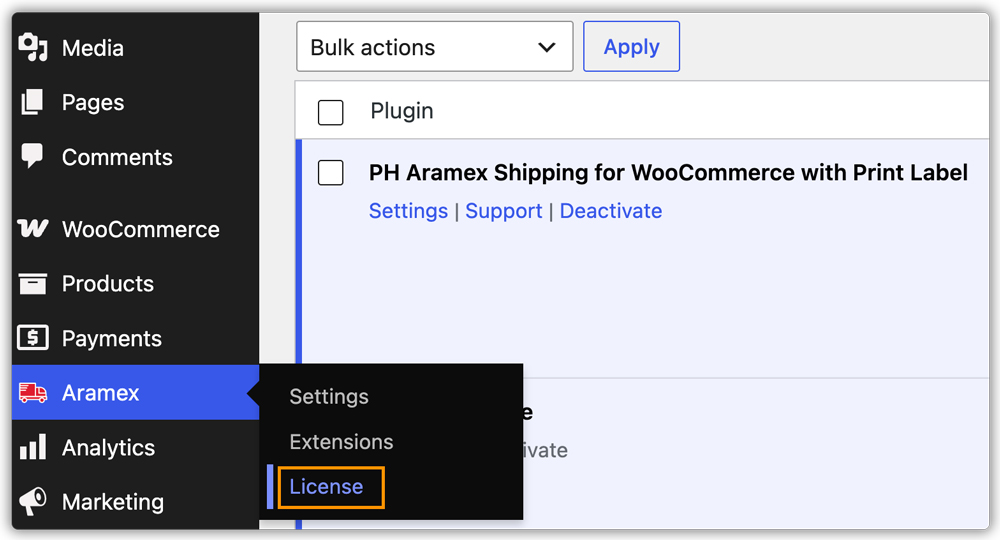
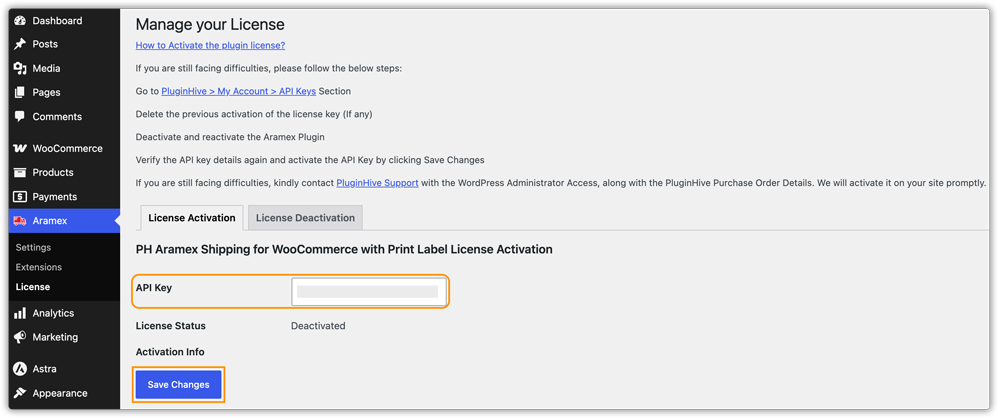
- Under License Activation, enter your Product Order API Key and click Save Changes.
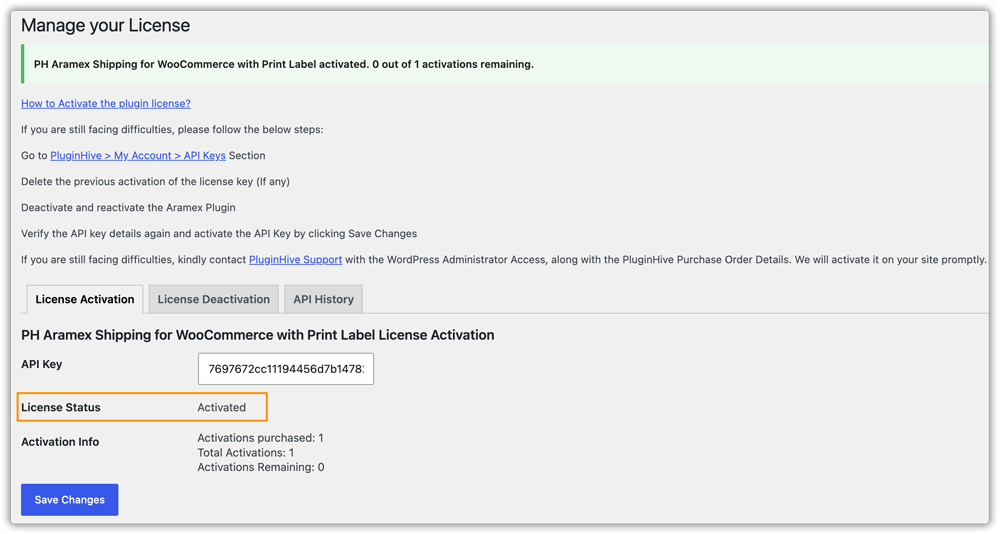
- Once activated, the API Key Status will display Activated, confirming the plugin is fully licensed.
An active plugin license is required for label generation and all premium features. Renew your license before it expires to avoid disruptions to your Aramex shipping workflow.
3. Navigate to Plugin Settings
Once you activate the plugin, WooCommerce adds Aramex Shipping as a new shipping method. You can access the plugin settings in two ways:
- Navigate to Plugins > Installed Plugins > Settings under PH Aramex Shipping for WooCommerce with Print Label.
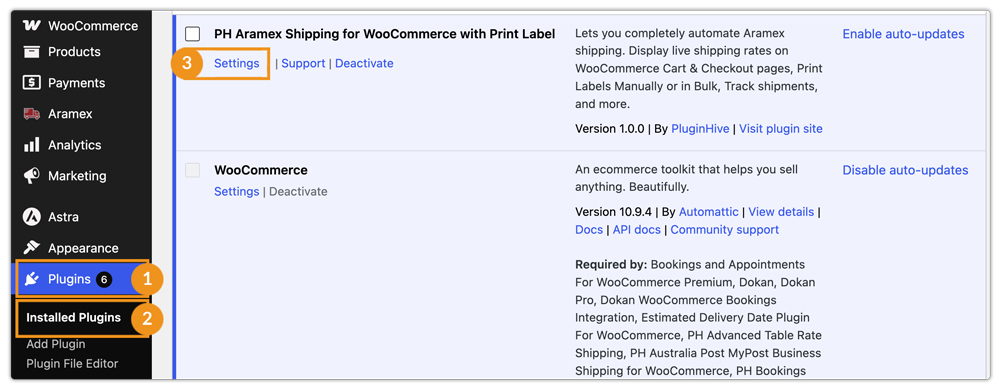
- Or navigate to WooCommerce > Settings > Shipping > Aramex.
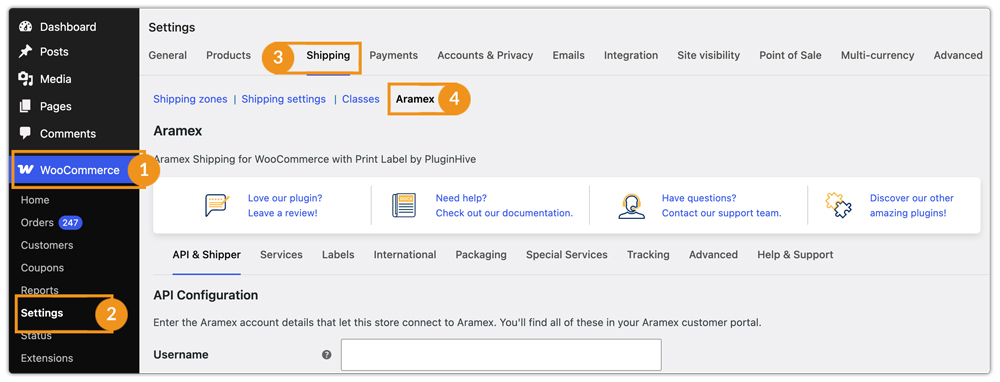
After opening the plugin settings, you will find the following tabs:
- API & Shipper
- Services
- Labels
- International
- Packaging
- Special Services
- Tracking
- Advanced
- Help & Support.
4. Configure API Credentials
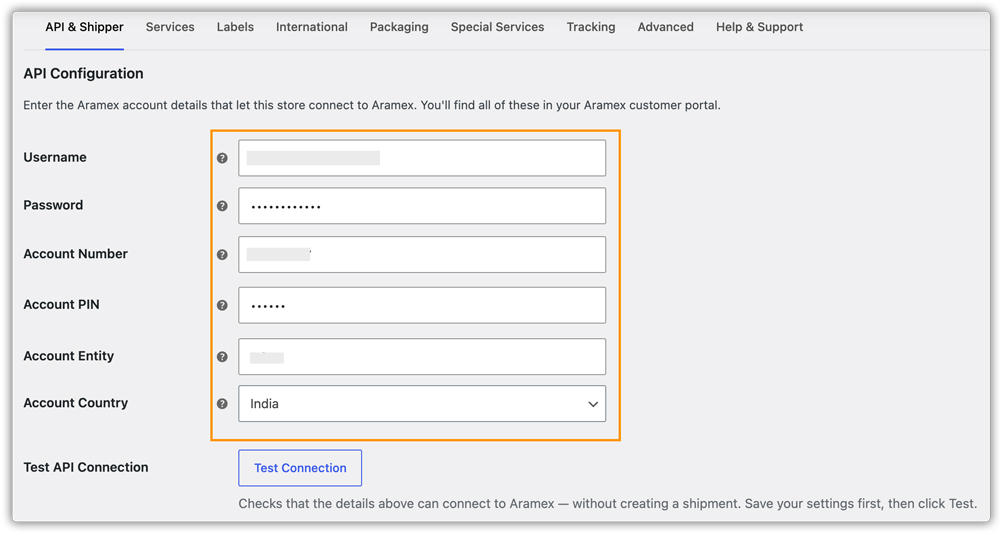
Go to WooCommerce > Settings > Shipping > Aramex. At the top of the API & Shipper tab, you will find the API Configuration section. These credentials are provided by Aramex when you register for an account and can be found in the Aramex customer portal.
- Username: Your Aramex account username (email address). Required.
- Password: Your Aramex account password. Required.
- Account Number: Your Aramex account number. Required for rate calculation, shipment creation, and label generation.
- Account PIN: Your Aramex account PIN code. Provided by Aramex alongside your account credentials. Required.
- Account Entity: Your Aramex account entity code — a 3-letter city code (e.g., AMM for Amman, DXB for Dubai). Provided by Aramex. Required.
- Account Country Code: The country associated with your Aramex account. Select from the dropdown. Provided by Aramex alongside your account credentials. Required.
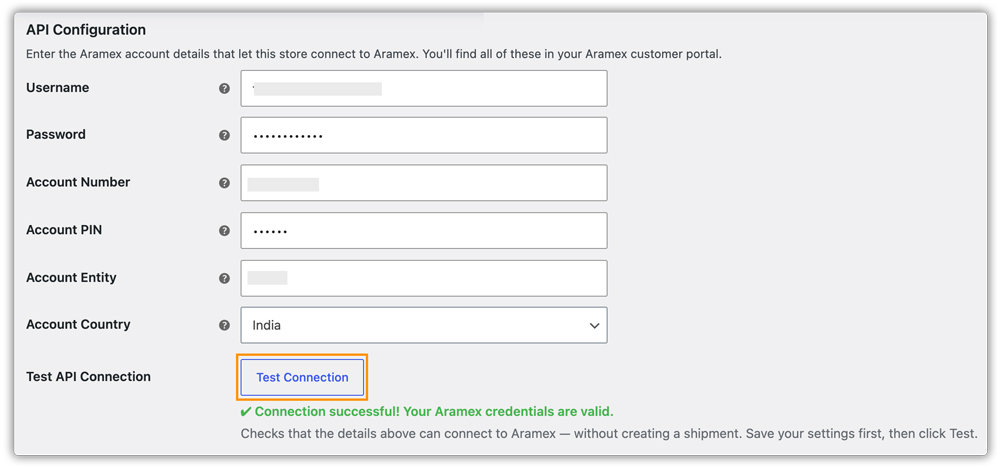
Test API Connection
After saving your credentials, use the Test API Connection button to validate them against the Aramex API without creating a shipment. When successfully connected, you will see “Connection successful! Your Aramex credentials are valid.”
If the test fails, double-check each credential field for typos before contacting Aramex support.
Add the shipper details under the Shipper Settings and save your settings before clicking Test API Connection; the test uses the credentials currently stored, not the unsaved values in the form.
5. Add Shipper Address Details
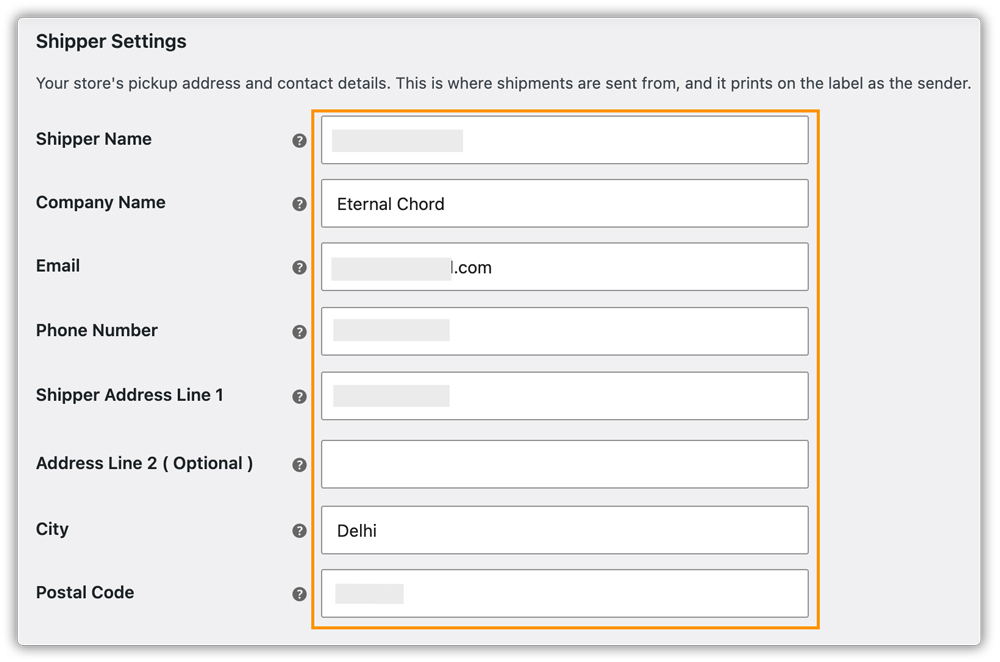
Below the API Configuration section on the API & Shipper tab, you will find the Shipper Settings. Provide the address from which your orders will be dispatched; this can be your store address, warehouse, or any dispatch location.
- Shipper Name: The name associated with your Aramex account. Used for rate calculation and label printing. Required (3–40 characters).
- Company Name: Your company name as it should appear on shipments. Required (max 40 characters).
- Email: Your contact email address. Required (max 50 characters).
- Phone Number: Your contact phone number. Required by Aramex for shipping and communication. Must contain at least 7 digits.
- Shipper Address Line 1: Primary street address of the shipment origin. Required (max 40 characters).
- Address Line 2 (Optional): Additional address information such as a floor or suite number (max 40 characters).
- City: Shipment origin city. Required (max 40 characters).
- Postal Code: Postal or ZIP code for the shipment origin address. Not shown for countries that do not have a postal code system (e.g. UAE).
- Origin Country: The country your shipments are dispatched from. Used to determine domestic versus international shipments. Required.
- State / Province: State or province of the shipment origin. Auto-populated based on the selected country. Leave blank if not applicable.
- Shipper Tax ID / VAT / EIN: Your GST, VAT, or EIN registration number. Required for Indian-origin international shipments for customs clearance.
Click Save Changes after filling in all required fields.
6. Verify Your Product Settings
To get accurate Aramex shipping rates and generate valid labels, your products must have correct weight and dimension values set in WooCommerce.
Set Product Weight and Dimensions Unit
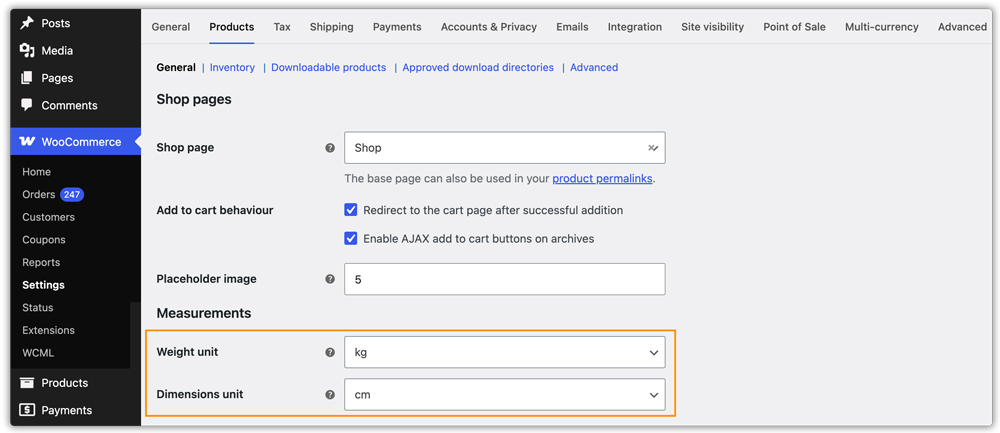
Make sure your WooCommerce weight and dimension units match what you intend to send to Aramex.
- Go to WooCommerce > Settings > Products.
- Under the Measurements section, set the correct Weight Unit and Dimensions Unit.
- kg/cm (Recommended): Kilograms and centimetres; the standard unit for Aramex shipments.
- lbs / in: Pounds and inches; the plugin converts these automatically, but kg/cm is recommended to avoid conversion discrepancies.
Add Product Weight and Dimensions
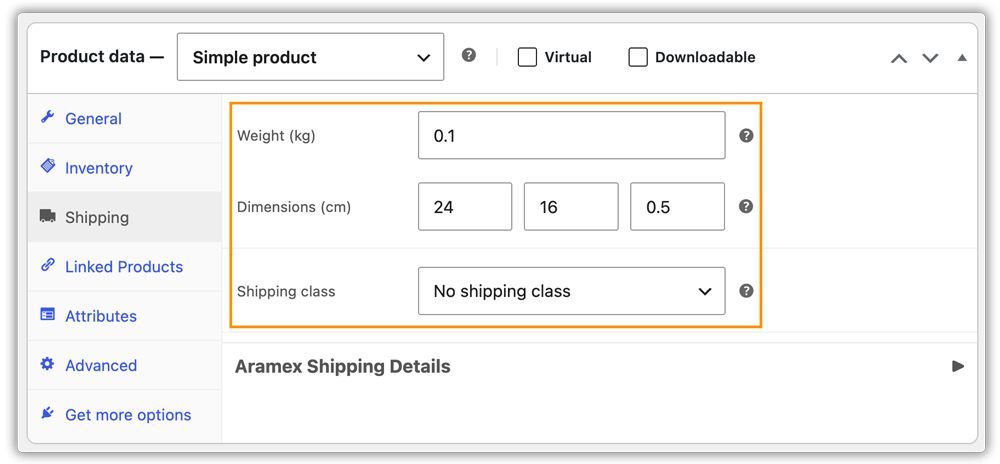
- Go to WooCommerce > Products and open the product you want to configure.
- Under Product Data, click the Shipping tab.
- Enter the product’s Weight, Length, Width, and Height.
- Assign a Shipping Class if applicable.
Add Aramex Shipping Details at Product Level
In the same Shipping tab, scroll down to the Aramex Shipping Details section and configure the following:
- Pre-Packed Product: Enable if this item ships in its own box. It will be treated as an individual package and not combined with other items regardless of the Packaging method selected in the plugin settings.
- Require Signature: Force signature-required (SIG) for any order containing this product, even if Signature Required is disabled in the global Special Services settings.
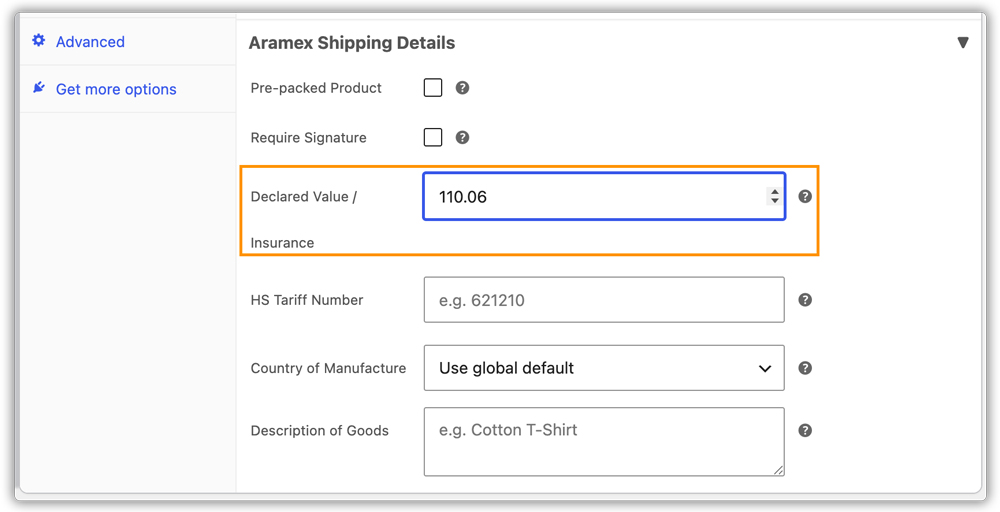
- Declared Value / Insurance: The declared insured value for this product. If left blank, the product’s own price is used instead. Only active when Insurance is enabled in the Rates & Services tab.
- HS Tariff Number: Harmonized System code for this product (6–12 digits). Required for international shipments. Overrides the Default HS Code set in the International tab.
- Country of Manufacture: The country where this product was manufactured. Overrides the Default Country of Origin set in the International tab.
- Description of Goods: Short description sent to Aramex for customs purposes (max 100 characters). Descriptions are combined when multiple products share a package. Leave blank to use the product name.
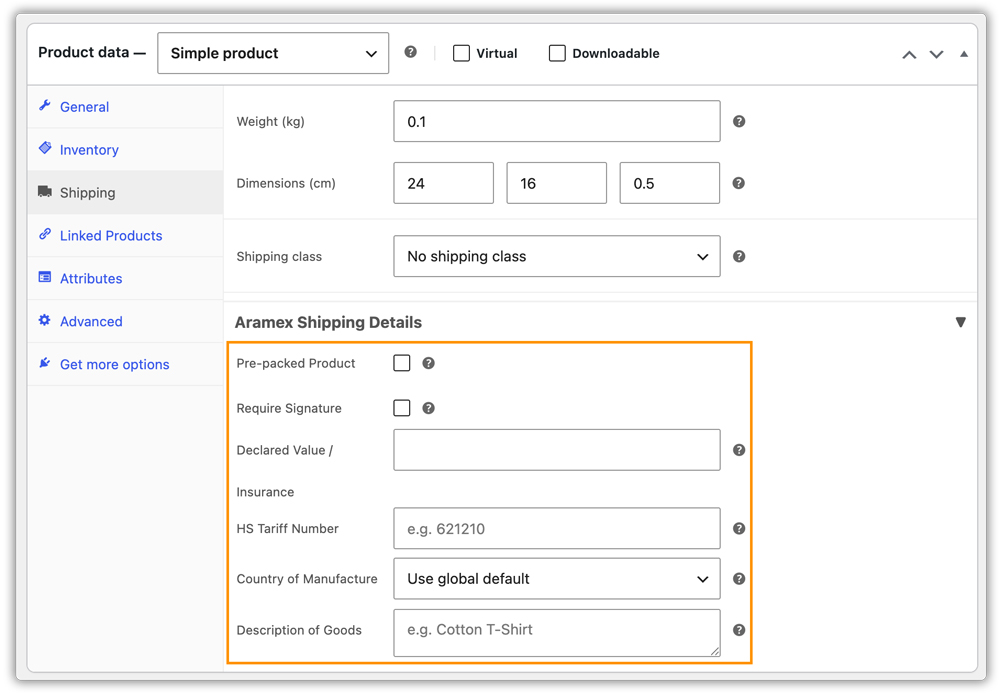
These Aramex Shipping Details fields are also available at the variation level for variable products.
Set Minimum Product Weight and Dimensions
Aramex requires product weight and dimensions to meet certain minimum values for rate calculation. Go to WooCommerce > Settings > Shipping > Aramex > Packaging tab and set the Minimum Product Weight and Minimum Dimensions values.
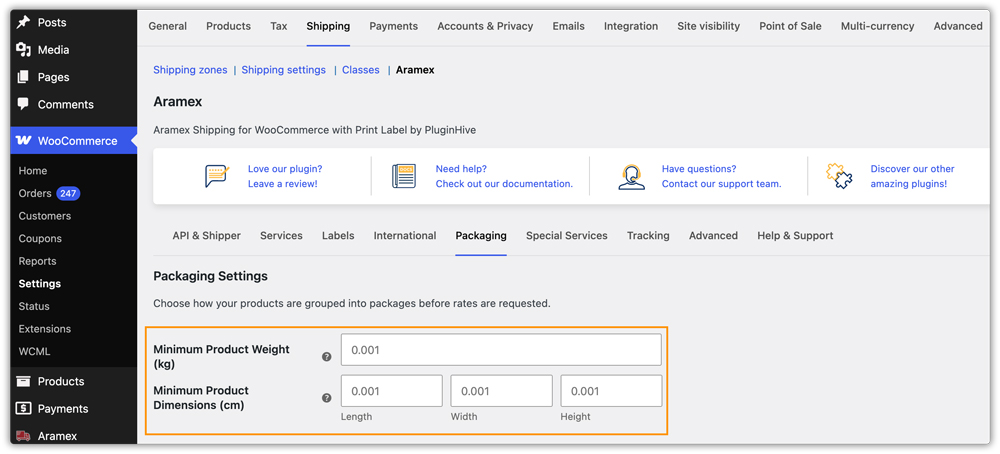
If a product has no dimensions configured, the minimum values set here are used as a fallback. Any product dimensions below the configured minimum are automatically adjusted before rates are fetched from Aramex.
7. Display Aramex Shipping Rates
Go to WooCommerce > Settings > Shipping > Aramex > Services tab to configure how shipping rates are fetched and displayed at checkout.
Enable Real-Time Rates
Tick the Realtime Rates checkbox to fetch live Aramex shipping rates and display them on the Cart and Checkout pages. This option is enabled by default.
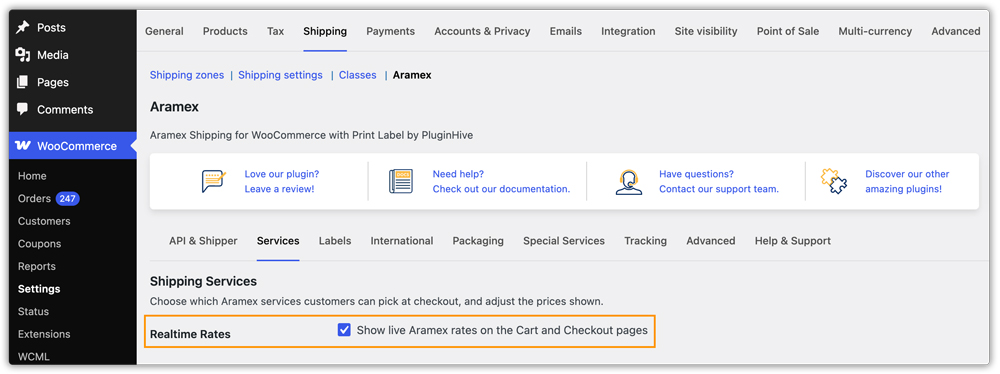
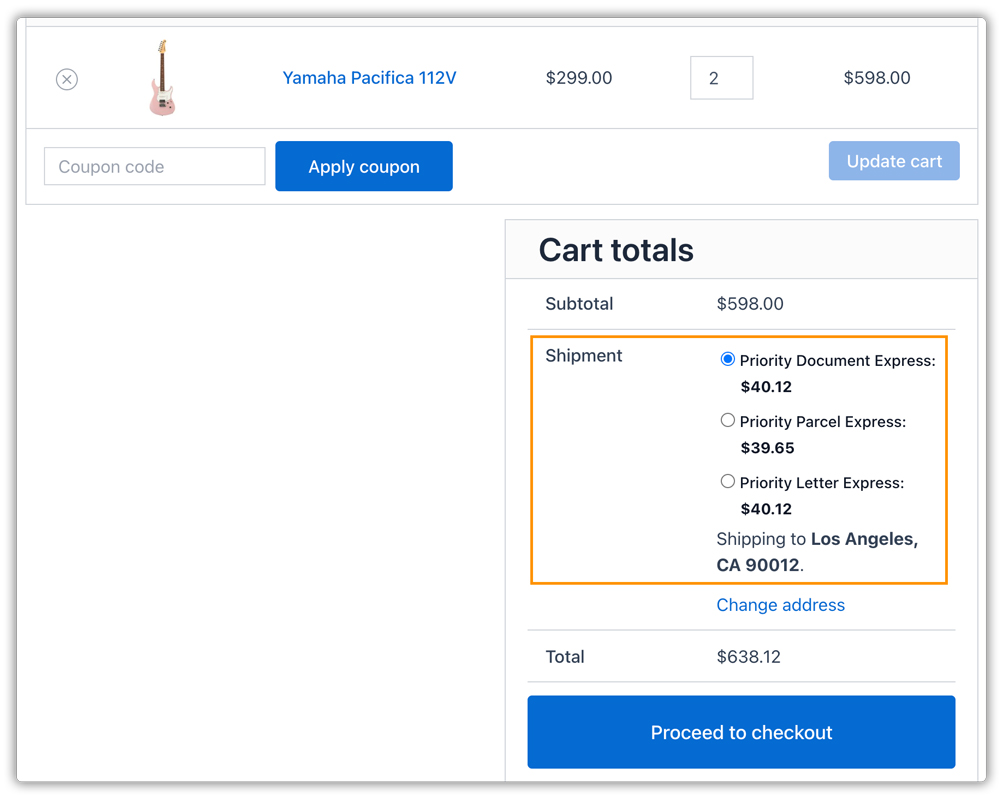
Once enabled and the settings are saved, real-time Aramex rates will appear at cart and checkout for customers to choose from.
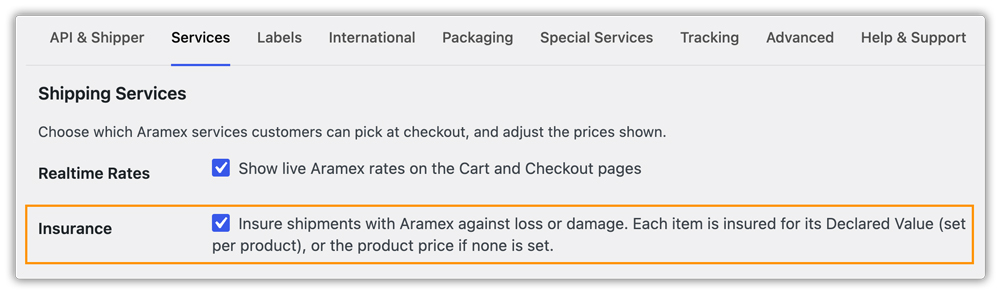
Enable Insurance
Enable Insurance to include the declared value of your shipments in every Aramex request.
You can enter the insured amount in the Declared Value / Insurance field on each product’s Shipping tab. If no product-level value is set, the product’s own price is used.
Add Fallback Rate
The Fallback Rate is displayed at checkout if Aramex does not return any rates for an order, for example, during an API timeout or when no service covers the destination. This ensures customers can still complete checkout. Enter the flat rate amount in your store currency in the Fallback Rate field.

Leave this field blank to disable the fallback.
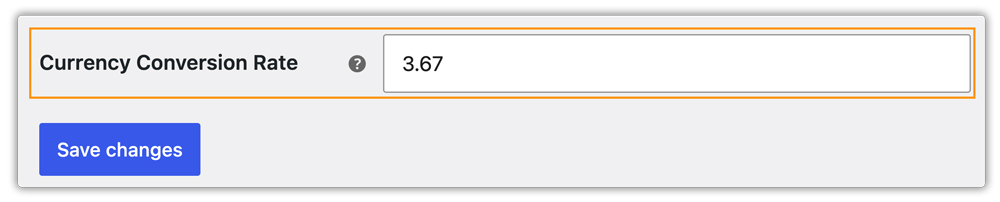
Add Currency Conversion Rate
Aramex returns shipping rates in your Aramex account’s own currency, which may differ from your WooCommerce store currency. Enter how many units of your store currency equal 1 unit of your Aramex account currency in the Currency Conversion Rate field.
Example: If your Aramex account returns rates in USD and your store currency is AED, enter 3.67 (if 1 USD = 3.67 AED). Set to 1 if both currencies are the same.
Click Save Changes.
8. Configure Aramex Shipping Services
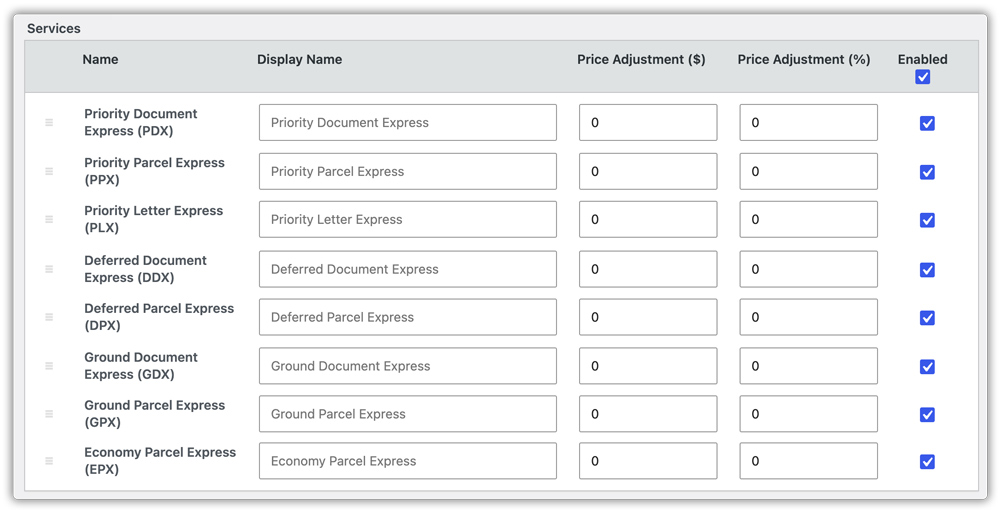
In the Services tab, below the rate settings, you will find the Shipping Services section. Enable the services you want to offer and customise how they appear to customers.
Available Services
The plugin supports the following Aramex shipping services:
- Priority Document Express (PDX): Express delivery for non-dutiable documents.
- Priority Parcel Express (PPX): Express delivery for dutiable small parcels.
- Priority Letter Express (PLX): Express delivery for non-dutiable letters.
- Deferred Document Express (DDX): Economy delivery for non-dutiable documents.
- Deferred Parcel Express (DPX): Economy delivery for parcels.
- Ground Document Express (GDX): Ground-routed delivery for documents.
- Ground Parcel Express (GPX): Ground-routed delivery for parcels.
- Economy Parcel Express (EPX): Budget cross-border delivery for parcels.
Enable the services you want to offer at checkout. You can also set a custom Display Name for each service; this is the label shown to customers at checkout instead of the default service name.
Adjust Shipping Rates
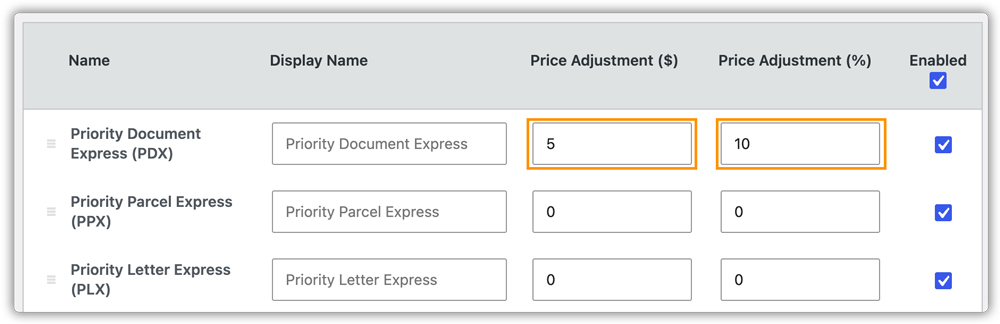
For each service, you can increase or decrease the rate displayed at checkout. Two adjustment types are available and can be used independently or in combination:
- Price Adjustment (fixed): A fixed amount added to or subtracted from the Aramex rate. Use a minus sign (–) to subtract.
- Price Adjustment (%): A percentage of the base rate added to or subtracted from it. Use a minus sign (–) to subtract.
When both are used together, the fixed amount is applied first, and the percentage is calculated on the resulting value.
Example: If the Priority Document Express (PDX) rate is $10, a fixed adjustment of $5 and a percentage adjustment of 10% gives a displayed rate of $16.50 ($10 + $5 = $15, then 10% of $15 = $1.50, total $16.50).
Display Aramex Services Based on Shipping Zones
To show specific Aramex services only to customers in certain regions, use WooCommerce Shipping Zones.
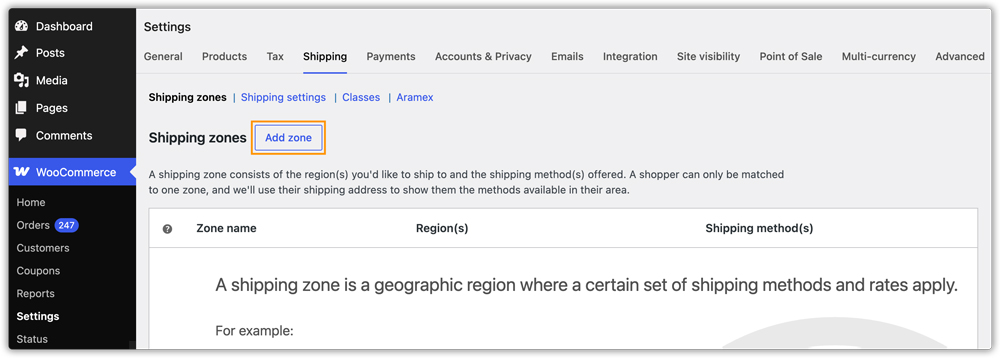
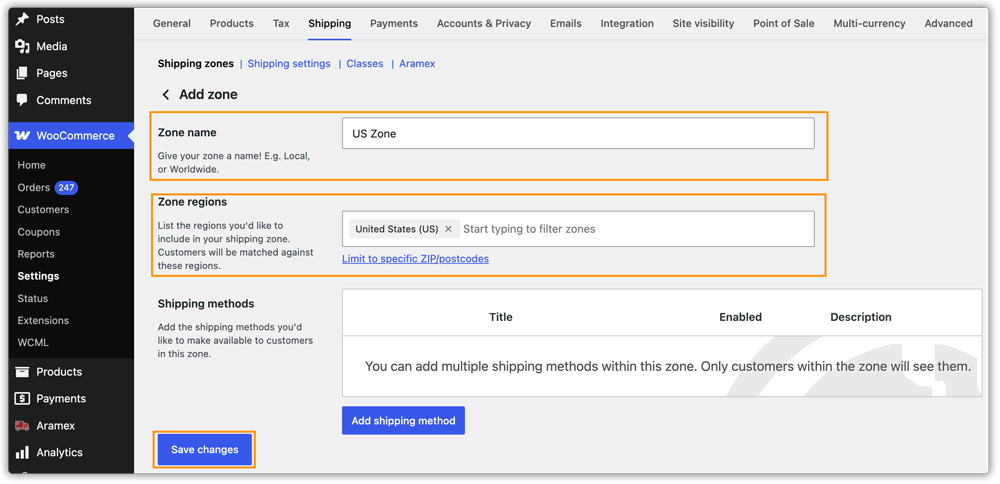
- Go to WooCommerce > Settings > Shipping > Shipping Zones.
- Click on an existing zone to edit it, or click Add Zone to create a new one.
- Give the zone a name, select the relevant region(s), and click Save Changes.
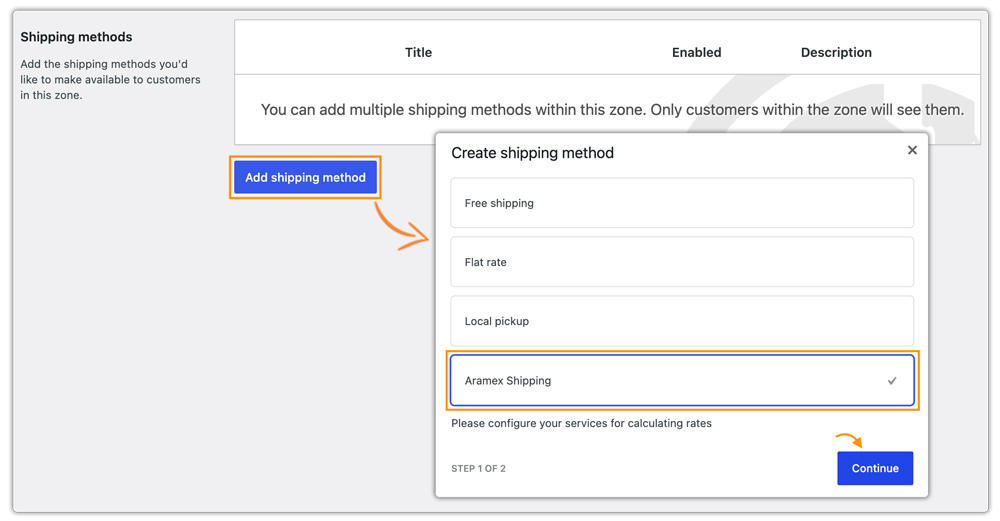
- Click Add Shipping Method, select Aramex Shipping, and click Continue.
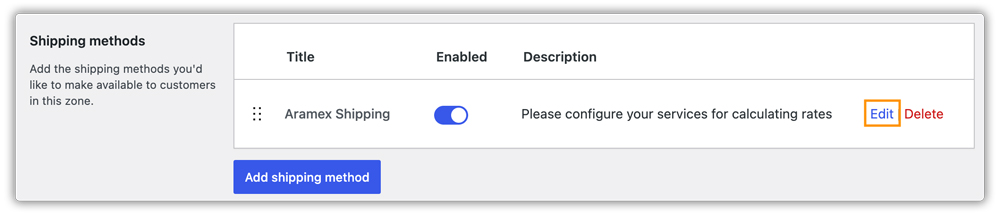
- Click Edit next to the Aramex Shipping method in the zone.
- Set a Method Title for this zone if needed. Enable the services you want to offer for that zone. Click Save Changes.
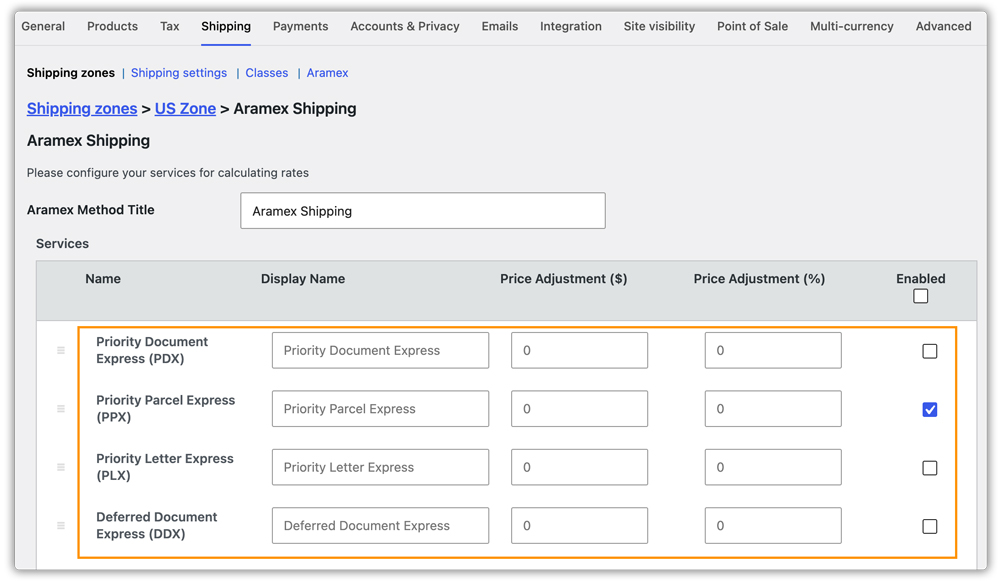
Now, at cart/checkout, the selected Aramex services applicable to the customer’s zone will be displayed.
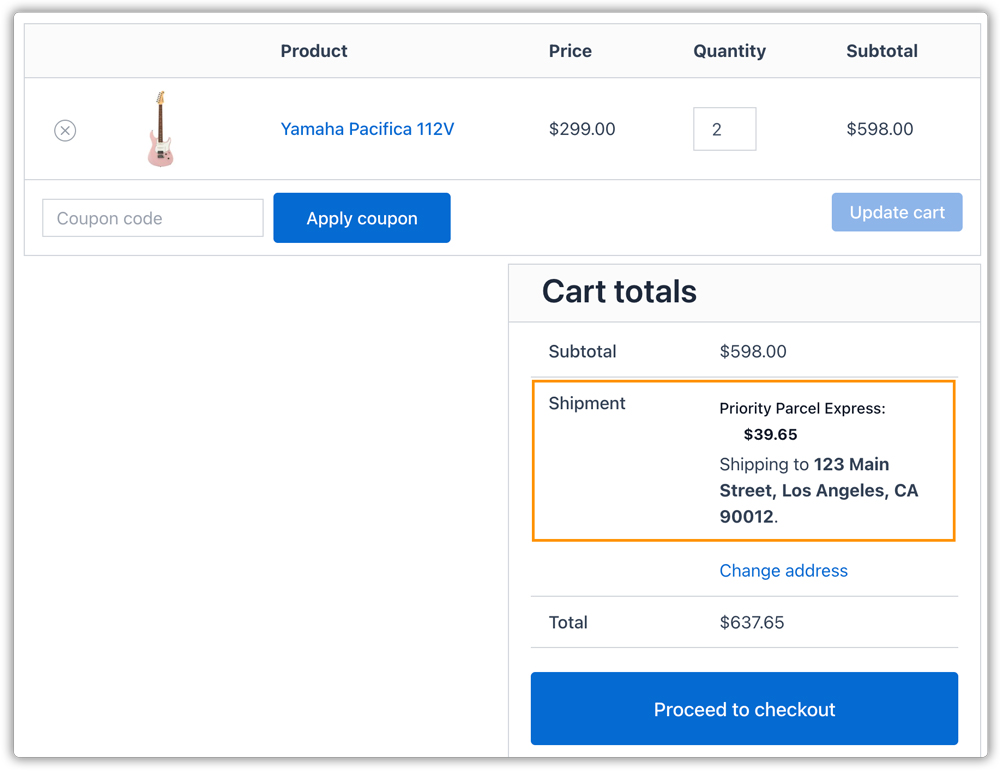
When Aramex services are configured inside a Shipping Zone, make sure the same services are disabled in the global Rates & Services settings. Otherwise, the same services may appear from both configurations, resulting in duplicate rates at checkout.
9. Configure Packaging Settings
Go to WooCommerce > Settings > Shipping > Aramex > Packaging tab. This tab controls how cart items are grouped into packages before shipping rates are calculated and labels are generated. There are 3 types of packaging as shown below.
Individual Packaging
Each item in the order is packed into its own separate box. Shipping costs are calculated per item, and a separate label is generated for each product.
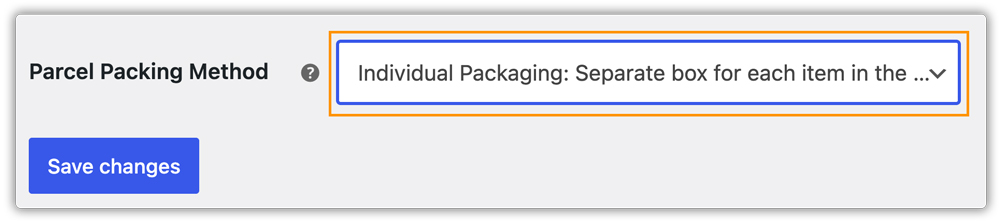
Example: If a customer orders 2 units of a product, each unit ships in its own box and two separate labels are generated.
Flexible Packaging
Items are packed into custom boxes that you define. The plugin selects the best-fitting box automatically based on product dimensions and weight. When this method is selected, a Packing Algorithm setting appears. Choose how items are fitted into boxes:
- Volume-Based Packing: Packs items based purely on available box volume. This is the default algorithm.
- Stack First Packing: Stacks items vertically before filling the remaining space.
- Based on Volume Used & Item Count: Balances both volume utilisation and item count to avoid overfilling boxes.
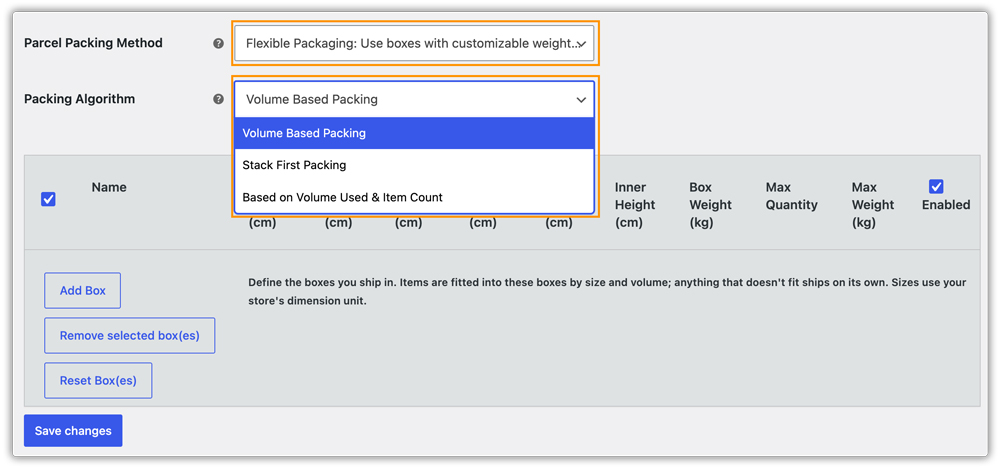
A Box Details table appears below where you can add your own custom boxes. Click on Add Box to add a new box, and for each box, enter a name, outer dimensions (Length, Width, Height), inner dimensions, empty box weight, maximum item quantity, and maximum weight per box. You can remove and reset box(es) by selecting them and clicking the respective button.
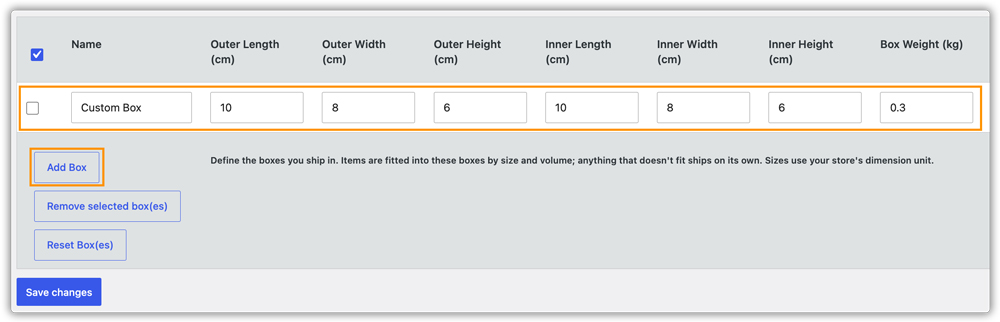
Click Save Changes to save.
Aramex does not supply carrier-specific pre-defined boxes, so no boxes are pre-loaded. You must add your own custom boxes when using Flexible Packaging.
Max Weight Limit
Items are packed together into a single box until the maximum weight limit is reached, then a new box is started. This is the default packing method and does not require product dimensions — only weights are needed.
- Box Weight: The weight of the empty box itself in your store’s configured weight unit. Default is 0.
- Max Package Weight: The maximum total weight (items + box weight) allowed per package. Default is 10.
- Max Package Quantity: Maximum number of items allowed per package. Set to 0 for no item count limit.
- Packing Process: Pack heavier items first (descending order) or pack lighter items first (ascending order).
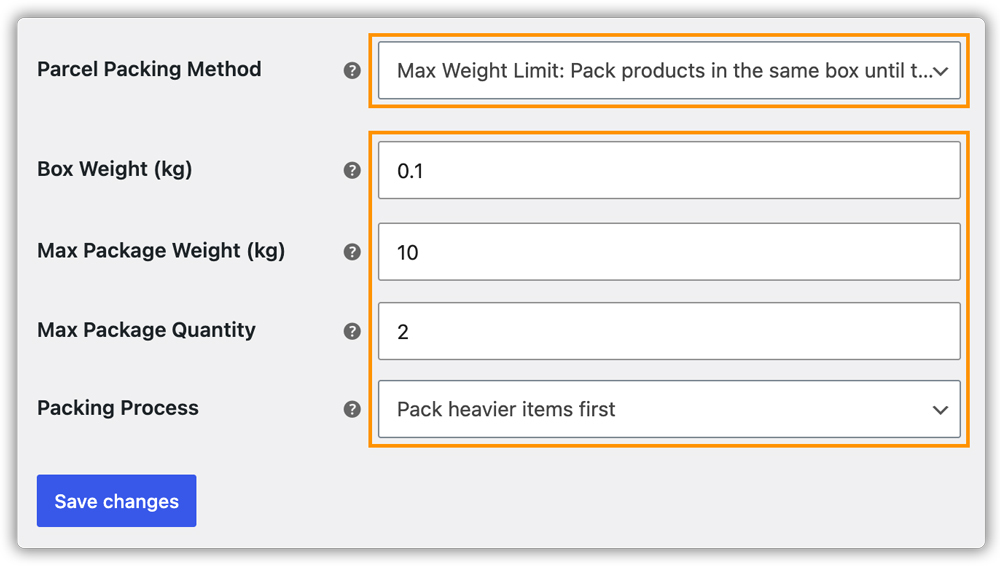
Make sure all products have accurate weights set on the product page. Incorrect or missing weights will cause inaccurate package generation and shipping rates.
10. Configure Label Settings
Go to WooCommerce > Settings > Shipping > Aramex > Labels tab. This tab controls how labels are delivered, whether they are generated automatically, and the default services and reference values used at label creation time.
Label Delivery Method
Choose how the Aramex label is returned by the API and made available in WooCommerce:
- Link – opens the label from Aramex (recommended): Aramex returns a hosted URL pointing to the label PDF. No file storage is required on your server. This is the recommended option.
- File – download a PDF from your server: Aramex returns the label as a base64-encoded binary. The plugin converts this to a downloadable file stored on your server.
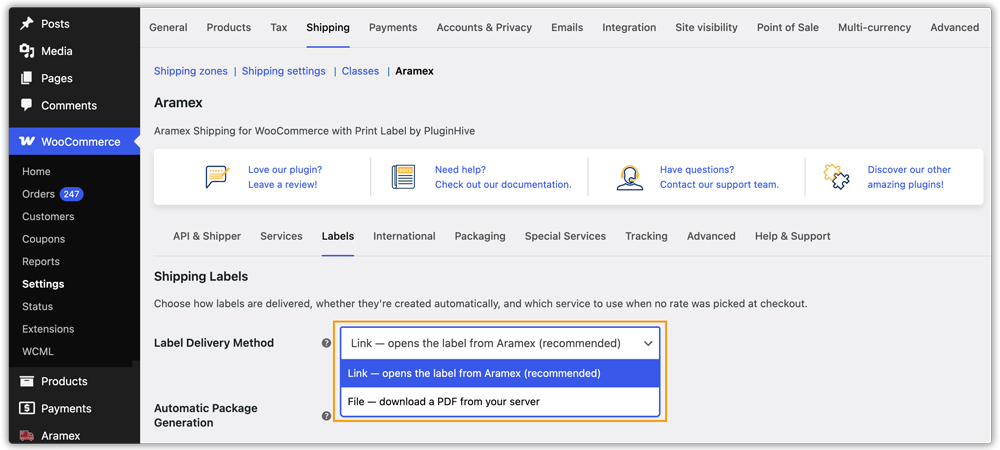
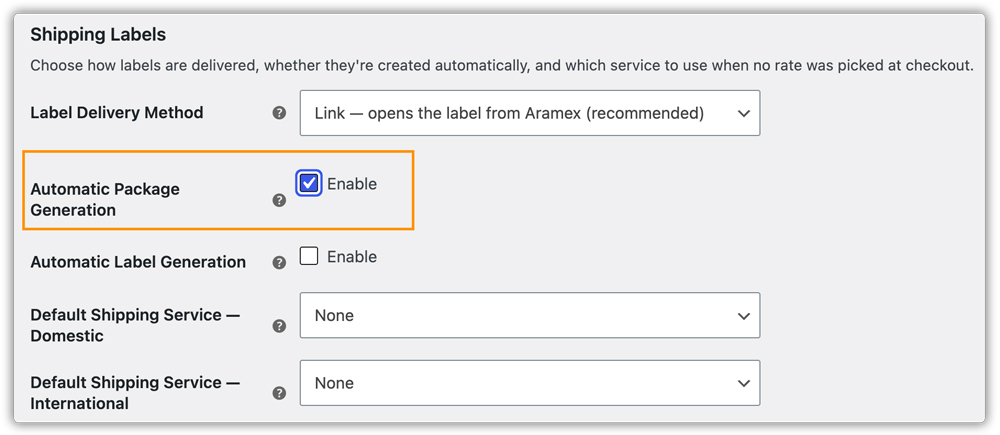
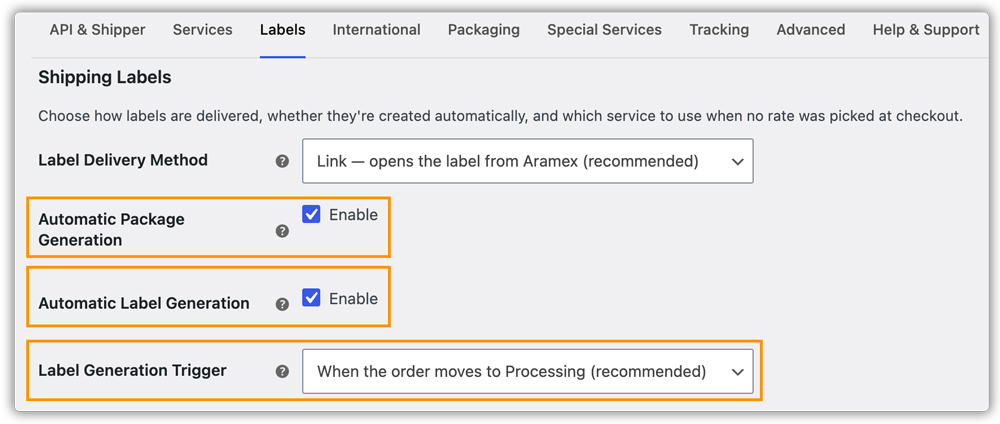
Automatic Package Generation
Enable this option to automatically generate package details for new orders based on your Packaging settings. When enabled, the plugin creates the package(s) as soon as a qualifying order is received.
If disabled, you must manually click Generate Packages on the order edit page before creating a shipment.
Automatic Label Generation
Enable this option to automatically generate the Aramex shipping label immediately after packages are created. This requires Automatic Package Generation also to be enabled.
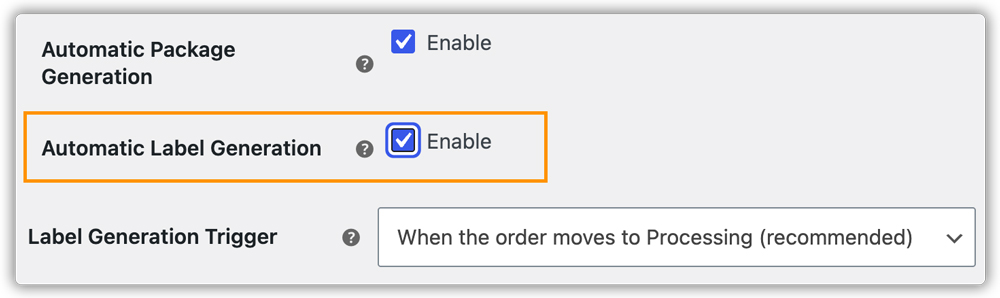
Both Automatic Package Generation and Automatic Label Generation must be enabled together for a fully automated label creation workflow.
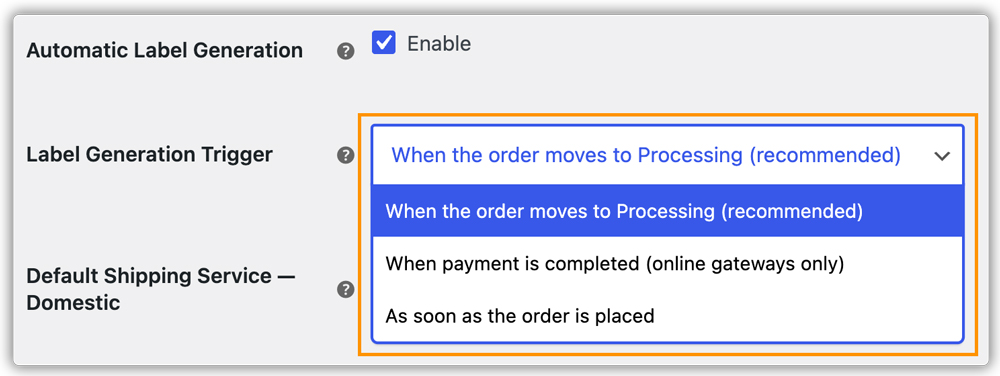
Label Generation Trigger
When Automatic Label Generation is enabled, choose which event should trigger the label creation:
- When order moves to Processing (recommended): Labels are generated when the order moves to the Processing status.
- When payment is completed (online gateways only): Labels are generated when the payment is confirmed. Suitable for payment methods that may have a delay, such as bank transfer.
- As soon as order is placed: Labels are generated at the moment the order is placed, before payment confirmation.
Default Shipping Services
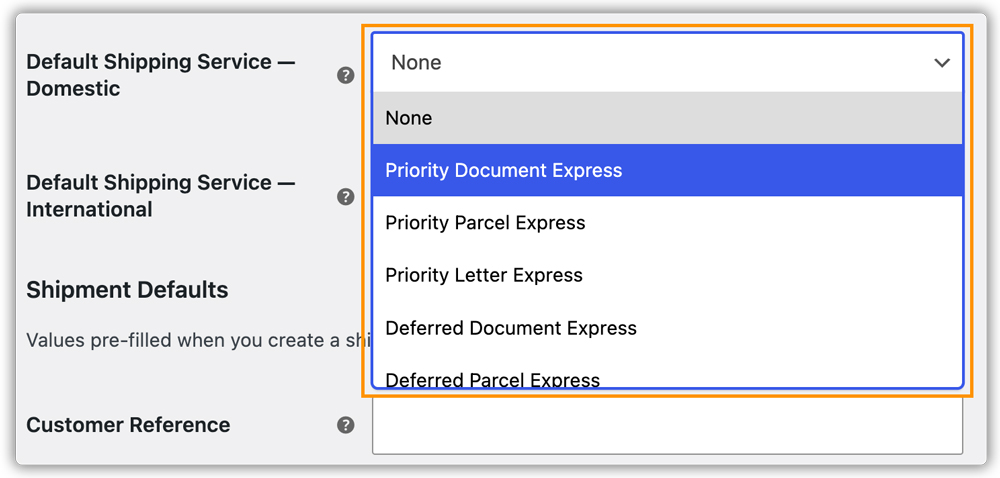
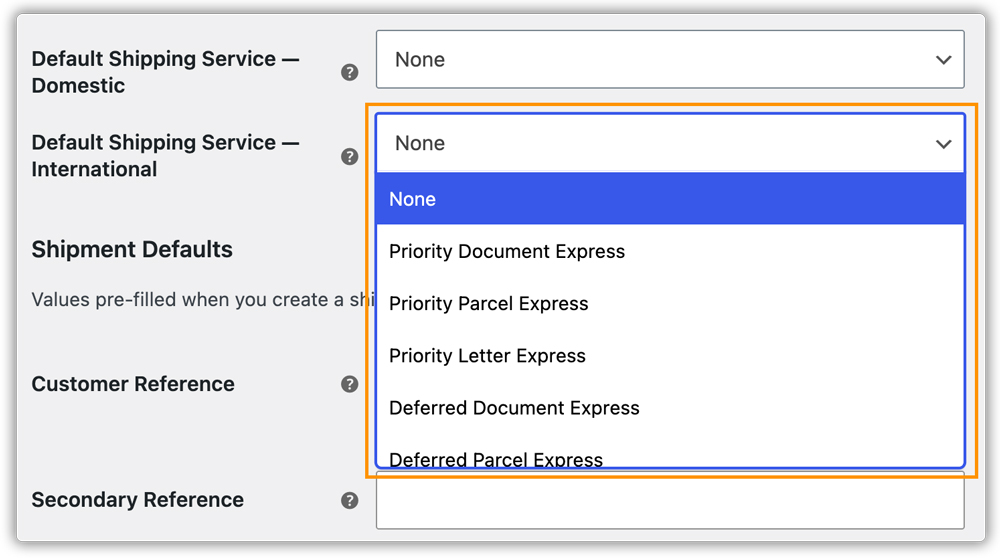
Select the Aramex service that will be pre-selected in the Create Shipment dropdown on the order edit page. These are used as fallback services when an order is placed without an Aramex rate (for example, via flat rate or free shipping):
- Default Shipping Service — Domestic: The service pre-selected for orders where the origin and destination are in the same country.
- Default Shipping Service — International: The service pre-selected for cross-border orders.
Shipment Defaults
These values are pre-filled in the Create Shipment form on the order edit page each time you create a shipment. They can be overridden per order at the time of shipment creation:
- Customer Reference: Pre-filled as the Your Reference field in the Create Shipment form. Sent as Reference 2 in the Aramex shipment. Max 50 characters. Example: your invoice number or internal PO code.
- Secondary Reference: Pre-filled as the Secondary Reference field. Sent as Reference 3 in the Aramex shipment. Max 50 characters. Optional.
- Shipment Comments: Default comments sent in every Aramex shipment request. Max 500 characters. Example: Handle with care.
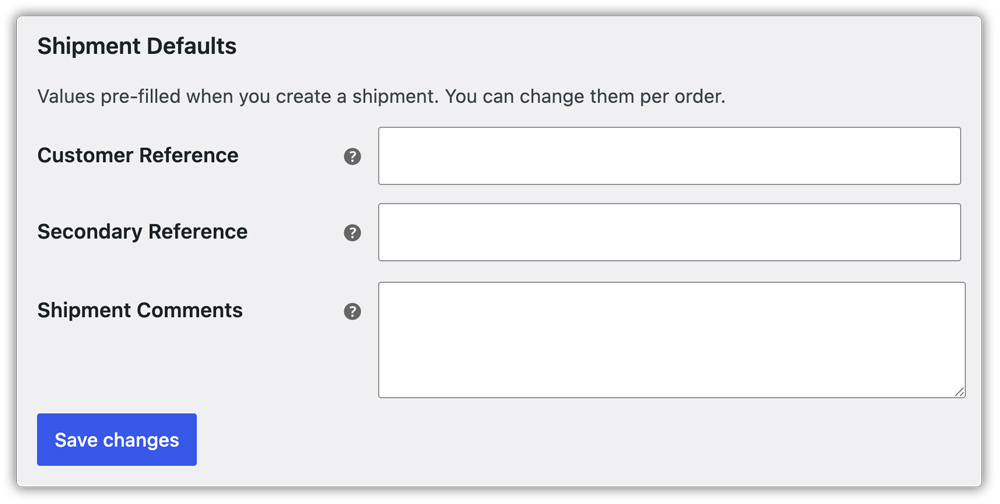
Click Save Changes.
11. Printing Aramex Shipping Labels
After configuring the plugin, customers can view the available Aramex shipping services on the Cart and Checkout pages, select their preferred service, and place the order.
Printing Your First Aramex Label
Once an order is placed, generate and print the shipping label from the WooCommerce order page:
Go to WooCommerce > Orders and open the relevant order.
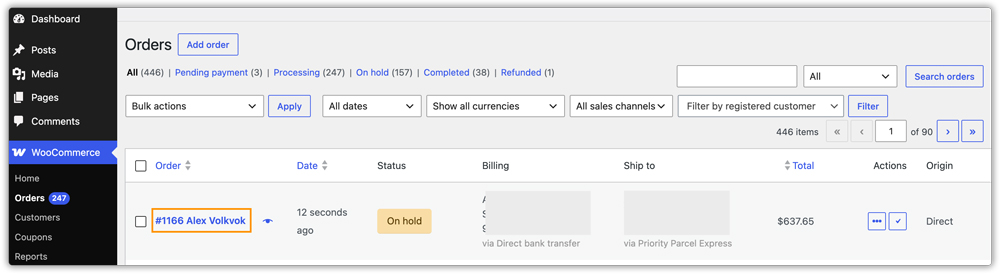
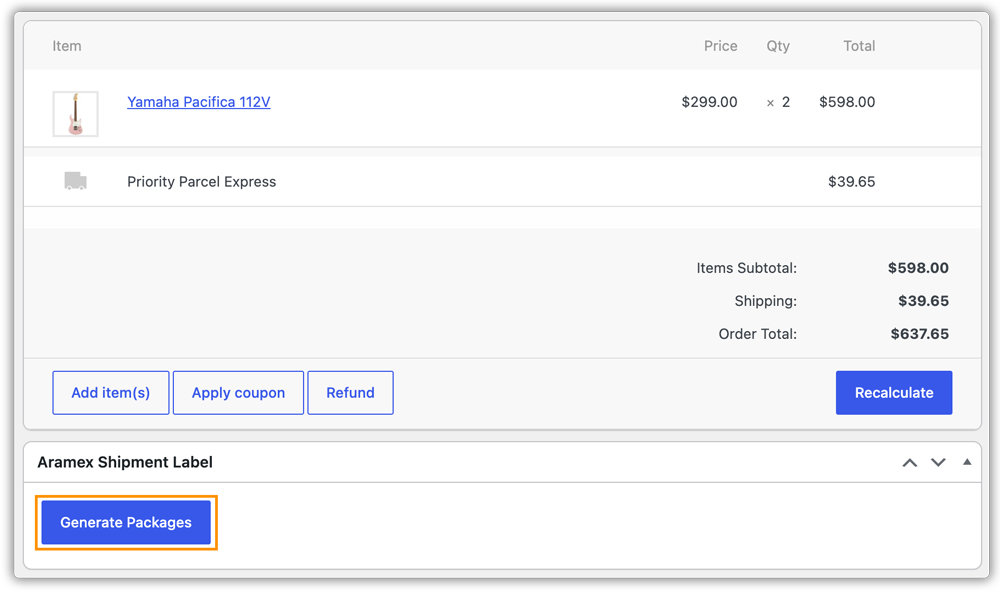
In the Aramex Shipment Label metabox on the order edit page, click Generate Packages. The plugin creates packages based on your Packaging settings.
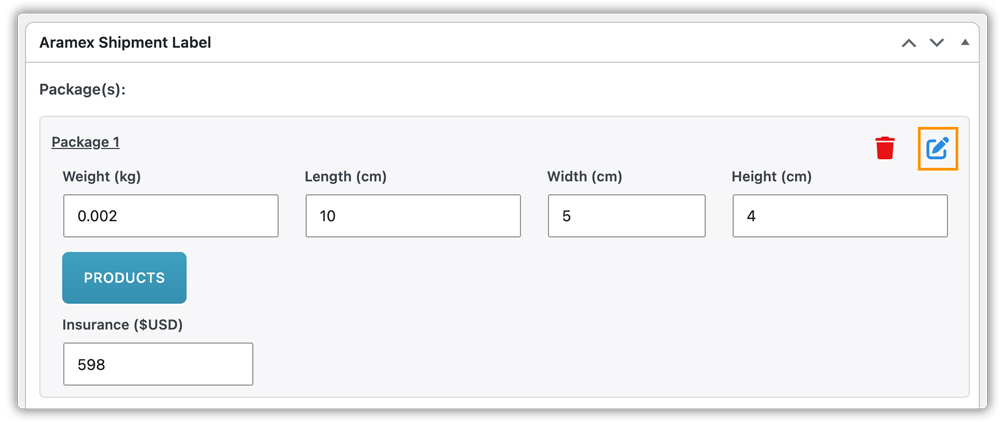
Once packages are generated, the package view appears on the order edit page. You have the following options before creating the shipment:
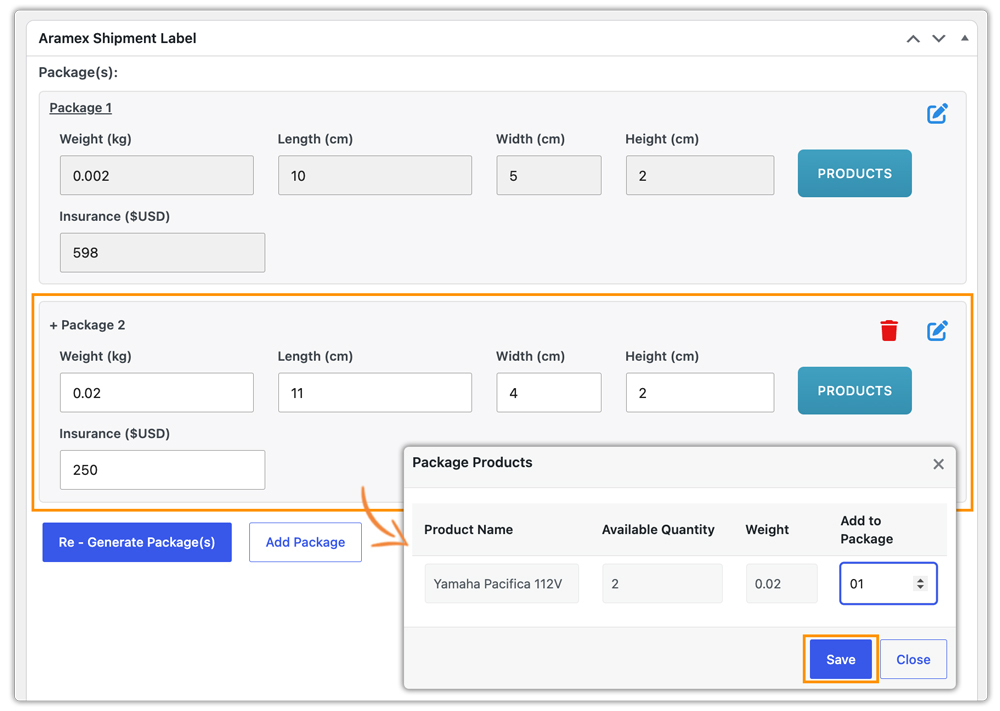
- Edit Package: Click the edit icon on a package to modify its weight, dimensions, or the products assigned to it and click Save Package(s). If Insurance is enabled in the Services tab, an Insurance amount field is also available per package so you can set the declared value individually for each box.
- Add Package: Click Add Package to create an additional package for the order.
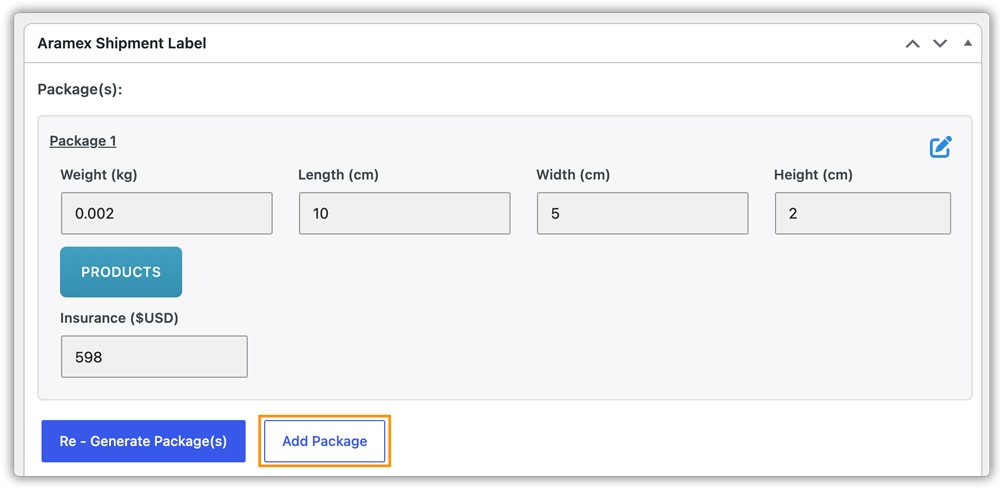
- Assign products by clicking PRODUCTS, enter dimensions and weight, and Save. You can add as many packages as needed. Ensure all products are assigned to at least one package before creating the shipment.
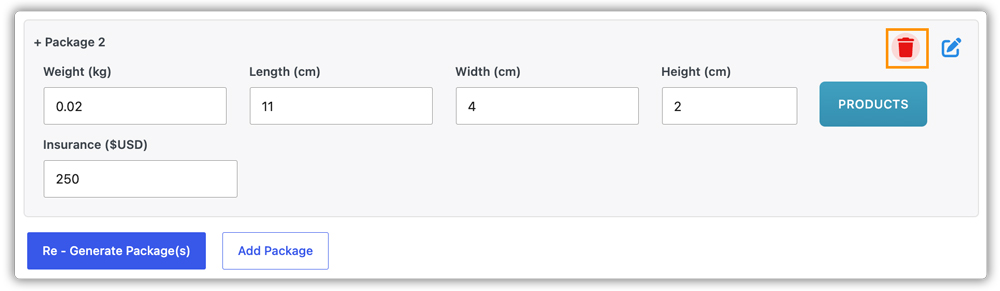
- Delete Package: Click the delete icon to remove a package.
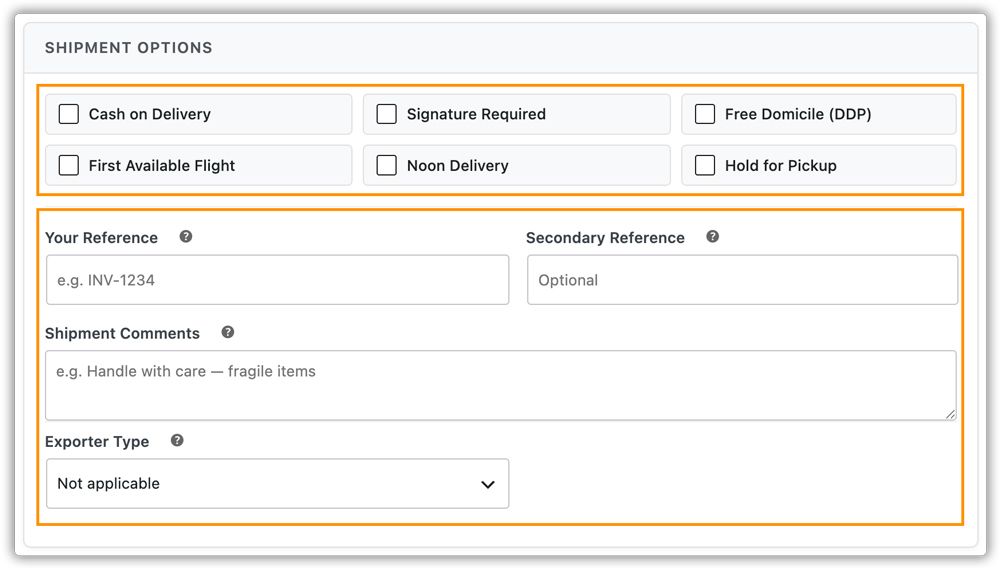
Below the package view, a Special Services section appears where you can enable or override per-order special services before creating the shipment. Six special services are available here as checkboxes, with their current global setting shown as the default state.
Additionally, you can fill in the following fields before creating the shipment:
- Your Reference: Pre-filled from the Default Customer Reference set in the Labels tab. Your internal reference for this shipment — e.g. invoice number or PO number. Printed on the Aramex label. Max 50 characters.
- Secondary Reference: Pre-filled from the Default Secondary Reference. Optional second reference. Max 50 characters.
- Shipment Comments: Pre-filled from the Default Shipment Comments. Comments sent to Aramex with this shipment. Max 500 characters.
- Exporter Type: For Indian-origin international shipments. Pre-filled from the global International settings but can be overridden per order.
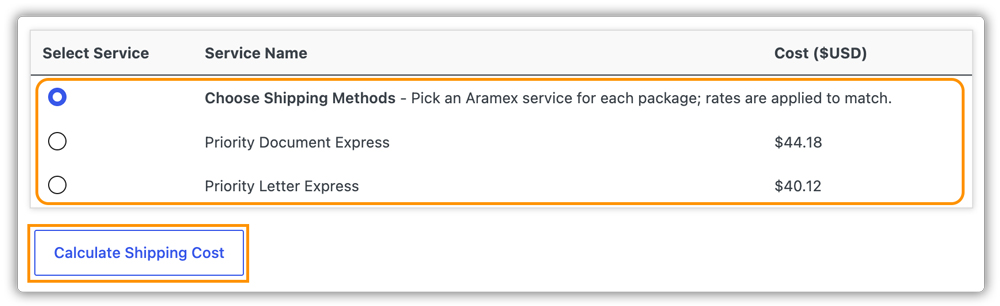
Click the Calculate Shipping Cost button to fetch the latest real-time Aramex rates for your package(s) if required. This lets you compare available services and their rates on the order page before committing to a service.
Once you have reviewed the order and details, click Create Shipment. The plugin sends the request to Aramex and generates the shipping label.

Once the label is ready, click Print Label to download and print the label.
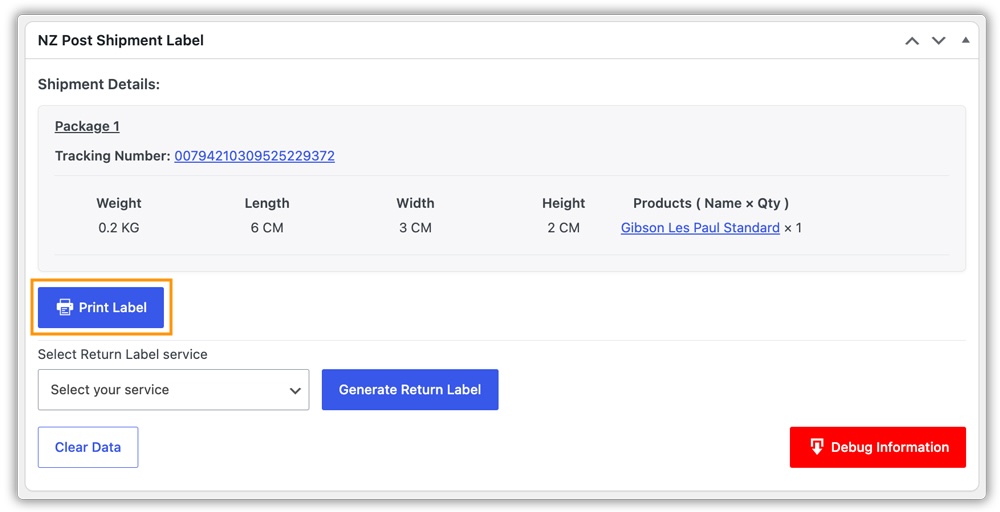
Here’s the printed label.

You can also print the label directly from the WooCommerce Orders list by clicking the print label icon that appears at the end of each order row once a label has been generated.
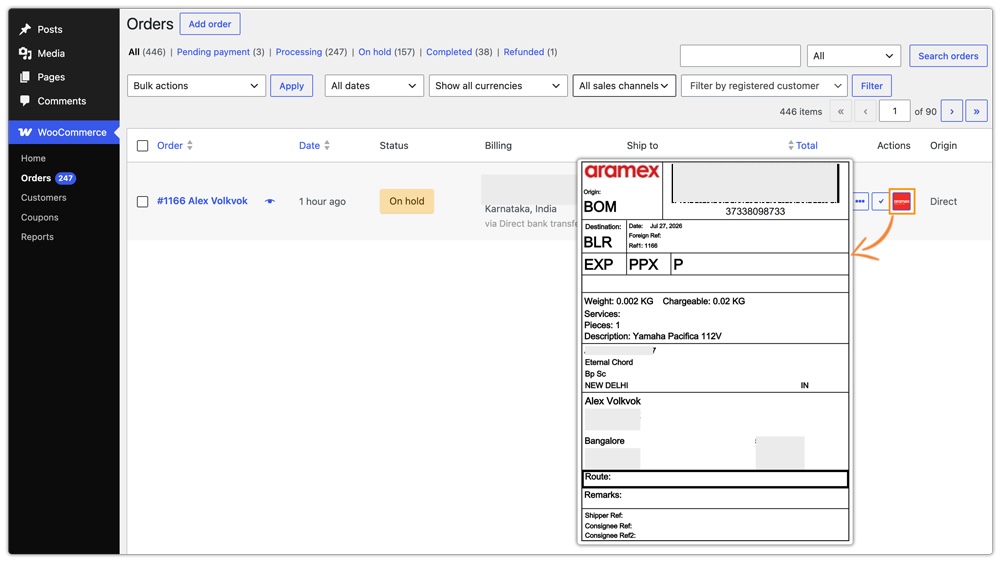
Print Aramex Return Label
Once an outbound label has been generated for an order, you can generate a return label from the same metabox on the order edit page.
- Open the order and scroll to the Aramex Shipment Label metabox.
- Under the existing shipment, click Generate Return Label by selecting a suitable service for the return shipment.
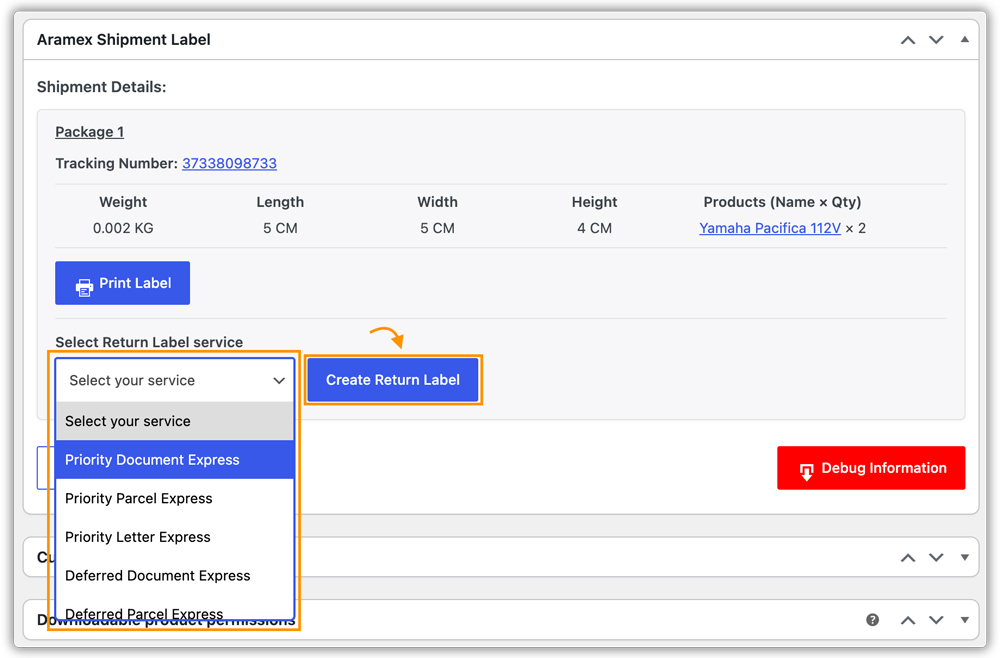
Once generated, the return tracking number appears alongside a Print Return Label button. Click it to download and print the return label.

Bulk Label Printing for Multiple Orders
The plugin supports bulk label generation and printing, allowing you to create and download labels for multiple orders at once.
- Go to WooCommerce > Orders.
- Select all the orders for which you want to generate labels.
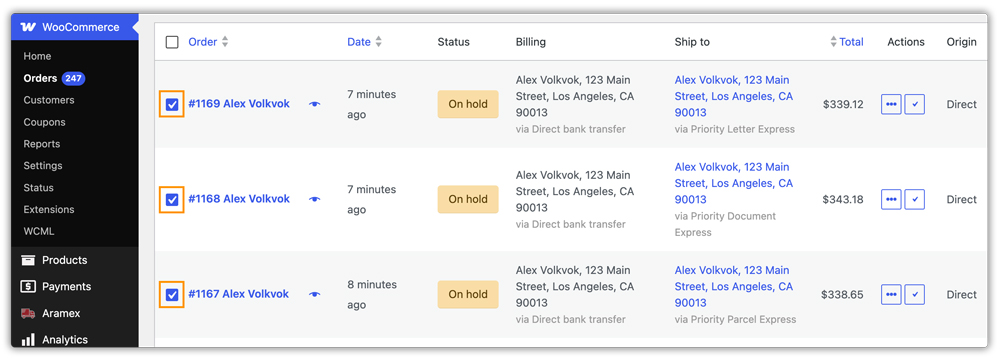
- From the Bulk Actions dropdown, select Create Aramex Label.
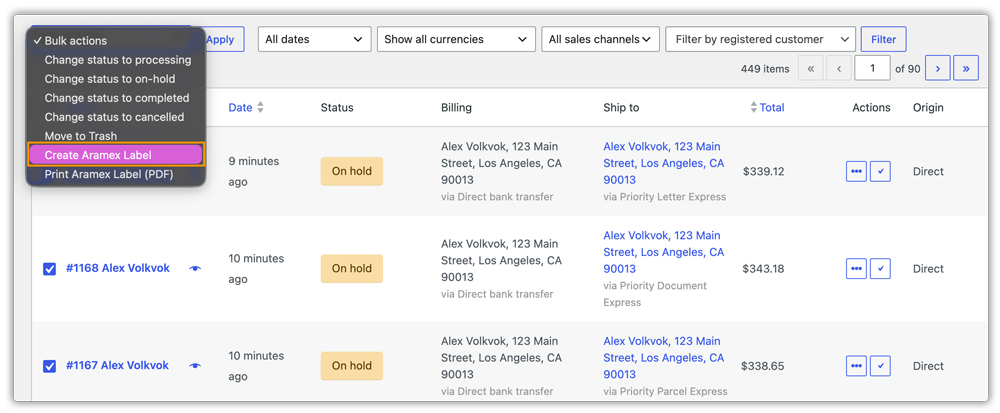
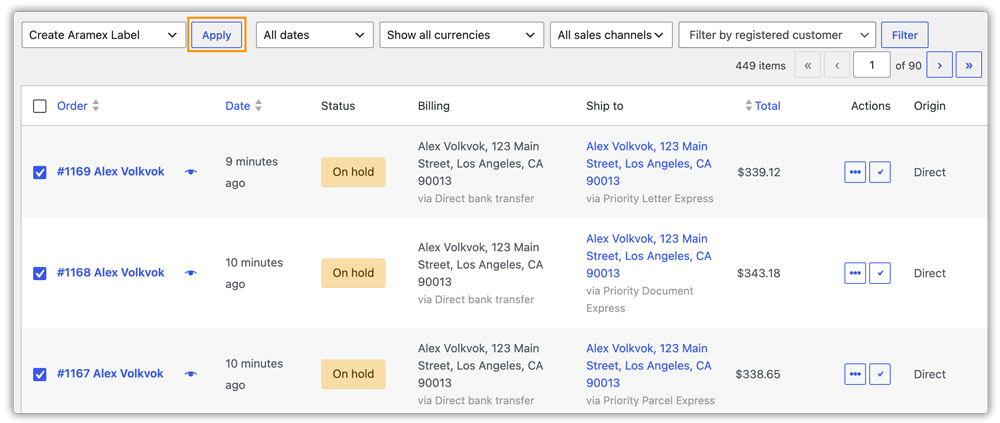
- Click Apply. The plugin creates a shipment for each selected order using the configured default service.
- Select the same orders again, choose Print Aramex Label (PDF) from Bulk Actions, and click Apply. The plugin merges all generated labels into a single PDF for download.
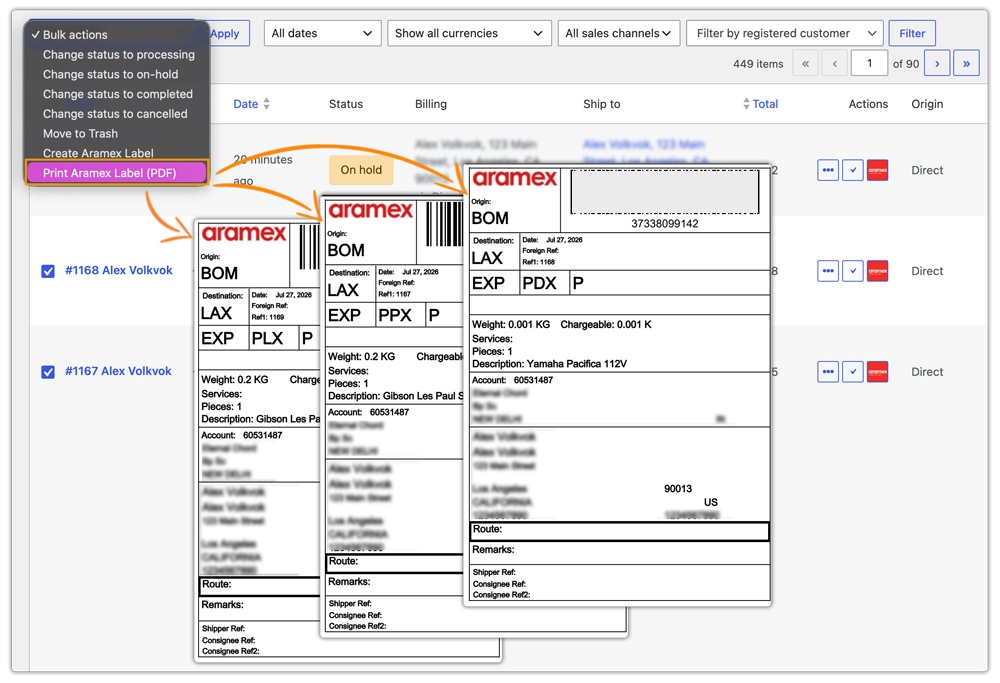
You can also click on the Aramex icon to print labels for each order individually.
Print Aramex Shipping Labels Automatically
To do this, make sure you have enabled Automatic Package Generation and Automatic Label Generation in the Labels tab.
Aramex labels are generated automatically when a qualifying order reaches the configured trigger status in the Label settings. No manual Generate Packages or Create Shipment steps required.
Once generated, you can print the label directly from the WooCommerce Orders list using the print label icon next to each order, or from the order edit page using the Print Label button.
Clear Label Data
If you need to remove all label data from an order, click the Clear Data button in the Aramex Shipment Label metabox. This removes the label information from WooCommerce only; it does not cancel the shipment with Aramex.
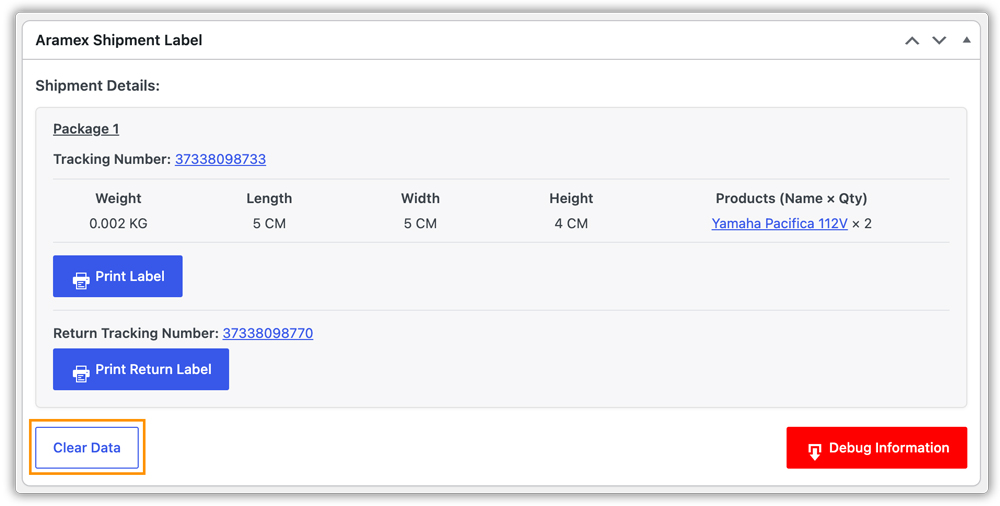
To cancel an actual shipment with Aramex, contact Aramex directly. Clear Data only clears the data stored within WooCommerce.
12. How to Set Up Aramex International Shipping
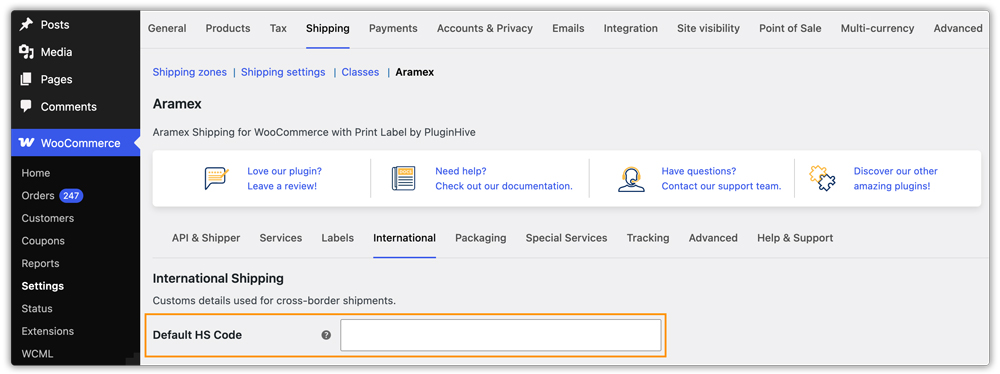
If you plan to ship products internationally, configure the required customs settings in the International tab. Go to WooCommerce > Settings > Shipping > Aramex > International tab.
Default HS Code
Enter a default Harmonized System (HS) tariff code (6–12 digits) to be used for all products that do not have a specific HS code set at the product level. This value is sent to Aramex for customs classification.
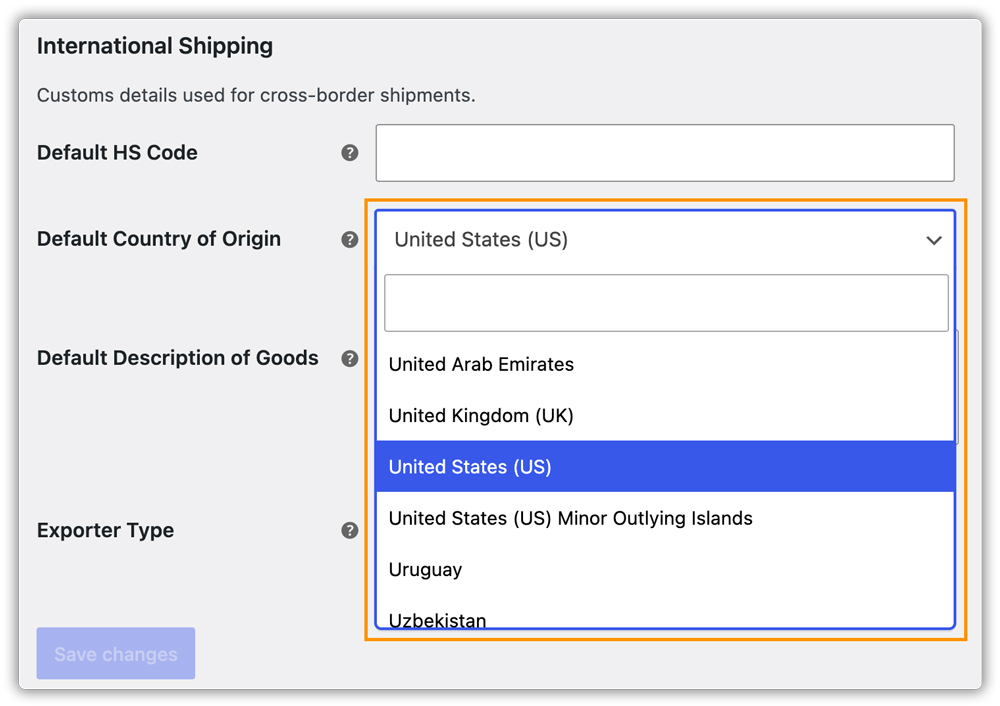
Default Country of Origin
Select the default country where your products are manufactured. This value is applied to all products that do not have a country of origin set at the product level and is sent as the GoodsOriginCountry in Aramex customs requests.
Default Description of Goods
Enter a default description of goods (max 100 characters) to be sent in Aramex rate and shipment requests when no product-level description is set. This appears on customs documentation.
Example: Clothing and Accessories.

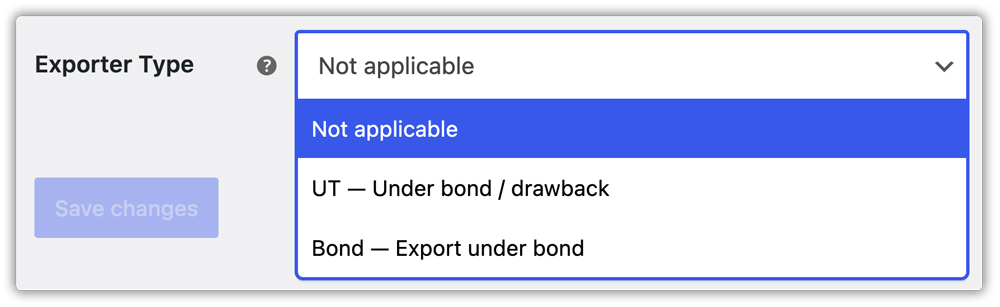
Exporter Type
This field is required for Indian-origin international shipments and is sent as an additional property in every shipment created when the origin country is India. Options:
- Not applicable (Default): Use for all non-Indian-origin shipments.
- UT — Under bond/drawback: Exports under bond with the right to drawback of duty.
- Bond — Export under bond: Exports made under bond without payment of duty.
This can also be overridden per order on the order edit page at shipment creation time.
13. Set Up Aramex Special Services
Go to WooCommerce > Settings > Shipping > Aramex > Special Services tab. The settings here are global defaults — they apply to all shipments created from your store. Each can also be toggled per order on the order edit page before creating the shipment.
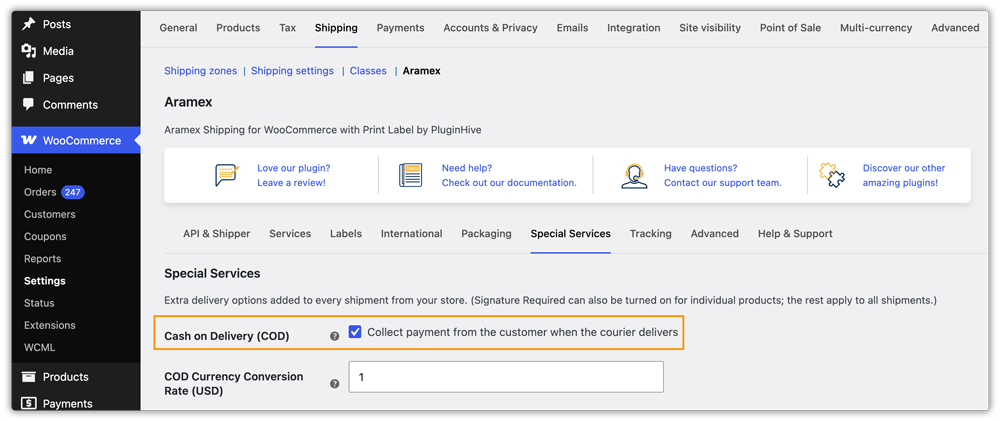
Cash on Delivery (COD)
Enable to collect payment from the recipient upon delivery. The COD service code (CODS) is sent to Aramex with every shipment, and the COD amount is taken from the WooCommerce order total.
COD Currency Conversion Rate (USD): Aramex requires the COD amount to always be declared in USD. Enter how many units of your store currency equal 1 USD (e.g. enter 83 if 1 USD = 83 INR). Set to 1 if your store currency is already USD.
Signature Required
Enable to require a recipient signature at delivery for all shipments (SIG service code). Can also be forced per product — if any product in an order has Require Signature enabled on its product page, the entire shipment will use signature regardless of this global setting.

Free Domicile / DDP
Enable to have the shipper pay all import duties and taxes on behalf of the recipient (FRDM service code — Delivered Duty Paid). Use this when your store absorbs all customs and import costs so recipients do not face unexpected charges.

First Available Flight
Enable to dispatch shipments on the earliest available flight regardless of route optimisation (FIRST service code). Useful for time-critical orders. May incur additional charges; check with your Aramex account manager before enabling.

Noon Delivery
Enable to guarantee delivery by 12:00 noon at the destination (NOON service code). Only available in supported Aramex service areas. Check with your Aramex account manager before enabling.

Hold for Pickup
Enable to have the shipment held at the destination Aramex station until the recipient collects it in person (HFPU service code). Useful when home or office delivery is not possible or convenient for the recipient.

14. Set Up Aramex Shipment Tracking
The plugin generates an Aramex tracking number with every shipping label. Tracking information can be included in the WooCommerce order completion email and displayed on the customer’s My Account page.
For this, go to WooCommerce > Settings > Shipping > Aramex > Tracking tab.
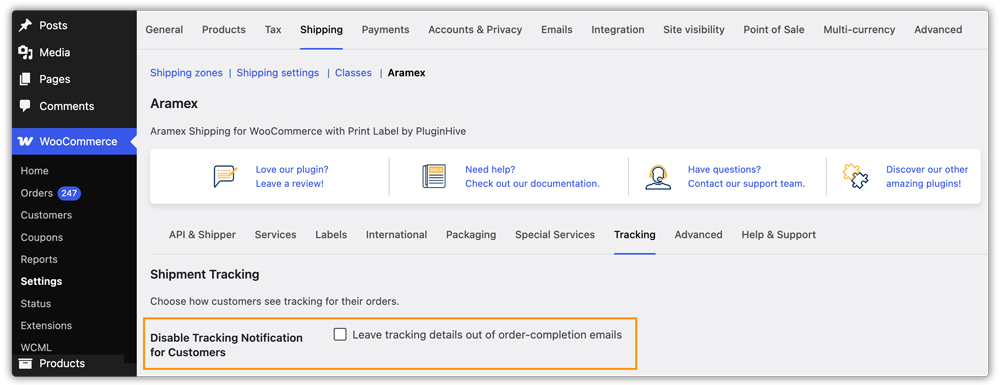
Disable Tracking Notification for Customers
By default, the plugin includes shipment tracking information in the WooCommerce Order Completed email sent to customers. Enable the Disable Tracking Notification for Customers option to exclude tracking information from these emails.
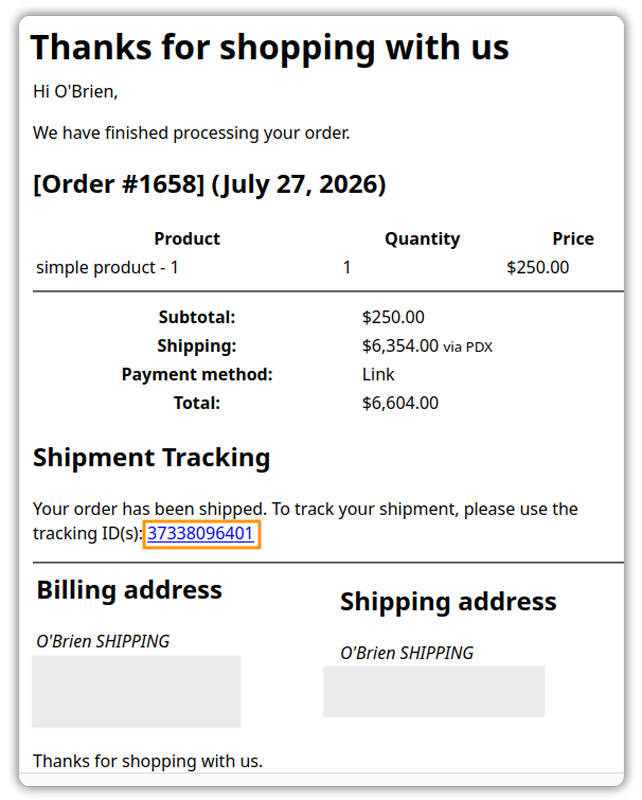
When this option is disabled (default), customers receive an email containing their Aramex tracking number and a clickable tracking link once the order is shipped. Clicking the link takes them directly to the Aramex tracking page for their shipment.
Hide Tracking in Customer’s My Account
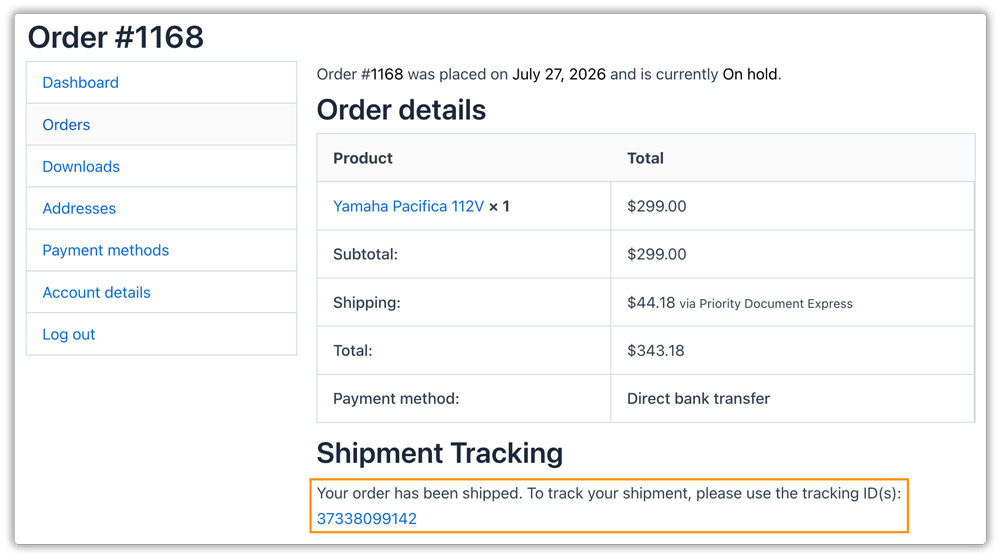
Enable Hide Tracking in My Account to prevent tracking information from appearing on the customer-facing page. Customers will not see tracking numbers or shipment details in their account order history.

When this option is disabled (default), customers can view their Aramex tracking number and tracking link directly from My Account > Orders.
Customise the Tracking Message
You can personalise the tracking information shown to customers using the following fields:
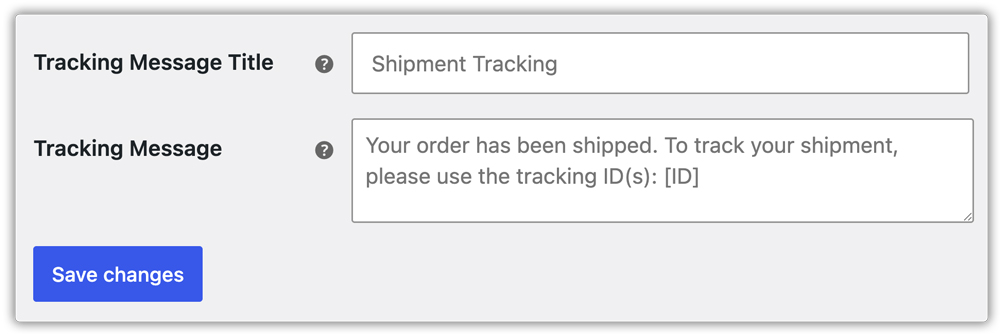
- Tracking Message Title: The heading shown above the tracking section in order completion emails and on the My Account page. The default placeholder is Shipment Tracking.
- Tracking Message: The message body sent to customers alongside their tracking number. Use [ID] as a placeholder — it is automatically replaced with the actual tracking number(s) when the email is sent.
Default: Your order has been shipped. To track your shipment, please use the tracking ID(s): [ID].
Click Save Changes.
15. Advanced Settings
Go to WooCommerce > Settings > Shipping > Aramex > Advanced tab.
Show All Services in Order Page
Enable this option to display all available Aramex services in the Create Shipment dropdown on the order edit page, not just the services enabled in the Services tab. This is useful when you want to use a different service for label generation than what is shown at checkout.

Debug Mode and Silent Debug Mode
Enable Debug Mode to display detailed API request and response information directly on the Cart and Checkout pages. Use this temporarily to diagnose rate calculation or connectivity issues. Disable it once troubleshooting is complete.
Enable Silent Debug Mode to log debug information in the background without displaying anything to customers on the Cart or Checkout pages. This is the preferred option for troubleshooting on a live store. Logs can be reviewed under WooCommerce > Status > Logs.

Disable Debug Mode on your live store once troubleshooting is complete. Leaving it enabled exposes API response data on your frontend pages.
Need Help?
If you have any questions about setting up the PH Aramex Shipping for WooCommerce plugin or run into any issues, reach out to the PluginHive support team. We are happy to help you get everything configured correctly.