
If you have a Shopify site and are still only selling locally, then you are leaving a lot of revenue on the table. The global e-commerce market is forecast to reach over $ 6.3 trillion by the end of 2025, and your Shopify Store will be able to capitalize on it. In every corner of the world, shoppers are actively searching for niche brands, better prices, and products not available locally. Recent statistics report that there are over 33,100 searches for “international shipping” and 590 searches for “Shopify international shipping” per month, which proves that merchants all over the world want to break the border, and Shopify fits well into that strategy.
While international shipping may feel enticing, it can also feel challenging. Duties are complex, carriers have regional regulations, transit times could be long, and currencies need to be switched. The good news is that by the end of this article, you will learn all that’s required and be able to seamlessly ship your products internationally.
Article Covers:
- Things to Identify Before Starting to Ship Internationally
- Can You Ship Internationally with Shopify?
- When Shopify’s Native International Shipping Isn’t Enough
- How Shopify Apps Come To Help ?
- Best Practices While Shipping Internationally
- How to Set Up International Shipping in Shopify
- Shopify International Shipping With PluginHive MCSL
- Conclusion
- FAQs
Things to Identify Before Starting to Ship Internationally
- Target Market Research: Figure out which countries are showing demand for your products, and also look at market size and cultural fit.
- Local Regulations & Import Restrictions: Each country has its own prohibitions of what can and cannot be imported. Do research on the restrictions and documentation requirements that relate specifically to your product here is a reference article.
- Shipping Costs & Transit Times: Compare shipping rates from different carriers, be cautious of lengthy delivery windows or excessive shipping fees, as these can hinder conversions. You can use Pluginhive MCSL App to get and compare carrier shipping rates in real time.
- Currency & Language Localization: To enhance the shopping experience for international customers, use currency converters and translation apps that allow them to browse in their native language and currency.
- Carrier Availability: Ensure reliable carrier options are available in your target regions. Consider integrating local carriers for better delivery times. The Pluginhive MCSL app offers integration with 30+ different carriers.
Can You Ship Internationally with Shopify ?
The question now is: can you ship internationally with Shopify? The answer is yes, but international shipping with Shopify is a little tricky, depending on your business case. Here is what Shopify offers to make international shipping convenient.
- Built-In Carrier Integrations: Shopify supports major carriers like DHL Express, UPS, USPS, and Canada Post. You can set international shipping zones and rates in your Shopify Shipping settings.
- Custom Shipping Profiles & Zones: You can create shipping zones for specific countries or regions and assign different shipping rates, rules, and carriers accordingly.
- Currency and Language Support: Shopify Markets allows you to localize currency, language, and pricing for different regions.
When Shopify’s Native International Shipping Isn’t Enough:
As your business expands and enters more global markets, you’ll quickly hit limitations of Shopify’s international shipping. Here are a few common scenarios where Shopify’s native tools may fall short.
- No Automation for Bulk Orders or High Volume:
If you’re processing hundreds of orders per day, Shopify’s default shipping label system isn’t designed for that task. You’ll need tools that automate label generation, manifest creation, and batch shipping.
- Limited Carrier Options in Certain Regions:
Shopify’s carriers may not operate in all the countries you serve or may not be the most cost-effective option.
- No Real-Time Carrier Rate Comparisons:
Shopify lets you set flat or calculated shipping rates, but it doesn’t show real-time rates across multiple carriers or offer rates based on delivery speed or cost efficiency. This makes it harder to offer competitive shipping options.
- Manual Customs Paperwork:
Shopify generates basic customs documents, but if you ship globally at scale, you’ll need to automate customs forms, HS codes, and product classification, especially for compliance with specific country regulations.
If your business falls under any of these scenarios, it’s a clear signal that relying on Shopify’s native international shipping features may not be enough. In such cases, integrating an app like Multi-Carrier Shipping Label isn’t just helpful, it’s essential. It’s specifically built to handle the complexities of global logistics, offering flexibility and control over your international shipping process.
How Shopify Apps Come To Help:
- Support Multiple different carriers:
Whether you’re shipping with DHL, FedEx, UPS, Aramex, or regional carriers like Australia Post or Canada Post, PH Multi Carrier Shipping app integrates directly with 30+ global and local carriers. This gives you access to real-time shipping rates, delivery estimates, and one-click label generation all from within Shopify.
- Bulk label generation:
Managing high-order volumes? Apps make it easy to generate shipping labels in bulk, saving you hours of manual work. Whether you’re fulfilling hundreds or thousands of orders, you can print all labels at once and streamline your fulfillment process.
- Live Tracking notifications:
Customers expect to know where their package is. Apps offer automated tracking updates via email, complete with live tracking pages, reducing customer support queries and improving satisfaction.
- Automated Custom documentation with ETD:
By enabling Electronic Trade Documents (ETD), apps automate the entire customs paperwork process. This includes electronic submission of required documents directly to customs authorities.
- Localized Shipping Rules:
Every market is different. External apps allow you to set up country-specific shipping rules, so you can adjust rates, restrict rules by region, or offer custom delivery options based on customer location, all tailored to your shipping strategy.
Best Practices While Shipping Internationally
Before you begin shipping internationally, it’s crucial to understand and implement key best practices to ensure a smooth, cost-effective, and customer-friendly process. Here are some of the aspects to keep in mind:
- Set Clear and Transparent Shipping Rates: Use real-time carrier rates or calculated flat rates based on zones. Avoid hidden fees and communicate all shipping costs at checkout to avoid cart abandonment.
- Offer Delivery Estimates at Checkout: Accurate ETAs build trust. Use carrier APIs, tools like Shopify MCSL to show customers estimated delivery times based on destination.
- Updating International Shipments Proactively: Use order tracking automation and delivery notifications to keep customers informed. This reduces support queries and builds confidence in your brand.
- Provide a Clear Return Policy for International Orders: Set expectations by clearly stating who pays for return shipping, how long returns are accepted, and whether refunds include duties/taxes.
Now that you’re familiar with the nuances of international shipping, let’s walk through how to set it up.
How to Set Up International Shipping in Shopify
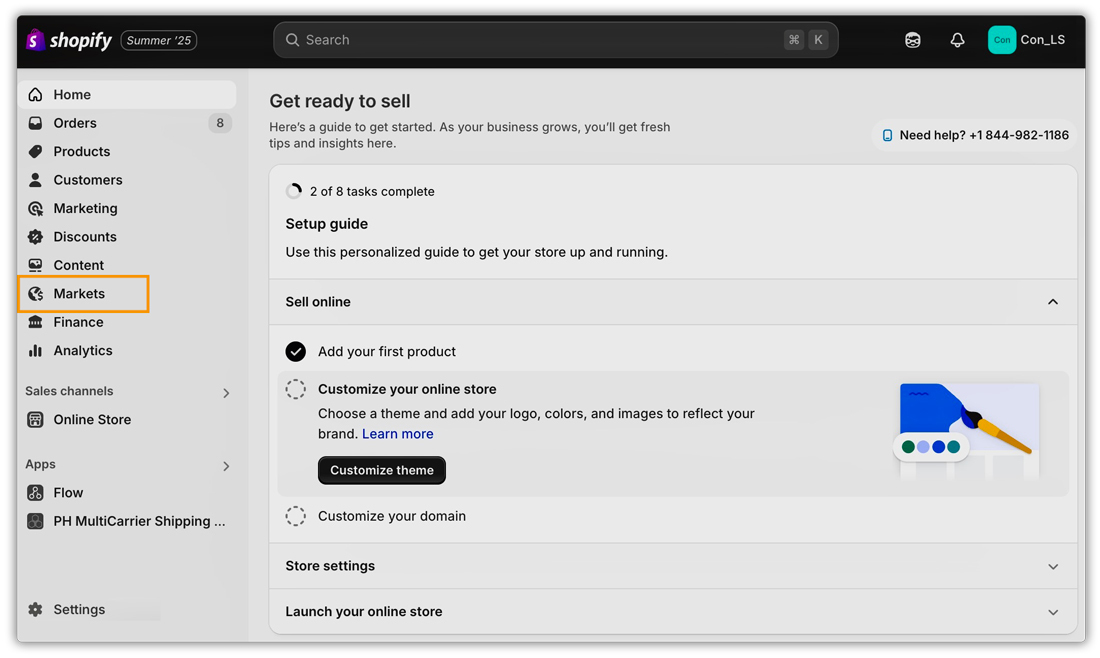
- Go to Shopify Admin Dashboard > Markets.
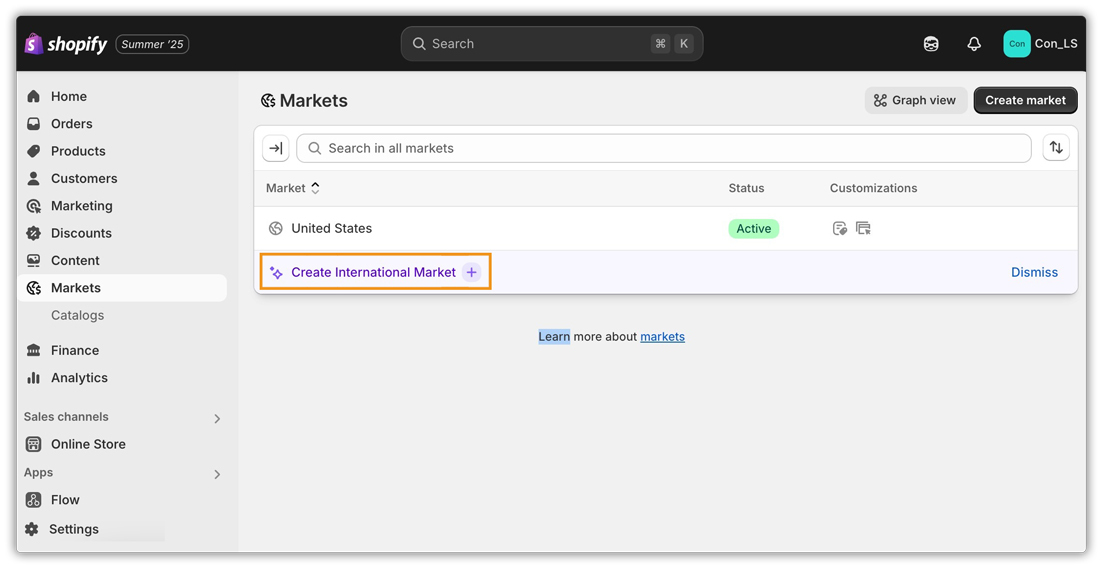
- Click on “Create International Market”.
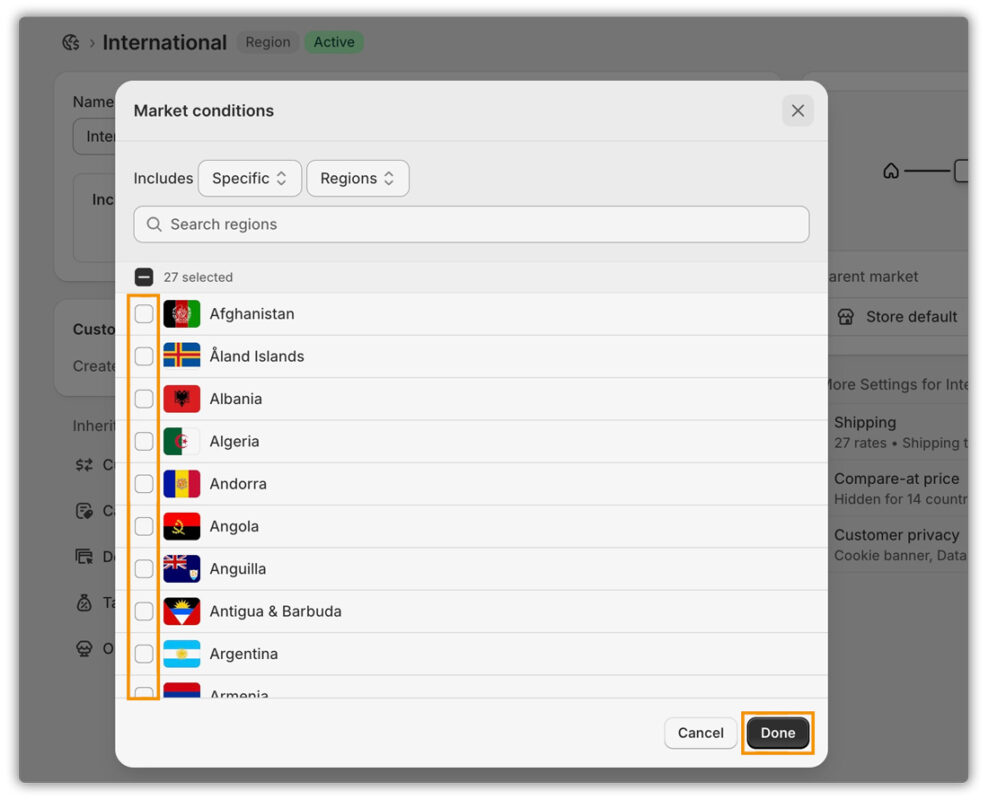
- Click on the “Pencil Icon” to open a menu that can be used to add countries to the market.
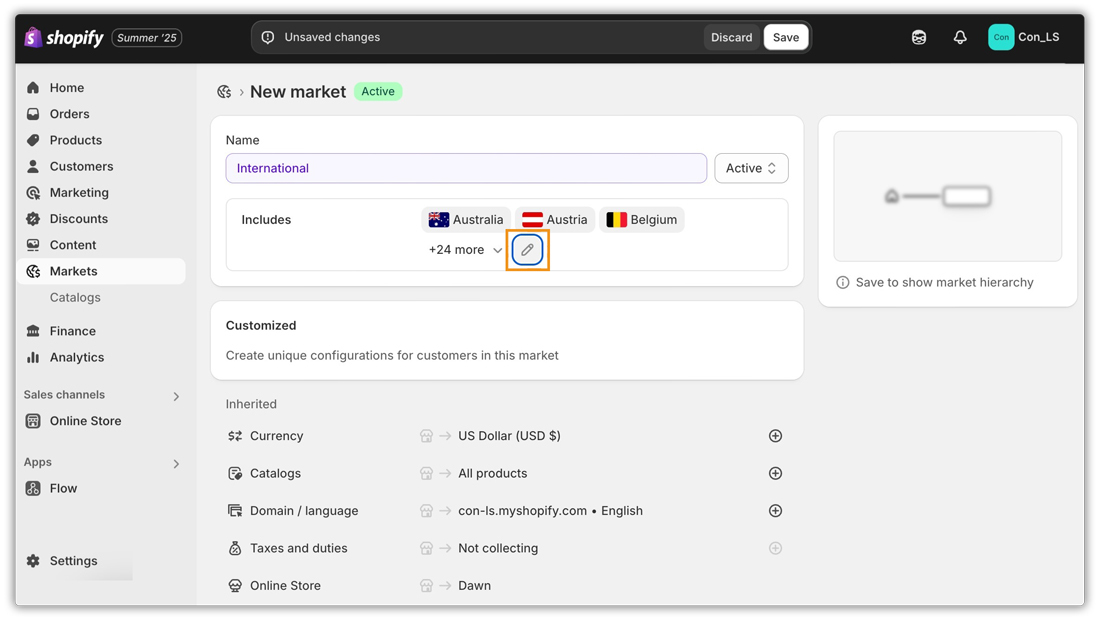
- Select all the countries that need to be added to the market by using the checkbox and click on “Done”.
- Now that the market has been created, the next step is to add these countries to the shipping zone of the warehouse that is to be used for shipping.
- To do this: Go to Settings > Shipping and Delivery> Shipping>General Shipping Rates

- You can add the same countries (or regions) under Shipping Zones to the warehouse that you want to ship from by “Add shipping zone” and define your rates for those zones by clicking on “Add Rate”.

- After adding the countries, just like we did in the market settings, you can proceed to set up your preferred shipping rates.
- Rates include flat rates, carrier-calculated rates, or app-based rates; tailor these depending on your business requirements. Both Shopify’s built-in international rates and rates from third-party shipping apps can be configured directly from this menu.

- Once you’ve set everything up, click Done, then Save your changes. Shopify is now fully configured for international shipping.
Shopify International Shipping With PluginHive MCSL
Now that we’ve covered the basics of setting up international shipping within Shopify, it’s time to take things a step further. While Shopify’s native features get you started, scaling your global logistics efficiently often requires more advanced tools. That’s where PluginHive Multi Carrier Shipping Label (MCSL) comes in.
In this section, we’ll learn how to incorporate MCSL into your Shopify store to simplify your international shipping operations.
Follow the steps in this article to install and set up the PH Multi Carrier Shipping Label app on your Shopify store: View Setup Guide .
After you have successfully set up the app next step is to add the carrier. Follow these steps to add the carrier.
- On the app’s landing page, locate the ☰ icon (hamburger menu) at the top left corner. then go to Settings>Carriers>”+” icon on the page.
- You can choose a carrier of your choice from the list of carriers that PluginHive supports. The carrier should ideally be chosen according to the region that you want to target internationally. The carrier that primarily works in your target region should be ideally selected

- Choose the carrier of your choice by using the search button at top of the page

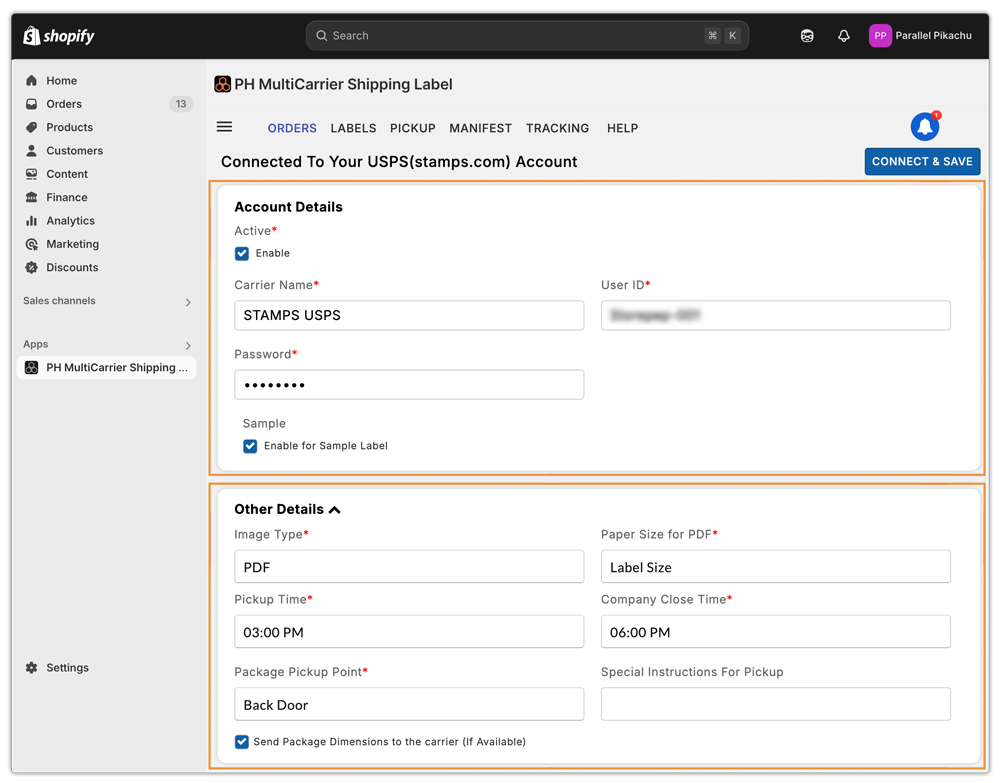
- On the carrier integration page, you’ll find all the necessary fields to enter your carrier account details. Fill in the required information, then click “Connect and Save” to complete the integration.
- After setting up the carrier, the next step is to select the packaging type. You can do so by navigating to Settings>Shipping>Packaging.

- You can select any packaging from the list of packaging methods you see on the tab

- Now that you’ve set up everything and PluginHive Multi Carrier Shipping Label (MCSL) supports your carrier, you can offer live shipping rates at checkout and generate shipping labels.
- To confirm that everything is working as expected, you can now place a test order from your storefront. Simply visit your shop, add a product to your cart, and proceed to checkout.
- If your selected carrier supports real-time rates via PluginHive, you’ll see the live shipping options displayed at checkout, complete with estimated delivery times and accurate pricing. You can now complete the checkout.

- Once the order is placed, it will be automatically displayed in the app. To print a shipping label for the international order, simply select the checkbox next to the order and click on “Generate Label.” and then “Print Documents”.

- PluginHive MCSL successfully creates the shipping label for your international order.

For carriers like USPS and Canada Post, the Commercial Invoice is combined with the shipping label, so only one document is generated for international shipments.
Some Additional Functionalities:
Shipping Zones:
- PluginHive MCSL lets you create advanced, custom shipping zones tailored to the international regions you want to target. You can then use these zones to build automation rules that apply specific rates and label generation settings only to those areas. This added flexibility helps you streamline operations, minimize errors, and deliver a more personalized shipping experience to your global customers.
- You can optimize your shipping strategy by using shipping zones to customize rates, delivery estimates, and carrier options based on the customer’s location. While Shopify’s built-in zones let you segment by country or state, the PluginHive MCSL app takes it a step further.

Shipping Rate Rules:
- With the PluginHive MCSL app, you control how shipping rates appear at checkout based on specific conditions.
- Here is how you can configure this: navigate to ☰ >Settings > Shipping Rates > Rate Automation.
- The PluginHive MCSL app automatically adds default shipping rules when you connect a carrier to display rates at checkout. However, you can define your own rate automation rules for greater control and customization.
- You can use the shipping zones you created to display rates only for a particular region.

Label Creation Rules:
- Within this section, you can define all the conditions required for label creation, tailoring them precisely to your shipping needs.
- You can use the shipping zones you’ve created to restrict these conditions to a specific zone.

In this way, PH Multi Carrier Shipping app simplifies the complexities of international shipping by allowing you to automate rates, customize rules, and streamline label generation—all tailored to your global shipping zones.
Conclusion:
International shipping can unlock massive growth for your Shopify store, but scaling globally comes with challenges. While Shopify covers the basics, tools like PluginHive MCSL take you further, offering bulk label automation, real-time carrier rates, local carrier integration, and seamless customs handling. If your business is growing beyond borders, make sure your shipping setup can grow with it.
Go global the smart way.
FAQs:
1. Can I ship internationally with Shopify?
Yes, Shopify supports international shipping through built-in features like shipping zones, custom rates, and major carrier integrations. You can also use Shopify Markets to localize currency and language for different regions.
2. Do I need to enable countries in Shopify Markets before shipping internationally?
Yes, to start international shipping, you should first enable the countries you want to sell to via Shopify Markets, then configure your Shipping and Delivery settings for those countries.
3. Can I get complete custom documents using Shopify?
Shopify provides only basic customs documents for international shipping. To generate detailed documents like Commercial Invoices, DDP, and DDU labels, use apps like PluginHive MCSL.
4. Can you create Custom Shipping zones in Shopify for Different Countries?
Yes, Shopify allows you to create basic shipping zones for different countries or regions, letting you set specific shipping rates and rules tailored to each zone. For more control and action over the zones, use PluginHive MCSL.
5. Is Shopify suitable for high-volume international shipping?
Shopify’s native shipping features don’t support high-volume international shipping efficiently, as they generate multiple labels per shipment. Use PluginHive MCSL or a similar app to streamline label generation and automation.