Setting up shipping rates, managing shipping zones, and implementing effective shipping strategies are essential for running a successful e-commerce business. Shopify provides various Local Delivery and Pickup Apps and features to help store owners streamline their shipping processes.
In this blog post, we will provide a comprehensive guide to Shopify rates, profiles, and zones, and explore the importance of having a well-planned shipping strategy in your Shopify store.
Understanding Shopify Shipping Profiles
A shipping profile allows you to configure and manage shipping settings for different regions, zones, or specific shipping requirements. With shipping profiles, you can create customized rules and rates for shipping methods, zones, and destinations to streamline your order fulfillment process.
Creating and managing shipping profiles in Shopify is a straightforward process. Here are the steps to create a Shopify shipping profile:
- Log in to your Shopify admin dashboard
- Click on “Settings” at the bottom left corner of the page
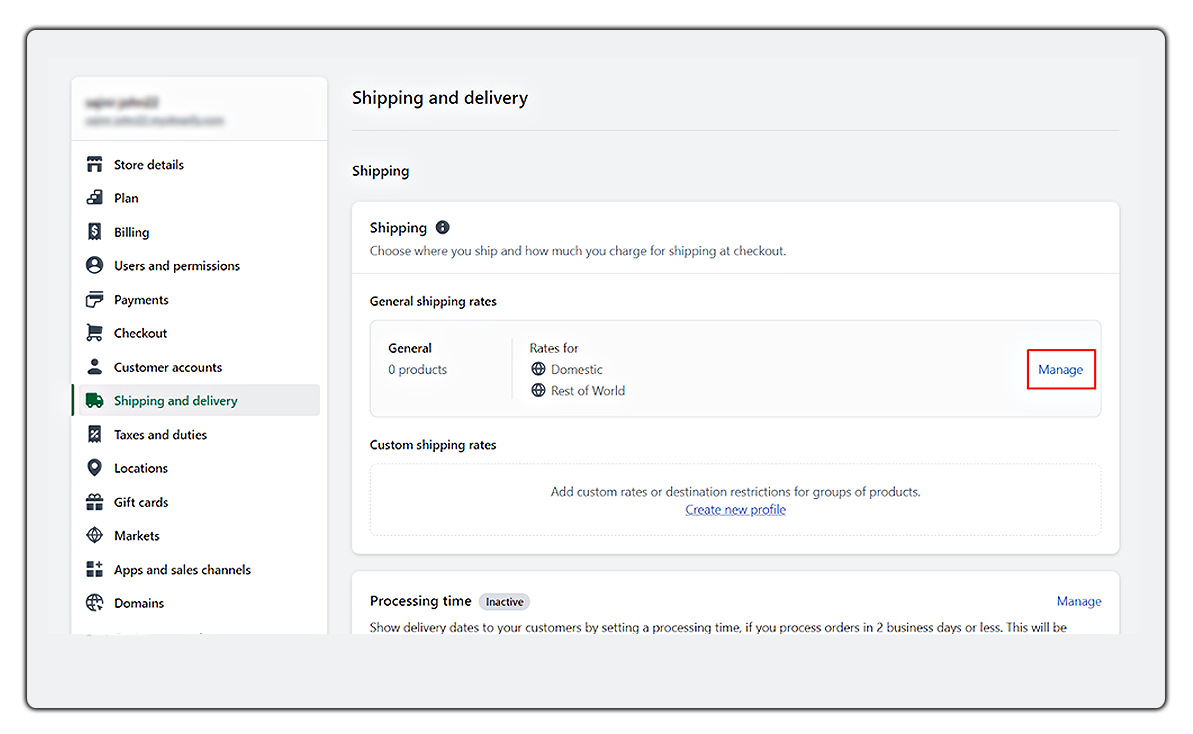
- Select the “Shipping and Delivery” option
- In the General shipping rates section, click on the Manage option
5. From the Shipping Origins section, you can make changes to your locations.
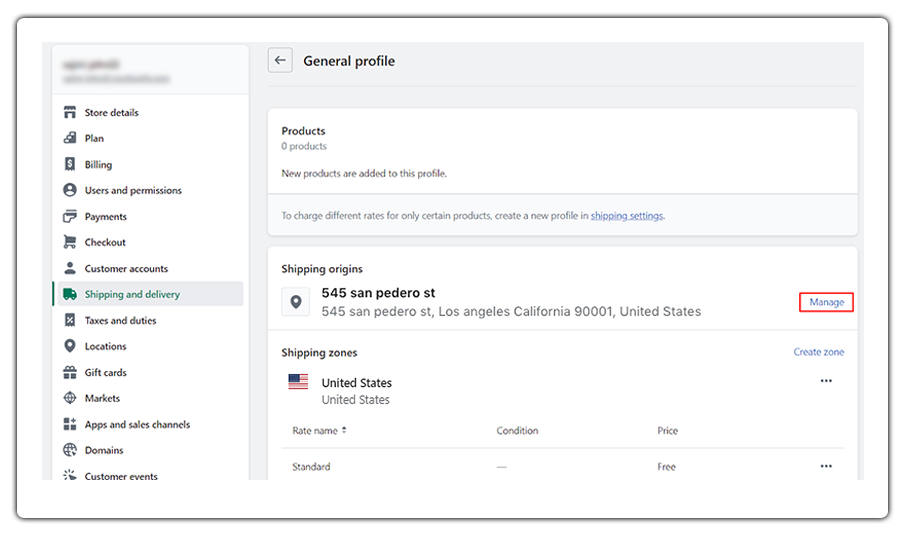
6. From the Shipping Zones section, click on Create Zone.
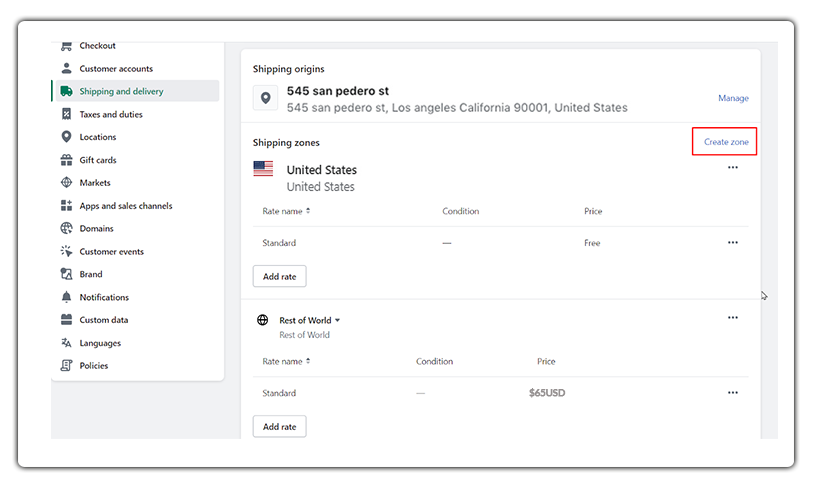
7. Give the name of the shipping zone.
8. Choose the countries or regions that are part of the zone, and click Done.
9. Click Add Rate and add the rates & details that you want to give in each zone and then click Done.
10. Finally hit the Save button.
Shopify Shipping Zones
By creating shipping zones, you can set different shipping rules and options based on customers’ locations, allowing you to customize shipping rates and methods for different regions.
A shipping zone is a defined geographical area or region that has the same shipping rates.
Steps to create Shopify shipping zones
- From your Shopify admin, click on Settings > Shipping and Delivery.
- Click Manage next to the shipping profile in which you want to add a shipping zone.
- Click on create zone next to the group of locations.
- Add a name for the shipping zone.
- Choose the countries and regions that you want to be in the zone and hit done.
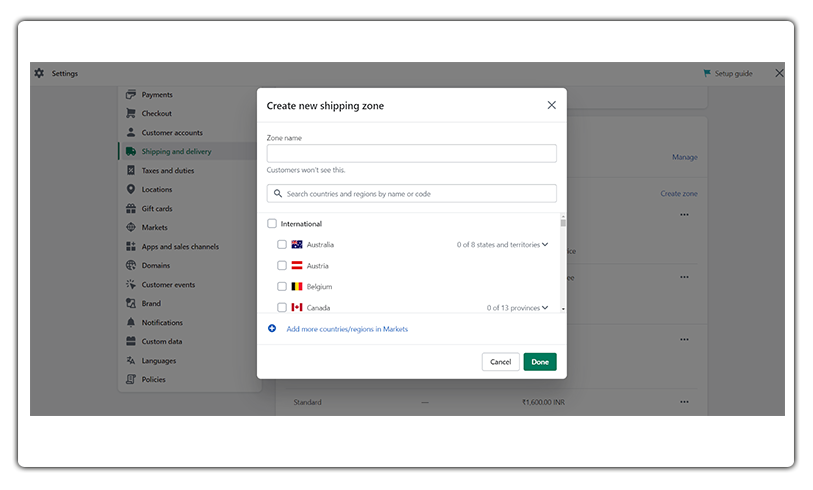
- Now you can add the rates for the zone and click on the Save button.
Shopify Shipping Rates
Shipping rates refer to the fees associated with delivering products to customers. Shopify provides various options for configuring shipping rates based on factors such as weight, price, destination, etc.
Steps to create Shopify flat rates
- Log in to your Shopify admin dashboard.
- From the bottom left corner of the page, click on the “Settings” option.
- Select “Shipping and delivery” from the Settings menu.
- In the Shipping and delivery settings, scroll down to the “Shipping profiles” and click the “Manage” option.

- To create a new flat shipping rate, click on the “Add rate” button next to the zone.
- Choose a custom flat rate to give a name to the rate.
- Click Done and hit the Save button.
Set up Shopify shipping rates in local currency
- Log in to your Shopify admin dashboard.
- From the bottom left corner of the page, click on the “Settings” option.
- Select “Shipping and delivery” from the Settings menu.
- In the Shipping and delivery settings, scroll down to the “Shipping profiles” and click the “Manage” option.
- To create a new flat shipping rate, click on the “Add rate” button next to the zone.
- Pick a transit time, or select the local currency for the country or region.
- Add weight-based or price-based conditions.
- Click Done, and then click Save.
Steps to create mark-up or discount-calculated rates
- Open your Shopify admin and go to Settings > Shipping and local delivery.
- Click on Manage next to the profile that contains the rate.
- Click the drop-down menu near the rate that you want to adjust and click Edit rate.
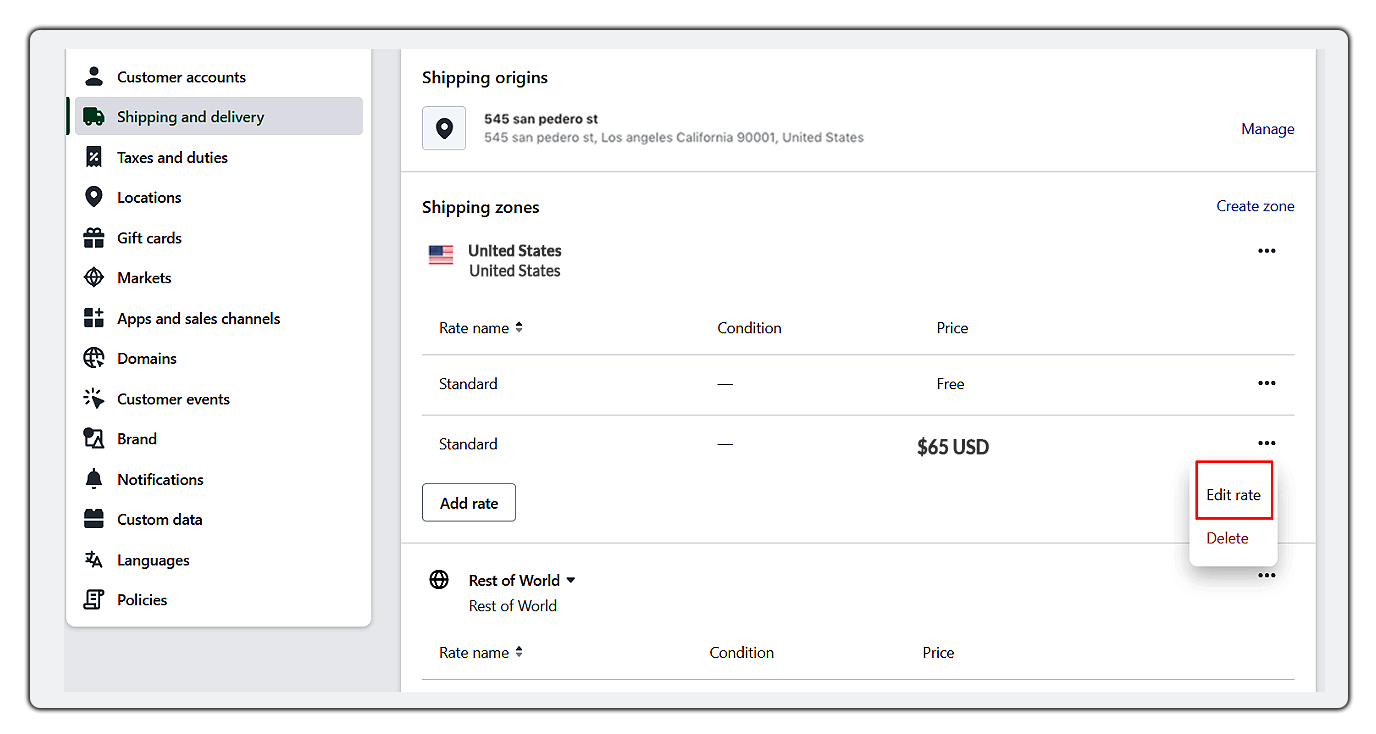
- From the Handling fee section, set the rate adjustments.
- Click Done and then the Save button.
- Creating free shipping rates
Steps to create Shopify free shipping
- Open your Shopify admin and go to Settings > Shipping and local delivery.
- Click on the Manage option, seen next to the General shipping rates.
- Click Add Rate and add a free shipping rate for each shipping zone.
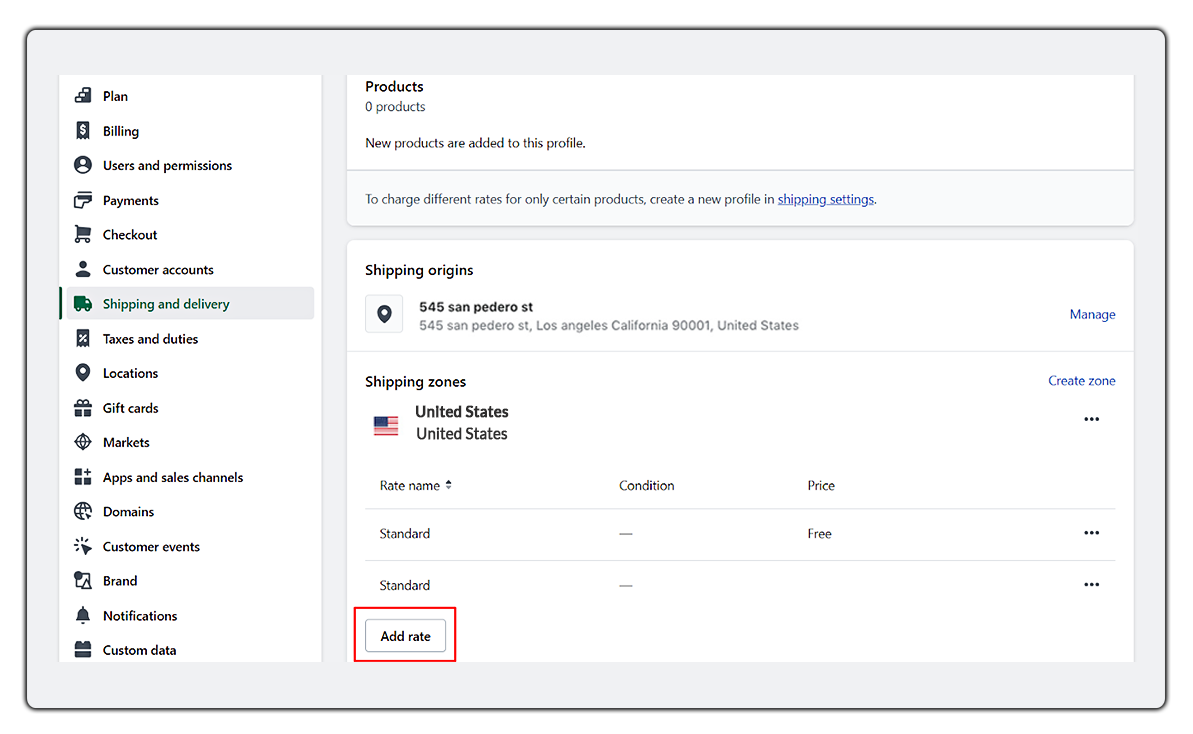
- Click Done and then Save.
Shopify Carrier Calculated Shipping Rates
Shopify Carrier-calculated shipping rates refer to shipping costs that are dynamically calculated in real-time based on the carrier’s pricing and the order’s weight, dimensions, and destination. Shopify integrates with various shipping carriers such as UPS, FedEx, USPS, DHL, and others to provide accurate and up-to-date shipping rates to customers during the checkout process.

Real-life business cases that utilize Shopify shipping rates, profiles & zones
1. Different shipping rates for lightweight & heavy products using Shopify shipping profiles
Let’s say you have an online store that sells various products, including clothing, electronics, and home decor. Each product category has different weight characteristics, and you want to set up shipping rates that reflect these variations.
Clothing: Clothing items are typically lightweight, so you can set lower shipping rates for this category. For example, you may charge $5 for orders under 1 pound and $8 for orders weighing 1-2 pounds.
Electronics: Electronics tend to be heavier due to their components and packaging. To account for this, you can configure higher shipping rates for electronics. For instance, you might charge $10 for orders under 5 pounds and $15 for orders weighing 5-10 pounds.
Home Decor: Home decor items can vary in weight, but they generally fall in the mid-range. You can set moderate shipping rates for this category. For example, you may charge $7 for orders under 3 pounds and $12 for orders weighing 3-6 pounds.
2. Different shipping rates for specific countries or regions
For domestic orders, you can set flat or weight-based rates specific to your country. For international orders, you can use flat rates or set carrier-calculated rates based on specific countries.
3. Shipping Rates based on order value or product quantity
Order Value Tiers: You can create different shipping rates based on the total order value. For example, you might set the following rates:
- Under $50: $5 shipping fee
- Between $50 and $100: $8 shipping fee
- Over $100: Free shipping
Quantity-Based Rates: If you want to incentivize customers to purchase more items, you can set shipping rates based on the number of products in the order. For instance:
1-3 items: $7 shipping fee
4-6 items: $10 shipping fee
7 or more items: Free shipping
Conclusion
In conclusion, understanding and effectively managing shipping rates, profiles, and zones in Shopify is crucial for any online store owner. By implementing the right shipping strategy, you can provide accurate and competitive shipping costs to your customers, enhancing their shopping experience and driving conversions.
By mastering the intricacies of Shopify rates, profiles, and zones, you can streamline your shipping processes, optimize costs, and deliver a seamless shopping experience to your customers. With the right setup, you’ll have the tools to scale your online business while ensuring efficient and accurate shipping every step of the way.

