In this article, we will show you how you can easily calculate shipping rates based on the city name using WooCommerce Table Rate Shipping Pro plugin. You can also display shipping rates based on other factors like price, weight, quantity, a destination address, etc.
An Overview
Table rate shipping allows store owners to personalize their shipping options. It can be on the basis of weight and quantity, or on the basis of the destination address. But sometimes there may come a strange scenario where table rate shipping needs to put something extra. Take the example of the UAE. In the UAE, there is no ZIP code used for shipping. In fact, there are a lot of countries that do not have a ZIP or postal code, and some of them use a single postal code country-wide. Here you can see the list of all the countries that don’t have postal codes. Having no postal code is not a great deal but when it comes to shipping, postal codes are very useful. Using table rate shipping, shipping rates can be configured based on ZIP codes too, but for all the countries listed above, the only option is that the table rate shipping to be configured based on the city name. WooCommerce Table Rate Shipping Pro offers city-based shipping to store vendors so that they can avoid the shipping loopholes with no ZIP codes or even those countries which use a single postal code for multiple cities.
How to configure table rate shipping based on City?
WooCommerce Table Rate Shipping Pro allows store owners to personalize shipping charges based on the name of the city. It provides an additional column where the store owner can enter the name of the city for which he/she wants to configure shipping rates. To show how the plugin handles city based shipping, let us consider the shipping scenario of Sam who owns an online electronics store. Most of Sam’s customers are from the three cities of Dubai, Sharjah and Abu Dhabi. So to promote sales further, Sam wants to provide Free Shipping to all his customers in those cities. Now let us see how WooCommerce Table Rate Shipping Pro deals with this situation.
City Matrix Column
WooCommerce Table Rate Shipping Pro has a number of matrix columns based on which it allows customers to configure shipping rates. It offers a dedicated matrix column to the name of the city where the store owner wants to ship. The only difference is that unlike other columns such as Country, State, etc, City column doesn’t have a list. The store owner has to write the name of the cities in that column.
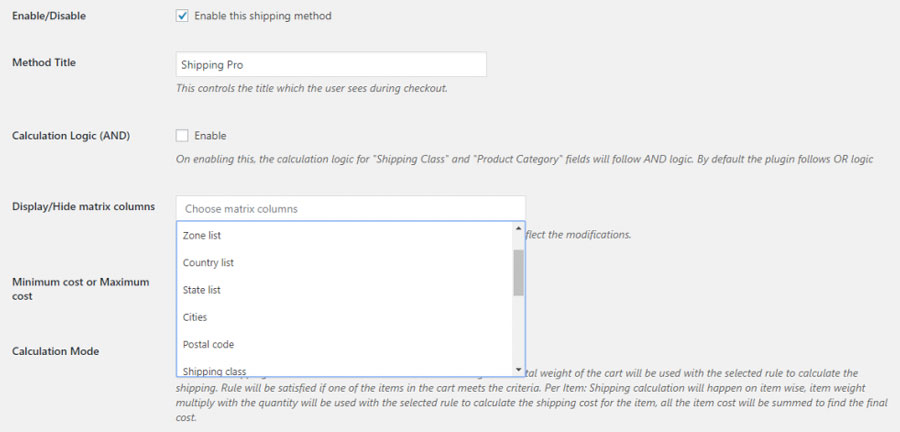
So based on Sam’s scenario the shipping rules will be something like this,

Based on this information we can easily configure the shipping rules using WooCommerce Table Rate Shipping Pro. And once configured, the above-mentioned shipping rules will be applied in WooCommerce Table Rate Shipping Pro in a manner similar to the image below.
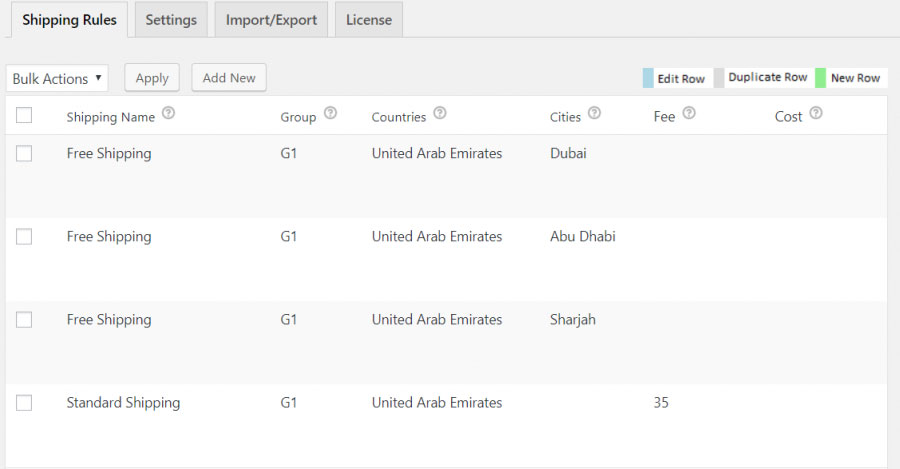
The above image clearly shows the shipping rules mentioned for the cities of Dubai, Abu Dhabi and Sharjah. Also, since Sam requires standard shipping for the rest of the cities, he will have to keep the city field blank for that rule. By default, that rule will be applicable for all the cities in UAE. One more thing worth noticing is that since those three cities are also in UAE, the standard shipping will also apply to them. To avoid such a scenario, the shipping rules in WooCommerce Table Rate Shipping Pro need to be configured in such a way that if multiple rules are matched, the rule with minimum shipping value must be selected. The following video will show you the step by step configuration of Sam’s city-based shipping scenario.
Also, once the shipping rules are configured accurately, the shipping rates should reflect on the cart page.
City Field as a Drop Down
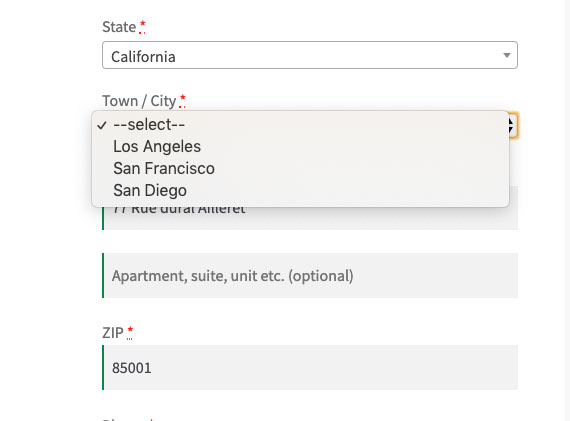
WooCommerce, by default, does not incorporate the city field as a drop down on the WooCommerce checkout page. Hence, there are chances that the customers may not enter the exact city name while checking out. For example, in this case, the city name set up in the settings is Abu Dhabi. There can be cases when the customers can enter the city name as Abu Dhabi, Abu dhabi, abu dhabi, abudhabi, etc. Another example is the Los Angeles city of California. Customers can enter the city name as L.A., LA, Los Angeles, Los angeles, etc. This makes it very hard for the store owners to rely on the city names that are provided in the Table Rate Shipping plugin. In such cases, the best way is to set up the city field on the checkout page as a drop-down with the predefined city names. These cities will be the exact ones which you have set up in the plugin.
How to set up City Field as a Drop-Down on the Checkout page?
Pre-Requisites: The solution will work only in the following cases:
- The solution will work for the cases when the shipping is for ONE specific country
- The solution will work ONLY in the checkout page and ONLY for the Billing Address
Follow the steps below to set up the city field as a drop-down on the checkout page.
- Install our add-on City Drop-Down plugin
- Visit the plugin settings
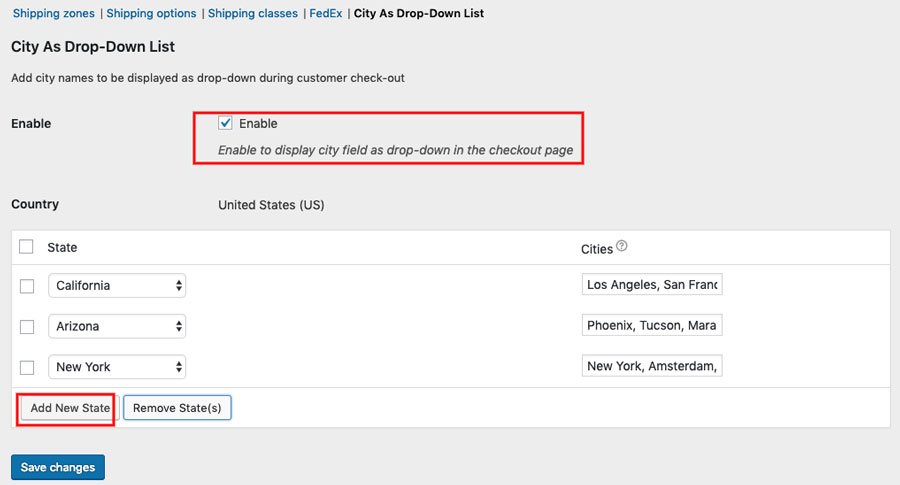
- Enable the option to display the city as a drop-down
- Click on Add New and select the State from the State Drop-Down
- Now enter the City Names which you want to display for that particular State Note: Please make sure the city names are separated by a comma (,)
- Repeat the steps to set up Cities for multiple states
- Save the settings
- You will be able to see the city field on the checkout page, as shown in the image below
Re-arranging Address Fields on the Checkout Page
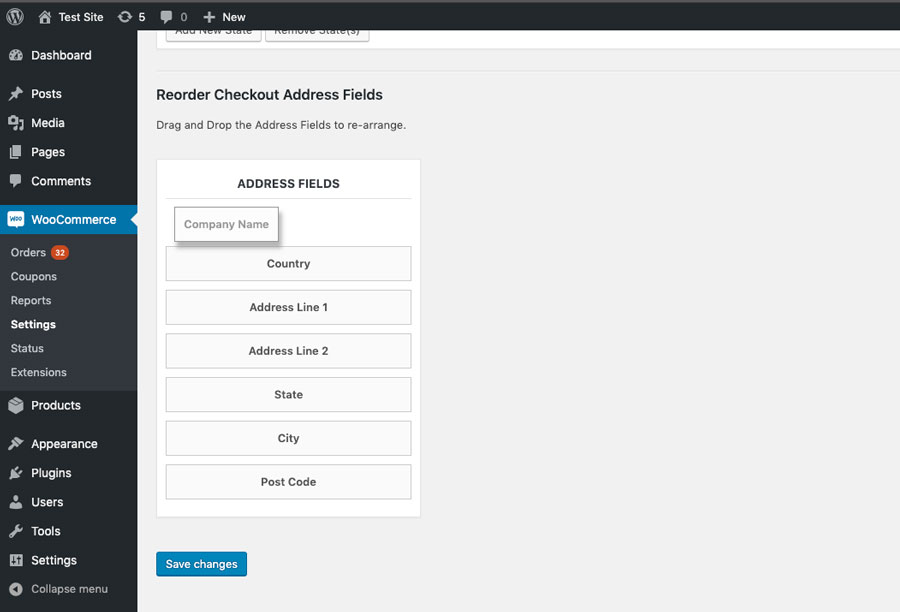
One of the other important features of this add-on is that it allows you to re-arrange the Address Fields on the Checkout Page. The fields include:
- Company Name
- Address Line 1
- Address Line 2
- Country
- City
- State
- ZIP Code
All you need to do is, drag and drop the fields in the plugin settings page and save the settings.
Summary
So in this article, you understood the need for the City field and its importance in shipping. Especially for the countries where ZIP code-based shipping is not applicable. WooCommerce Table Rate Shipping Pro is among such plugins, that offer a lot of possibilities within a small package. The idea behind so many Matrix Columns in the plugin settings shows that there is no limit to personalization when it comes to configuring shipping rates with WooCommerce Table Rate Shipping Plugin. Also, the video is attached as a guide so that the store owners can have an idea that dealing with City-based table rate shipping is not as difficult and confusing as it seems in the beginning.
For those WooCommerce store owners who want to configure their shipping based on product weight, they can try the Table Rate Shipping plugin. If you have any queries regarding the Country-based table rate shipping or any other shipping scenario based on the fundamentals of table rate shipping, feel free to share your views in the comment section below.

