Managing product returns is just as important as fulfilling new orders for any WooCommerce store. A smooth and reliable return process not only fosters customer trust but also enhances brand reputation and encourages repeat business. However, handling returns manually, managing labels, processing refunds, and keeping everything organized can quickly become messy and time-consuming.
If you’re using Canada Post, things get much easier. With the WooCommerce Canada Post Shipping Plugin with Print Label, you can automate and simplify the entire returns process. From generating return labels to receiving shipments without hassle, this plugin ensures a smooth experience for both store owners and customers. In this guide, we’ll walk you through how to manage returns in WooCommerce using Canada Post, along with best practices and practical tips to streamline your return management.
Table of Contents
- Challenges with Manual Return Management
- Integrate Canada Post to Manage Returns on WooCommerce
- Real-World Example
- Best Practices for Managing Returns
- Conclusion
- FAQs
Challenges with Manual Return Management
Returns are a part of every online business, but handling them manually in WooCommerce can quickly become a headache. Many store owners start by creating labels themselves, asking customers to email return requests, and tracking refunds through spreadsheets. While this may work for a handful of orders, it becomes messy and inefficient as sales grow.
Some of the common challenges include:
- Time-consuming process: Manually generating and sharing return labels takes up valuable time that could be spent on growing your business.
- Errors and miscommunication: Without automation, it’s easy to lose track of which orders have been returned, refunded, or replaced.
- Poor customer experience: Customers expect a quick and easy return process. Delays or confusion can harm your store’s reputation.
- Operational stress: Managing returns manually adds extra workload for your team, leaving less time to focus on scaling the business.
For WooCommerce merchants, these challenges not only add operational stress but can also reduce customer trust. That’s why automating return management with tools like Canada Post integration is a game-changer – it helps you save time, reduce errors, and keep customers happy.
Integrating Canada Post to Manage Returns in WooCommerce
Managing returns in WooCommerce becomes simple once you integrate the WooCommerce Canada Post Shipping Plugin with Print Label.
To get started, make sure the Canada Post Plugin is installed, activated, and properly configured. You can follow this detailed setup guide to set everything up correctly.
Once the setup is complete, let’s see how you can use the plugin’s return label feature to make handling returns easier for both you and your customers.
1. Automatically Generate Return Labels
With the Canada Post shipping plugin, you can have return labels created automatically whenever you create a shipment. This means every order already has a ready-to-use return label, saving you time and making it convenient for your customers.

2. Let Customers Print Their Own Return Labels
Customers don’t want to wait for emails or support responses. By enabling this feature, they can download and print their return labels directly from their My Account page. It’s simple, fast, and improves their experience.

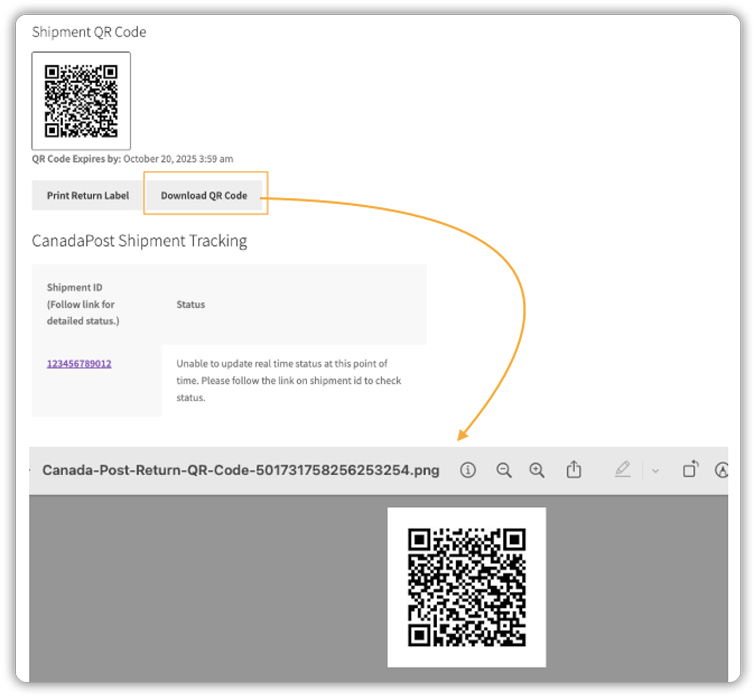
3. Shipment QR Code
The plugin also provides a Shipment QR Code with the return label. Customers can take this QR code to any Canada Post retail location to print their label ideal for those who don’t have a printer at home. An expiry date is included, so both you and the customer know the deadline for retrieving the label.
With these features, the Canada Post WooCommerce plugin automates the most time-consuming parts of return management, making the process faster, more reliable, and customer-friendly.
Real-World Example: Managing WooCommerce Returns with Canada Post
Let’s say you run a small WooCommerce store selling handmade candles across Canada.
A customer requests a return because the product arrived slightly damaged. Without automation, handling this return manually can be time-consuming: creating labels, emailing them to the customer, and following up with queries, all while trying to keep your workflow organized.
How Canada Post Integration Helps
With the WooCommerce Canada Post Shipping Plugin with Print Label, these challenges are simplified:
- Automatic Return Labels: A return label is ready as soon as the shipment is created, saving you time.
- Customer Convenience: Customers can download and print their return label directly from their My Account page or use the QR code at any Canada Post location, even if they don’t have a printer at home.
The return process becomes fast, organized, and hassle-free. Customers feel supported, your team saves time, and your store maintains a professional reputation, all without the complexity of tracking return shipments manually.
Best Practices for Managing Returns in WooCommerce
Efficient return management is key to keeping your customers happy and your store running smoothly. Here are some best practices to follow when using Canada Post with WooCommerce:
1. Communicate Clearly: Make your return policy easy to find and understand. Clearly state the return window, the condition of the items, and who is responsible for shipping costs. A transparent policy helps set the right expectations and reduces customer confusion.
2. Prompt Refunds: Process refunds as soon as you receive and inspect the returned item. With the Canada Post plugin’s Refund Shipment feature, you can easily issue refunds directly, making the process faster and hassle-free. A quick refund process reinforces customer trust and encourages repeat purchases.
3. Monitor Return Trends: Pay attention to which products are returned most frequently. Analyzing return patterns can help identify potential issues with packaging, product descriptions, or shipping. Using this data can reduce future returns and enhance customer satisfaction.
4. Keep it Professional: Make sure all labels, emails, and instructions are clear and carry consistent branding wherever possible. A smooth and professional return process builds trust and encourages repeat purchases
By following these best practices, WooCommerce merchants can simplify returns, reduce errors, and provide a seamless experience, making both customers and your team happy.
Conclusion
Managing returns efficiently is crucial for any WooCommerce store. Manual returns can be time-consuming, error-prone, and frustrating for both merchants and customers. By integrating Canada Post with WooCommerce using the WooCommerce Canada Post Shipping Plugin with Print Label, you can automate return label generation, simplify customer returns, and provide a smooth, professional experience, all while saving time and reducing operational stress.
Ready to make returns easier for your store? Contact PluginHive Support today and get started with a shipping solution that saves you time, money, and effort, while keeping your customers happy and boosting your store’s reputation.
FAQs
1. Can I automatically generate Canada Post return labels in WooCommerce?
Yes. The WooCommerce Canada Post Shipping Plugin with Print Label lets you enable automatic return label generation whenever a shipment is created.
2. Can customers print Canada Post return labels from their WooCommerce account?
Yes. Customers can log in to their My Account page, download the Canada Post return label, and print it directly.
3. Does the WooCommerce Canada Post plugin support return labels for international shipments?
No. Canada Post return labels generated through WooCommerce are only available for domestic orders within Canada.
4. What if a WooCommerce customer doesn’t have a printer? Can they still get a Canada Post return label?
Yes. With the Shipment QR Code feature, customers can take the QR code to any Canada Post retail location and print their label there.
5. Do I need a Canada Post commercial account to print shipping and return labels in WooCommerce?
Yes. A Canada Post commercial account with a parcel agreement is required for printing labels, while a VentureOne account can be used for rates.