
Setting Up WooCommerce Canada Post Shipping Plugin
This tutorial is a quick guide to help you set up the WooCommerce Canada Post shipping plugin on your WooCommerce store. With this plugin, you can display live Canada Post shipping rates on the WooCommerce cart/checkout page, print Canada Post shipping labels, track your orders in real time, and much more.
In this Guide
- Download, Install and Activate the Plugin
- Navigate to Canada Post Plugin Settings
- Add Canada Post Account details
- Activate the Plugin License
- Verify your Product Settings
- Add Shipper Address Details
- Display Canada Post Shipping Rates
- Configure Canada Post Shipping Service(s)
- Configure Canada Post Package Settings
- Print Canada Post Shipping Labels
- Display Estimated Delivery Dates on Cart/Checkout
- Enable Canada Post Shipment Tracking
- Enable Pickup Point Service
- Setting up Canada Post International Shipping
- Frequently Asked Questions (FAQs)
1. Download, install & activate the plugin
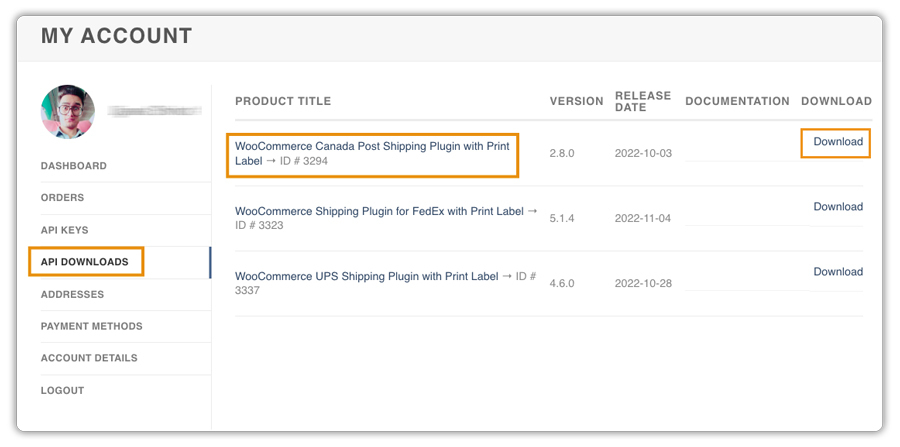
After purchasing the PluginHive’s Canada Post WooCommerce Shipping Plugin, the plugin Zip file is available under your My Account > API DOWNLOADS. Download the plugin zip file as shown below.
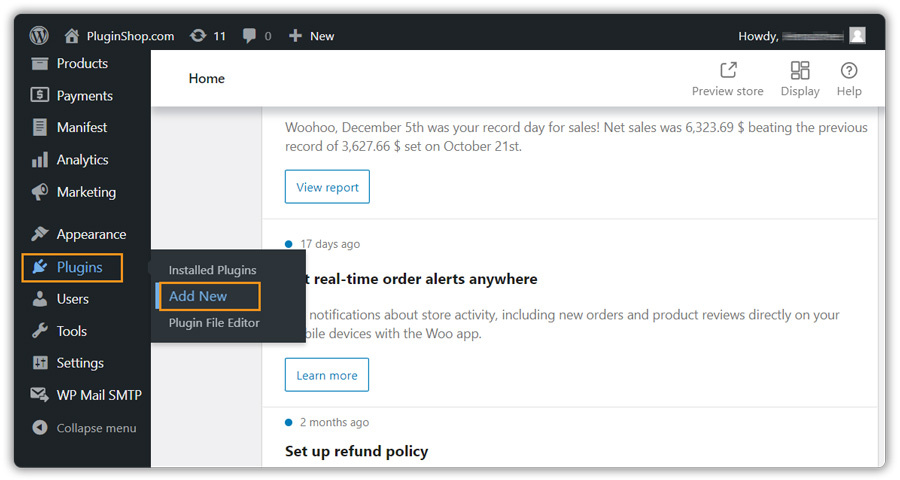
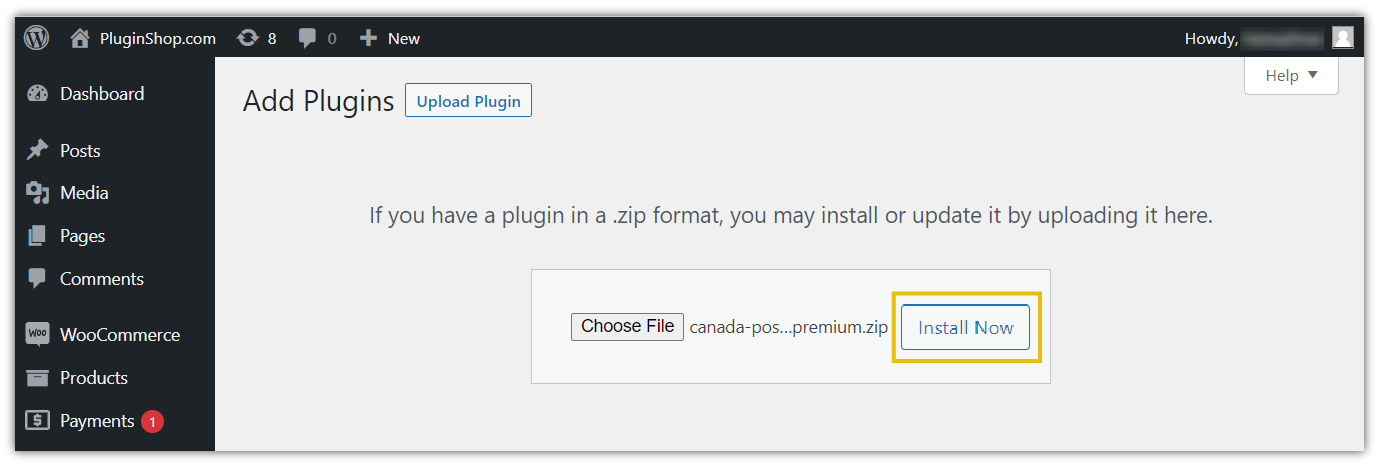
Log in as the WordPress Admin of your online store and navigate to Plugins > Add New, as shown below.
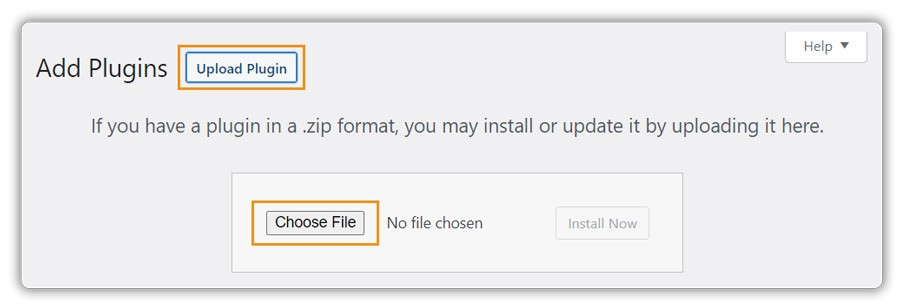
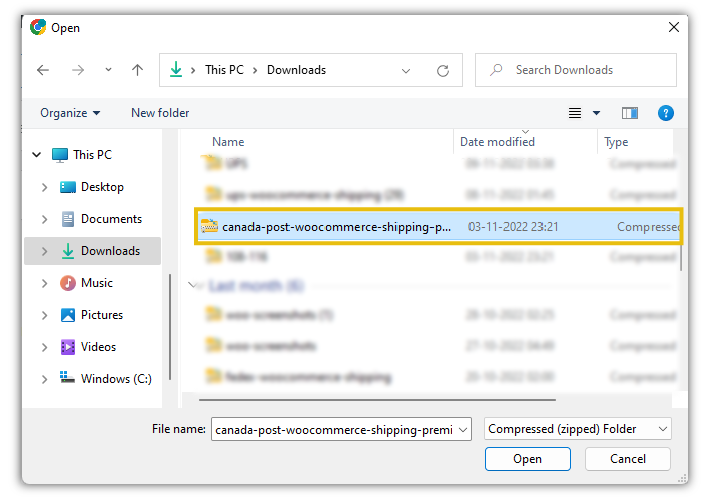
To upload the plugin to your WooCommerce store, click on Choose File and select the plugin zip file as shown below.
To start the WooCommerce Canada Post plugin installation process, click on Install Now.
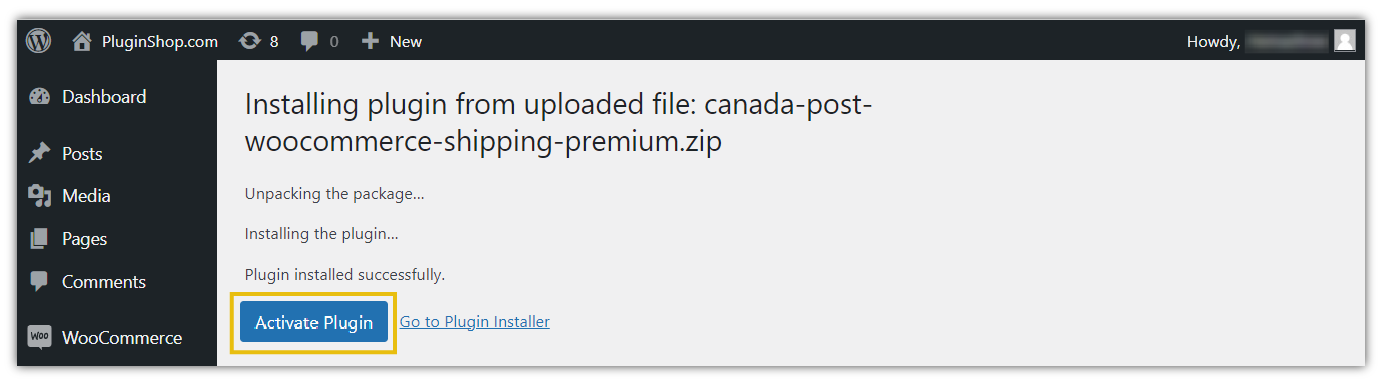
Once the plugin is installed successfully, click on Activate Plugin to start using the plugin.
2. Navigate to Canada Post Plugin Settings
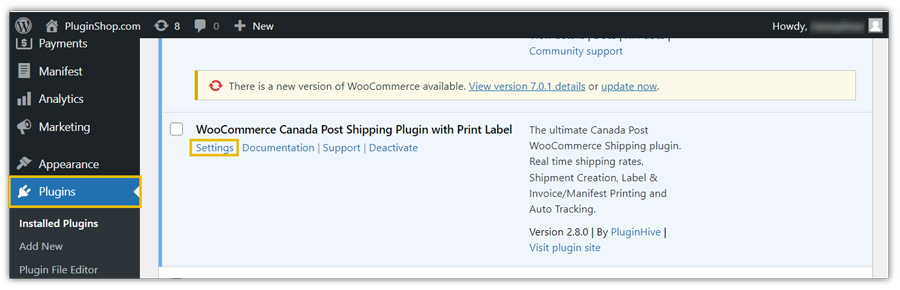
After installing and activating the plugin, a new shipping method ‘Canada Post’ is added to WooCommerce Shipping settings.
To navigate to the plugin settings navigate to WooCommerce> Settings > Shipping > Canada Post. Or, navigate to Plugins > Installed Plugins > WooCommerce Canada Post Shipping Plugin > Settings
You will be able to see the following Shipping related options in detail
- General
- Rates & Services
- Shipping Labels
- Packaging
- Package Templates
- Pickup
3. Add Canada Post Account Details
Go to WooCommerce> Settings > Shipping > Canada Post
Visit the General tab & click on Canada Post Account.
This plugin is officially certified by Canada Post and allows you to connect your Canada Post account to WooCommerce by directly logging into your Canada Post account via the plugin settings.
Canada Post offers two types of Shipping:
- Contract Shipping: Contract Shipping with Canada Post is a commercial contract between your business and their shipping carrier services, which allows you to automatically print and ship parcels without the need to purchase individual or even bulk shipping labels.
- Non-Contract Shipping: If your small business chooses not to sign up for Contract Shipping, this means that you will have to individually purchase shipping labels. With Non-Contract Shipping, small business owners can still request tracking information and provide this to their customers. All payment is authorized each time a new non-contract shipment is made.
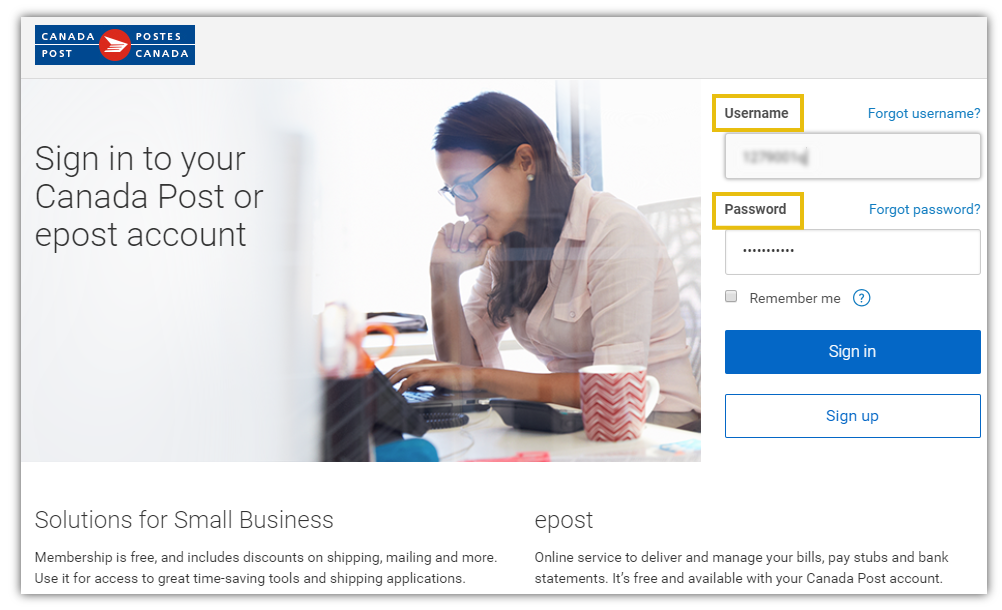
Provide the Canada Post Account details (Contract/Non-Contract), Click on Sign in.
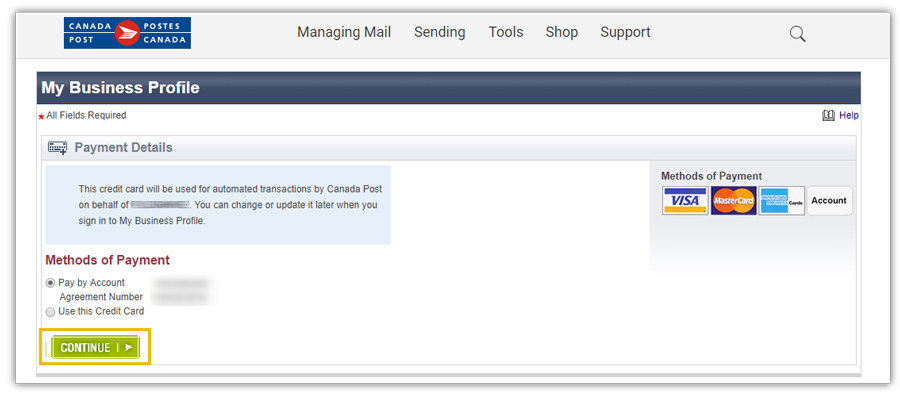
After successful sign-in, select a payment method, as shown in the image below, and click on Continue.
The payment method that you select within your Canada Post account is used to invoice the shipping/postage charges. You can chose from the following options as per your agreemet with Canada Post.
* Pay By Account
* Use this Credit Card
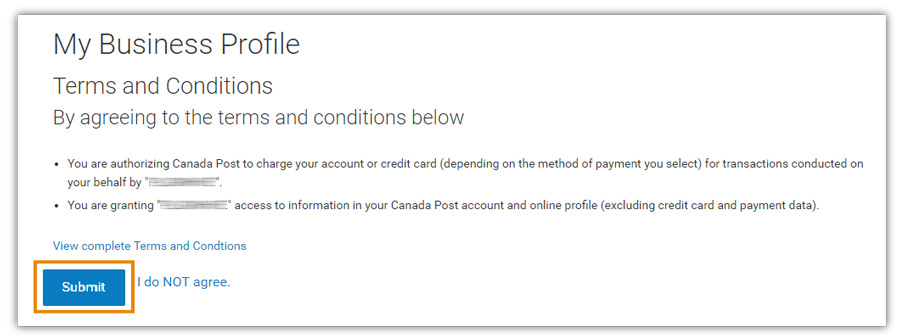
You will be redirected to the Terms and Conditions page where you can take a look at the terms and conditions of the Canada Post. After reading the terms and conditions, click on Submit.
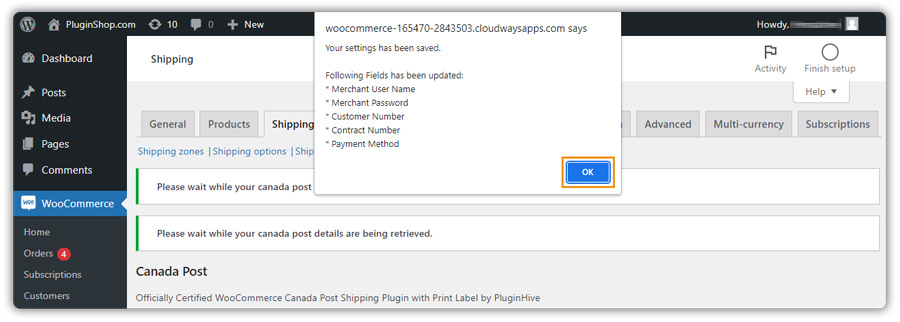
WooCommerce Canada Post plugin settings will be displayed along with the following message.
This means, your Canada Post Account details are successfully integrated with your store. Click on OK.
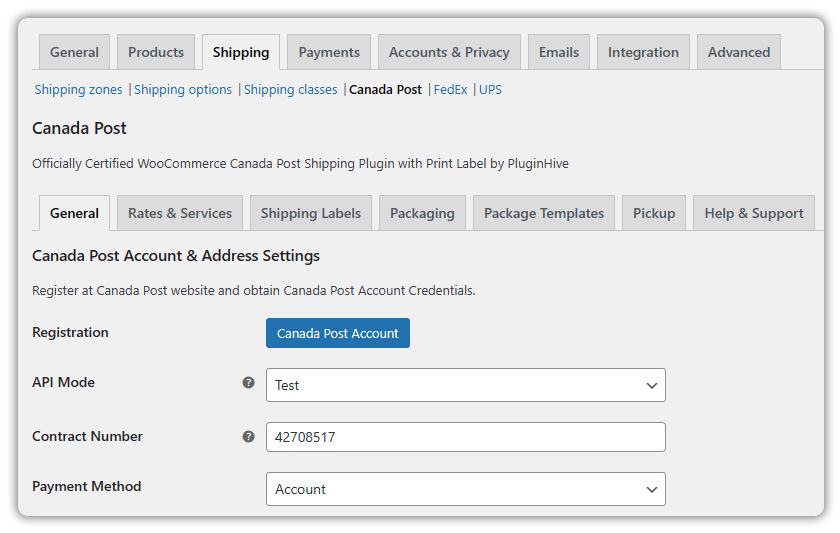
This way your Canada Post Registration/Integration will be complete in your WooCommerce store. Now let’s add your Canada Post Account details. In General Settings, you can find the following options.
Provide the details as shown in the image:
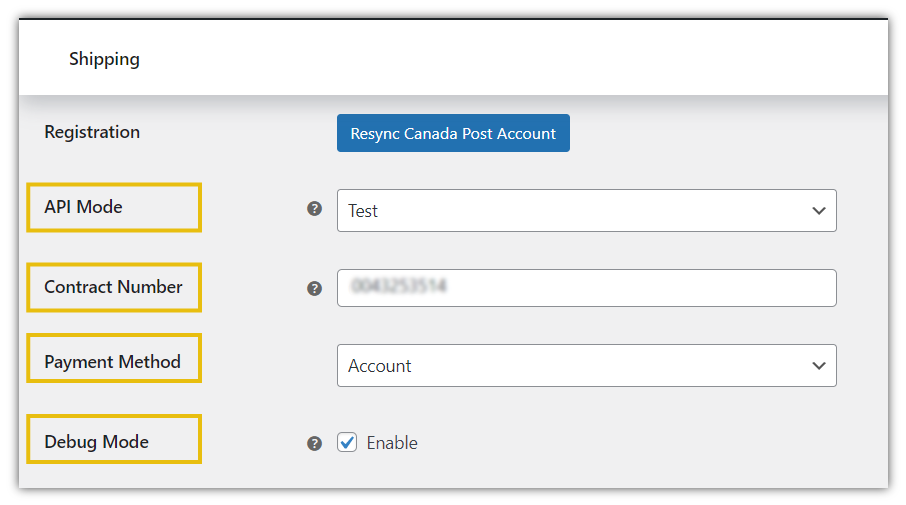
- API Mode: With this field, you can set a required API mode for getting real-time rates and printing the labels. The available options are as given below:
- Test mode: You can place test orders and generate labels and will not be charged for it. There is no actual money transaction involved in test mode.
- Live: Live mode is used for actual purchase and label printing.
- Contract Number: Enter the Contract Shipping Number of your Canada Post Account. For more information, See Contract Shipping.
- Payment Method: The plugin allows you to choose between payment options for shipping labels. You can pay via your Canada Post Account or Credit Card.
- Debug Mode: Enable debug mode in order to access debug information in logs and the cart pages.
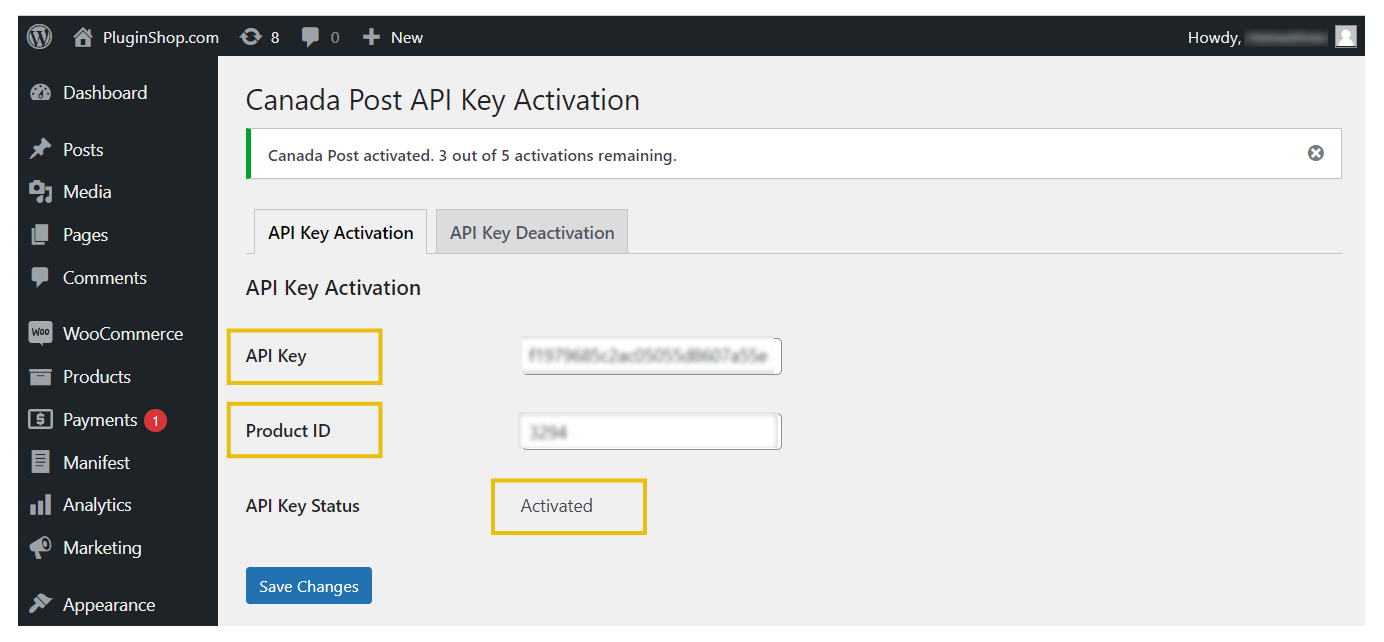
4. Activate Plugin License
To activate the WooCommerce Canada Post plugin, you need to enter the API Key and the Product ID used for the purchase. You can find these details in the order completion email or by visiting your My Accounts > API Keys section, as shown below.

You can skip entering the API License Keys while testing the plugin in the Test Mode. However, API License keys are required while using the plugin in the Live Mode.
Next, navigate to WordPress Settings > Canada Post Activation
Enter your API Key & Product ID and click on Save Changes. Once you activate the license keys, you are eligible for 1 year of plugin updates & premium customer support from the PluginHive support team.
5. Verify your Product Settings
To get accurate Canada Post shipping rates it is mandatory to provide specific product details like product weight & dimensions, type, country of manufacture, etc.
Add your Product weight and Dimensions
Navigate to WooCommerce Dashboard > Products and select the product of your choice
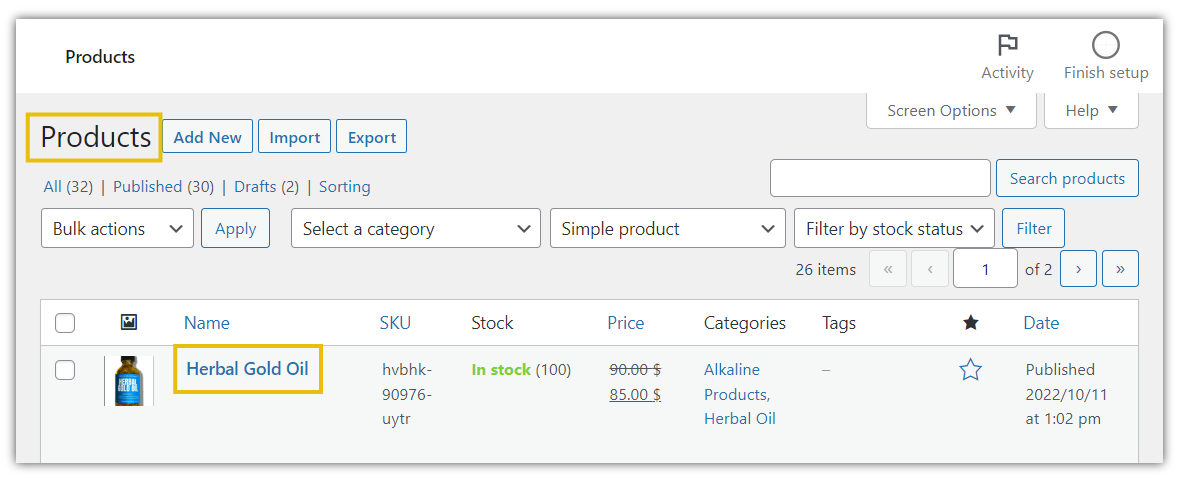
In the Edit Product Page, visit the Shipping tab as shown below.

Make sure you fill in the following fields correctly to ensure accurate shipping rates, available services, and proper label generation.
Required Fields:
- Weight: Enter the product’s weight here. This is essential for calculating shipping costs.
- Dimensions (Length × Width × Height): Provide the exact dimensions of the product. Missing or incorrect dimensions can result in inaccurate shipping rates.
- Shipping Class: If you are using custom shipping classes in your store, assign the appropriate class here. Otherwise, you can leave it as the default.
- Pre Packed Product: Enable this if the product is shipped in a fixed, predefined package. The plugin will use the assigned package details directly instead of calculating packaging dynamically.
- Age of Proof: Select this if the shipment requires proof of age upon delivery (for example, alcohol or restricted items). Choose the appropriate option based on your requirement.
- Customs Title: Enter a short description of the product for customs documentation. This helps in identifying the item during international shipping.
- H.S Tariff Number: Required for international shipments. This helps carriers identify the product category for customs clearance.
- Country of Manufacture: You can assign the country of manufacture at the product level here.
If you leave it as “Use Global Setting”, the system will automatically use the default country of manufacture configured in the global settings. - Province of Manufacture: Enter the province/state where the product is manufactured (if applicable). This is mainly used for more detailed customs documentation.
Set your product weight and dimensions unit
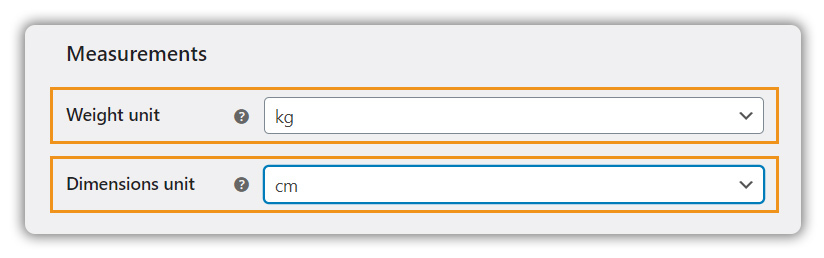
When creating a product on the WooCommerce Store, it is essential to provide the product dimensions and assign product weight accordingly. Weight and Dimensions Units can be assigned depending on your shipper address.
- Select WooCommerce > Settings > Products > Measurements
- Select the Weight unit and Dimension unit respectively
- Select an option applicable to your store from the given drop-down list.
6. Add Shipper Address Details
Provide the details for the following fields as shown in the image:
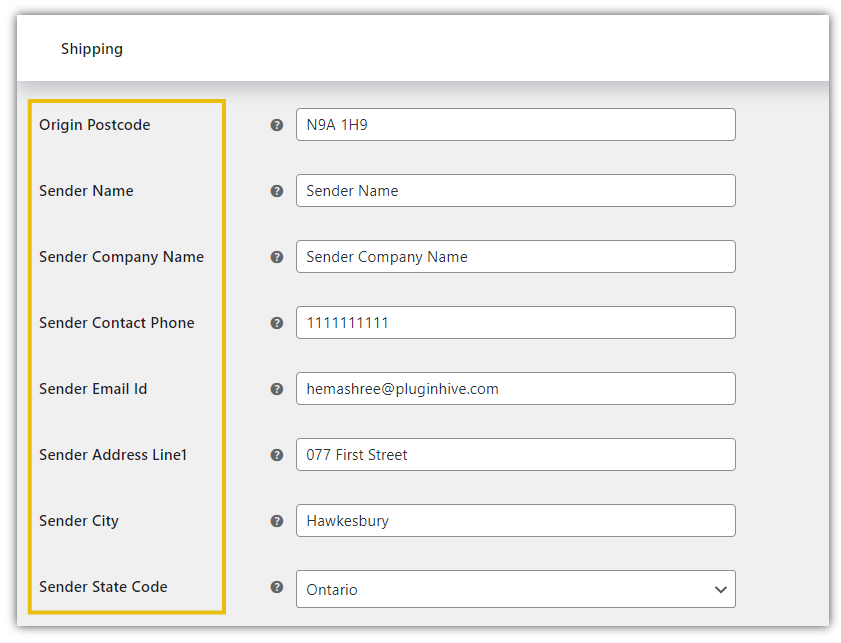
Origin Postcode: Enter the postcode for the sender
Sender Name: Enter the person’s name to be printed on the shipping label and invoice
Sender Company Name: Company name to be printed on the shipping label and invoice if nothing is provided ‘-’ will be printed.
Sender Contact Phone: Contact phone to be printed on the shipping label and invoice
Sender Email Id: Email address to send the shipping label
Sender Address Line 1: Address line 1 is to be printed on the shipping label and invoice
Sender City: City to be printed on the shipping label and invoice
Sender State Code: State to be printed on the shipping label and invoice
Please ensure that the Store Address and Currency options are configured in the WooCommerce General Settings.
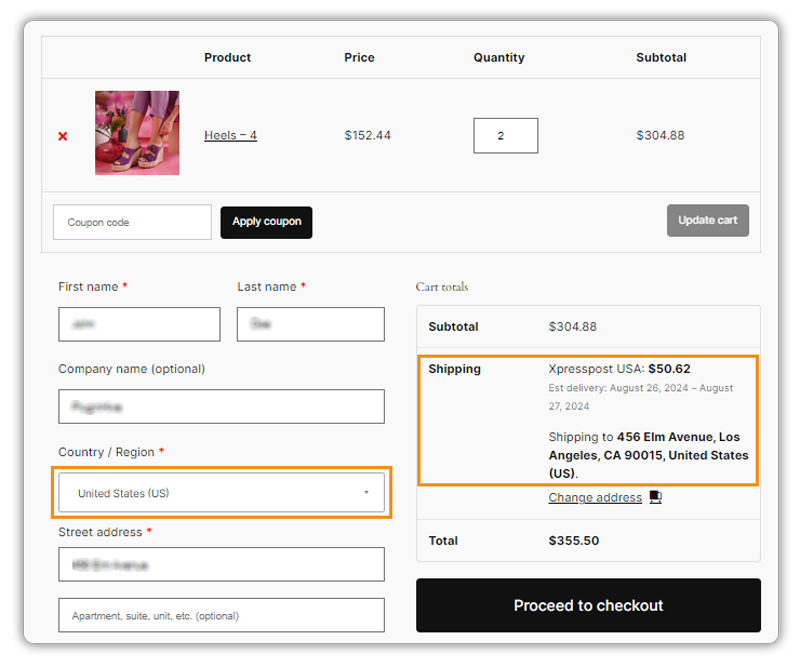
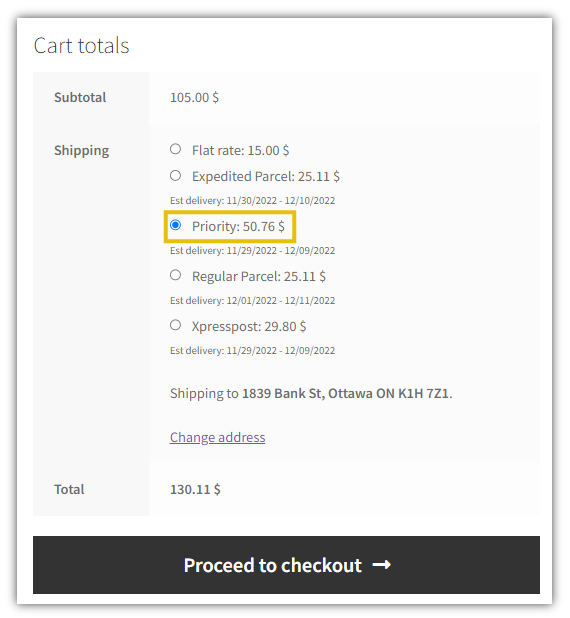
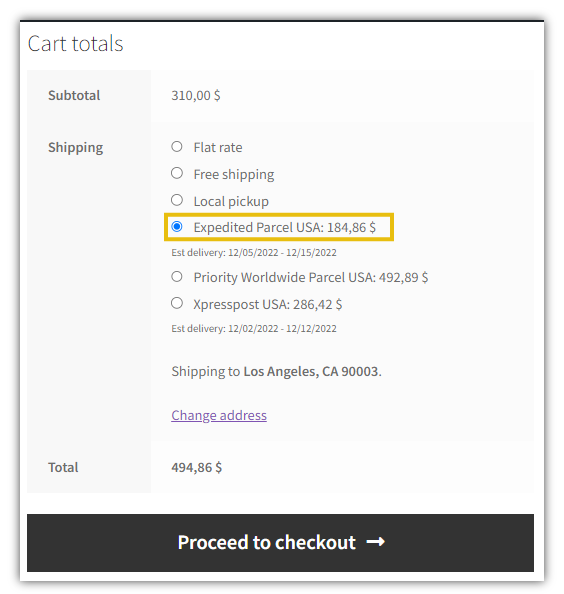
7. Display Canada Post Shipping Rates
Get Real-time rates shipping rates at cart/checkout
Accessing Canada Post Real-Time Shipping Rates
- Select WooCommerce > Settings > Shipping > Canada Post
- Select Rates & Services (Under Canada Post Menu)
- Enable RealTime Rates as shown below

The Canada Post rates are shown in the cart as follows:

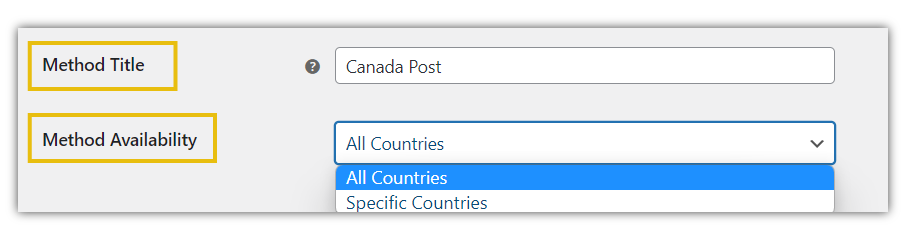
Assign Shipping Method Title and Method Availability
Method title returns the name of the shipping method you want to display when you select the cheapest rate for your order shipments.
For e.g: Let’s say, you have a product for which you want to display the cheapest shipping rate. Using the Canada Post method title, you can define the shipping method name for the service which provides the cheapest shipping rate and display it over the cart/checkout
Method Availability: This field allows you to make the Canada Post shipping methods available for selected countries. The available options are as given below:
- All Countries: This makes the Canada Post shipping options available to customers in all countries. It is set as a default option.
- Specific Countries: This allows you to specify the list of countries for which you want to provide Canada Post shipping. Canada Post Shipping Method would be available only in the listed countries.
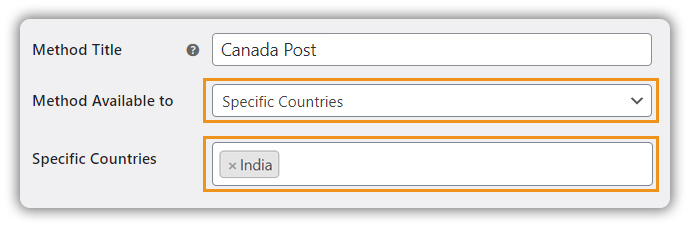
For eg: You want to enable the Canada Post service rates for product shipments specifically to India. You can proceed in the following way:
- Go to WooCommerce Settings > Shipping > Canada Post
- Select Rates & Services (Under Canada Post Tab)
- Select Method Availability as Specific Countries
- Select India in the Specific Countries Tab
Once this is done, we can now check the Canada Post rates in the cart and checkout pages:
Cart Page:
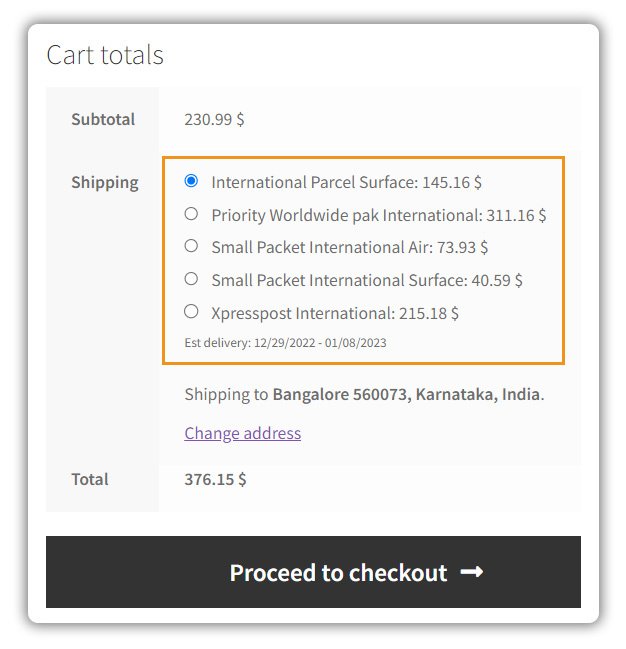
Checkout Page:
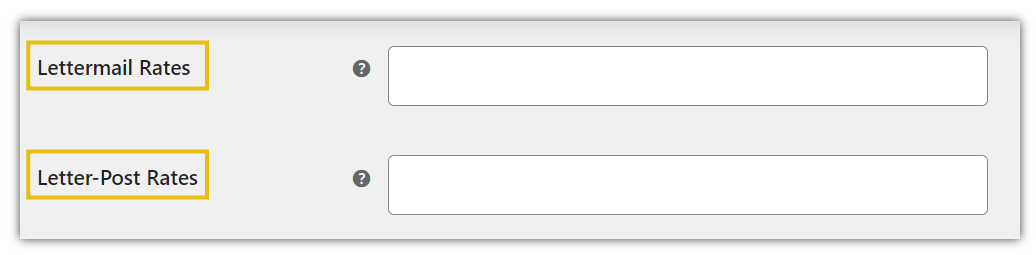
Set Lettermail / Letter-Post Rates & Packing Method
Lettermail is a convenient and cost-effective way to send items in Canada including Personal messages, Business correspondence, Invoices, and Billing statements.
Letter-post is the most economical method of sending personal and business correspondence. You mail Letter-post items in Canada for delivery outside of Canada.
Items acceptable for the Letter-post service include:
- Items made of paper or other material with the general characteristics of paper (for example, photographs)
- Paper enclosures that meet the requirements for Letter-post (U.S. and International)
Similar to LetterMail, Letter-post Rates are defined in the plugin, and not part of Canada Post API. Printing labels and invoices is not possible for Letter-post.
You can select packing methods for Lettermail/Letter-Post Packing Method:
- Allow Multiple Packages (This is the default packing method)
- Pack all items into a single package.

The plugin displays the exact rate for Lettermail and Letterpost services. Rate adjustments for the following services are not supported.
Assign Special Services for Shipment Delivery

- Additional Option: You can provide the shipment with liability coverage and signature at an additional cost to your customer. Additional options are as given below:
- Coverage: It shows the final rates which include coverage against loss or damage. The availability and the limits of liability coverage depend on the service selected, the country of destination, and the nature of the items being shipped.
- Signature: Requesting a signature on delivery is ideal when you require proof that your mail item has been delivered. A signature image is captured and can be viewed online by entering the item’s tracking number.
- Age proof required 18 (or) 19: If the receiver appears to be less than 25 years of age, a photo identification proving age will be requested and the signature and name of the signatory will be recorded. The item will only be handed over to a person with an acceptable identification (ID) proving the required age (18 or 19) selected by the customer as part of the Age-proof required option.
- Do not safe-drop: This option changes the delivery process only for items that are usually delivered to the door. A delivery attempt will be made at the door and, if no one is available to receive the item, the item will not be dropped. The addressee will be able to pick up the item from the designated post office.
- Deliver to Post Office (D2PO): Deliver to Post Office gives online shoppers the choice to have their purchases delivered to a post office for pickup when and where it’s convenient for them – right from your website.
- Do not safe Drop (DNS): The Do Not Safe Drop option only changes the delivery process for items where Canada Post makes a delivery attempt at the door. The item will be left near the addressee’s mail receptacle
- Card (Hold) for pickup (HFP): The Card (Hold) for Pickup option is ideal for shipments containing temperature-sensitive items. A Delivery Notice Card will be left for the addressee to forward the item to the designated post office. The addressee or a representative needs to show one valid piece of government-issued photo identification when picking up the item. The delivery attempt at the door will not be made.
- Proof of age required 18 years / Proof of age required 19 years: You can set your shipments to require proof of age on delivery by checking Proof of age (18) or Proof of age (19). If your shipment requires proof of age, then a signature is also required.
- Coverage: It shows the final rates which include coverage against loss or damage. The availability and the limits of liability coverage depend on the service selected, the country of destination, and the nature of the items being shipped.
It is mandatory to assign the units of weight and dimensions in the General settings.
Set Canada Post Shipment Quote Type
Quote Type: You can select an appropriate rates option from the available options which are as given below:

- Commercial: These are the rates provided to Canada Post Customer who ships frequently and on large scale.
- Counter: These are the rates provided to Canada Post Customer who does not ship frequently.
Enable Shipping Taxes and Surcharges
If you want to display the rates along with surcharges, taxes, and additional charges, you can provide a relevant option under Shipping Taxes & Surcharges

Shipping cost only: Shipping without any discounts, taxes, and Surcharges. When this feature is enabled, the rates fetched from the Canada Post API are shown without any addition of taxes.
Shipping cost with surcharges only: Shipping Cost with discount, surcharges & transportation taxes. When this feature is enabled in the rates and services tab, the shipment cost is discounted and extra surcharges and transportation taxes are added.
Shipping cost with surcharges, taxes, and additional charges: Cost with discount surcharges, transportation taxes & all other international taxes. When this service is enabled in the rates and services section shipment services costs are discounted and extra surcharges are added and transportation charges and other international taxes are added.
Shipping cost without tax only: Shipping Cost with discount and surcharges. When this feature is enabled, the prices will be discounted and extra surcharges will be added to the rates displayed for the shipment services
Configure Return Rate Type
Once you get Canada Post Rates, you can choose to show the type of rates to the Customer at the cart/checkout.
You can select the required option from the Offer Rates drop-down list.

- Offer the customer all returned rates: This option shows quotes for all the available services which are returned by Canada Post.
- Offer the customer the cheapest rate only, anonymously: This option shows the only service with the cheapest quote from the available services.
Add Currency Conversion Rate
Enter the conversion amount if you are using a currency different from the one that you set up in the WooCommerce base location. This amount gets multiplied by the shipping rates.
For e.g: Enter CAD to USD Conversion Rate 0.82, if your base currency is USD

Add Fall Back Rate
Fallback: This field indicates the shipping cost which is taken as the default cost if Canada Post does not return any quotes. This allows the customer to check out even if Canada Post does not return any quotes. Leave it blank to disable.

Leave it empty or add ‘1’ if you are using the same currency (you set up in the WooCommerce currency settings) to communicate with Canada Post. It means conversion is not required.
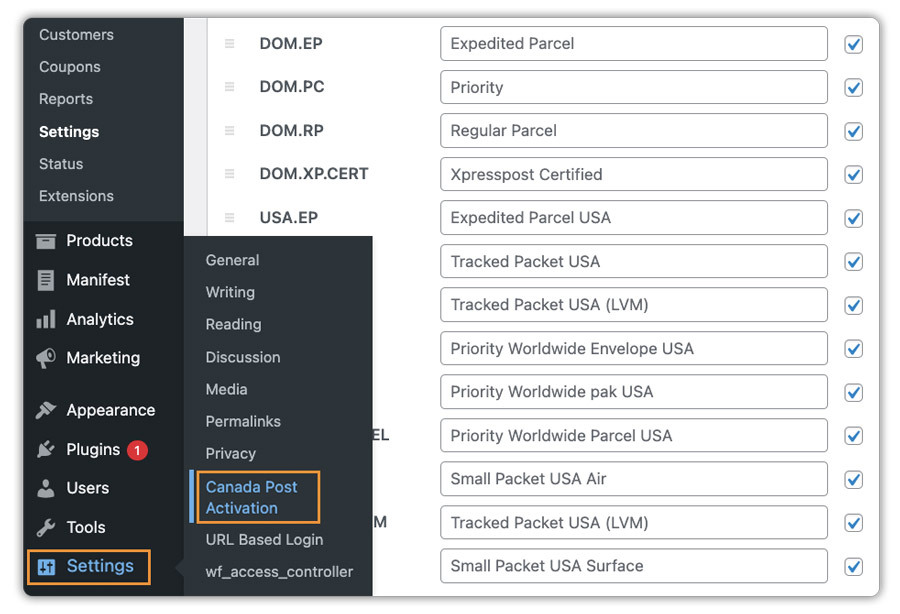
8. Configure Canada Post Shipping Services
Canada Post provides different kinds of shipping methods that suites to different needs of the customer. If the customer is in need of fast delivery, then the customer can opt for Priority. Likewise, the customer can select the best-suited service. PluginHive supports these services domestically and internationally.
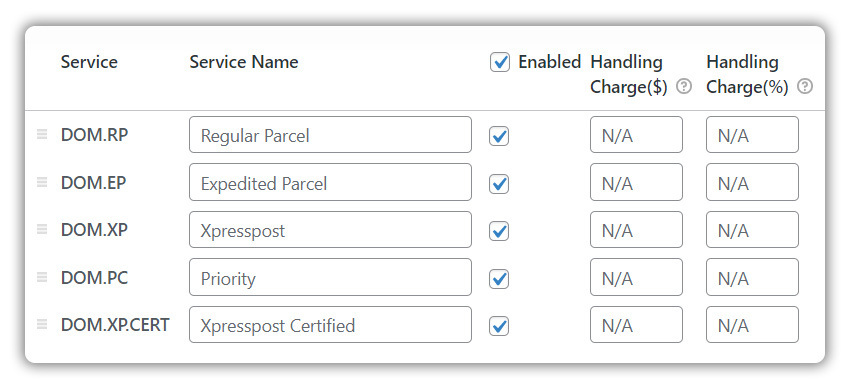
Canada Post Domestic Services
Domestic services supported by our plugin are as listed below:
- Regular Parcel
- Expedited Parcel
- Xpresspost
- Priority
- Xpresspost Certified
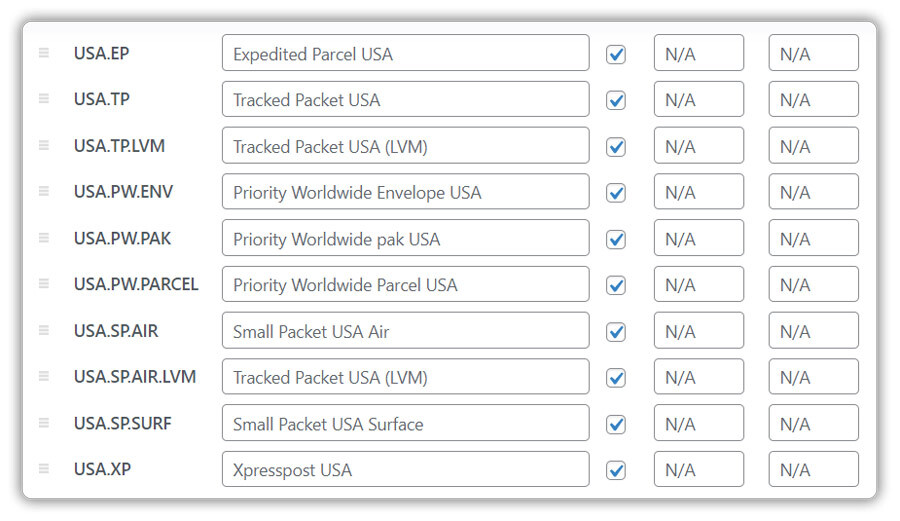
Canada Post Services for USA
USA services supported by the plugin are as listed below:
- Expedited Parcel USA
- Tracked Packet USA
- Tracked Packet USA (LVM)
- Priority Worldwide Envelope USA
- Priority Worldwide pak USA
- Priority Worldwide Parcel USA
- Small Packet USA Air
- Small Packet USA Surface
- Xpresspost USA
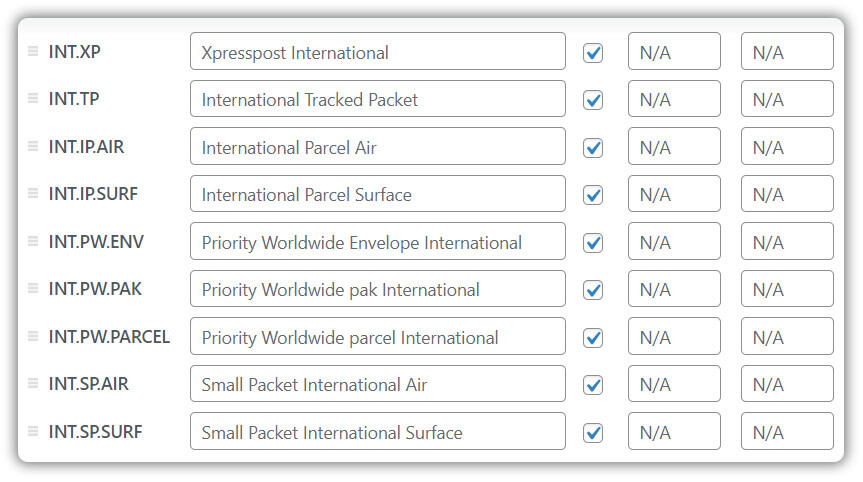
Canada Post International Services
International services supported by the plugin are as listed below:
- Xpresspost International
- International Parcel Air
- International Parcel Surface
- Priority Worldwide Envelope International
- Priority Worldwide PAK International
- Priority Worldwide parcel International
- Small Packet International Air
- Small Packet International Surface
Non-selected services are not shown to the customer even if they are available services from Canada Post. Please go to Canada Post Services for detailed information on each service.
Adjust Shipping Rates
You can adjust the shipping price by adding/subtracting the required amount from the actual shipping cost. You can mention the amount in % and $ for each service.
For example: Consider, the Shipping Cost of First-Class Mail returned by Canada Post is $5.
-Price Adjustment for First-Class Mail is $5 as shown below:

Total Cost Displayed for FIRST_OVERNIGHT – $10 (5+5).
– Price Adjustment for First-Class Mail is 10 % as shown below:

The total cost Displayed for First-Class Mail is $5.5 (The 10% of 5 is added to 5 to get the actual shipping cost).
-Price Adjustment for First-Class Mail is $5 and 10% as shown below:

Total Cost Displayed for FIRST_OVERNIGHT – $10.5 (The 10% of 5 is added to 5 + 5 to get actual rates).
Display Canada Post Services Based on Shipping Zones
If you want to show Canada Post Shipping Services based on your customer zones, follow the below steps:
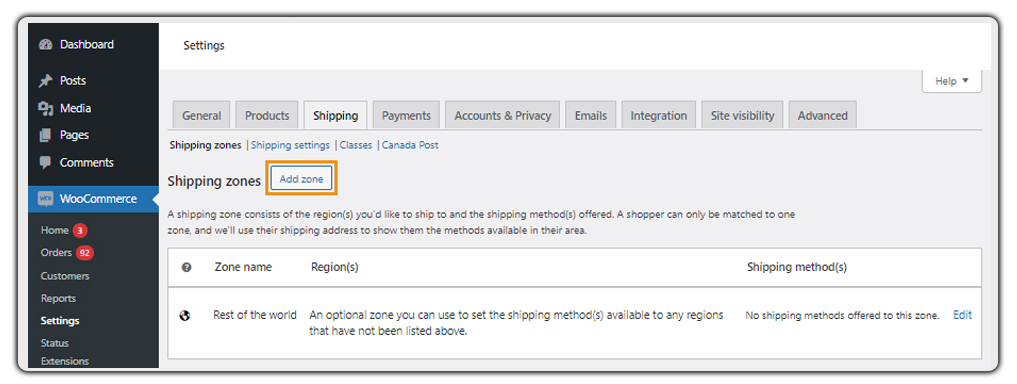
- Go to your WooCommerce Settings > Shipping > Shipping Zone.
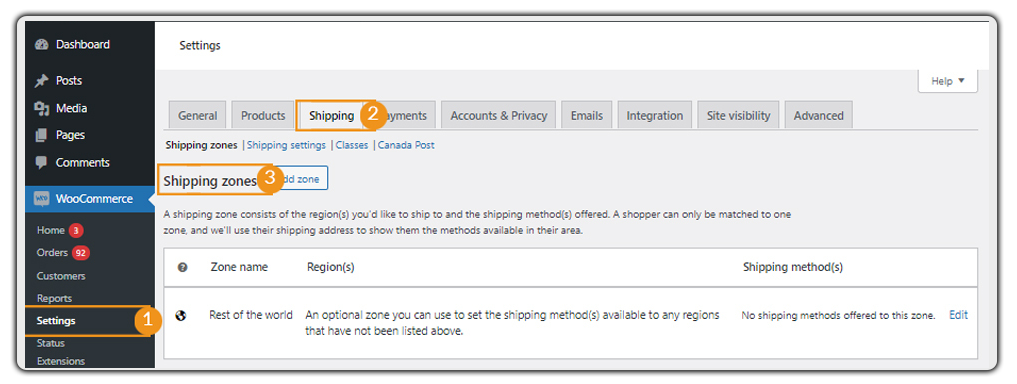
- To add a shipping zone, click on Add Zone.
- Give your zone a name and add the shipping regions.

- To add a Canada Post shipping method, click Add Shipping Method and select Canada Post.
- Then click on Continue.

- Save the changes.
- Click on Edit in the Canada Post section.

- Select the Canada Post services for the zone and click on Save Changes.
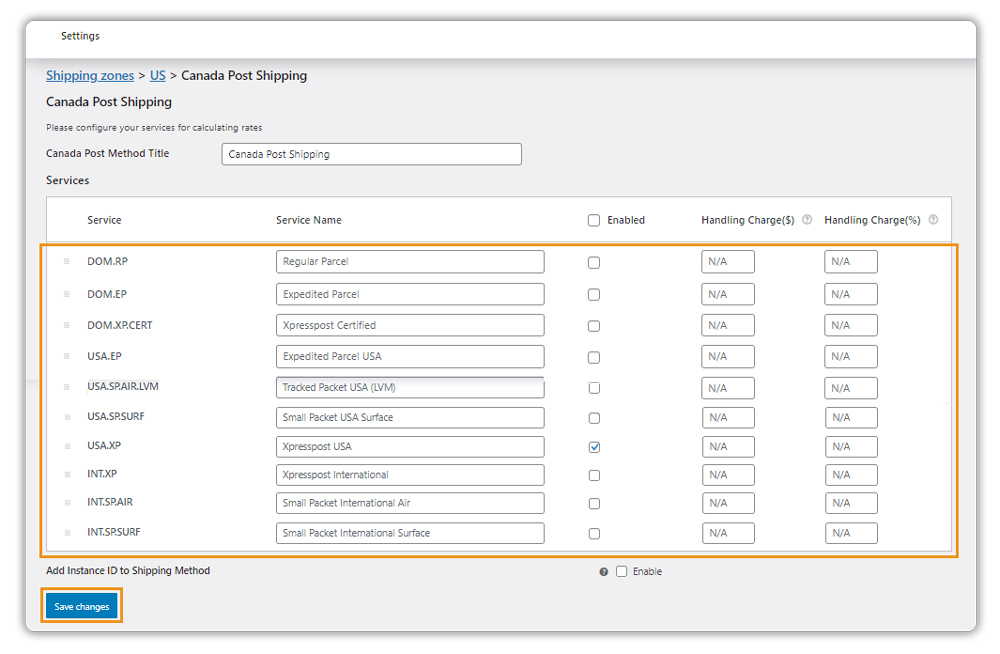
Now at the WooCommerce checkout, selected Canada Post services will only be displayed if the customer’s address falls within the zone region that we have set.
For example, when a customer checks the Rates with a US address, the Canada Post services selected for US Zone will be displayed as shown below:
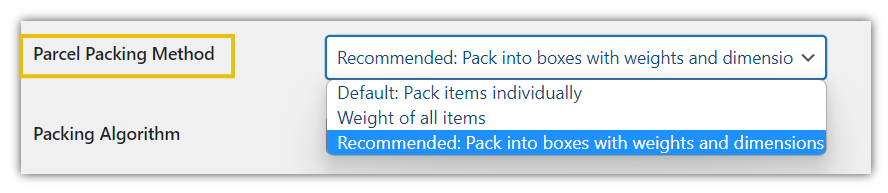
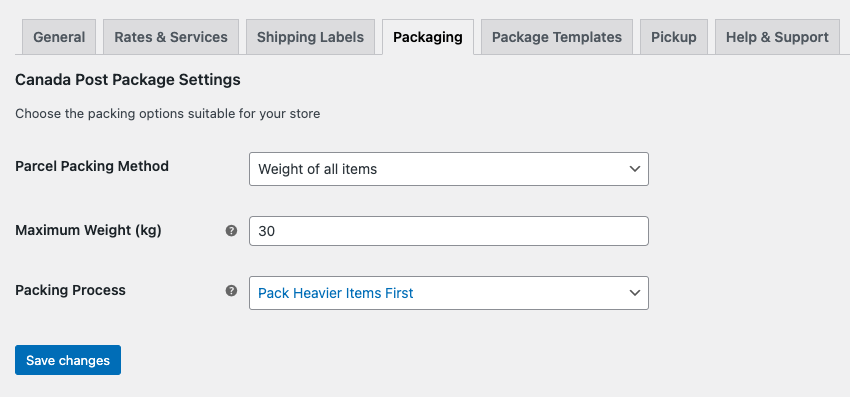
9. Configure Canada Post Package Settings
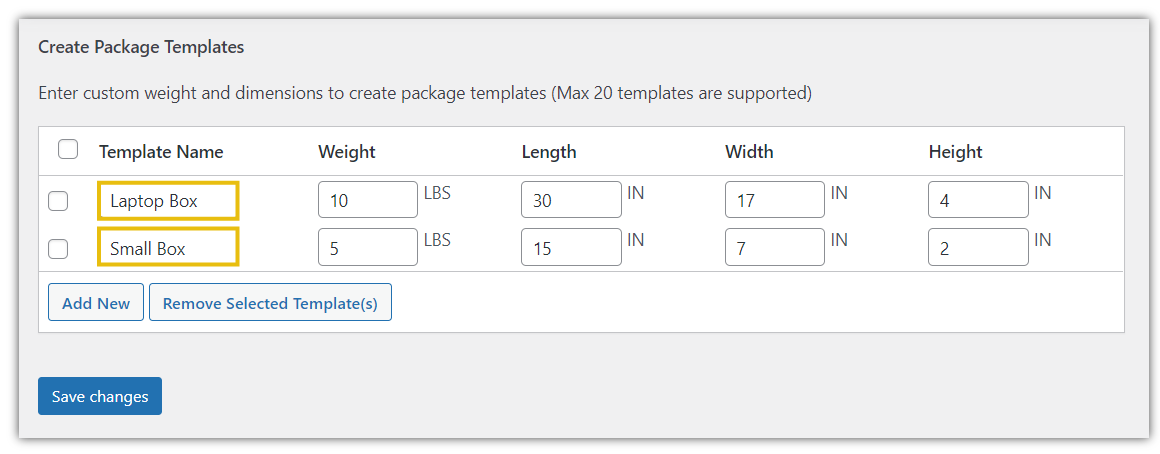
The three options to pack parcel(s) using our plugin are as given below:
Pack products individually – Use a separate box for each item in the cart
Under this option, each item in the cart is individually packaged. The overall shipping cost is determined by summing the shipping cost for each item. As a result, separate labels are produced for each item.
For instance, if the shipping cost for Item X is $10 and the customer adds two units of Item X to their cart, the total shipping cost would be $10 x 2, which is $20. In this scenario, two labels would be generated.
Pack products using boxes with customizable weight & dimension limits
This packing method involves packaging items into boxes with weight and dimension specifications that can be customized. The shipping cost for each box will be calculated based on the weight and size of the items it contains. This approach allows you to set limits on the size and weight of the boxes that you use for shipping, which can be useful for ensuring that your packages are safe and secure during transit and for managing shipping costs effectively.
Let’s say that you sell books, and you want to package your books in boxes that have a maximum weight limit of 10 kg and a maximum dimension of 40 x 30 x 20 cm.
Using this packaging method, you would specify these limits in your plugin settings. When a customer places an order, the plugin will automatically select the best-fit box for the items in the order, taking into account the weight and size of each item and the limits you’ve set.
For example, if a customer orders 5 books that weigh a total of 8 kg and have a total size of 35 x 25 x 15 cm, the software would choose a box with a size of 40 x 30 x 20 cm and calculate the shipping cost for that box.
Weight-based packing – Pack products in the same box until the weight limit is reached
With this packaging method, the total weight of all items in a customer’s cart is used to calculate shipping rates. In this method, the weight of all items in the cart is summed up and then passed to the shipping carrier’s API (in this case, the Canada Post API) to get shipping rates. By using weight-based packing, the shipping costs for the customer are more accurate as the shipping rates are based on the actual weight of the products being shipped. This method also helps to streamline the shipping process, as the WooCommerce Canada Post plugin will automatically calculate the number of boxes required based on the total weight of the items in the cart.
As shown in the image above, the “Max Weight” is the maximum weight that can be packed into a single box. All products up to this weight will be packed into one box, and once the max weight is reached, the plugin will automatically assign a new box to the remaining items. This helps to optimize the shipping process by ensuring that the packages being shipped are not overweight and can be easily handled by the shipping carrier.
Let’s say your customer has placed an order for three items:
- A book that weighs 1 lb.
- A laptop that weighs 4 lbs.
- A lamp that weighs 3 lbs.
The total weight of all items in the cart is 1 + 4 + 3 = 8 lbs. If the Max Weight for the boxes is set to 5 lbs, the plugin will pack the book and the lamp into one box, and the laptop into another box. The weight of the first box will be 1 + 3 = 4 lbs, and the weight of the second box will be 4 lbs.
The WooCommerce Canada Post plugin will then get the shipping rates for the boxes (4 lbs and 4 lbs). The customer will be presented with the calculated shipping costs, which are based on the actual weight of the items in their cart. This provides a more accurate estimate of shipping costs and helps to ensure that the customer is not overcharged for shipping.
Options for Different Packing Process
The WooCommerce Canada Post plugin provides the following two options for different packing processes:
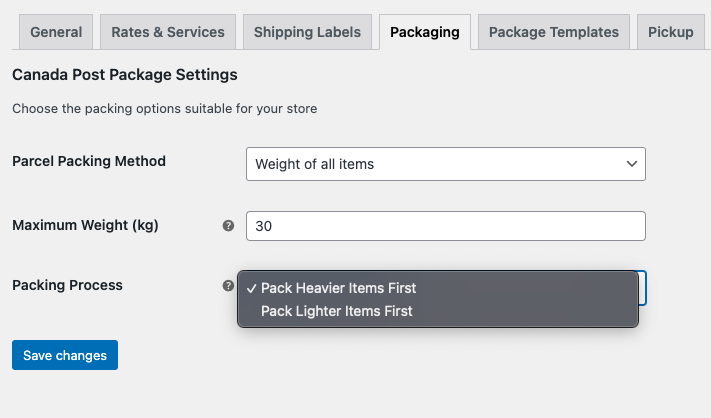
- Pack Heavier Items First
By selecting this option, the plugin will try to accommodate all the heavier products first in order to fill the weight limit of your box
- Pack Lighter Items First
By selecting this option, the plugin will try to accommodate all the lighter products first in order to fill the weight limit of your box
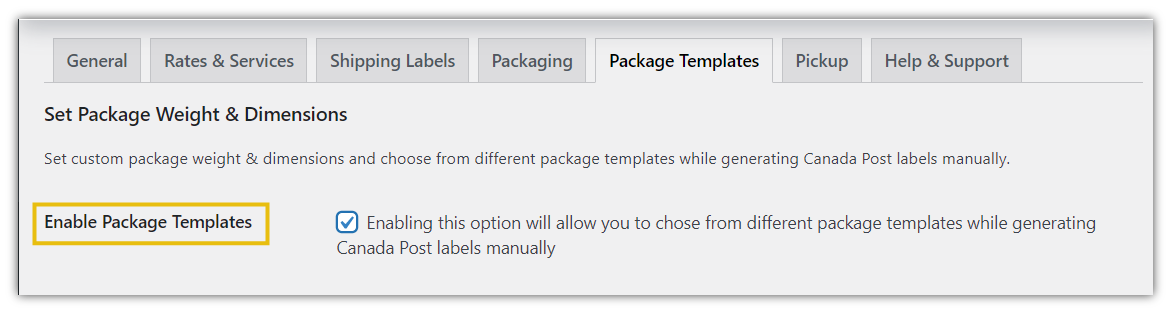
Pack Products with Custom Boxes (Packaging Templates)
Set custom package weight & dimensions and create customized packaging boxes as templates and use them to create shipping labels for your orders. Click on Enable Package templates, to implement this feature
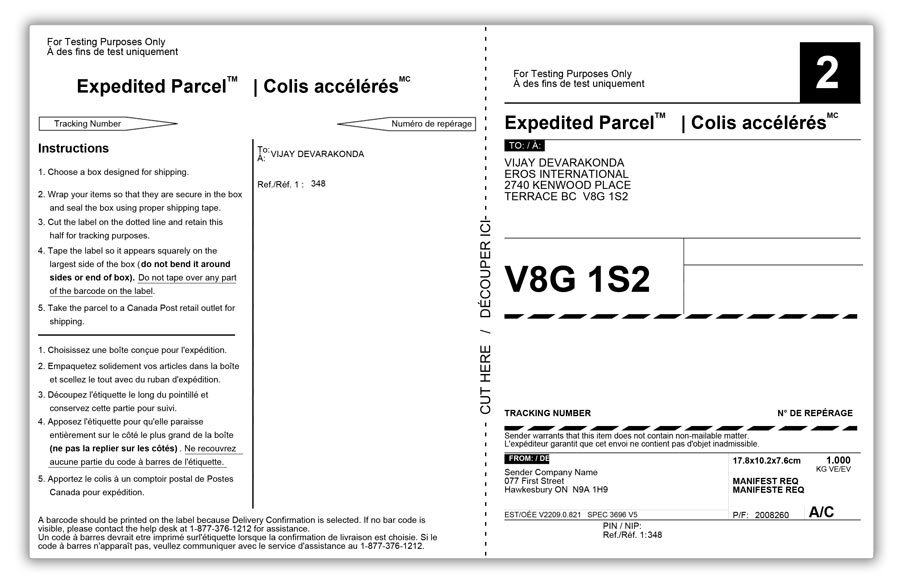
10. Printing Canada Post Shipping Labels
In this section, we will see how to print Canada Post Shipping Labels and manifest them for your shipping orders.
Print your first Canada Post Shipping Label
- Select WooCommerce < Settings < Shipping < Canada Post
- Select Shipping Labels
- Enable Label Printing Option.
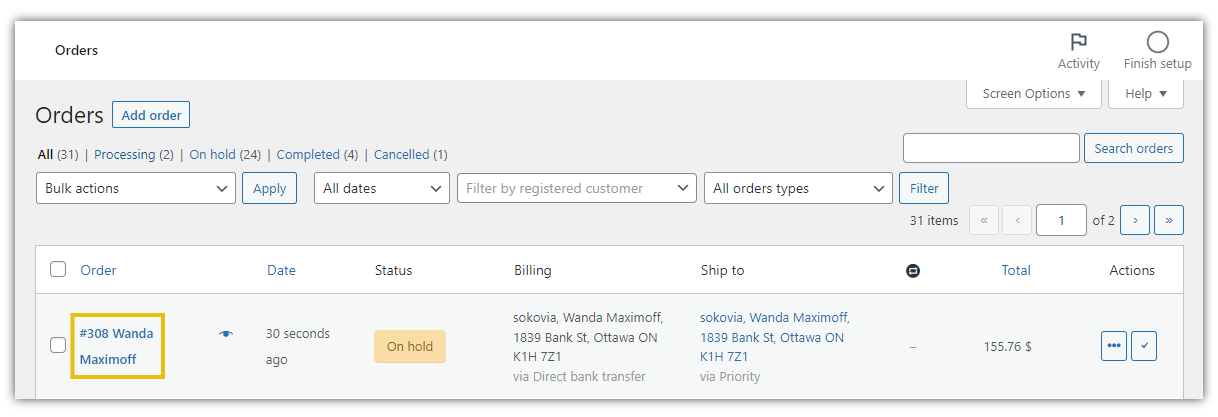
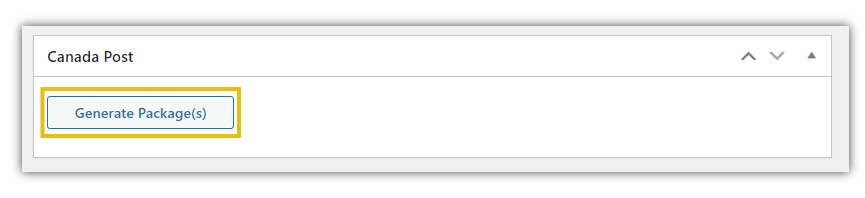
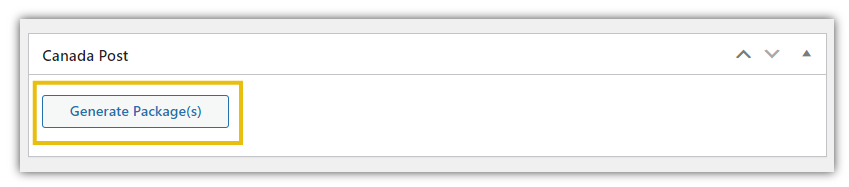
On the order page, Click #OrderNumber or view button under the Action column for which you want to create and print the label. The edit order page appears as shown below:
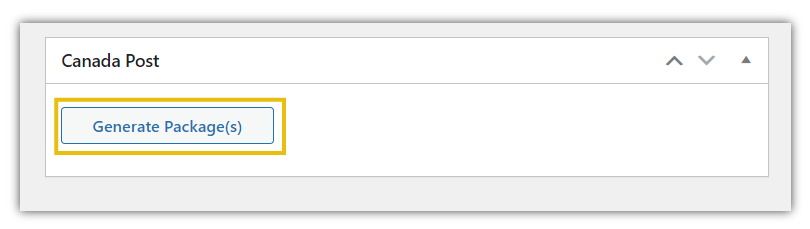
Click on Generate Package
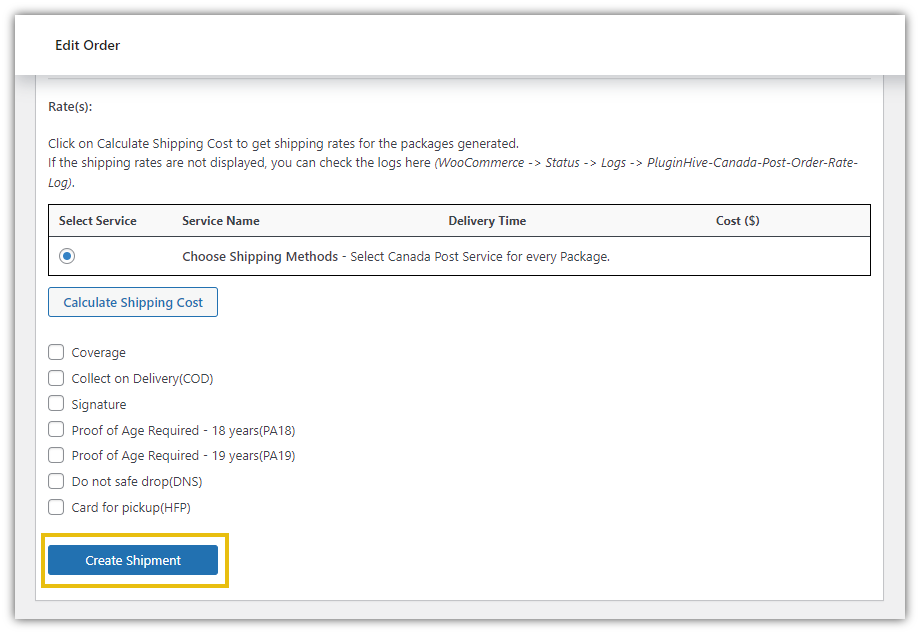
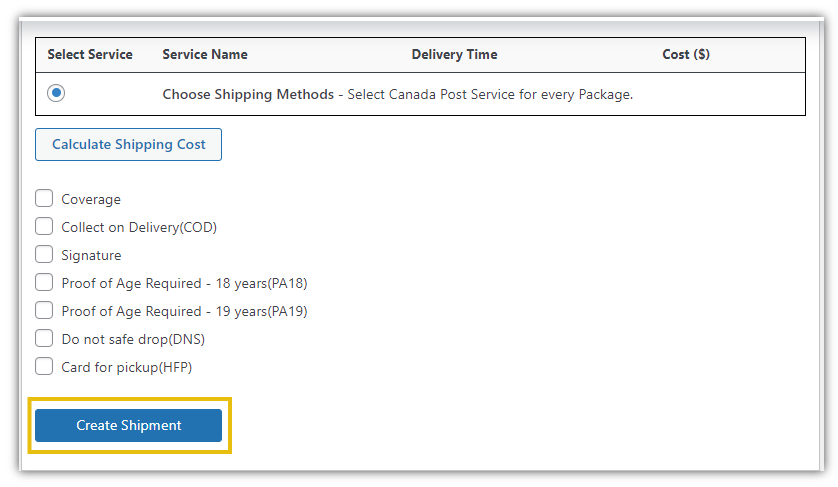
Click on Create Shipment
Click on Print Label

All created shipment labels get stored in your host site database. All these labels are auto-downloaded in a file and can be printed multiple times if the print label type is pdf.
For the Non-Contract user, you can print only Labels and not Manifest.
Print Shipping Labels in Bulk
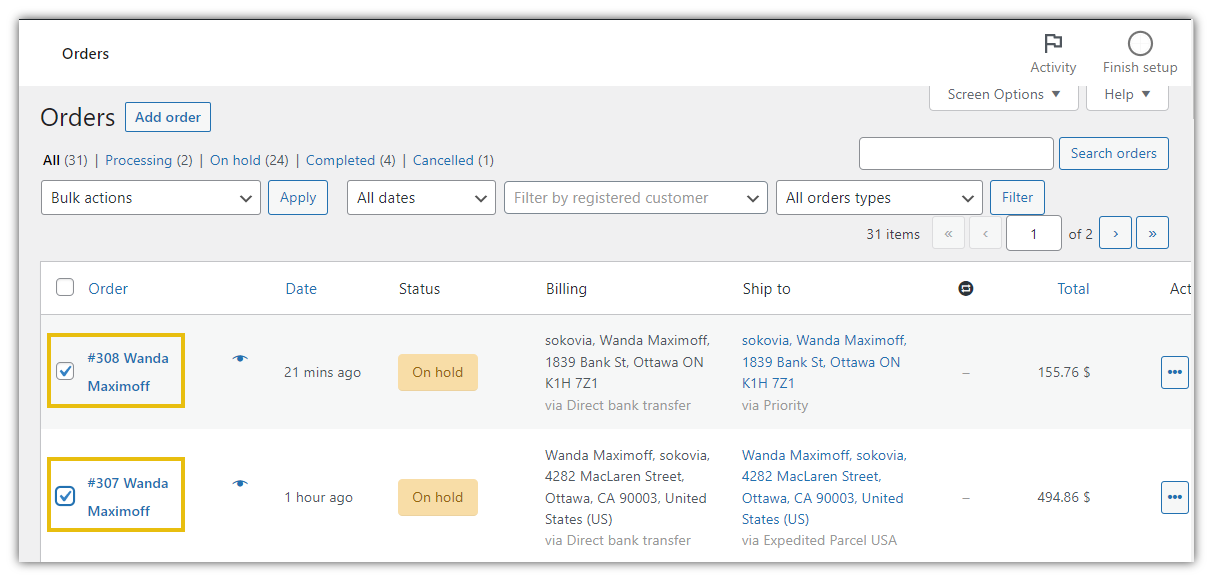
Bulk Label Generation not only creates multiple shipment labels instantly but also saves you a lot of time! Once you have got all the orders, just select all the orders for which you want to create the shipping labels.
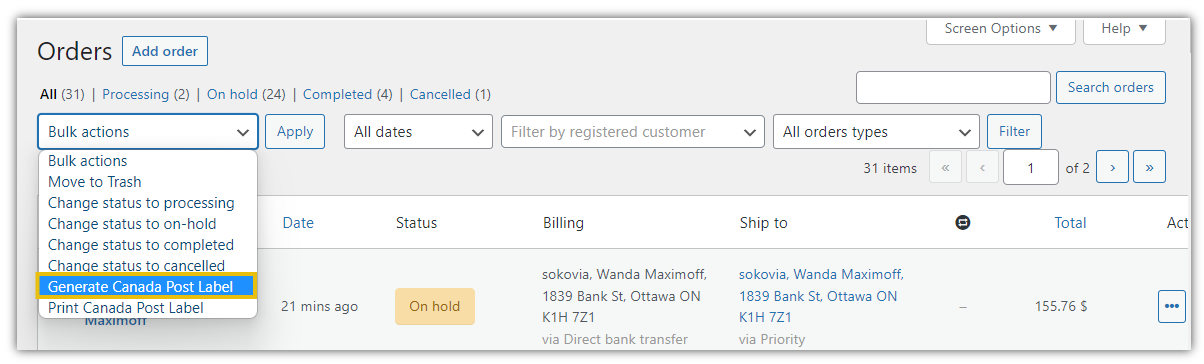
And after that, select the option to create Canada Post shipping labels, under Bulk Actions. The following image will show you the option under Bulk Action.
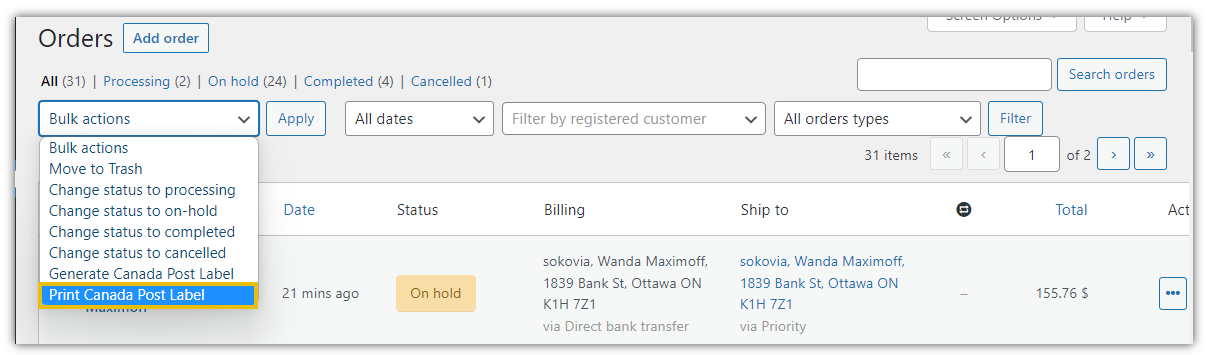
Under Bulk Actions, Select Generate Canada Post Label.
Labels are created and ready to print. In order to print labels, select Print Canada Post Label.
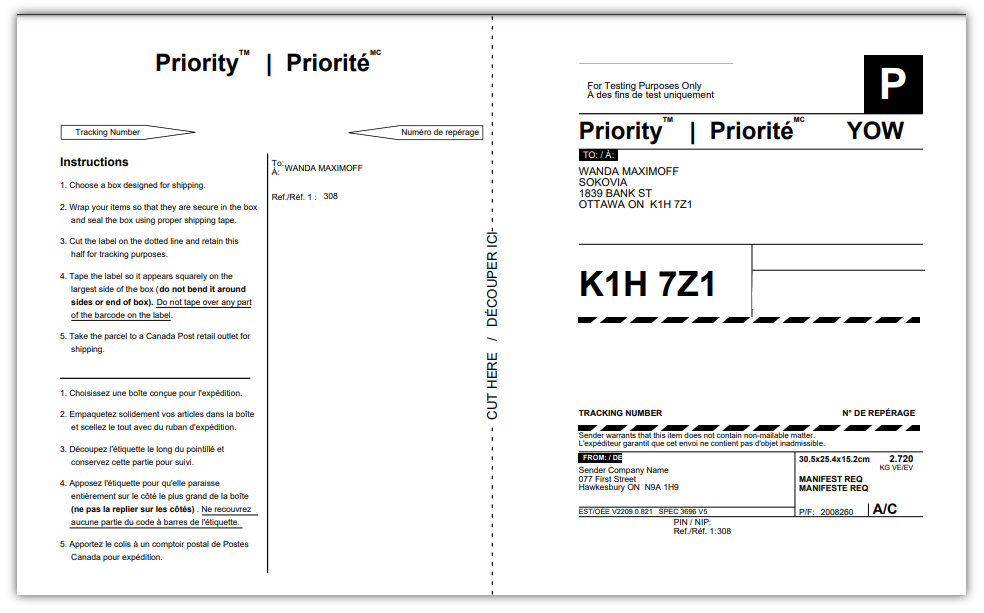
The Labels printed are as follows:

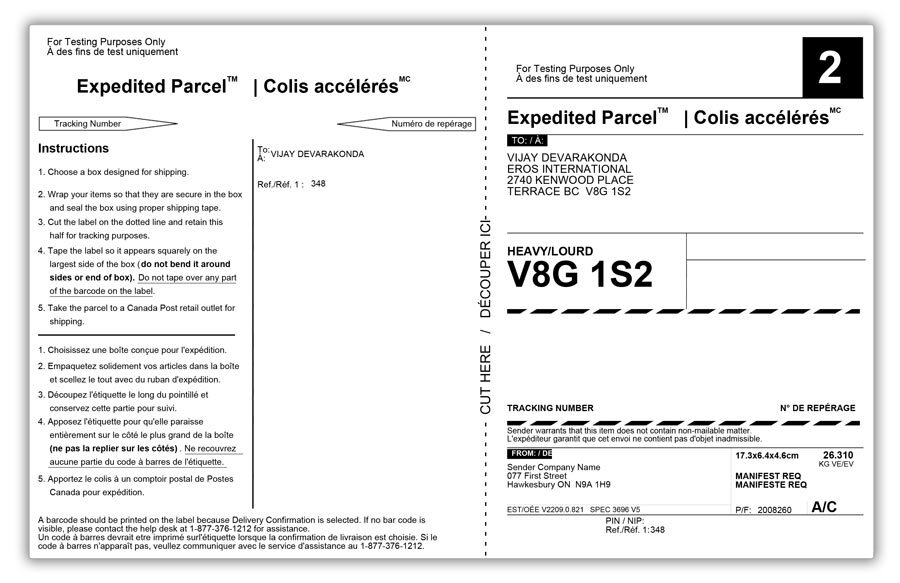
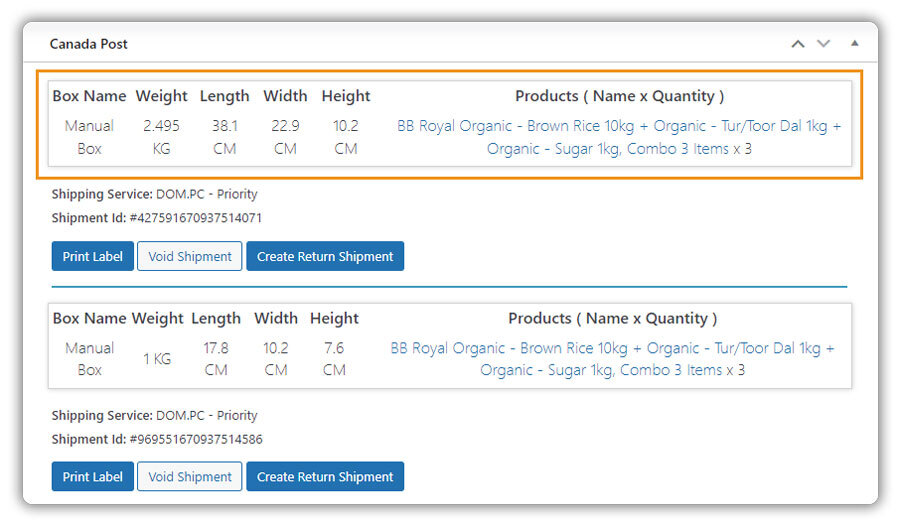
Print Individual Shipping Labels for Multiple Packages
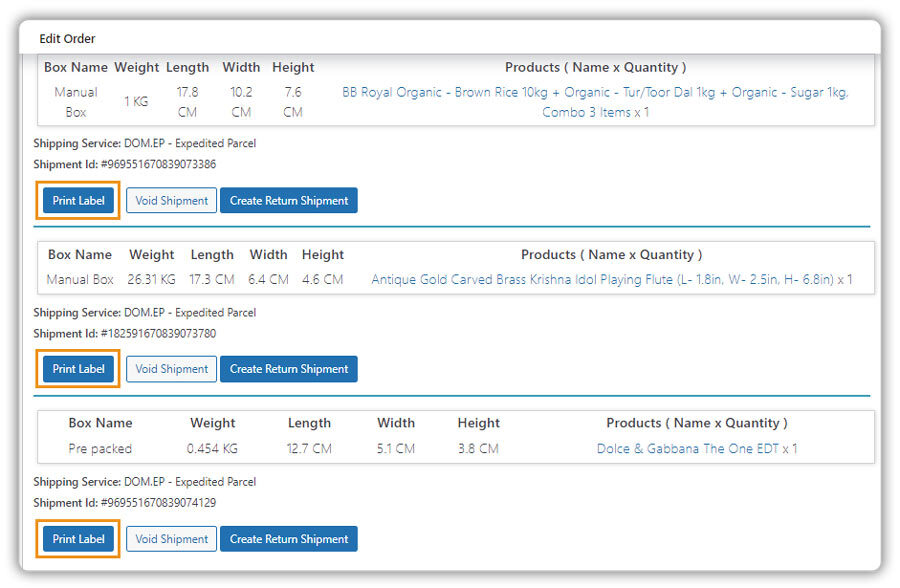
Sometimes you might have to use multiple boxes/packages to pack your products within an order. Under such scenarios, we recommend you use our WooCommerce Canada Post plugin in printing multiple shipping labels for your orders.
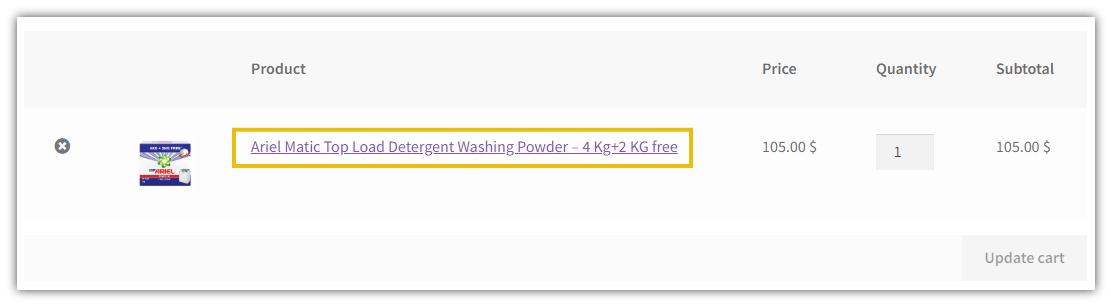
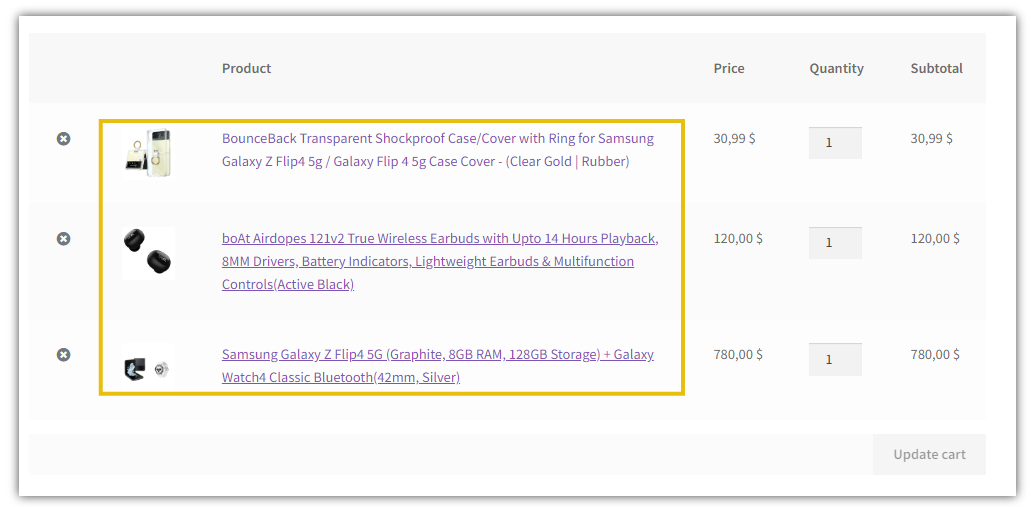
In this case, let’s add multiple products to the cart and place an order.
Once the order is placed, go to the Orders Page and select your order
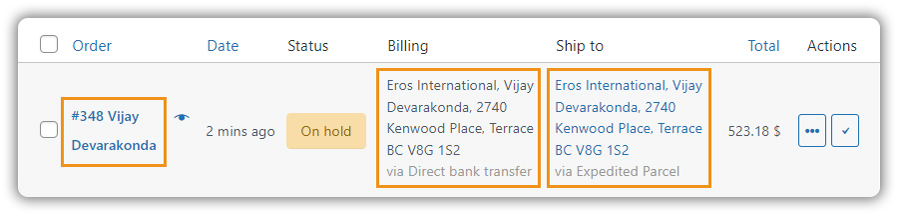
Click on Generate Package
You can see three packages are created for shipping 3 different products.
Click on Create Shipment
You can Print labels for your packages as shown in the image below

Canceling the Canada Post Shipping Label
Suppose you want to drop a few orders and nullify them or regenerate a new package, but the shipment labels are already generated. In such cases, you can cancel the Shipment labels with ease, by clicking the Void Shipment option.
For Contract Shipping Orders:
- Go to the WooCommerce Order where the label has already been generated
- Click on the Void Shipment option (as shown in the image)
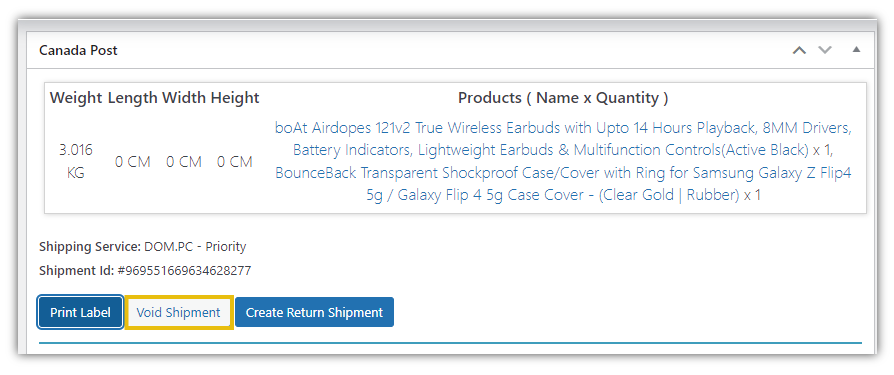
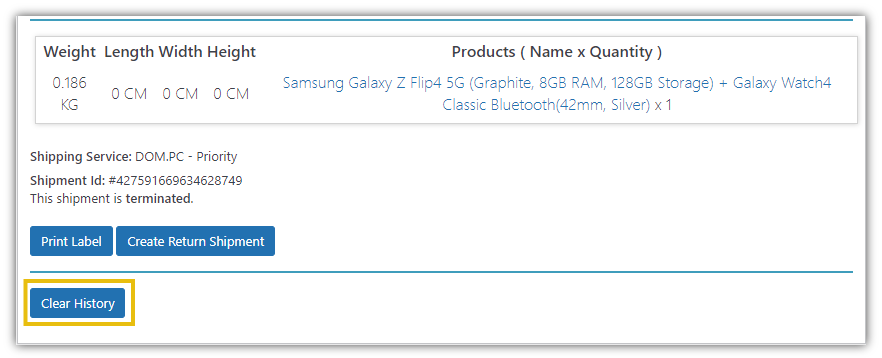
- Once that is done, Click on Clear History
As shown in the image, the shipment will be terminated.
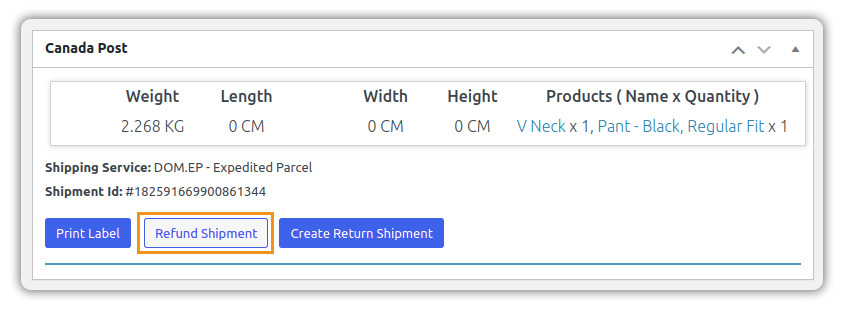
For Non-Contract Shipping Orders
- Go to the WooCommerce Order where the label has already been generated
- Click on the Refund Shipment option, the shipment will be canceled immediately.
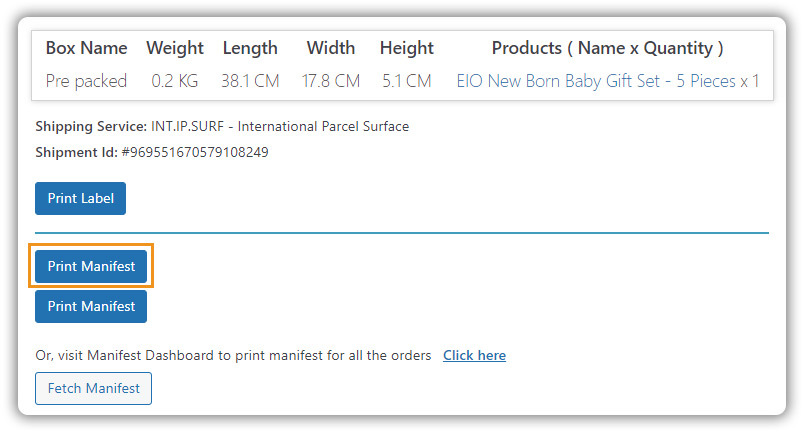
Printing Canada Post Manifest Document
WooCommerce Canada Post Shipping plugin allows store owners to generate and print Manifest documents directly. With the help of this plugin, they don’t need to go to the official Canada Post website for printing manifests.
You can print manifests in 2 ways:
1. Print Manifest within an Order Shipment
2. Print Manifest under Manifest Tab
To print Manifest within the order shipment, go to Orders Section, select an Order
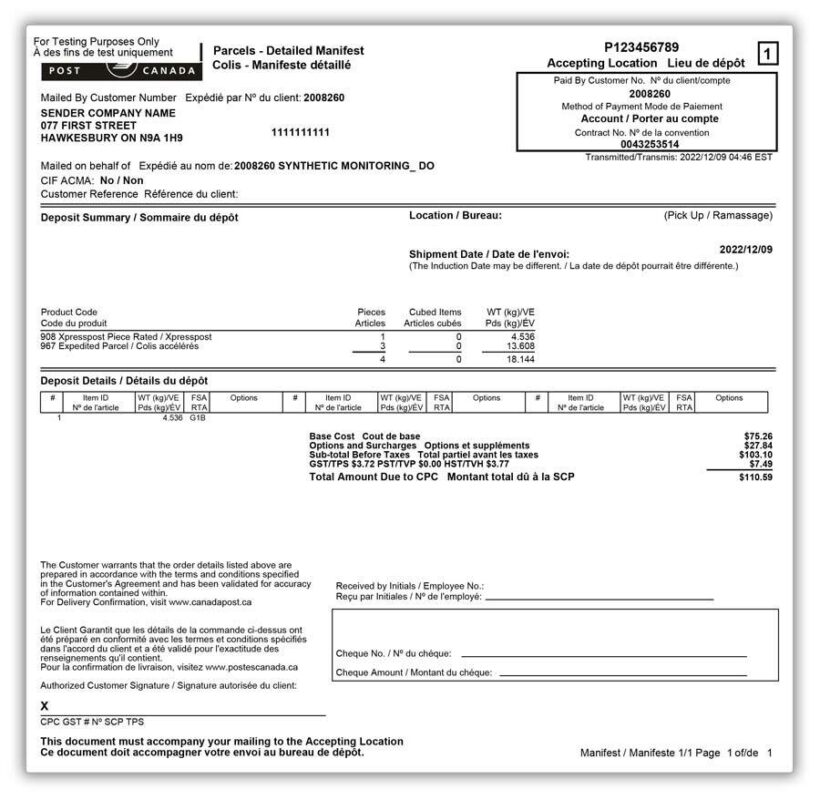
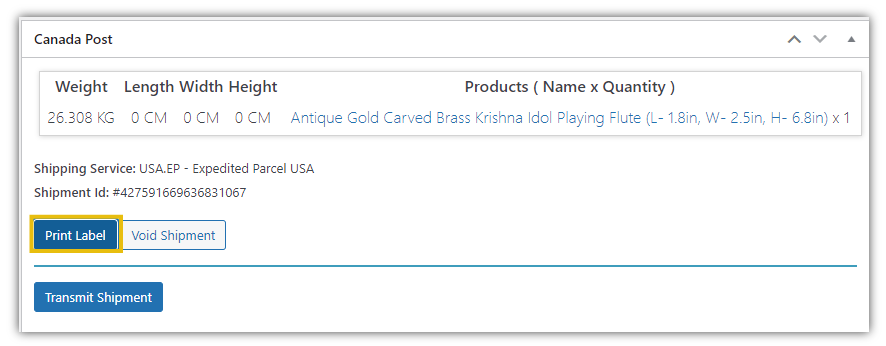
After Generating Packages and Shipping Labels, Click on Transmit Shipment

The Manifest is downloaded as shown in the image below.
For an order to be mentioned in a manifest, order shipment must be generated along with the shipping label.
Generate Manifest based on Order Status
You can also generate Manifests for your WooCommerce Orders, based on their order status.
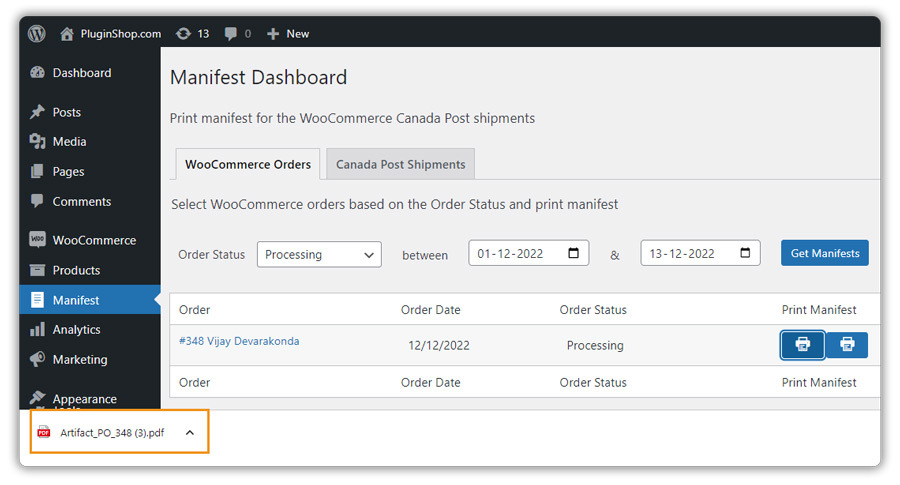
Go to Manifest tab > Select WooCommerce Orders Option
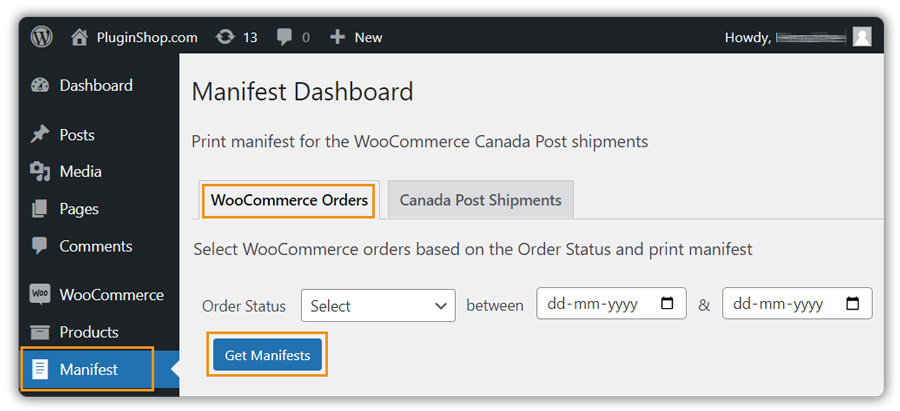
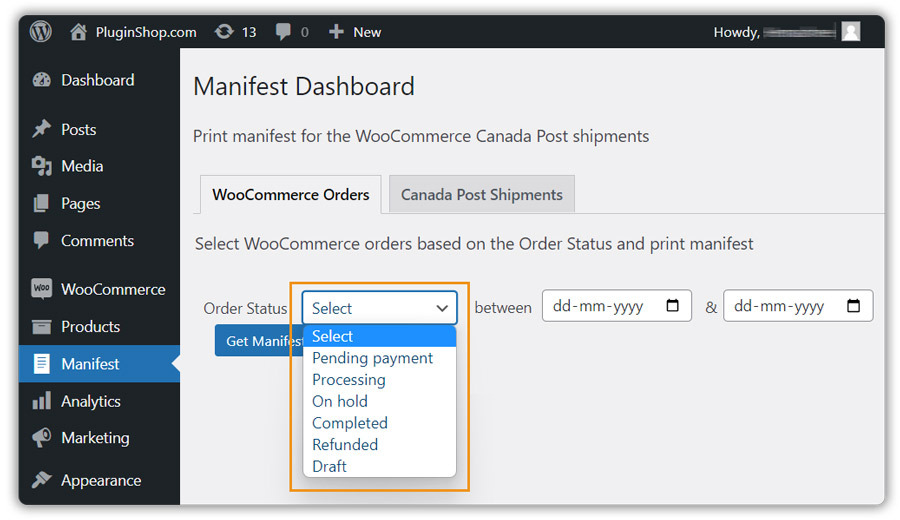
Select the Order Status in the dropdown as shown below:
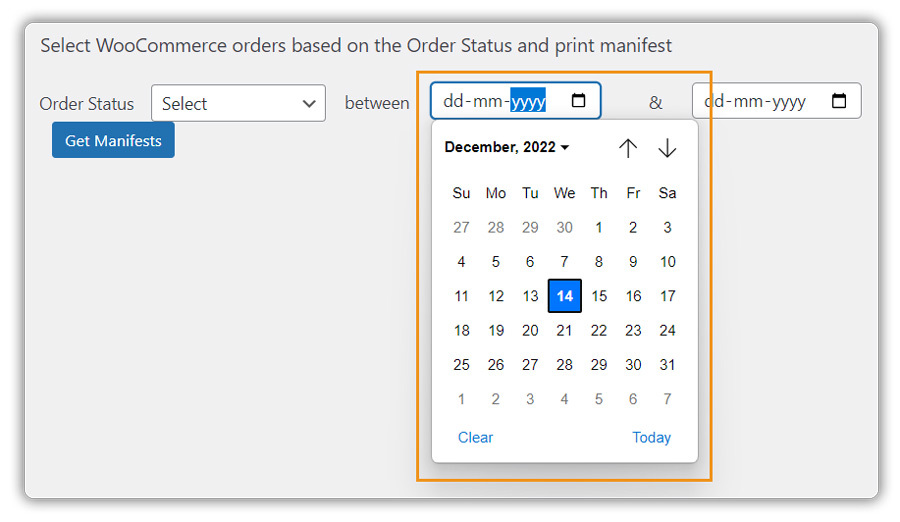
Now select the dates for which based on the order status chosen, the manifest is generated accordingly.
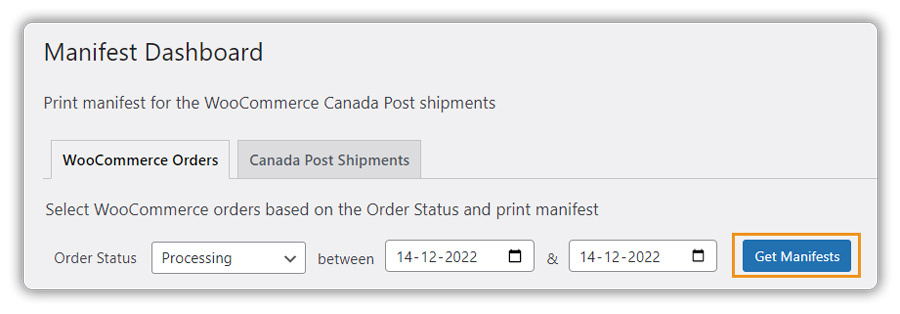
Click on the Get Manifest button to generate Manifest Documents
You will be able to Print Manifest documents, by clicking the print icon as shown in the image
Generate Manifests directly from Canada Post Shipments
Our plugin facilitates Manifest printing directly from Canada Post Shipments.
Go to Manifest Tab on your WooCommerce Dashboard. Select Canada Post Shipments
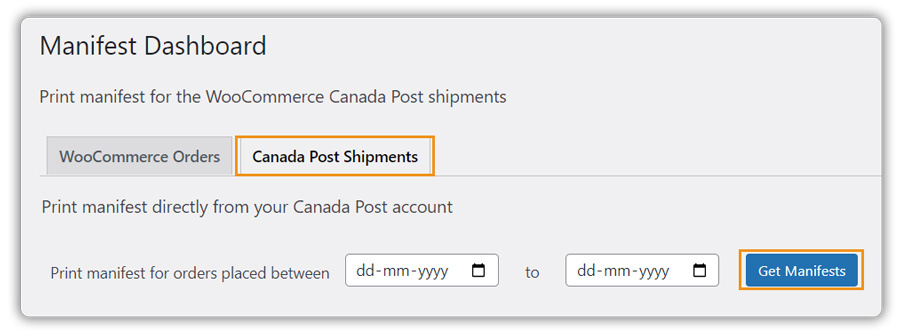
Select Canada Post Shipments. Select the date range and click on Get Manifests.
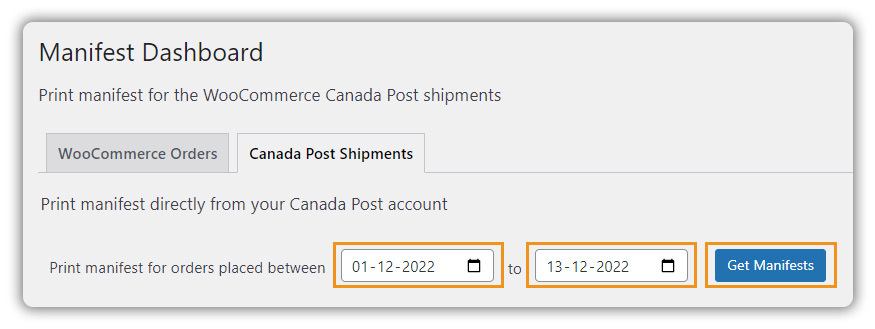
Based on the date range, the plugin generates the manifests accordingly. The manifests generated are based on orders linked to Canada Post Account. Click on Print Icon, to print the Manifest documents.
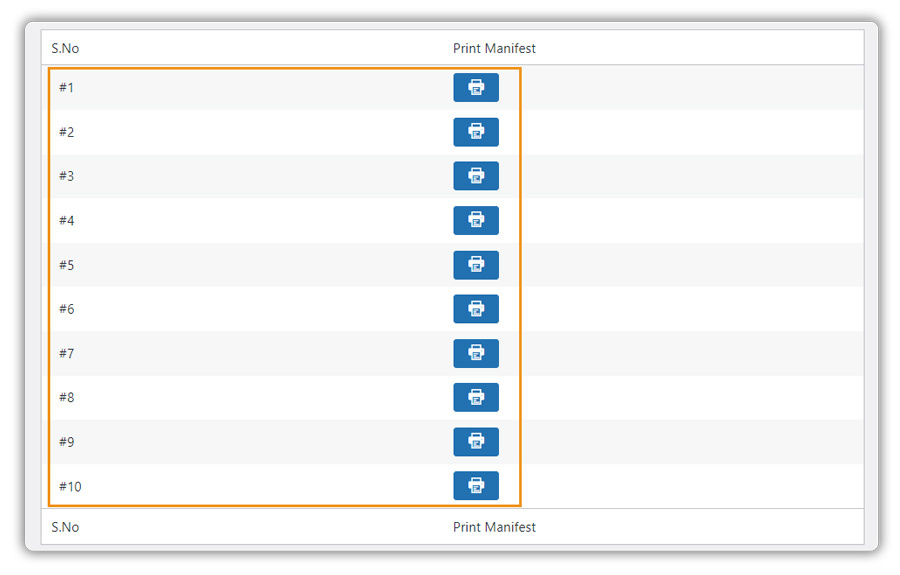
The plugin will generate the Canada Post Manifest Containing all the orders since the last time the store owner has clicked the transmit Shipment
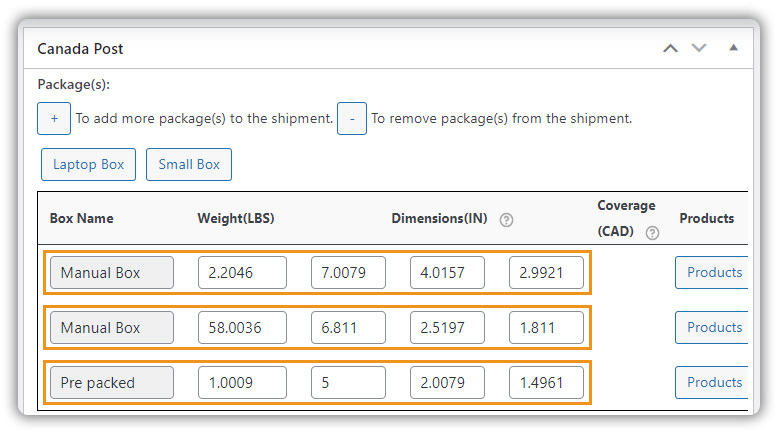
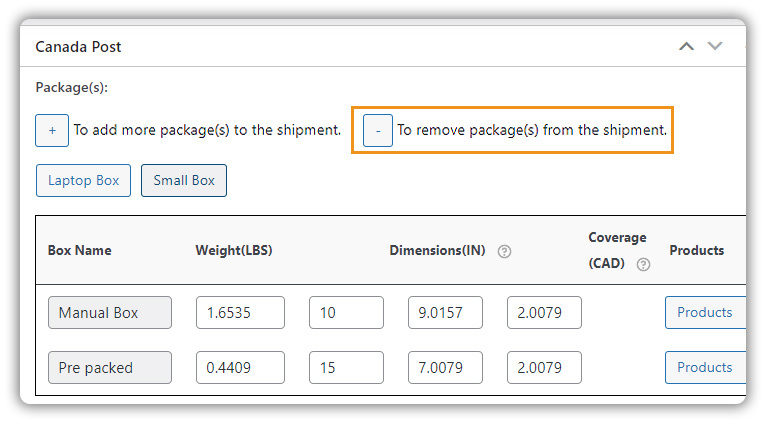
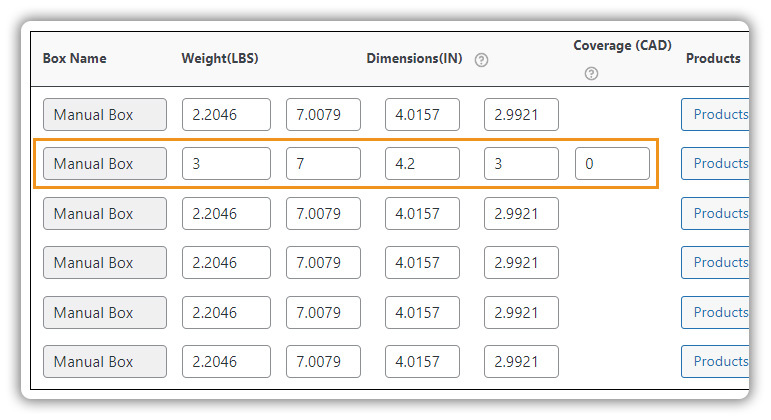
Add or remove Packing boxes within Order Shipment
Within Shipping Order Details, you can add or remove custom boxes for your packages. This feature helps you edit and select the best suitable custom box for your products and also add more boxes if required.
Go to Orders Section, select an Order

Click on Generate Package, you will be able to see the following Package Settings.
1. To add more packages to the shipment
2. To remove packages from the shipment
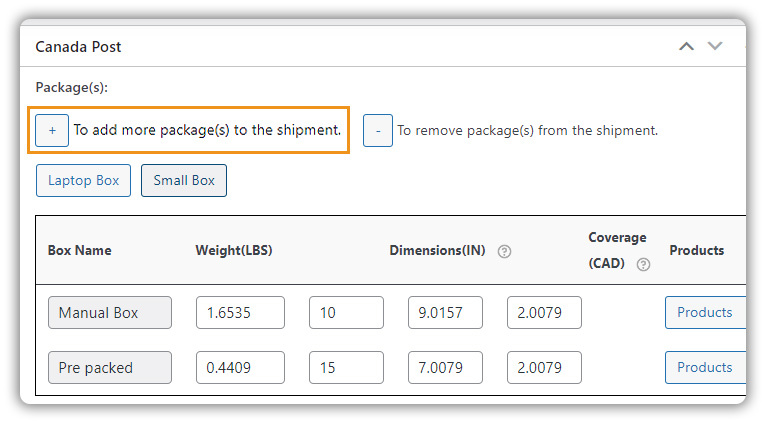
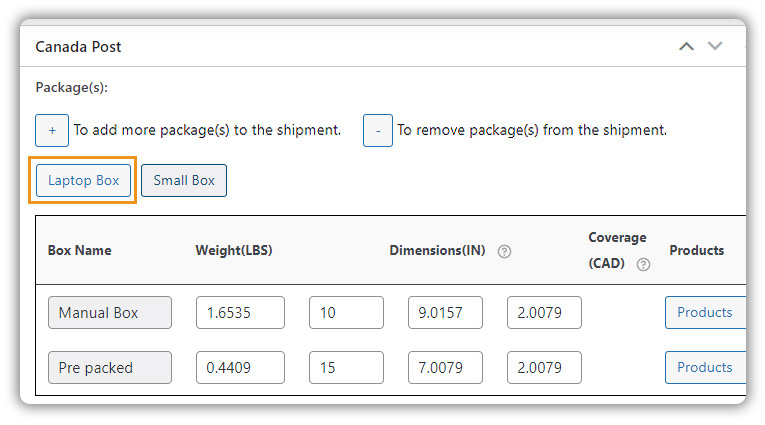
Suppose you want to select a custom box for packaging, you can do it by choosing the required box as shown in the image. The boxes configured initially get replaced once the custom boxes are selected
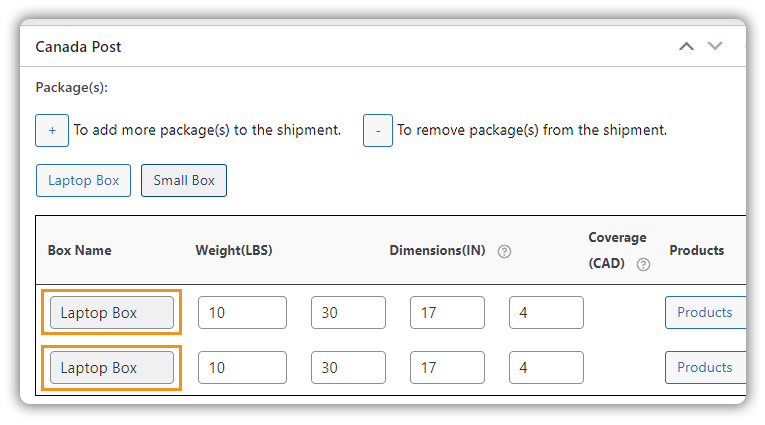
Suppose you don’t have sufficient boxes within your order shipment or you require another packaging box to contain your product, this can be adjusted within the order packaging
For e.g, we have 5 more products to be packed out of 10, and as of now, each product is assigned to individual boxes. We can resolve the issue in the following way:
Adding New Boxes: This involves adding custom boxes within order details and adding the products to it. It can be achieved in the following way.
Click on the + Icon, in order to add a new box, the following box does not have any dimensions.

Select Products, wherein you can assign the available quantity of products to the package as shown below, and click Save.
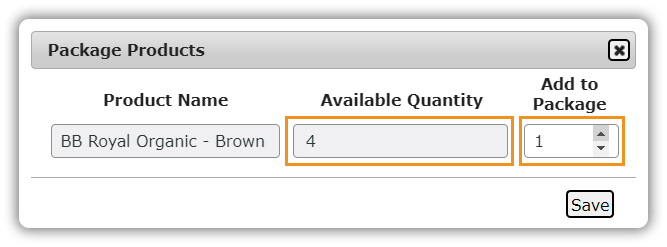
Provide the box dimensions and click on create a shipment.
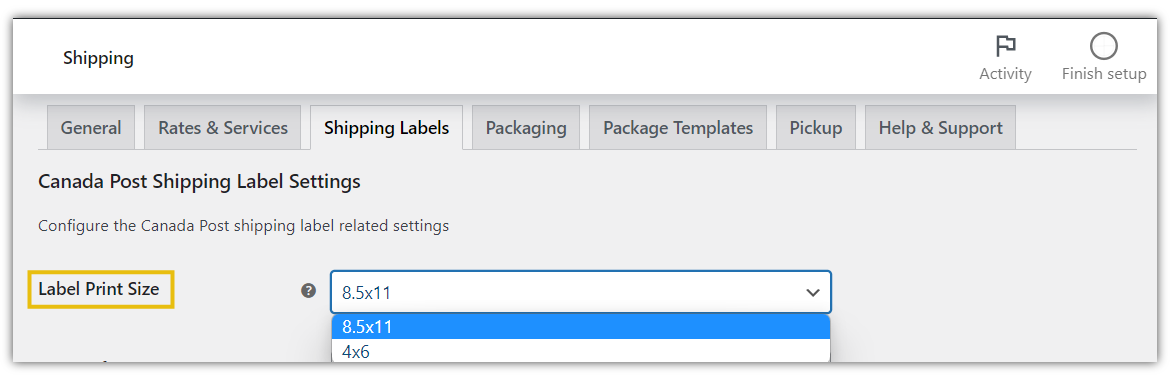
How to Configure Canada Post Label Size?
In this field, you can set the size for Print Label. The available options are as given below:
- 8.5 x 11: Provides ideal dimensions for paper label generation
- 4 x 6: Provides ideal dimensions for thermal label generation
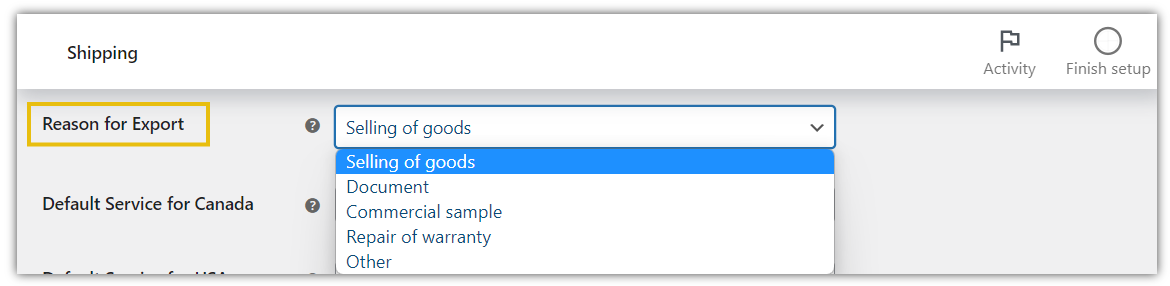
Reason for Export: In this field, it is required to provide the reason for export in order to assist with border crossing protocols
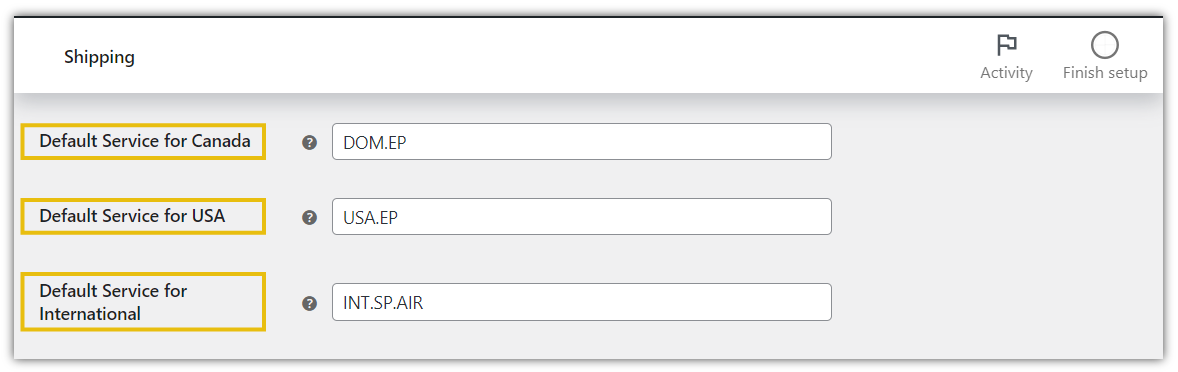
Assign Default Shipping Services
- Default Services Canada: Enter the required shipping method for Canada. This service is used to generate a label when users have selected free shipping.
- Default Service USA: Enter the required shipping method for the USA. This service is used to generate a label when users have selected free shipping.
- Default Service International: Enter the required shipping method for International customers. This service is used to generate a label when users have selected free shipping.
Generate Canada Post Return Labels Automatically
Create Return Label automatically at the time of shipment creation
- Go to WooCommerce tab > Settings > Shipping > Canada Post > Shipping Labels
- Enable Create Return Label Automatically option

Allow Customers to Print Return Labels
When the option is enabled, the customer will be able to see a button to download the return label and it can also be printed via the Customer’s My Account Page
- Go to WooCommerce tab > Settings > Shipping > Canada Post > Shipping Labels
- Enable Allow customers to print shipping labels option

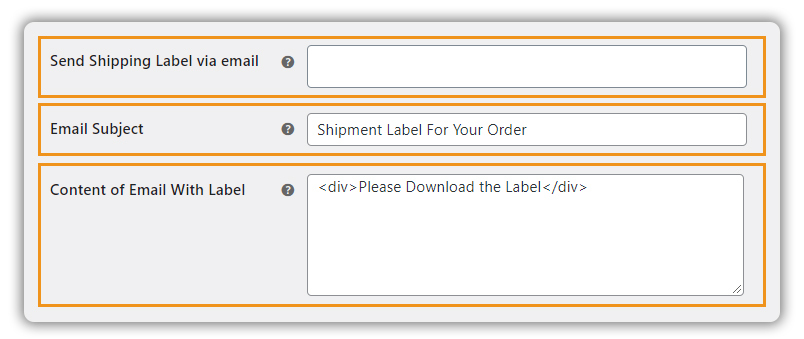
Send Shipping Labels via Email
Send labels to selected recipients when the label is printed for the first time by the Store Owner. You can also select Shipper as the recipient. You can also define the Email Subject and Content.
- Go to WooCommerce tab > Settings > Shipping > Canada Post > Shipping Labels
- Enable Send Shipping Label via Email option
11. Display Estimated Delivery Dates on Cart/Checkout
The estimated delivery date is the date upon which the shipment will arrive at the destination provided.
For eg: Expedited Parcel USA Delivery – approx 2 days
Accessing Estimated Delivery Date Settings:
- Select WooCommerce > Settings >Shipping >CanadaPost
- Select Rates & Services
- Enable the Delivery Time option
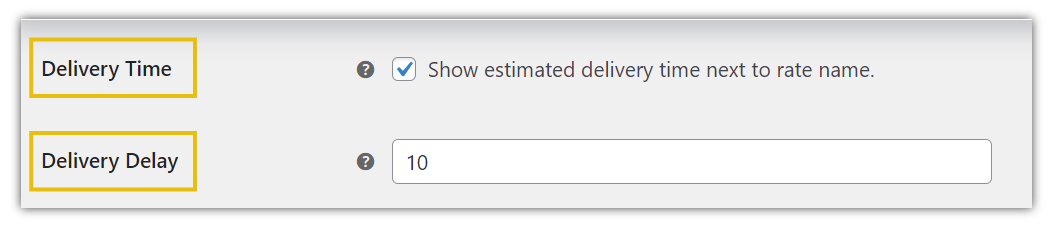
- Delivery Time: The delivery date of the package is displayed on the cart/checkout. This depends on the service chosen for shipping. The estimated delivery date will be labeled along with the rates.
Eg: Small Packet USA Air – Approx 2 days
- Delivery Delay: You can display the delay time if it’s allowed while showing the delivery time.
Eg: If a delay of 1 day for a method that ships in 2 days, would be labeled – approx 2-3days
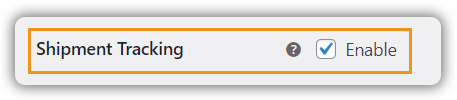
12. Enable Canada Post Shipment Tracking
Canada Post Tracking It provides information to customers about the route of a package and the anticipated date and time of delivery.
Enable Shipment Tracking under Shipping Labels Tab
Tracking Notifications for Customers can be enabled in the following ways:
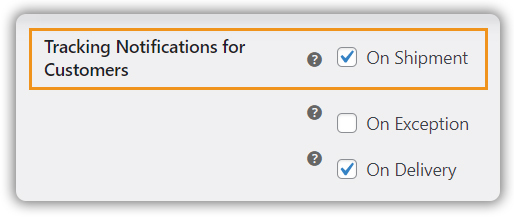
- On Shipment: Indicates whether you wish to receive an email notification upon shipment of the parcel. By default, notification will be sent for Deliver to Post Office Option (D2PO)
- On Exception: Indicates whether you wish to receive an email notification on exceptions. By default, a notification will be sent for Deliver to Post Office Option (D2PO).
- On Delivery: Indicates whether you wish to receive an email notification upon the delivery of the parcel. By default, a notification will be sent for Deliver to Post Office Option (D2PO).
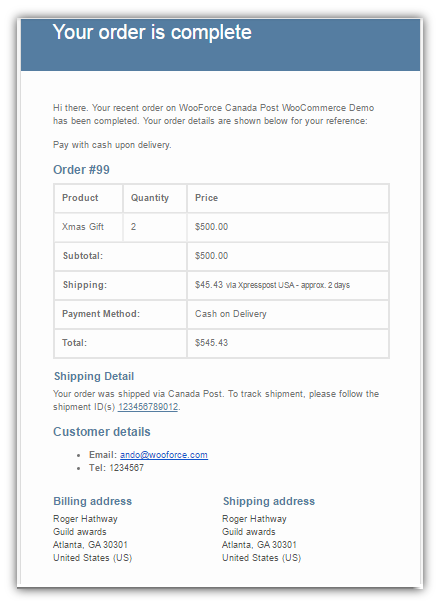
To get the shipment tracking information, the Customer can go to My Account. Under Order, click the required #OrderNumber or view button, and the tracking information appears as highlighted below:
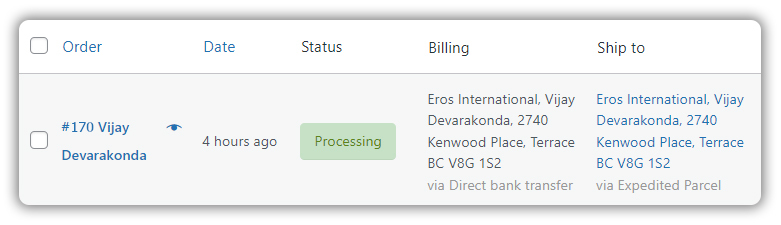

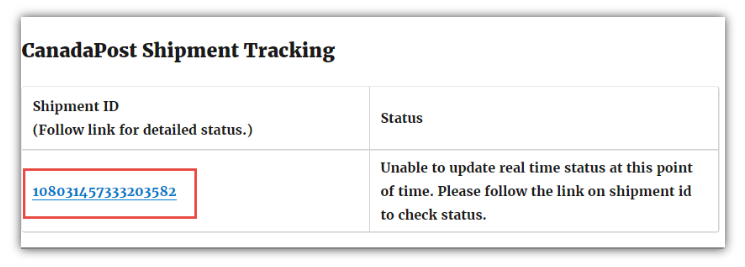
Click Shipment ID (highlighted) to see the status of the package.
The customer even gets the shipment tracking information through the order completion email. We have attached a snapshot of the order completion email (with the tracking number).
13. Enable Pickup Point Service
Enable this option if you want Canada Post to pick up the shipments from your store. Disable if you deposit your items at a Post Office or other Canada Post shipping facility
- Go to WooCommerce tab > Settings > Shipping > Canada Post > PickUp
- Enable Pickup option

If you wish to deposit your items at a post office or a Canada Post facility, our WooCommerce Canada Post plugin provides an option called Pickup Point Id to do so. This Id specifies the deposit location where you can leave your package to be shipped.
To use the Pickup Point Id option, you have to first disable the Pickup option in the plugin. You can only use either of the options for pickup facility.
14. Set up Canada Post International Shipping
Integrate Zonos for US Shipping
When shipping to the U.S., you can simplify duties, taxes, and customs declaration requirements by integrating Zonos with the Canada Post WooCommerce plugin.
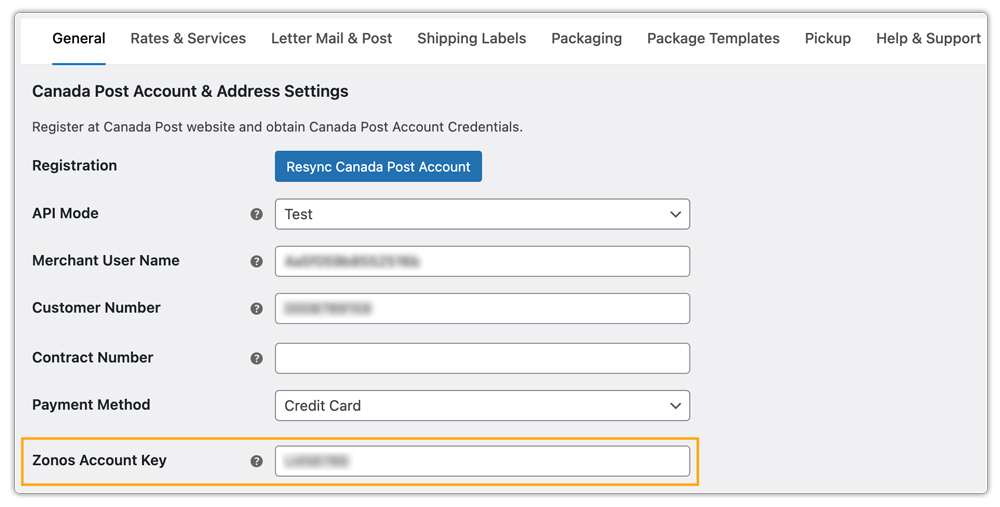
Before integrating, make sure you have either a Zonos Account Key or a Declaration ID. One of these is mandatory – without them, shipping to the U.S. will not be possible.
- Zonos Account Key: It is available in the Zonos platform (Settings → Integrations) when you sign up for a Zonos Verified Account. Required if you want the plugin to submit shipments without pre-existing Declaration IDs.
- Declaration ID: A 13-character code that proves duties and taxes for a shipment have already been paid. If you’ve prepaid duties via Canada Post, they will provide you with a Declaration ID.
To integrate Zonos in the plugin:
- Go to WooCommerce > Settings > Shipping > Canada Post.
- Click the General tab.
- Enter your Zonos Account Key.
If you prefer, you can provide a Declaration ID directly on the Edit Order page instead of using a Zonos Account Key.

Print Labels for International Shipments
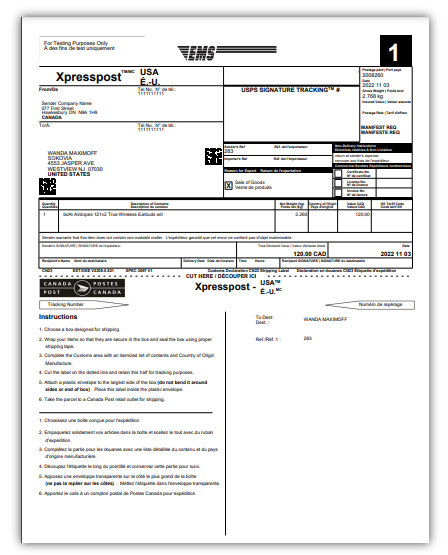
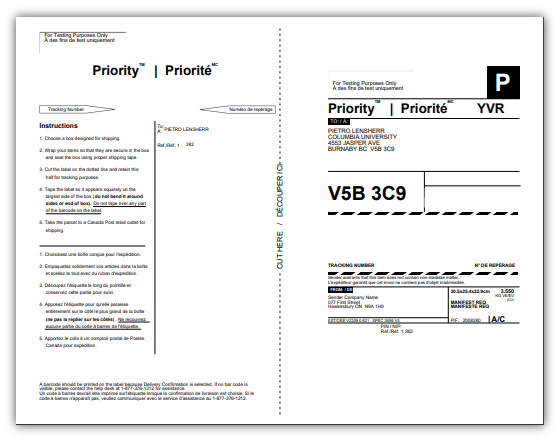
Whether you’re sending a regular parcel to a friend/family member overseas or a business owner who ships products overseas on a regular basis, Canada Post is one such service that caters to the needs of their customers. As a carrier, Canada Post international shipping services ship to more than 193 countries worldwide.
Place an order
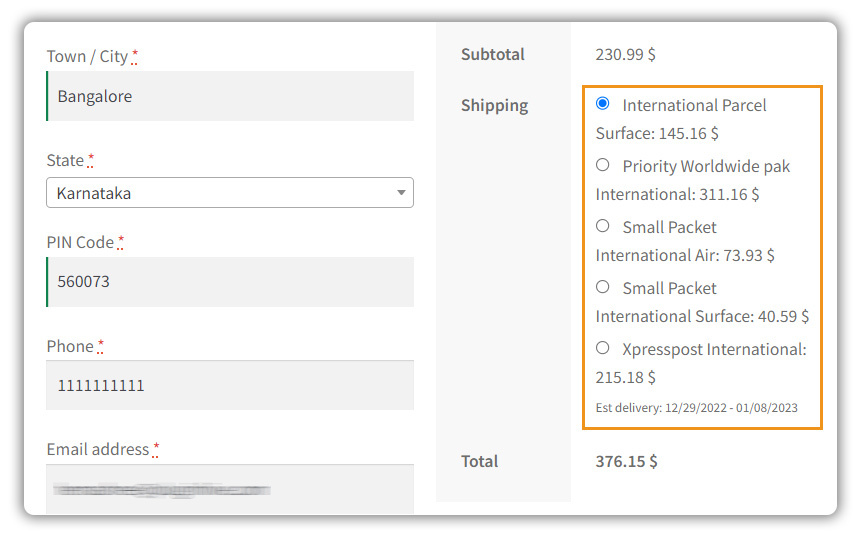
Add a product to your WooCommerce Cart and provide the shipping and billing addresses accordingly, as shown in the image:

After placing the order, Go to the Orders section. Click on the order you want to generate the label. Once done, Click on generate package:
Click on Create Shipment
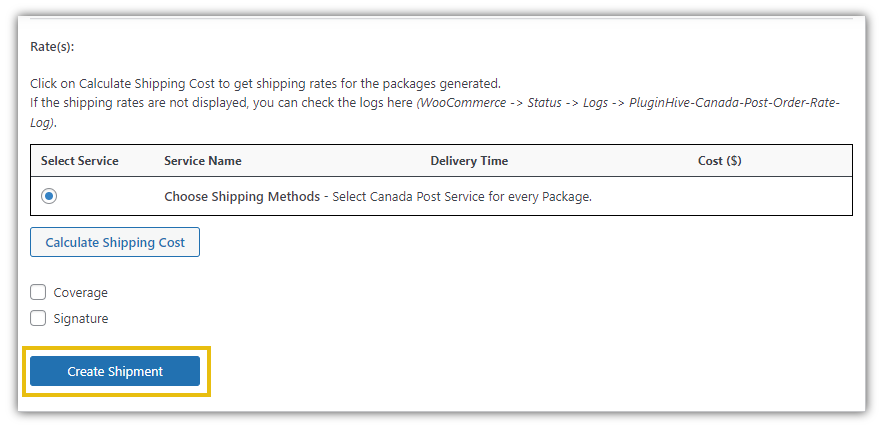
Click on Print Label
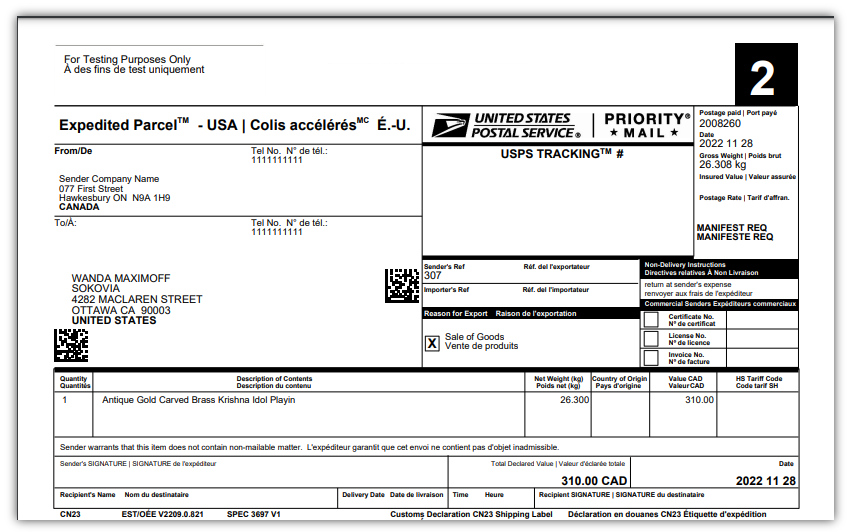
Canada Post International Shipment Label is printed as shown in the image:
Set Default Country of Manufacture
To configure this, go to WooCommerce > Settings > Shipping > Canada Post > Shipping Labels and set the Default Country of Manufacture.
- This value is automatically applied to all products that do not have a country of manufacture set in the product settings, and the plugin will use this default country for customs documentation, such as the commercial invoice.
- If you have already assigned a country of manufacture for individual products (in the product Shipping tab), that value will take priority.

Add Recipient’s name to Commercial Invoice
Enable this option to pass Recipient’s Name in Commercial Invoice
- Go to WooCommerce tab > Settings > Shipping > Canada Post > Shipping Labels
- Enable Recipient Name in Commercial Invoice option

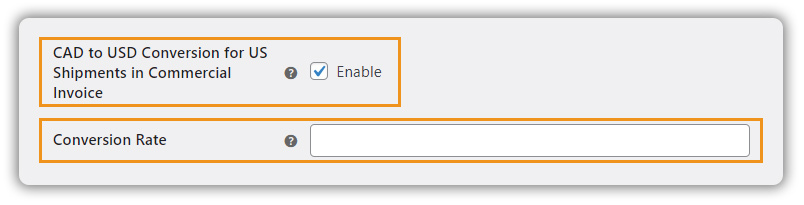
Enable CAD to USD Conversion
Enable this option to provide CAD to USD Conversion Rate for US Shipments in Commercial Invoice. Also, enter the current CAD to USD Conversion rate in the field given.
- Go to WooCommerce tab > Settings > Shipping > Canada Post > Shipping Labels
- Enable CAD to USD Conversion for US Shipments in Commercial Invoice option
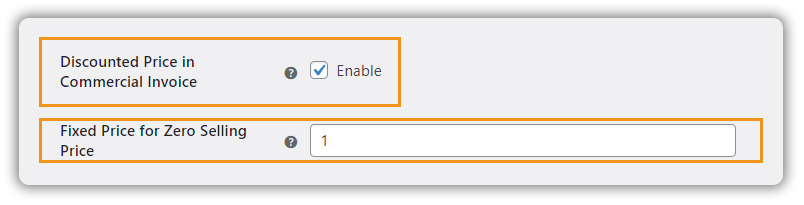
Set Discounted Price in Commercial Invoice
Enabling this option will display Discounted product price in the Commercial Invoice. Also, enter the Fixed price to display on the Commercial Invoice when the Selling price is zero. However, 1 is assigned as the default value of the Fixed Price.
- Go to WooCommerce tab > Settings > Shipping > Canada Post > Shipping Labels
- Enable Discounted Price in Commercial Invoice option
Set Fixed Product Price in Commercial Invoice
Enter the Fixed Product Price to display on the Commercial Invoice. Leave Blank to take the default product price.
- Go to WooCommerce tab > Settings > Shipping > Canada Post > Shipping Labels
- Enable Fixed Product Price in Commercial Invoice option
