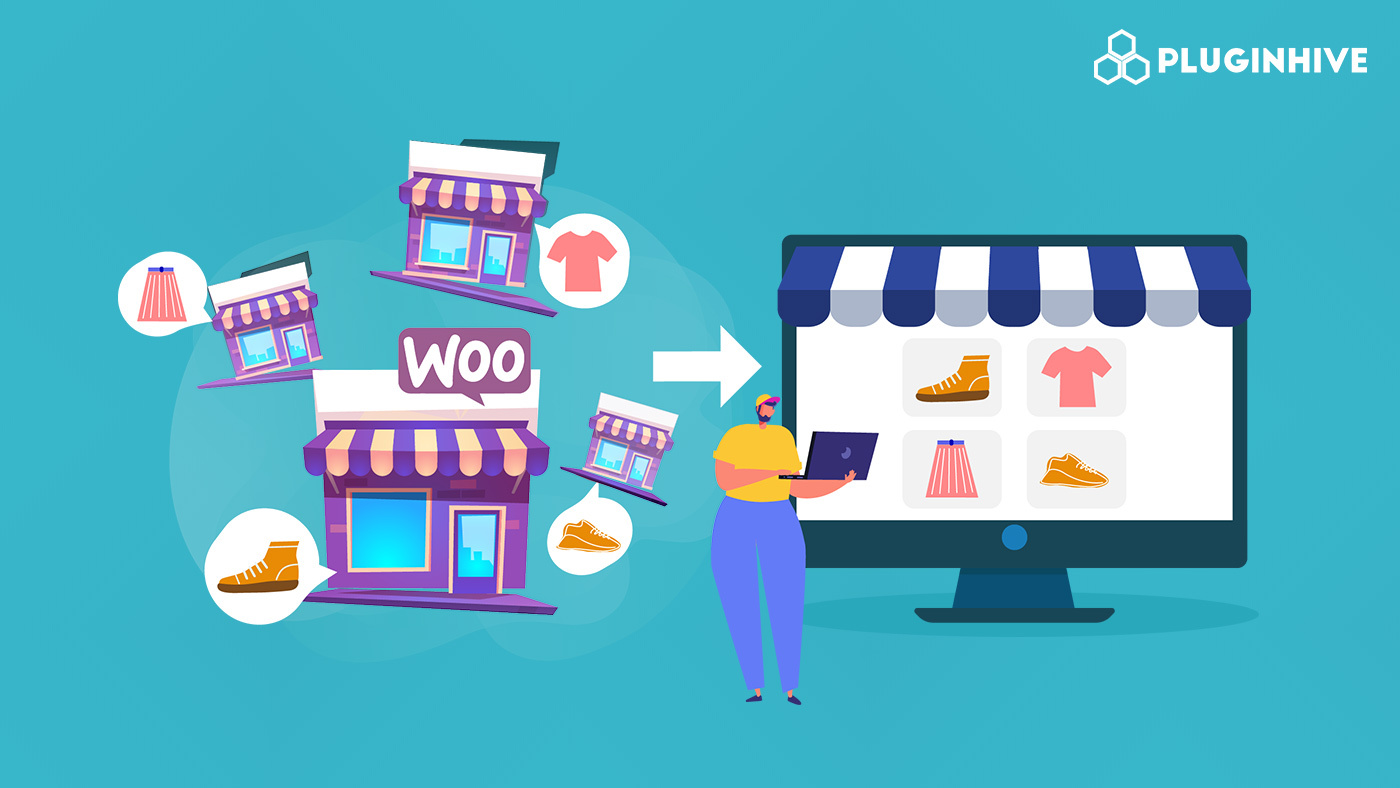
If you already have a WooCommerce store and now want to convert it into an online multi vendor marketplace, you are in the right place. Today, in this blog, we will show you the total process of converting a WooCommerce store into a multivendor marketplace in just 6 steps.
The online multivendor marketplace concept isn’t something new for the eCommerce industry. Statista predicts that the multivendor marketplace market size was worth more than $5.2 trillion worldwide in 2017. They expect it to grow to about $8.1 trillion by 2026, showing a big increase of 56%.
So, if you want to get a small slice of this huge cake, create a multivendor marketplace and start your journey now.
To know more about it, keep reading the blog!
On this page
- What is an Online Multi Vendor Marketplace
- Difference Between a Single Store and a Multi Vendor Marketplace
- Why You Should Convert a WooCommerce Store into a Multi Vendor Marketplace
- Convert a WooCommerce Store to a Multi Vendor Marketplace – 6 Steps Guide for You
- Step 01: Install Dokan on Your WooCommerce Store
- Step 02: Customize the Basic Settings of Your Marketplace
- Step 03: Create Your Admin Shop and Upload Products
- Step 04: Allow Vendors to Register on Your Marketplace
- Step 05: Empower Your Vendors to Smoothly Manage Their Stores
- Step 06: WooCommerce Multi Vendor Shipping
What is an Online Multi Vendor Marketplace
An online multivendor marketplace is a digital platform that connects multiple sellers with buyers. It serves as a virtual marketplace where sellers can showcase and sell their products or services to a wide audience of potential customers.
A marketplace offers a variety of products and services, ranging from consumer goods to electronics, fashion, furniture, and even services like home repair and pet grooming.
In one online marketplace, buyers can easily browse through a wide range of products from different sellers, compare prices, and make informed purchasing decisions. Also, an online marketplace often provides secure payment gateways, customer reviews, and hassle-free multi-vendor marketplace return solutions that enhance the shopping experience.
Examples: Amazon, eBay, Etsy, Walmart, Rakuten, etc.
Difference Between a Single Store and a Multi Vendor Marketplace
Long story short, a single online store is like a physical store and an online marketplace is like a shopping mall.
Let’s check this comparison table to get a clearer idea of an eCommerce single store vs multivendor marketplace:
| Feature | Single Store | Multivendor Marketplace |
|---|---|---|
| Number of Sellers | Operated by a single entity, typically the store owner | Hosts multiple independent sellers, each with their own storefronts |
| Product Diversity | Offers products from a single brand or entity, limiting diversity | Provides a wide range of products from various sellers, offering greater diversity |
| Ownership and Control | Single owner has full control over products, pricing, and policies | Individual sellers retain control over their products, pricing, and store policies. The marketplace operator oversees the overall platform |
| Competition Among Sellers | Limited competition within the store, as it’s a single entity | Intense competition among multiple sellers, driving innovation and competitive pricing |
| Administrative Responsibilities | Store owner manages all aspects, from inventory to customer service | Marketplace operator oversees transactions, payment processing, and may handle logistics, while sellers manage their individual stores |
Why You Should Convert a WooCommerce Store into a Multi Vendor Marketplace
A multivendor marketplace has many benefits for a multivendor marketplace owner. In this segment, we are going to show you the benefits of having an online marketplace over a single eCommerce store:
- More Stuff to Choose From: Turning your WooCommerce store into a multivendor marketplace means more sellers can join. That gives customers a bigger selection of products and services, making your store more appealing.
- Earn More Money: With a multivendor setup, you don’t just make money from your sales. Other sellers pay you a fee to use your marketplace, creating extra income for your business.
- Keep Customers Happy: A multivendor marketplace creates competition among sellers. That competition leads to better prices and more choices for customers, making them happier and more likely to stick around.
- Grow Without Limits: Going multivendor lets your business grow without handling all the extra products and operations. It’s a scalable way to expand and adapt to what your customers want.
- Build a Shopping Community: A multivendor setup brings sellers and buyers together. Sellers can build their brands, and customers get a social shopping experience. This community vibe can boost your marketplace’s success and keep customers coming back.
Convert WooCommerce Store to Multi Vendor Marketplace – 6 Steps
Converting a WooCommerce store into a multivendor marketplace isn’t as difficult as it sounds. You can do it by simply installing a multivendor marketplace solution on your store.
There are several multivendor marketplace solutions that you can use. Let’s talk a little bit about that:
- Woo Product Vendor: Woo Product Vendor is an extension of WooCommerce for creating multivendor marketplaces. It’s a premium solution which means you won’t get the free version to try it before finally choosing it.
- Dokan Multivendor Plugin: Dokan Multivendor is the most popular and feature-rich WordPress plugin with more than 60,000 active installations available for everyone who easily wants to create an online multivendor marketplace.
- WC Vendors: WC Vendors is another WordPress multivendor plugin with more than 7000 active installations. This is not as popular as the Dokan plugin, still, it comes with a list of handy features to create online marketplaces.
Since the Dokan Multivendor plugin is by far the most used marketplace solution available for WordPress and WooCommerce users, we are going to show you this tutorial with this powerful yet easy-to-use plugin.
Well, now let us show you the 6 steps that you need to follow to convert your WooCommerce store into an online multivendor marketplace:
- Install Dokan on Your WooCommerce Store
- Customize the Basic Settings of Your Marketplace
- Create Your Admin Shop and Upload Products
- Allow Vendors to Register on Your Marketplace
- Empower Your Vendors to Smoothly Manage Their Stores
- WooCommerce Multi Vendor Shipping
Note: We are assuming that you already have a WooCommerce store and now you want to convert it into a marketplace. In that case, all you need to do is follow the below described 6 steps.
However, if you don’t have a ready WooCommerce or WordPress website, you can simply create one website by following these steps:
- Buy a domain and Woocommerce hosting
- Install WordPress on your cPanel (You can ask your hosting provider to install WordPress on your behalf)
- Install WooCommerce on your site
That’s all!
Now you can follow this tutorial. So, let’s get started!
1. Install Dokan on Your WooCommerce Store
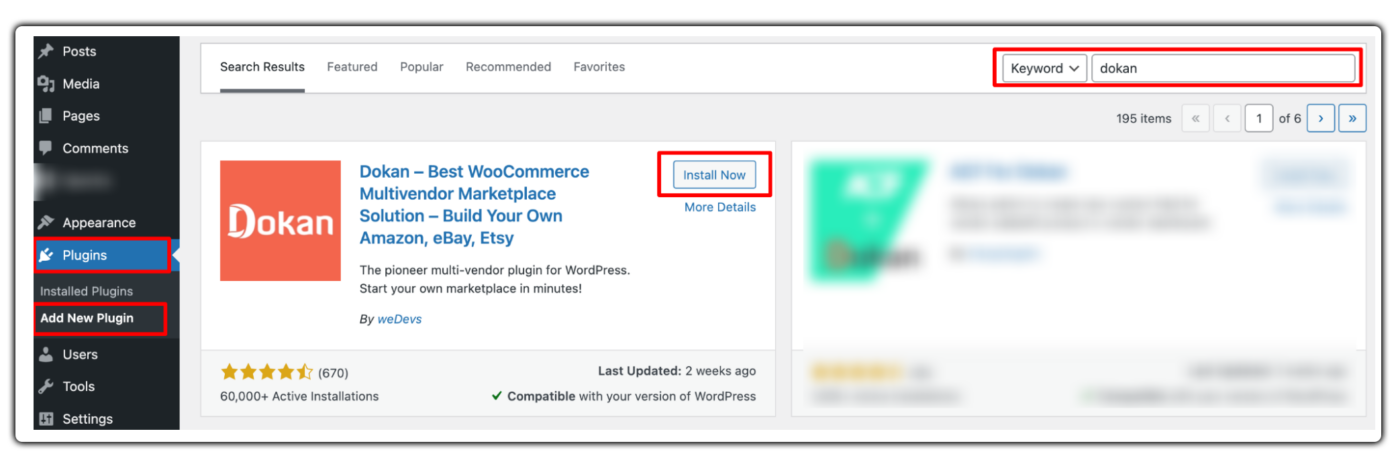
To install Dokan Lite directly from your WordPress dashboard, log in to your WordPress dashboard then navigate to Plugins -> Add New.
There you’ll find the search box to search for the Dokan plugin. Then install and activate the plugin by clicking on the “Install” and “Activate” buttons respectively.
2. Customize the Basic Settings of Your Marketplace
After installing and activating the Dokan plugin, it’s time to customize the basic settings of this plugin.
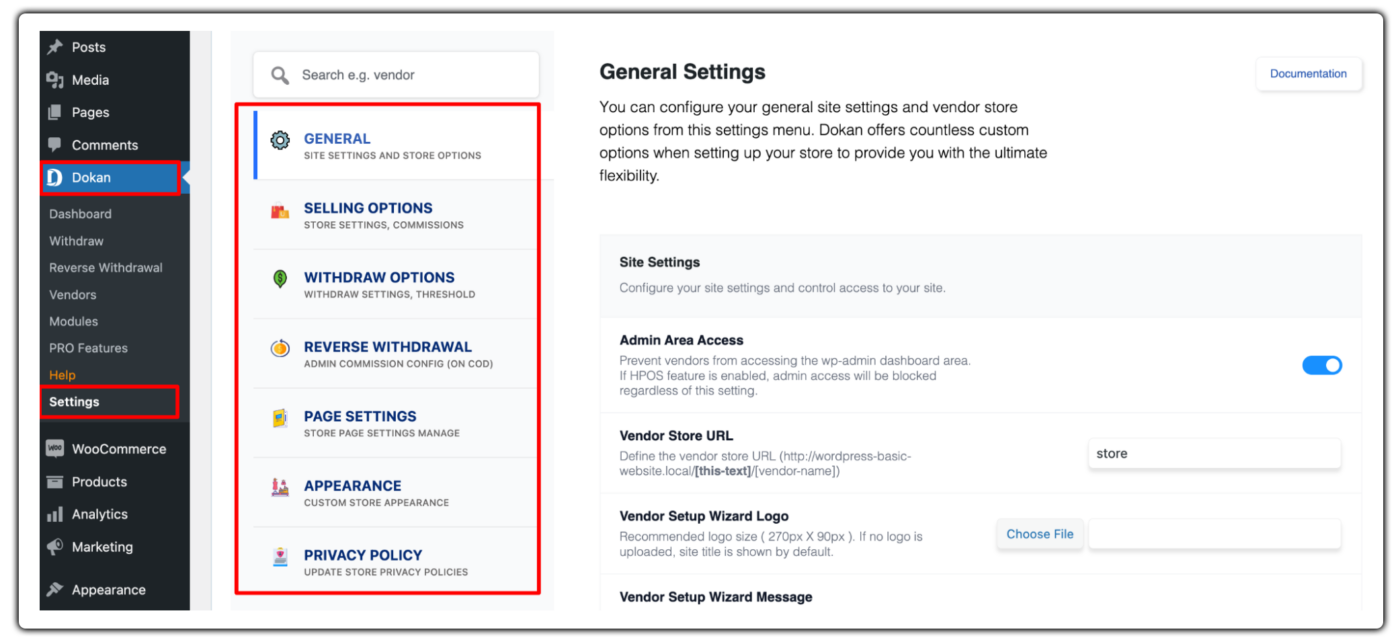
To access the Dokan basic settings, navigate to your WordPress dashboard -> Dokan -> Settings. There you’ll find the following settings:
- General
- Selling Options
- Withdraw Options
- Reverse Withdrawal
- Page Settings
- Appearance
- Privacy Policy
Under the Selling Options, you’ll find some important configurations like Commission type, Commission rate, Shipping fee recipient, Tax fee recipient, and a few more.
Also, you need to configure the Withdraw method, Minimum withdrawal limit, and so on under the Withdraw Options section.
You can leave the rest of the settings as they are and configure them later in case you need to do it.
Configure the Payment Gateways
The Payment Gateway is another must to configure the setting of your marketplace. Otherwise, your registered vendors won’t be able to collect payments from their customers.
Go to your WordPress dashboard -> WooCommerce -> Settings and then click on the Payments tab.

If you don’t find the PayPal payment gateway there, that’s because you haven’t installed the “WooCommerce PayPal Payments” plugin yet. You’ll get the PayPal option after installing the plugin.
3. Create Your Admin Shop and Upload Products
There are two ways to earn from a marketplace. The most common way is the commission. That means when any of your registered vendors make a sale, you’ll get a commission as an admin or marketplace owner.
There is another way to make money from your marketplace. That is selling as a vendor from your own marketplace. In this step, we will show you how you can open a store and sell as a vendor.
Note: This is not a mandatory step. If you don’t want to sell products from your marketplace, you can skip this step and proceed to the next step.
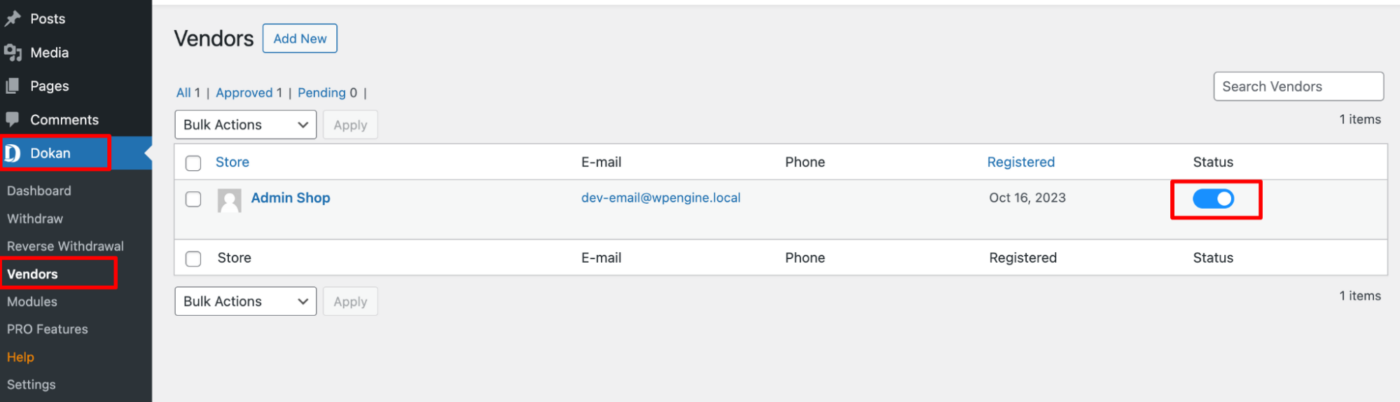
To be able to create your admin store, first, you need to enable yourself as a vendor. Go to your WordPress dashboard -> Dokan -> Vendors, then enable yourself as a vendor by clicking on the toggle button.
To upload products to your store, click on the “Add New” option under the Products button. There you’ll find options like Product name, Product description, Product Type, Price, Shipping, and a few more to configure.
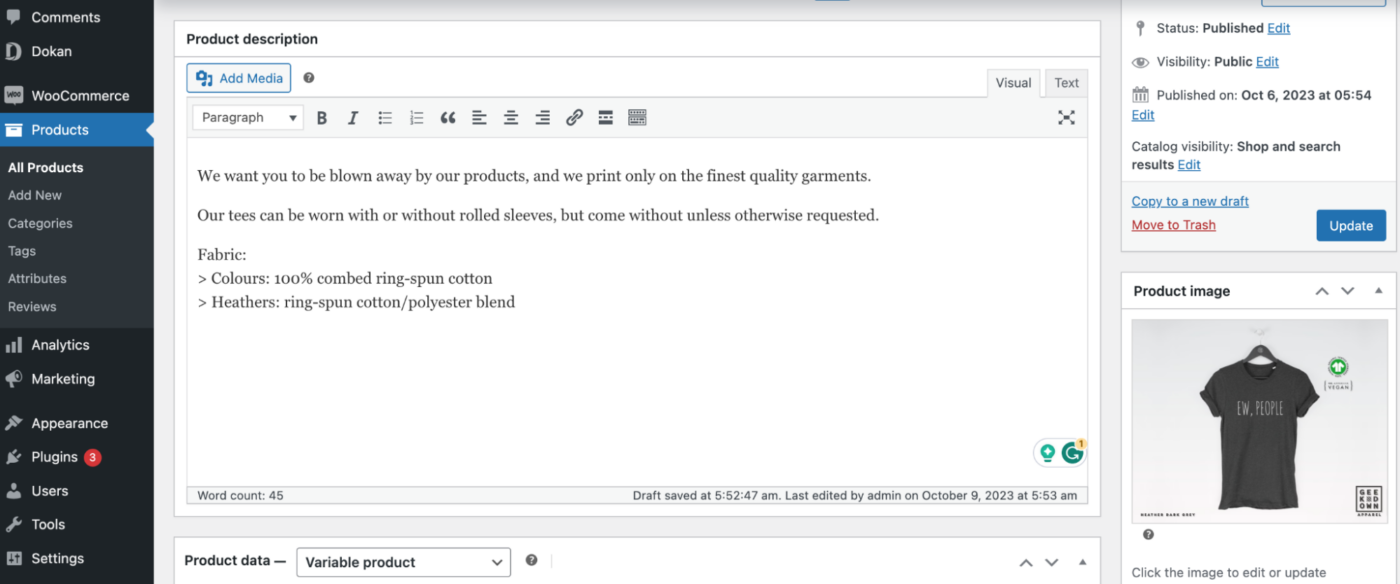
Once you are done with this configuration, just click on the Publish button to publish the product.
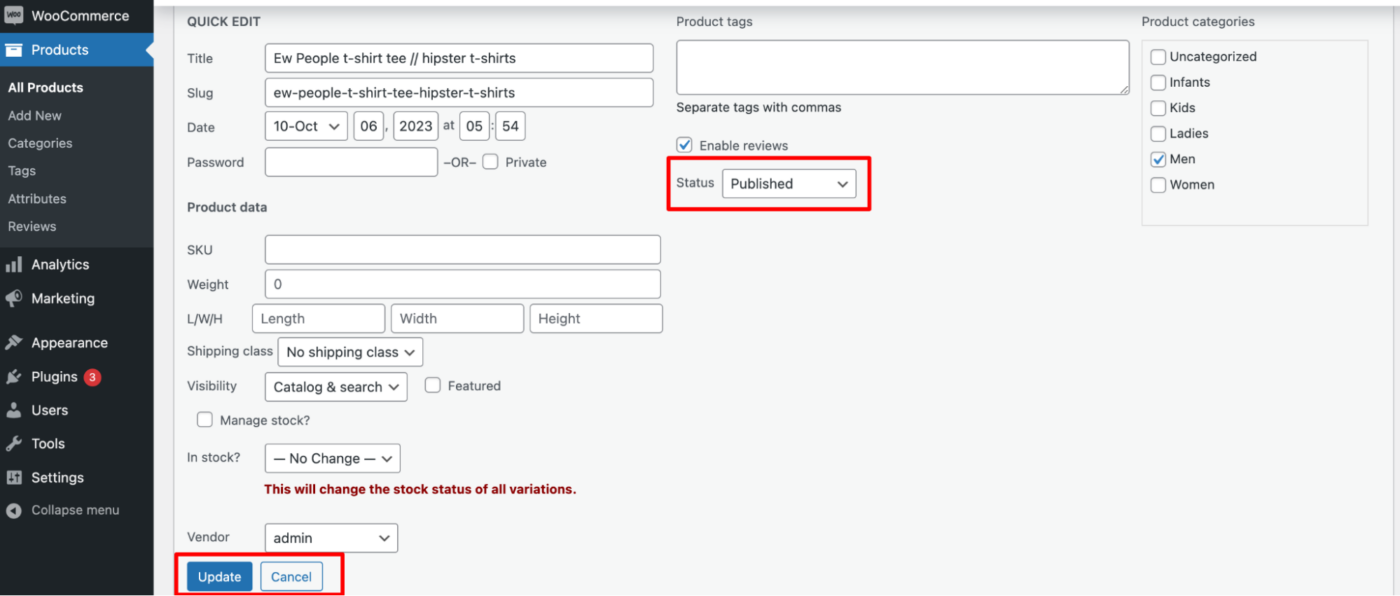
But you aren’t done yet. Your admin (which is you) has to approve this product to make it publicly accessible. Navigate to your WordPress dashboard -> Products -> Quick Edit to approve the product.
That’s how you can upload products to your admin store.
Now you can customize your store design by going to Vendor Dashboard -> Settings. From here you can update your store name, address, opening & closing time, etc.
Congratulations! You have successfully designed your admin store.
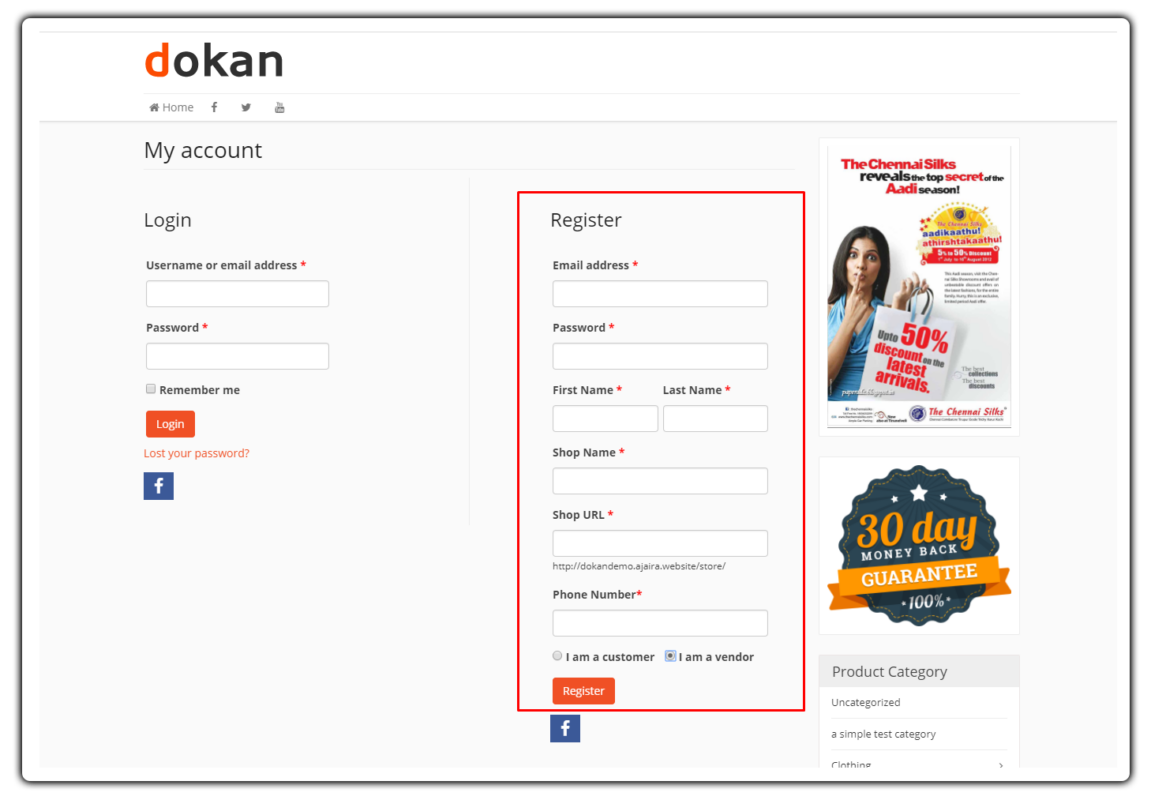
4. Allow Vendors to Register on Your Marketplace
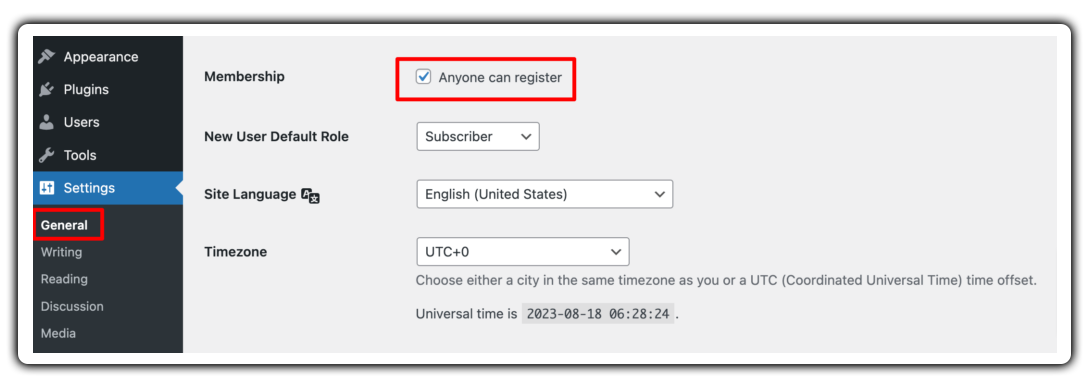
After adding all the functionalities and configuring your marketplace, you can invite vendors to sign up for your marketplace. To make sure vendors can sign up for your marketplace, enable the “Anyone can register” option from WP Admin –> General –> Settings.
So, it will open the default registration form for vendors to sign up.
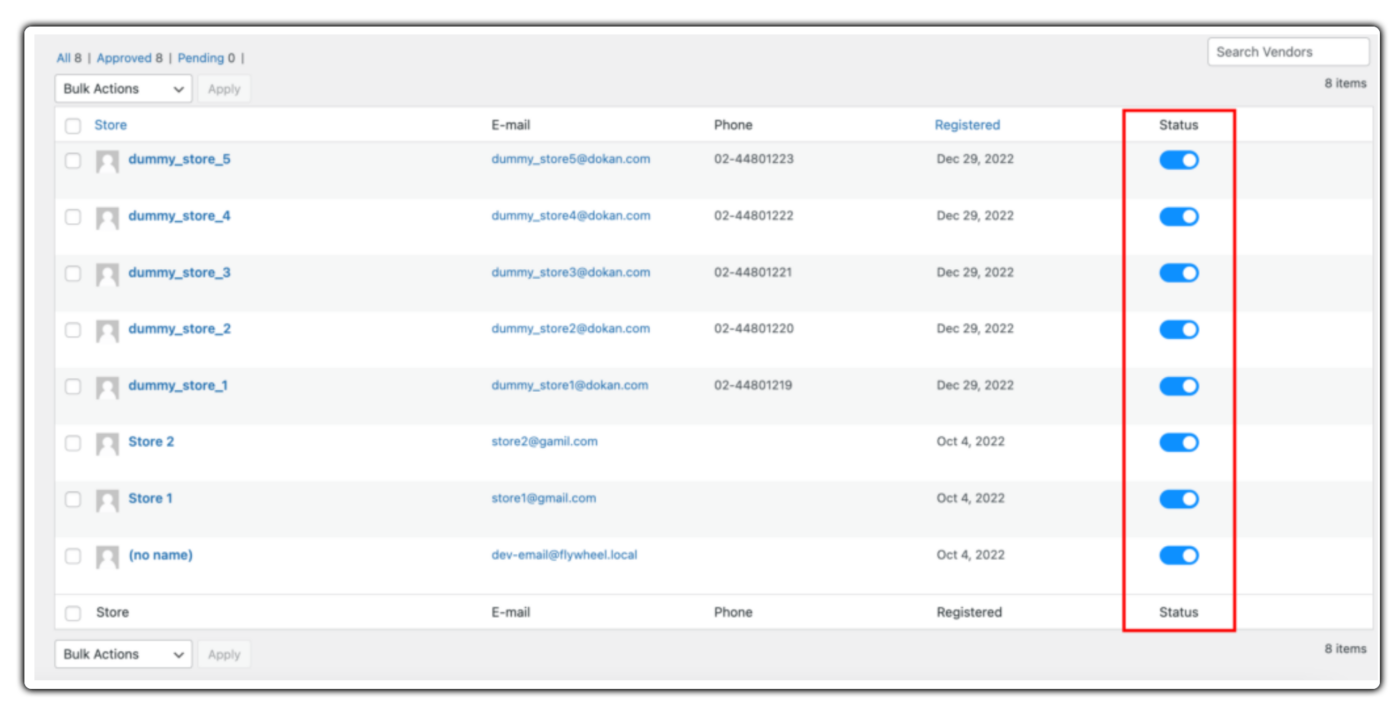
When a vendor registers on your marketplace, you need to enable selling status from Dokan –> Vendors
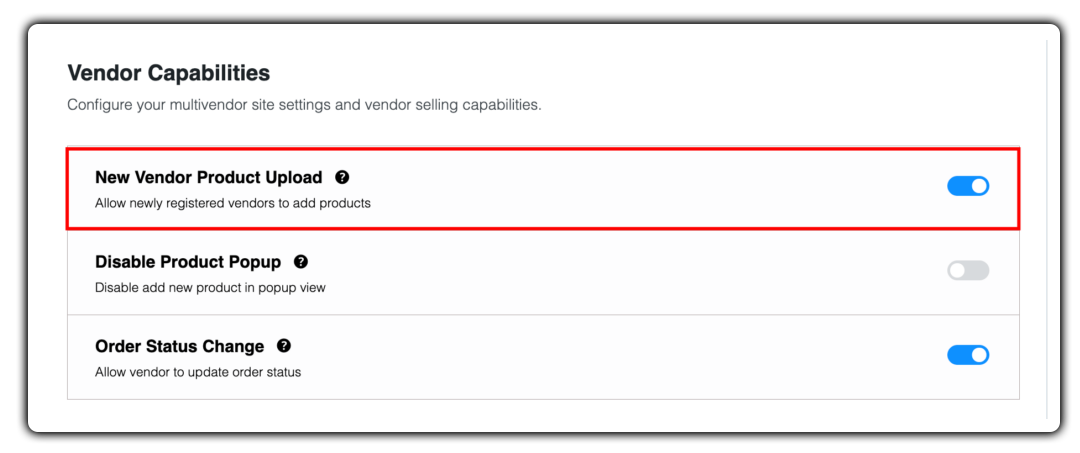
Also, if you want the vendors to upload their products, then you need to change the product status from Dokan → Settings –> Selling options. You need to enable the New Vendors Product Upload.
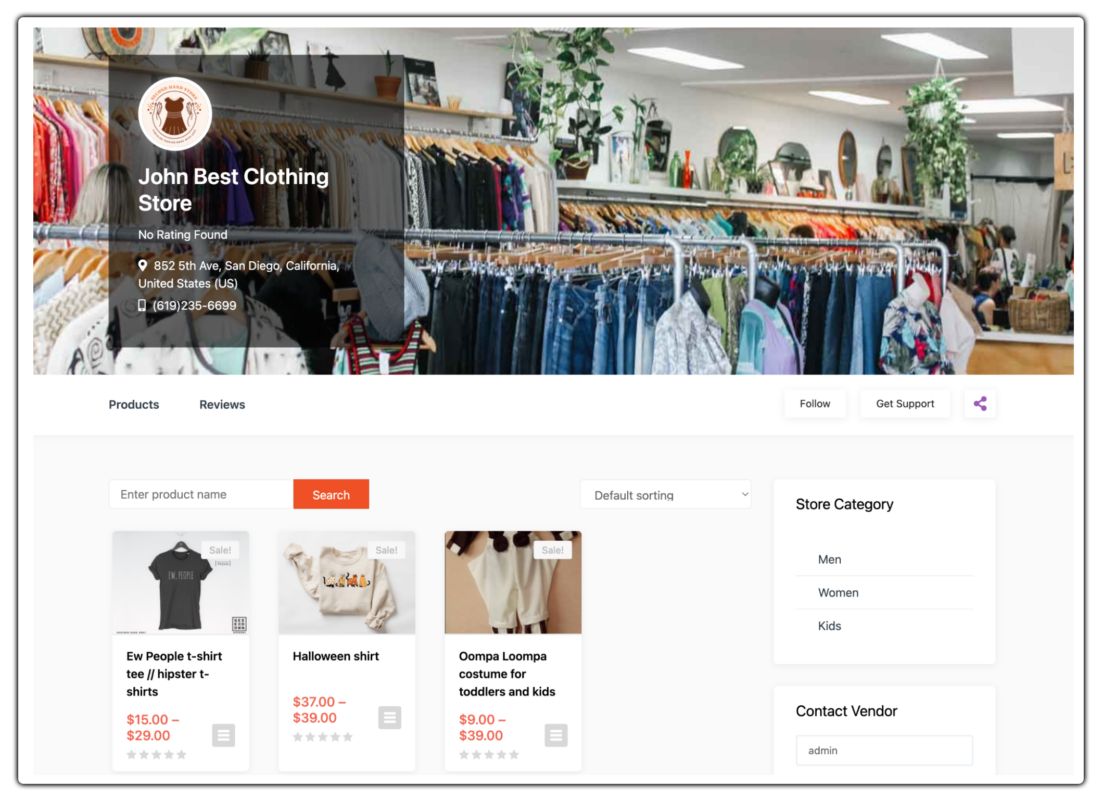
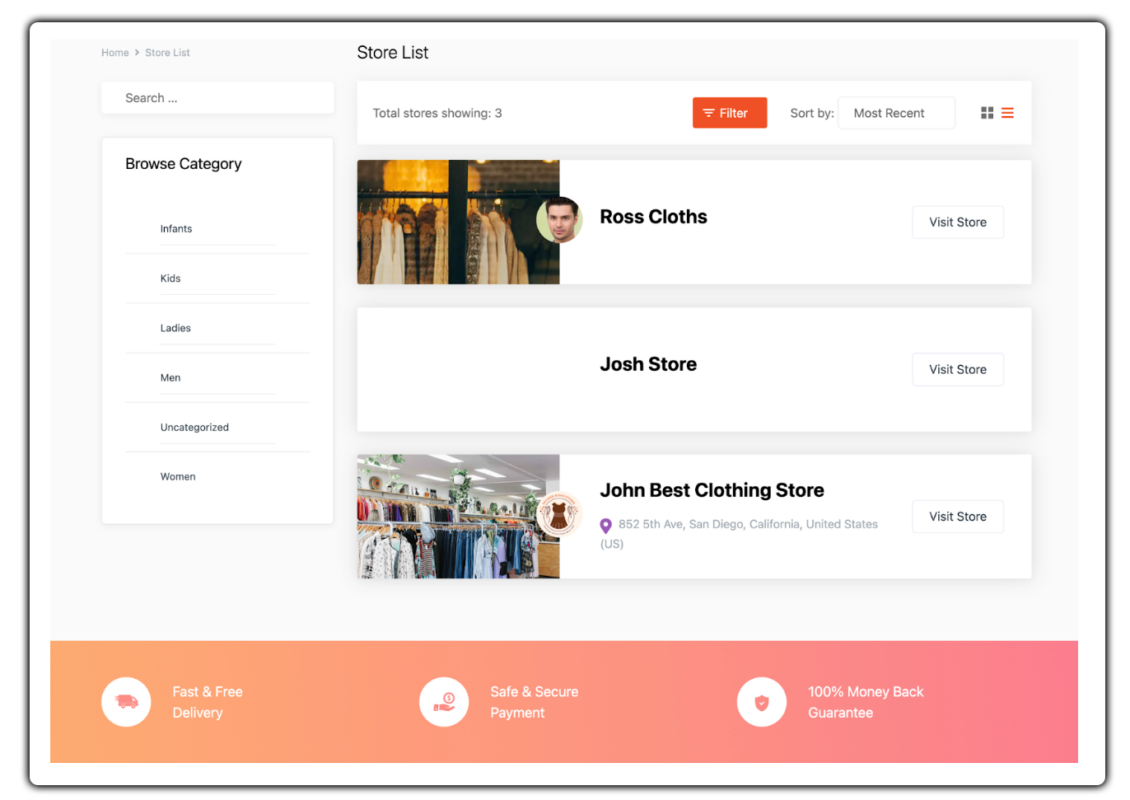
You can check all your registered vendors from the “Visit Stores” option.
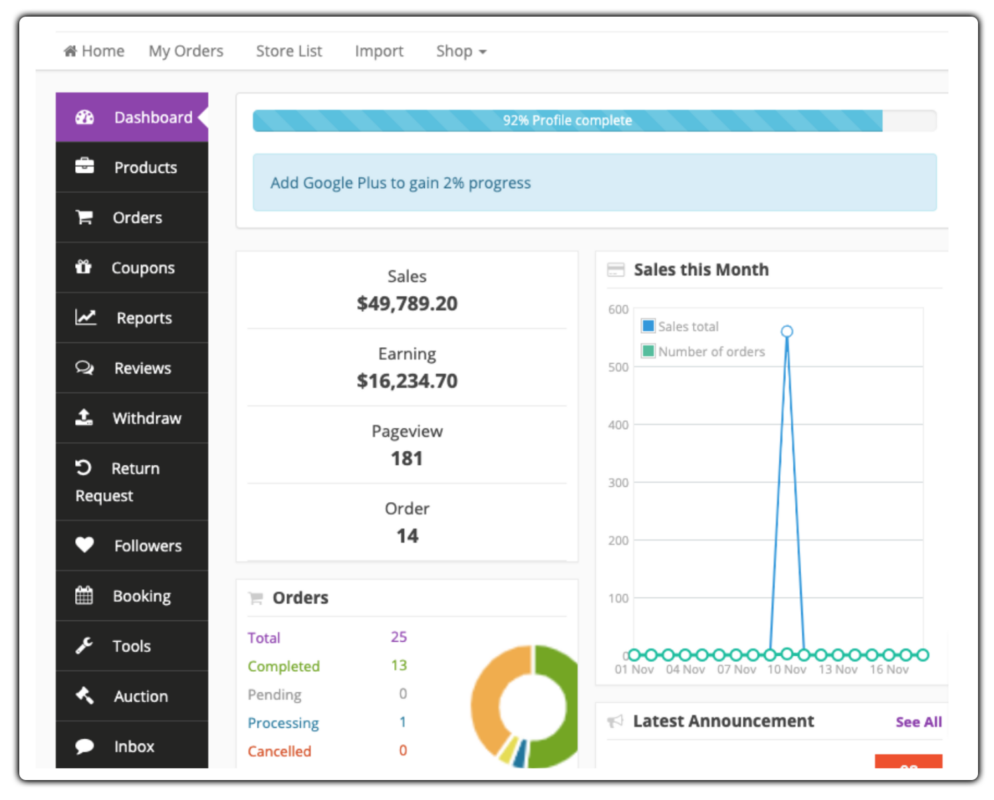
5. Empower Your Vendors to Smoothly Manage Their Stores
You have already successfully converted your WooCommerce store into an online marketplace. Now you should focus on how you can empower your registered vendors to manage their stores smoothly.
There is a free plugin specially for Dokan users called – Dokan Vendor Dashboard. You can use this plugin to manage all your vendors with ease.
The Vendor Dashboard serves as a centralized control center for vendors. This offers a comprehensive overview of a vendor’s store performance and activities. It empowers vendors to manage their store operations effortlessly while gaining valuable insights to enhance customer satisfaction.
Using this plugin on your marketplace, you can allow vendors to:
- Create Products: Create simple products, variable products, or digital products with subscriptions directly from their dashboard.
- Manage Products: Easily view, edit, and filter their products using a comprehensive table view.
- Import/Export Products: Import or export product details with one-click buttons.
- Orders: Manage current and past orders with detailed information, including order ID, bill amount, status, customer details, and shipping status.
- Coupons: Create custom coupons to boost their store’s sales and attract more customers.
- Return Requests: Easily manage return and warranty requests directly from their dashboard.
- Store Announcements: View important announcements from the marketplace admin to stay up-to-date with the latest updates and information.
That’s how you can help your vendors to manage their stores without any hassles.
6. WooCommerce Multi Vendor Shipping
Setting up shipping for multiple vendors in your WooCommerce multi vendor store is crucial for seamless order fulfillment. Whether your vendors prefer a uniform carrier or multiple carriers for shipping, you can use WooCommerce shipping plugins that can streamline the multi vendor shipping process.
If your vendors prefer utilizing multiple carriers, PluginHive’s WooCommerce Shipping Services plugin accommodates this need. Easily integrate and manage various carriers, assign specific carriers to different vendors, set individual shipping rates, and establish diverse shipping methods tailored to each vendor’s preferences.
Over to You
That’s all!
You said that it’s gonna be an easy process to convert your WooCommerce store into a full-fledged online multivendor marketplace.
Was it complicated? No, right?
So, what are you waiting for? Start converting your single store into a multivendor marketplace by following this 6 steps tutorial now!
That being said if you have any queries regarding this tutorial, feel free to share that with us using the comment box below. We are all ears!