Multi-Vendor Shipping with WooCommerce Shipping Services
WooCommerce Shipping Services is the best shipping solution for your multi-vendor WooCommerce store. From displaying live shipping rates on the WooCommerce cart & checkout page to generating shipping labels and sending tracking details to your customers, this plugin does it all.

This guide will help you understand how WooCommerce Shipping Services allows vendors to streamline their shipping process.
On this page
- Pre-requisites to use WooCommerce Shipping Services on your Multi-Vendor store
- Download, install, activate and setup WooCommerce Shipping Services
- Install and activate the supported Multi-Vendor plugins
- Sync Vendors to WooCommerce Shipping Services
- Add shipping carriers used by the vendors
- Set vendor store address for shipping rates calculating
- Display vendor preferred shipping services on WooCommerce cart and checkout page
- Display shipping rates on the WooCommerce cart and checkout page for different vendor products
- Let Vendors print shipping labels from the Vendor Dashboard
- Let Vendors request carrier pickups from the Vendor Dashboard
- Let Vendors fulfill orders and send tracking details to the customers via Email
Pre-requisites to use WooCommerce Shipping Services on your Multi-Vendor store
In order. to make the best use of WooCommerce Shipping Services on your Multi-Vendor store, please check out the following requirements,
Supported WooCommerce Multi-Vendor Solution
WooCommerce Shipping Services supports:
- DOKAN Business Multi-Vendor
Supported Shipping Carrier(s)
You can use the WooCommerce Shipping Services if your vendors use any of the supported shipping carriers. WooCommerce Shipping Services readily supports the following shipping carriers,
- UPS
- USPS
- FedEx
- Canada Post
- Australia Post
- Aramex
- TNT
- Blue Dart
- DHL Express
- DHL Paket
- Delhivery
- Stamps.com
- Parcelforce Worldwide
- EasyPost
- PostNL
- Postnord
- Royal Mail
- APC Postal Logistics
- Purolator
- Canpar Express
- Sendle
- TNT Australia
- StarTrack
- DHL Freight Sweden
- NZ Post
- Chilexpress
- The Professional Couriers
- XPRESSBEES
- HongKong Post
- XPO Logistics
- DPD
- Landmark Global
- Couriers Please
- Fastway Couriers
Shipping Carrier Account Credentials
If your Vendors have an account with one of the shipping carriers mentioned in the list they can start using WooCommerce Shipping services to display rates, print labels, and enable order tracking.
Getting the carrier account credentials is very easy. Please refer the following links on how to get the shipping carrier credentials.
* UPS
* FedEx
* DHL
Download, install, activate and setup WooCommerce Shipping Services
Once you are sure all the prerequisites are met, you can download the plugin from PluginHive’s WooCommerce Shipping Services page.
For more details on how to activate and setup WooCommerce Shipping Services, please refer – Setting up WooCommerce Shipping Services.
Install and activate supported Multi-Vendor plugins
WooCommerce Shipping Services supports DOKAN Business Multi-Vendor by WeDevs.
After installation and activation, set up your WooCommerce multi-vendor store and create vendors.
Sync Vendors to WooCommerce Shipping Services
After successfully registering and approving vendors, you need to sync your vendors to the WooCommerce Shipping Services.
From the Orders tab, click on the (≡) icon and visit Settings > Vendors > Setup, as shown below.
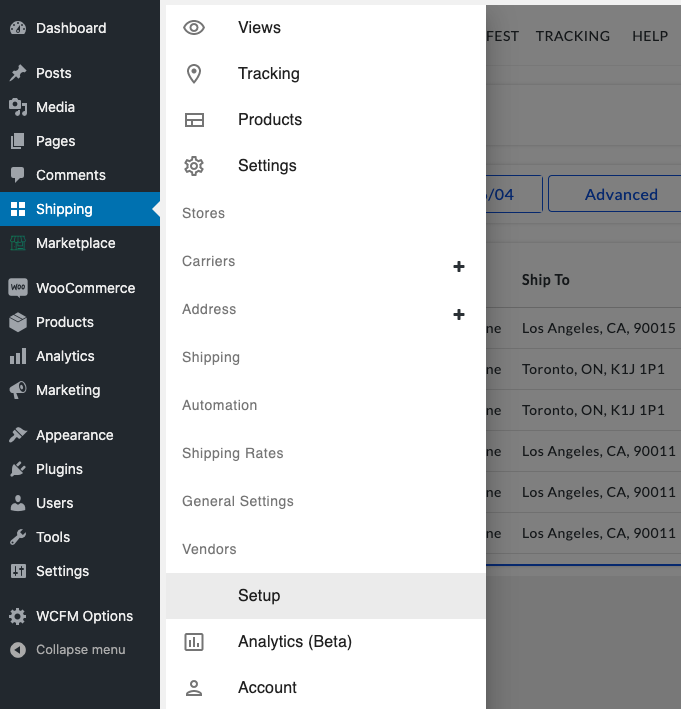
Make sure your store’s name is listed on the vendor setup page and click on Sync, as shown below.

Once the vendors are synced, you will be able to view all the vendors on your WooCommerce store, as shown below.
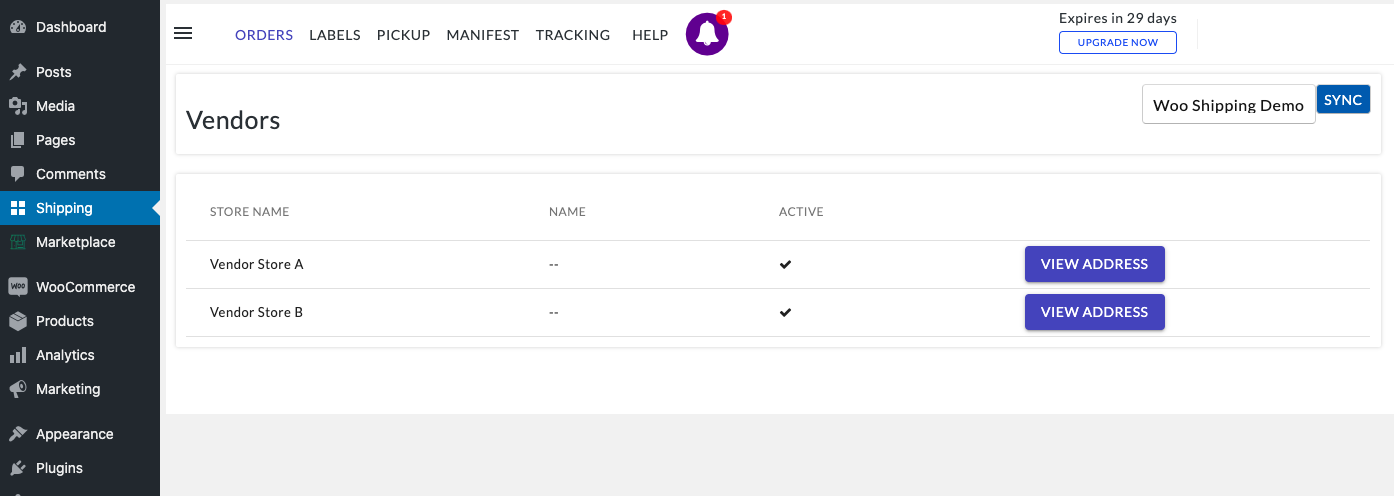
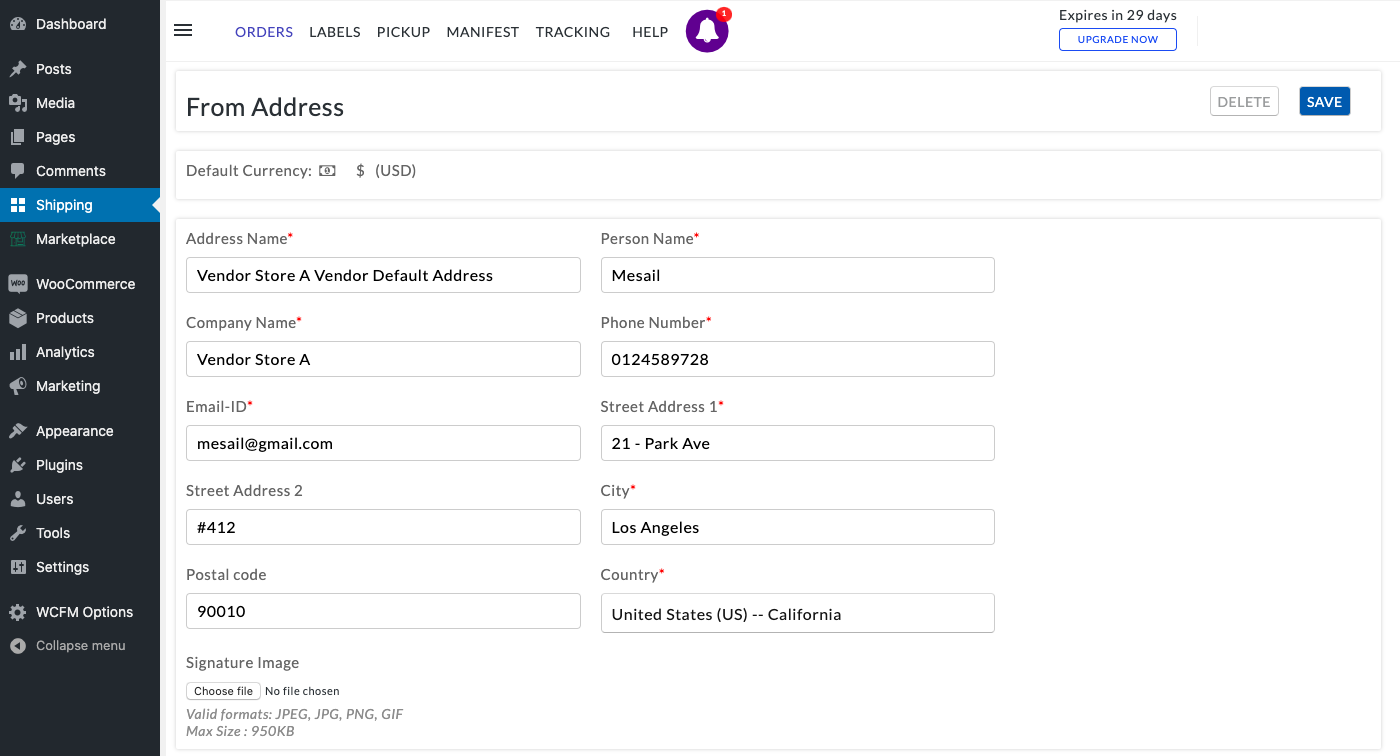
You can also view the vendor details and shipping address by clicking on the View Address button, as shown below.
Add shipping carriers used by the vendors
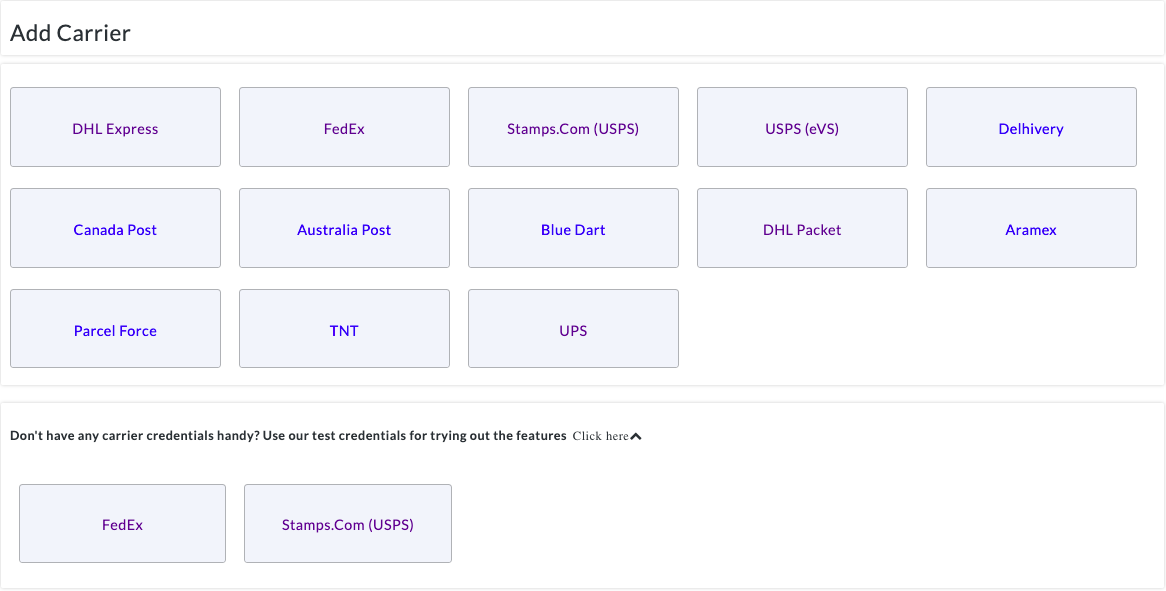
Click on the (≡) icon and visit Settings > Carriers, and click on the (+) icon to add the shipping carriers used by your vendors for order fulfillment.
You can select your vendors’ preferred shipping carrier, enter the shipping carrier account credentials, and add it to the plugin, as shown below.
To know more about adding shiping carriers to the plugin, please refer – How to add shipping carriers to WooCommerce Shipping Services?
Set the vendor store address for shipping rates calculation
In order for your vendors to handle shipping and ship the products from their warehouse, make sure that the plugin uses the vendor’s address for calculating shipping rates that will be displayed to the customers on the WooCommerce cart and checkout page.
Click on the (≡) icon and visit Settings > Shipping Rates > Rate Automation, as shown below.
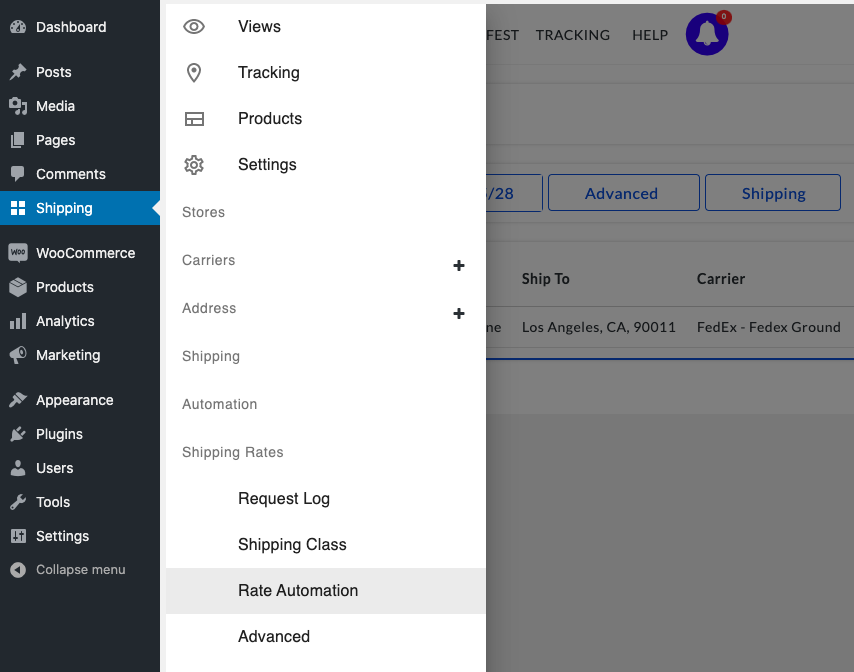
You can see the rules for all the shipping carriers that you have added for your vendors. Click on the Edit button to modify the shipping rates automation rule for your vendors’ shipping addresses.
Under the Automation Criteria, click on the (x) icon in front of the shipping rules that state Any, as shown below.

Click on Add Condition and select Vendors. Set the vendor’s name for which you want to set this carrier, as shown below.

Under Action Details, select Set Shipping From Address and set it to the same vendor’s address that you have added in the step above, i.e. Vendor A.
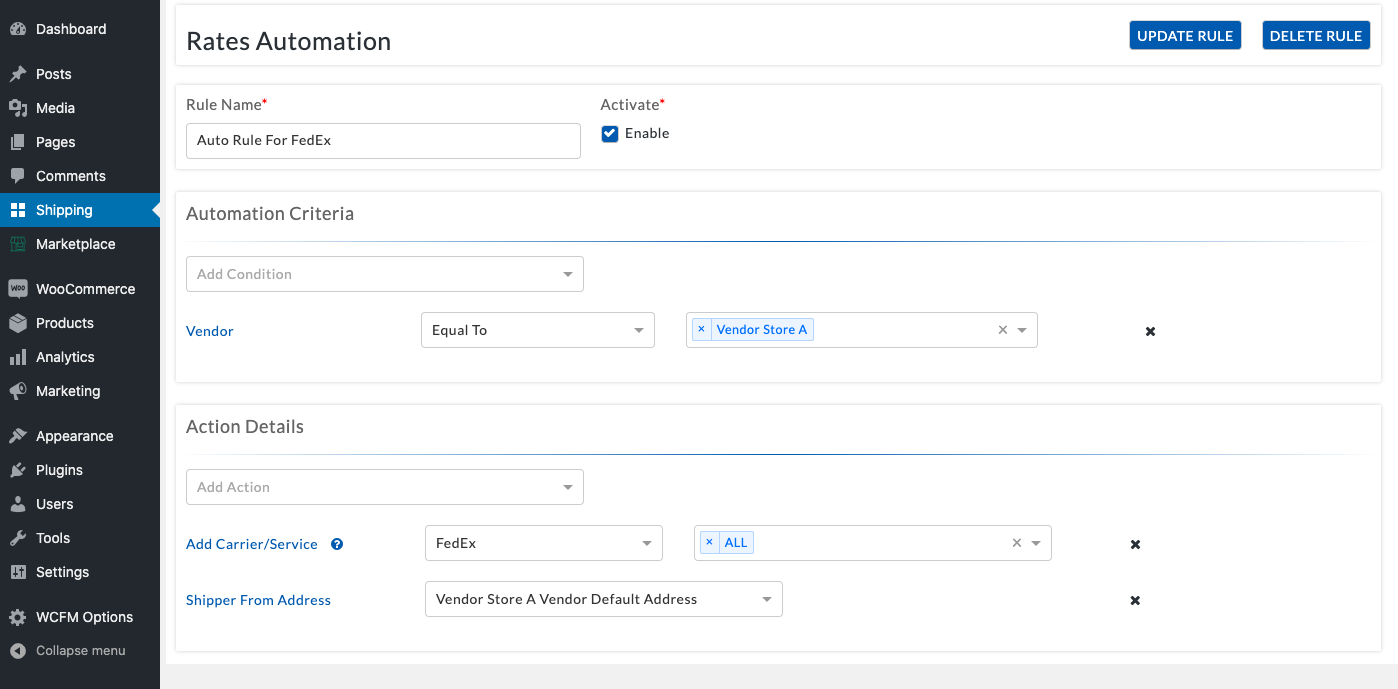
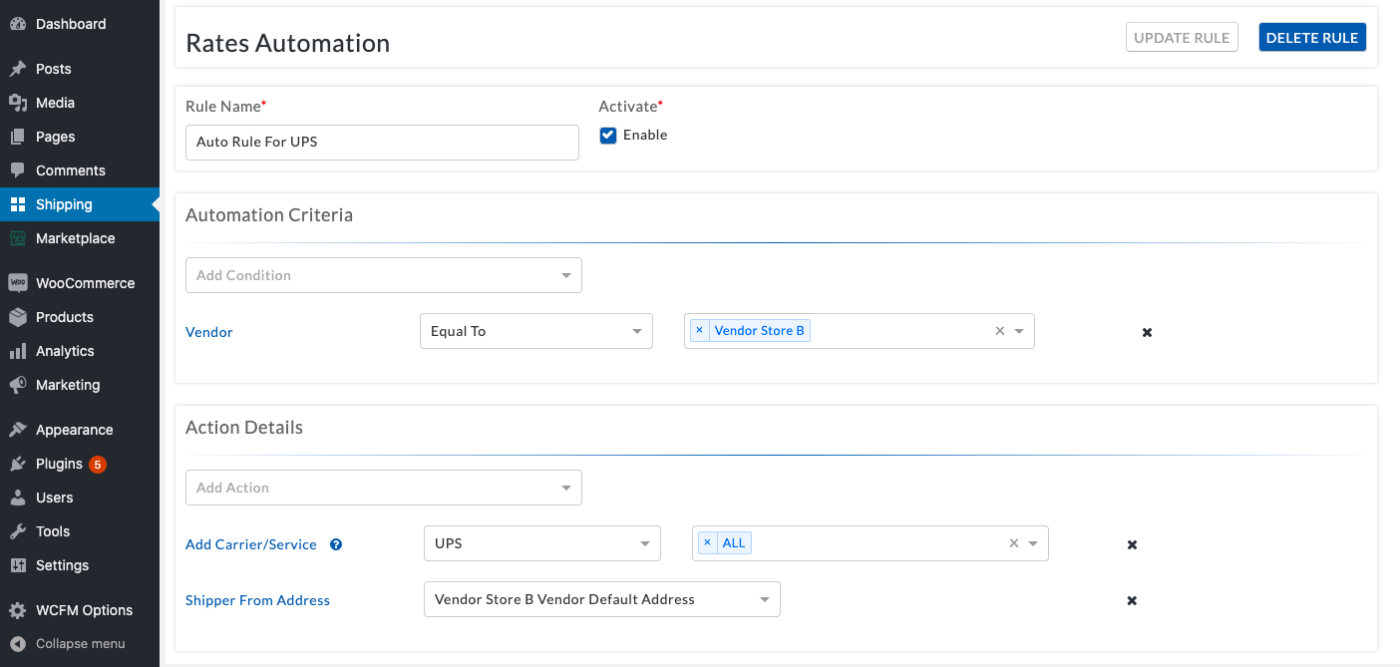
Similarly, set the address of the other vendors to their preferred shipping carriers, as shown below.
Display vendor preferred shipping services on the WooCommerce cart and checkout page
After setting the vendor shipping address, you can set their preferred shipping services to be displayed on the WooCommerce cart and checkout page.
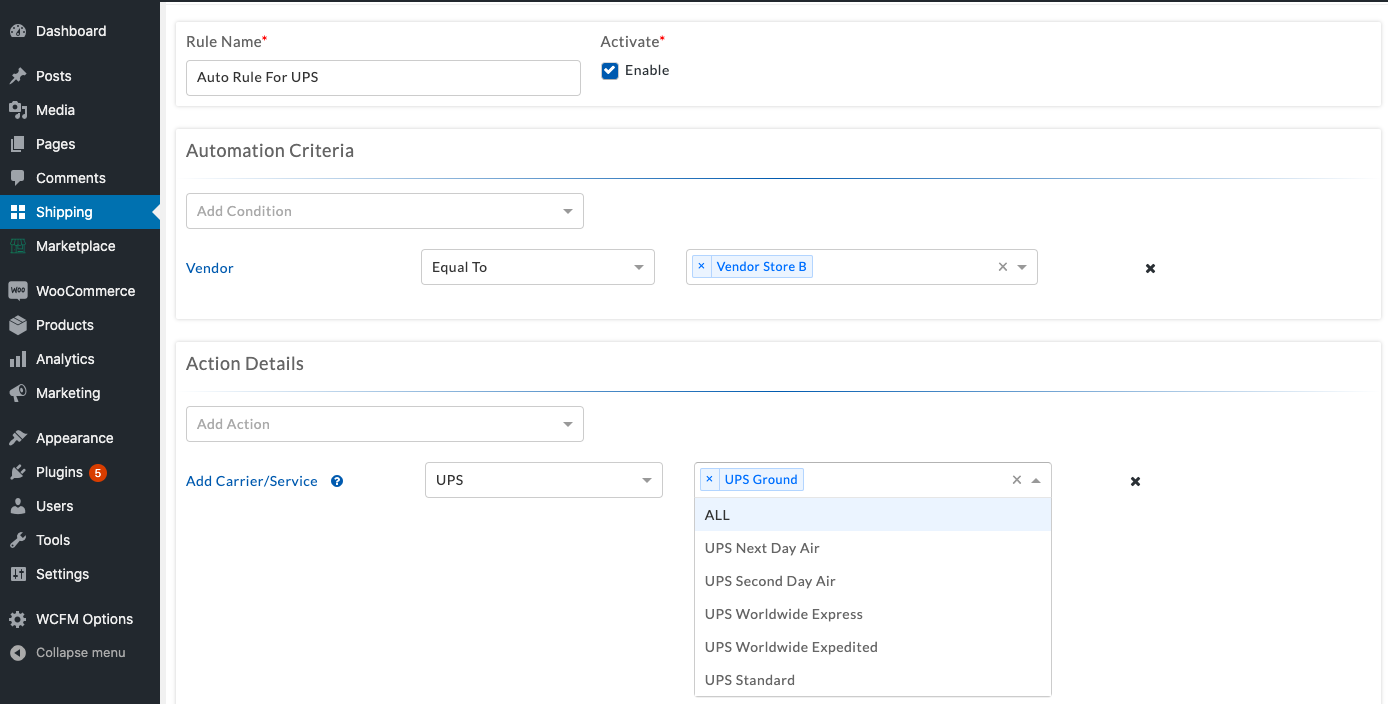
Under Action Details, select the services that your vendors use for fulfilling the orders, as shown below.
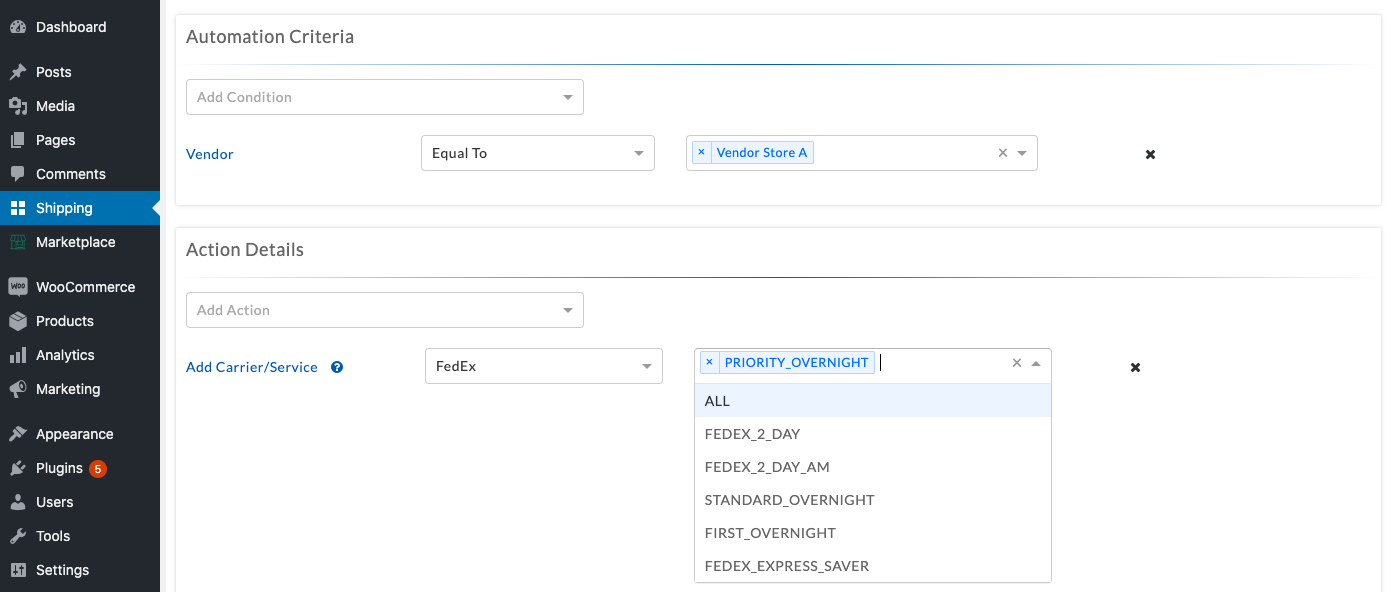
You can see in the above image that FedEx Priority Overnight is selected for vendor A.
Click on Update Rule to save the changes.
Similarly, add the preferred shipping services for vendor B, let’s say, UPS Ground, within the automation rules, as shown below.
Display shipping rates on the WooCommerce cart and checkout page for different vendor products
1. Customer purchases products from a single vendor
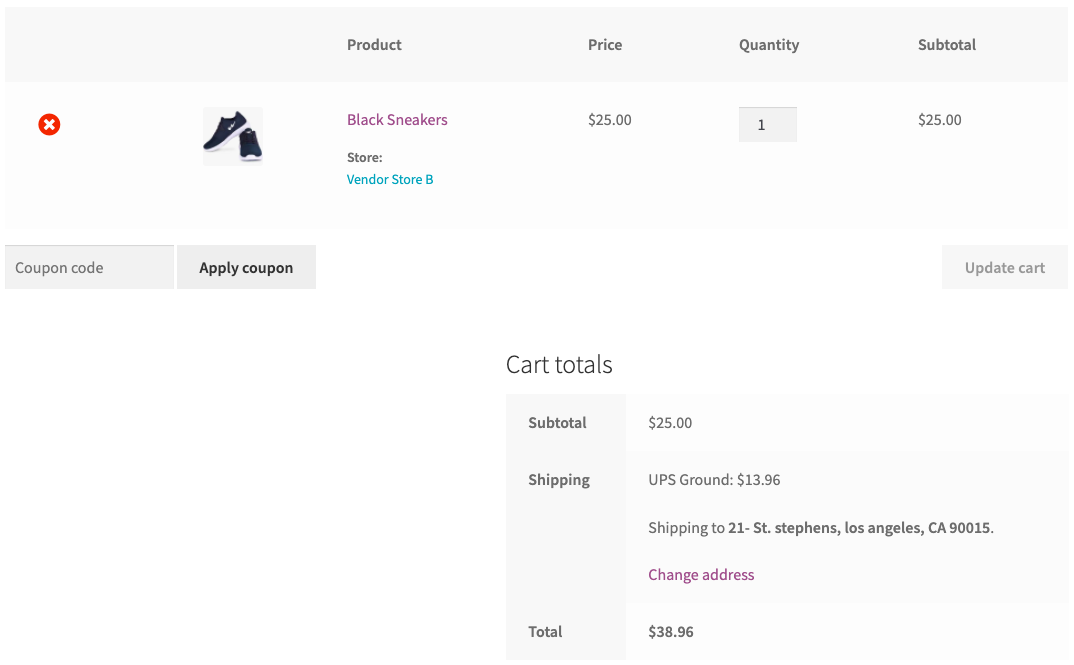
Visit the WooCommerce shop page and add a product to the cart that is sold by Vendor B. Enter the shipping address and calculate the shipping cost. The plugin will display the shipping cost for the preferred shipping services that you have selected for that particular vendor.
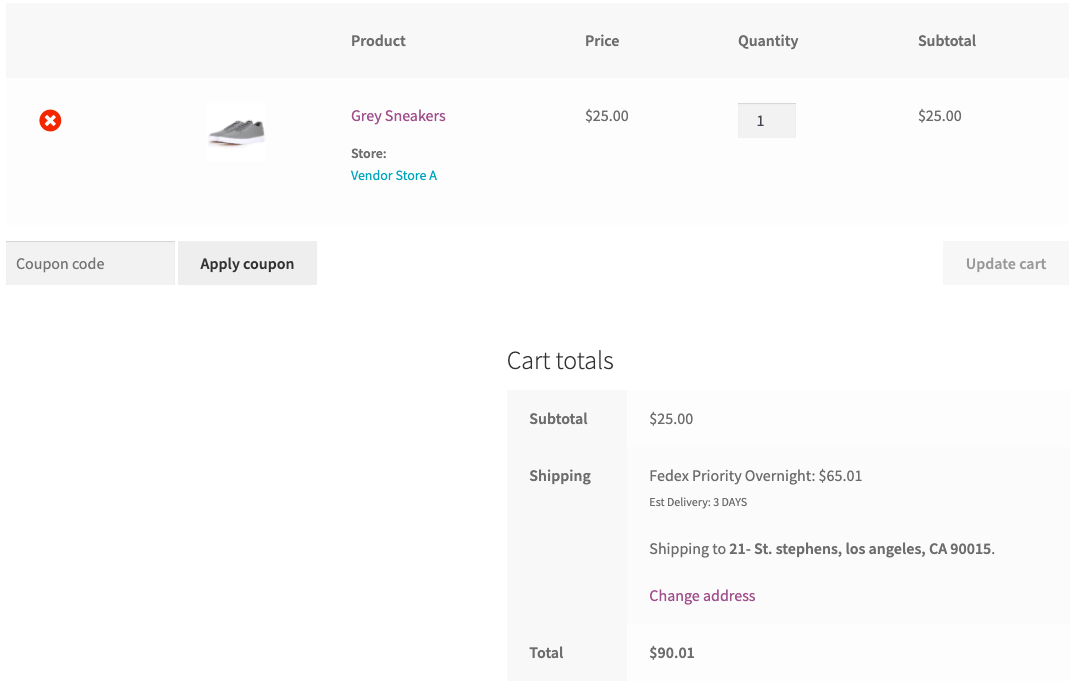
Similarly, if the customers only choose to purchase the products from vendor A, they will be able to view the FedEx Priority Shipping as a shipping method on the cart page, as shown below.
2. Customer purchases products from multiple vendors
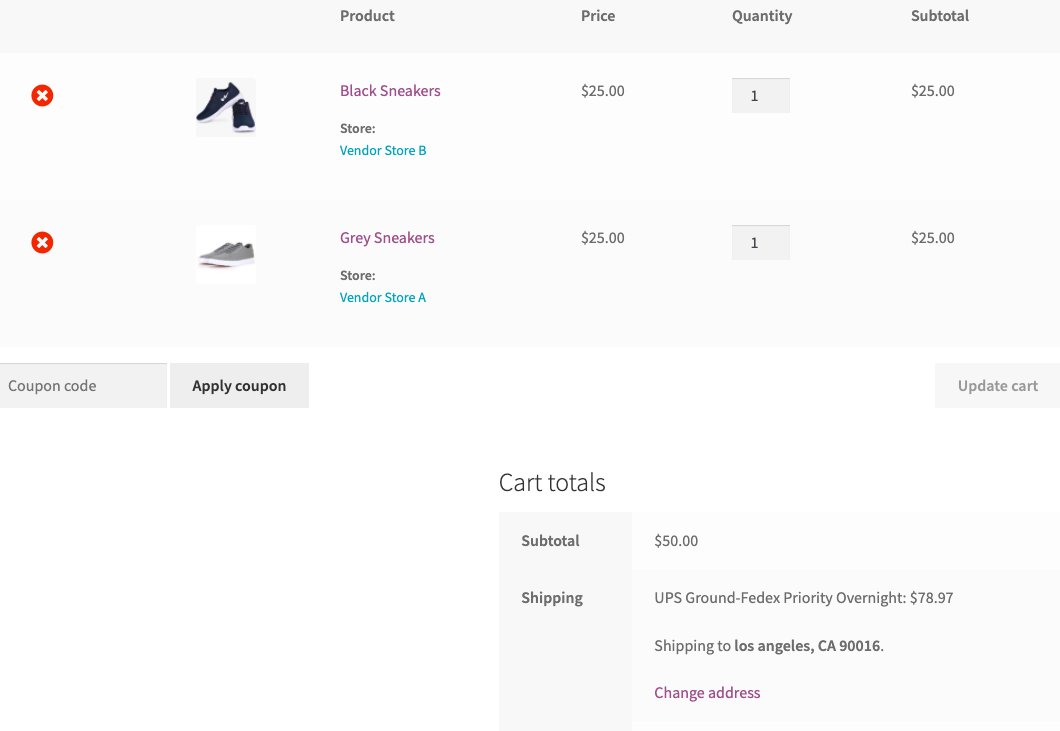
Visit the WooCommerce shop page and add multiple products to the cart that is sold by individual vendors, say, Vendor A and B.
Enter the shipping address and calculate the shipping cost. The plugin will calculate the shipping rates for both products and add the shipping cost to the services that are available for both vendors, as shown below:
Place a couple of orders choosing various vendor products
After complete verification of the packages, shipping services as well as shipping cost, place a few orders using different vendor products.
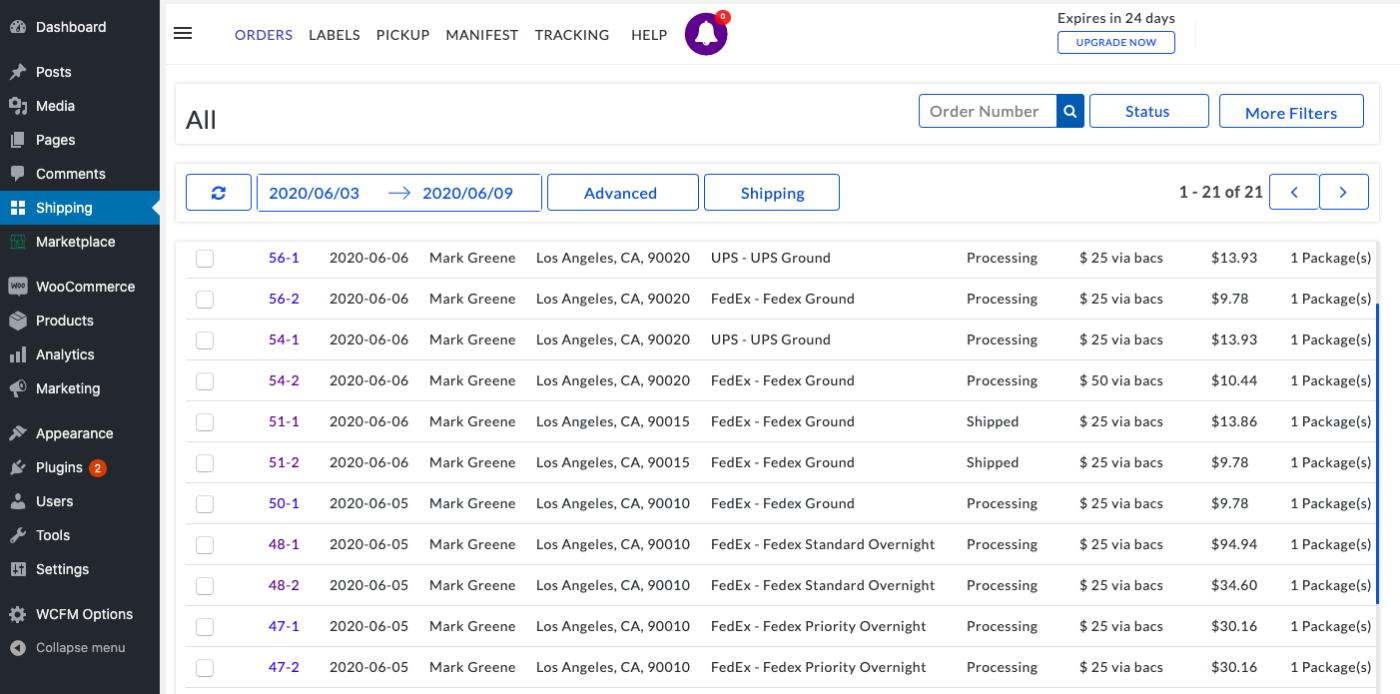
Now visit the Shipping tab from your WordPress Dashboard. Under the orders section, the plugin will automatically import all the WooCommerce orders that are marked as Processing and display it as shown below.
Let Vendors print shipping labels from the Vendor Dashboard
Once the orders are imported and are in the Processing state, vendors can proceed with the order fulfillment and print shipping labels directly from their dashboard.
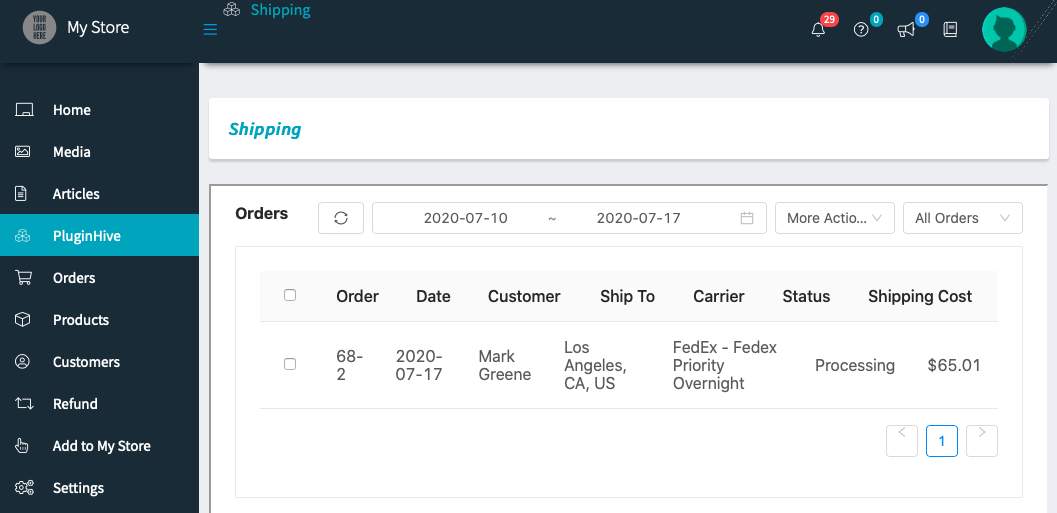
Visit the Vendor dashboard and click on the PluginHive tab. Here the vendors will be able to view their respective orders along with their preferred shipping carriers assigned to the orders for order fulfillment.
Below you can see Vendor A’s orders which are ready to be fulfilled using FedEx.
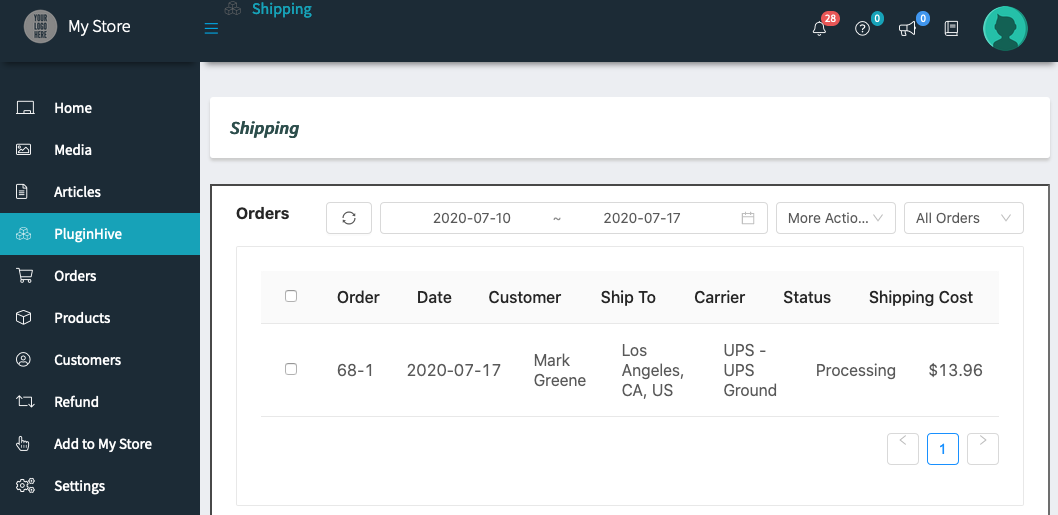
Also, since the same orders contain products from other vendors as well. Hence, below you can see Vendor B’s orders which are ready to be fulfilled using UPS as his preferred shipping carrier.
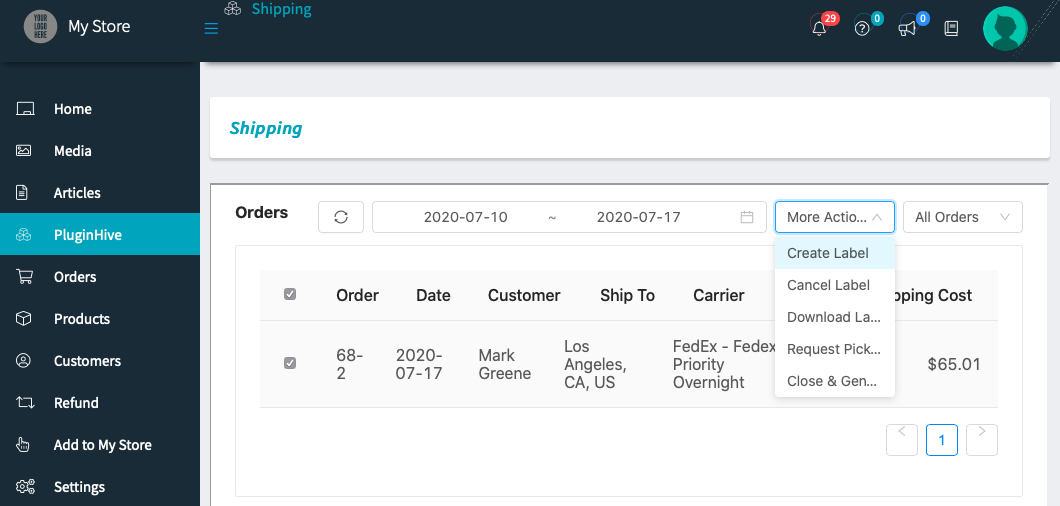
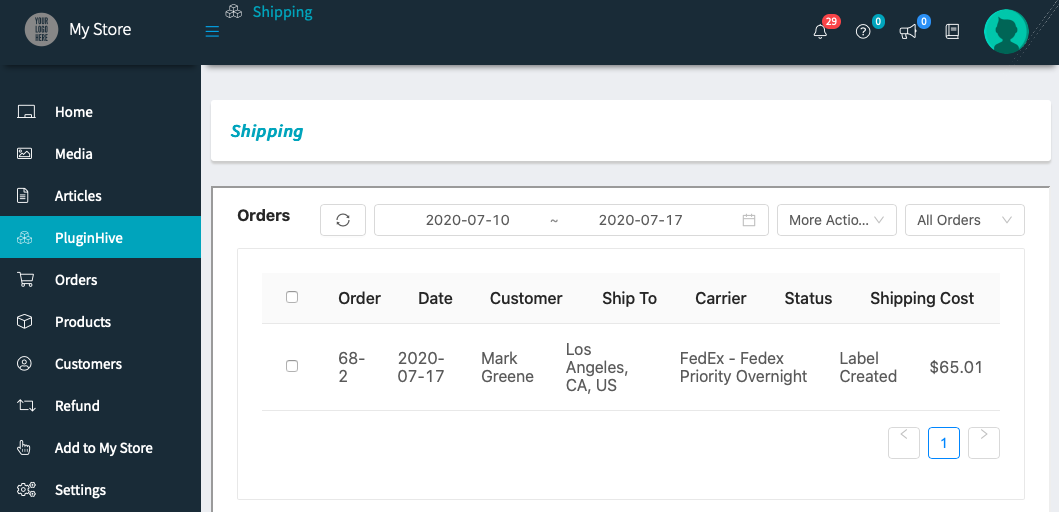
Once the vendors are ready to print the shipping labels, they can select the orders and click on Create Label to generate the shipping label and then click on the refresh icon to refresh the order status, as shown below.
After the shipping label is created successfully, refresh the order by clicking on the refresh button.
The plugin will automatically change the order status to Label Created, as shown below.
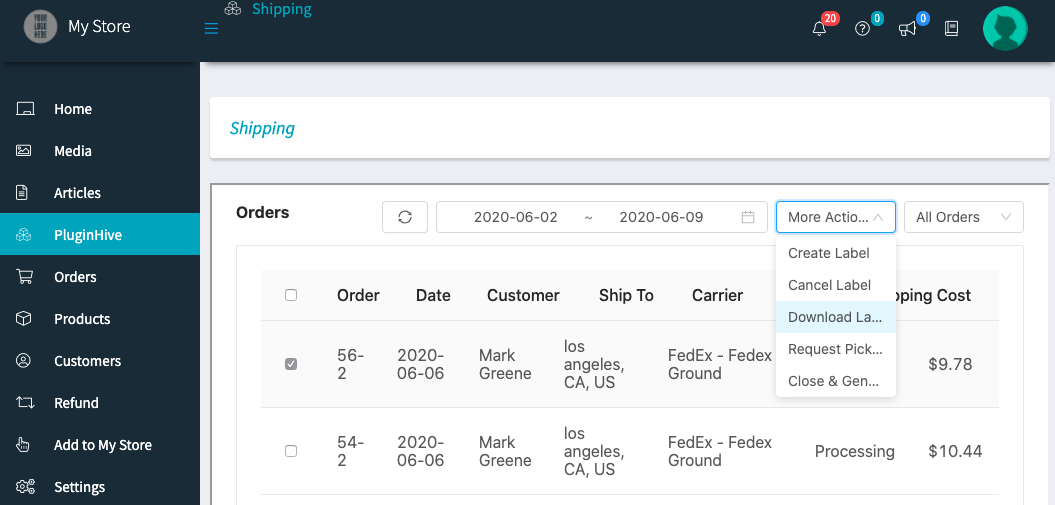
Vendors can easily print the shipping labels by selecting the order and clicking on Download Label under More Actions, as shown below.
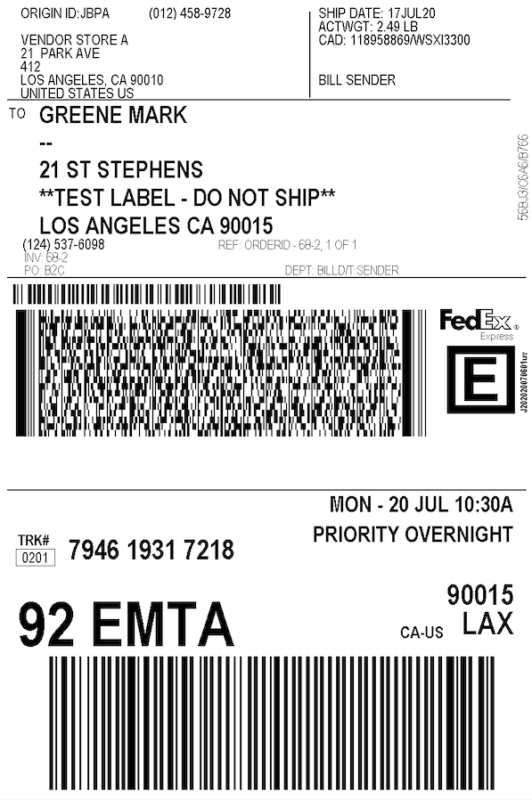
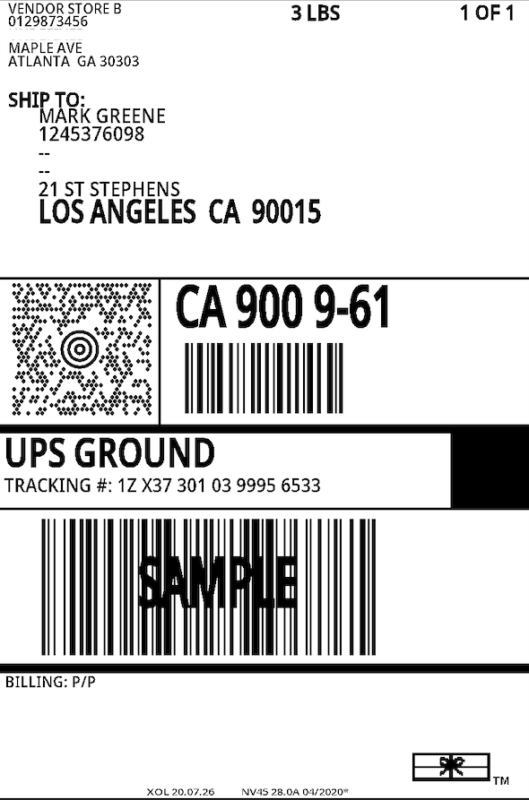
Here are the shipping labels for both vendors with the respective vendor addresses.
Let Vendors request carrier pickups from the Vendor Dashboard
After printing the shipping labels each vendor can request for tier respective shipping carrier pickups directly from their vendor dashboard.
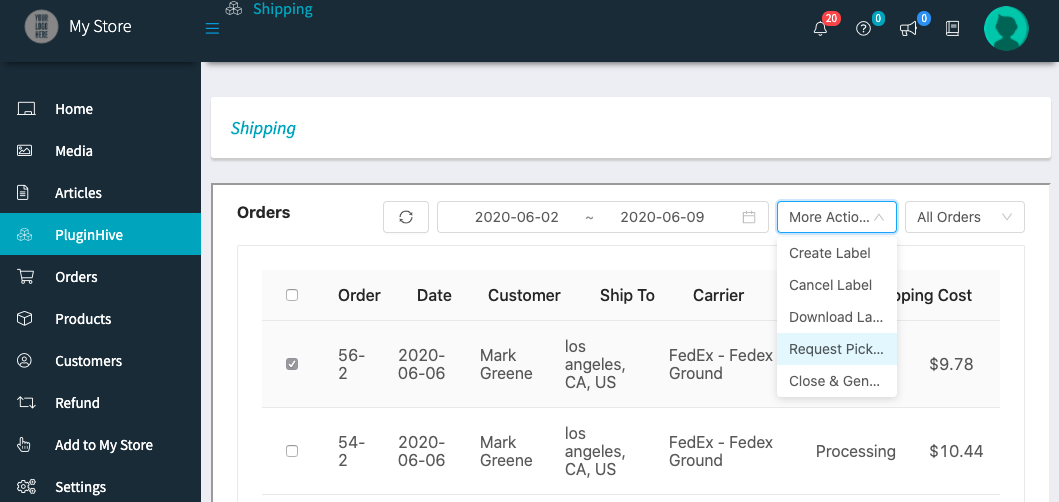
Vendors can select the orders and click on Request Pickup from More Actions as shown below.
Let Vendors fulfill orders and send tracking details to the customers via Email
Vendors can fulfill the orders by selecting the orders and clicking the Mark As Shipped option under More Actions, as shown below.
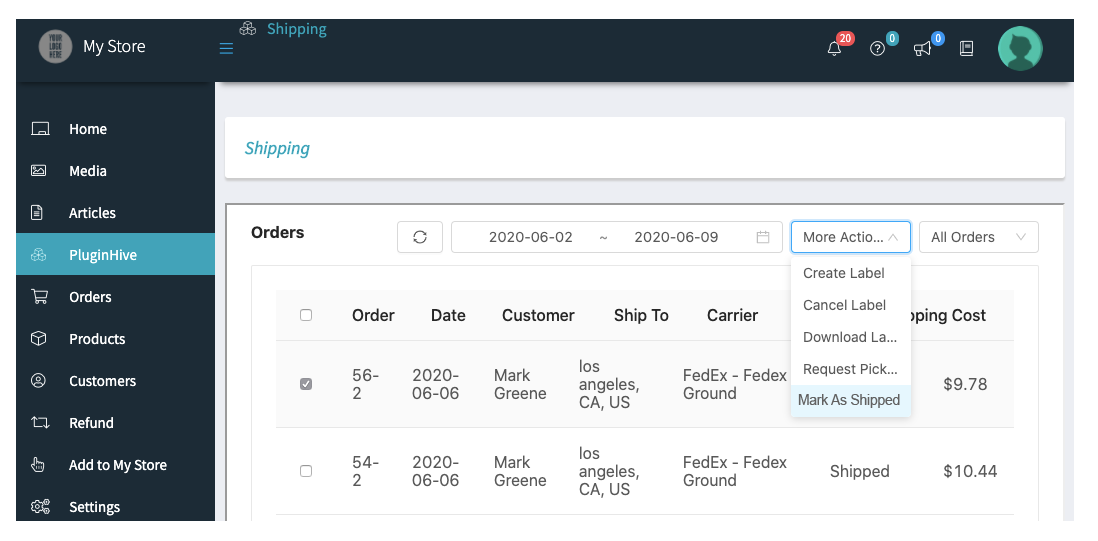
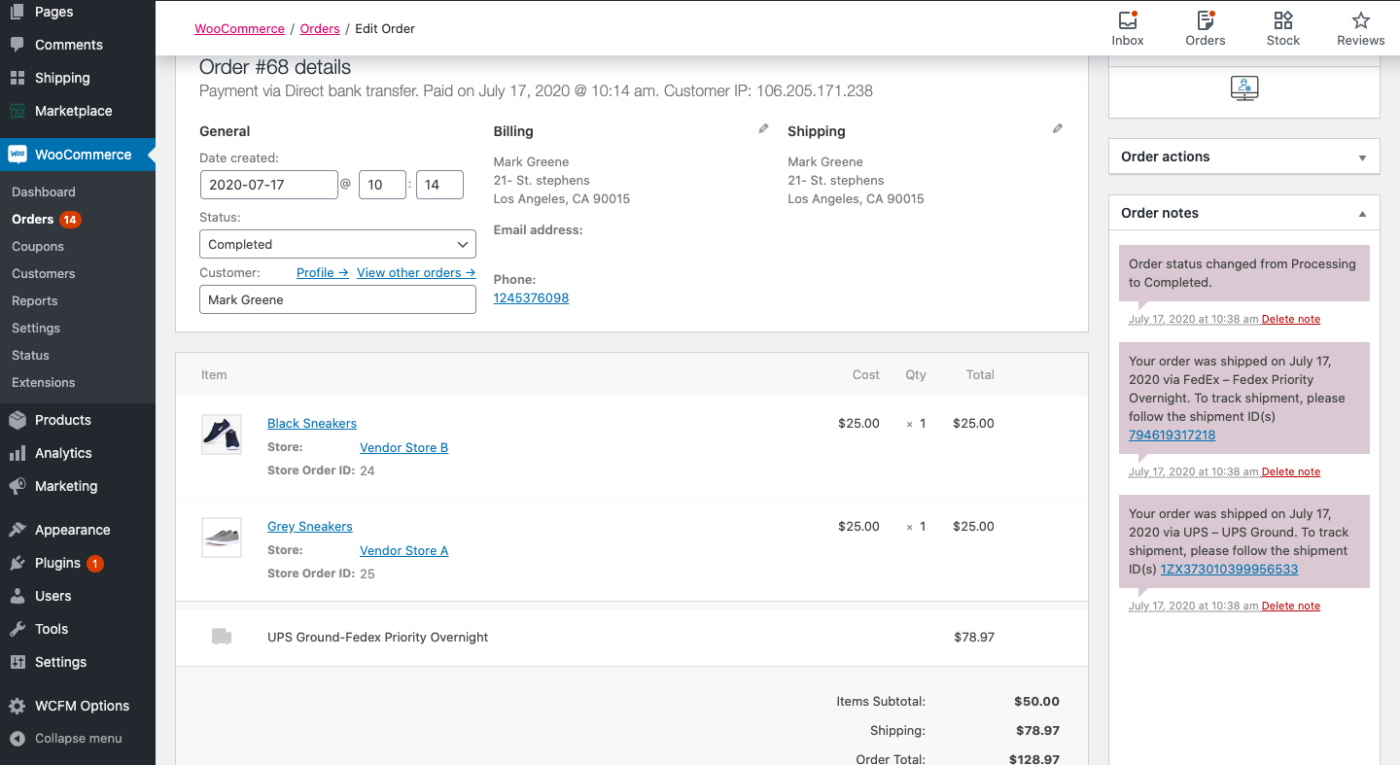
Once both vendors fulfill the orders and mark them Shipped, the WooCommerce Shipping Services plugin automatically marks the WooCommerce orders as completed, as shown below.

The plugin also updates the tracking details within the WooCommerce orders under the Order Notes as shown below.
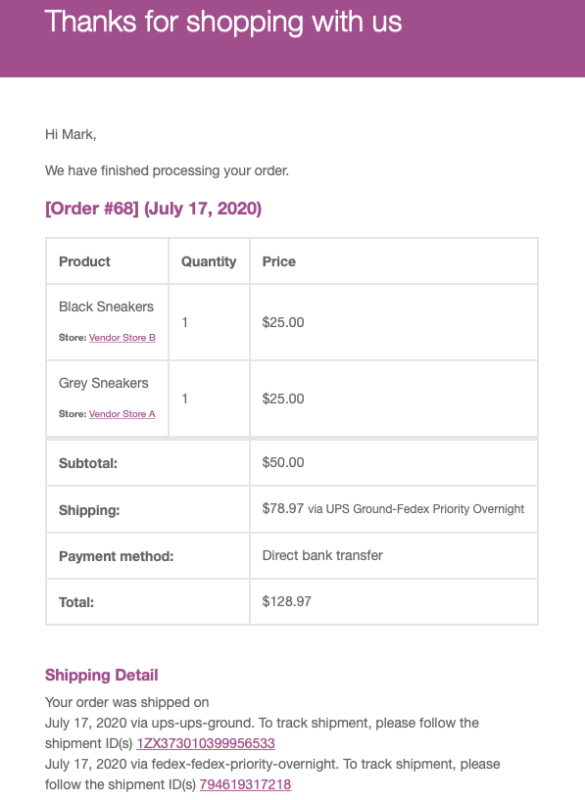
The plugin also sends the tracking details to the customers from both the vendors via the WooCommerce Order Completion Email as shown below.
WooCommerce Shipping Services by PluginHive automates shipping for your WooCommerce multi-Vendor store and helps your vendors fulfill orders directly from the vendor dashboard.
This guide is aimed at helping you understand how to set up the plugin correctly so that it works seamlessly with the supported WooCommerce multi-vendor solutions mentioned above.
Feel free to contact PluginHive support if you require further assistance with the plugin.
