This is a complete guide to building your own fitness website with the Bookings And Appointments for WooCommerce plugin along with the WooCommerce Royal Mail Shipping plugin. So you can forget all those expensive and time-consuming tools required to build and maintain a website. It will take around half an hour or so to do that. So read along and follow these easy 5 steps to get your fitness business online.
An Overview
Fitness websites like Bodybuilding.com collect up a lot of traffic. The number of daily visitors goes beyond a staggering number of 1 million. They offer tons of articles and tutorial videos, diet plans, exercise programs, weight-training tips, and much more. They also sell food supplements and pieces of gym equipment. Some of their professional trainers invite their members to join various fitness programs and organize many group events as well. So it is evident that having an end-to-end fitness website can bring you a great deal of traffic and sales. But creating a fitness website with WooCommerce alone is just not enough. It doesn’t have the necessary features to help you out. And so, you would require additional plugins and tools to do that.
Plugins you need
Every WordPress-based website needs a few plugins to give it shape and keep everything moving. In your case, you need plugins that suit your fitness needs and its applications. Here are the necessary plugins that you’d be needing for your website.
Keep in mind that you can choose any other shipping plugin depending on your choice.
Things you need to do
So once you are done with the plugin installations, you would need a roadmap in order to build a website. It should help you have a clear picture of what your website would look like. Here’s a basic list of things you’ll be doing.
- Set up a WooCommerce store for your website
- Set up a shipping system to sell fitness items like supplements, workout accessories, workout equipment, etc.
- Set up a booking system for your classes, sessions, etc.
- Set up a blog to offer workout plans like weight-loss plans, build muscle plans, gain strength plans, etc.
- Set up a community or forum
Note: For the sake of making this guide universal, we will cover only the basic things. So if you feel like adding or removing something then feel free to do that. It’s your website.
Step 1: Set up your WooCommerce
The first step is to build yourself a WooCommerce website. For that, you need to set up WordPress and then apply a theme to give your website a good look. Though it’s always good to apply a beautiful theme, you should not spend much time doing that. That’s because most fitness websites are simple-looking and don’t usually have a ton of animations going around. So having a theme that has a few good solid colors can really give your website a professional feel to it. Now that you have WordPress and the choice of your theme installed on it, you have to now set up WooCommerce. Here are the necessary steps:
- Install WooCommerce – WooCommerce will be an important part of your website. It will handle most of your payments, orders, bookings and much more. Check out this WooCommerce tutorial to learn more.
- Create pages for the website – WooCommerce has four default pages – Shop, Cart, Checkout and My Account. After installing the plugin you need to go to the Pages section under the Dashboard. Under this section, you can make necessary changes to your pages like changing the name, changing the parent page, etc.
- Set up Checkout and Payments – This is one of the most important parts of setting up the WooCommerce plugin on your website. That’s because it largely impacts your customer behavior.
- Set up Currency and Store location – After setting up your checkout and payment options, you need to define the currency and your store location.
- Add products and configure the settings – Since you are going to sell items on your website, you need to define and set up your products.
Step 2: Set up a shipping system
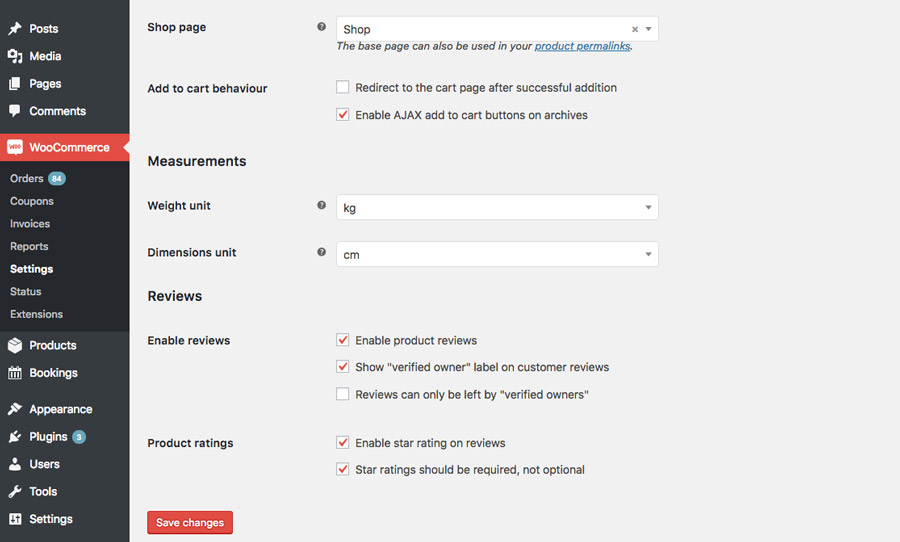
Once you are done setting up your WooCommerce, you have to now set up the WooCommerce Royal Mail Shipping Plugin with Tracking. To do that, you need to buy this plugin first and then use the installation and activation article to install it on your WooCommerce. You need to make sure that the Currency is in Pound Sterling and the Weight and Dimensions are in the units of kg and cm. In order to change the currency, you need to go to WooCommerce > Settings and then change the currency to Pound Sterling. Once you are done with it, you need to go to WooCommerce > Settings > Products and then mention the units as kg and cm.
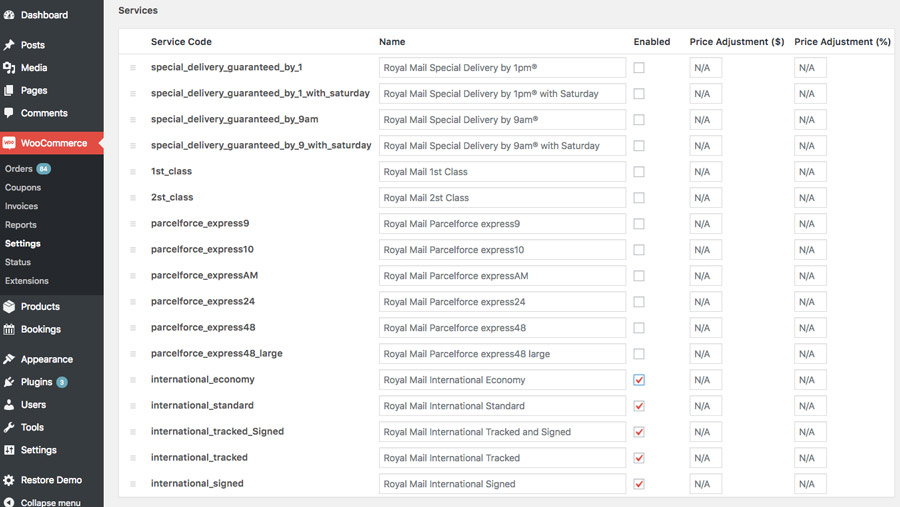
Thereafter, you need to go to WooCommerce > Settings > Shipping > Royal Mail and set up the plugin. Based on the type of products that you are going to sell, you can select from the Royal Mail parcels accordingly. You have the option to enable or disable certain shipping methods or services as well. So, for example, if you are only going to ship internationally then you can select the following international services. Have a look at the following image.
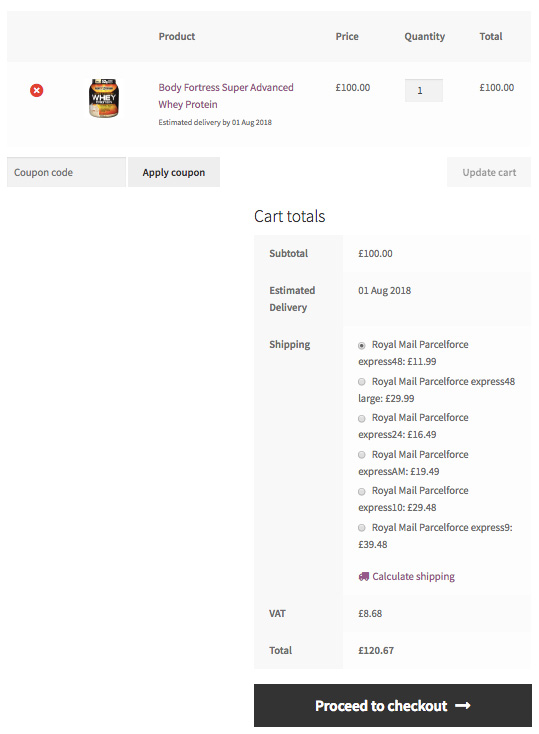
On top of that, you can adjust the shipping price by either adding or subtracting the required amount to/from the actual shipping cost. Use minus sign(–) for subtracting the amount. You can change the prices by entering any value in % and £ for each service. If you have correctly followed the above shipping setup guide, then you should be able to see the shipping rates for your product. Here is a sample product that we created in order to show you how it might look in the end. Product image

Product in the Cart
Step 3: Set up a bookings system
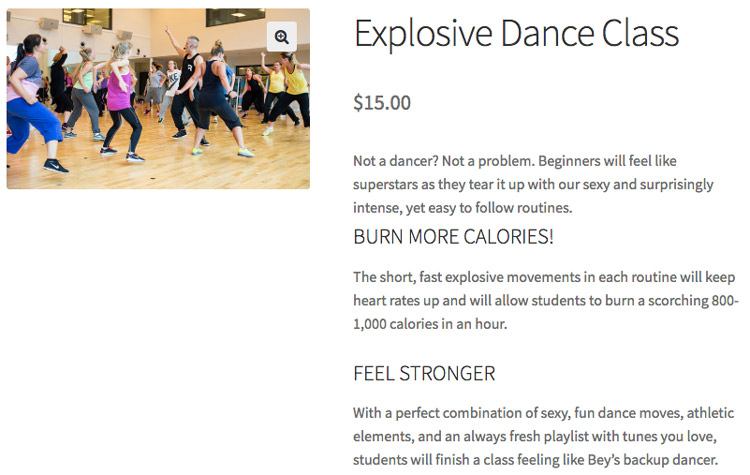
Now it’s time to have your fitness classes or sessions put up on the website. The idea here is that any one of your customers should be able to book their time slot for the fitness session. Some fitness websites even allow their clients to choose their desired workout hours. So they can come to the gym within that time period only. Let’s try to add a Dance Fitness Program where customers can find a class and book the desired one for the time period. They will have the choice to mention the number of people joining that particular class. That’s because many people like going together with their friends, and they look up to classes that allow multiple entries.
Define the class and set up bookings for it
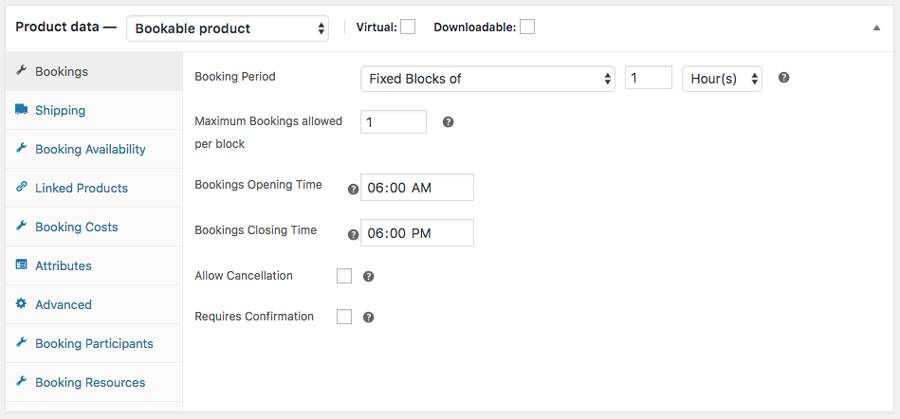
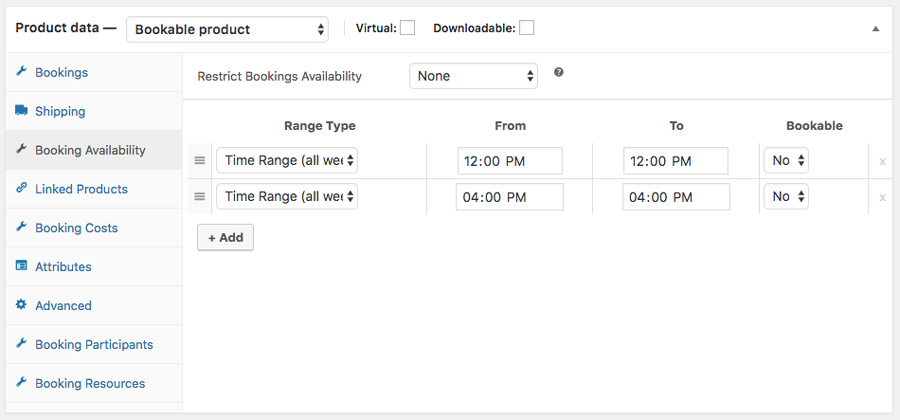
Now let us assume that you operate between 6:00 AM to 7:00 PM every day. Each one of your classes lasts for an hour. You also take two breaks in between those classes for 1 hour each.
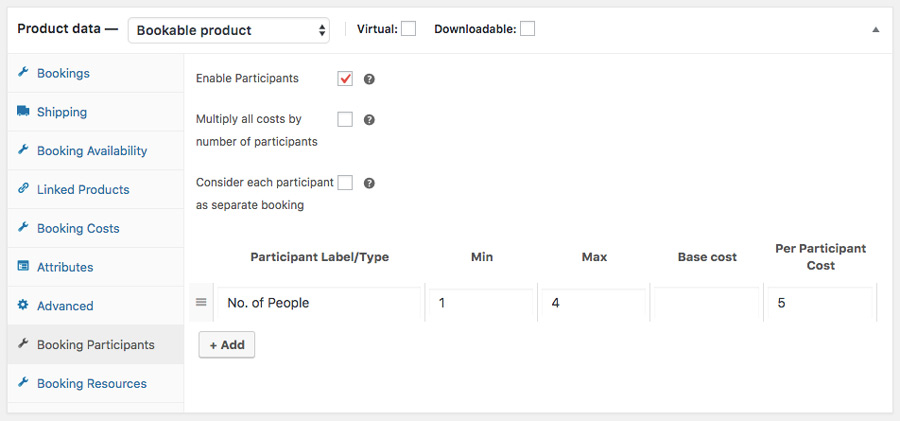
Once your product is ready, you have to set up booking system for it. For that, you have to select the Bookable Product option under the Product Data section. Upon doing that, the next thing you need to do is define the booking structure for this product. Have a look at the following set of images that show how you have to define these settings. Set up basic bookings
Set up the availability
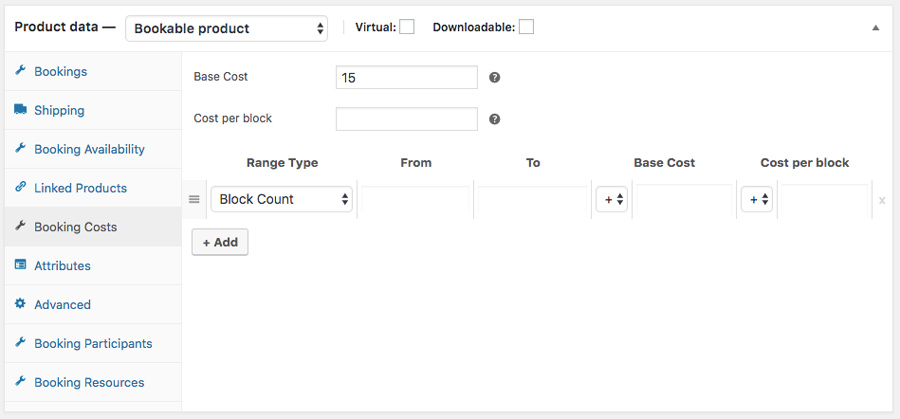
Set up the cost
Add participants
Offer extra services

The above image shows the Booking Resources section. It allows you to offer additional items or services along with the bookings. In our example, we have offered a choice for the clients to have a hot shower right there at the fitness center. You can also see that the plugin allows you to mention the cost as well. Once you are done with setting up the product, here’s how it would look on the product page:
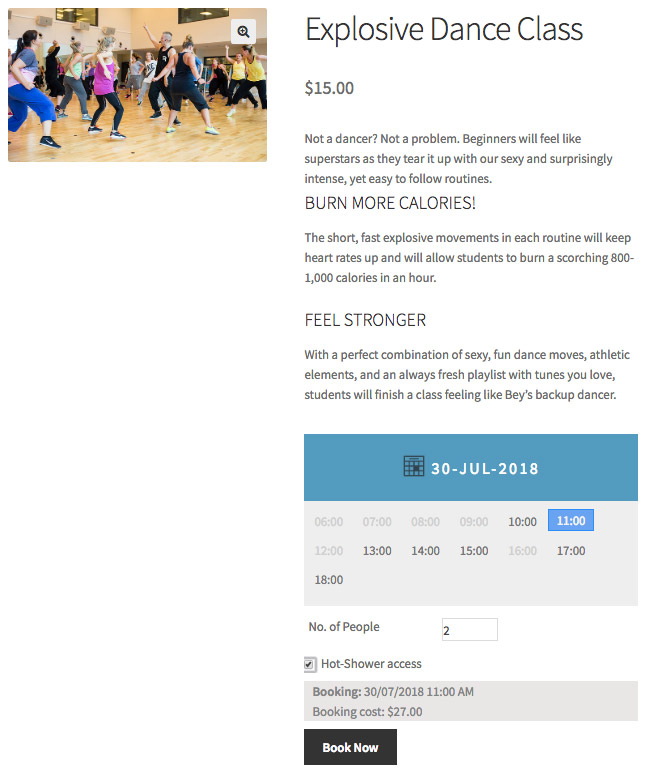
Suppose a customer and his friend have to book the class from 11:00 AM to 12:00 PM. They can select the time, mention the number of people and then click on the Hot-Shower access option if required. They can further click on Book Now option and then follow the WooCommerce Checkout process in order to pay for the bookings.
Step 4: Set up a blog
It is really important to have articles on your website. It increases the overall engagement and even has the power to convince customers to make a purchase. You can hire good writers to write, create images, offers, etc., for your blog. Another good thing about having a fitness-related articles is that people tend to share them with their friends and family. This can indirectly increase the incoming traffic and eventually may get you even more customers. Although the Blog section offered by WordPress is powerful enough to write and manage your articles, there’s a lot you can do to generate more traffic around it. And for that, you need to make your articles visible across your website. There are several good plugins that can help you with it. Here are some of the best options for you.
Jetpack
This should be your first choice. The highlight of this plugin is that it allows you to set up Top Posts and Pages Widget. It displays either the most liked posts, or the most-visited posts in the last 48 hours. You can even preview these widgets before publishing. And addition, if you can handle a little bit of coding then you can have a customized widget as well.
WordPress Popular Posts
Another popular choice is WordPress Popular Posts. The plugin is very easy to customize according to your needs. You can add several widgets to your website. You also get the option to display your popular posts for a particular time range ( like the last 24 hours, or the last 3 days, etc.). The plugin also offers you to set up and display the posts based on the number of views, the number of comments, or even average views per day.
Step 5: Set up a community or forum
People seek out advice and tips related to fitness. Having a community on your website can really help them out. They can come down to the community page, share their experience, and also may help out others. You and your fitness instructors can also join the community in order to increase even more engagement. So it should be obvious by now that running a fitness website does call out for the need for a community. There are some really good WordPress plugins that can help you build a decent community. Here are two plugins that are quite popular.
BuddyPress

It is a well-known plugin and a wonderful WordPress community plugin. Users can register on your website, create their profiles, have conversations with everyone within a group, or have private chats with other members. The best thing about this plugin is the support for multiple languages. And it has a point system that is used to ignite user engagement. You can click here to know more about it.
ARMember

With ARMember Plugin, you can create a membership community or forum easily. Further, it can also be used to create different levels of fitness plans and cater to a wide range of audiences. Allow internal communication using its Social Community Addon or BuddyPress integration. To motivate the members to reach their fitness goals faster, you can implement gamification elements. This myCRED integration provides badges for various achievements that boost your clients to be consistent in their fitness journey.
UltimateMember
The UltimateMember is a very good-looking plugin. The overall user interface is pleasing and users can create stunning profiles. The plugin offers an easy sign-up process for the membership which makes it even more desirable. One unique thing about this plugin is that it offers content restrictions. With this feature, you can protect some of your content sections, pages, images, URLs, and much more.
Final thoughts
WooCommerce is growing rapidly by covering businesses one by one. Every day, a lot of people are downloading this plugin in order to grow their business online and reach a wider audience. So if you’re a fitness center owner, a gym owner, or a dance class manager and looking for a way to enter the online business industry, then WooCommerce is the way to go. It is a much cheaper way to run a quality website. We hope that this article was useful to you in some way. Do let us know how you feel about it in the comment section below.
Happy selling!