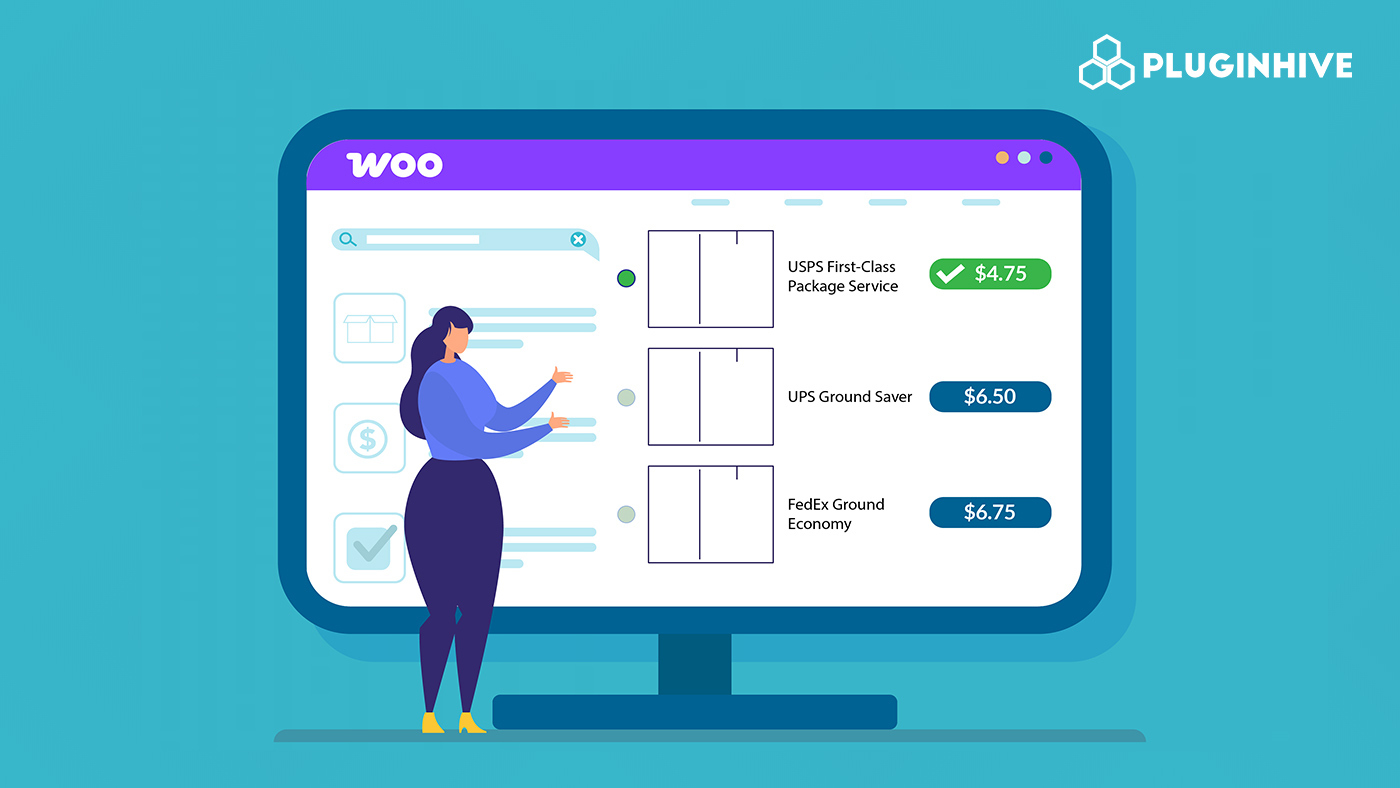
Shipping costs play a big role in whether a customer completes a purchase or walks away. Most shoppers will always go for the cheapest shipping option available, but as a store owner, manually figuring out which carrier offers the lowest rate for every single order is simply not practical. The more carriers you use, the harder it gets to stay on top of them.
With the Multi-Carrier Shipping Plugin for WooCommerce, this becomes automatic. The plugin connects to multiple carriers – UPS, FedEx, USPS, DHL, and Stamps.com fetches live rates, and shows only the lowest one at checkout. In this guide, you’ll learn exactly how to set this up for your WooCommerce store.
Table of Contents
- Why Showing the Cheapest Shipping Option in WooCommerce Matters
- How to Automatically Show the Lowest Shipping Rate in WooCommerce
- Real-World Example
- Best Practices to Optimise the Cheapest Shipping Setup in WooCommerce
- Conclusion
- FAQs
Why Showing the Cheapest Shipping Option in WooCommerce Matters
Shipping cost is one of the first things customers notice during checkout. If the delivery price feels high or confusing, many shoppers leave before finishing their purchase. Showing the cheapest shipping option helps remove that hesitation by making pricing clear and easy to understand.
Key Benefits for WooCommerce Store Owners
- Keeps checkout simple: Customers don’t need to compare multiple delivery options.
- Makes pricing clearer: Showing one affordable rate avoids confusion.
- Encourages faster purchases: Buyers can move through checkout without second-guessing shipping choices.
- Creates a cleaner checkout layout: Fewer options make the buying experience feel smoother.
Keeping shipping choices simple can make a big difference in how customers experience your store. Now that you understand why showing the cheapest shipping option matters, let’s look at how you can automatically display the lowest shipping rate in your WooCommerce store.
How to Automatically Show the Lowest Shipping Rates in WooCommerce
Setting this up is easier than it sounds. Here’s everything you need to do inside your WooCommerce store to start showing the cheapest shipping rate automatically at checkout.
Add Product Weight and Dimensions
Every product in your store needs a weight and dimensions filled in under the WooCommerce Shipping tab; without this, carriers cannot calculate accurate rates.

Connect Your Carrier Accounts
Go to WooCommerce → Settings → Shipping → Multi-Carrier Shipping and enter your credentials for the carriers you use; you don’t need all five. Even two carriers give the plugin enough to compare and find the lowest rate.

Choose How Your Orders Are Packed
Inside the plugin settings, scroll to the Packing section. Choose how items in a cart should be packed before rates are requested:
- Pack Individually: Each product is packed in its own separate box
- Weight-Based Packing: Multiple products are packed together based on total weight
- Volumetric Weight: Shipping cost is based on package size rather than just weight
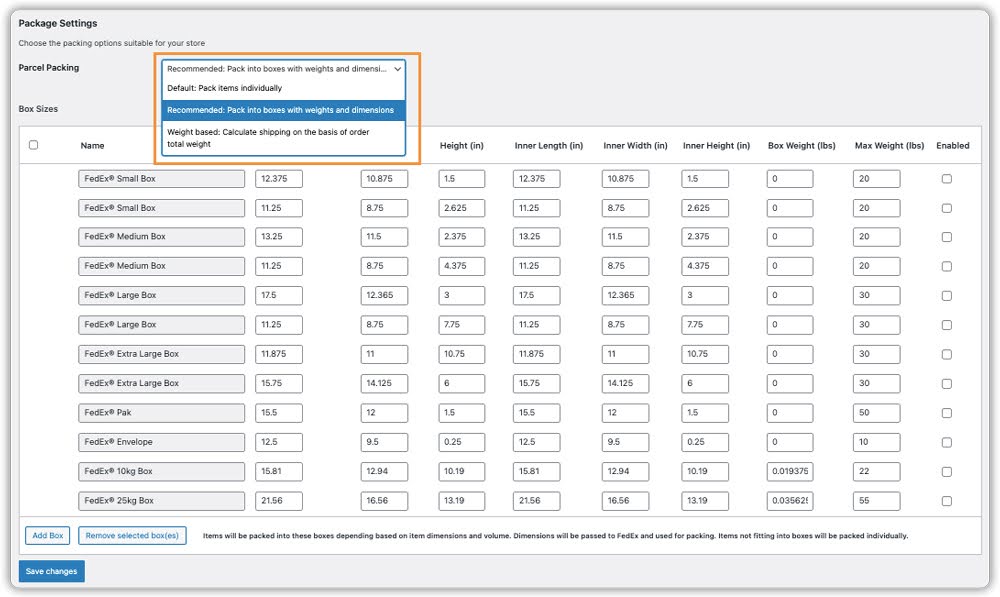
The right choice here ensures the shipping rate your customer sees is accurate and realistic.
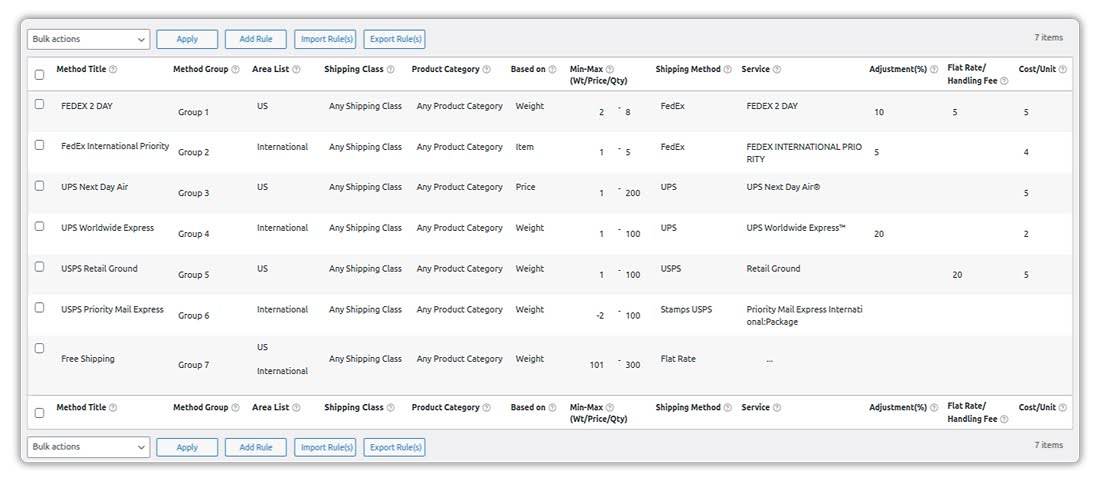
Set Up Your Shipping Rules
Head to the Rules section inside the plugin and add one rule per carrier you want included in the rate comparison. This tells the plugin which carriers and services to pull rates from for each order.
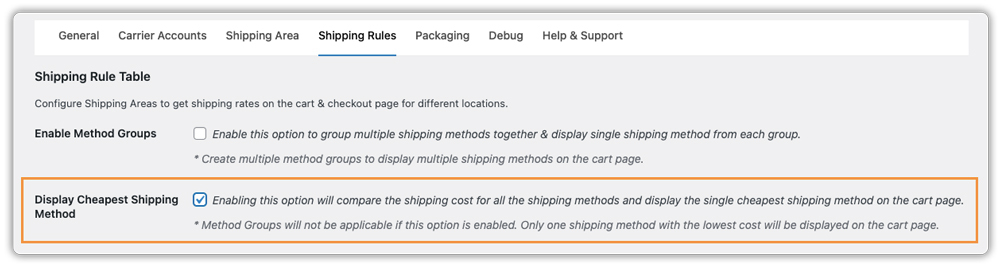
Turn On “Display Cheapest Shipping Method”
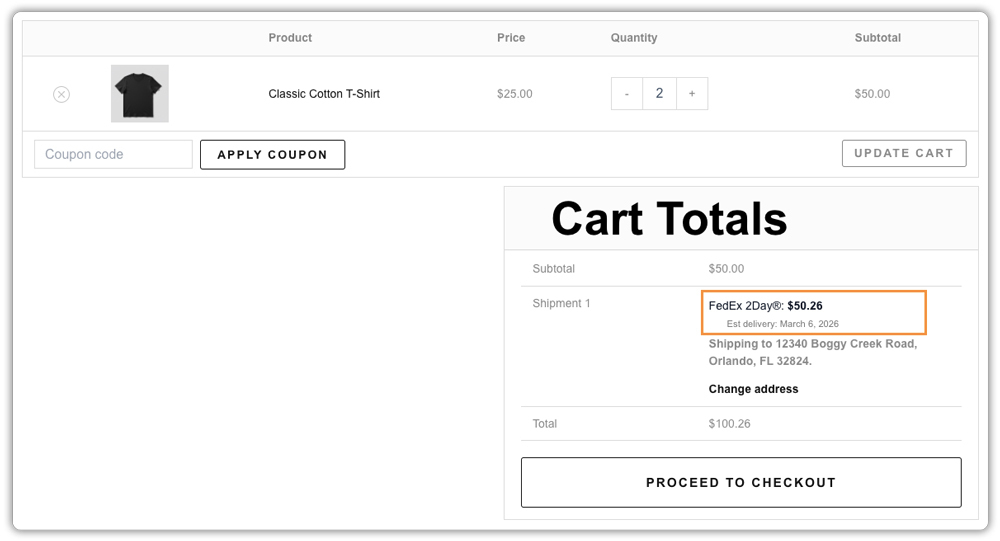
Inside the Shipping Rules tab, find the toggle labelled “Display Cheapest Shipping Method” and switch it on. From this point, the plugin automatically compares all rates from your configured carriers and displays only the single lowest one at checkout.
Test Before Going Live
Enable Debug Mode in the plugin settings, add a product to your cart, enter a shipping address, and check that the single lowest rate appears at checkout. Once confirmed, switch your carriers from Test Mode to Live Mode, and you’re all set.
Once live, this works automatically on every order without any manual input from you. For a complete setup walkthrough, refer to the Multi-Carrier Shipping Plugin Setup Guide.
Real-World Example: Automatically Showing the Cheapest Shipping Rate in WooCommerce
Let’s say you run a WooCommerce store that sells fitness equipment, things like resistance bands, yoga mats, and small weights. You ship across the US and have carrier accounts with both USPS and UPS. Orders vary in size and weight depending on what customers buy.
The Challenges You Face
- Lighter orders, like resistance bands and yoga mats, have a low product price, so a high shipping cost makes the total feel unreasonable to customers
- Heavier orders, like small weights, cost more to ship, and showing the wrong carrier makes customers feel overcharged
- Displaying multiple shipping options at checkout confuses customers and slows down the buying decision
- Manually checking which carrier is cheaper for each order type takes time and is easy to get wrong
How It Can Be Solved
With the Multi-Carrier Shipping Plugin for WooCommerce, here is how this store can fix it:
- Connect both USPS and UPS inside the plugin and create a shipping rule for each carrier
- Turn on the “Display Cheapest Shipping Method” toggle so the plugin compares both carriers automatically for every order
- A customer ordering two resistance bands gets USPS First Class at $4.80; the plugin picks it because it is the cheapest option for that weight
- A customer ordering a set of small weights gets UPS Ground at $10.20. USPS is no longer the cheapest for that order size, so the plugin switches automatically
- Every customer sees one clean, affordable rate at checkout, no confusion, no comparing, no second-guessing
As a result, customers spend less time thinking about shipping costs and more time completing their purchase, and the store owner never has to manually compare carrier rates again.
Best Practices to Optimise the Cheapest Shipping Setup in WooCommerce
Setting up the cheapest shipping option is just the beginning. These simple practices help make sure the rates your customers see are always accurate, competitive, and reliable.
- Connect more than one carrier: More carriers mean more options to compare, which increases the chances of showing the lowest possible rate every time
- Use your negotiated carrier rates: If you have a business account with UPS or FedEx, always use those credentials. Discounted rates give your customers a better price than standard public rates
- Always set a fallback rate: If a carrier is temporarily unavailable, a fallback rate ensures customers always see a shipping option at checkout
- Avoid adding large extra fees: High handling charges can make even a cheap shipping rate look expensive. Keep extra fees small so the savings feel real to your customer
- Review your shipping settings regularly: As your product catalogue grows, revisit your shipping rules to keep pricing accurate and up to date
Following these practices ensures the cheapest rate your customers see at checkout is not just the lowest, but also it is accurate, consistent, and reliable for every order.
Conclusion
Automatically showing the cheapest shipping option in WooCommerce is a small change that can create a big impact on your store. It keeps checkout simple, reduces cart abandonment, and helps customers feel confident that they are getting the best delivery price without you needing to compare carrier rates manually. The Multi-Carrier Shipping Plugin for WooCommerce handles this by pulling live rates from UPS, FedEx, USPS, DHL, and Stamps.com and displaying the lowest available option automatically.
The setup is quick, and once it is active, it works quietly in the background for every order. This makes your shipping strategy more efficient while improving the overall customer experience at checkout. If you need help setting up this in your WooCommerce store, the PluginHive support team is ready to assist you with configuration and guidance.
FAQs
- Why is the cheapest shipping important for WooCommerce conversions?
Many store owners notice that customers abandon carts when delivery options feel confusing or expensive. Showing only the lowest shipping rate simplifies checkout and helps shoppers complete purchases faster. - Can WooCommerce automatically show the cheapest shipping option at checkout?
Yes. With the Multi-Carrier Shipping Plugin for WooCommerce, you can connect multiple carriers, and the plugin will automatically compare their live rates and display only the lowest one at checkout. - Do I need to connect all five carriers to show the cheapest rate in WooCommerce?
No, you don’t need to connect every carrier. The Multi-Carrier Shipping Plugin for WooCommerce compares only the carriers you enable. Even using two or three carriers can help WooCommerce find and display the cheapest available shipping rate based on your setup.