How to setup Multi-Carrier Shipping Plugin for WooCommerce?
This guide explains how to set up the WooCommerce Multi-Carrier Shipping Plugin to get real-time shipping rates from UPS, USPS, FedEx, Stamps.com, and DHL.
It’s a complete guide to using multiple shipping carriers on your WooCommerce store, along with WooCommerce Flat Rate and Free Shipping based on factors like Weight, Quantity, and Price.
On This Page
- Download, Install and Activate the Plugin
- Navigate to the Plugin Settings
- Activate the Plugin License
- General Settings
- Carrier Accounts
- Shipping Area Management
- Shipping Rules
- Parcel Packing
- How Does It Look at the Cart Page?
- Debug Setting
Download, Install, and Activate the Plugin
After purchasing the Multi-Carrier Shipping Plugin for WooCommerce, the plugin will be available as a zip file in the API Downloads section of your MY ACCOUNT page.
- Download the .zip file from API DOWNLOADS by logging into MY ACCOUNTS on www.pluginhive.com
- Once the .zip file is downloaded, log in to the WordPress Admin page of your online store.
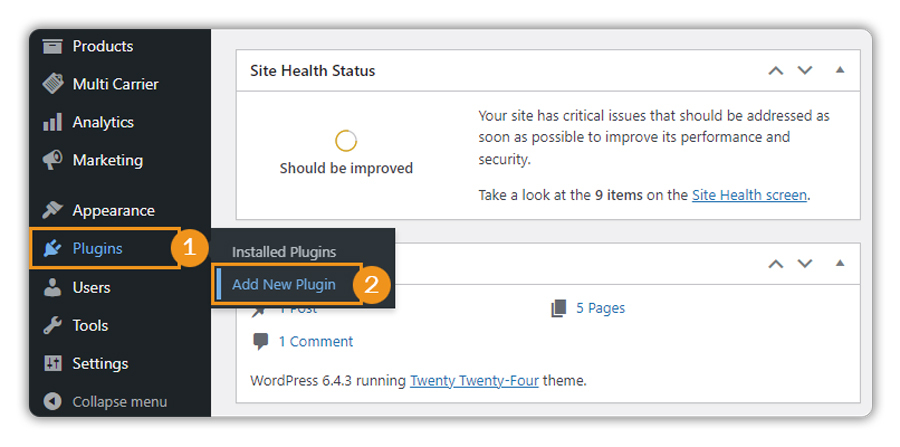
- Navigate to Plugins → Add New to upload the downloaded WooCommerce UPS Shipping Plugin as shown below:
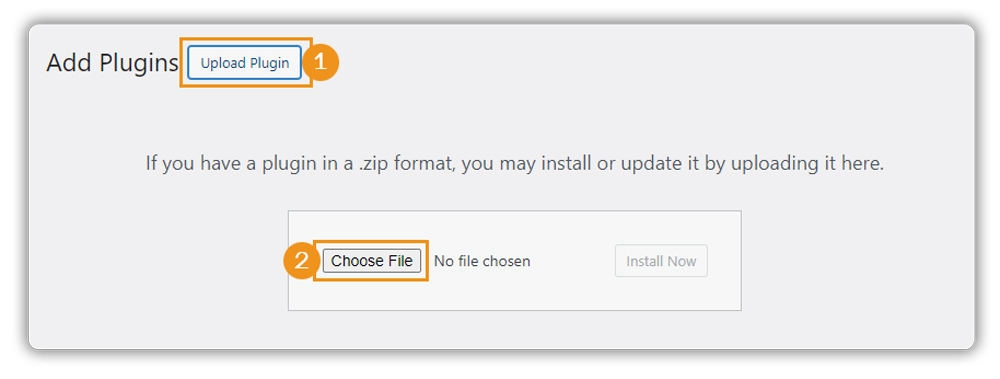
- Upload the plugin to the WooCommerce Store as shown below:
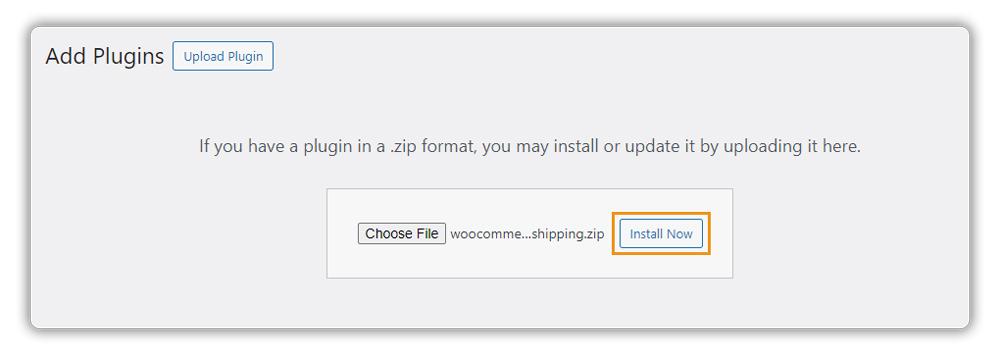
- Click on Install as shown below:
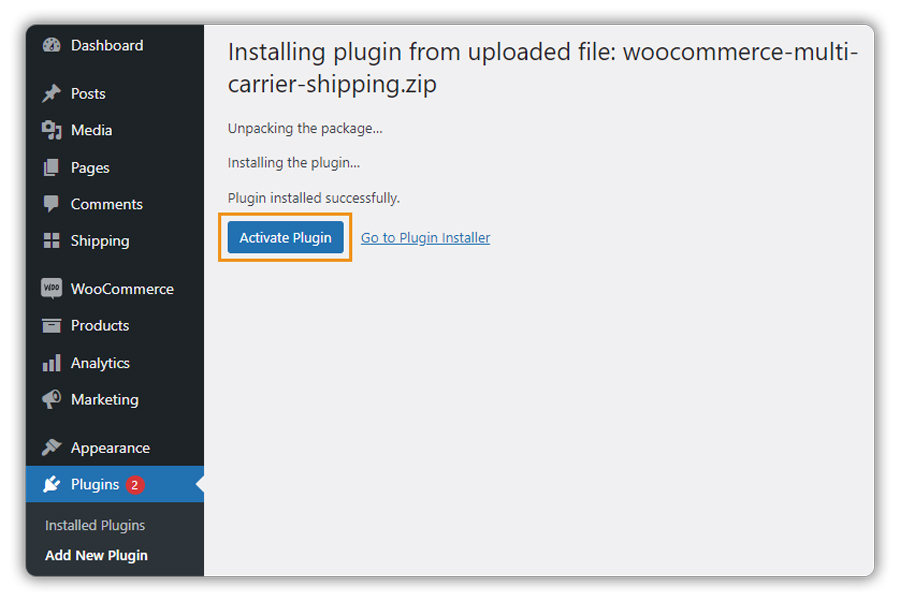
- Finally, click on Activate Plugin to activate the plugin as shown below:
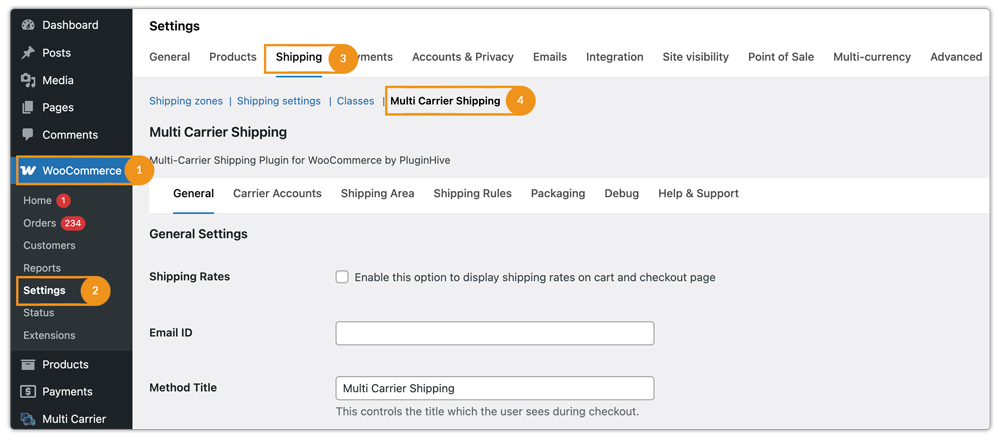
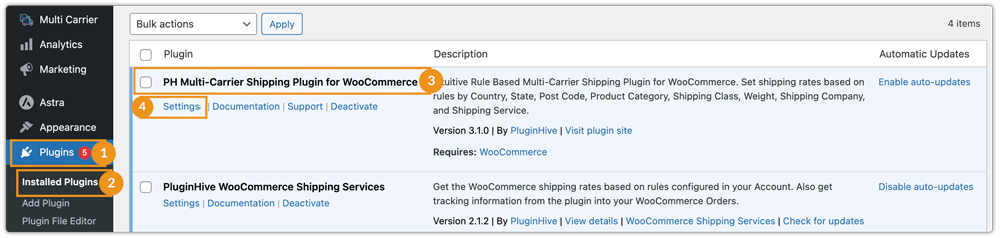
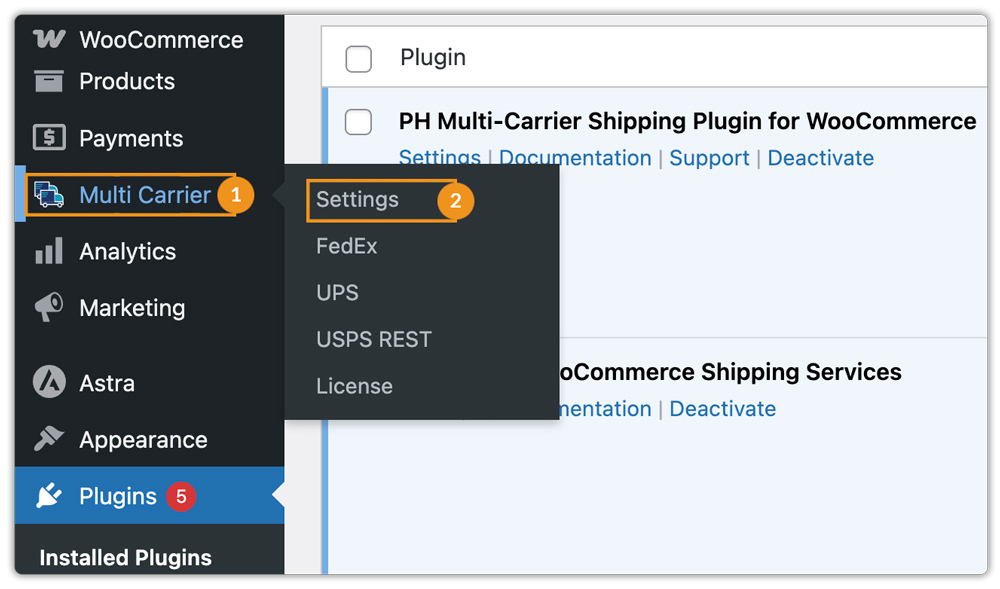
Navigate to the Plugin Settings
After installing and activating the plugin, a new shipping method, Multi-Carrier Shipping Plugin, is added to your WooCommerce Shipping settings.
Now you can configure the Multi-Carrier Shipping settings as per your requirement. You can navigate to settings in two ways, as shown below:
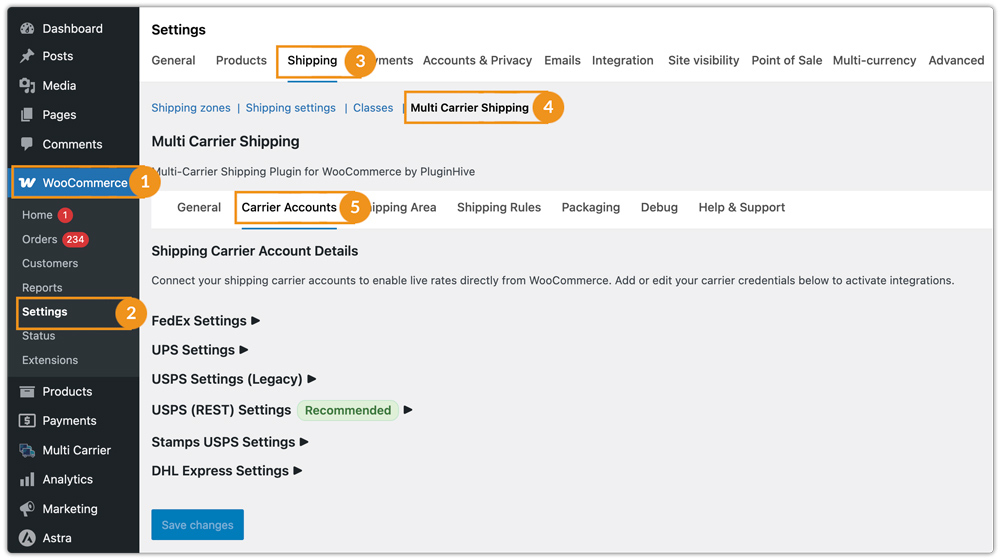
Navigate to WooCommerce → Settings → Shipping → Multi-Carrier Shipping as shown below:
Or navigate to Plugins → Installed Plugins → PH Multi-Carrier Shipping Plugin for WooCommerce → Settings as shown below:
Or navigate to Multi-Carrier → Settings as shown below:
You will be able to see the following shipping-related options in detail
- General
- Carrier Accounts
- Shipping Area
- Shipping Rules
- Packaging
- Debug
- Help & Support
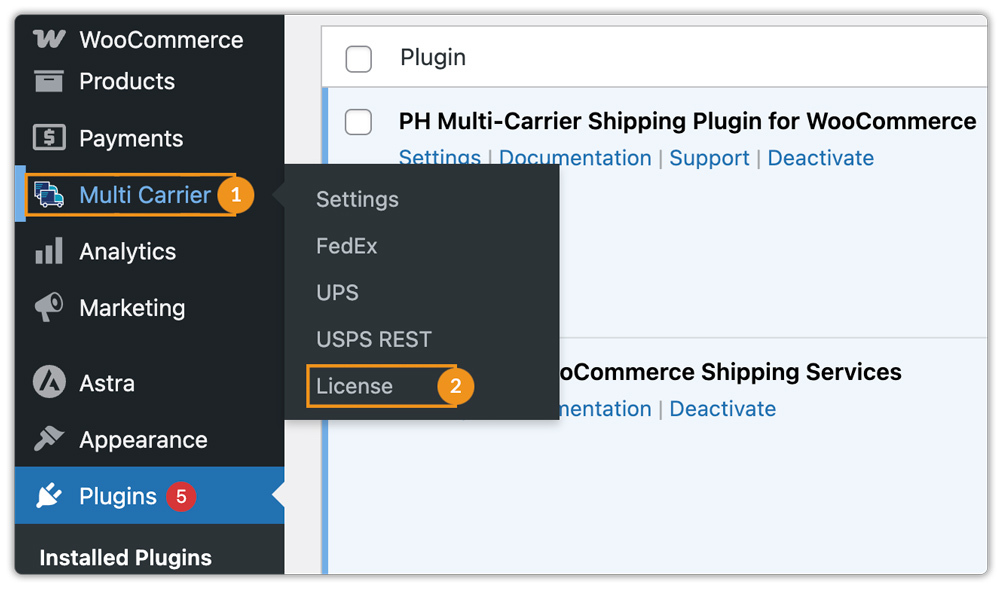
Activate the Plugin License
To activate the license key, you have to enter the Product Order API Key and the Product ID used for the purchase.
To find your API Key and Product ID, follow these steps:
- Log in to your PluginHive account.
- Navigate to the MY ACCOUNT section.
- Click on API KEYS.
- Here, you’ll find your Product Order API Key.
Plugin License Is Mandatory:
** Please ensure that your plugin licence is always active for the smooth functioning of the plugin.
** Remember to renew your license annually and keep it activated.
Now go to Multi-Carrier → License as shown below:
Enter the following on the license activation page:
- API Key
- Product ID
Now, click on Save Changes, and your API Key Status is Activated as shown below:

General Settings
Multi-Carrier Shipping Settings

The General settings contain the following:
- Shipping Rates: Enable this option to display shipping rates on both the cart and the checkout page. This provides your customer with a clear visibility of shipping costs before completing their purchase, ensuring a transparent and seamless shopping experience.
- Method Title: You can set your preferred method title. This title is visible on the cart/checkout page under shipping options.
Shipper Settings
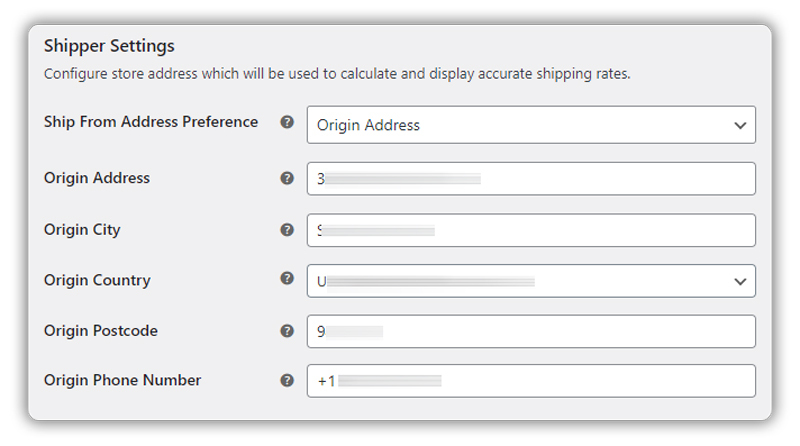
This section contains the following fields:
- Ship From Address Preference: This option lets you choose your preferred shipping origin address. By selecting your preferred address, you ensure that orders are dispatched from the correct location, streamlining your shipping process and reducing the risk of errors.
- Origin Address: Enter the shipper address, i.e, the address from where you’ll ship your products
- Origin City: Enter the specific city name.
- Origin Countries: Select the country where your shipping address is based.
- Origin Postcode: Enter the postcode of your shipping address.
Advanced Settings
The Recipient Is a Residential Address
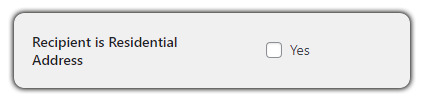
If you want to treat all addresses like residential ones, enable the ‘The Recipient Is a Residential Address‘ option. This means even if a customer enters a commercial address, it’ll be treated as a residential address, making it easier for you to manage shipping for all kinds of addresses, whether it’s residential or business. This may increase your shipping charge.
AND Logic

This option allows you to set up shipping rules for various shipping classes and product categories.
For example, consider an online clothing store that sells T-shirts and Sweatshirts. You can create a single shipping rule for both categories.
With the AND Logic functionality, you can set up shipping rules in scenarios like:
- When a customer adds products from the “T-shirts” categories.
- When a customer adds products from the “Sweatshirts” categories.
- When a customer adds products from both the “T-shirts” and “Sweatshirts” categories.
- When a customer adds products from either the “T-shirts” or “Sweatshirts” categories.
Enabling the AND Logic for shipping calculation makes it easy to create these rules, ensuring accurate shipping rates for different combinations of products.
Tax Status
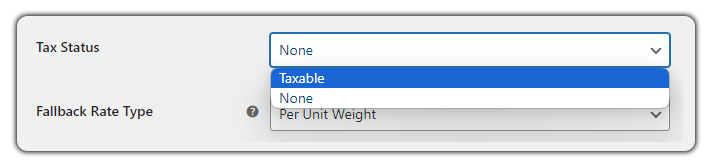
Tax is an additional charge added to the base shipping rate, which is applied to your shipment based on the chosen shipping service.
Tax Status determines whether taxes should be applied to shipping rates. Select Taxable if you want to charge taxes on shipping, or choose None if you don’t want to apply taxes to shipping rates. This setting ensures compliance with tax regulations and helps streamline your transaction process.
Fallback Rate

Adding Fallback Rates is necessary when real-time rates from carriers are unavailable or when you want to provide flat rates. These rates are used as backups to ensure that shipping costs are always displayed to customers, even if carrier rates aren’t accessible.
Fallback Rate Type

You can set fallback rates according to various factors such as weight, quantity, or price, allowing you to customize your shipping charges.
The Fallback Rate Type option provides three methods for calculating fallback rates:
- Fixed Cost: Based on the fixed cost configured.
- Per Unit Weight: Based on the weight of each item, the fallback rate is calculated.
- Per Unit Quantity: Based on the number of items, the fallback rate is applied to each item regardless of its weight and dimension.
To get more understanding on Fallback rates, read Set Shipping Rates in WooCommerce with Multi-Carrier Shipping Plugin
Carrier Accounts
The Carrier Accounts section includes settings for FedEx, UPS, USPS (Legacy), USPS (REST), USPS Stamps, and DHL. Here, you can configure specific options and preferences for each carrier to customize your shipping process according to your needs.
To access the carrier accounts settings at once, navigate to Multi-Carrier → Settings → Carrier Accounts tab
(Or) go to WooCommerce → Settings → Shipping → Multi-Carrier Shipping → Carrier Accounts tab.
FedEx Registration
To get FedEx rates on your checkout page, you are required to register your FedEx account.
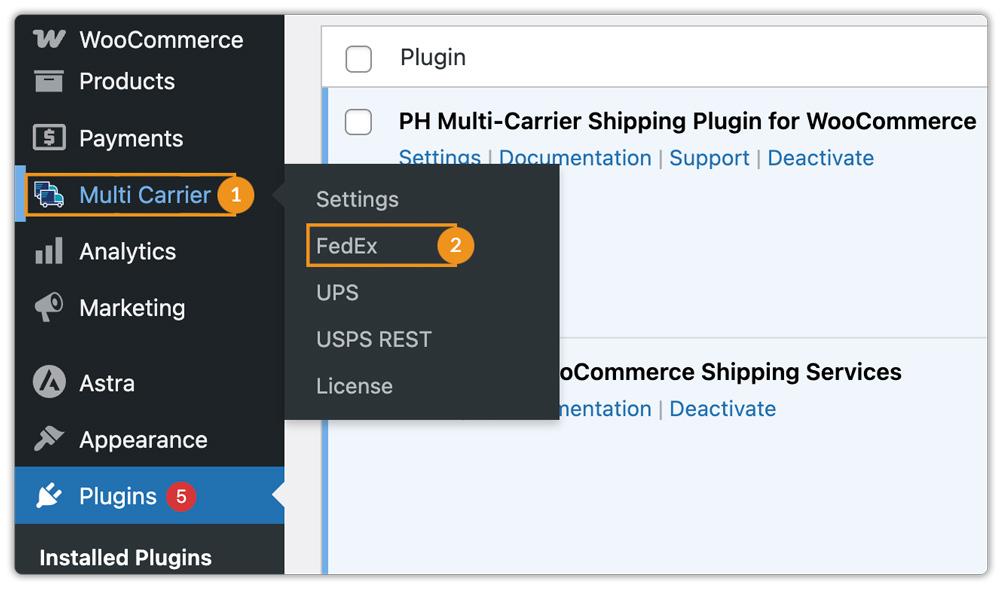
Navigate to Multi-Carrier → click on FedEx as shown below:
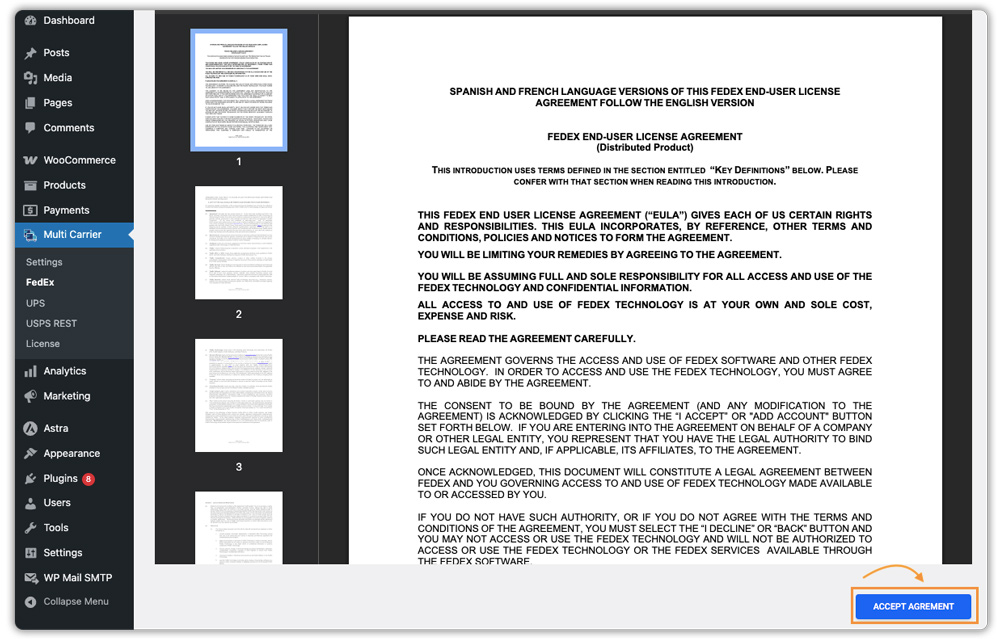
Accept the FedEx End-User License Agreement (EULA)
You will be taken to the Terms and Conditions page. Scroll through the FedEx End-User License Agreement (EULA), which outlines the terms of using the FedEx REST APIs, and click Accept Agreement to proceed.
Fill in Your Account Details
Enter your account and contact details, including your name, company name, phone number, email address, and complete business address associated with your FedEx account.

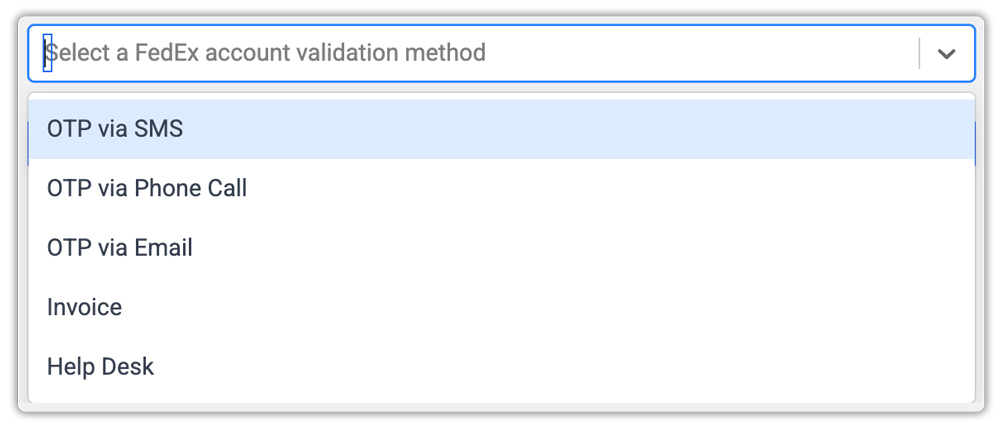
Account Validation
In Select a FedEx Account Validation Method, choose a method for FedEx to validate your account. Available options include:
- OTP via SMS
- OTP via Phone Call
- OTP via Email
- Invoice
- Help Desk
If you select OTP via SMS, Phone Call, or Email, you will receive two OTPs from FedEx. The first one is for verifying your account. Enter the OTP and click Submit.
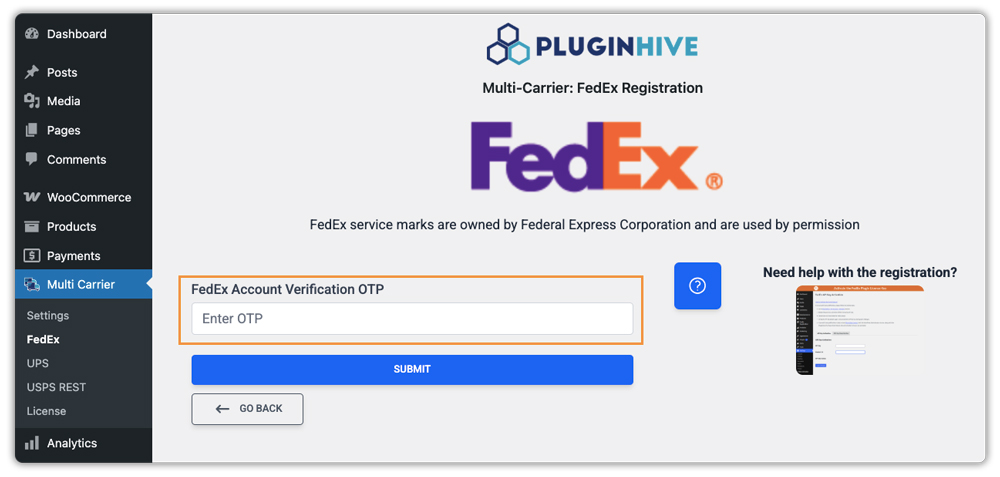
The second OTP is for tracking verification. Enter it and click Submit again to complete the process.
If you select Invoice for account validation, you will be required to enter details from your latest FedEx invoice, including the Invoice Number, Amount Due, Invoice Issue Date, and Invoice Currency.
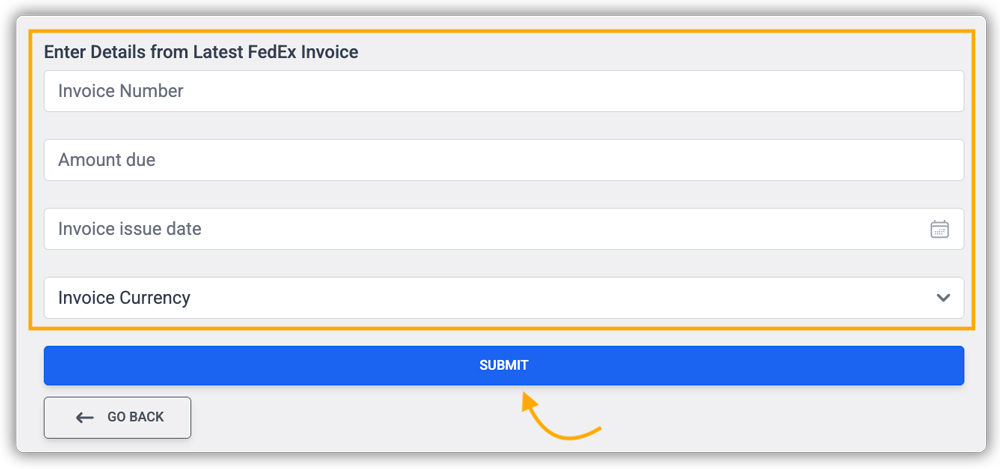
Note that you must have at least one recent shipment with FedEx for this method to work. Once entered, click Submit to validate your account.
If you select Help Desk for account validation, you will need to contact your FedEx Account Manager or FedEx Tech Support and request a bypass for FedEx REST registration. Before reaching out, keep the following details ready:
- FedEx Account Number
- FedEx Billing Address (including Email ID and Phone Number)
- Recent FedEx Invoice ID
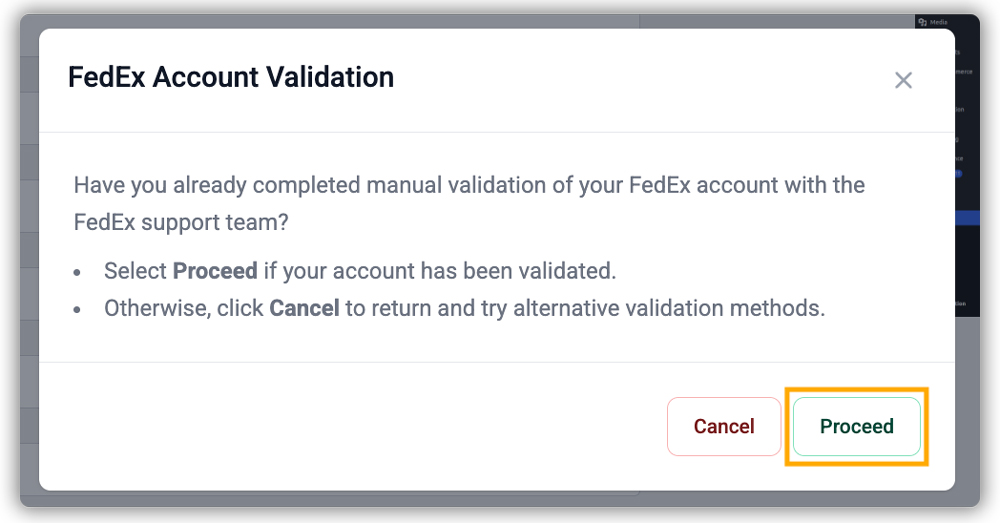
Once the FedEx team confirms the bypass, return to the plugin and select the Help Desk option for account validation. A confirmation screen will then appear asking whether you’ve completed the manual validation with the FedEx support team:
- Click Proceed if your account has been validated; your account will be registered successfully.
- Click Cancel to go back and choose a different validation method.
If the bypass has not been completed on the FedEx side, the registration will fail. In that case, reconnect with your FedEx Account Manager or Tech Support and confirm the bypass. For best results, complete the Help Desk registration while still on the call with the FedEx team, so you can immediately verify that the process works.
Alternatively, you can share the required details with the plugin support team, who can coordinate with FedEx on your behalf.
Registration Complete
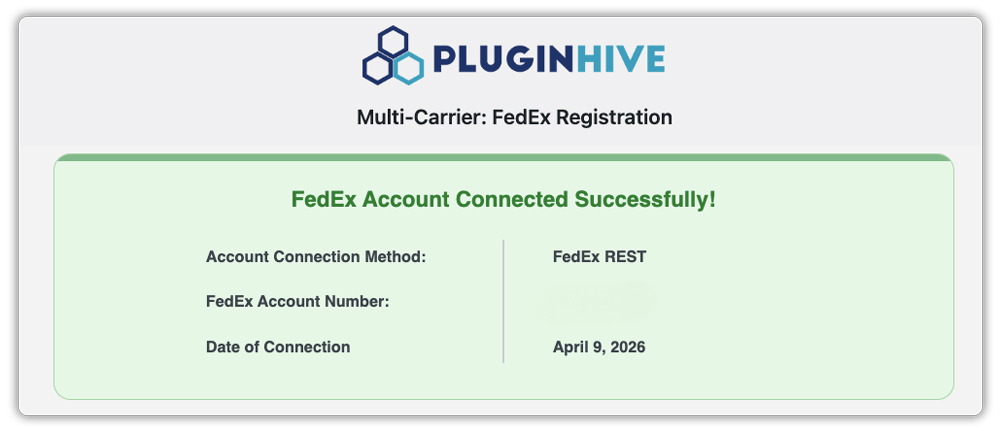
Once validation is successful, your FedEx REST credentials (Client ID, Secret Key, and License Key) are created automatically.
You will also see a confirmation message: “FedEx Account connected successfully,” along with your FedEx account number. An automatic confirmation email will be sent to PluginHive Support after successful REST registration.
Now, you can proceed to configure the plugin settings for shipping rates, packaging, and more.
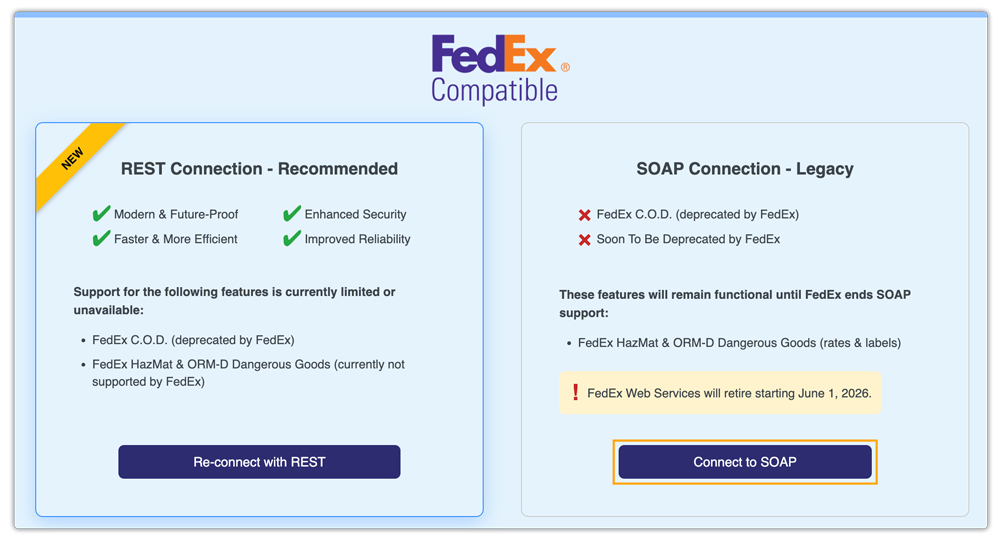
Need to Register With FedEx SOAP?
If you want to connect using SOAP, follow the steps to register your account. Go to the Registration section and click on Connect to SOAP.
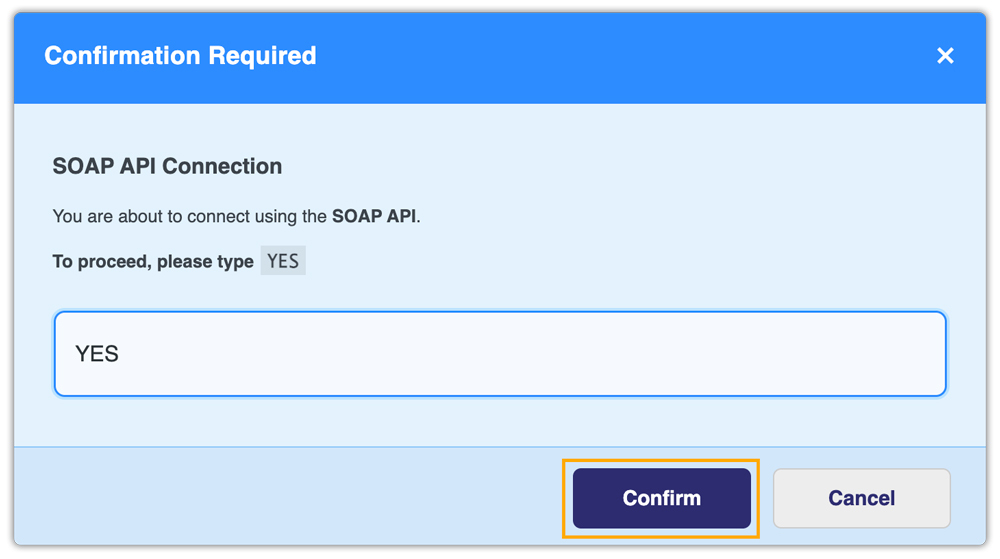
To proceed further, type YES and confirm it.
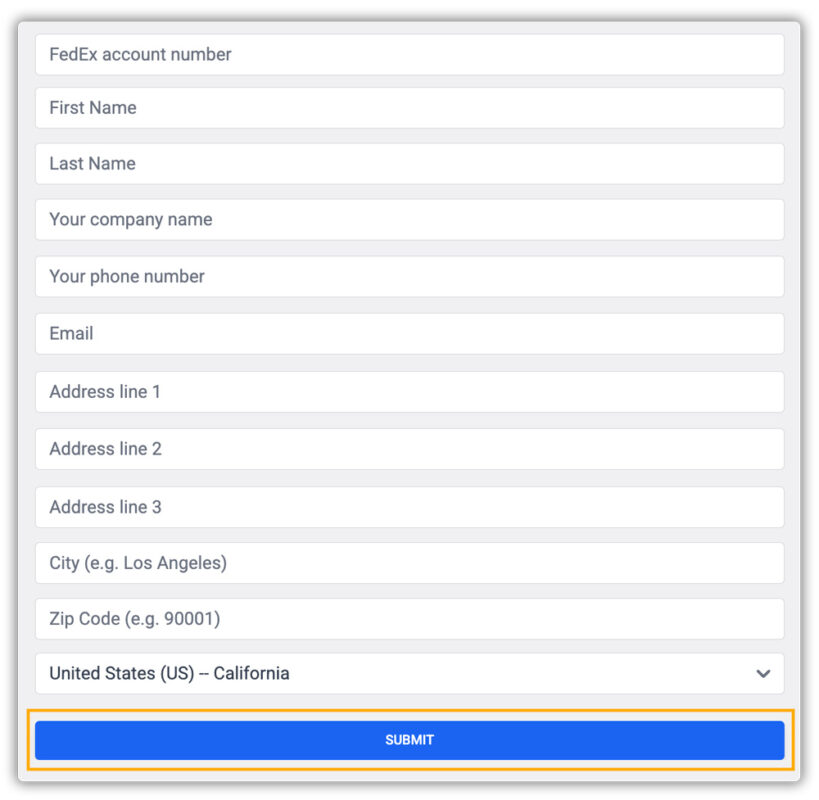
Enter the FedEx Account Name, FedEx Account Number, and the Shipper Address associated with your account, and click on submit.
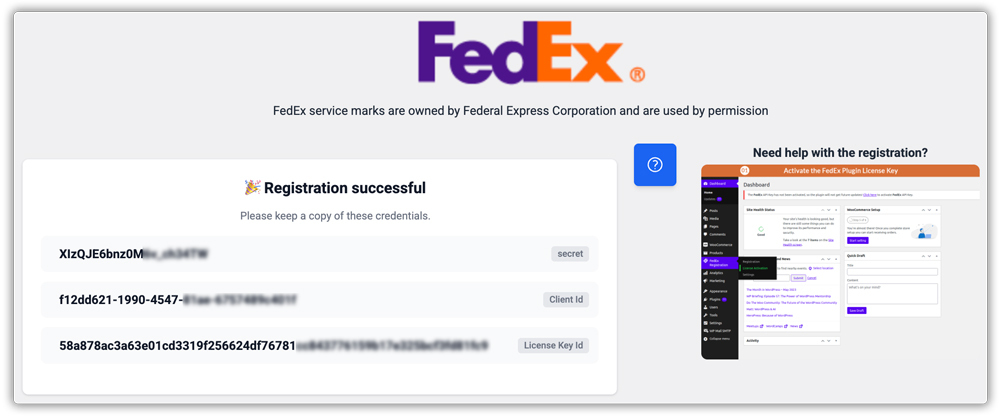
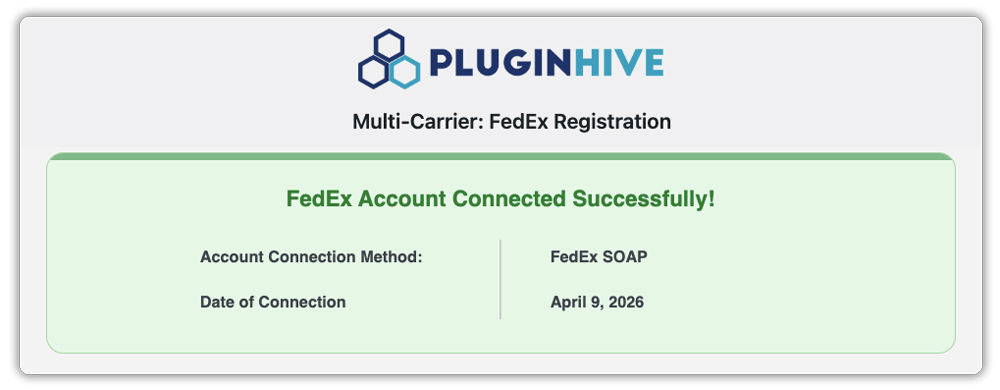
After successful registration, you will be directed to a page where the Secret Key, Client ID, and License Key ID will be displayed.
Your FedEx account has now been successfully connected using the SOAP connection method. You can proceed with the plugin configuration.
FedEx Settings
- Request Type: Select the type of rates you want to display at checkout. Choose Account Rates to display the negotiated rates associated with your FedEx account, or choose List Rates to display FedEx’s standard published rates.
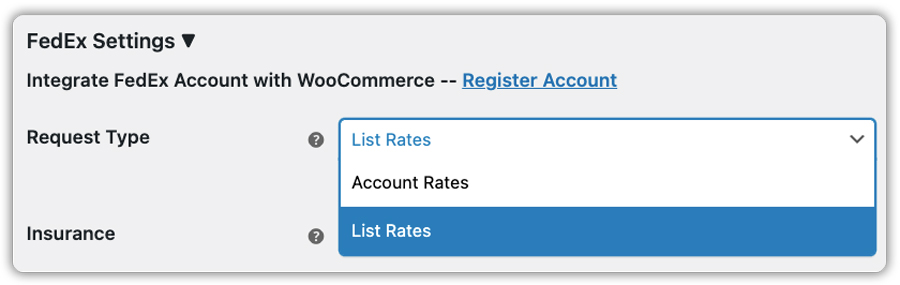
- Insurance: Insuring your product is a way to protect you from potential financial losses. There are many reasons why you might consider insuring your products, ensuring that any issues won’t harm your business entirely. FedEx provides insurance covering different situations like theft, loss, or damage, offering peace of mind for your shipments.

To get more understanding on FedEx Insurance, read When to Consider FedEx Insurance for Your WooCommerce Shipments?
- FedEx One Rate: FedEx One Rate is a flat-rate shipping option where you pay a fixed price based on the package size, regardless of the package weight. Enable this option to display FedEx One Rate pricing at the WooCommerce checkout.

To get more understanding on FedEx One Rate, read How to Save Shipping Cost using FedEx One Rate
- Show Estimated Delivery: Enable this option to show estimated delivery days at checkout. This provides customers with an estimated timeframe for when they can expect their product or shipment to arrive.

- Address Validation: Enable this option to automatically verify whether the address provided by the customer is residential or commercial. FedEx Address Validation is used to confirm the address type, ensuring accurate shipping information for smoother delivery processes.

**Please note that to use address validation option, your FedEx account must have Address Validation Service enabled. This might make the rate calculation slower in the checkout page.
**For more understanding on FedEx Address Validation, read How to use FedEx Address Validation on your Online store?
- Delivery Signature: Enable this option if you are looking for a delivery confirmation for your .
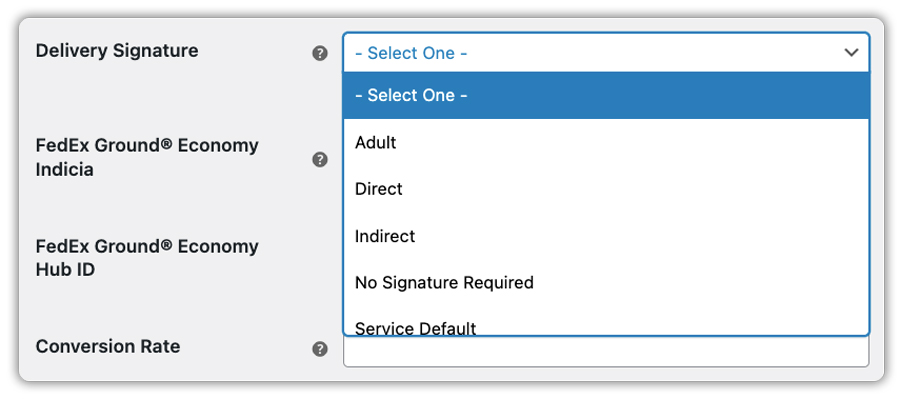
- FedEx Ground® Economy Indicia: This is a type of shipping label used by FedEx for their Ground® Economy service. Enable this option if you are shipping with FedEx Ground® Economy, and enter the appropriate indicia value. The default value is PARCEL_SELECT.
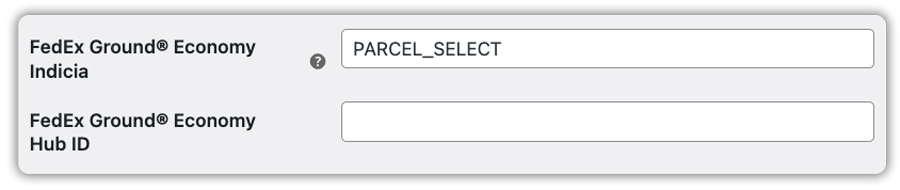
- FedEx Ground® Economy Hub ID: FedEx assigns a unique identification number to each FedEx Ground® Economy hub facility. Enter your FedEx Ground® Economy Hub ID in this field.
- Conversion Rate: This option helps when the sender and receiver use different currencies. For instance, if you’re a seller in Europe and your customer in the US wants to pay in US dollars, you need to enter the current exchange rate. This ensures everyone pays the correct amount, even if they use different currencies.

UPS Registration
To get UPS rates on your checkout page, you are required to register your UPS account.
Follow the steps below to register:
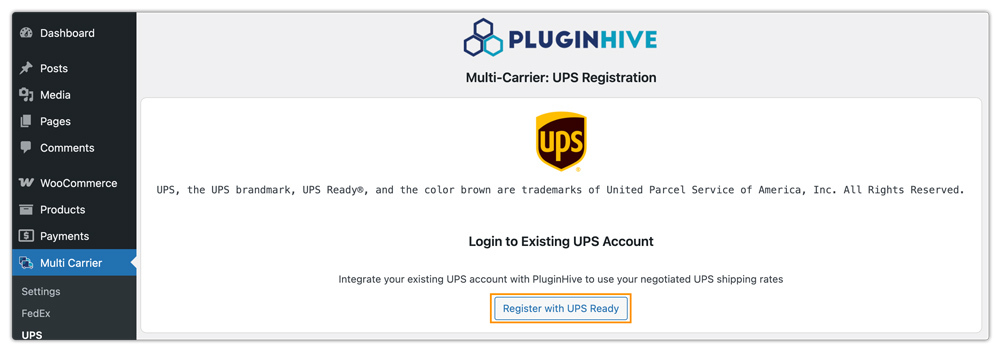
- Navigate to Multi-Carrier → click on UPS as shown below:

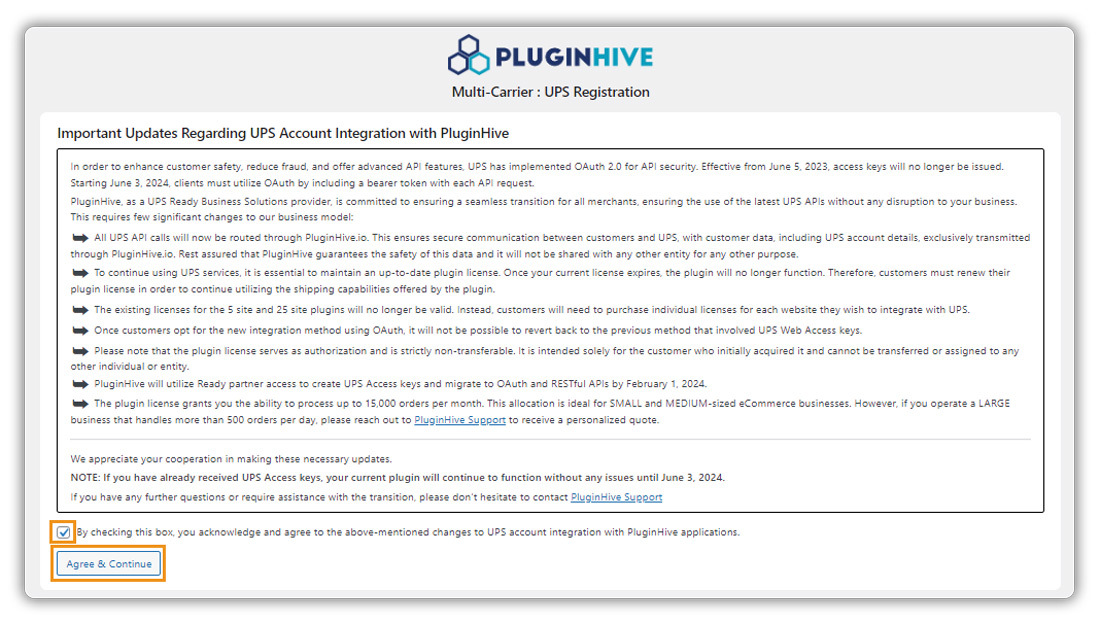
- You will be redirected to a page where you need to click on Agree & Continue as shown below:

- Now you will be taken to the Terms and Conditions page. Read the updates and check the checkbox. Click on Agree & Continue as shown below:
- Now you will be taken to the Log In page, as shown below. To add to your existing UPS account, click on Register with UPS Ready as shown below:
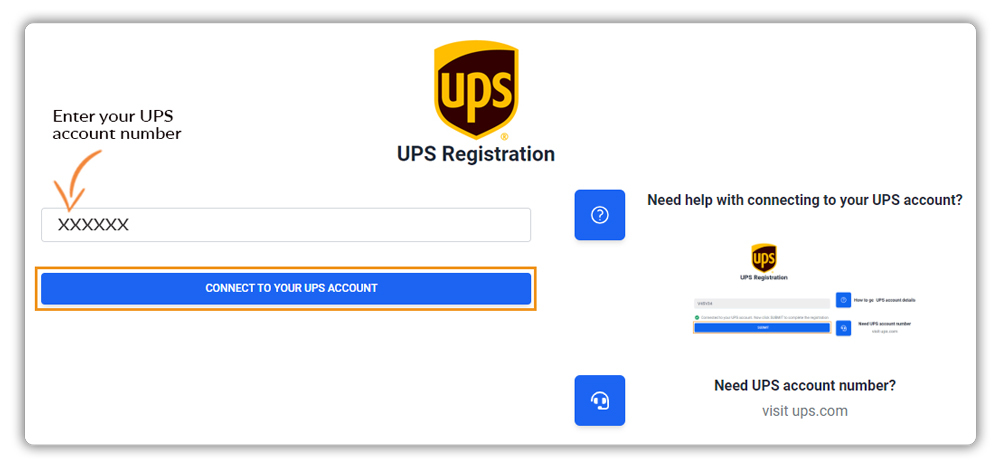
- You will be redirected to the UPS Registration page.
- Enter your UPS account number and click on CONNECT TO YOUR UPS ACCOUNT as shown below:
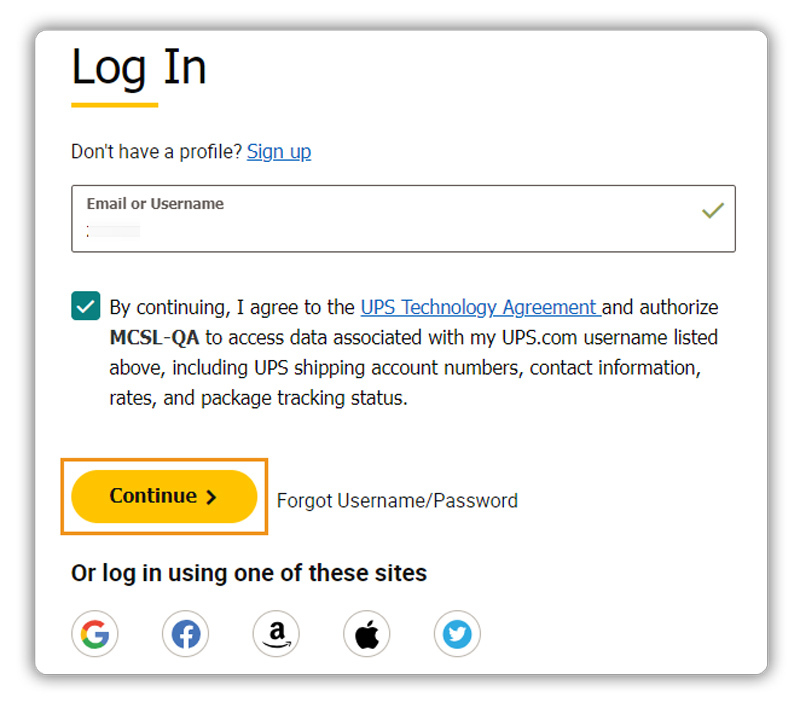
- You will be taken to the login page.
- Enter your Username, check the checkbox, and click on Continue as shown below:
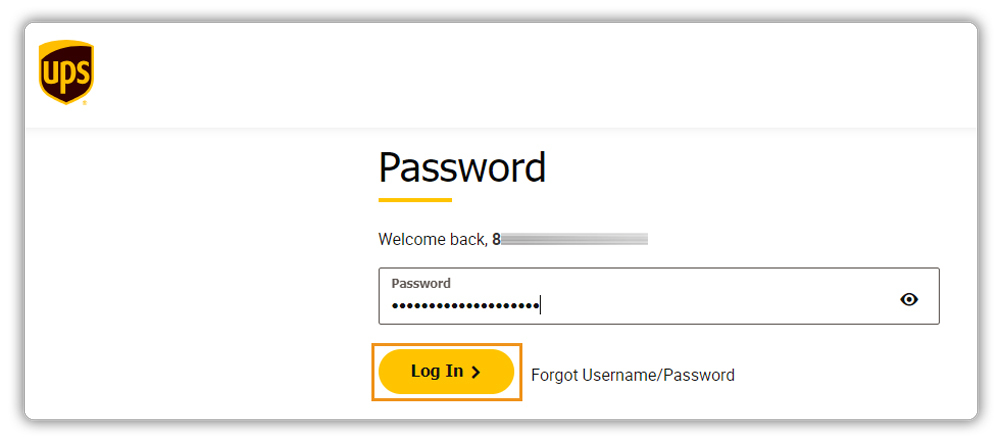
- Enter your Password and click on login as shown below:
- Now your UPS account is connected. Click on PROCEED TO NEXT STEP as shown below:
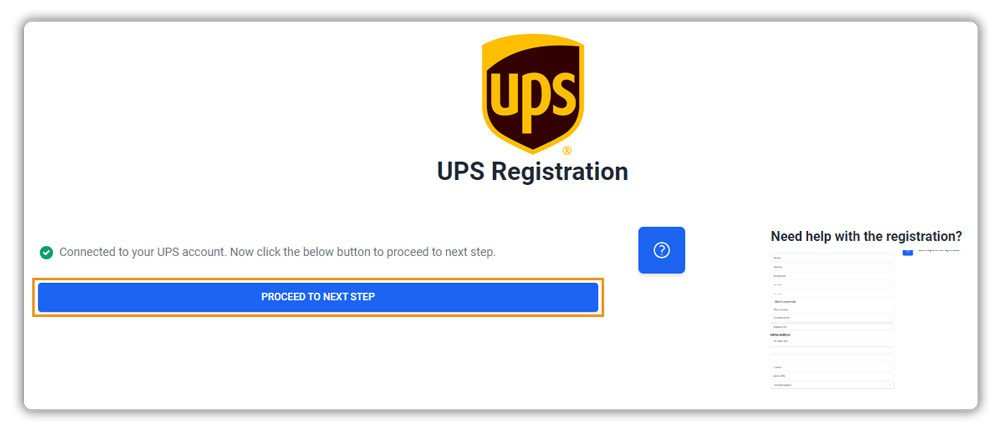
- The registration is successful.

UPS Settings
Once the registration is successful, you can continue to configure the UPS settings as shown below:
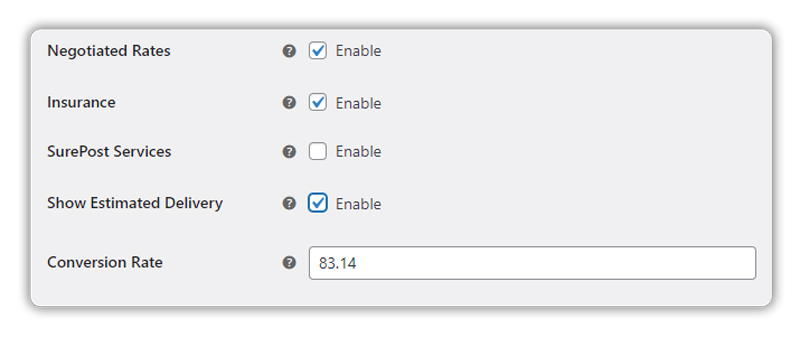
- Negotiated Rates: Enable this option if your shipping account has negotiated rates available.
- Insurance: Enable this option if you want to add insurance coverage value to your products.
- SurePost Service: Enable this option to get SurePost Service rates in the checkout.
- Show Estimated Delivery: Enable this option to show estimated delivery days at checkout. This provides customers with an estimated timeframe for when they can expect their product/shipment to arrive.
- Conversion Rate: This option helps when the sender and receiver use different currencies. For instance, if you’re a seller in Europe and your customer in the US wants to pay in US dollars, you need to enter the current exchange rate.
This ensures everyone pays the correct amount, even if they use different currencies.
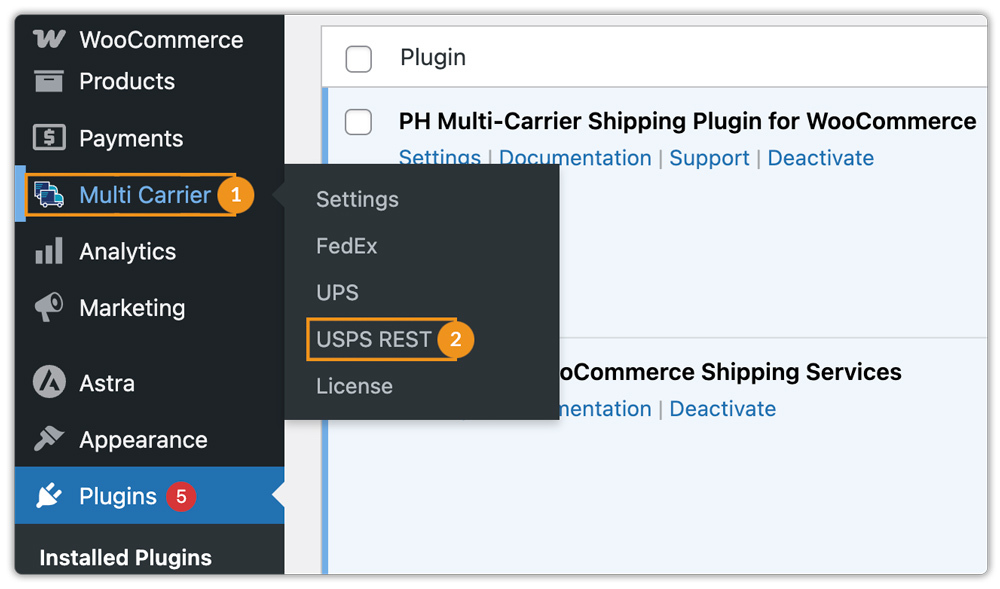
USPS REST Registration
The USPS (REST) Registration section allows you to connect your USPS account to WooCommerce using the REST API for improved performance and faster rate fetching.
If you don’t already have a USPS account, refer to this guide – How to Create a USPS Account and Integrate It With WooCommerce to create one before proceeding.
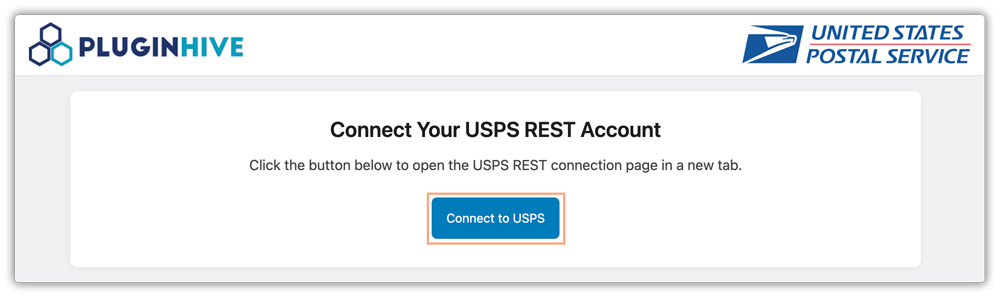
For USPS REST integration, navigate to Multi-Carrier → click on USPS REST as shown below:
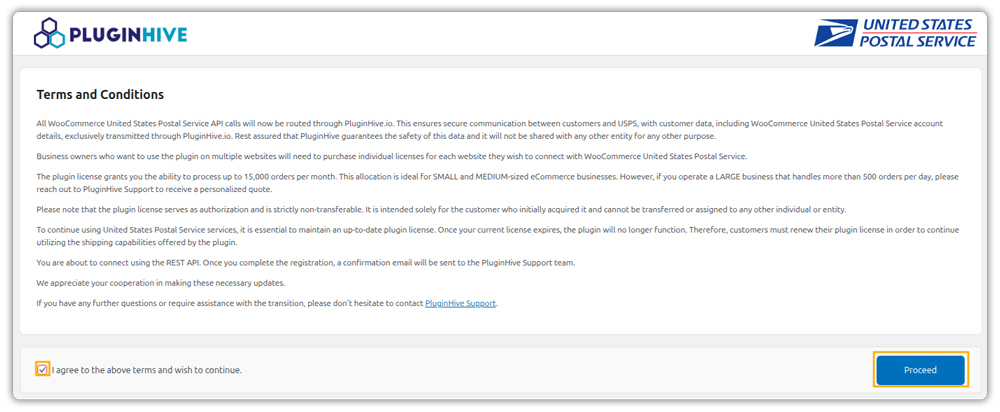
You will be taken to the USPS REST Registration Terms and Conditions page. Read the terms carefully, check the agreement box, and proceed.
Next, click on Connect to USPS to link your USPS REST account with your WooCommerce store.
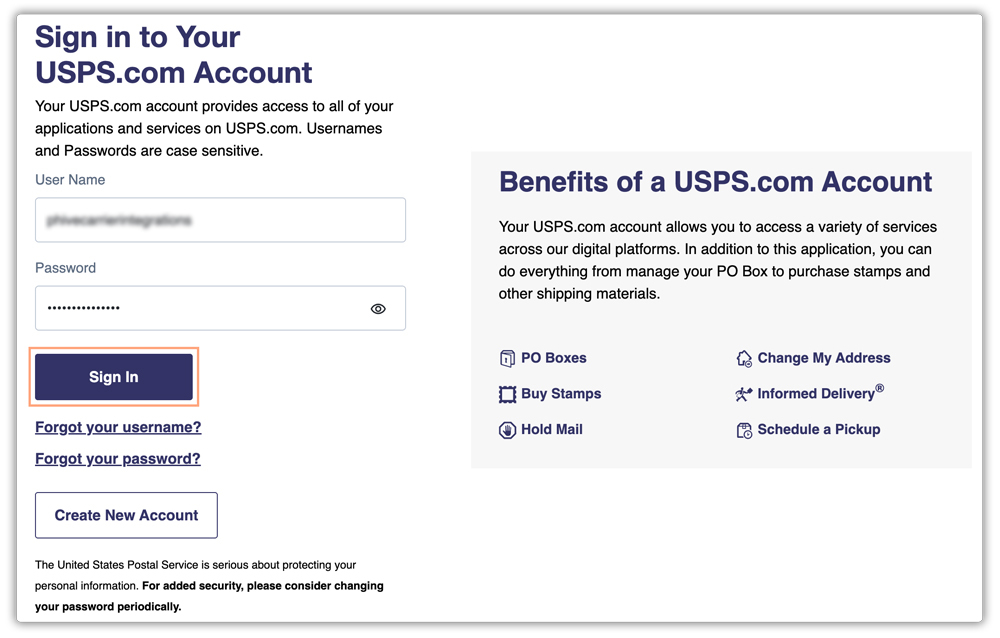
You will then be redirected to the USPS Login page, where you can log in using your Username and Password.
This step is optional. If you have enabled multi-factor authentication on your account, you need to enter the passcode sent to your registered email address and click Submit to verify your account.
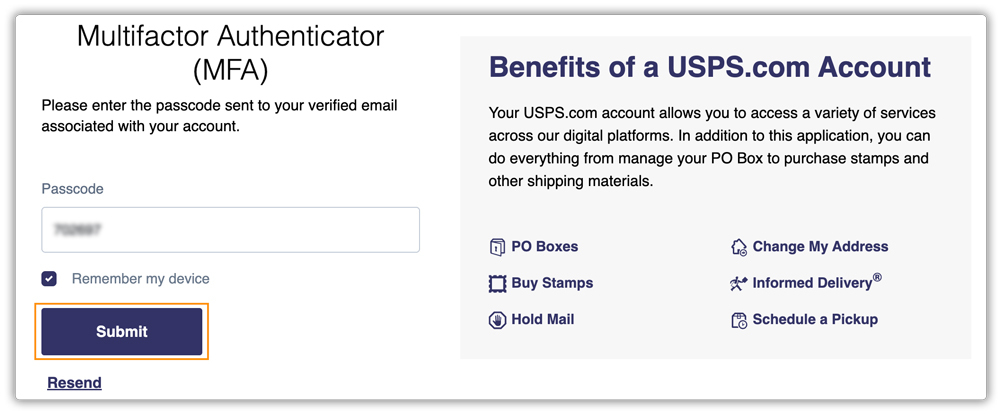
Once verified, click on Authorize and Continue to allow WooCommerce to access your USPS REST account securely.

After authorization, your registration will be successful.

You will now be prompted to Confirm Your USPS REST Account Details. Select your account credentials from the dropdown menu and click on Confirm and Continue.
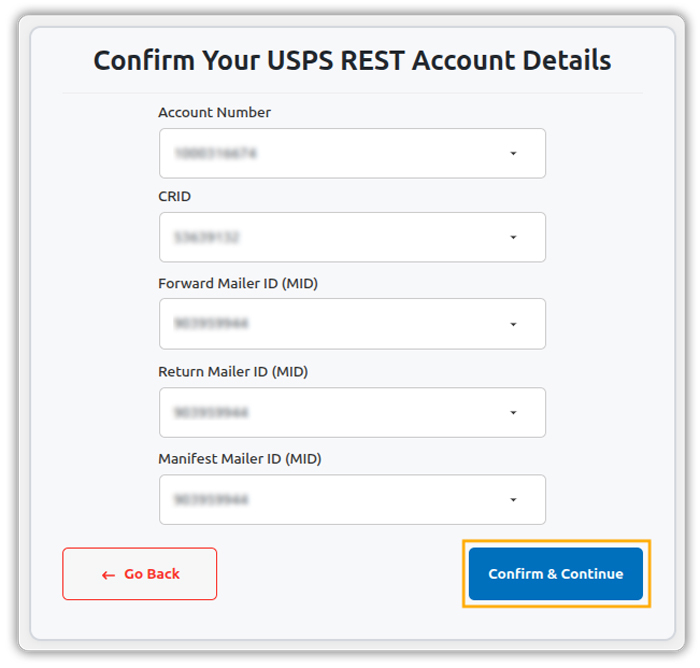
If needed, you can click Go Back to restart your registration.
Once confirmed, you’ll see a message indicating that your USPS REST account has been connected successfully. If needed, you can disconnect your account at any time by clicking on Disconnect.
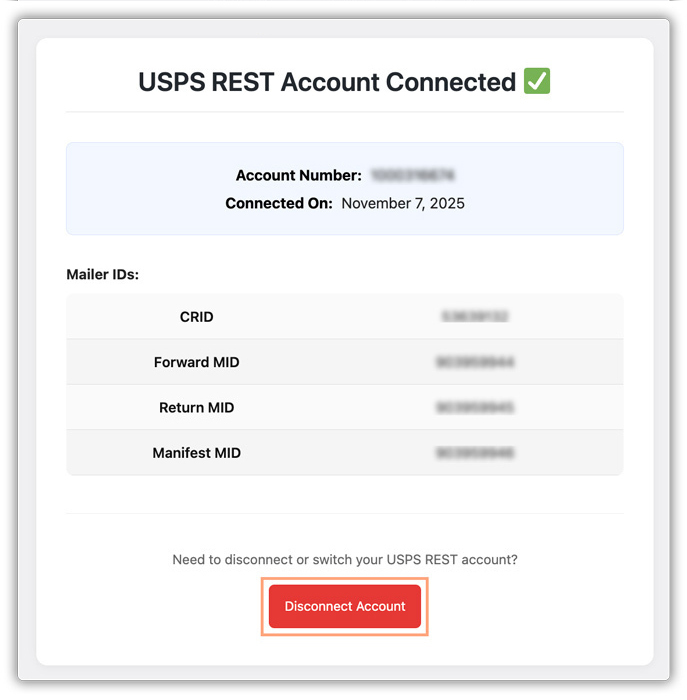
To confirm the disconnection, simply type DISCONNECT in the prompt and proceed.

You can reconnect your USPS REST account whenever required by following the same process.
USPS REST Settings
Once your USPS REST account is successfully connected, you can configure the following settings:
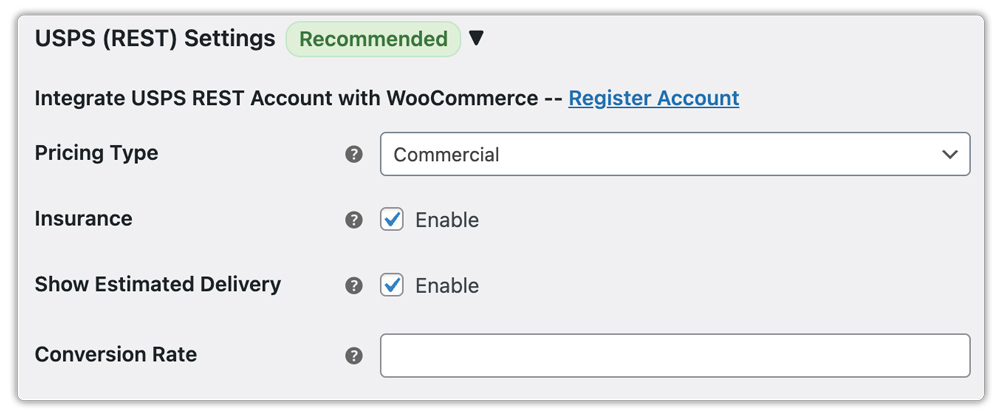
Pricing Type:
Choose the type of USPS pricing you want to display at checkout. You can select from the following options:
- Commercial: Displays discounted commercial rates (available for business accounts).
- Retail: Displays standard retail rates.
- Contract: Displays contract-based rates if you have a special agreement with USPS.
Insurance:
Enable this option to add insurance coverage for your shipments. USPS insurance protects your packages against loss or damage during transit.
Show Estimated Delivery:
Enable this option to display estimated delivery dates at checkout. This helps customers know when to expect their shipments.
Conversion Rate:
Use this option if the sender and receiver use different currencies. Enter the current exchange rate to ensure accurate rate calculations and payments.
USPS Settings (Legacy)
To add and access your USPS Legacy account, you need to provide the USPS User ID and Password in the USPS Settings(Legacy).
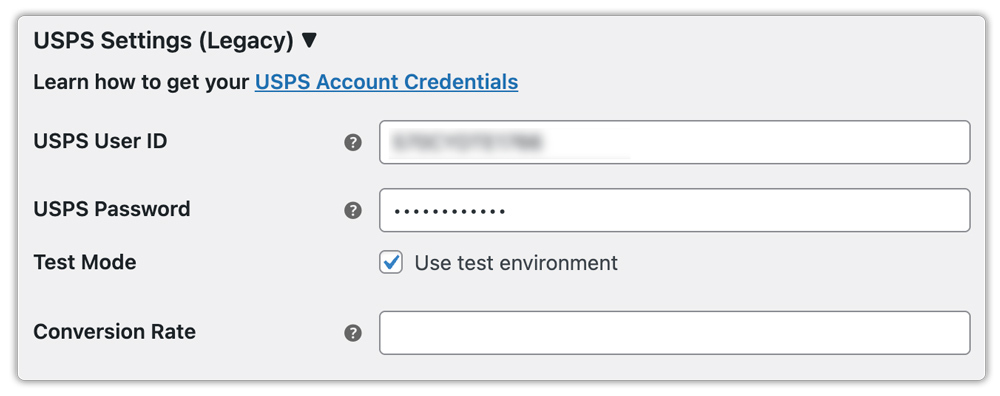
- Test Mode: Enable this option to run the plugin in the test environment. The test credentials are provided by the respective shipping carrier.
- Conversion Rate: This option helps when the sender and receiver use different currencies. For instance, if you’re a seller in Europe and your customer in the US wants to pay in US dollars, you need to enter the current exchange rate.
This ensures everyone pays the correct amount, even if they use different currencies.
Stamps USPS Settings
To add a Stamps USPS carrier, you need to provide the following in the Stamps USPS Settings:
- USPS User ID
- USPS Password
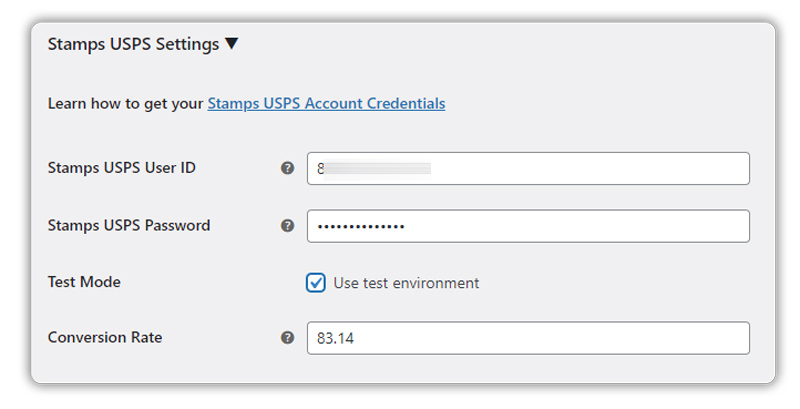
- Test Mode: Enable this option to run the plugin in the test environment. The test credentials are provided by the respective shipping carrier.
- Conversion Rate: This option helps when the sender and receiver use different currencies. For instance, if you’re a seller in Europe and your customer in the US wants to pay in US dollars, you need to enter the current exchange rate.
This ensures everyone pays the correct amount, even if they use different currencies.
DHL Express Settings
To add your DHL Carrier, you need to provide the following in the DHL Express Settings:
- DHL Account No.
- DHL Site ID
- DHL Password
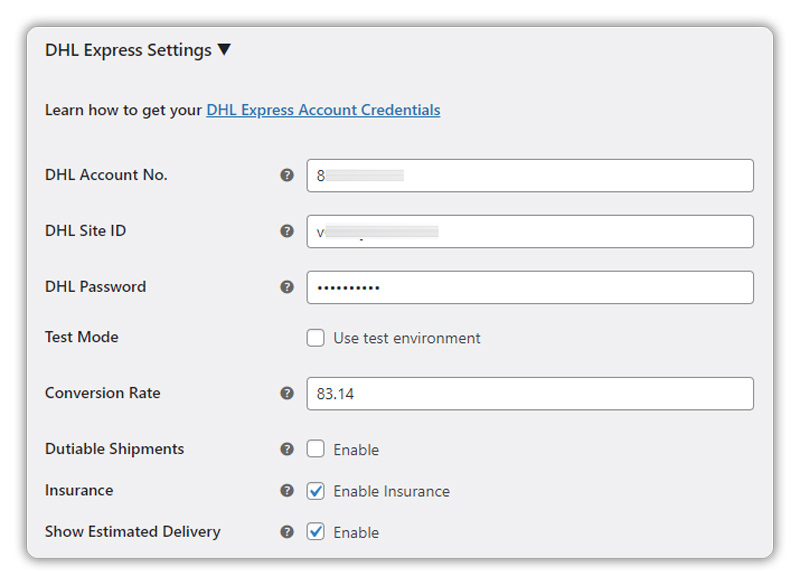
- Test Mode: Enable this option to run the plugin in the test environment. The test credentials are provided by the respective shipping carrier.
- Conversion Rate: This option helps when the sender and receiver use different currencies. For instance, if you’re a seller in Europe and your customer in the US wants to pay in US dollars, you need to enter the current exchange rate.
This ensures everyone pays the correct amount, even if they use different currencies.
- Dutiable Shipments: Enable this option for Dutiable Shipments. These are the packages that have extra fees at customs when they’re sent across borders.
- Insurance: Enable this option if you want to add insurance coverage value to your products.
- Show Estimated Delivery: Enable this option to show estimated delivery days at the checkout. This provides customers with an estimated timeframe for when they can expect their product/shipment to arrive.
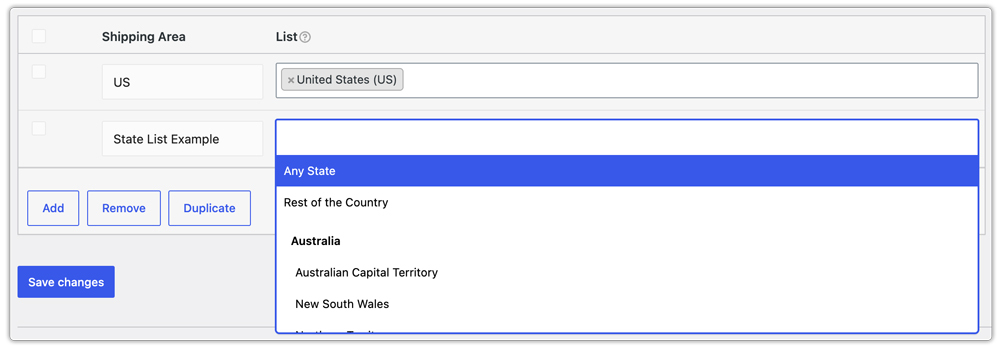
Shipping Area Management
With Shipping Area Management, you can create your areas using Shipping zones, country names, city names, and postcodes.
To access this, navigate to WooCommerce Settings > Shipping > Multi-Carrier Shipping > Shipping Area Management. Under that, you can add your Shipping area as shown below:
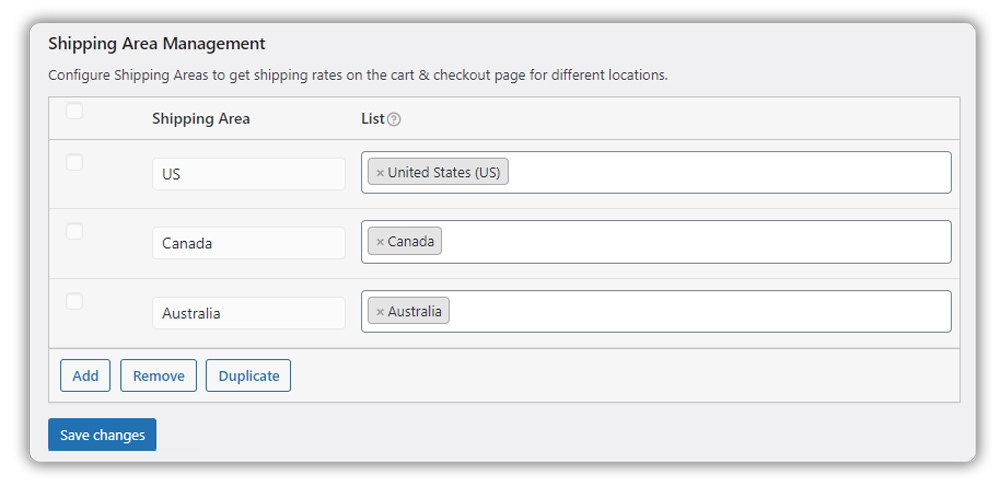
This image shows the settings that contain a Zone matrix with two attributes:
- Shipping Area: This allows you to set a customized area name.
- List: Contains possible selections by the type of shipping area selected.
To create a new shipping area, click the Add button. A new window pops up that allows you to select the type of shipping area type as shown below:
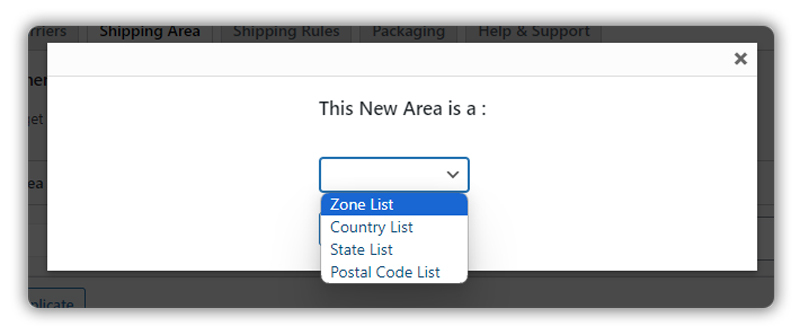
There are 4 options:
- Zone List
- Country List
- State List
- Postal Code List
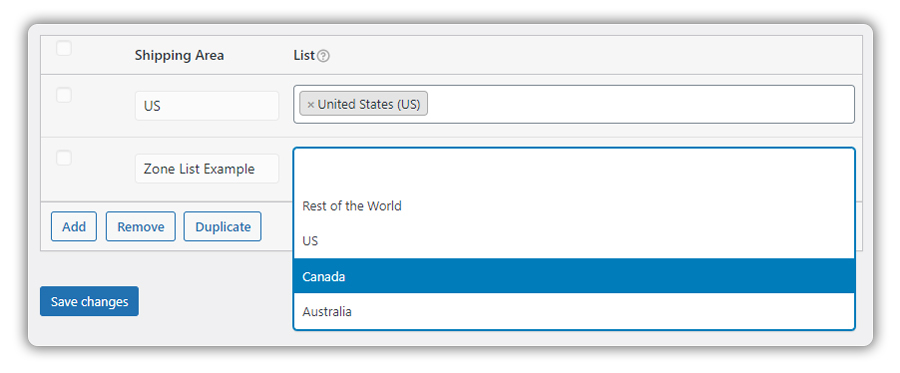
1. Zone List: This allows you to set an area with your created Shipping Zones. All the created Shipping zones will be available in the List attribute. If you have not created any shipping zones, the List attribute will only contain the default shipping zone, Rest of the World.
2. Country List: This allows you to select countries where you ship your products.
Important: The countries available in this list are controlled by the WooCommerce Shipping location(s) setting under WooCommerce > Settings > General. If WooCommerce is configured to ship to specific countries, only those selected countries will appear in the Multi-Carrier Shipping country dropdown. Therefore, before creating a Country-based Shipping Area, ensure that all the required countries are enabled in WooCommerce, as shown below.

Once the required countries are configured in WooCommerce, they will be available for selection while creating the Shipping Area, as shown below.

3. State List: This allows you to select states to create a new area. Only states belonging to the countries available in the configured Country List will be displayed for selection.
4. Postal Code List: This allows you to enter multiple postal codes. The postal codes should correspond to the countries and states included in your configured Shipping Areas.

Read more about how to set up the Shipping Area Management for different shipping scenarios based on WooCommerce Shipping Zones, Countries, States, and Postal Codes.
Shipping Rule
Rule Table
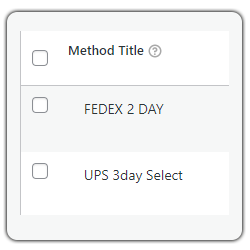
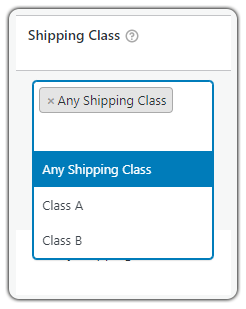
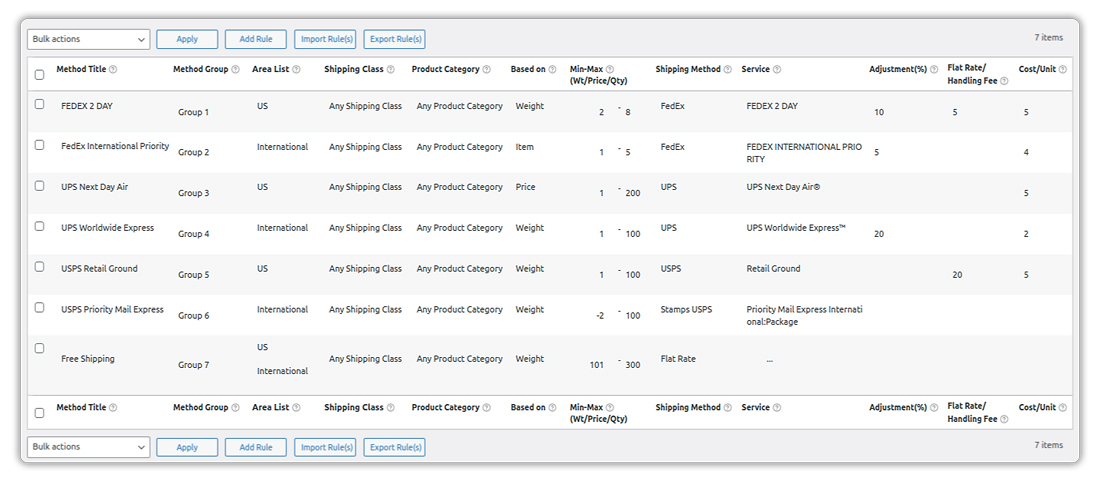
The Rule Table consists of 11 attributes, as follows:
- Method Title
- Area List
- Shipping Class
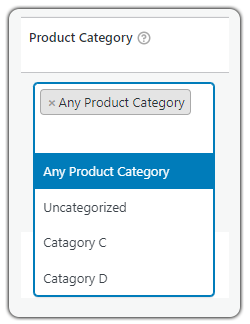
- Product Category
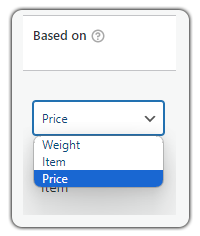
- Based on
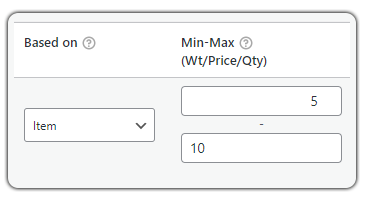
- Min-Max (Wt/Price/Qty)
- Shipping Method
- Service
- Adjustment(%)
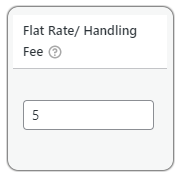
- Flat Rate/ Handling Fee
- Cost/Unit
- Method Title: This allows you to set a customized shipping method title (i.e. FedEx Standard, Priority Shipping, etc.) for the rule. Each rule will be identified by its method title.
- Area List: This list contains all the Area Names created in the Shipping Area.
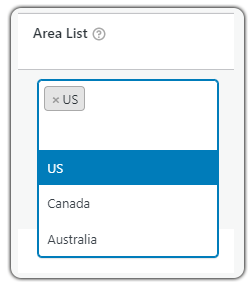
** If you haven’t created any area in the Shipping Area section, this list will be empty.
** Make sure you create areas in the Shipping Area Management section before setting up a rule matrix or the plugin will not save the shipping rules that you have set.
- Shipping Class: The Shipping Class attribute contains all the created Shipping Classes in your WooCommerce settings. Remember to create shipping classes before setting this in the rule matrix.
- Product Category: This attribute contains all the product categories that you have created in your WooCommerce settings. Make sure you have created product categories before selecting values in this attribute.
- Based on: Allows you to calculate the shipping rate based on 3 characteristics: Weight, Item Quantity, or Price of the products.
- Min-Max (Weight, Price, Item Qty): Based on the characteristics you select for calculating shipping rates, you can set a range for the same. That is the range for product weight, product quantity or product price.
- Flat Rate/ Handling Fee: This amount will be used as a flat rate or added to the rates received by the carrier in the respective rule.
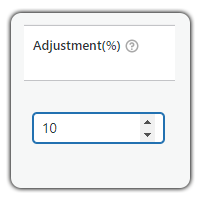
- Adjustment: This amount is taken as a percentage adjustment. If you want to add a percentage amount to the final shipping cost, provide the amount in this field. i.e., adding 10 in this field will add 10% of the final shipping cost to the shipping cost.
If you want to provide a shipping discount, add the minus ‘-‘ sign before the value, i.e. adding -10 in this field will provide a 10% discount on the final shipping cost.
- Cost / Unit: Using this, you will be able to adjust shipping rates based on per unit weight, price, or quantity of products that are in the cart. The image below shows the option to add the shipping cost per unit based on the factor selected.

- Shipping Method: These settings contain the following possible options for shipping:
- Flat Rate ~ For setting a standard Flat Rate or Free Shipping for products.
- FedEx ~ For using real-time FedEx shipping services.
- UPS ~ For using real-time UPS shipping services.
- USPS ~ For using real-time USPS shipping services.
- Stamps USPS ~ For using real-time Stamps USPS shipping services.
- DHL Express ~ For using real-time DHL Express shipping services.

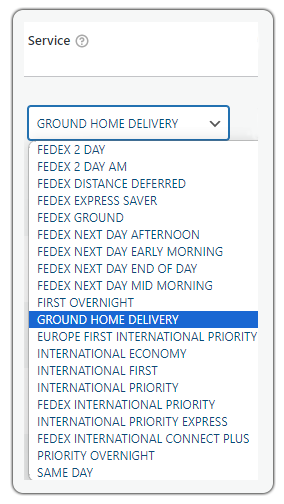
- Service: Allows you to select your preferred shipping service based on the selected shipping carrier in the Shipping Option list.
You can select the services based on your requirements. For more information about the services, check the respective websites of the shipping carrier.
Set Shipping Rules
To get shipping rates on your cart page, you need to set up shipping rules based on your shipping scenario. Let us consider a simple example.
I require shipping rates based on weight for domestic and international destinations with UPS, FedEx & USPS, for the following services:
- FedEx 2-Day Shipping
- FedEx International Priority
- UPS Next Day Air
- UPS Worldwide Express
- USPS Retail Ground
- USPS Priority Mail Express
Also, apart from that, I want customers to have Free Shipping for Orders Weighing above 100 lbs.
Hence, the following rules would provide the desired results in this case. Please make sure you have created shipping rules based on your shipping requirements.
If you have not set up shipping rules, you will not be able to get any shipping rates on the cart page.
Shipping Rule Options
Method Groups
This option helps in grouping different shipping methods. It allows you to display multiple shipping methods, one for each group, on the cart and checkout page.

Once you enable this option, a new column will appear in the rule table. You can set a custom name for grouping the methods. Hence, if you want to display, say 3 different shipping rates, make sure there are three different groups created and set up different rates. The plugin will display 3 shipping options on the cart page based on the conditions.
A screenshot of the updated rule table is shown below:

Cheapest Shipping Method
Enable this option to show the cheapest shipping service on the cart page, among all available shipping methods available.

If this option is enabled, Method Groups will not be applicable. Only the shipping method with the lowest cost will be shown on the cart page.
Parcel Packing
This option allows you to define how items will be packed. This information will be used by the shipping carriers to calculate total shipping charges.
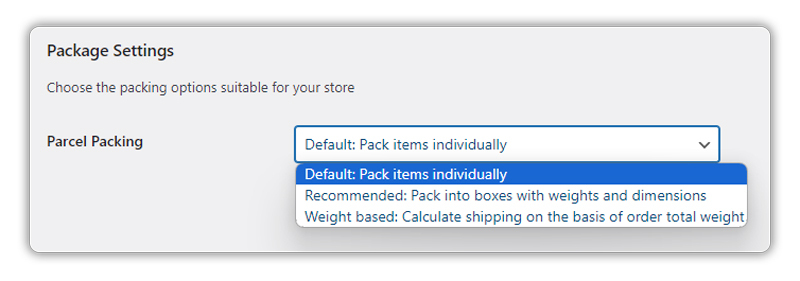
There are three choices:
- Default: Pack items individually
- Recommended: Pack into boxes with weights and dimensions
- Weight-based: Calculate shipping on the basis of order total weight
Default: Pack Items Individually
This is the default setting, which enables the shipping carriers to pack items individually regardless of product weight and dimensions.
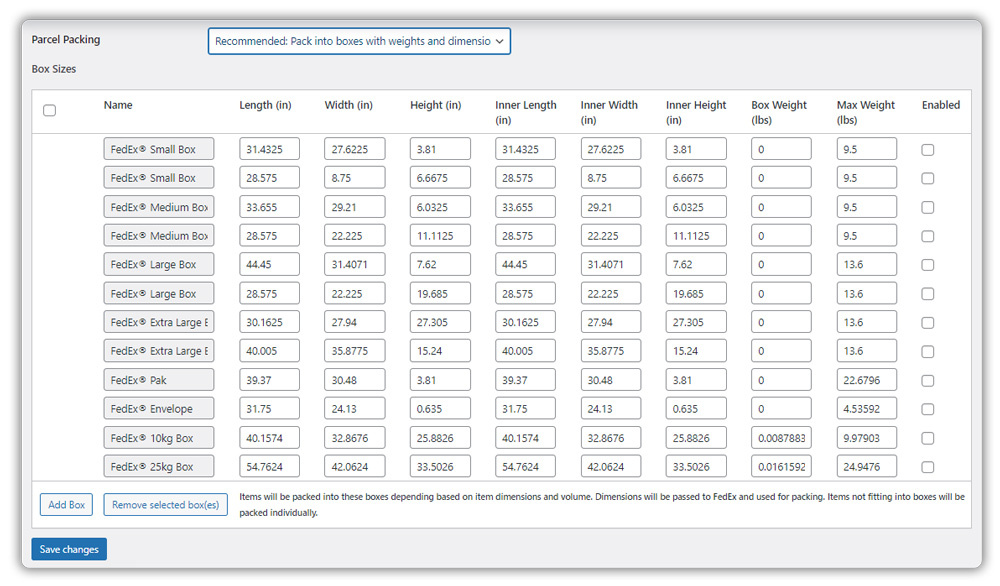
Recommended: Pack Into Boxes With Weights and Dimensions
If packing items individually does not suit your business, then the recommended option is to define the required box sizes in terms of dimensions and volume under the Box Sizes rule metric.
All the cart items are packed into custom boxes defined in Box Sizes settings. Items not fitting into any of the defined box sizes will be packed individually.
According to the requirement, you can add or remove the box dimensions. You can also enable or disable a particular box by selecting or deselecting the check box under Enabled.
To add a custom box, click on Add Box and enter the box’s name and measurement as shown below:

Apart from custom boxes, the plugin also supports FedEx Standard Boxes. Hence, you can choose from various FedEx Standard Boxes and get shipping rates based on that.
Weight-Based: Calculate Shipping based on Order Total Weight
This calculates shipping rates based on the weight of the parcel.
Once you select this option, two new options will be enabled:
- Max Package Weight
- Packing Process.
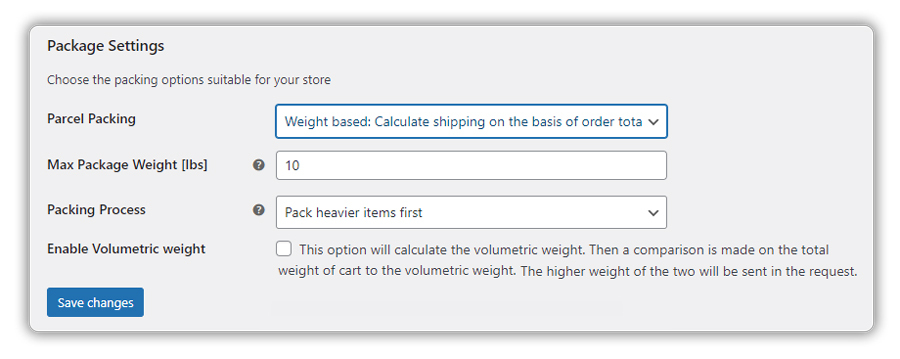
The Max Package Weight option allows you to set the weight limit of one package. Once the limit is exceeded, a new parcel is added for other products.
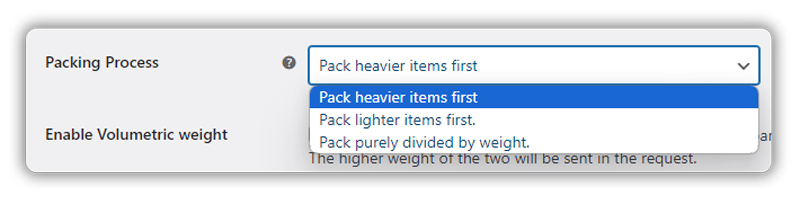
The Packing Process option allows you to define how items should be packed. There are 3 possible choices with which you can:
- Pack heavier items first
- Pack lighter items first
- Pack purely divided by weight.
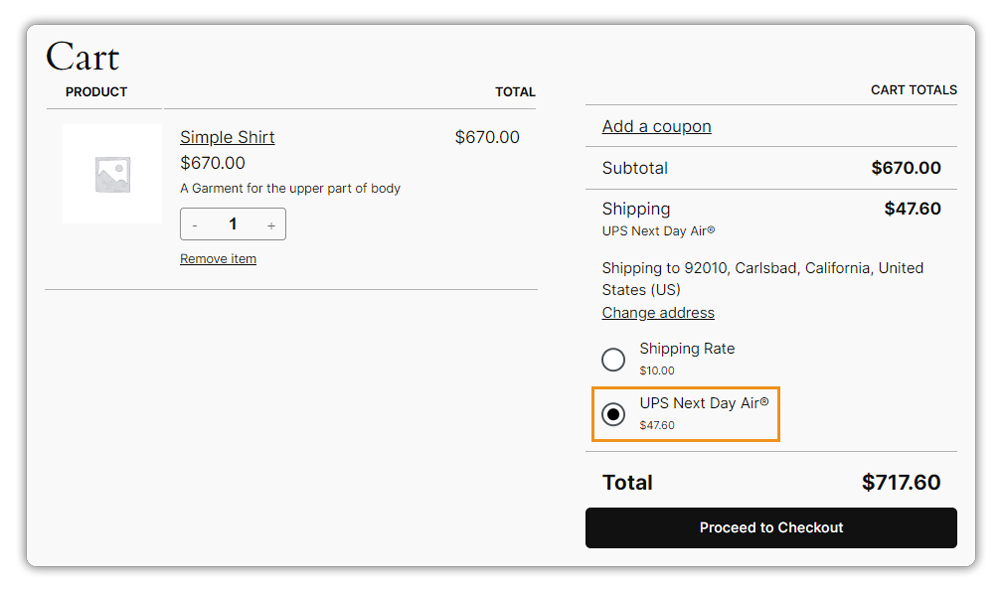
How Does It Look at the Cart Page?
Now that you have configured the plugin, you can check out how the WooCommerce Multi-Carrier shipping plugin works on the cart page.
The image below shows how the Cart page appears when the Shipping Rule is applied.
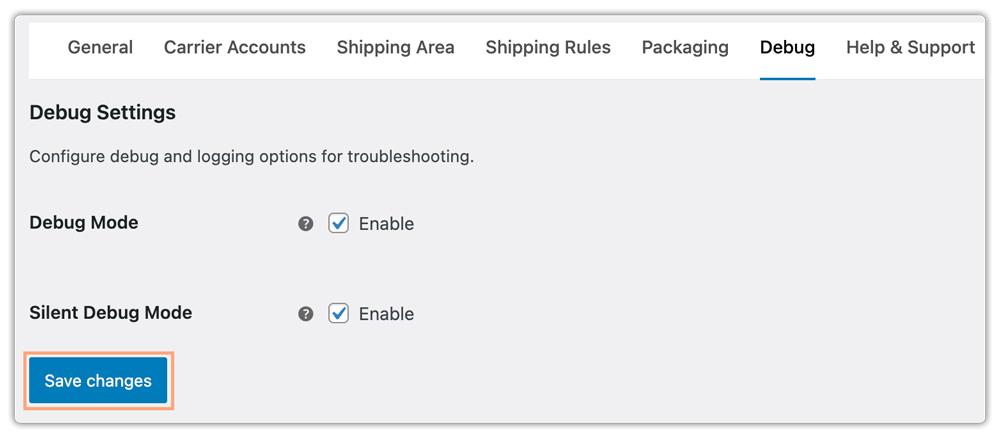
Debug Setting
To access and configure debug options, navigate to WooCommerce → Settings → Shipping → Multi-Carrier Shipping Settings → Debug Tab.
Debug Mode: Enable this option to view detailed information and logs directly on the Cart and Checkout pages. This helps identify and resolve configuration or rate calculation issues.
Silent Debug Mode: Enable this option if you want to log debug information in the WooCommerce logs without displaying it on the cart/checkout. This is useful for testing without affecting the customer experience.
Click on Save changes.
If you need more help, feel free to contact our customer support. Our support team will help you set up WooCommerce shipping on your online store.
Hi,
For some reason my shipping always says $250. it does not matter what service i use, fedex, ups, usps.
I’ve followed all the instructions, yet I do not get any shipping rates or methods in my cart.
Hi Joe,
Can you enable the debug option in plugin settings page and then try to place an order? You will get a request and response. You will be able to make out the problem from that.
If you are still not getting it, just raise a ticket to our support and provide us access so that we can quickly fix this.