
Shipping costs play a major role in online buying decisions. In WooCommerce stores, customers often compare total prices, including shipping, before completing a purchase. Offering clear and affordable shipping rates helps reduce cart abandonment.
This guide explains how to use the UPS Cheapest Rate Selector in WooCommerce to automatically select the lowest UPS shipping service at checkout, ensuring customers always get the best possible rate.
On The Page
- Why Offering the Lowest Shipping Rate Matters in WooCommerce
- How It Works with UPS in WooCommerce
- Setting Up the UPS Cheapest Service Selector in WooCommerce
- Real-World Example
- Tips for Best Use of UPS Plugin in WooCommerce
- Conclusion
- FAQs
Why Offering the Lowest Shipping Rate Matters in WooCommerce
Even if your products are competitively priced, high or confusing shipping fees often drive customers away. Offering the lowest possible shipping rate helps improve customer experience and store performance in several ways, such as:
- Improves Conversion Rates: Customers are more likely to complete their purchase when shipping costs are reasonable.
- Builds Customer Trust: Transparent, consistent shipping rates build confidence.
- Reduces Cart Abandonment: Unexpected shipping costs are a major reason for cart abandonment.
- Saves Time for Store Owners: Manually choosing or adjusting shipping services takes time. Automating rate selection ensures every order uses the most cost-effective UPS service without extra effort.
- Optimizes Fulfillment Costs: Selecting the lowest rate across all shipments helps keep overall fulfillment expenses low, especially for stores managing high order volumes.
How the Cheapest Rate Selector Works with UPS in WooCommerce
The UPS Cheapest Rate Selector in WooCommerce automatically compares all available UPS services in real time and selects the lowest-priced option. This feature works through the WooCommerce UPS Shipping Plugin with Print Label, which connects your store to the UPS API to fetch accurate live rates. The plugin then picks the most cost-effective UPS service at checkout, ensuring customers always get the best shipping price.
Here’s how the process works:
1. Fetches Real-Time UPS Rates
When a customer enters their shipping address, the plugin connects to the UPS API to retrieve live rates for all eligible UPS services.
2. Compares All Available Services
The plugin then automatically compares the returned rates, taking into account package weight, destination, and dimensions to identify the most affordable service for that particular order.
3. Selects the Cheapest UPS Option
Once the comparison is done, the system automatically chooses the lowest-cost UPS service. This rate is then displayed to the customer at checkout as the default (or only) shipping option.
4. Reflects Real-Time Price Updates
Since the selector relies on UPS’s live rates, it automatically adjusts prices based on any rate changes, ensuring that the customer always pays the accurate and current shipping cost.
The feature works seamlessly for both U.S. and international shipments.
Setting Up the UPS Cheapest Service Selector in WooCommerce
To enable the UPS Cheapest Rate Selector in your WooCommerce store, you’ll need to install and activate the WooCommerce UPS Shipping Plugin with Print Label. This plugin connects your store to UPS, fetches live shipping rates, and lets you automatically display the lowest one at checkout.
For detailed instructions on setting up and configuring the plugin, check out the UPS Shipping Guide for WooCommerce.
In the plugin’s Rates and Services Settings, simply enable the option to “Cheapest Rate”.
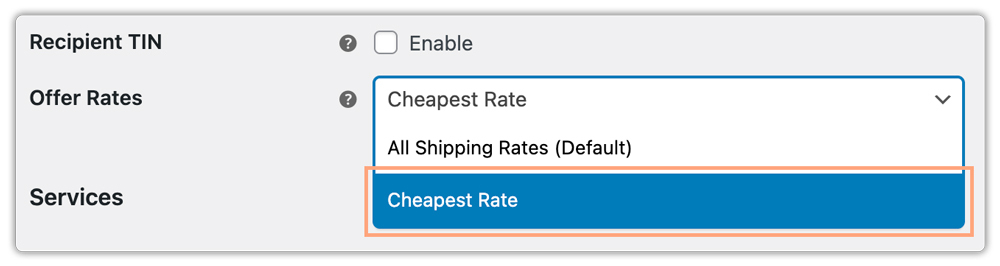
Once activated, customers will see the lowest available UPS rate directly on the WooCommerce Cart and Checkout pages.

Along with rate selection, the plugin also allows you to generate and print UPS shipping labels right from your WooCommerce orders.
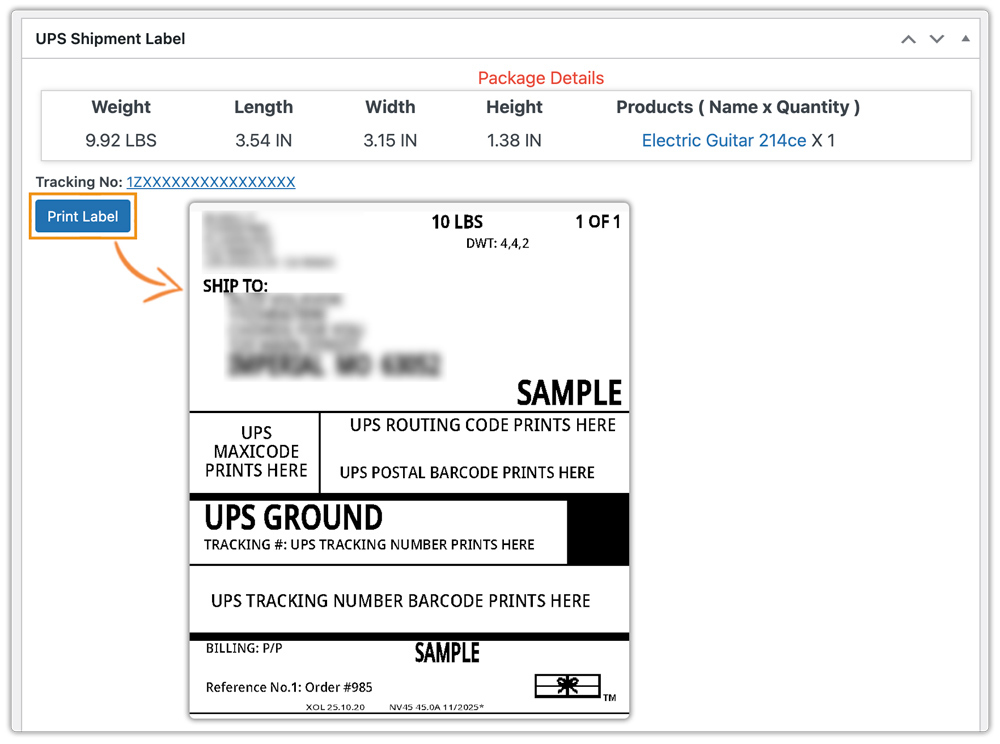
After generating the label, you can schedule UPS pickups and track your orders. To learn more about tracking and managing UPS orders, check out How to Track UPS Orders in WooCommerce.
Real-World Scenario: WooCommerce Store Reducing Shipping Costs with UPS
A WooCommerce store selling custom apparel across the U.S. faced ongoing challenges with shipping costs and checkout confusion:
- Customers were overwhelmed by multiple UPS shipping options.
- Many selected faster services like UPS 2nd Day Air, increasing overall shipping expenses.
- High and inconsistent shipping rates often led to abandoned carts.
Solution:
The store implemented the WooCommerce UPS Shipping Plugin, enabling the UPS Cheapest Rate Selector feature. This allowed them to:
- Automatically display the lowest available UPS rate at checkout, without showing multiple options.
- Fetch live UPS rates in real time, ensuring accurate and up-to-date pricing for every shipment.
- Generate and print UPS shipping labels directly from WooCommerce orders.
- Provide customers with automatic tracking updates for every delivery.
By automating rate comparison and selection, the store reduced average shipping costs, simplified checkout, and improved customer satisfaction.
Tips for Best Use of UPS Plugin in WooCommerce
Using the Cheapest Rate Selector with UPS effectively helps you cut costs and simplify shipping in WooCommerce. Here are some best practices:
- Enable Negotiated Rates: Activate your UPS discounted rates in the plugin settings to ensure accurate, cost-effective rate comparisons.
- Exclude Unwanted Services: Disable premium services you don’t use, like Next Day Air, to focus on standard, affordable options.
- Use with Automatic Label Generation: Combine it with the plugin’s Print Label feature to instantly create labels once the lowest rate is selected.
- Test Rates by Zone: Check rates across different zones and weights to confirm the selector always applies the best price.
- Refine Rate Display and Visibility: Use the Hide WooCommerce Shipping Methods & Rate Adjustment Plugin to hide specific shipping methods or adjust displayed rates. This helps you streamline checkout options and ensure customers always see the most relevant, affordable UPS rate.
These steps ensure reliable, optimized, and fully automated WooCommerce shipping with UPS.
If you’d like to offer multiple carriers along with UPS, you can explore the Multiple Carrier Shipping Plugin for WooCommerce. While it provides slightly less flexibility compared to the dedicated UPS plugin, it allows you to display and manage rates from UPS, FedEx, USPS, DHL, and Stamps.com — all within one solution.
Conclusion
Offering the lowest possible shipping rate is one of the simplest yet most effective ways to enhance your WooCommerce store’s customer experience. With the UPS Cheapest Rate Selector, you can automate rate comparison, ensure fair pricing, and simplify the checkout process, all while saving on fulfillment costs.
If you need assistance configuring your WooCommerce UPS Shipping Plugin, reach out to PluginHive Support.
FAQs
- Does the Cheapest Rate Selector work with negotiated UPS rates?
Absolutely. If your UPS account has negotiated or discounted rates enabled, the plugin will use those rates to determine and display the lowest option.
- Do I need a UPS account to use this feature?
Yes. You’ll need a registered UPS account to connect the WooCommerce UPS Shipping Plugin and access live rates, label printing, and tracking features.
- How can I offer international UPS shipping in WooCommerce?
To provide global delivery options for your WooCommerce store, you can configure UPS international services. Read the detailed guide on setting up UPS international shipping in WooCommerce.
- Can I show estimated delivery dates with UPS shipping rates?
Yes, the UPS plugin lets you display estimated delivery dates. For more flexibility and customization, you can use the Estimated Delivery Date Plugin for WooCommerce.