
Setting Up WooCommerce UPS Shipping Plugin
This comprehensive guide will show you how to easily set up the WooCommerce UPS Shipping Plugin with Print Label on your WooCommerce store to get live UPS rates, print shipping labels, enable order tracking, and much more.
With step-by-step instructions, images, and crucial notes along the way, you will be easily able to configure the WooCommerce UPS plugin’s features. You can go through the complete setup tutorial or select a specific section in the index for your specific needs. (If you are new here, we recommend you begin from the start).
In this Guide
- Download, Install and Activate the Plugin
- Navigate to UPS Plugin Settings
- Activate The Plugin License
- Register your UPS Account
- Verify your Product Settings
- Add Shipper Address Details
- Add Ship From Address Details
- Assign Shipping Address different from shipper address
- Add Residential Address
- Enable Address Classification
- Address Suggestion
- Address Suggestion on Cart/Checkout
- Skip products
- Show All the Service in Order page
- Remove Recipient Phone Number
- Display Shipper Release Indicator
- Working Days
- Display UPS Shipping Rates
- Enable UPS Negotiated Rates on Cart/Checkout
- Add UPS Insurance Value
- Add Shipping Method Title
- Assign Shipping Methods to Specific Countries
- Configure Return Rate Type (Offer Rates)
- Add Currency Conversion Rate
- Add FallBack Rate
- Enable Shipping Taxes on the Cart/Checkout Page
- Set Minimum Order Value
- Assign Minimum and Maximum Weight
- Assign Minimum and Maximum Shipping Cost
- Configure UPS Shipping Services
- Configure Parcel Package Settings
- Printing UPS shipping labels
- Printing your first UPS Shipping Label
- Print Shipping Labels Automatically
- Print Individual Shipping Labels for Multiple Packages
- Print Shipping Labels for Multiple Orders in Bulk
- Cancel UPS Shipping Label
- Let Customers Print Shipping Label
- Configure UPS Label Format
- Additional Options for UPS Labels Printing
- Billing Address as Shipper Address on Label
- Transportation
- Duties and Taxes Payer
- Custom Tracking
- UPS Carbon Neutral
- Remove Special Characters from Product Name
- Shipment Description for UPS Label or Commercial Invoice
- Order details in the Shipment Description
- Display Estimated Delivery Dates on Cart/Checkout
- How to Request UPS PickUp
- How to set up UPS Shipment Tracking
- How to Set up UPS International Shipping
- Print Commercial Invoices along with Shipping Labels
- Enable EDI on Shipping Labels
- Print NAFTA Certificate along with Shipping Labels
- Get EEI Data for UPS Shipments
- Product level Settings for International Shipments
- Printing Labels for International Shipments
- Additional Options for International Shipments
- How to Set up UPS Special Services
- Configure Automatic Additional Handling
- UPS Simple Rate
- UPS Ground Saver (UPS SurePost)
- UPS Mail Innovations
- UPS Access Point Location
- Tax Identification Number
- UPS Hazmat Shipping
- International Special Commodities – Restricted Articles
- UPS Import Control
- UPS Saturday Delivery
- UPS COD
- UPS Delivery Confirmation
- Vendor Info
- Print Customer’s Name as Company Name on Labels
- Default Product Price
- Recipient Phone Number
- Frequently Asked Questions (FAQs)
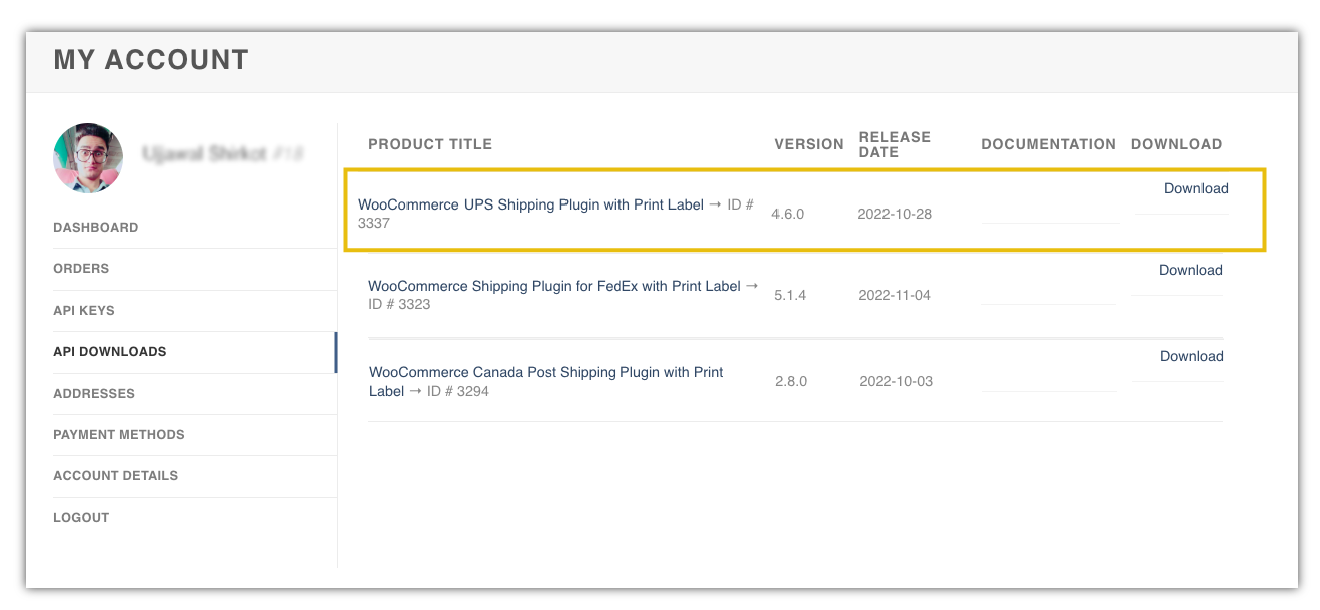
1. Download, Install, and Activate the Plugin
After purchasing the PluginHive WooCommerce UPS Shipping plugin, the plugin Zip file is available in API DOWNLOADS.
- Download the .zip file from API DOWNLOADS by logging into MY ACCOUNTS page.
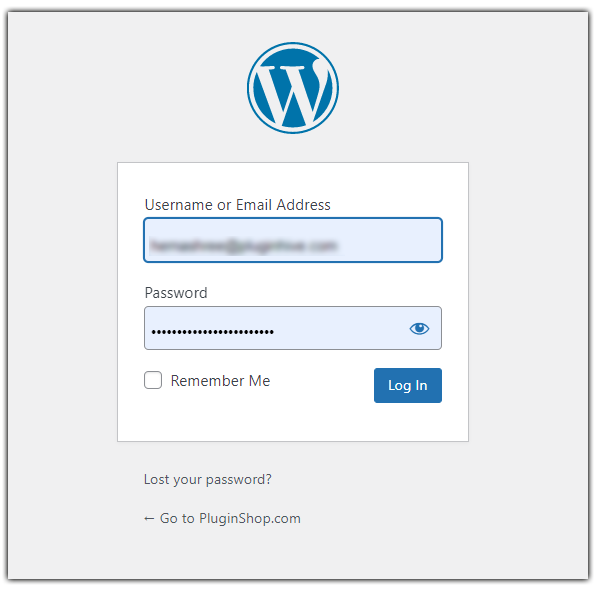
- Log in as the WordPress Admin of your online store
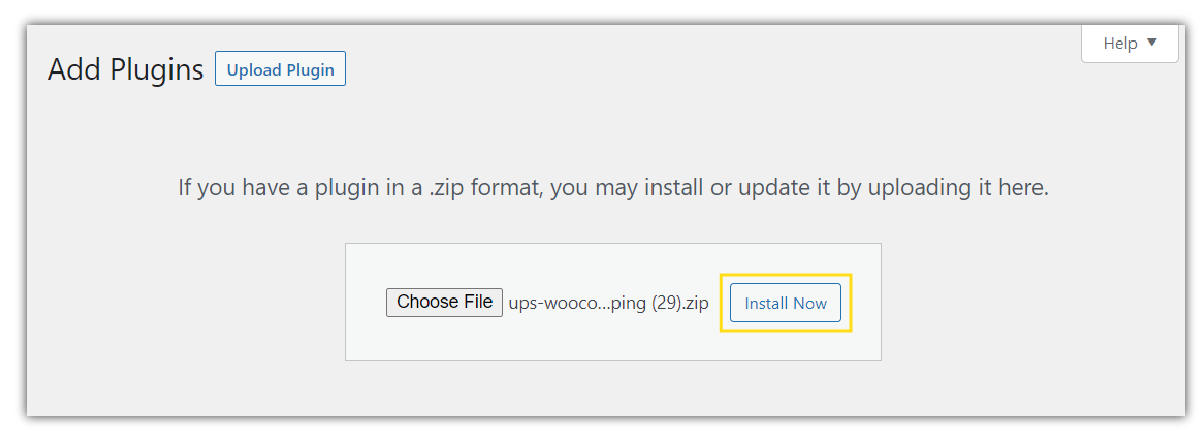
3. Navigate to Plugins > Add New to upload the downloaded WooCommerce UPS Shipping Plugin

4. Upload the plugin to the WooCommerce Store and Click on Install
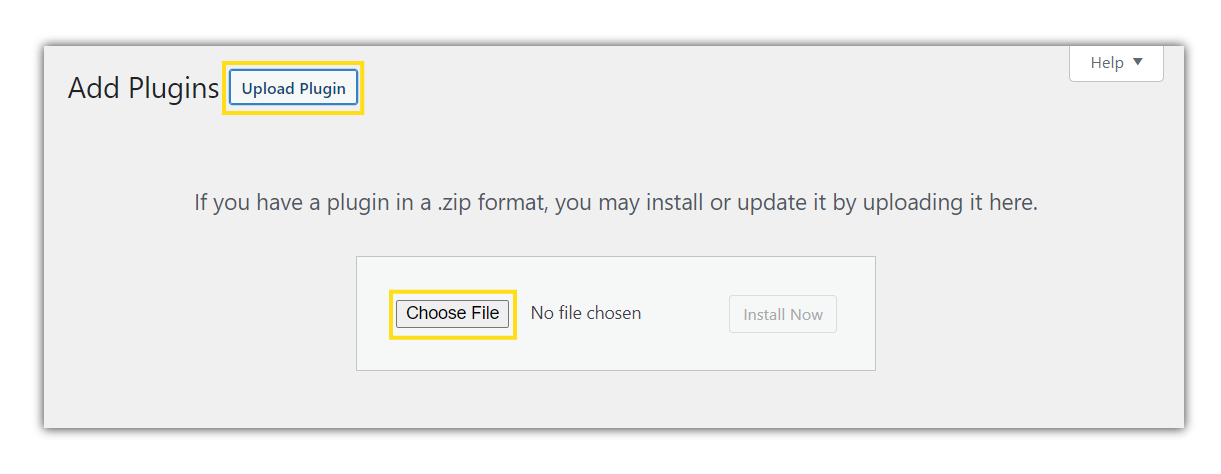

Click on Install Now
5. Activate the WooCommerce Shipping Plugin for UPS

The plugin is activated and ready to use.
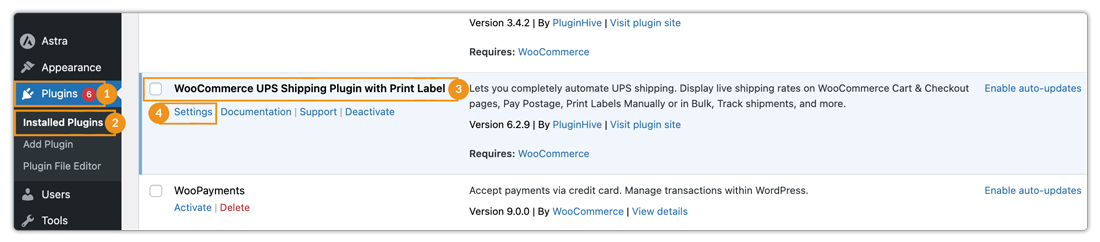
2. Navigate to UPS Plugin Settings
After installing and activating the plugin, a new shipping method ‘UPS’ is added to WooCommerce Shipping settings. Now you can configure this UPS Shipping method as per your requirement. You can navigate to settings in two ways as shown below:
Navigate to WooCommerce> Settings > Shipping > UPS

Or, navigate to Plugins > Installed Plugins > WooCommerce UPS Shipping Plugin > Settings
You will be able to see the following Shipping related options in detail
- General
- Rates and Services
- Shipping Labels
- International Forms
- Special Services
- Packaging
- Pickup
- Advanced
- Need LTL Freight?
- Help & Support
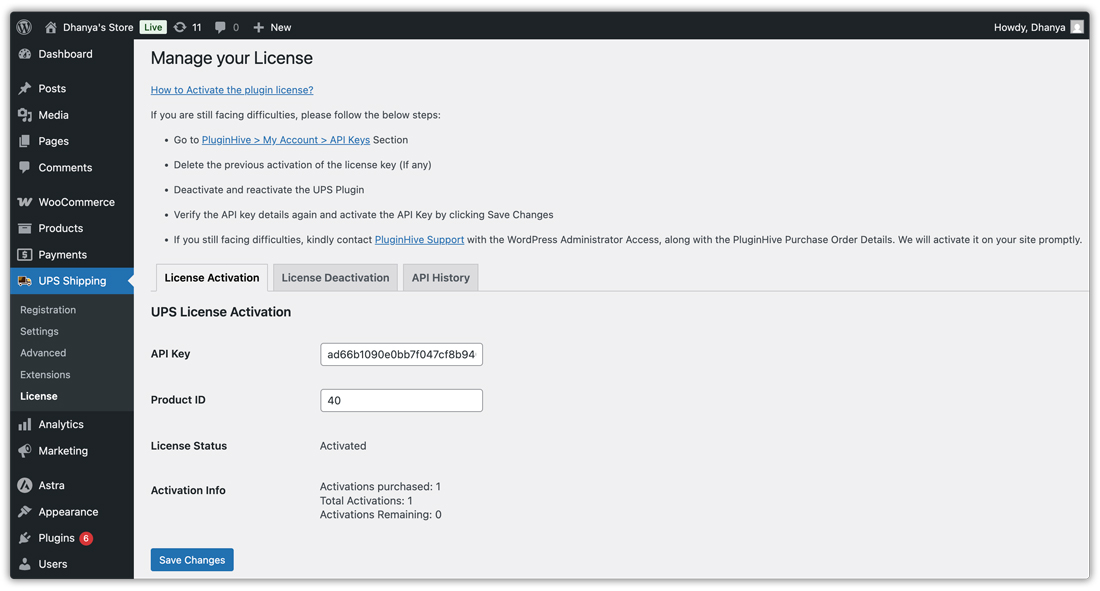
3. Activate the plugin license
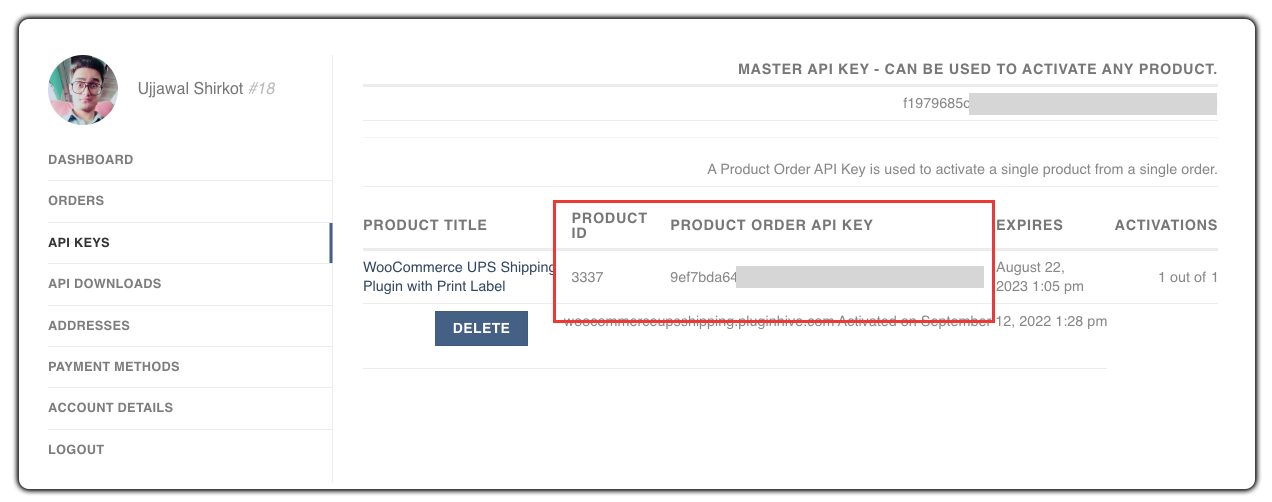
To activate the license key, you need to enter the Product Order API Key and the Product ID used for the purchase.
To get the API Key and Product ID, go to the My Account section of PluginHive. Navigate down to API KEYS as shown below:
* Without an active plugin license the customers will not be able to utilize the plugin functionality and the plugin will stop functioning.
* Hence, our team strongly recommends activating the license & renewing it promptly when expired to avoid any disruption in the shipping capabilities.
Now Go to Dashboard > UPS Shipping > License
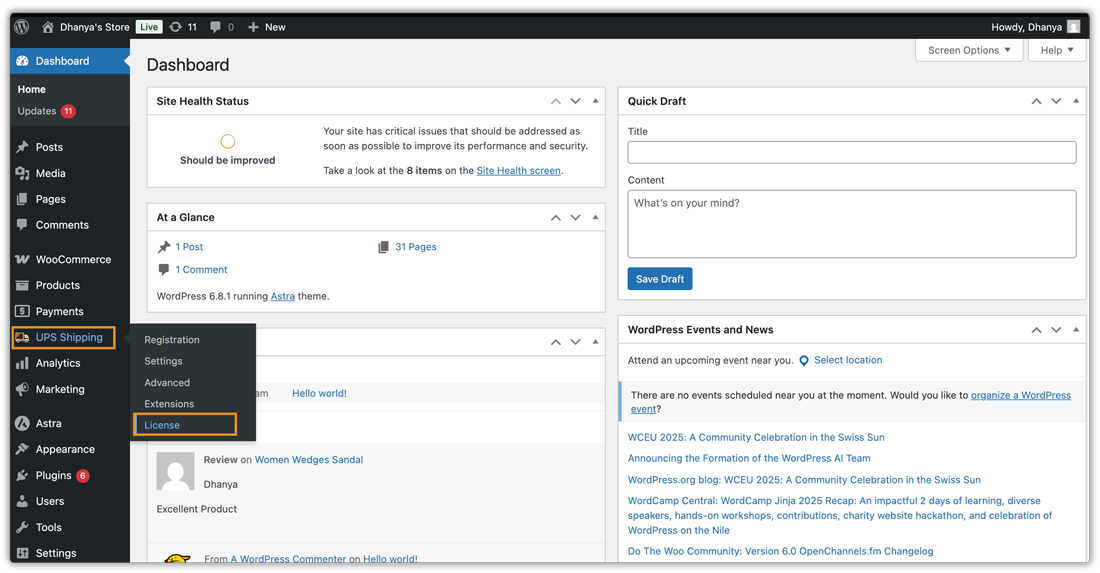
Click on License Activation. Enter the following on the license activation page:
- Provide your API Key and Product ID Credentials
- Click on Save Changes
- Your API Key Status is now Activated
You can move your license key from development sites to live sites seamlessly. However, using a different UPS account on each site is not possible.
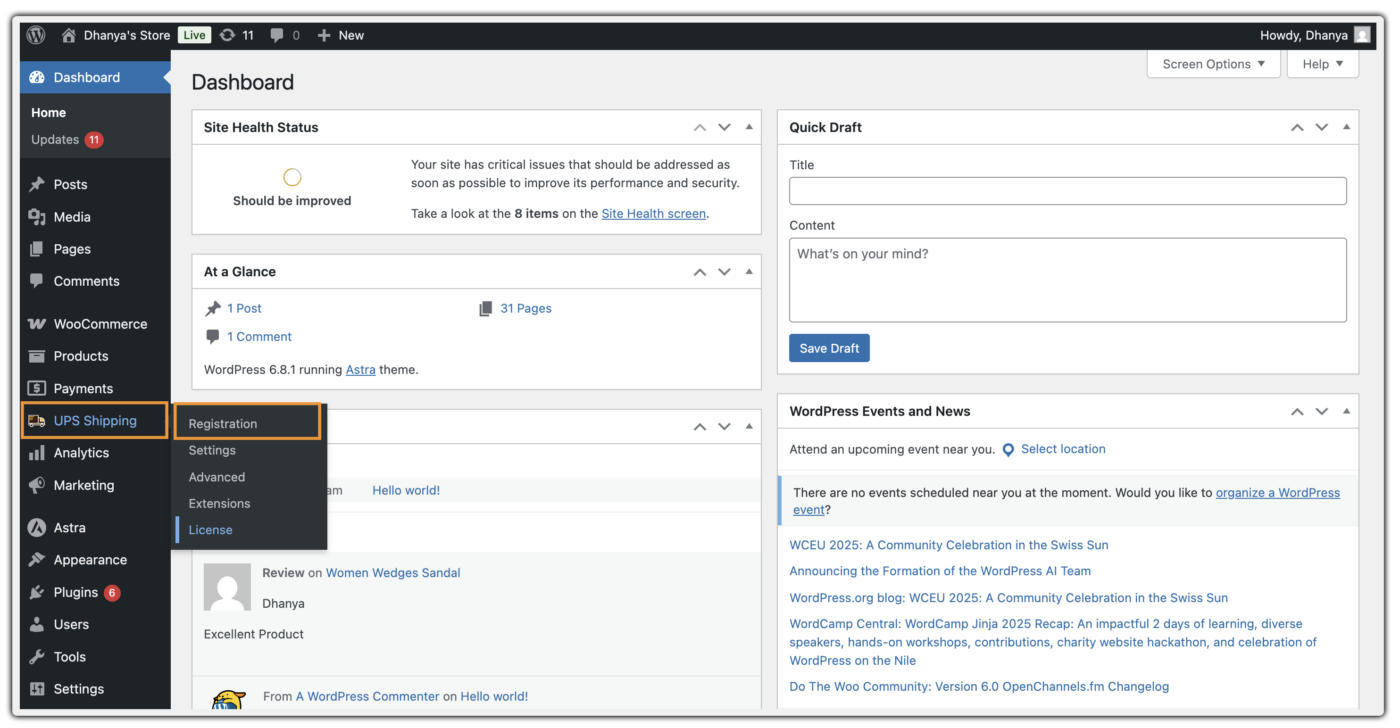
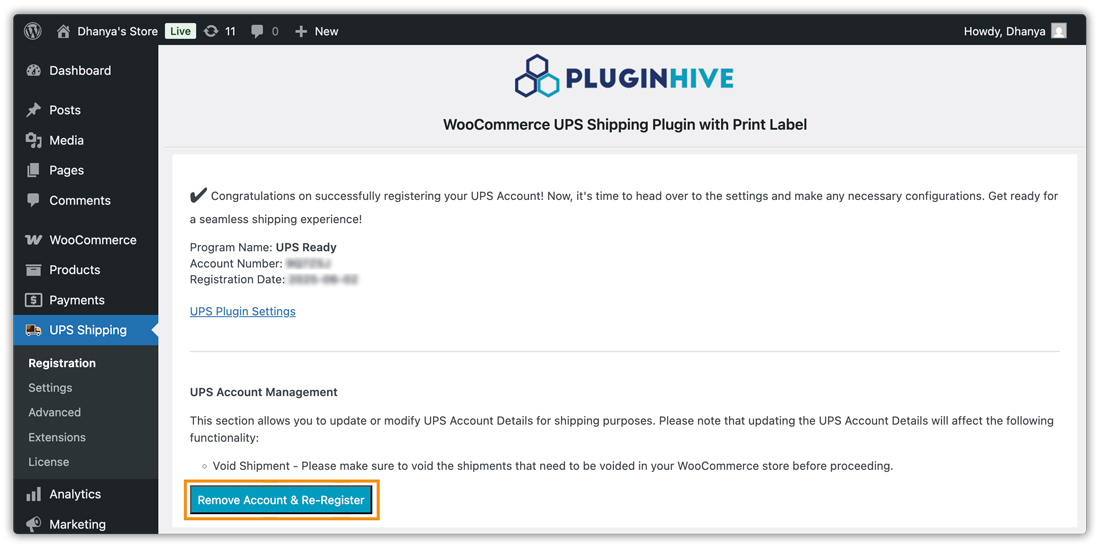
4. Register your UPS Account
As of June 2023, UPS will no longer provide the Web Access Keys to the merchants. PluginHive being a UPS Ready Solution provider will let WooCommerce store owners integrate their UPS accounts seamlessly.
If you want to use your UPS account to ship your WooCommerce orders using the WooCommerce UPS plugin with Print Label, follow the steps below.
- Click on UPS Shipping < Registration button as shown below
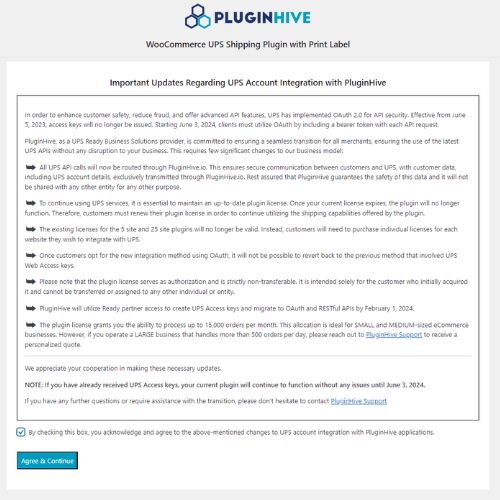
Read the information on the screen carefully and click the checkbox at the bottom of the information. Then click on the Agree & Continue button.
- To connect your UPS account with the app, click on Register with UPS Ready as shown below:
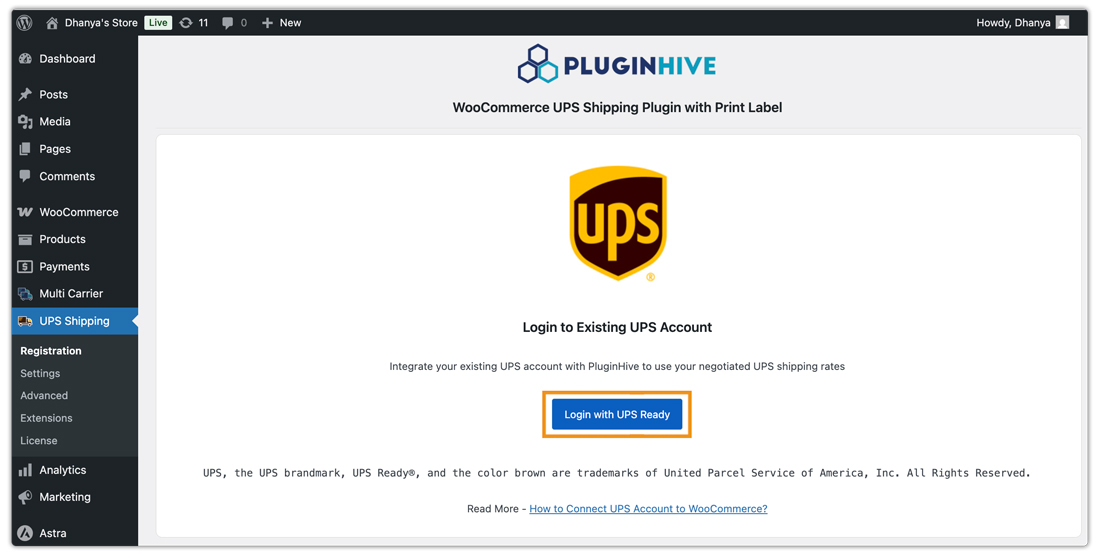
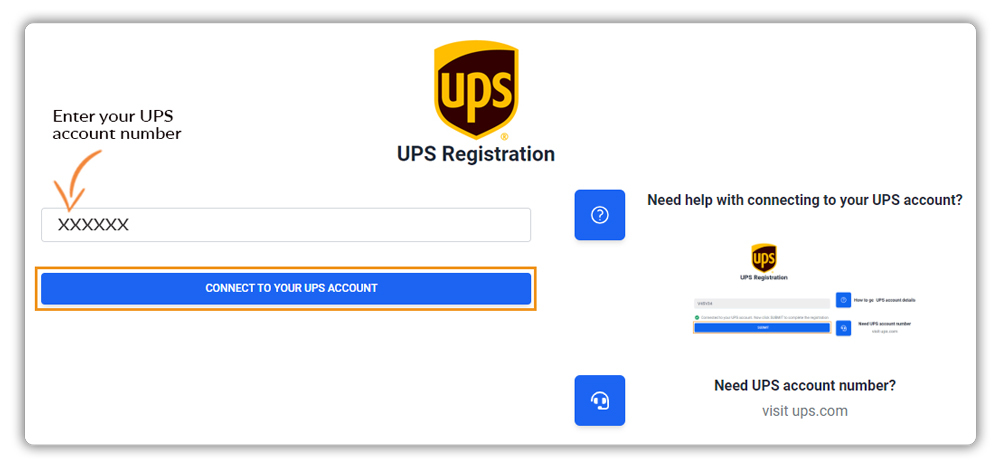
- You will be redirected to the UPS Registration page.
- Enter your UPS account number and click on CONNECT TO YOUR UPS ACCOUNT as shown below:
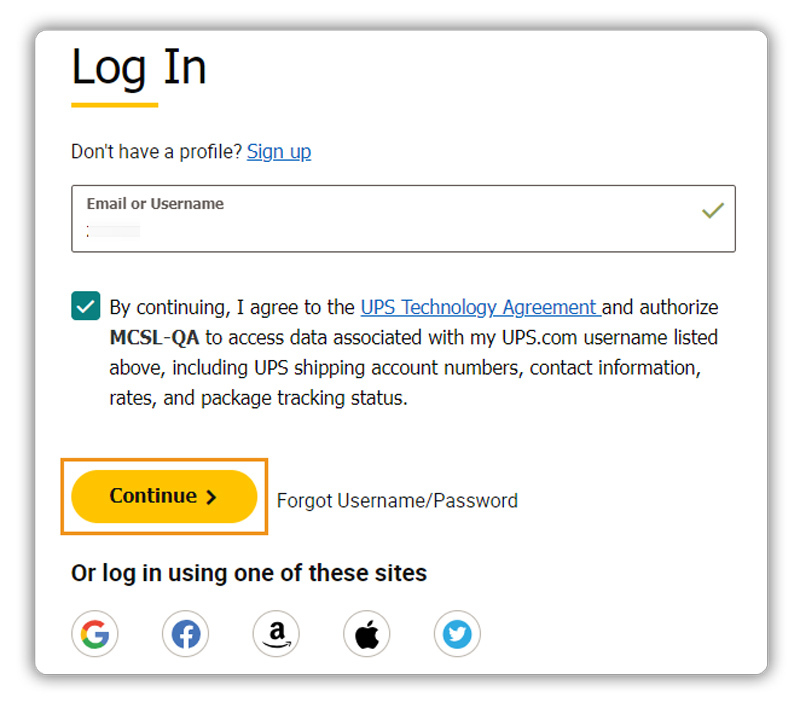
- You will be taken to the login page.
- Enter your Username, check the checkbox, and click on Continue as shown below:
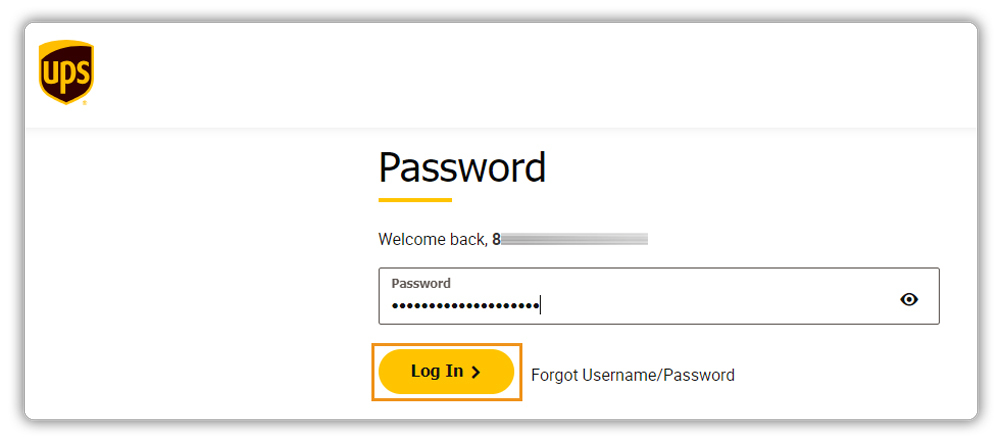
- Enter your Password and click on login as shown below:
- Now your UPS account is connected. Click on PROCEED TO NEXT STEP as shown below:
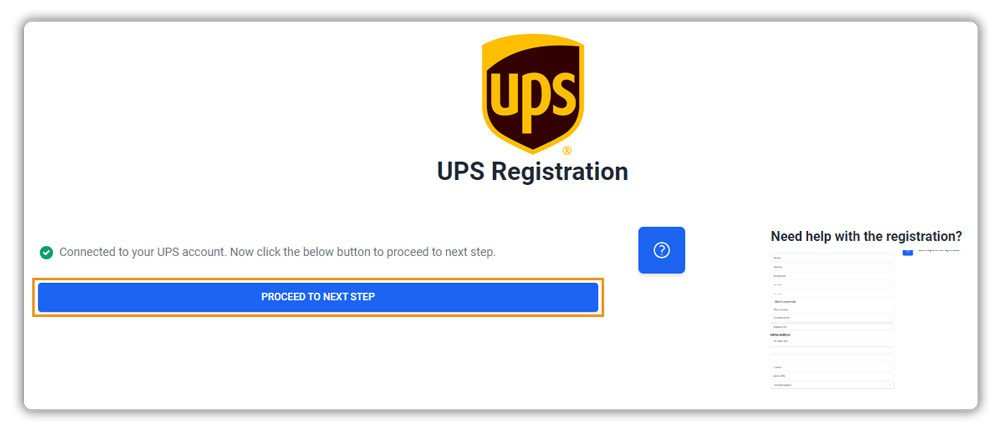
- The registration is successful.

If you want to make any updates to your UPS account, click on the Remove & Re-Register button. Follow the same steps outlined above to update your UPS account. For more details, refer to the UPS Account Setup Guide.
5. Verify your Product Settings
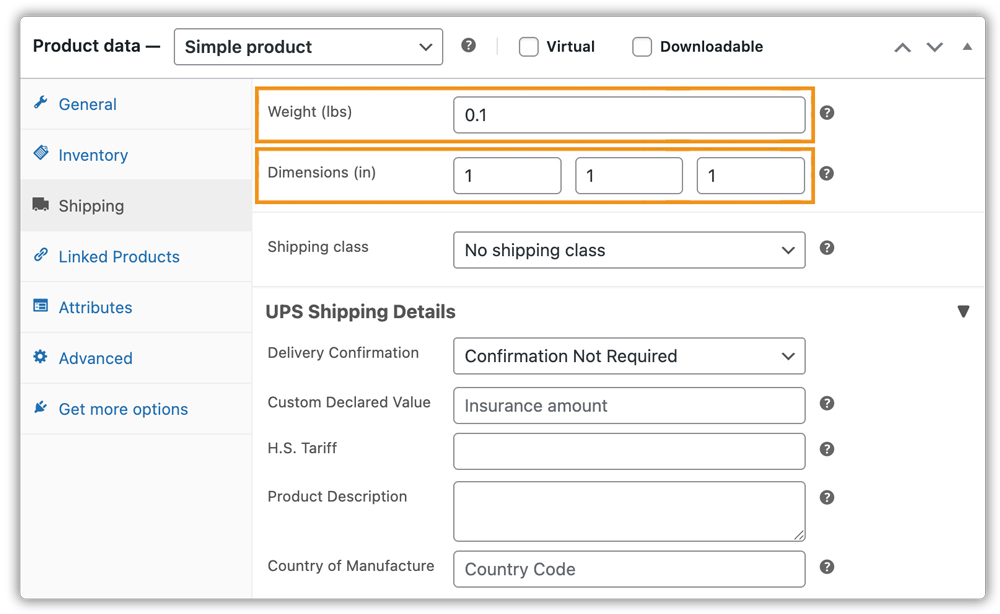
Add Product Weight and Dimensions
- Select the product you want to edit
- Under the Edit Product section, Go to Product Data < Shipping settings
- Provide the Product Weight and Dimensions in the fields as shown in the image
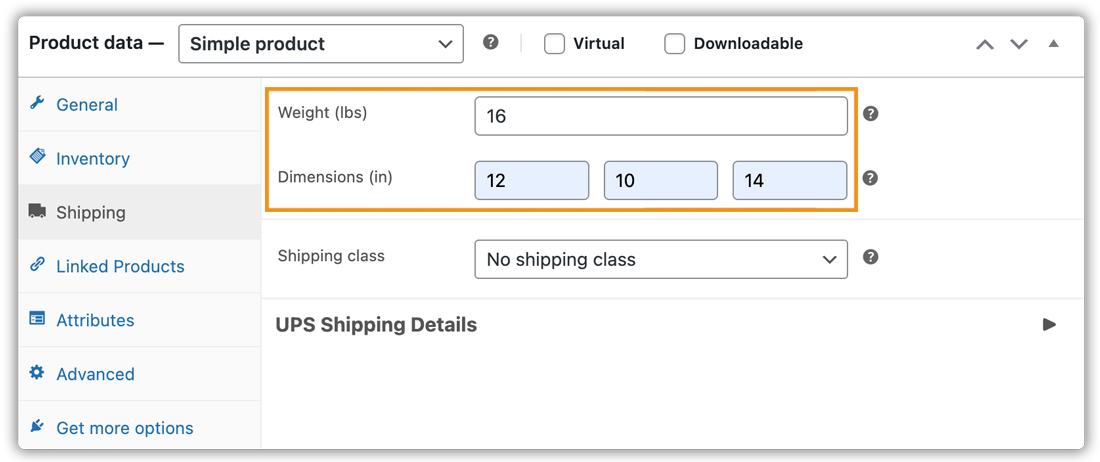
If the weights and dimensions of your product are not configured, you might face some issues ahead. Check out Common Reasons for Failure in WooCommerce UPS Shipping Article to know more.
Set Product Weight/ Dimension Unit
When creating a product on the WooCommerce Store, it is essential to provide the product dimensions and assign product weight accordingly. Weight and Dimensions Units can be assigned depending on your shipper address.
- Select WooCommerce < Settings < Shipping < UPS
- Select General (Under UPS Menu) < Weight / Dimensions Units
- Select an option applicable to your store from the given drop-down list. The options available are as shown below:
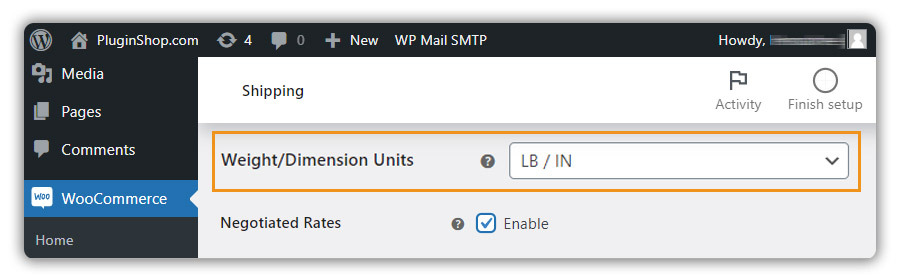
- LB/IN: Product weight and dimensions will be in pounds (lb) and inches (in).
- KG/CM: Product weight and dimensions get converted to kilograms (kg) and centimeters (cm).
6. Add Shipper Address Details
Provide the address details from where your order gets shipped. You can select Shipment Address from the address as Origin Address or Shipping Address.
This can be your store address, shipping warehouse address, etc.
Add Ship from Address Details
- Select WooCommerce < Settings < Shipping < UPS
- Select General (Under UPS Menu)
- Select the shipment address type from the Ship From Address Preference dropdown
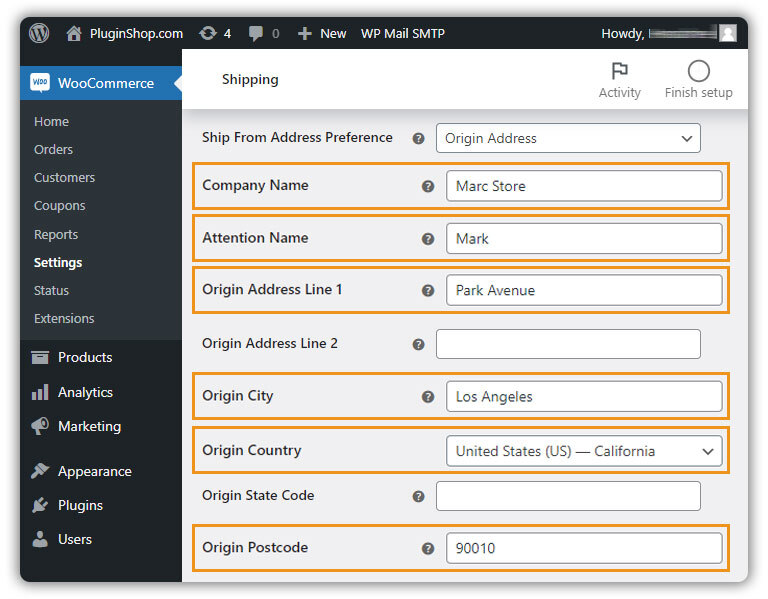
- Ship From Address Preferences: With this field, you can set the address of the actual order shipper. The available options are as given below:
- Origin Address: The Origin address will be the address of the shipper. By selecting Origin Address, the origin and shipping address will be entered inside the From and To address respectively, and printed on the label. This is for normal shipping cases, from the store owner to the customer.
- Shipping Address: The shipping address is the address where the order is shipped to. By selecting the Shipping address as your “Ship from Address Preference”, your Shipping Address will be added as the From address on your shipment label. The customer can easily ship the item(s) with the reverse label that you can send the customer through Email.
- Origin Address: Enter the address of the WooCommerce shop owner.
- Origin City: Enter the city of the WooCommerce shop owner.
- Origin Country: Enter the country of the WooCommerce shop owner.
- Origin State Code: Enter the State code of the WooCommerce shop owner, if the state is not listed in the above Origin Country drop-down list.
- Origin Postcode: Enter the postcode of the place of the WooCommerce shop owner.
You can also add your phone number and email details here.
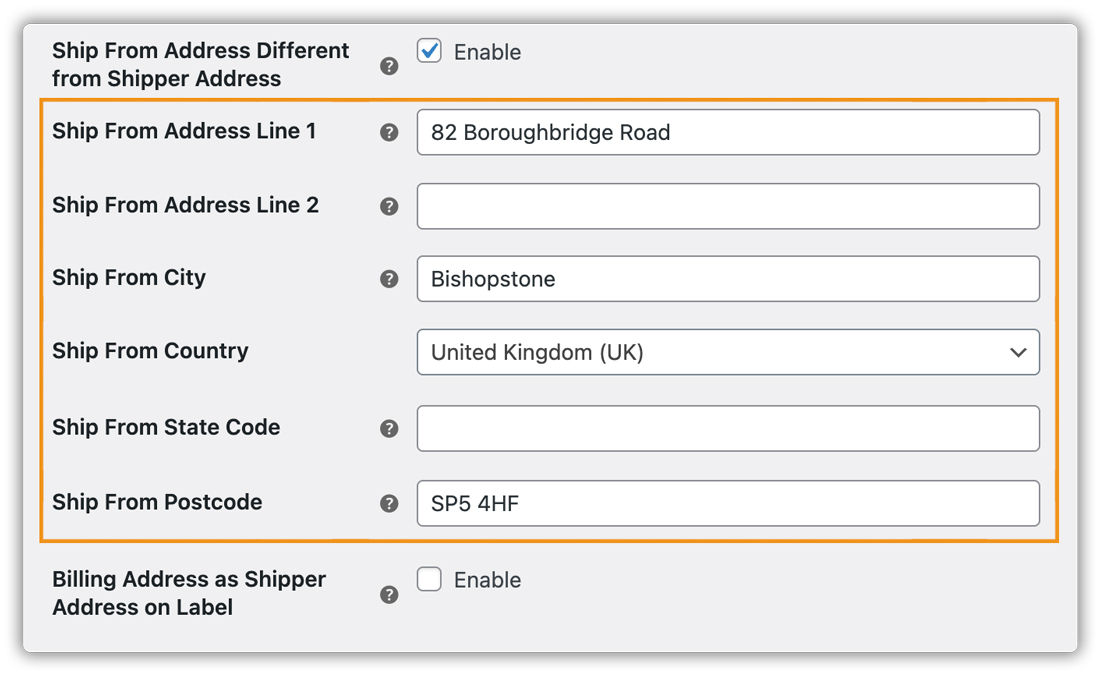
Add Ship from Address different from Shipper Address
If you ship your products from a warehouse where their address is different from the store address, you can enable the Ship From Address Different from Shipper Address option, as shown in the image above.
- Provide the details of your Shipment address (address line, City, Country, State Code, PostCode)
- Click on Save Changes
This address is where UPS will pick up the package.
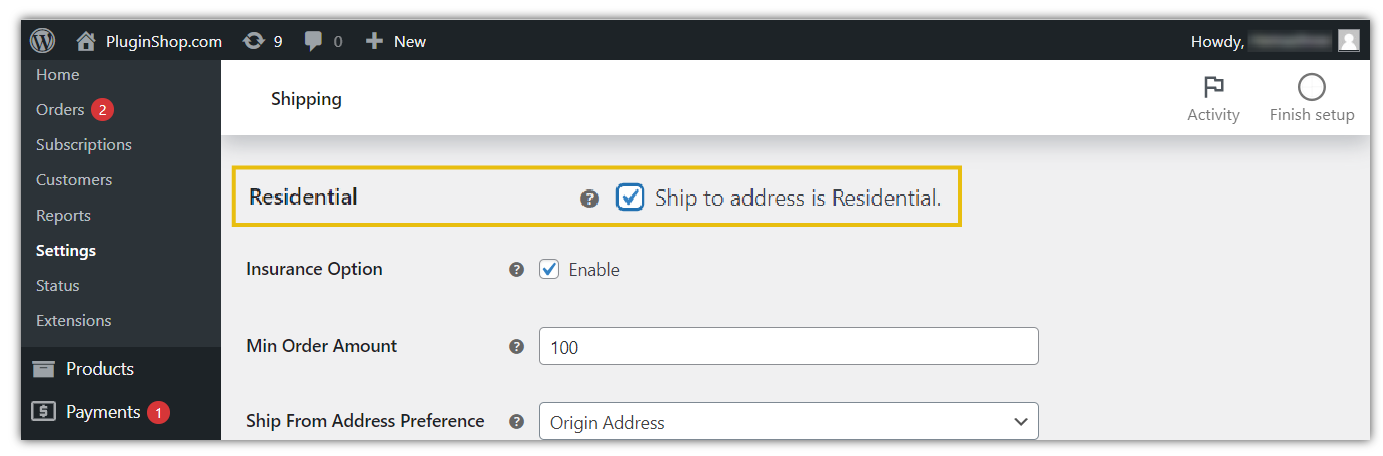
Add Residential Address
Unlike Commercial Addresses, Residential Addresses usually refer to Home addresses such as apartments, and family houses. By enabling the Residential Address option, the shipments are delivered to the Home Address mentioned, and also additional costs are added to your shipment delivery.
Accessing Residential Address
1. Go to WooCommerce Settings < Shipping < UPS < General
2. Enable Residential Option
You might want to know what happens if addresses are not properly configured
Check out Common Reasons for Failure in WooCommerce UPS Shipping Article to know more.
Enable Address Classification
Helps in classifying addresses as Commercial or Residential. Applicable for US and Puert Rico.

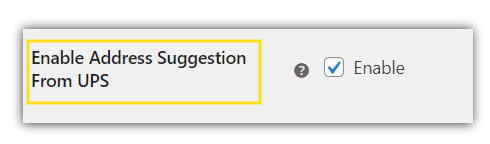
Address Suggestion
Provides Address Suggestions based on addresses in the UPS Database
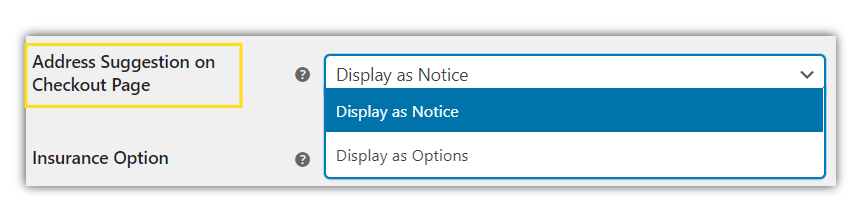
Address Suggestion on Cart/Checkout
Select how the address suggestions is displayed on the WooCommerce Checkout page
Skip products
You can assign a shipping class to the product for which you don’t want to calculate shipping rates. When this product is added to the cart, rate calculation will be skipped.

Show All the Service in Order page
Enable this to show all the service in the Order Page

Remove Recipient Phone Number
Enable this to exclude the phone number from labels, except where it’s mandatory.

Display Shipper Release Indicator
Enable this option to allow the driver to leave the package without obtaining a signature. It applies only to US/PR shipments without return service and is used only for the package that do not require signature and for non COD shipment

Working Days
You can add your company working days to ensure accurate shipping rate calculations, proper label generation, and correct pickup scheduling. This helps to determine when your business is operational, so deliveries and pickups are only planned on days you’re available.

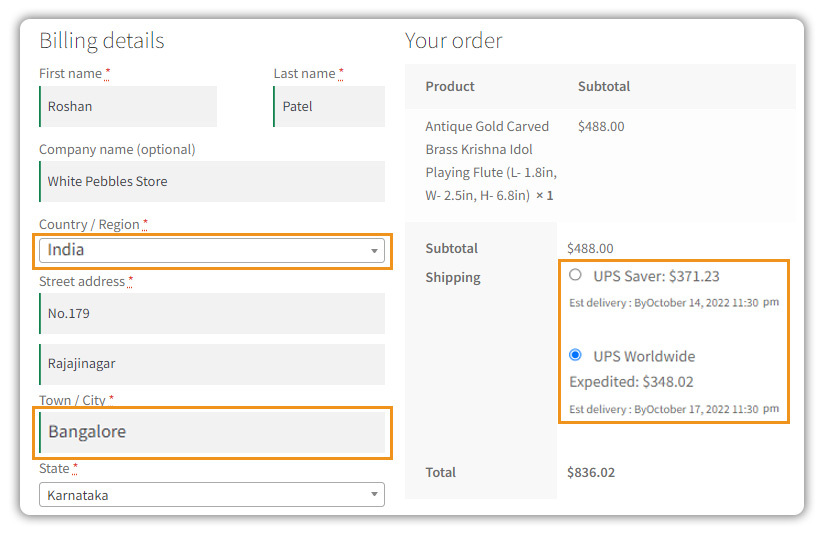
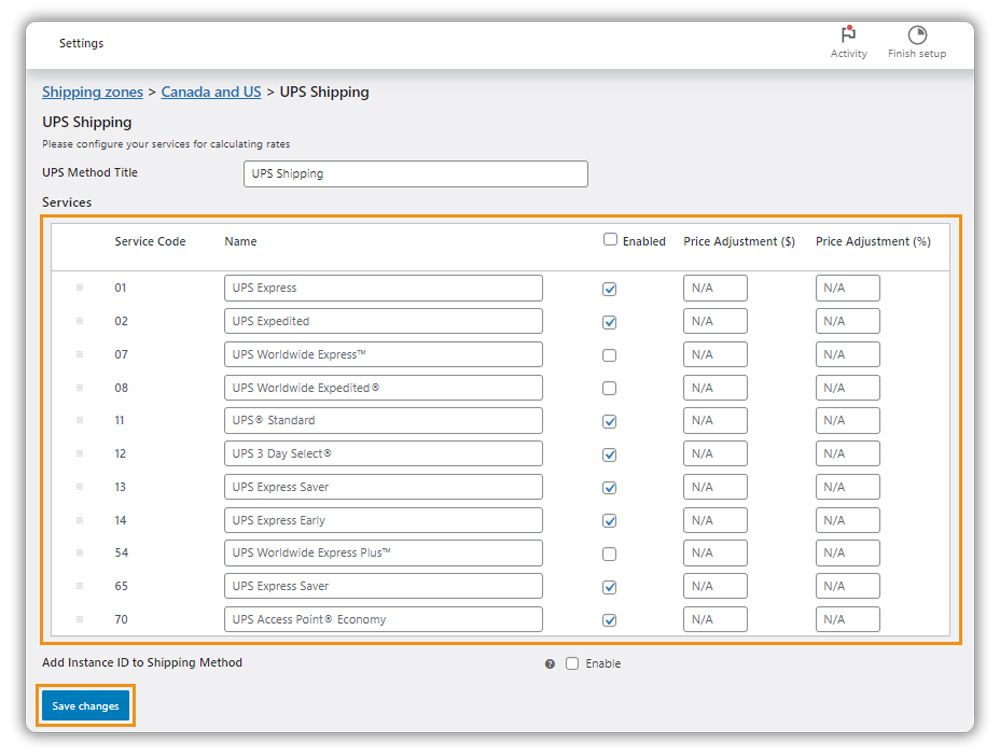
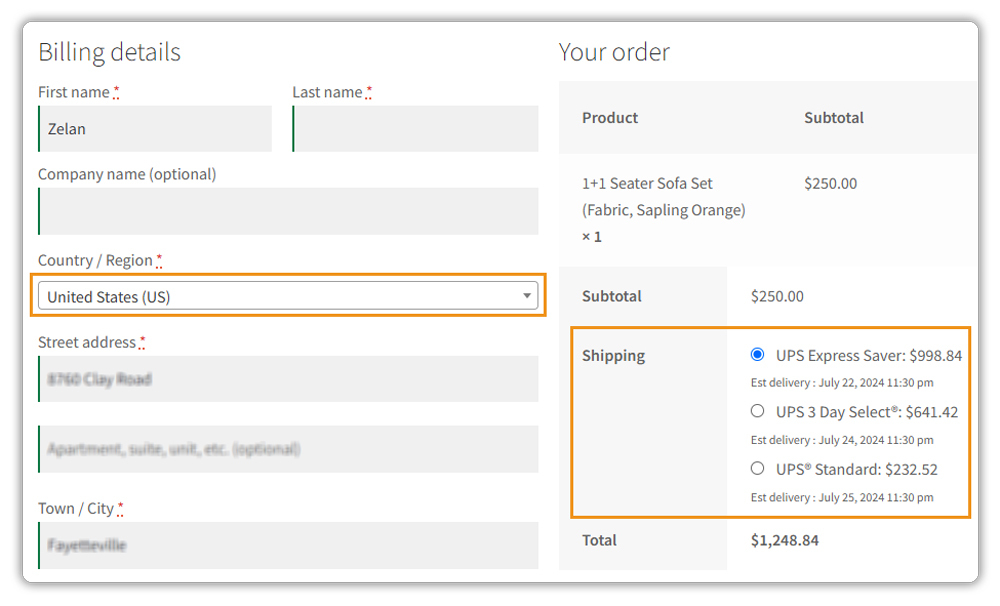
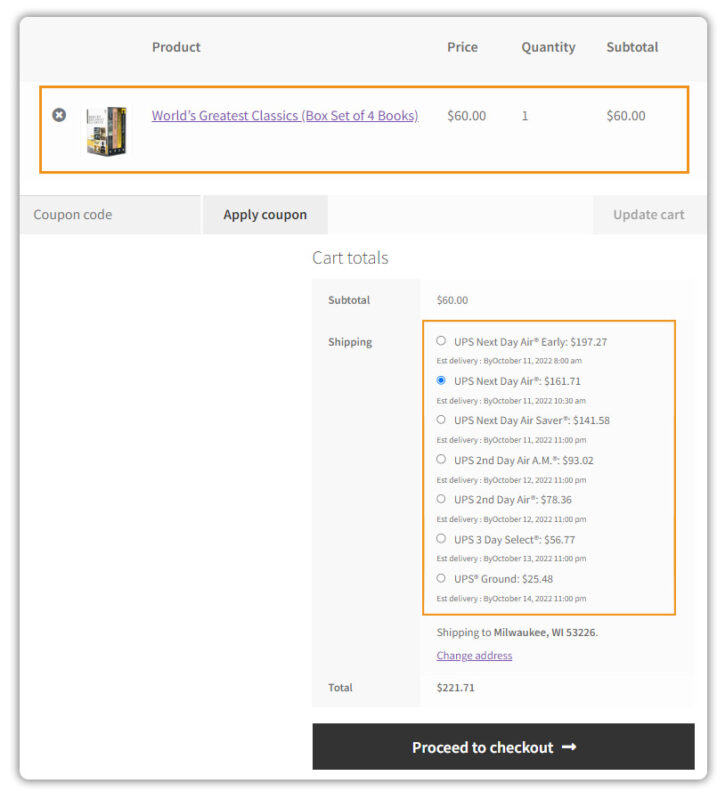
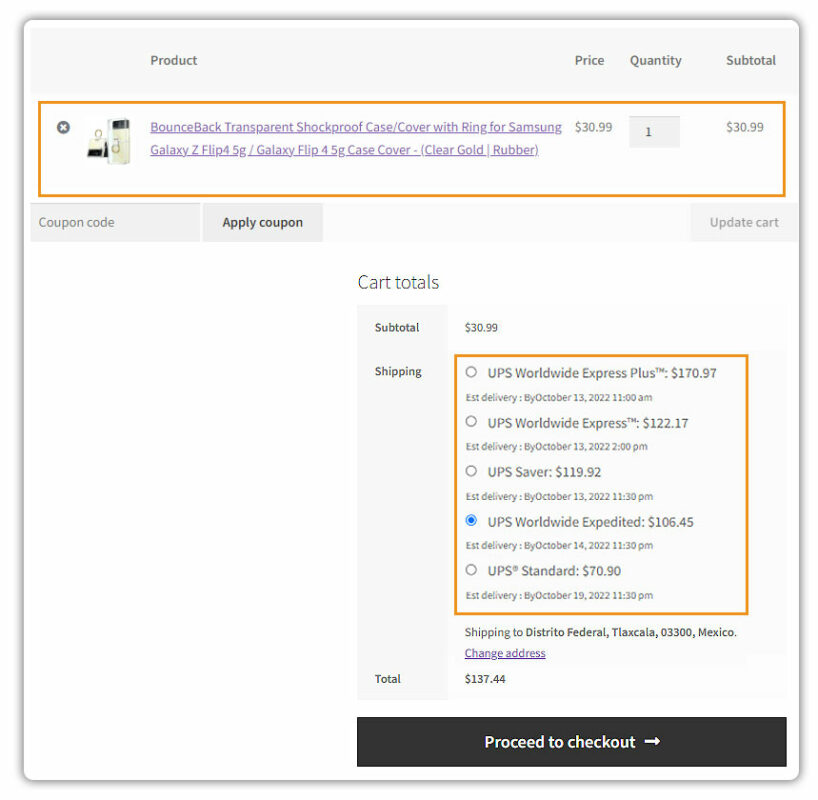
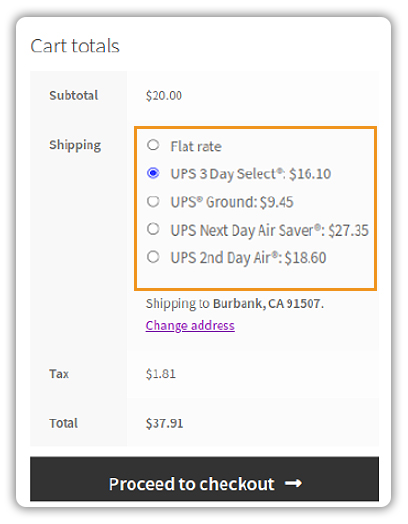
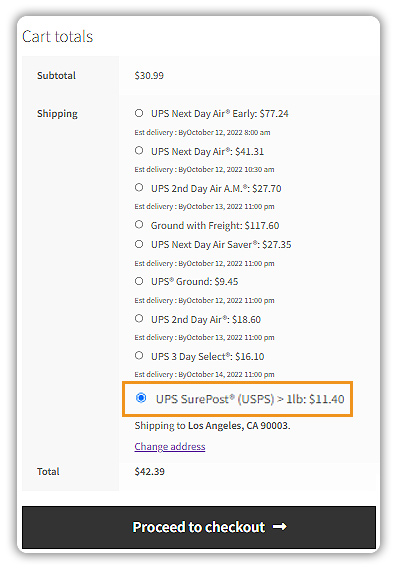
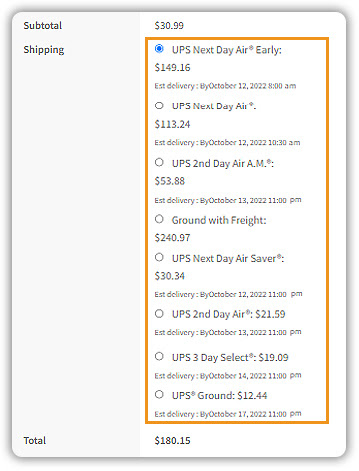
7. Display UPS Shipping Rates
The WooCommerce UPS Shipping plugin supports all the UPS shipping methods with real-time and accurate shipping rates from UPS. All you need to do is configure your UPS account in the plugin settings, and you are good to go. The WooCommerce UPS plugin automates the real-time shipping rates on your website.
When a customer adds your products to the cart, as shown in the image below, they can choose from tons of UPS shipping methods based on their preferences and the WooCommerce UPS plugin will display the real-time shipping rates on the cart page.
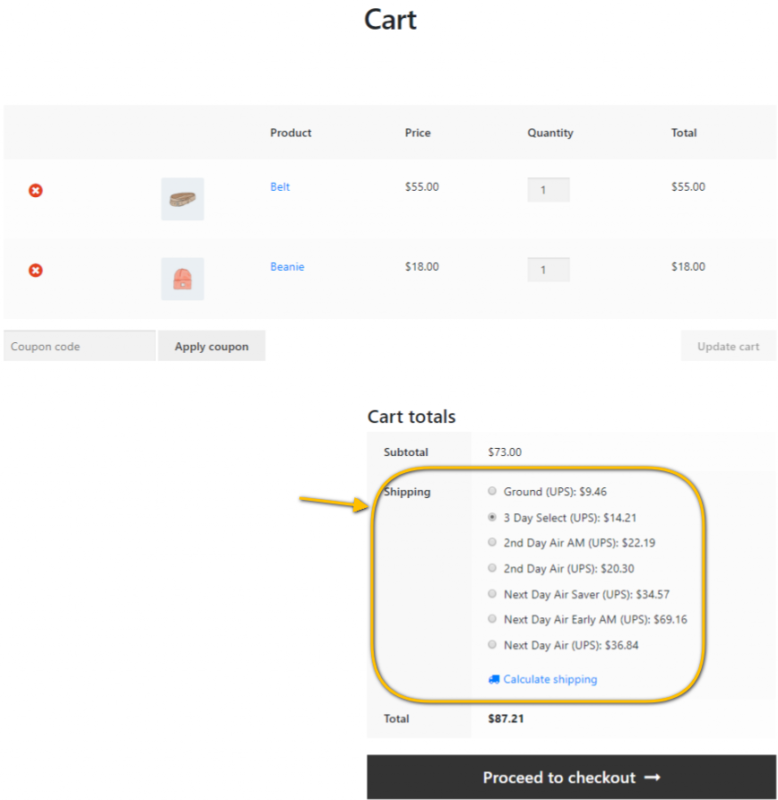
The WooCommerce UPS plugin even lets you enjoy all the benefits UPS provides based on your UPS account. It supports UPS negotiated shipping rates, UPS Ground Saver(UPS SurePost),etc
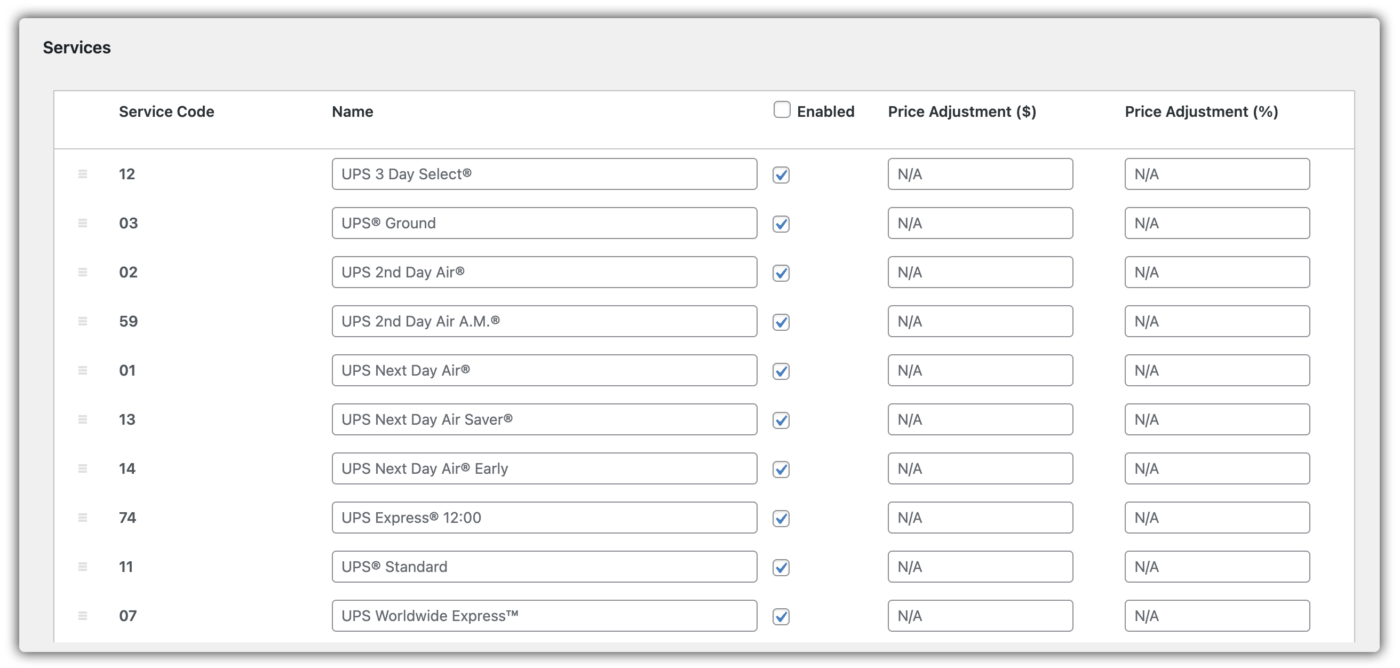
Accessing UPS Shipping Rates & Services:
- Select WooCommerce < Settings < Shipping < UPS
- Select Rates & Services
- Enable RealTime Rates as shown below

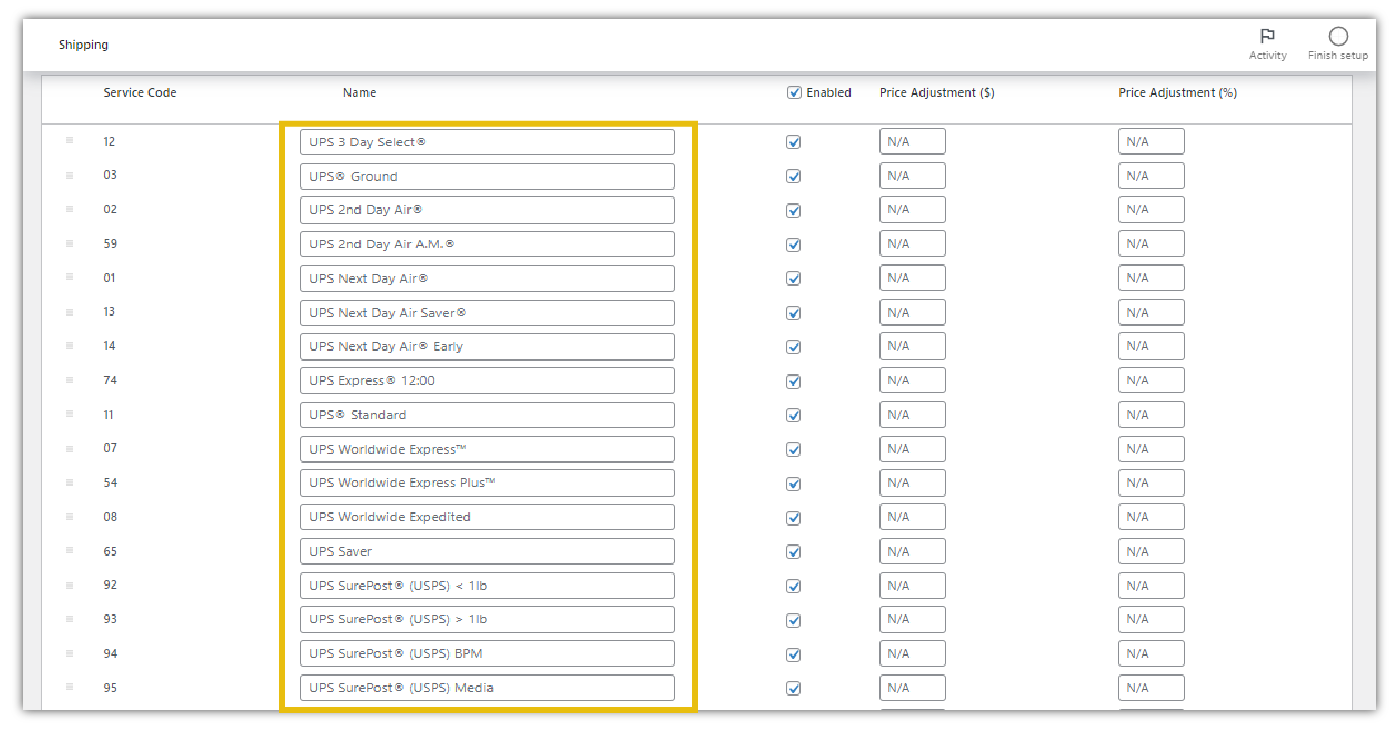
We can also see the UPS Shipping Methods available for your origin and shipping addresses assigned as shown in the image below
Note – The services vary from the shipper to the destination address.
- UPS 3-Day Select
- UPS Ground
- UPS 2nd Day Air
- UPS 2nd Day Air AM
- UPS Next Day Air
- UPS Next Day Air Saver
- UPS Next Day Air Early AM etc.
You can enable or disable the desired services. For more information about services, See the UPS Service Guide.
Note: The services you don’t select are not shown to the customer even though they are available services from UPS.
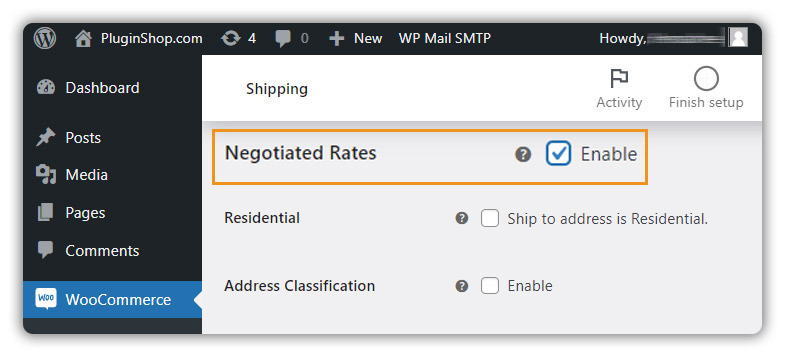
Enable UPS Negotiated Rates on Cart/Checkout
“Negotiated Rates” are the contract rates established by UPS and your UPS Account Representative. Enabling Negotiated Rates allows you to view the most current and accurate rates for your UPS account.
Accessing UPS Negotiated Rates:
- Select WooCommerce < Settings < Shipping < UPS
- Select General < Negotiated Rates
- Select the Negotiated Rates checkbox to enable it if your account has negotiated rates available.
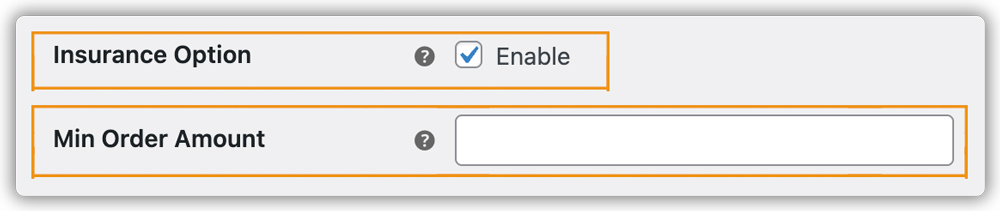
Add UPS Insurance Value
UPS covers the loss or damage, at no extra cost, for up to $100.00. If the value of your goods exceeds this amount, you can follow the steps below to add Custom Declared Value. This way you will be charged an additional fee that will be added to the shipping cost.
Accessing UPS Insurance Value:
- Select WooCommerce < Settings < Shipping < UPS
- Select General < Insurance Option
- Enable the Insurance Option checkbox to opt for the insurance
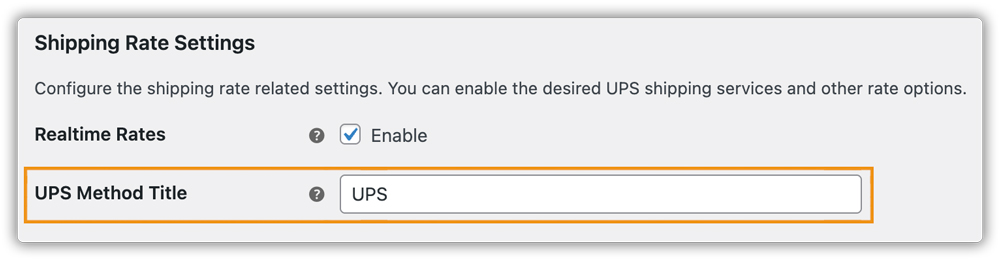
Add Shipping Method Title
UPS Method title returns the name of the shipping method you want to display when you select the cheapest rate for your order shipments.
For e.g: Let’s say, you have a product for which you want to display the cheapest shipping rate. Using the UPS method title, you can define the shipping method name for the service which provides the cheapest shipping rate and display it over the cart/checkout
You can enable the cheapest rate settings in Offer Rates.
Accessing UPS Method Title
- Go to WooCommerce Settings> Shipping> UPS
- Select Rates and Services
- Provide UPS Method Title in the field given.
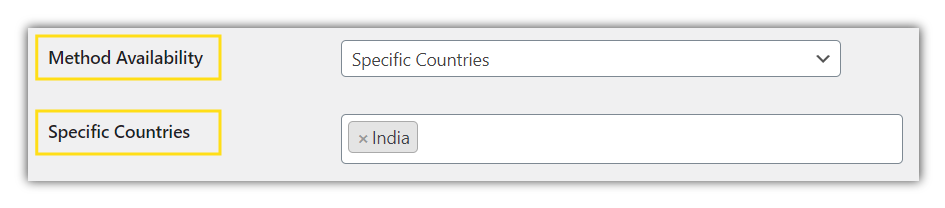
Assign Shipping Methods to Specific Countries
The WooCommerce UPS plugin allows you to restrict shipping methods to certain zones. For instance, you can restrict the shipping methods to India, and for that, you need to specify the destination countries under the Specific Countries as shown below.
Method Availability: This field allows you to make the UPS shipping method available for selected countries. The available options are as given below:
- All Countries: This makes the UPS shipping options available to customers in all countries. It is set as a default option.
- Specific Countries: This allows you to specify the list of countries for which you want to provide UPS shipping. UPS Shipping Method would be available only in the listed countries.
For eg: You want to enable the UPS service rates for product shipments specifically to India. You can proceed in the following way:
- Go to WooCommerce Settings -> Shipping->UPS
- Select Rates & Services (Under UPS Menu)
- Select Method Availability as Specific Countries
- Select India in the Specific Countries Tab
Once this is done, we can now check the UPS rates in the cart and checkout pages:
(you will only see the UPS rates when you enter the specific country address):
Cart Page:
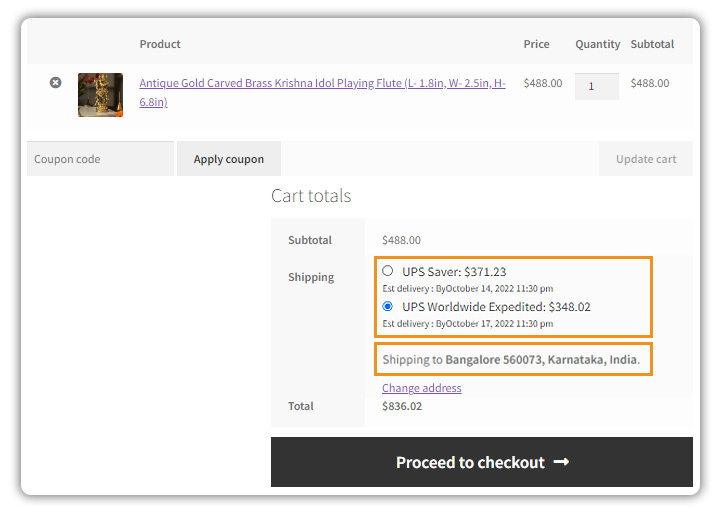
Checkout Page:
Configure Return Rate Type (Offer Rates)
Once you get UPS Rates, you can choose to show the type of rates to the Customer at the cart/checkout.
You can select the required option from the Offer Rates drop-down list.

- All Shipping Rates (Default): This option shows quotes for all the available services that are returned by UPS.
- Cheapest rate: This option shows the only service with the cheapest quote from the available services.
Eg: List of UPS Shipping Services available for the US is as follows:
It displays UPS Standard Shipping methods such as:
UPS 3-Day Select
UPS Ground
UPS 2nd Day Air
UPS Next Day Air
UPS Express
UPS Standard
It also includes UPS International Shipping Services such as:
UPS Worldwide Express
UPS Worldwide Express Plus
UPS Worldwide Expedited
UPS Worldwide Expedited
Special Shipping Methods are included such as:
UPS Ground Saver (UPS SurePost)
UPS First Class Mail
UPS Priority Mail
UPS EconomyMail Innovations
UPS Access Point Economy
You can enable any UPS Shipping method based on your business case as well as your shipping source and destination countries.
Add Currency Conversion Rate
Currency: You can choose the currency unit you want to use to communicate with UPS

Conversion Rate: Enter the conversion amount if you are using a currency different from the one that you set up in the WooCommerce base location. This amount gets multiplied by the shipping rates.

Leave it empty or add ‘1’, if you are using the same currency (you set up in the WooCommerce currency settings) to communicate with UPS. It means conversion is not required.
Add Fallback Rate
Fallback: This field indicates the shipping cost which is taken as the default cost if UPS does not return any quotes. This allows the customer to check out even if UPS does not return any quotes.

Enable Shipping Taxes on Cart/Checkout
Tax On Rates
Enabling Tax on Rates will make taxes applicable for your shipments

Set Minimum Order Value
In some cases, you want to define the minimum and maximum values of weight and order amount, so that you can assign shipping charges accordingly. This can be done by providing values in the following fields:

You can set a minimum order value above which shipping methods are available. For e.g: If you set the Minimum Order Value as $200, UPS Shipping Methods and Rates are available for an Order Value of more than $200.
Assign Minimum and Maximum Weight
Minimum Weight

If you want to enable shipping services and charge only for package weight above a given weight, provide the minimum weight value. Shipping rates will be returned and Label will be created if the total weight is more than the minimum weight.
Maximum Weight

If you want to enable shipping services and charge only for package weight within a given weight, provide the maximum weight value. Shipping rates will be returned and a Label will be created if the total weight is less than the maximum weight.
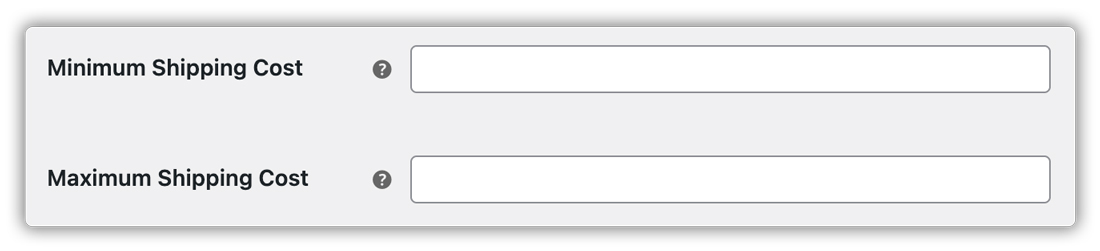
Assign Minimum and Maximum Shipping Cost
Minimum Shipping Cost
If Rate Returned by UPS is less than the minimum Shipping cost then customer will be charged minimum shipping cost.
Maximum Shipping Cost
If Rate Returned by UPS is more than the maximum Shipping cost then customer will be charged maximum shipping cost.
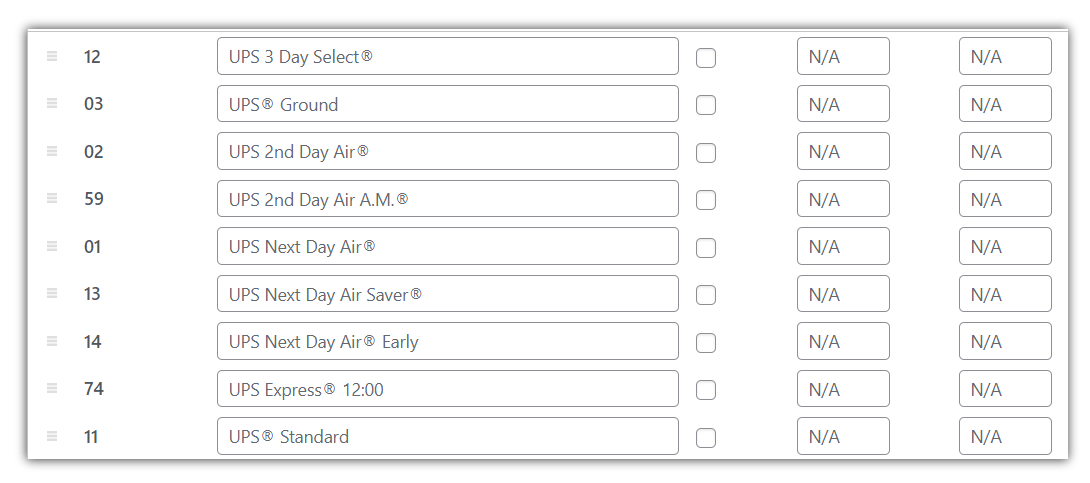
8. Configure UPS Shipping Services
UPS Domestic Services
UPS Domestic services include
- UPS 3 Day Select
- UPS Ground
- UPS 2nd Day Air
- UPS 2nd Day Air A.M
- UPS Next Day Air
- UPS Next Day Air Saver
- UPS Next Day Air Early
- UPS Express 12:00
- UPS Standard
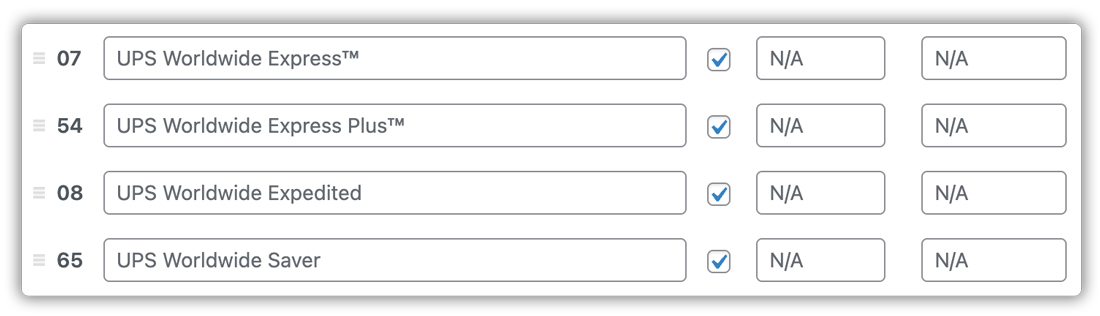
UPS International Services
UPS International Services include:
- UPS Worldwide Express
- UPS Worldwide Express Plus
- UPS Worldwide Expedited
- UPS Worldwide Saver
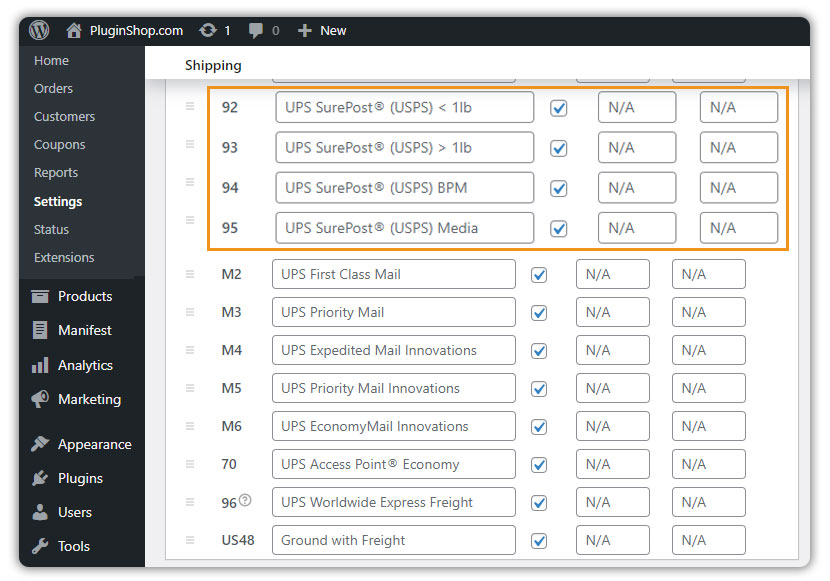
UPS Ground Saver Services
UPS Ground Saver (Formerly UPS SurePost) Services include
- UPS SurePost (USPS) < 1lb
- UPS SurePost (USPS) > 1lb
- UPS SurePost (USPS) BPM
- UPS SurePost (USPS) Media

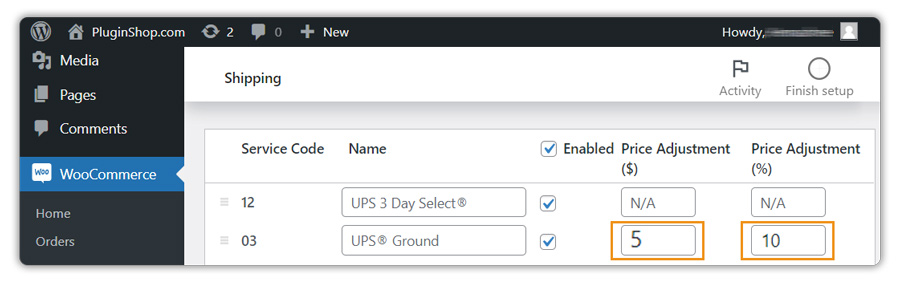
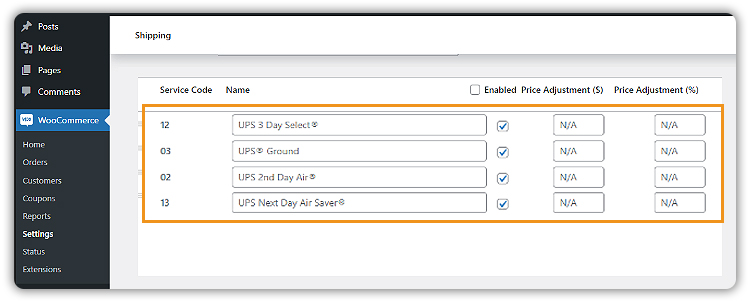
Adjust Shipping Rates
You can adjust the shipping price by adding/subtracting the required amount/from the actual shipping cost. Use the minus sign(–) to subtract the amount. You can mention the amount in % and $ for each service.
For example, the shipping cost of GROUND returned by UPS is $5.
Scenario 1: Price Adjustment for GROUND is $5 as shown below:
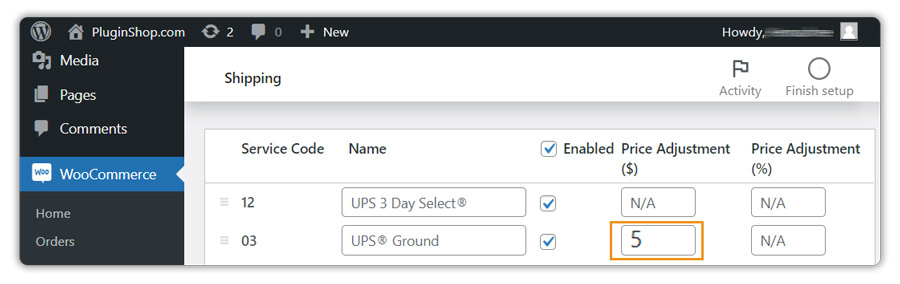
The total cost displayed for GROUND is $10 (5+5).
Scenario 2: Price Adjustment for GROUND is 10% as shown below:

The total cost Displayed for GROUND is $5.5 (the 10% of 5 is added to 5 to get the actual shipping cost).
Scenario 3: Price Adjustment for GROUND is $5 and 10% as shown below:
Display UPS Shipping Services Based on Shipping Zones
If you want to show UPS shipping services based on your customer zones, follow the steps below:
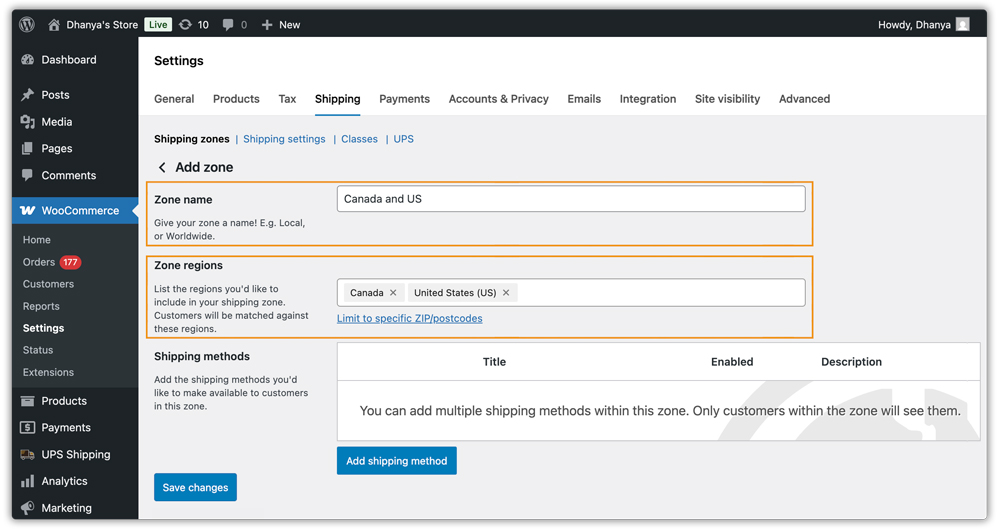
- Go to your WooCommerce Settings > Shipping > Shipping Zone.
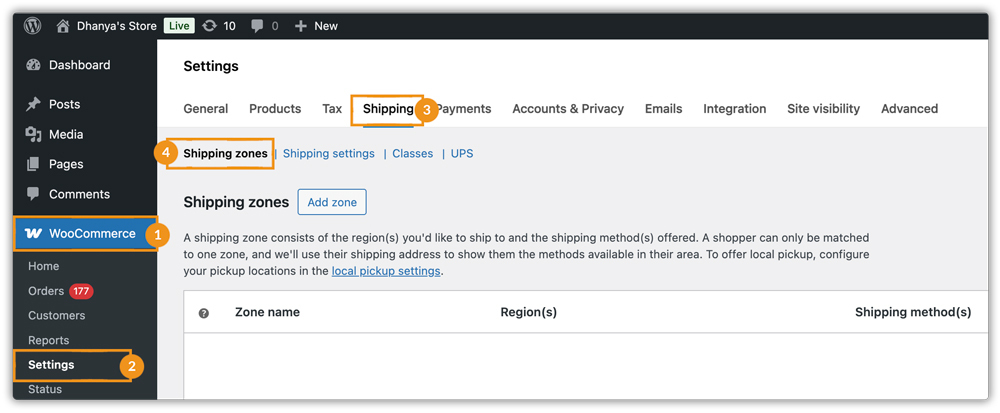
- To add a shipping zone, click on Add Zone.
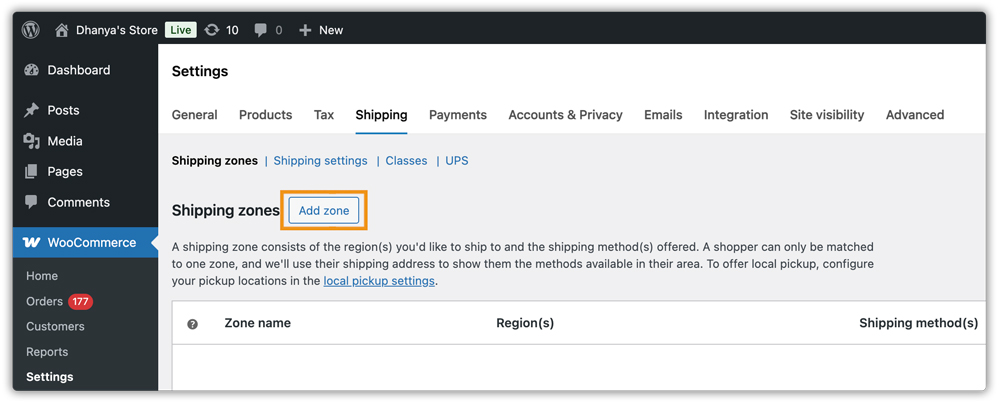
- Give your zone a name and add the shipping regions.
- To add a UPS shipping method, click Add Shipping Method and select UPS Shipping.
- Then click on Continue.
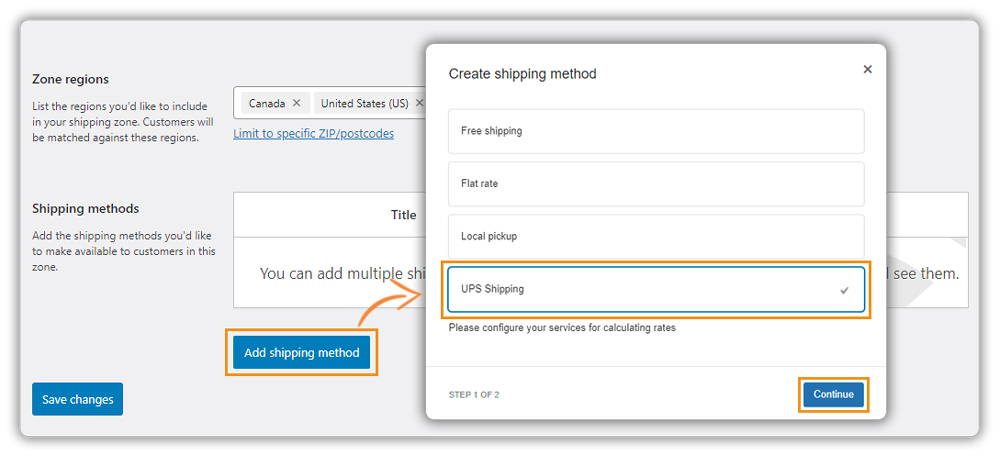
- Save the changes.
- Click on Edit in the UPS Shipping section.
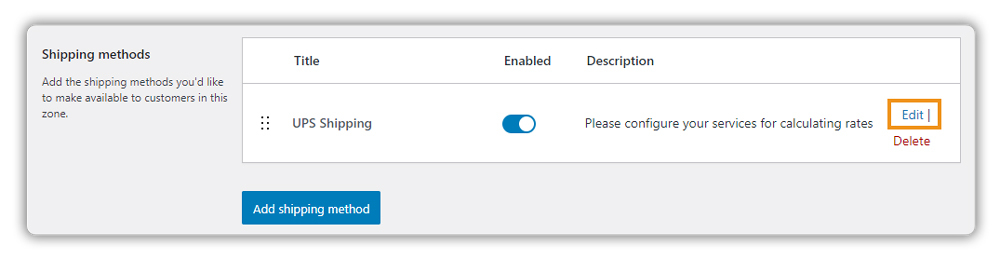
- Select the UPS shipping services for the zone and click on Save Changes.
Now at the WooCommerce checkout, UPS shipping services will be displayed according to your
customers’ regions.
For example, when a customer places an order with a US address, the UPS shipping services selected
for Canada and US region will be displayed as shown below:
9. Configure Parcel Package Settings
WooCommerce UPS Shipping Plugin has three primary packing options available. You can set the Packing Method in the plugin settings, as shown below:
Accessing UPS Packaging Settings
- Select WooCommerce < Settings < Shipping < UPS
- Select Packaging (Under UPS Menu)
- Select the suitable Parcel Packing option in the drop-down
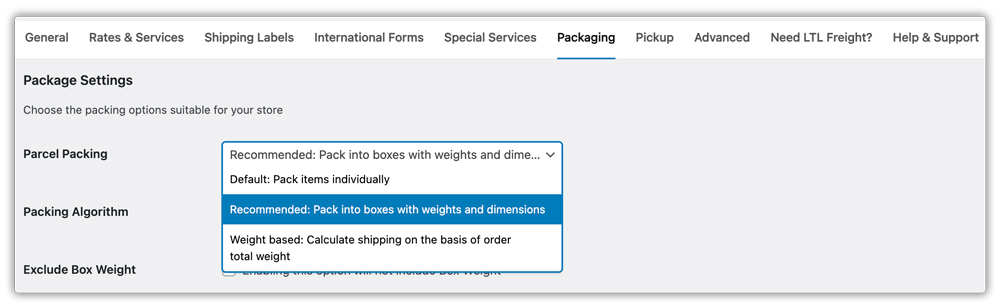
- With Box Packing & Pack Items individual options, dimensions & weight will be considered to calculate the shipping cost.
- With the Weight-based option, only the weight will be considered to calculate the shipping cost.
The three options to pack parcel(s) using our plugin are as given below:
Pack Products Individually
In this option, each item in the cart is packed separately. The total Shipping cost is calculated by adding the shipping cost for each item. Hence labels are also generated separately.
For example, the shipping cost of Item X is $10. If the customer adds two units of item X to the cart, then the total shipping cost is $10 x 2, which is $20. In this case, two labels are generated.
Pack Products Using UPS Boxes
If packing items individually does not suit your business, you can define the required UPS box sizes under the Box Dimensions section. All the cart items are packed into custom boxes defined in the Box Dimensions settings. The best-fit box is auto-chosen from the defined boxes. This is the recommended option. You can read through “Box Packing” to understand more in detail.
Pack Products Purely Based On Weight
In this option, the weights of all the cart items are summed up and passed to the UPS API to get rates. You have to just define a Max Weight which will determine the maximum weight that can be packed in a single package. All the products up to the Max Weight will be packed inside a single package and once the Max Weight is reached, the plugin will create a new package. Read More about Weight Based Packing here.
UPS Box Packaging
Correct packaging is essential for your shipment to arrive at its destination on time and in good condition. You can choose the packaging options offered by UPS. The available options are as given below:
- UPS Letter
- You can ship letters, business correspondence, and documents.
- Dimensions are 12.5″ x 9.5″ x 0.25″
- Weight limit = 0.5 lbs.
- UPS Tube
- You can ship larger documents that should be rolled instead of folded, such as blueprints, charts, maps, drawings, and posters.
- Rates are based on the total actual weight or the total dimensional weight of all packages in a shipment, whichever is greater, and the respective destination.
- Dimensions are 38” x 6” x 6”
- Weight limit = 100 lbs.
- UPS PAK
- You can ship flat, unbreakable items, such as large reports or bulky documents.
- Rates are based on the total actual weight or the total dimensional weight of all packages in a shipment, whichever is greater, and the respective destination
- Dimensions are 17″ x 13″ x 1″
- Weight limit = 100 lbs
- UPS 25 Kg Box
- You can use this box for UPS Worldwide Express shipments. It holds up to 25 kg (55 lbs). Export paperwork included.
- Charges are based on flat rate and zone.
- Dimensions are 19.375″ x 17.375″ x 14″.
- Weight limit = 55 lbs.
- UPS 10 Kg Box
- You can use this box for UPS Worldwide Express shipments. It holds up to 10 kg (22 lb).
- Export paperwork included.
- Charges are based on flat rate and zone.
- Dimensions are 16.5″ x 13.25″ x 10.75″.
- Weight limit = 22 lbs
- UPS Small Express Box
- You can ship smaller items such as books, tapes, etc.
- Dimensions are 13″ x 11″ x 2″.
- Weight limit = 100 lbs.
- UPS Medium Express Box
- You can use it for a wide variety of merchandise.
- Dimensions are 15″ x 11″ x 3″
- Weight limit = 100 lbs
- UPS Large Express Box
- You can use it for a wide variety of merchandise.
- Dimensions are 18″ x 13″ x 3″
- The Weight limit is 30 lbs.
For more information, see UPS Packaging Guidelines.
Add Custom Box:
You can add your own custom boxes based on your requirements.
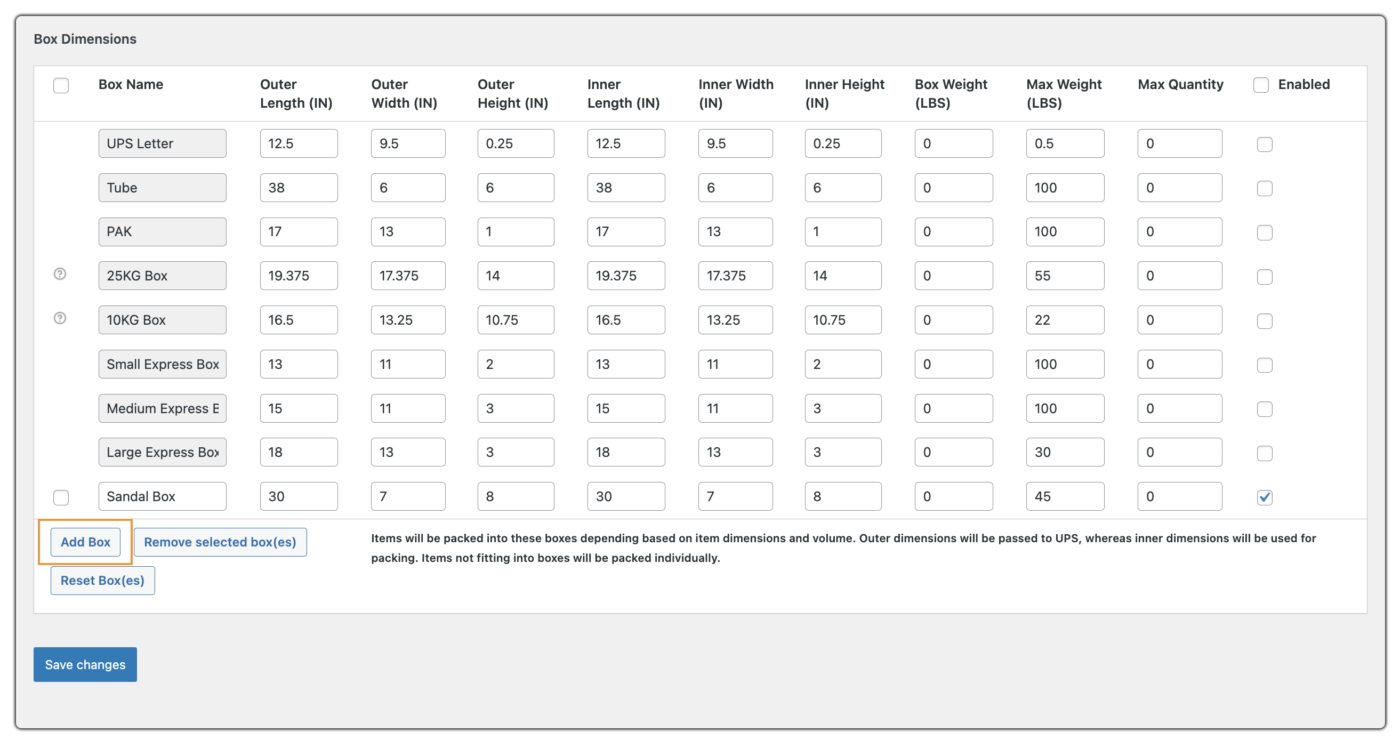
Here, you can define the outer and inner dimensions of boxes. Outer dimensions are the dimensions of the package. Inner dimensions are the dimensions of the product.
Still, Facing issues with UPS Box Packing?
Check out Common Reasons for Failure in UPS Packaging to know more.
10. Printing UPS Shipping Labels
Enabling UPS Label Printing:
- Select WooCommerce < Settings < Shipping < UPS
- Select Shipping Labels
- Enable Label Printing Option.

Label Printing: Select enable/disable from the drop-down for label printing. By default, the printing shipping label option is activated.
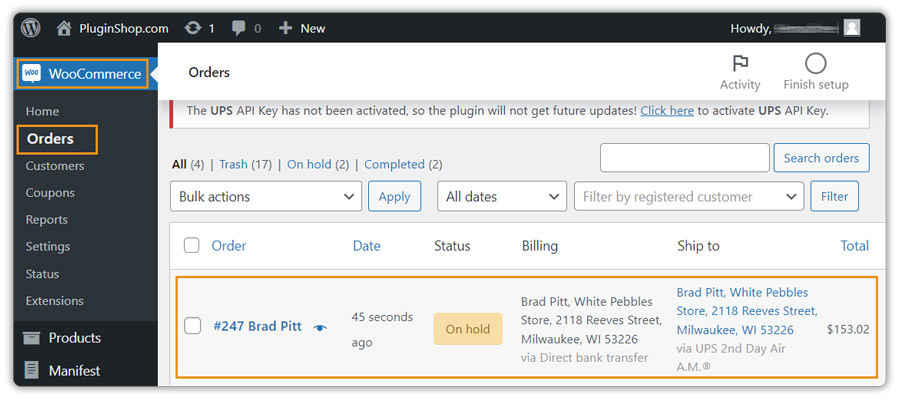
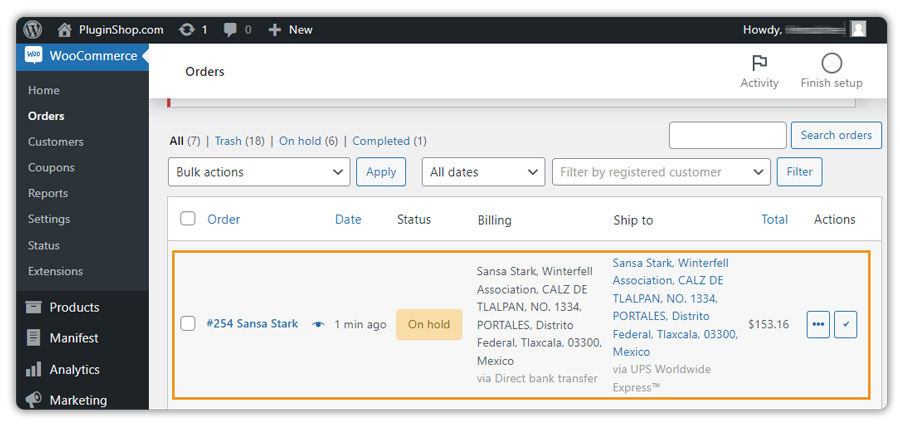
Place an order
After setting up the UPS Configuration Settings, your customers can see all available UPS services listed on the Cart page which is shown in the below screenshot. The customer can select the required option and proceed to checkout.
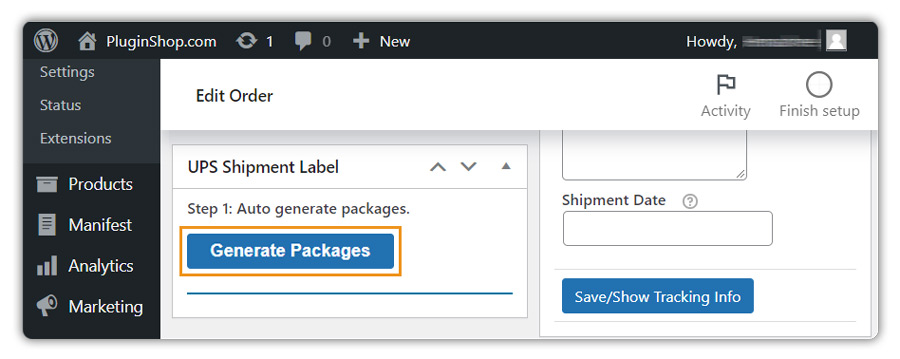
Printing your first UPS Shipping Label
You can print the label in PNG, GIF, ZPL, or EPL format based on the UPS Configuration settings.
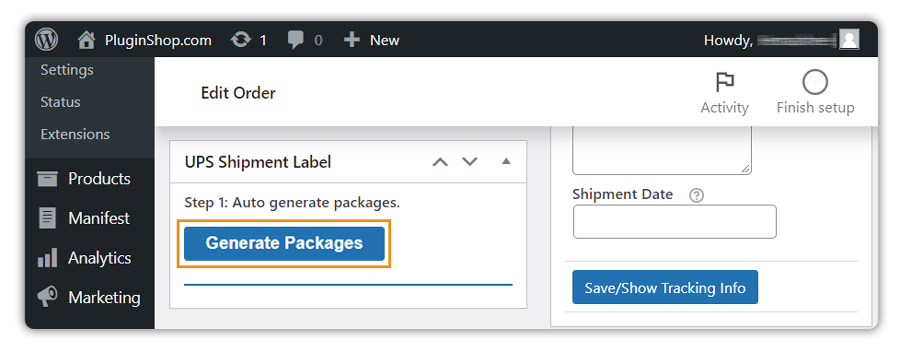
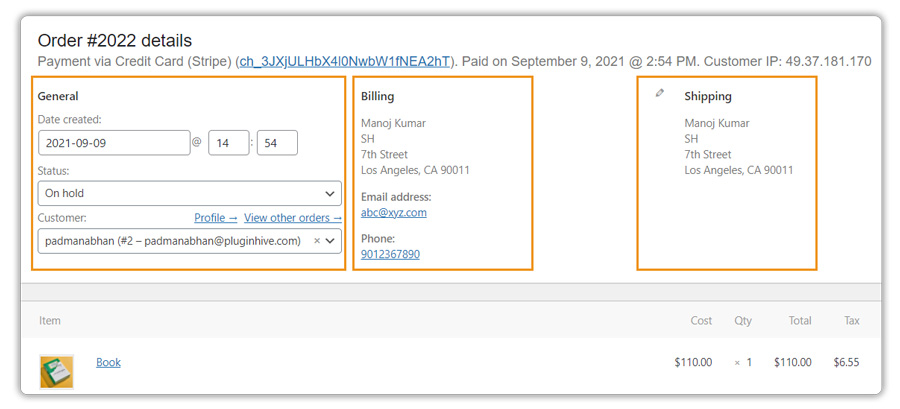
- Navigate to Dashboard > WooCommerce > Orders.
- On the order page, click #OrderNumber for which you want to create and print the label.
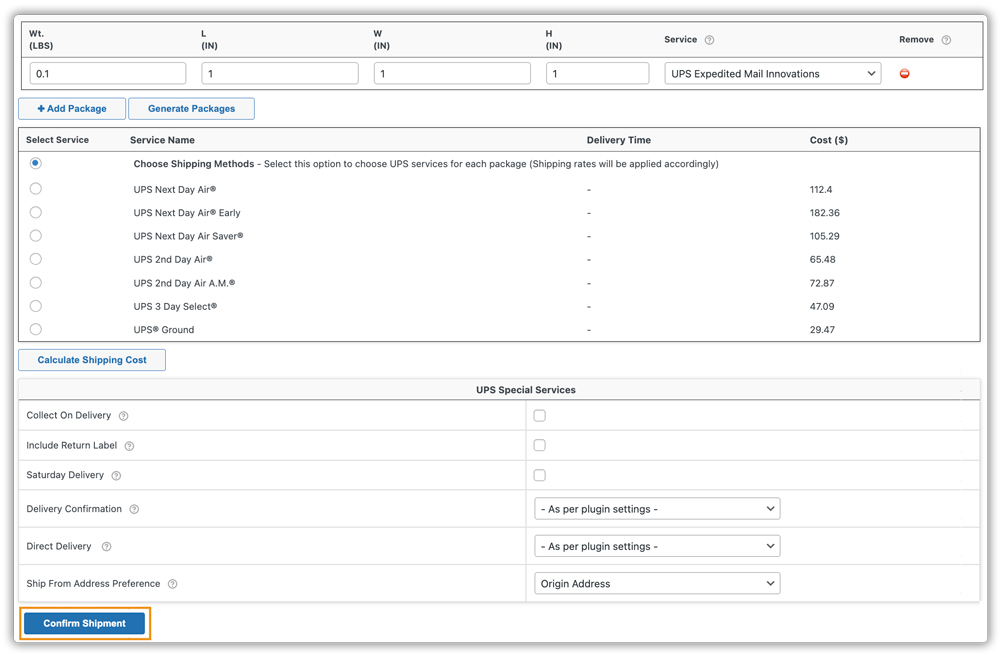
- Click on Generate Packages. It will generate a package based on the Parcel Packing Method that you have set up in the plugin settings.
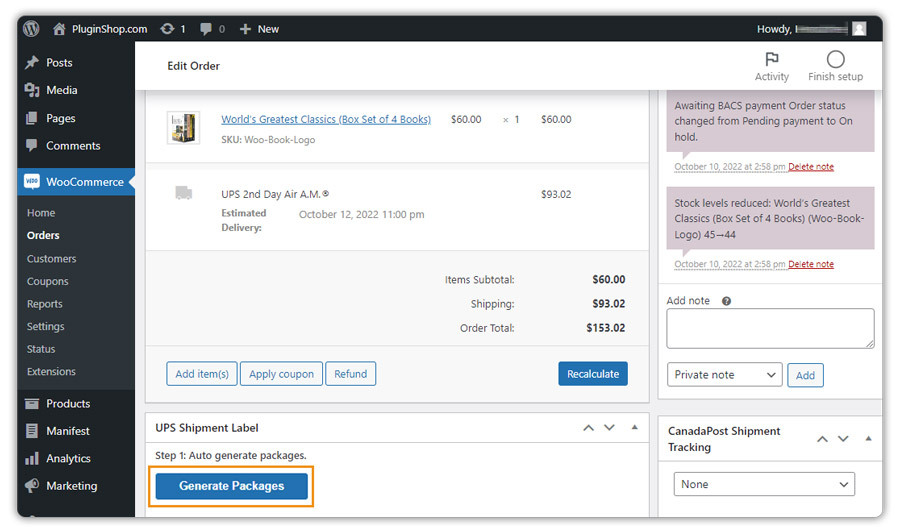
- Once the package is successfully created, the following options will be available to you.
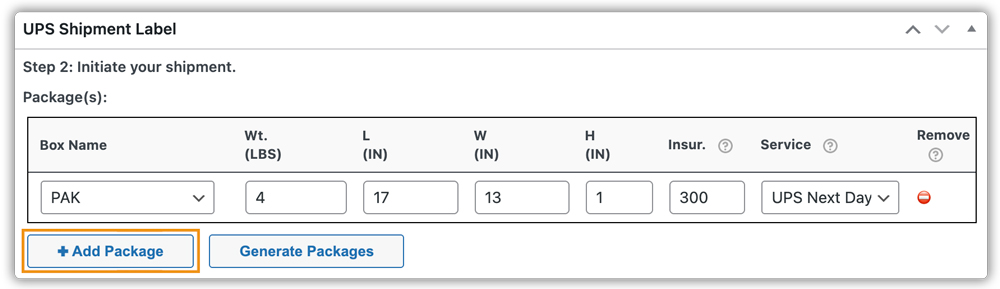
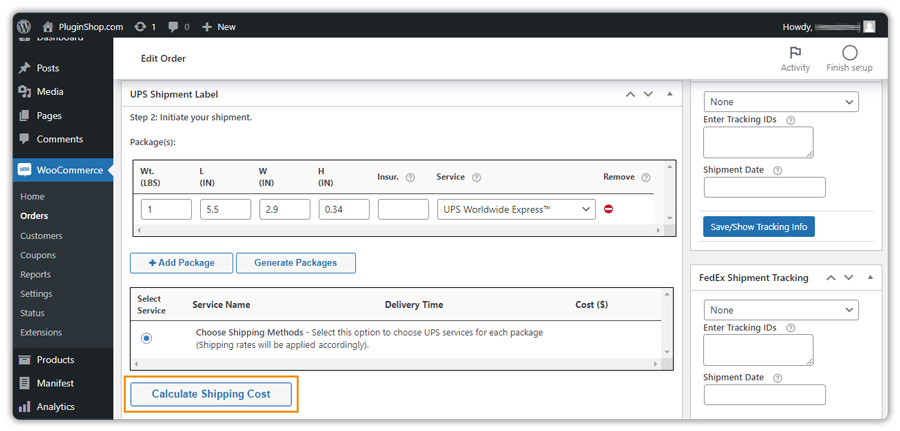
- Add Package: Suppose you want to ship your product where you require multiple packages/ boxes, the following option allows you to manually add custom box packages to your order. You can also provide package weight and dimensions and assign the Insurance value and UPS shipping service for your packages accordingly.
- Calculate Shipping Cost: It allows you to calculate real-time shipping rates on the order page in order to compare different UPS shipping rates and assign the cheapest or fastest UPS shipping services to the packages. This way you can compare shipping rates and generate shipping labels of any available shipping service for the destination address.
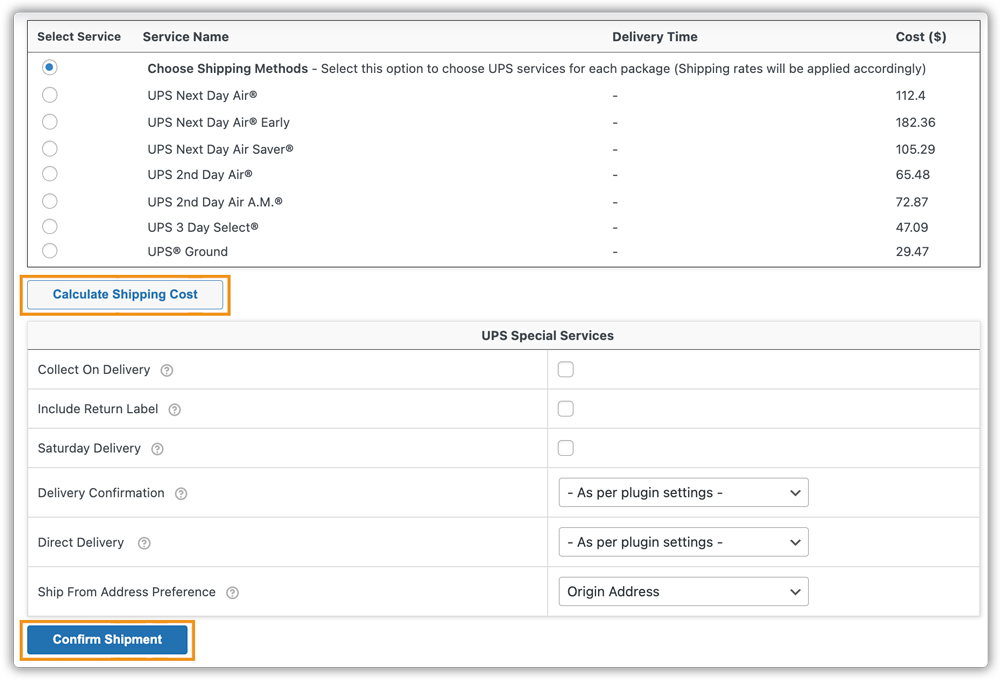
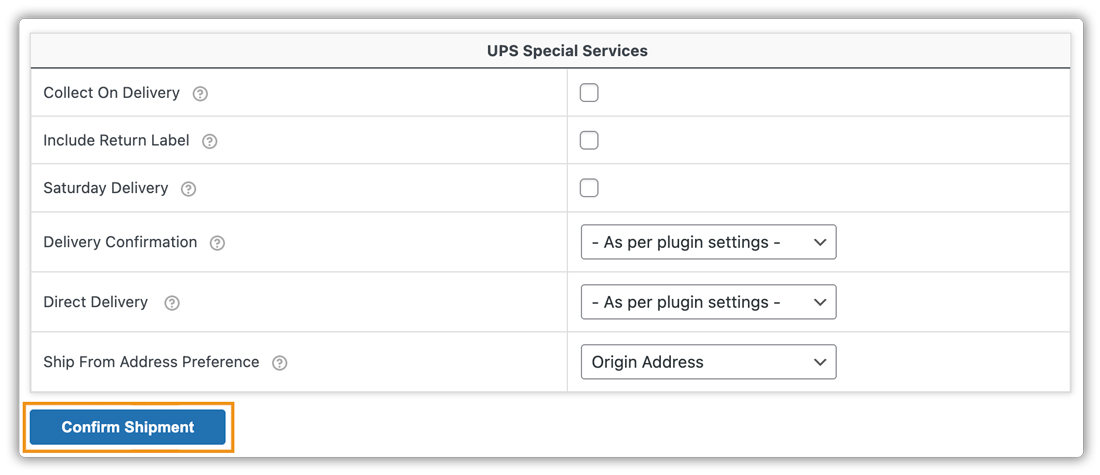
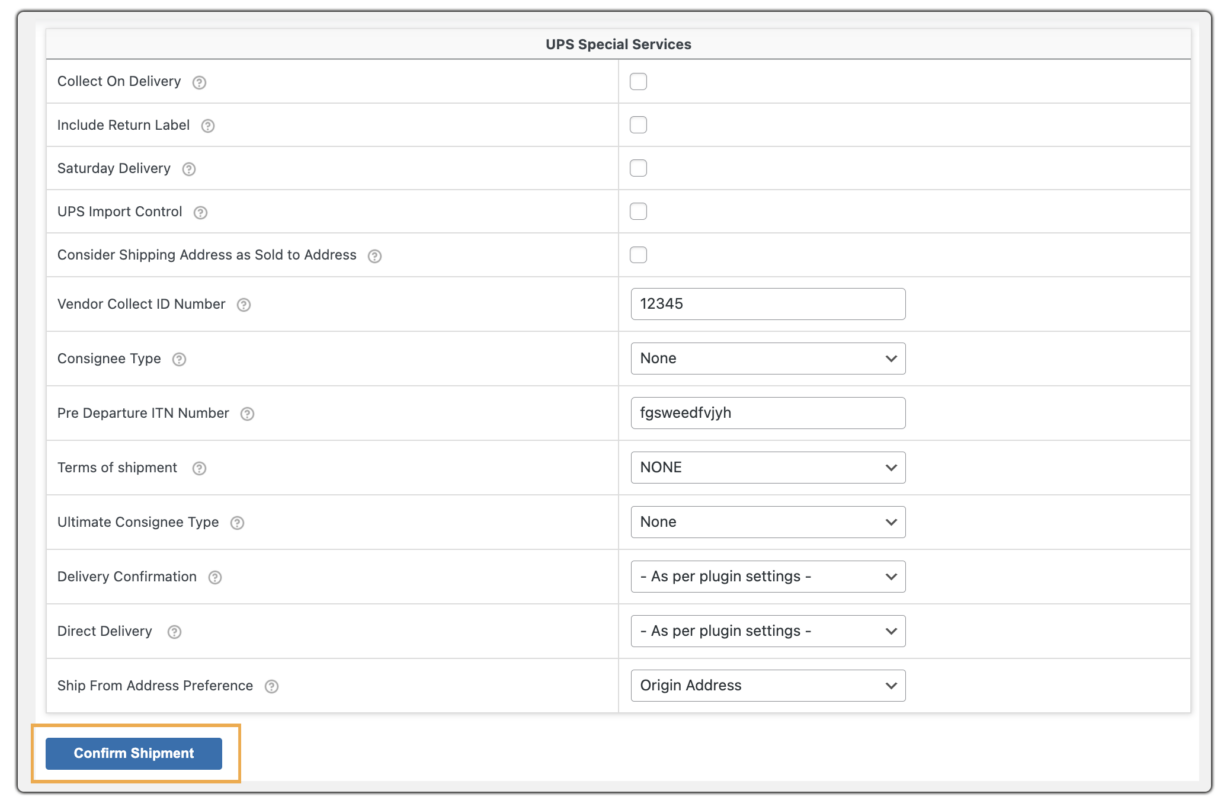
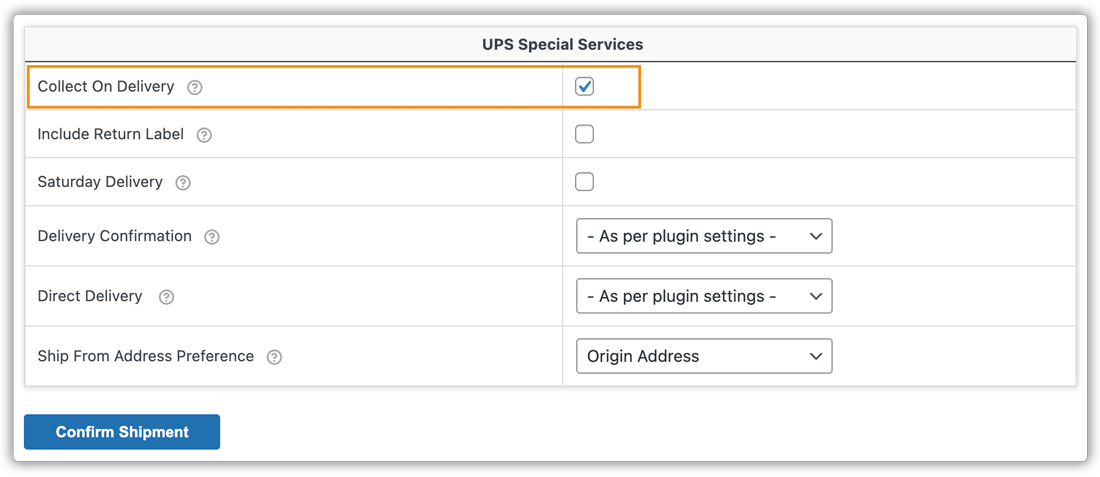
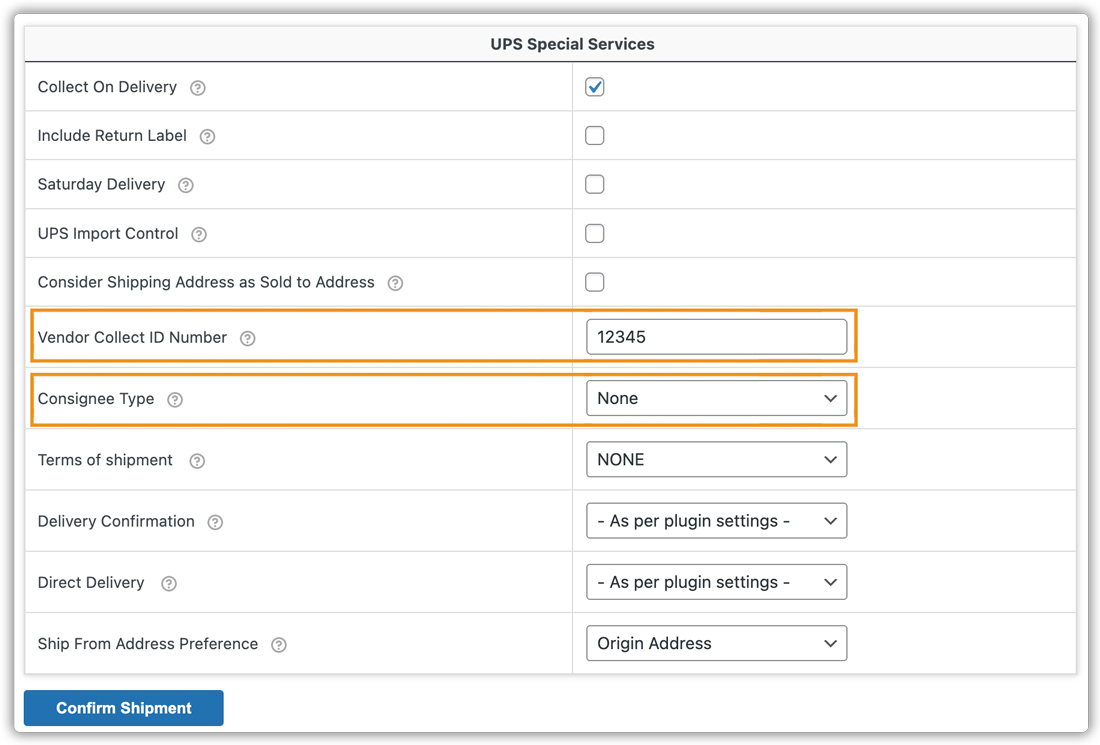
Here is the list of special services available by UPS based on your shipping requirements. Some of these services may or may not apply to your product shipments, you can enable them as per your requirements.
- Collect On Delivery: This allows you to enable the UPS Collect On Delivery option for the current order. Enabling UPS Collect On Delivery will ensure that UPS will attempt to collect the amount shown on the C.O.D. tag or package label. After that, the payment will be sent to the store owner.
- Include Return Label: A return label is a prepaid shipping label containing the shipper’s complete address details which are updated priorly. It is essential for customers as they can easily return items in their delivery if needed. The Include Return Label option allows you an easy way to print a Return Shipment Label for the current order.
- Saturday Delivery: With UPS Saturday Delivery, you can deliver packages to your customers even on a Saturday. UPS can provide this service to you only if require it.
- Confirm Shipment: Once you are done with the packages, click on Confirm Shipment to generate a UPS shipping label for the current order.
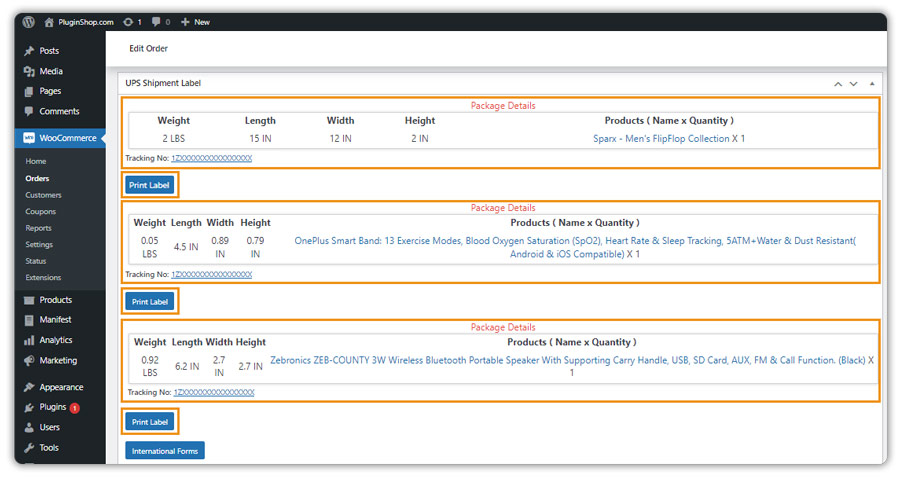
After clicking the Confirm Shipment button, the shipment tracking ID automatically gets generated in the tracking box. Print Label and Return label buttons become available for printing.
Print Label and Return label buttons become available for printing.
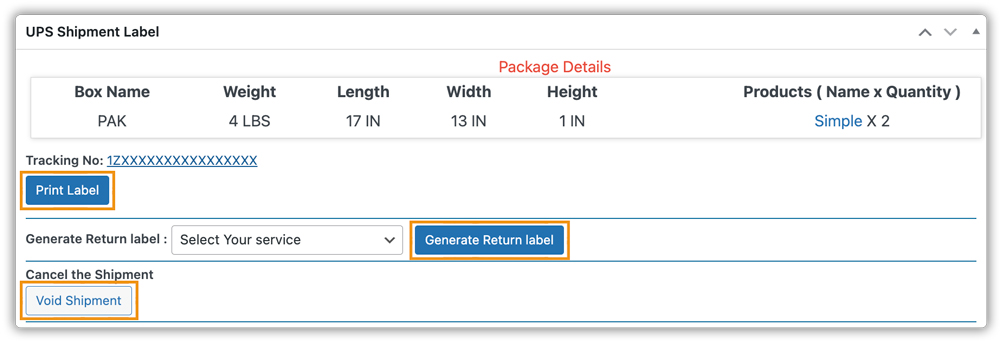
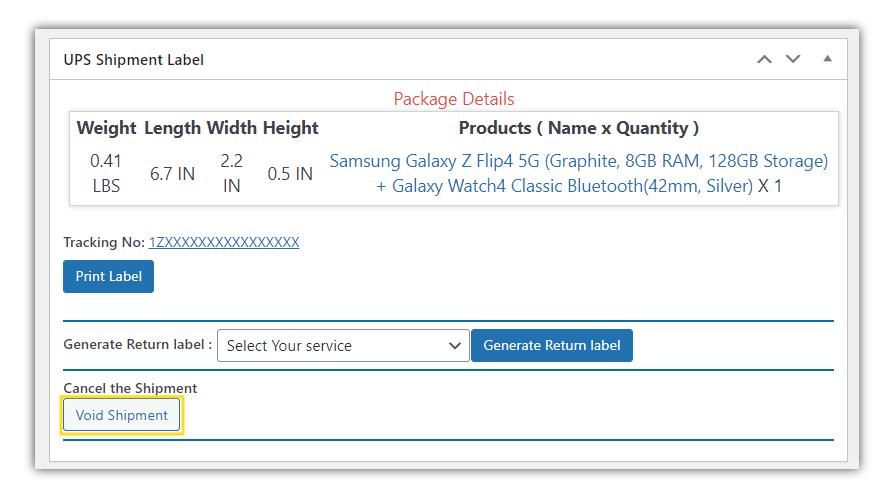
- Package Details: The plugin allows you to know exactly how the products are packed inside the package by displaying the package details with the name and the quantity of the products inside each package.
- Print Label: Click Print Label to print the label for the order.
- Generate Return Label: Click Generate Return Label to generate and print the label with the destination address as the address of the shop owner and the origin address as the address of the customer.
- Void Shipment: In case the order gets canceled, you can click on the Void Shipment option.
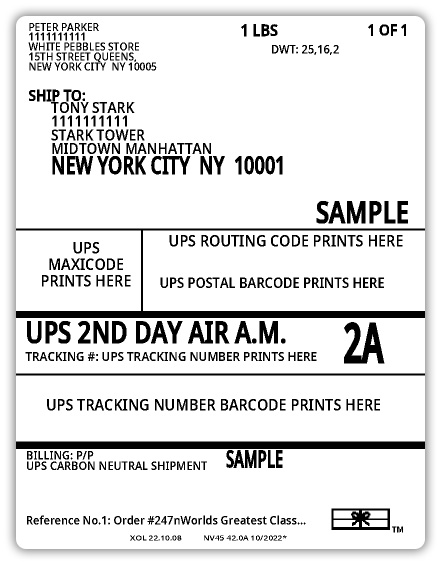
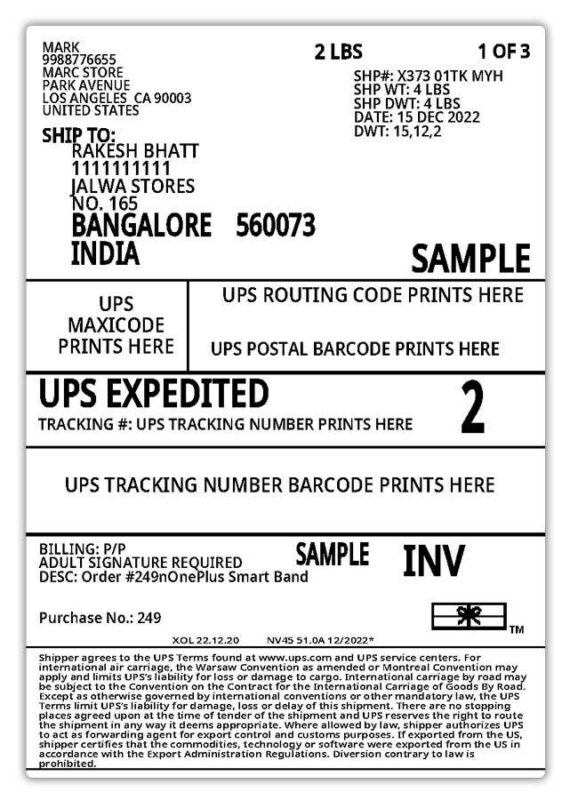
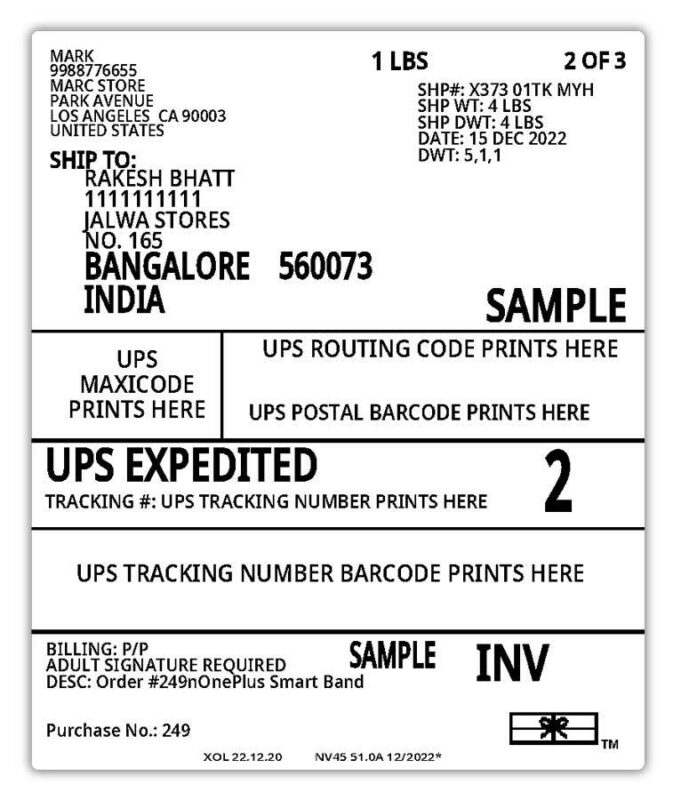
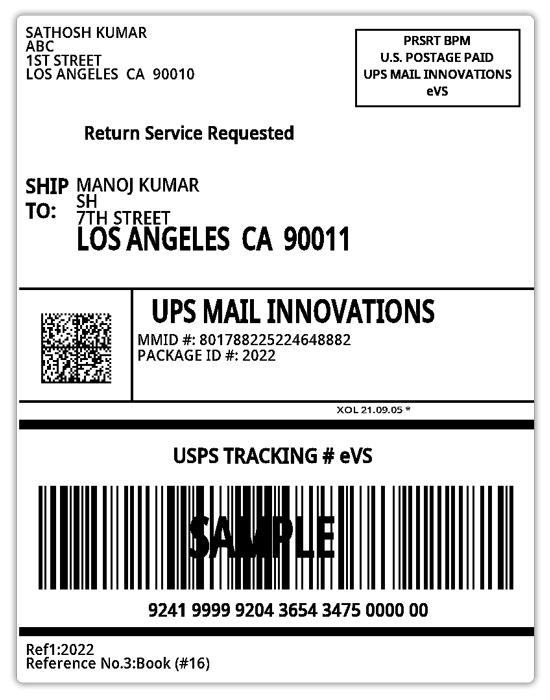
Sample UPS Shipping Labels
All created shipment labels get stored in your host site database. All these labels are auto-downloaded in a file and can be printed multiple times.
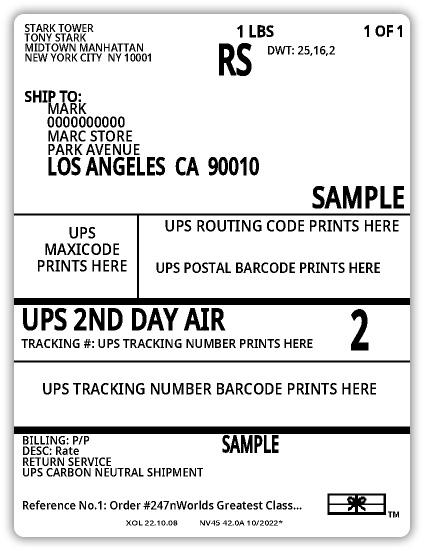
Return label:
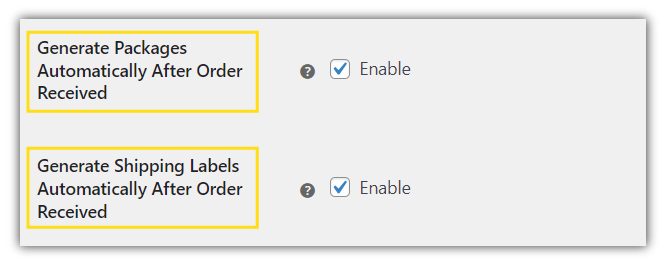
Print Shipping Labels Automatically
To print the UPS Shipping label automatically
Go to WooCommerce Settings> Shipping>UPS>Shipping Labels
Enable the following options:
- Generate Packages Automatically After the Order is Received
- Generate Shipping Labels Automatically After the Order is Received
If you have enabled rates, no need to assign default services. When 3rd party rates are used, default services need to be assigned.
- Default Service for Domestic (where you will be assigning UPS Domestic service as the default service)
- Default Service for International (where you will be assigning UPS International service as default service)
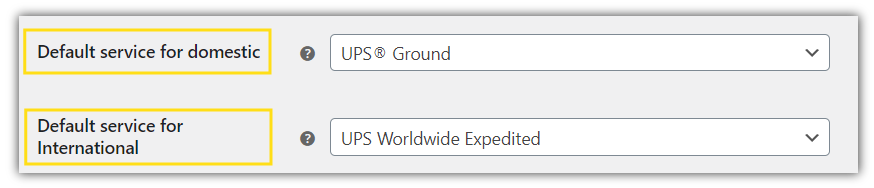
Also, Trigger Automatic Label Generation needs to be assigned. Automatic labels can be triggered “when the payment is confirmed” or “Default- When the order is placed”.

Once the order is placed, the UPS shipping labels are automatically generated and can be downloaded from the Edit Orders page. Select the order you want the label to be printed and click on the Print Label option
You can also print Labels by clicking on the Print UPS Label icon as shown in the image

Print Shipping Labels for Multiple Packages
Sometimes you might have to use multiple boxes/packages to pack your products. In such cases, we recommend you use our WooCommerce UPS plugin to print multiple shipping labels for your orders.
Once the order is placed, go to the Orders Page and select your order
Click on Generate Package
Click on Calculate Shipping Cost
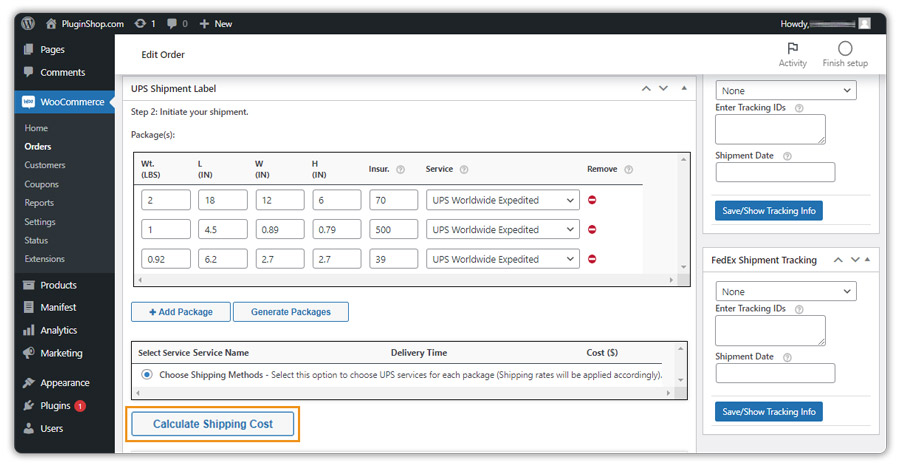
Click on Confirm Shipment
You can generate the labels of your packages as shown in the image
Label images:


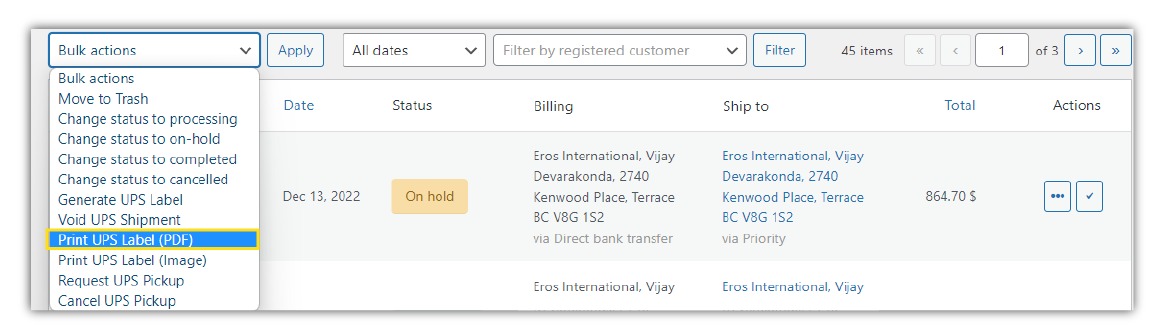
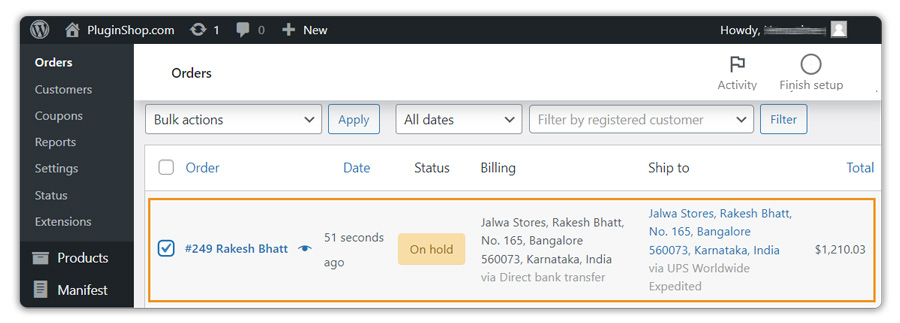
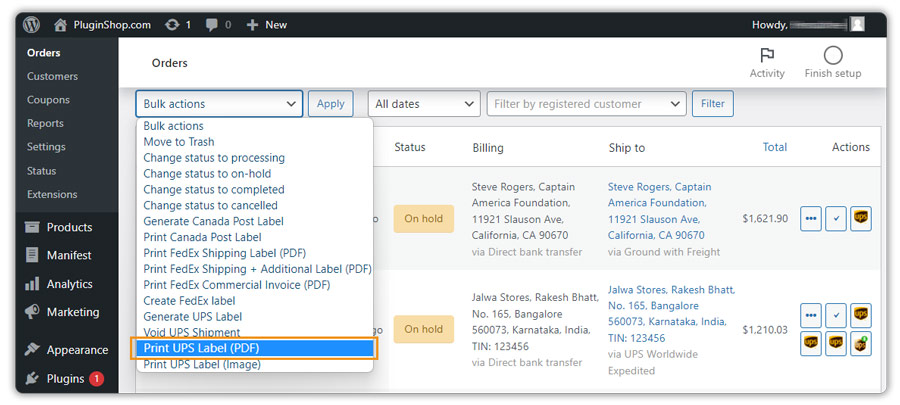
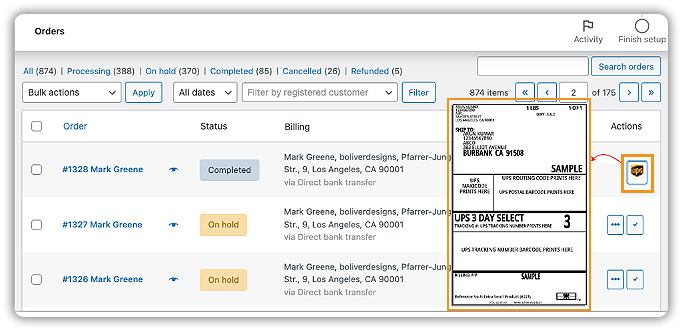
Print Shipping Labels for Multiple Orders in Bulk
Once the WooCommerce UPS plugin is installed and activated, all you have to do is change the image type of the shipping label to PNG. This is because the plugin only supports bulk label generation in the PNG file format. You can find the option to change the image type in the plugin settings under the Label Generation tab. The image below shows the option under the Label Generation tab.
Once you change the image type and save the settings, all you have to do is wait for the customers to place orders. The following image shows the orders placed on the orders page.
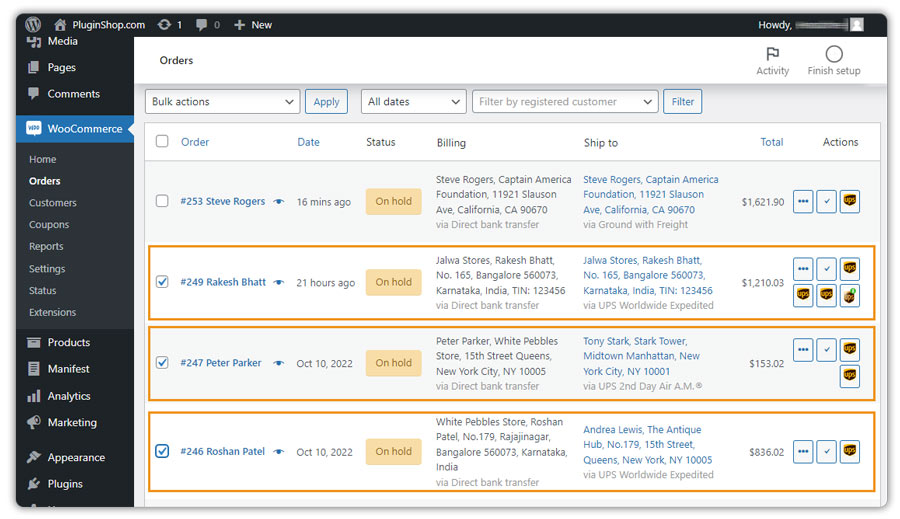
Once you have got all the orders, just select all the orders for which you want to create the shipping labels. And after that, select the option to create UPS shipping labels, under Bulk Actions. The following image will show you the option under Bulk Action.
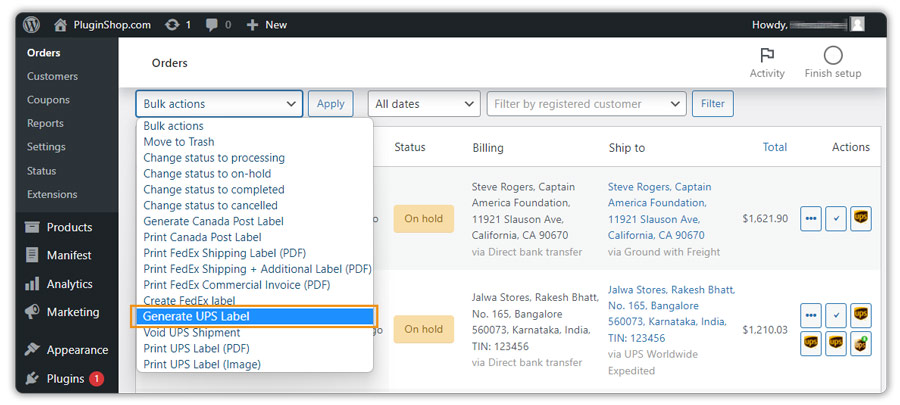
Then click on apply, and the plugin will generate official UPS shipping labels for all of the orders that you have selected. Once you have successfully generated the shipping label, you need to select the order you want to get the shipping label and click on the option to print it. The image below shows the option to print the shipping label.
Order 1 Labels


Order 2 Label:

Order 3 Label:

The shipping label will be downloaded. You can download it using any printer.
Note: The return label generation remains the same in automatic and multipackage shipping
Cancel UPS Shipping Label
The WooCommerce UPS Shipping plugin provides the functionality wherein you can cancel out the shipment generated and nullify the order. When the label is generated, you will be charged the shipping cost at that point, no additional fees will be deducted. If you do not want to ship the package, you can cancel the shipment with UPS by voiding the shipping labels. No additional fees will be deducted, you will be charged the same shipping cost to create a label as on the UPS website.
Go to the Orders page, select an order where the shipment is confirmed and the label is generated

Now, click on Void Shipment.
The shipment will be terminated.
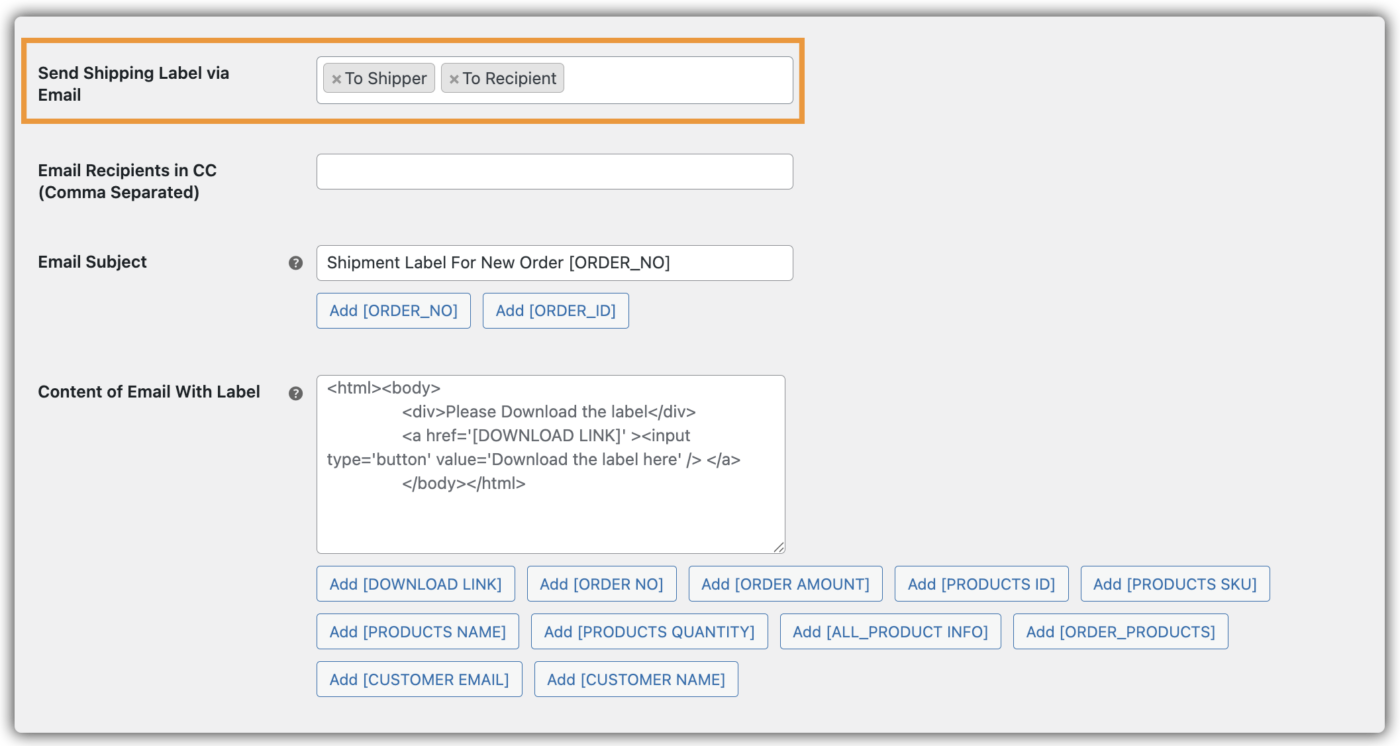
Let Customers Print Shipping Label
You can let your customers print the labels from the My Accounts page. A button will be available for downloading the label and printing.
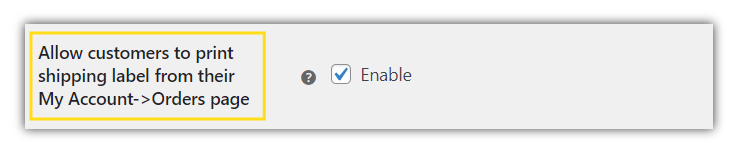
Note: Please ensure that the orders are in the processing state.
You can also share the shipping labels with your customers via email. The order number is the supported tag for the email subject. You can also define your Email HTML here.
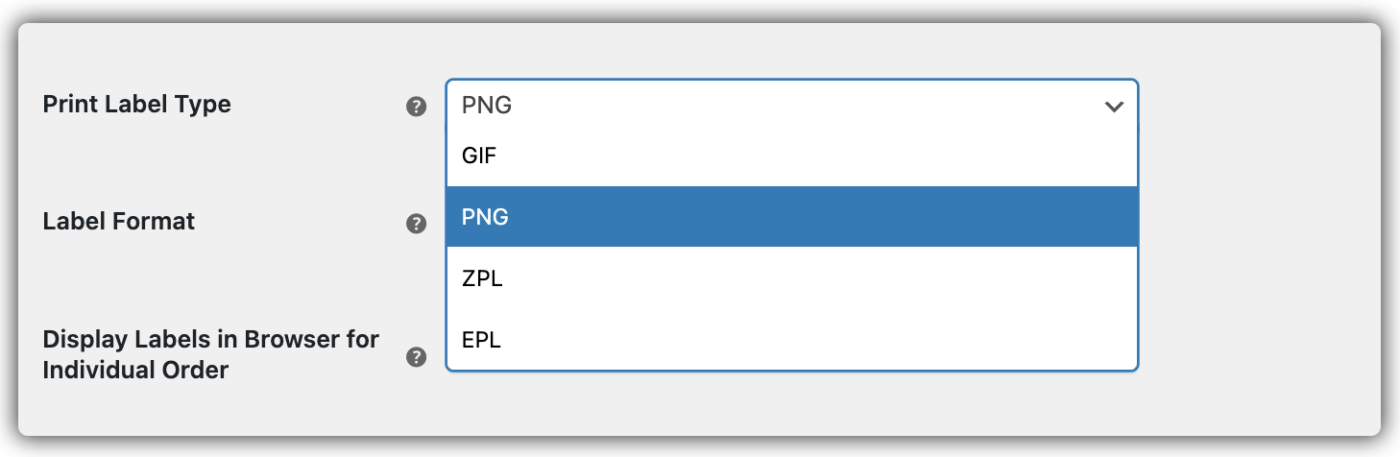
Configure UPS Label Format
Print Label Type: With this field, you can set a required file format for printing the labels. The available options are as given below:
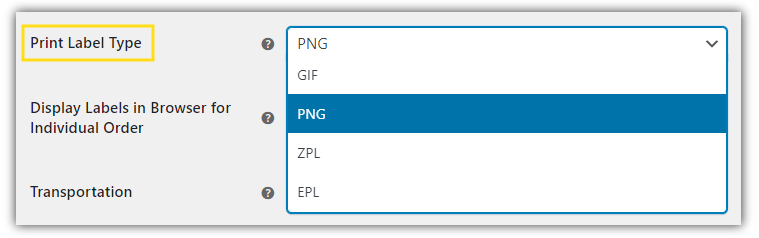
GIF: This option prints the label in Graphics Interchange Format which is used on the World Wide Web due to its broad support and portability. Enable this for obtaining animated videos of UPS labels of lower sizes.
PNG: This option prints the label in Portable Network Graphics (PNG) which has good color templates and clarity. Enable this to print your labels in image format.
ZPL: This option prints the label in Zebra Programming Language (ZPL) which is the command language used for ZPL Compatible Printers.
EPL: This option prints the label in Eltron Programming Language (EPL) It is a printer control language used to produce printed labels for various Eltron model printers.
Additional Options for UPS Label Printing
Display Labels in Browser for Individual Order: Enabling this will display the label in the browser instead of downloading it.
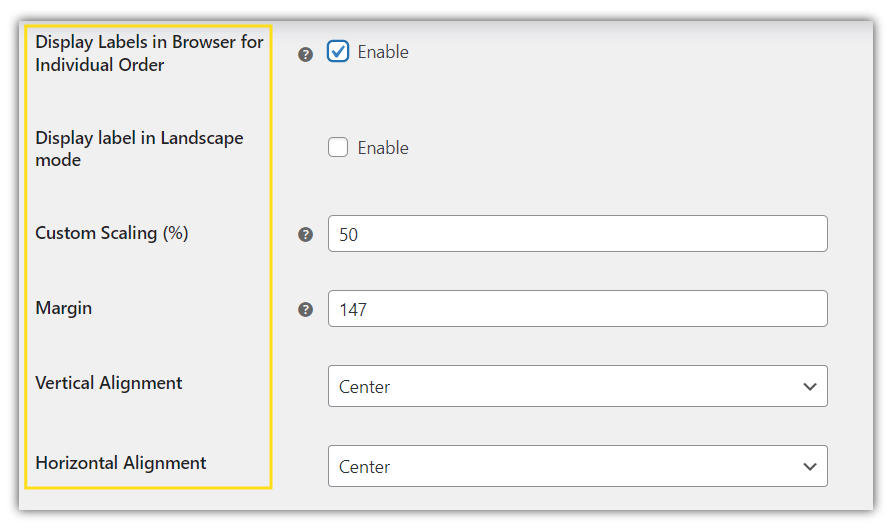
- Display label in Landscape mode: Shows the label in horizontal orientation
- Custom Scaling: Provide a % value to scale the shipping label
Eg: 50% - Margin: Margin defines the pixel values applicable on all 4 sides of the label.
- Vertical alignment: In this option, you can select the positioning of the label generated to the top, center, or bottom of the browser page.
- Horizontal alignment: In this option, you can select the positioning of the label generated to the left, center, or right sides of the browser page.
Billing Address as Shipper Address on Label
Billing address will be printed on the label. UPS will pickup the package from the address set under Ship From Address preference or Ship From Address different from the Shipper Address

Transportation
By Enabling the Transportation option, you can select the payer who covers the transportation charges.
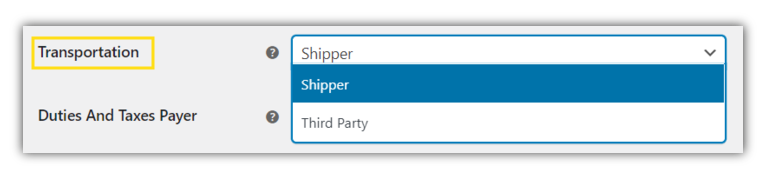
Duties and Taxes Payer
Select who will pay the Duties and Taxes.
Duties and Taxes Payer will default to Shipper in case the customer selects Access point location.

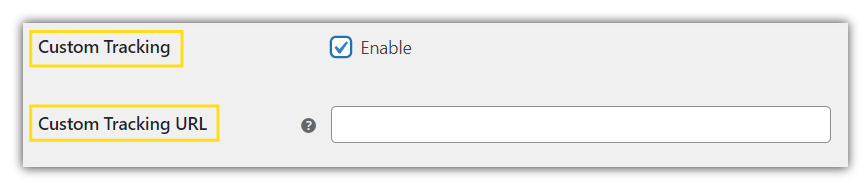
Custom Tracking
Enable Custom Tracking and add the custom tracking URL you want to use for tracking UPS orders. You are required to pass the tracking ID along with the URL.
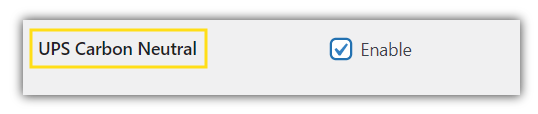
UPS Carbon Neutral
UPS carbon neutral indicator presence at the shipment level is required to create carbon neutral Shipments.
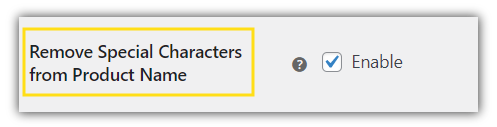
Remove Special Characters from Product Name
While passing product details for Commercial Invoice, remove special characters from the product name
Shipment Description for UPS Label or Commercial Invoice
Select how you want the shipment description on the UPS Shipping Label or Commercial Invoice.
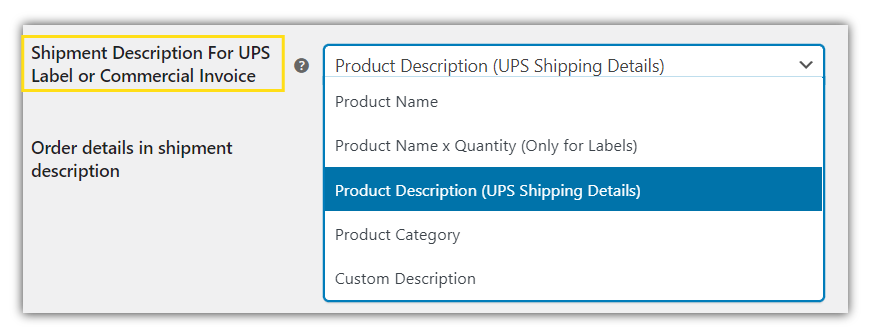
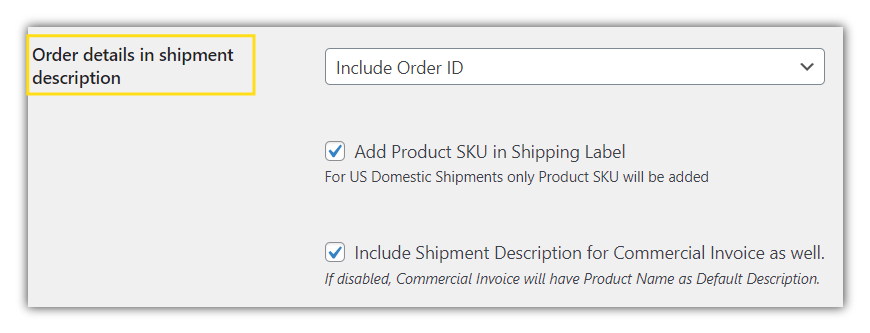
Order details in the Shipment Description
Enabling this option will include the Order ID and Order number details on the shipping label. You can also add Product SKU (for US Domestic Shipments) and Shipment Descriptions on Commercial Invoices (for International Shipments)
11. Display Estimated Delivery Dates on Cart/Checkout
The estimated delivery date is the date upon which the shipment will arrive at the destination provided.
Accessing Estimated Delivery Date Settings:
- Select WooCommerce < Settings < Shipping < UPS
- Select Rates & Services
- Enable Show Estimated Delivery option
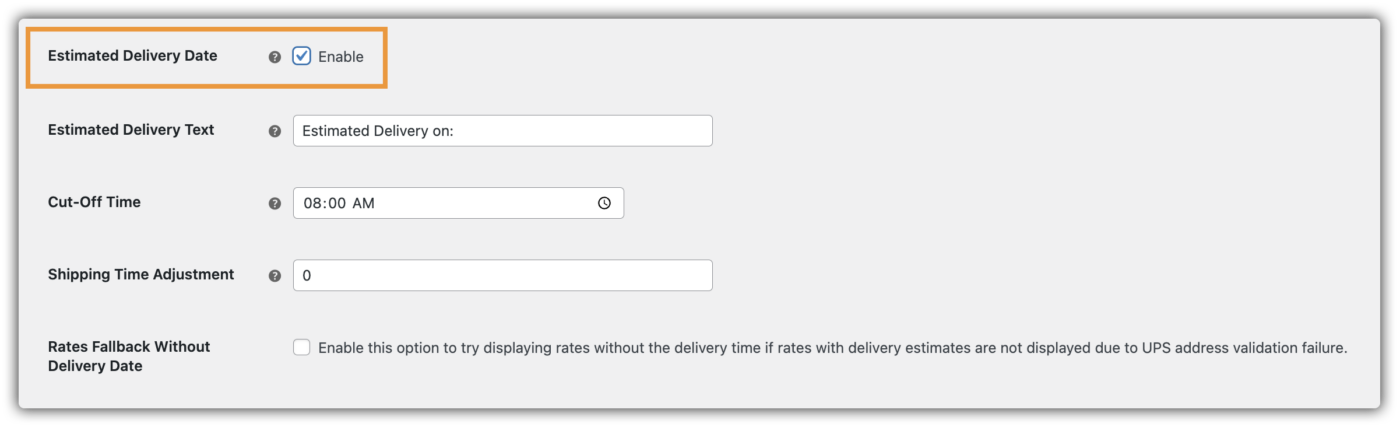
Show Estimated Delivery Date
This option allows you to display estimated delivery dates on the cart page. The plugin will get the dates from UPS and display them on the cart and the checkout page.
Estimated Delivery Text
You can set up a custom text to display along with the delivery dates.
For e.g: Get Delivery By
Cut-off Time
Cut-off time essentially adds a buffer time on your order placements. If any order is placed after the cut-off time, the estimated delivery of your product shipments will be adjusted to the next day.
We recommend you use the 24-hour format. For example, if you enter 23:00, any orders placed after this time will have 1 additional day added to the delivery date.
Shipping Time Adjustment
You can adjust the number of days to get the estimated delivery accordingly
Rates Fallback without delivery date
Enable this option to display rates without delivery estimates if UPS address validation fails to show rates with delivery time.
12. How to Request UPS PickUp?
Enable your Product Pickup Service via UPS, through UPS Pickup Services Tab
- Select WooCommerce < Settings < Shipping < UPS
- Select Pickup
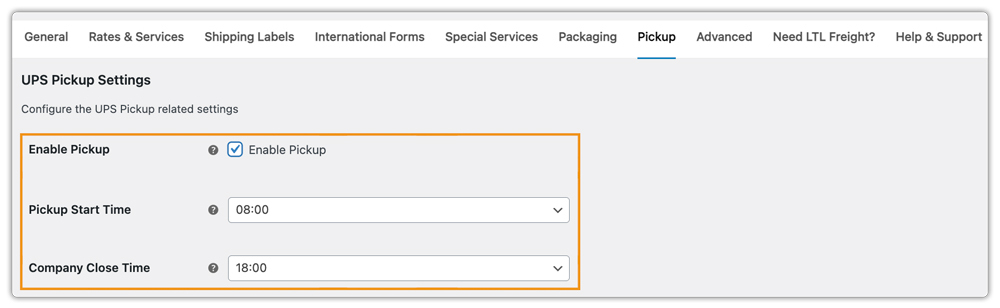
Enable Pickup: You can check this field to set up a pickup request with UPS.
Pickup Start time: Items will be ready for pickup from this time, from the shop
Company Close Time: Your shop closing time, must be greater than the pickup start time
Once the Pickup Settings are completed,
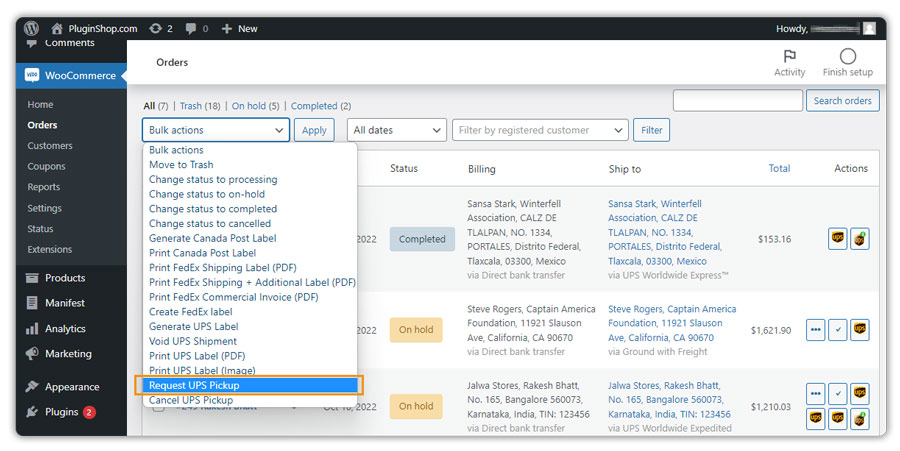
- Go to the Orders page and select the order which needs the pickup.
- Under the bulk actions drop-down, Select the Request UPS Pickup option.
After you have successfully scheduled the pickup the following notification will come at the top of your WooCommerce store page.
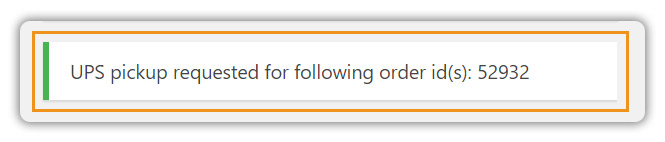
Apart from that, you will also receive the confirmation email containing the Pickup Request Number (PRN).
13. How to set up UPS Shipment Tracking?
Shipment Tracking: It provides information to customers about the route of a package and the anticipated date and time of delivery.
Enabling Shipment Tracking:
- Select WooCommerce < Settings < Shipping < UPS
- Select Shipping Labels
- Enable Shipment Tracking Option.
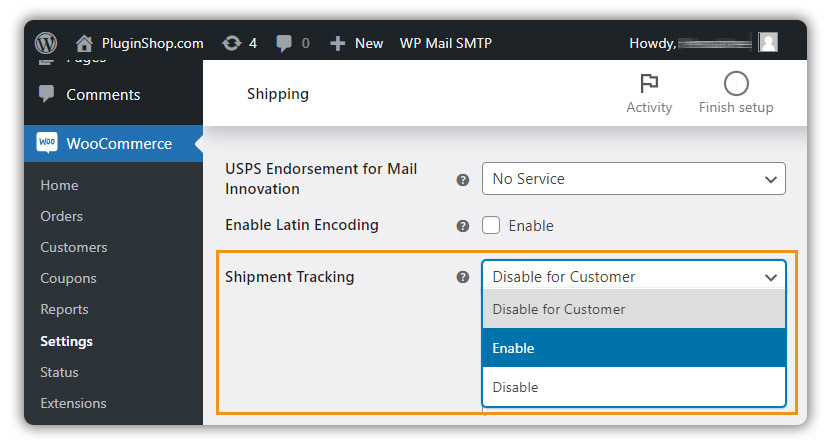
- The available options for Shipment Tracking are as given below:
- Disable for Customer: This option disables tracking information only at the customer end. For Example, the Order page of the Customer.
- Enable: This option enables UPS shipment tracking for the shipper as well as the recipient. Once the WooCommerce orders are marked as complete, the plugin sends an automatic Email notification to the customer with tracking information. For detailed information about UPS shipment tracking services, see UPS Shipment Tracking. For a detailed understanding read how our WooCommerce UPS plugin handles shipment tracking.
- Disable: This option disables UPS shipment tracking for the shipper as well as the recipient.
You can also add custom tracking messages. Refer below screenshot.
14. How to Set up UPS International Shipping?
If you are planning to ship globally, you can enable UPS International Shipping Services within the WooCommerce UPS plugin as well.
Configure the UPS International forms-related settings like Commercial Invoice, NAFTA, and EEI DATA as shown below:
Accessing UPS International Shipping Settings:
- Select WooCommerce < Settings < Shipping < UPS
- Select International Forms
Print Commercial Invoices along with Shipping Labels
The UPS Commercial Invoice is needed for all parcels being shipped internationally with UPS.
Enabling the Commercial Invoice option will help you in getting invoices along with your shipment labels.

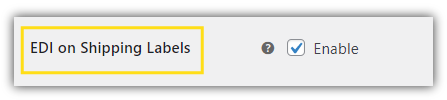
Enable EDI on Shipping Labels
The provision of Electronic Data Interchange (EDI) on your Shipping Labels can be enabled. This is also useful when your shipper does not intend on supplying other self-prepared international forms such as EEI, CO, NAFTACO, etc to accompany the shipment
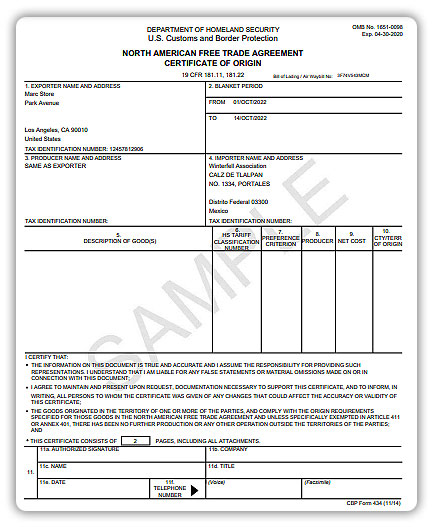
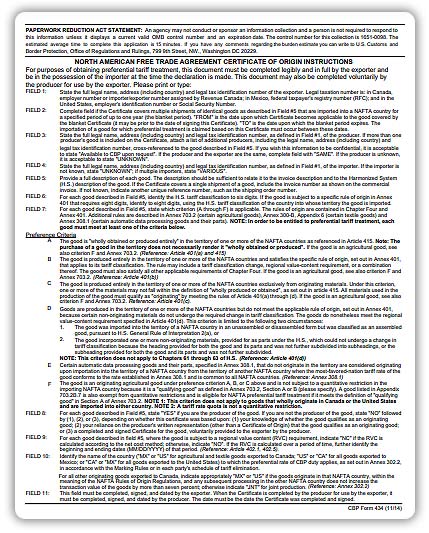
Print NAFTA Certificate along with Shipping Labels
The NAFTA Certificate of Origin is used by the United States, Canada, and Mexico to determine if imported goods are eligible to receive reduced or eliminated duty as specified by the NAFTA. You can create a NAFTA certificate of origin shipments by enabling the NAFTA Certificate option as shown in the image below.
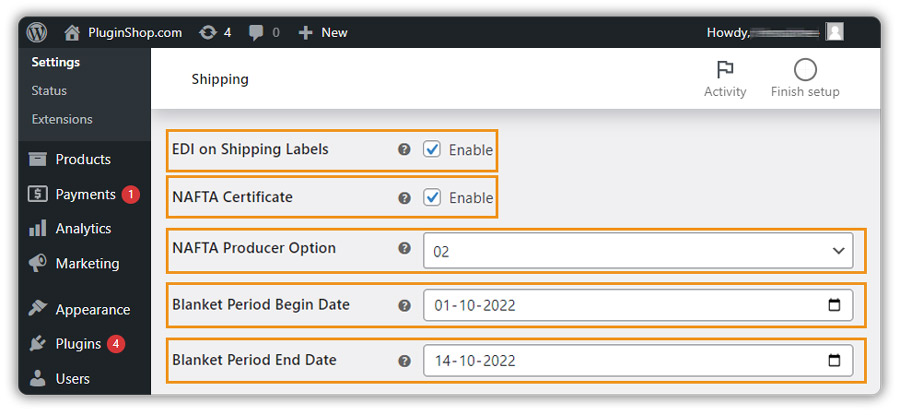
NAFTA Producer Option: The text associated with the code will be printed in the producer section, instead of the producer contact information.
01: Available to customs upon request
02: Same as Exporter
03: Attached List
04: Unknown
Blanket Period Begin Date: It is the date upon which the certificate becomes applicable to the goods covered by the blanket certificate (it may be prior to the date of signing the certificate)
Blanket Period End Date: it is the date upon which the blanket period expires.
Get EEI Data for UPS Shipments
Electronic Export Information (EEI) is the electronic declaration of merchandise leaving the U.S. for export to a foreign country. You can also enable EEI Data for your International shipments as shown in the image.
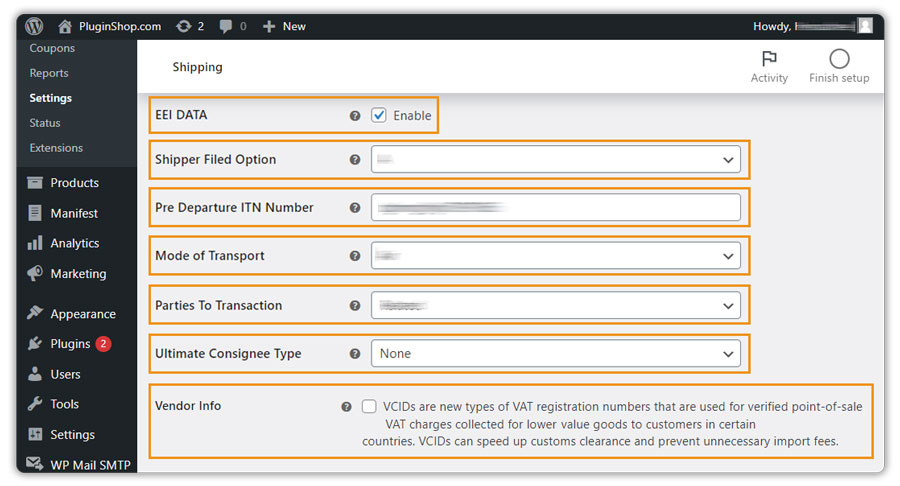
Shipper Filed Option:
- A: Requires ITN Number
- B: Requires the Exemption Legend
- C: Requires the Post departure filing citation
Pre-Departure ITN Number: The ITN is the AES-generated number assigned to a shipment confirming that an EEI transaction was accepted and is on file in the AES.
Mode of Transport: Mode of transport defines the means by which the goods are exported. Only 10 characters can appear on the form. Anything greater than 10 characters will be truncated on the form.
Parties To Transaction: The Parties to Transaction explains whether or not the shipper and ultimate receiver are with the same company. For more info, visit Parties to Transaction.
Ultimate Consignee Type: An ultimate consignee is a party who will be the final recipient of a shipment.
Vendor Info: VCIDs are new types of VAT registration numbers that are used for verified point-of-sale VAT charges collected for lower-value goods to customers in certain countries. VCIDs can speed up customs clearance and prevent unnecessary import fees. If enabled, VCID details will be available on the edit order page.
Product level Settings for International Shipments
For international shipments, it is mandatory to provide the HS Tariff Code, detailed product description, and the country of manufacture. These details are essential for customs clearance and to ensure compliance with international shipping regulations.
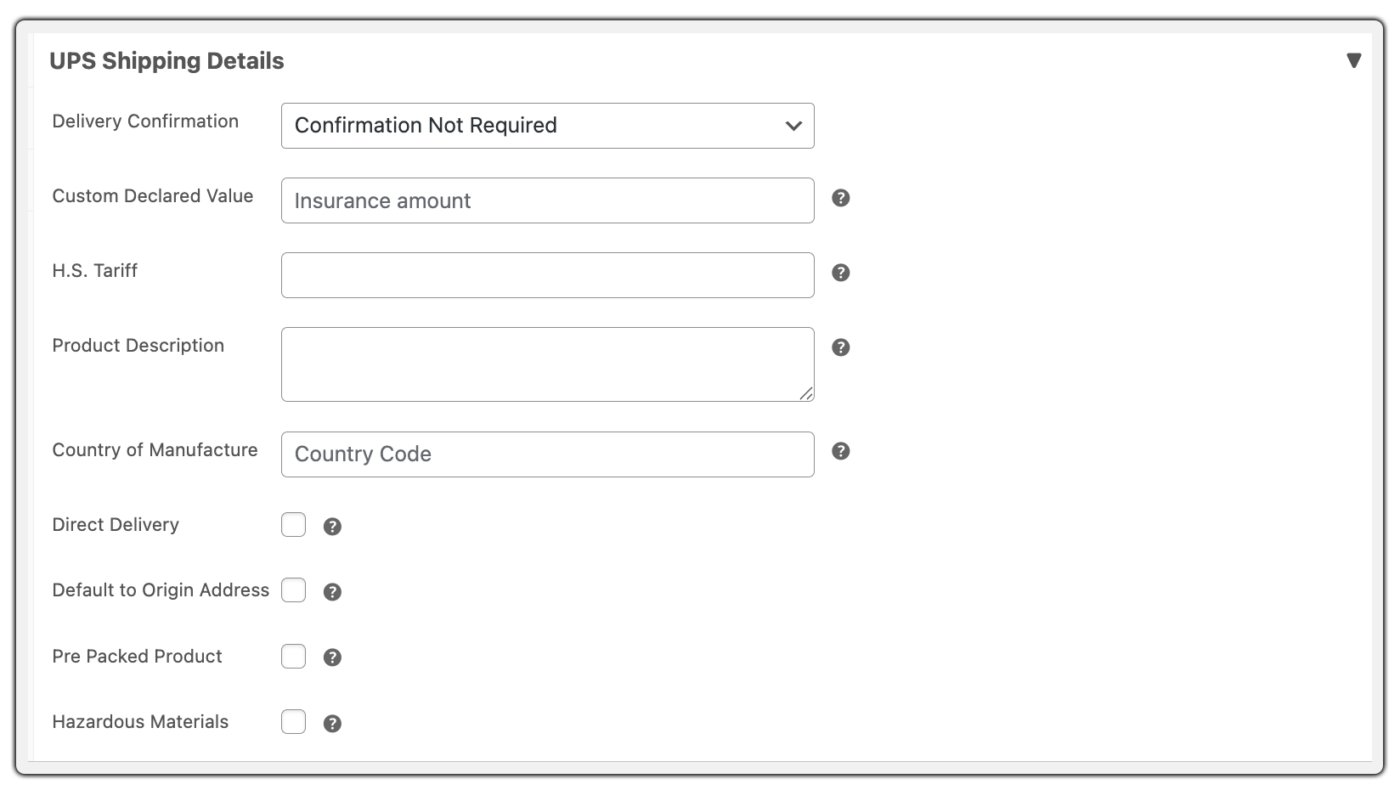
If you need the Direct Delivery option, you can enable it from the product page.

Print Labels for International Shipments
Add a product to your WooCommerce Cart and provide the shipping and billing addresses accordingly, as shown in the image:
After placing the order, Go to the Orders section:
Click on the order you want to generate the label
Click on generate package:
Click on Calculate Shipping Cost:
Click on Confirm Shipment
- Consider Shipping Address as Sold to Address: Enabling this option will consider the shipping address as the sold-to address for International Shipments.
- Terms of shipment: Indicates the rights to the seller from the buyer, internationally.
- Ship From Address Preference: Change the preference of ship from the address printed on the label. You can make use of the billing address from the order admin page if you ship from a different location other than the shipment origin page.
Recipients’ Billing Tax Identification Number and Recipients’ Shipping Tax Identification Number details are added to the International Forms.
Note: Recipients’ Billing Tax Identification Number and Recipients’ Shipping Tax Identification Number details are added to the International Forms.
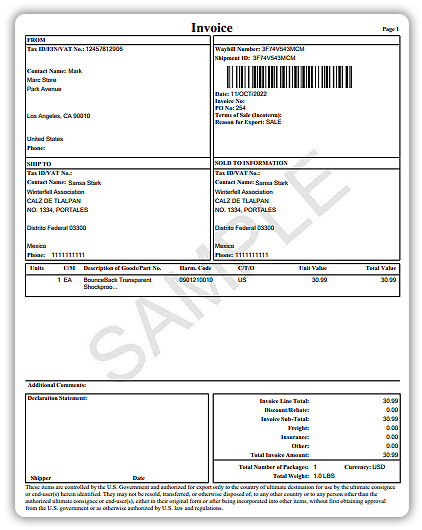
Shipment Label along with other International Documents is printed as shown in the image:

NAFTA DOCUMENTS:
Commercial Invoice:
Additional options for International Shipments
Skip Commercial Invoice for EU Shipments
Enable this option to skip generating a Commercial Invoice for shipments between European Union (EU) member countries. Since goods moving within the EU generally do not require customs clearance, a Commercial Invoice is often unnecessary for these shipments.
When enabled, the plugin will automatically avoid generating Commercial Invoices for intra-EU shipments.

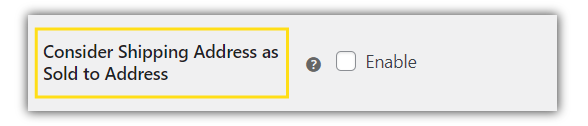
Consider Shipping Address as Sold to Address
Enabling this option will consider the Shipping address as the sold-to address for International Shipments
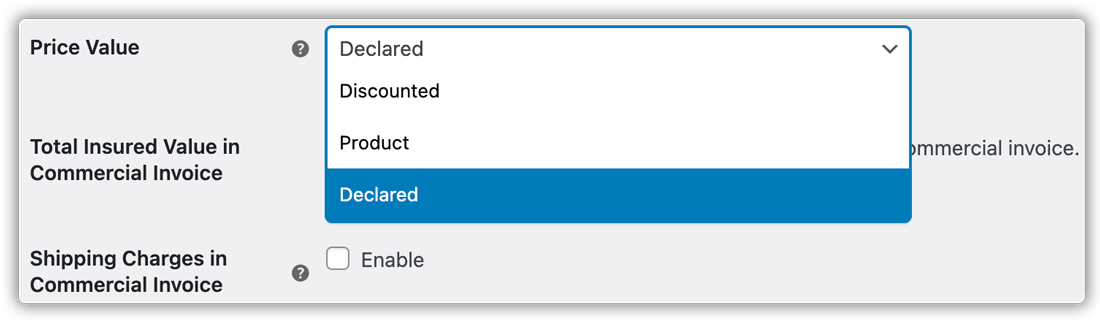
Price Value
Select this option to choose whether to display the product value, discounted value, or declared value on the Commercial Invoice.
Total Insured value in Commercial invoice
Enable this option to show the total insurance value on the Commercial Invoice.

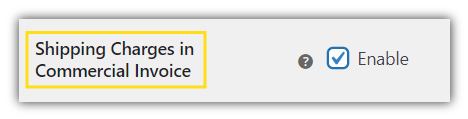
Shipping Charges in Commercial Invoice
Enabling this option will display Shipping charges (if any) on the Commercial Invoice.
Declaration Statement
This is an optional field for the legal explanation, used by Customs, for the delivery of the shipment. It must be identical to the set of declarations used by the customs.

Terms of Sale
It indicates the rights to the seller from the buyer, internationally.
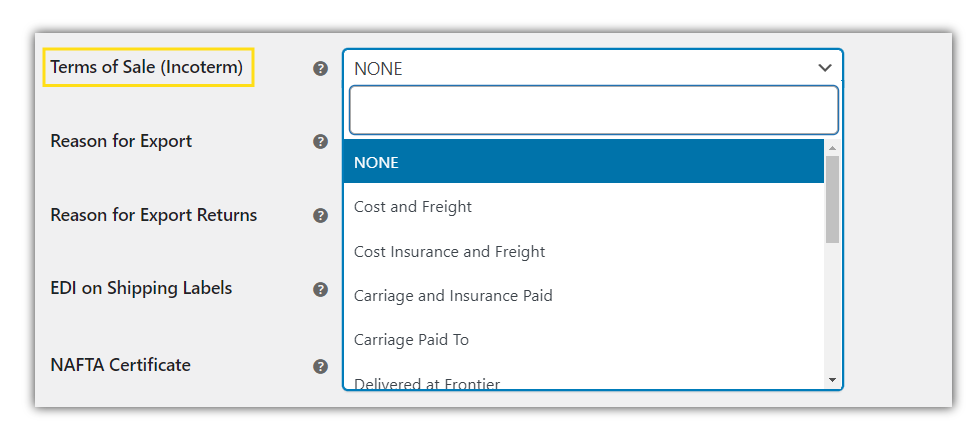
Reason for Export
This may be required for the custom purpose, while shipping products to your customers, internationally.

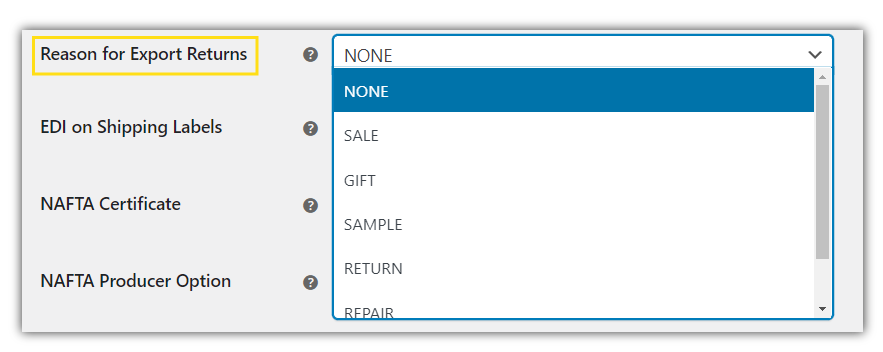
Reason for Export Returns
This may be required for customs purposes in case of return shipments
15. How to Set up UPS Special Services?
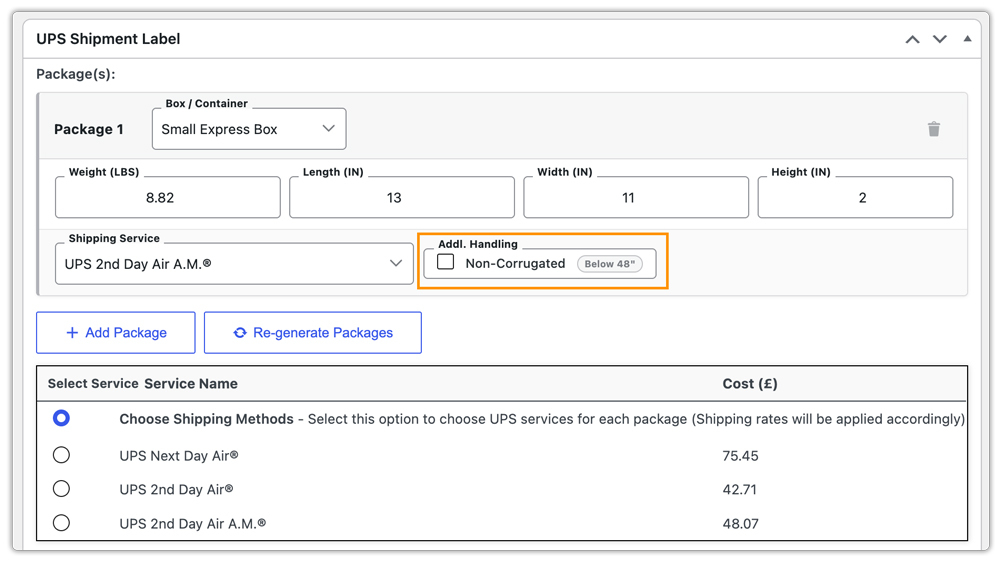
Configure Automatic Additional Handling
UPS applies Additional Handling surcharges to packages that exceed certain size or weight limits or use non-standard packaging. The plugin can automatically send the UPS AdditionalHandlingIndicator for packages shipped in non-corrugated packaging when:
- The longest side exceeds 48 inches
- The second-longest side exceeds 30 inches
- The package weight exceeds 70 lbs
To enable this,
- Go to WooCommerce > Settings > Shipping > UPS
- Select Special Services
- Enable Automatic Additional Handling
The plugin will automatically apply the UPS AdditionalHandlingIndicator whenever a package exceeds UPS size or weight thresholds.
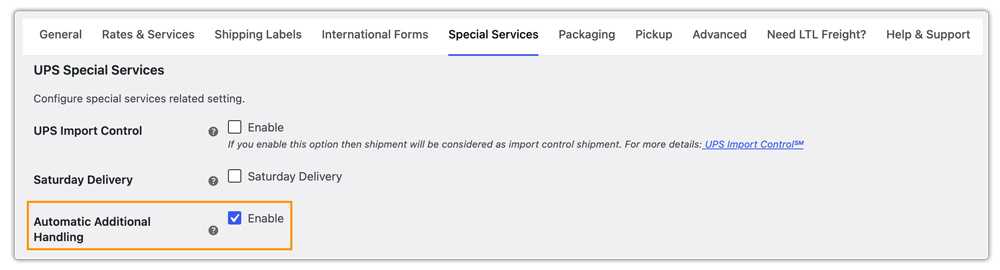
In addition to the automatic Additional Handling detection, the plugin also provides a per-package Additional Handling checkbox on the Order page. This allows store owners to manually override the setting for individual packages before generating labels, ensuring the shipment is processed exactly as required.
UPS Simple Rate
This service enables shippers to use their own packaging to ship up to 50 lbs anywhere in the U.S. for a flat fee based on the package size.
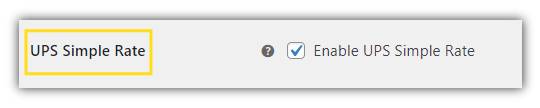
UPS Simple Rate boxes are also listed within the plugin so that you can choose as per your requirements, The plugin supports all the UPS shipping services for the UPS Simple Rate. Make sure you enable these services as per your preference.
Once this is done, customers will be able to see the shipping options along with UPS Simple Rate on the WooCommerce checkout, as shown below
WooCommerce store owners can also use the plugin to fulfill the order and print the UPS shipping label directly from their WooCommerce orders page.
UPS Ground Saver (UPS SurePost)
UPS Ground Saver is an economical, residential, ground service that is acquired on a contractual basis. The service provides the user with the consistency of the UPS Ground services and network and the final leg of the journey will be provided by U.S.P.S. where the package will be delivered to registered P.O. Boxes. The carrier to deliver the package is decided by UPS WorldShip.
Enabling UPS Ground Saver Services:
- Go to WooCommerce > Settings > Shipping > UPS
- Select Rates and Services
- Under Services, you can find different UPS Ground Saver (UPS SurePost) shipping methods , as shown in the image
When you place your WooCommerce Orders on your cart, you can also simultaneously compare the rates of UPS Ground Saver (SurePost) along with other UPS Services.
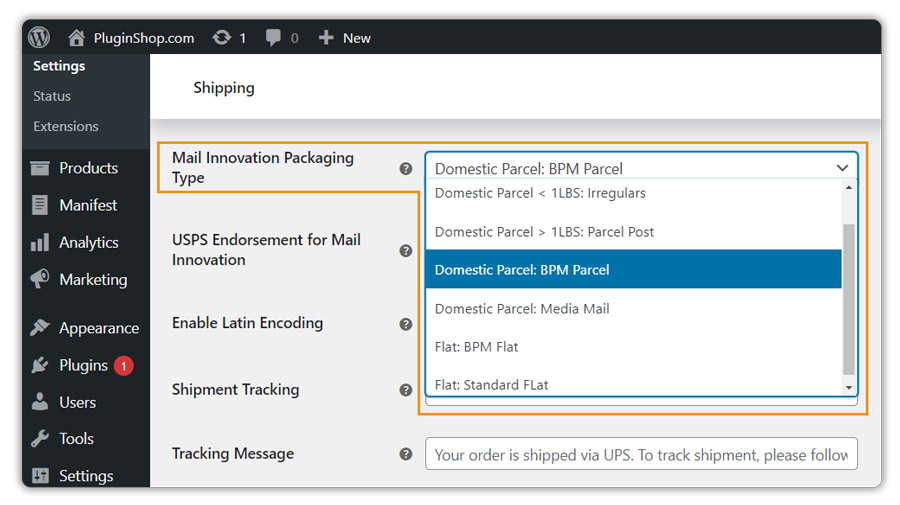
UPS Mail Innovations
UPS Mail Innovations with its efficient technical capabilities make mail shipments, for small businesses, much easier. It is one of the simplest ways to send packages that require less prep time and provide consistent transit times, reliable delivery, and better postal rates. It can also provide pick up, process and provide interim transportation of all your mail and parcels to both domestic and international locations.
Enable UPS Mail Innovations:
- Go to WooCommerce > Settings > Shipping > UPS
- Select Shipping Labels
- Select Mail Innovation Packaging Type
Select the packaging type for Mail Innovation Services. For International Mail Innovations Shipments by default value will be “Parcels”
Configure your product settings as shown in the image. You can change them in the Edit Product section, under the WooCommerce Products section.
Once your WooCommerce Orders are placed, proceed to edit the order section for label generation
Confirm the shipment of your package and generate the label.
The Label is generated as shown in the image:
UPS Access Point Locator
The idea behind UPS Access Point is to give store owners an additional option to deliver the shipment especially when they are not comfortable with the delivery timings. Additionally, it also serves as a great option for customers to have a trusted place to take care of their orders.
Enable UPS Access Point Locator:
- Go to WooCommerce > Settings > Shipping > UPS
- Select Rates & Services
- Enable Access Point Locator
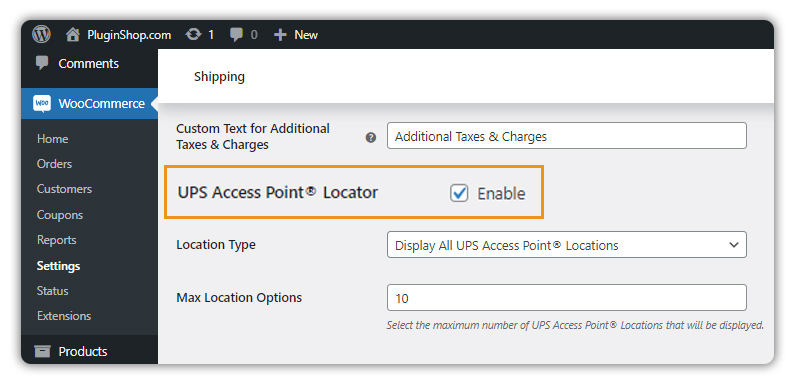
At the WooCommerce Checkout page, you can select the UPS Access Point Location, based on your Destination Address
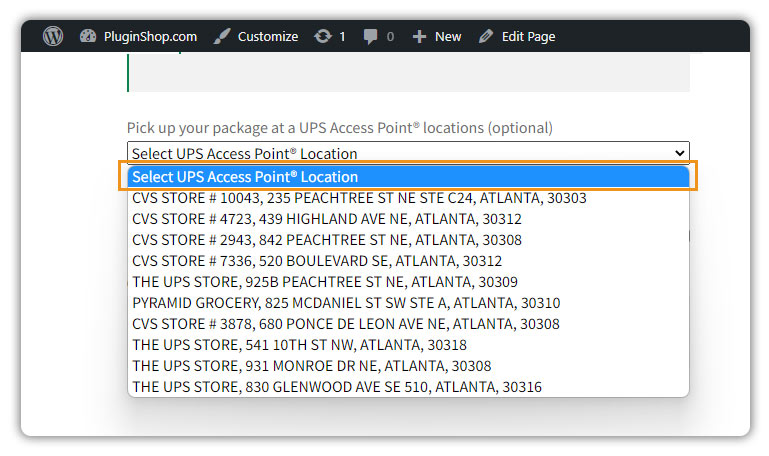
Subsequently, the rates also change in the checkout
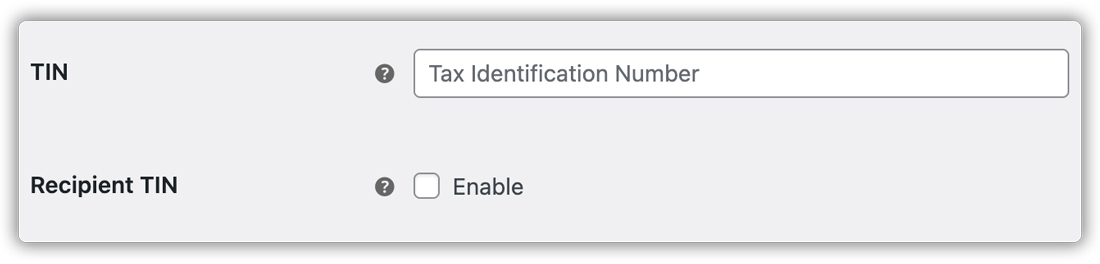
Tax Identification Number
The Tax Identification Number (TIN) in UPS is required for customs clearance and international shipping purposes.
If you prefer recipient enter the TIN number in checkout you can enable Recipient TIN
UPS Hazmat Shipping
Considering the UPS Hazardous Material and Dangerous Goods service is available upon the signing of a contract, the service will only display in the plugin if the UPS Account Number and relevant details entered are the same as the Account Details for which the Hazardous Material and Dangerous Goods service is enabled.
To display Hazardous Materials and Dangerous options at the product level, you must refer to the following steps:
Proceed to WooCommerce > Products > Product Data > Shipping > Enable Hazardous Materials (UPS) (shown below)
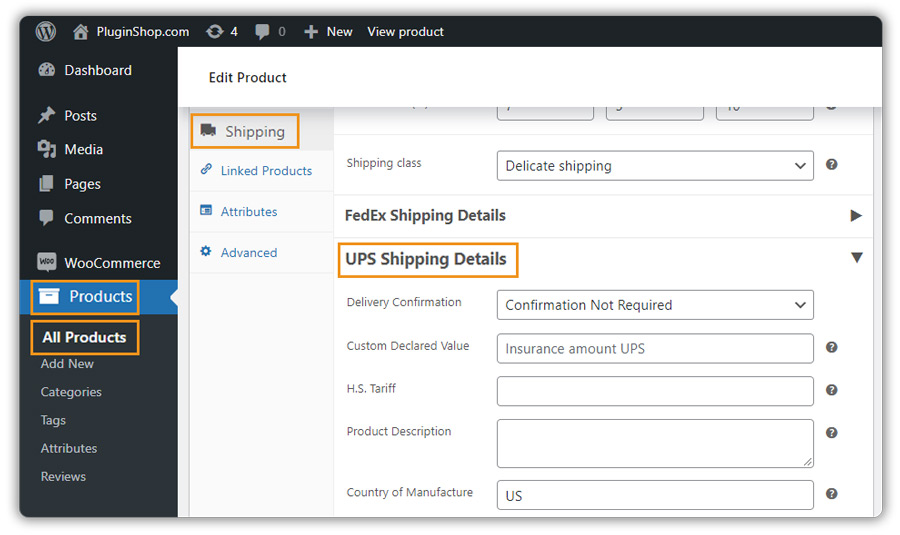
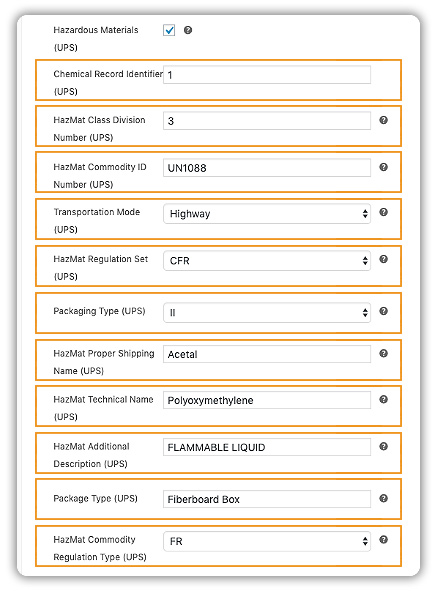
Upon Enabling the service, 9 new fields appear on the Product Data Page:
- Chemical Record Identifier: The Chemical Record Identifier is the chemicals in the shipment. If there are 3 chemicals then they need to be numbered in that field with 1, 2, and 3 as values in the container.
- Class Division: Class or Division associated with the Hazardous Material
- Commodity ID: Commodity ID number
- Transportation Mode: The mode of transport by which the shipment is approved to move and the regulations associated with that method.
- HazMat Regulation Set: Select the Regulation set (ADR – Europe to Europe Ground shipments; CFR – HazMat regulated by the U.S DOT within U.S or Ground shipments to Canada; IATA – Worldwide Air Shipments; TDG – Either Canada to Canada Ground Service or Canada to U.S Standard service)
- Packaging Type: The Packaging Group Category will be associated with the specific commodity
- HazMat Proper Shipping Name: The shipping name set by ADR, CFR, or IATA
- HazMat Technical Name: The technical name for the specified commodity
- HazMat Additional Description: Additional remarks or special provision information. Additional information that may be required by the regulation about a hazardous material such as Limited Quantity, DOT-SP Numbers, and EX Numbers.
- Package Type: Package type code, identifying the type of packaging used for the shipment
- HazMat Commodity: Select the appropriate Regulation type (FR – Fully Regulated; LQ – Limited Quantity; EQ – Excepted Quantity; LR – Lightly Regulated)
Proceed to place the order for the product and print the UPS Hazardous Materials shipping label from the order details page. (image shown below)
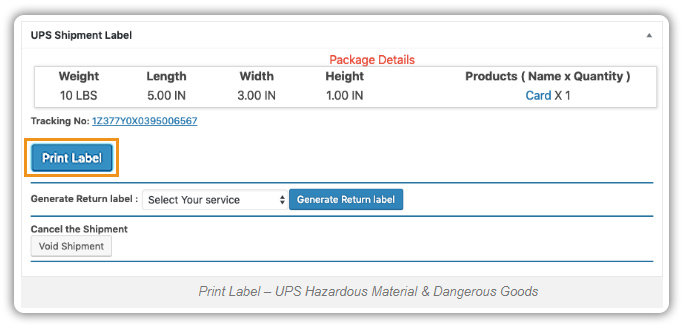
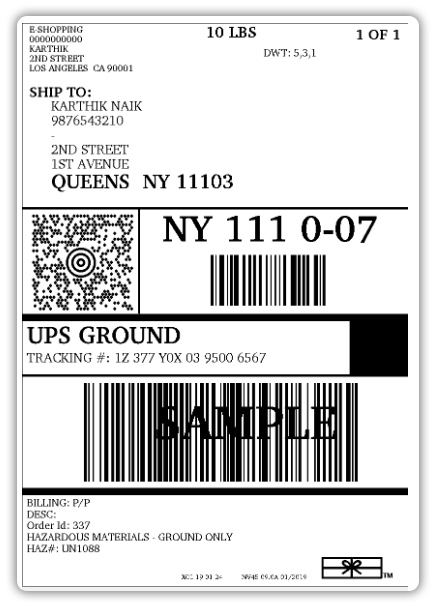
Notice, at the footer of the Shipping Label, the HazMat ID Number is mentioned. You also have a notification stating “HAZARDOUS MATERIALS – GROUND ONLY” specifying the service selected.
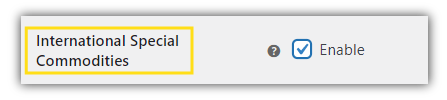
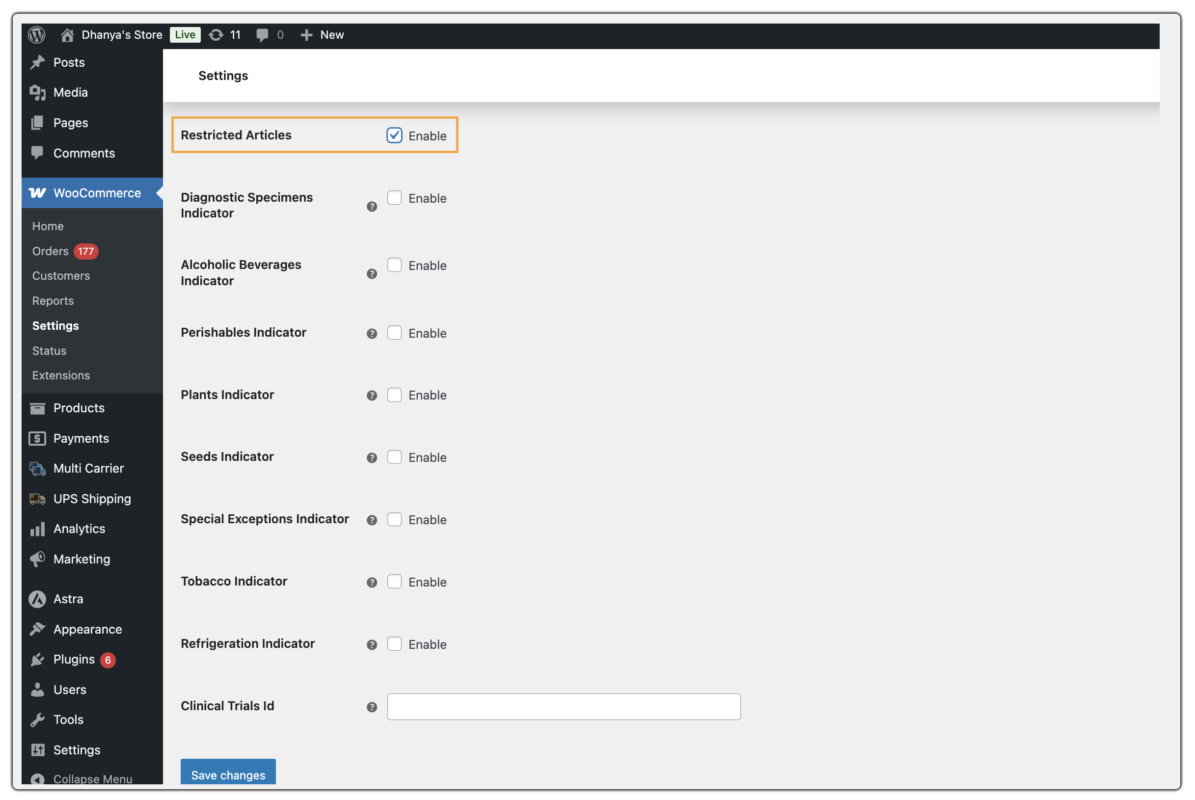
International Special Commodities – Restricted Articles
Under the law, certain goods can be transported only if prescribed conditions and compliance with applicable laws of the destination country shall be the consignee’s responsibility. Such goods are covered in the Restricted Articles section.
To get Restricted Articles, International Special Commodities options need to be enabled.
Enabling International Special Commodities
- Go to WooCommerce> Settings > Shipping > UPS
- Select Special service
- Enable International Special Commodities.
Enabling Restricted Articles for global level
Enabling Restricted Articles under product level
- Go to Products > All Products > Select the product as per your business requirements
- Under Product Data > Shipping > UPS Shipping Details
- Enable Restricted Articles, as shown in the image
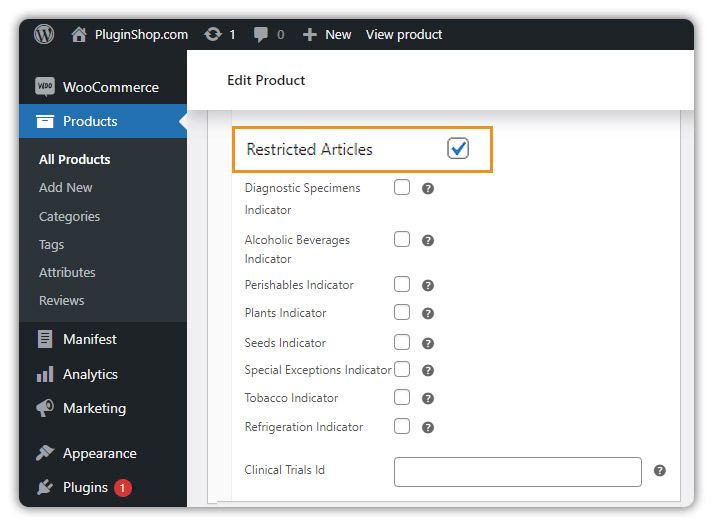
You can get the following list of restricted articles currently, enable them if your product falls in any of the following categories if required:
Diagnostic Specimens Indicator
Alcoholic Beverages Indicator
Perishables Indicator
Plants indicator
Seeds Indicator
Special Exceptions Indicator
Tobacco Indicator:
Refrigeration Indicator
Clinical Trials Id
UPS Import Control
UPS import Control allows you, as the importer to initiate UPS Shipments from another country and have those shipments delivered to your business or to alternate locations.

UPS Saturday Delivery
With UPS Saturday Delivery, you can deliver packages to your customers even on a Saturday. UPS can provide this service to you only if required.

UPS COD
Enable UPS COD will facilitate Cash On Delivery Rates on the cart/checkout page.
UPS attempts to collect the amount specified on the C.O.D. tag or package label and then mail the money to you. If UPS is unable to collect the money after three tries, the shipment will be returned to the sender.

Types of COD supported by UPS
There are two modes of COD collection supported by UPS that are available within the plugin settings.
- Check/Cashier’s Check/ Money Order
- Cash
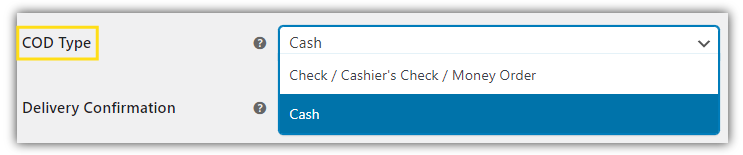
When a customer chooses a COD order he must pay at the time of the delivery. You can let your customer choose the accepted payment methods, this can include checks or money orders. If the customer wishes to make payment through check then the check should be made out to the online seller. Cash is accepted everywhere except the United States.
As soon as the customer places the order, the store owners can find the option to enable the C.O.D. for that order on the Edit Order page. The image below shows the option to enable the C.O.D. feature for a particular order.
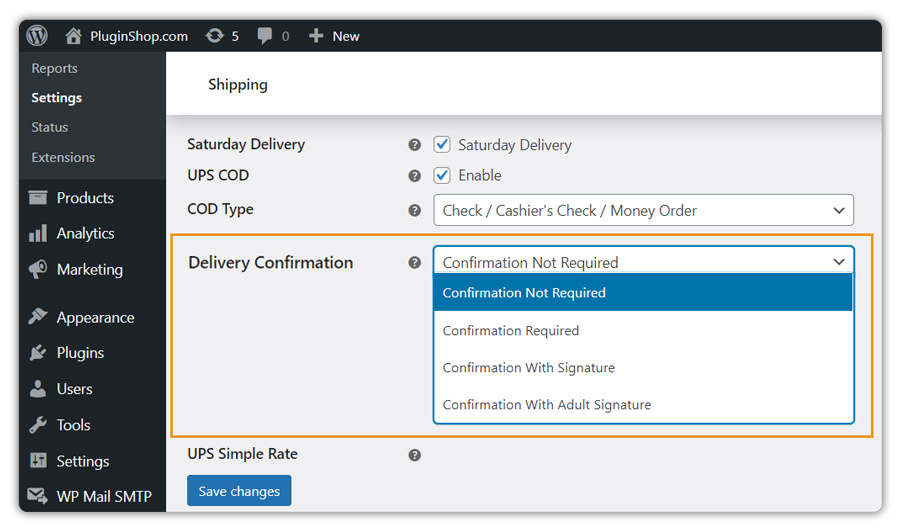
UPS Delivery Confirmation
UPS is well known for its speedy deliveries. However, UPS also makes sure that the deliveries are not misplaced and there must be a check on who is receiving the products. Here are the delivery confirmation options provided by UPS:
- Confirmation not Required
Using this option, no specific delivery confirmation will be selected. In other words, UPS will not send any notification of the delivery. If you require, you would have to check online to get an idea about the delivery. You can select this option if you do not require UPS to send any dedicated notification for delivery.
- Confirmation Required
UPS will send you a mail confirmation as soon as the shipment is delivered.
- Confirmation with Signature
UPS will obtain the recipient’s signature or another electronic acknowledgment of receipt from the recipient when this option is selected. It will also provide you with a printed copy of the same. You may also view the recipient’s signature or electronic acknowledgment of receipt online. - Confirmation with Adult Signature
UPS will obtain the adult recipient’s signature and provide you with a printed copy. Adult recipients must be at least 21 years of age. You may also view the adult recipient’s signature online.
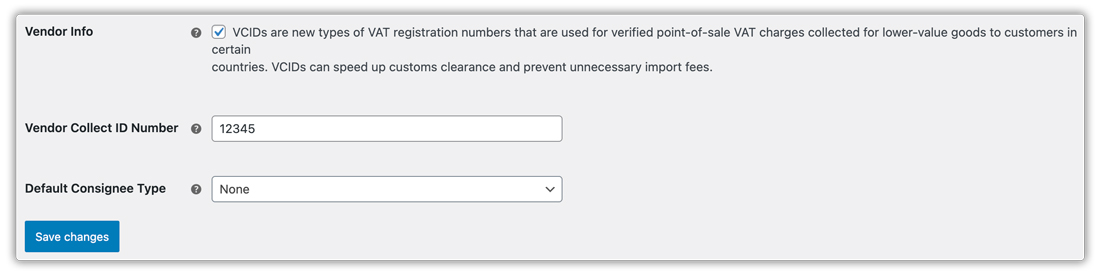
Vendor Info
VCIDs are special VAT numbers used for low-value goods sold to certain countries. They help speed up customs clearance and avoid extra import fees.
To get this enable VCID then enter Vendor Collect ID Number and the Consignee Type. Once done, it will be available in the edit order page.
Print Customer’s Name as Company Name on Labels
If the customers do not enter a Company Name on the checkout page, enabling this option will print the customer’s name as company name on the labels.
Go to UPS plugin Settings < Advanced

Default Product Price
Enter a Default Product Price to generate shipping label for products that are free or have a zero cost

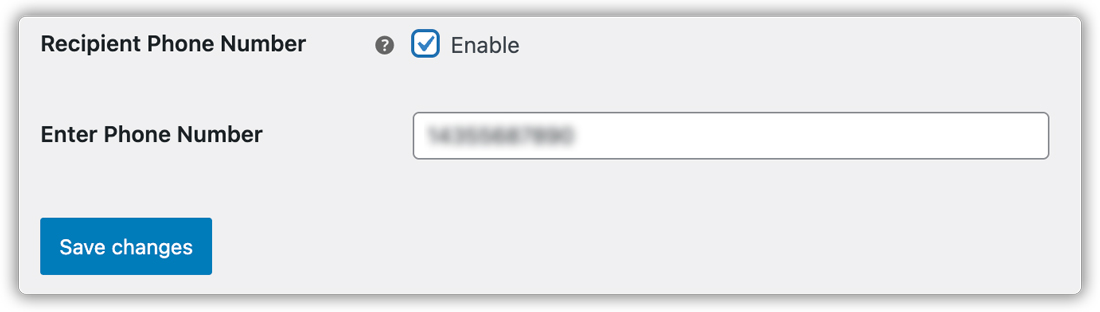
Recipient Phone Number
Enable this option to provide a default Recipient phone number that UPS will use on the shipping label.
Sirs,
I actually have several issues that are either not working or not showing as options as indicated by your tutorial:
1) i can’t find the option to set the box sizes/weights manually
2) i can’t see a way to remove a box that the plug in is generating
3) i can’t seem to override weight (we set the weight over for the customer’s displayed rate, we want to enter the actual weight for generating the label)
4) can’t find anywhere to require an adult receiving signature (required for our larger ticket items)
5) tutorial says we can generate a pdf label,but that does not seem to be an option in the label type drop down list (I only get: gif, png, zpl and epl)
Please help!
thank you!
c
Hi Carol,
First, we need to know the plugin version you’re on. Our latest version of the plugin is 3.8.8, Please note the features you mentioned are available only in the premium version of the plugin.
In the UPS plugin settings:
1. Parcel packing option drop down the box packing: based on weight and dimension, it should be available.
2. When the plugin is generating packages, if you add another package you’ll be able to remove the added package, but the default package you’ll not be able to remove.
3. Weight should be editable, Please raise a ticket in PluginHive support, if it’s not allowing you to in the premium version.
4. We don’t have the signature option in the WooCommerce UPS Shipping plugin.
5. The pdf option is not available for the labels with our plugin. There must be some mistake in the documentation.
Regards,
Anindo
Team PluginHive
Hi,
how to add 2 different rates for one service. I need 2 options in Standard UPS Service:
1. FREE shipping for domestic clients.
2. 85% Discount for Europe.
Hi Marta,
You can set free shipping using the WooCommerce Shipping Zones. Please follow instructions from the guide.
Regarding giving an 85% discount for Europe, you can set a price adjustment in the plugin settings for the shipping services.
Regards,
Anindo
Team PluginHive
Hi,
Does this plugin work with UPS API in Czech Republic that required CZK and kg for real-time to sell in USD (pounds/in)?
How to woocommerce plugin setups it to do?
Hi Dohnalf,
It will work for CZK and Weight Unit KG to sell in USD. You can contact PluginHive Customer Support for more help.
Hi Kofi,
Yes, our plugin works in UK with GBP currency support.
Hope this helps!
Let us know if you have any query.