
When customers book an appointment, reserve a rental, or schedule a service through your WooCommerce store, collecting only the booking date and time is often not enough. Many businesses also need additional details such as customer preferences, special requests, attendee information, or booking instructions. Without collecting these details up front, store owners often have to follow up via email or phone.
That’s where WooCommerce booking custom fields help. By adding custom fields to your WooCommerce booking form, you can collect all the required information during the booking process itself. Whether it’s dietary preferences for tours, patient details for appointments, or special instructions for rentals, WooCommerce custom fields help make the booking process easier for both customers and store owners. In this guide, you’ll learn how to add custom fields to your booking form and explore the different field types available.
On This Page
- Why Add Custom Fields to Your WooCommerce Booking Form?
- What Types of WooCommerce Custom Fields Can You Add?
- How to Add Custom Fields to Your WooCommerce Booking Form
- Common Use Cases for WooCommerce Booking Custom Fields
- Tips for Creating Better WooCommerce Booking Forms
- Conclusion
- FAQs
Why Add Custom Fields to Your WooCommerce Booking Form?
Every booking that comes in without the right details creates extra work, follow-up messages, unprepared staff, and last-minute clarifications. Custom fields fix this by turning your booking form into a proper intake process.
- Reduces back-and-forth – customers provide what you need at checkout, not after.
- Prepares your team in advance – preferences and requirements are visible before the appointment.
- Minimises errors – customers confirm their own choices during booking.
- Boosts order value – paid add-on fields let customers select premium services at checkout.
Now let’s look at where these fields make the most difference in the common use cases.
What Types of WooCommerce Custom Fields Can You Add?
Before diving into the setup, it helps to know what kinds of custom fields are available. There are two ways to add WooCommerce booking custom fields using the built-in options in the Bookings and Appointments for WooCommerce plugin, and using PH Product Add-ons for WooCommerce for more advanced field types.
Built into the Bookings Plugin
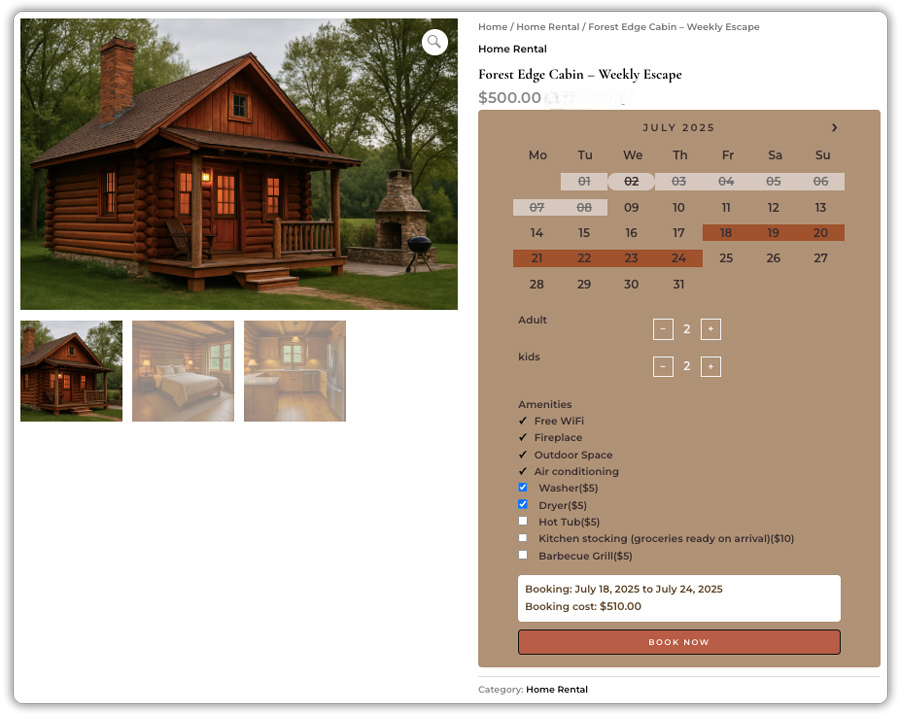
- Booking Notes – a text box for special requests or instructions. Can be marked as mandatory.
- Booking Resources – lets customers select additional items or services during booking, each with its own price.
- Booking Assets – lets customers pick a specific staff member or room. The calendar automatically shows only that asset’s available slots.
Available with PH Product Add-ons
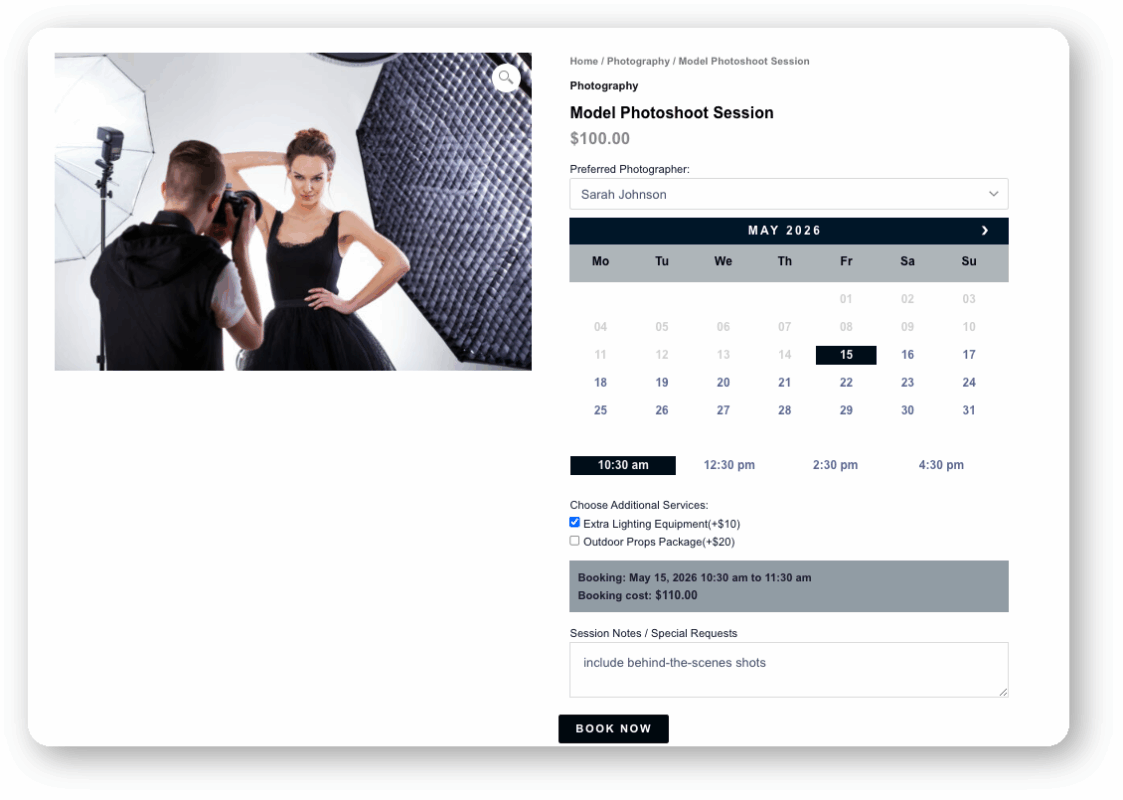
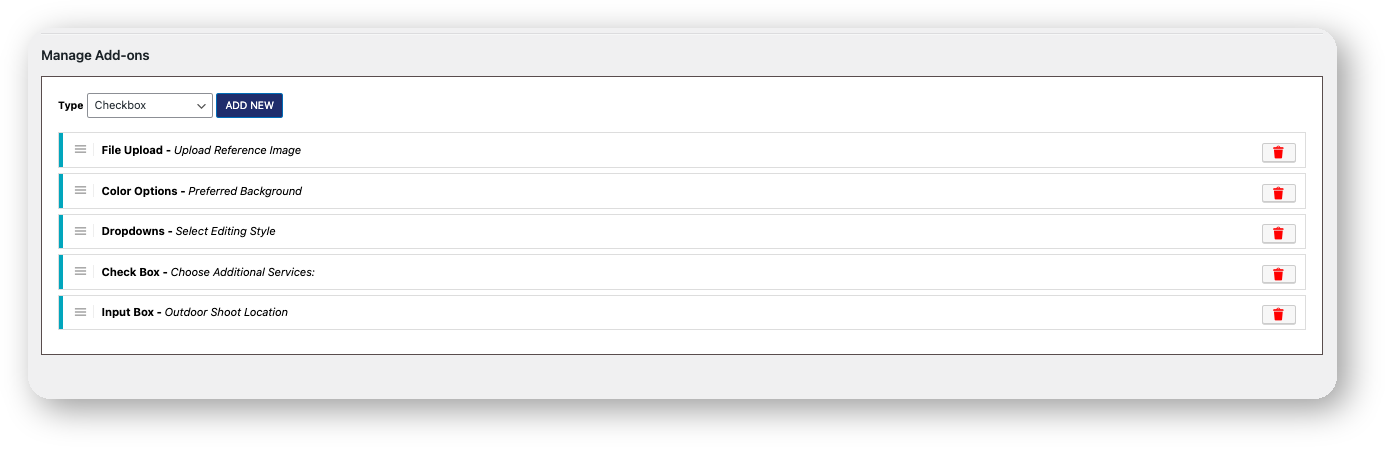
For more structured inputs, the PH Product Add-ons for WooCommerce plugin adds a wider range of field types to your booking form – Text, Textarea, Checkbox, Radio Button, Dropdown, Multi-Select Box, Date, Time, Telephone Number, File Upload, Color Options, and Image Options.
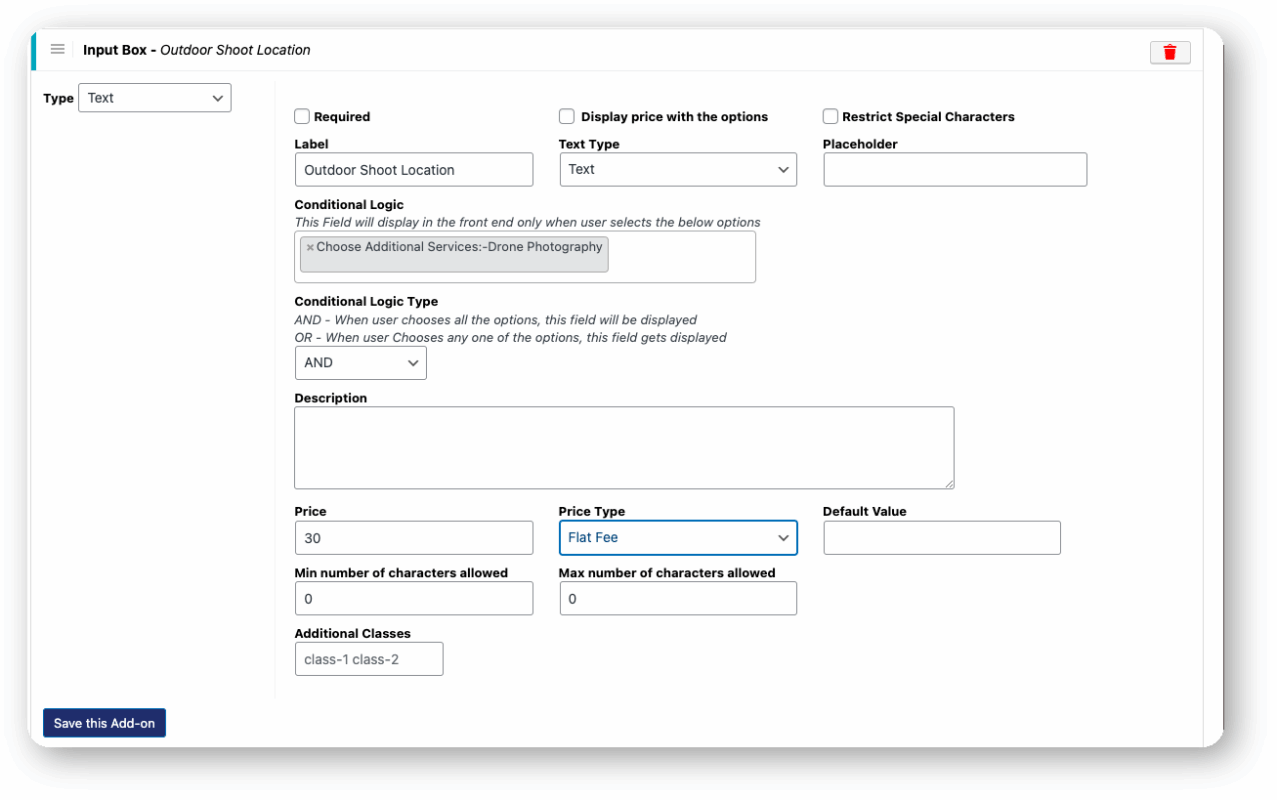
Each field can be set as required or optional, and fields like checkboxes and dropdowns can carry an additional price per option for paid upgrades. You can also use Conditional Logic to show or hide fields based on a customer’s earlier selection, keeping the form clean and relevant.
How to Add Custom Fields to Your WooCommerce Booking Form
The best way to build your WooCommerce booking form is to start with what the Bookings and Appointments for WooCommerce plugin already offers, and then extend it with PH Product Add-ons if your form needs more.
Enable Booking Notes
Go to WooCommerce → Products and open your bookable product. In the Booking tab, toggle on Booking Notes. This adds a free-text box to your booking form where customers can leave special requests or instructions. Mark it as mandatory if needed.

Set Up Booking Resources
In the same product, go to the Resources tab. Click Add Resource, give it a name (e.g., Parking Slot, Extra Equipment), and set a price if applicable. Customers will see a resource selection on the booking form, and availability for each resource is tracked independently.
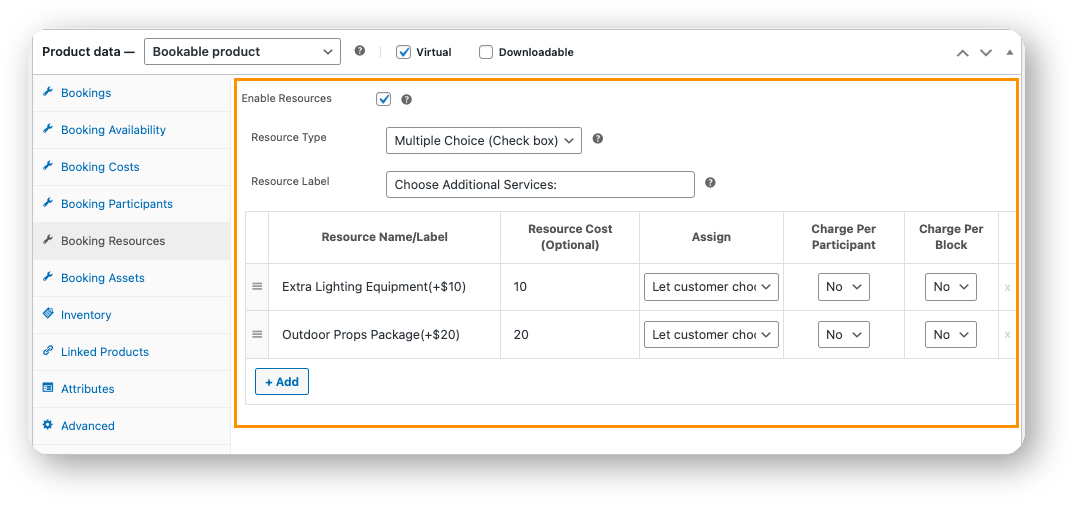
Check the Booking Resources setup guide for a step-by-step walkthrough.
Set Up Booking Assets
Go to the Assets tab inside the same bookable product. Click Add Asset and define each one, for example, a specific instructor, therapist, or room. Customers can then choose their preferred asset during booking, and the calendar automatically adjusts to show only that asset’s available slots.
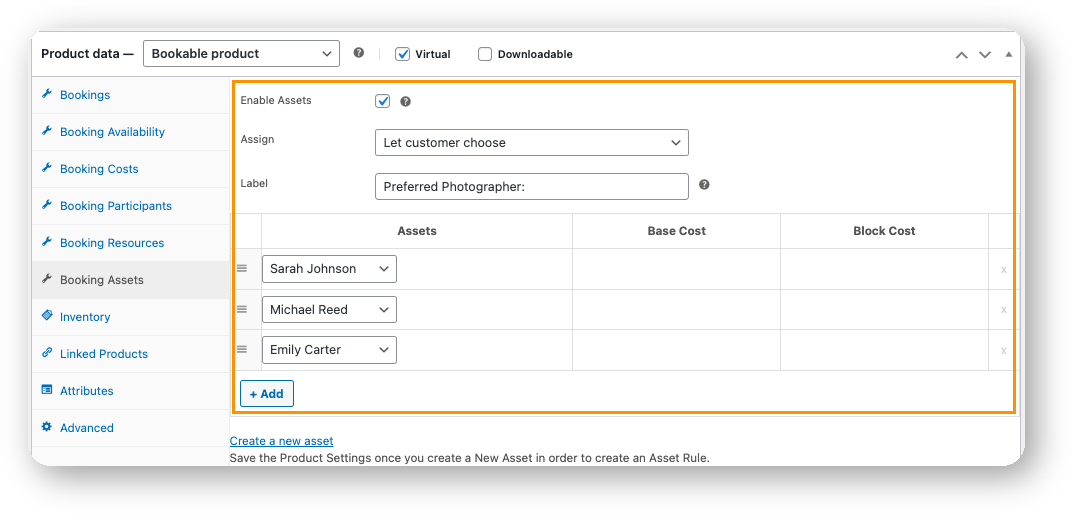
Head over to the Booking Assets setup guide to set this up on your store.
At this point, your booking form already collects notes, resource preferences, and asset selections.
For most businesses, this is enough. If you’d like to go further and collect more specific details like colour preferences, reference images, or offer paid add-on options at checkout, pairing it with PH Product Add-ons for WooCommerce makes that possible.
Extend Your Form with PH Product Add-ons
Install and activate the PH Product Add-ons for WooCommerce plugin. Then:
- Create an Add-on Group: Go to PH Product Add-ons → Settings → Add New.

Name the group and assign it to your bookable product using the Applies To option.

- Add Your Fields: Click Add Field, choose your field type, set a label, mark it as required if needed, and assign a price for paid upgrades. Use Conditional Logic to show or hide fields based on earlier selections.
- Save and Check: Visit your booking page on the front end to confirm the fields appear below the calendar. All inputs are saved in the WooCommerce order details.
Refer to the PH Product Add-ons setup guide to get this configured on your store.
A Quick Example
A photography studio uses the Bookings plugin to let customers pick their preferred photographer as an asset and leave session notes. They then add PH Product Add-ons to let customers choose a backdrop colour from a colour picker, upload a reference image for the shoot style, and opt into express photo editing as a paid upgrade.
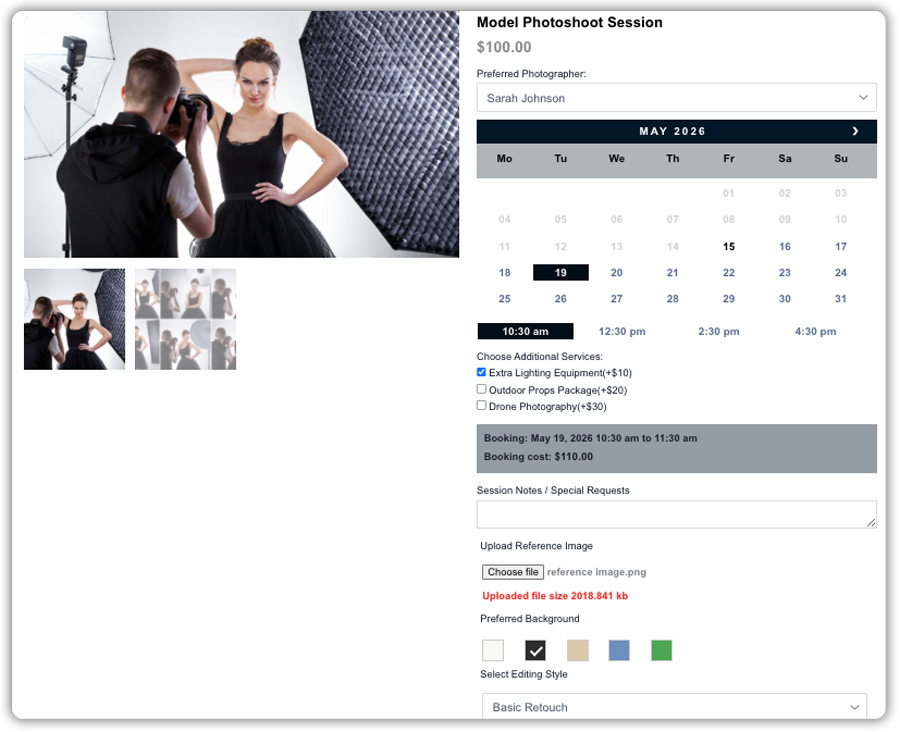
By the time the booking arrives, the studio has everything they need. No follow-up calls, no back-and-forth emails.
Common Use Cases for WooCommerce Booking Custom Fields
Custom fields aren’t one-size-fits-all; what a salon needs is very different from what a consultant or a rental business needs. Here are the most common scenarios where WooCommerce booking custom fields make a real difference:
- Salons and spas: Collect service type, preferred stylist, or allergy and skin concern details before the appointment.
- Fitness and wellness studios: ask for fitness goals, experience level, or any medical conditions relevant to the session.
- Consultants and coaches: let clients describe their agenda or key questions before the call, so sessions are focused from the start.
- Event venues: capture guest count, event type, catering preferences, and setup requirements at the time of booking.
- Rental services: confirm delivery address, equipment preferences, or special handling needs before dispatching.
- Healthcare providers: gather reason for visit, existing conditions, or insurance details upfront.
In each case, the booking form does the intake work for you, so your team walks into every booking fully prepared.
Tips for Creating Better WooCommerce Booking Forms
Adding more fields does not always make a booking form better. The goal is to collect the right information without making the booking process feel overwhelming.
- Keep it short: Only ask for information you genuinely need before the booking. Too many fields can increase drop-offs.
- Use the right field type: Use dropdowns, radio buttons, or checkboxes instead of large text areas whenever possible. Structured inputs are faster for customers and easier to review later.
- Make only essential fields required: Mandatory fields are useful, but too many can frustrate customers.
- Use conditional logic: Show fields only when they are relevant. For example, display dietary preference options only if a customer selects “Food Included.”
- Offer paid add-ons thoughtfully: Additional services like priority support, express delivery, or upgrades can increase order value without complicating the booking flow.
A well-designed booking form collects everything your team needs while keeping the booking process simple.
Conclusion
Adding WooCommerce booking custom fields to your booking form is one of the most practical ways to improve how your service business collects information and prepares for appointments. The Bookings and Appointments for WooCommerce plugin handles the core booking experience, and the PH Product Add-ons for WooCommerce plugin extends your form with unlimited field types and flexible pricing. Together, they give you full control over what your booking form collects without any custom development. If you need help setting things up, reach out to the PluginHive support team, and we’ll get you sorted.
FAQs
Q: Can I add custom fields to WooCommerce bookings?
Yes. The Bookings and Appointments for WooCommerce plugin lets you add booking notes, resources, and assets. You can also use PH Product Add-ons for additional field types.
Q: How do you charge extra for custom booking options in WooCommerce?
PH Product Add-ons for WooCommerce lets you assign additional pricing to options such as upgrades, premium services, or add-ons.
Q: Can customers upload files with their booking in WooCommerce?
Yes. Using PH Product Add-ons for WooCommerce, customers can upload files such as reference images, documents, or supporting materials during booking.