Setup Guide for WooCommerce Bookings & Appointments plugin
Use this quick guide to set up your WooCommerce Bookings and Appointments Plugin by PluginHive. We’ve shown the necessary settings, steps, and images along the way to help you configure features available in the plugin.
Table of Content
- Booking Calendar Appearance
- Create a Bookable Product
- Define the Booking Period
- Maximum Bookings per Block – How many bookings do you take for the same block?
- Daily Booking opening and closing times
- Booking Duration
- Booking Cancellation
- Bookings requiring Approvals
- Buffer Time: Do you need a Gap Time for Preparation or Travel between Bookings?
- Booking Costs, Discounts, and Special prices
- Booking Availability – Make calendar dates/times available/unavailable to book
- Add People to your Bookings
- Add Resources/Add-On options to your Bookings
- Set a language / WPML compatibility
- Booking Emails
- Manage your bookings/Booking Reports
- Booking Process – Frontend
- Staff Management
- Syncing bookings between 2 or more bookable products
- Bookings as Calendar Events
- Create a WooCommerce Booking Form with additional fields or options
- Accept a deposit or partial payment for your bookings
- Dokan Multi-Vendor Integration
- Compatibility with Preview E-mails for WooCommerce
- Search Products based on availability
- FAQs
1. Booking Calendar Appearance
The WooCommerce Bookings and Appointments Plugin lets you create the booking calendar design of your choice. The following are available options in the plugin settings.
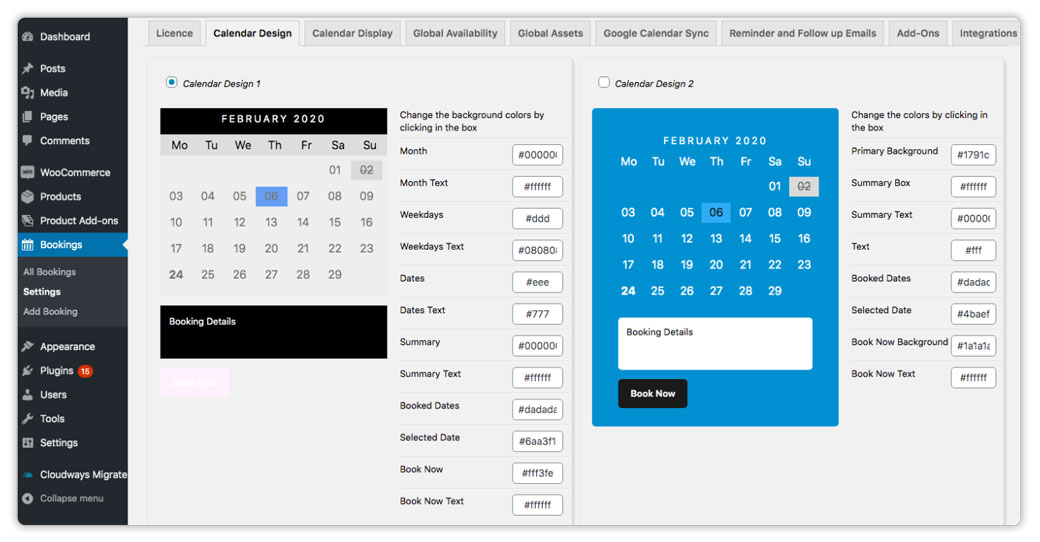
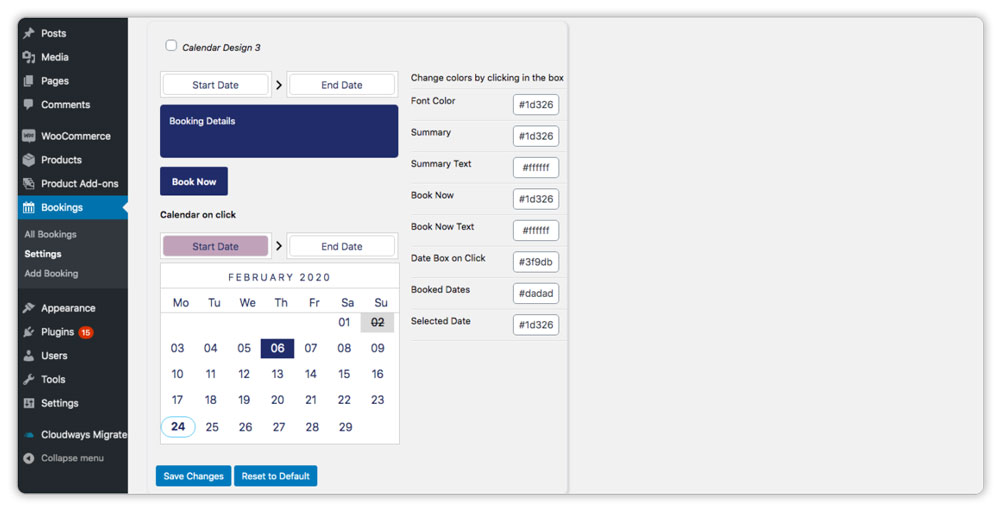
1.1 Choose a Design Template for your Booking Calendar
There are 3 calendar design templates provided within the WooCommerce Bookings Plugin.
- Designs 1 and 2 have the calendar always displayed on the product page.
- Design 3 displays the calendar on click.
- Design 1 is selected as the default template by the plugin.
Visit Bookings > Settings > Calendar Design, select a preferred design and also customize the colors to suit your website.
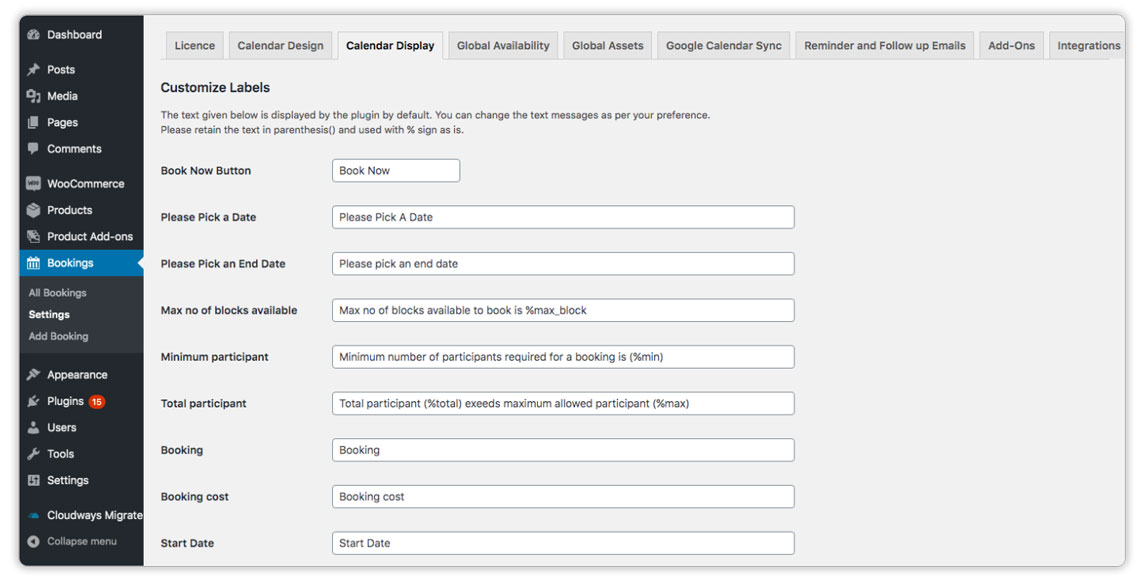
1.2 Customize the Labels and Messages Displayed by the Plugin
Visit Bookings > Settings > Calendar Display
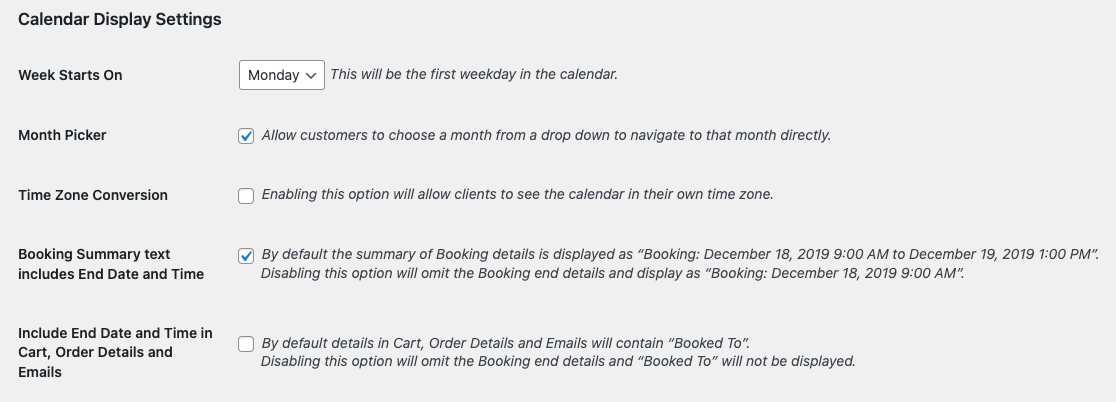
1.3 Choose Calendar Display Options
Visit Bookings > Settings > Calendar Display
Use the below settings to:
- Week Starts On: Start the week on a Monday or Sunday
- Month Picker: Display a dropdown in the place of the month label for the user to select a month directly rather than scrolling through the months
- Time Zone Conversion: Have your customers see the time slots in their own time zone and not yours
- Booking Summary: Display the end date and time in the calendar summary.
- Include End Date & Time in Cart, Order Details & Emails: this option allows you to display or hide the end date/time of a booking on the cart page, order details, and the emails sent to the customers.
1.4 Choose the Date and Time Format for the Calendar
The plugin uses your WordPress date and time format. If you wish to use a specific format for your calendar, follow the instructions below.
Visit Settings > General > Date and Time Format
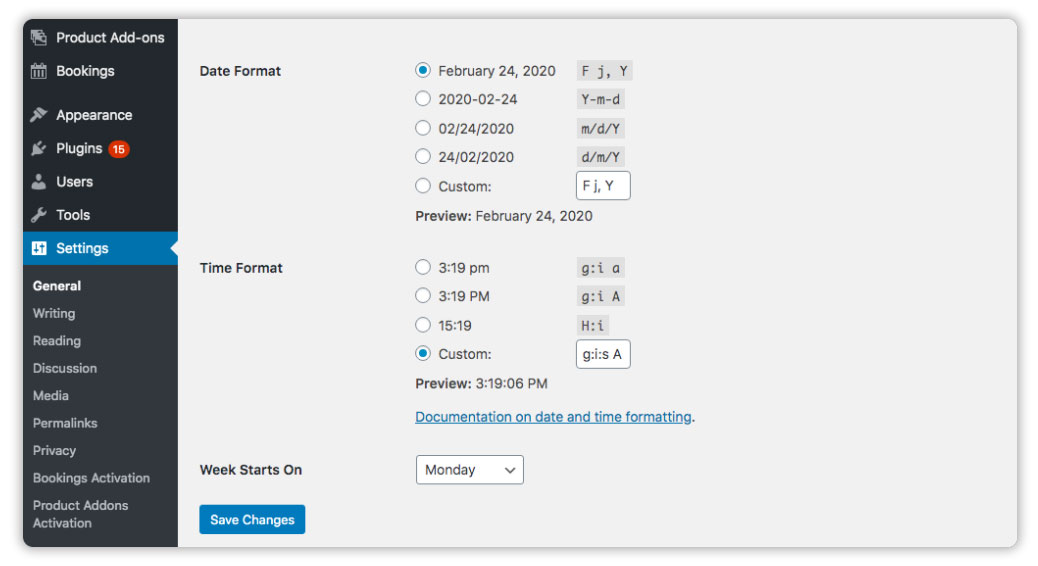
This is a global setting and will be applied everywhere on your website.
For more information related to Calendar Appearance queries, please refer – WooCommerce Bookings – Calendar Appearance FAQs
2. Create a Bookable Product
The WooCommerce Bookings and Appointments Plugin lets you create bookable products/services or convert an existing WooCommerce Product into a Bookable Product
Edit the desired WooCommerce Product, and change the Product Type to “Bookable Product”. When you save and view the product in the front end, you will see a calendar available to book the product.
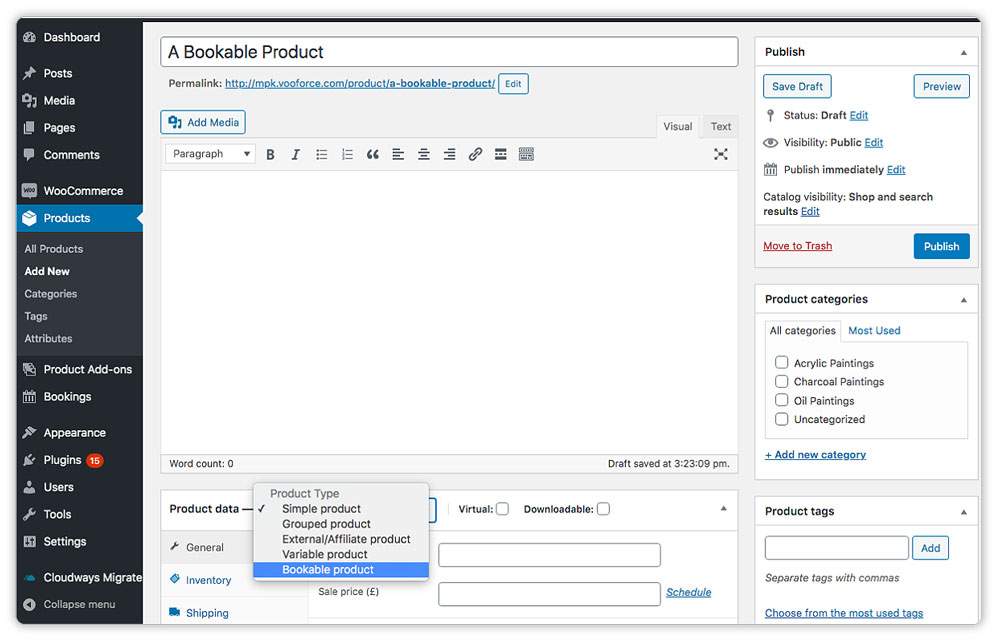
Since “Bookable Product” is a product type, it cannot be used along with a variable product type. However you can achieve variation options for your booking calendar by using the plugin features like Assets and Resources or The Product addons plugin
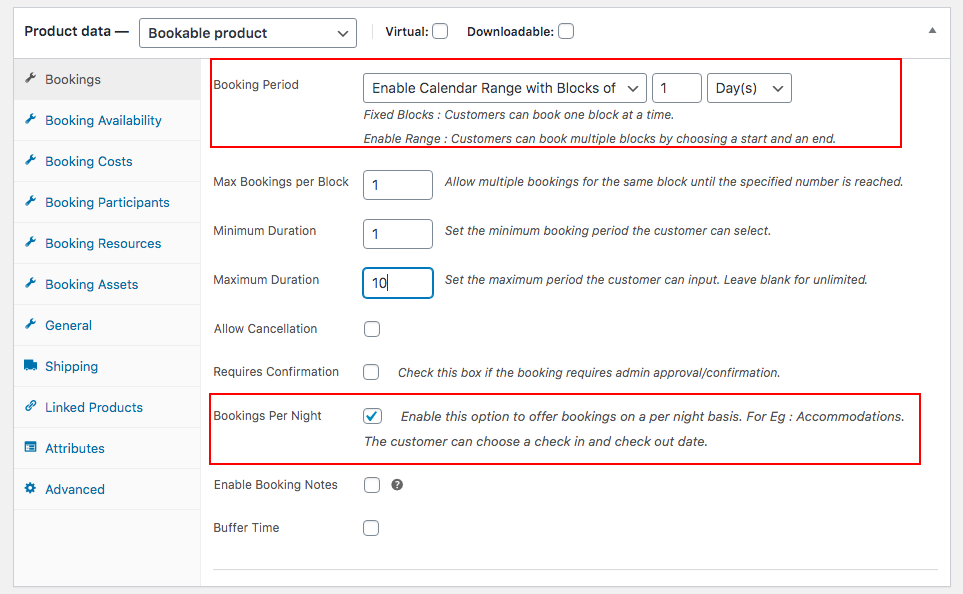
3. Define the Booking Period: Decide how long your booking lasts (Booking Block)
The WooCommerce Bookings and Appointments Plugin offers multiple booking periods. You have the below options to choose from.
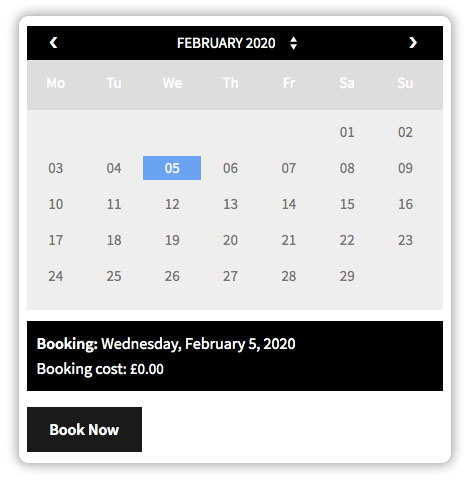
3.1 Single-Day Booking
If you need the user to choose a single day to book, you can use the “Fixed Block of 1 Day(s)” option as shown below.

Here is how the calendar will look on the front end.
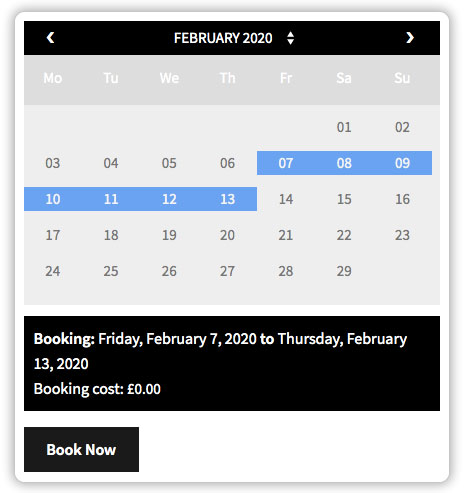
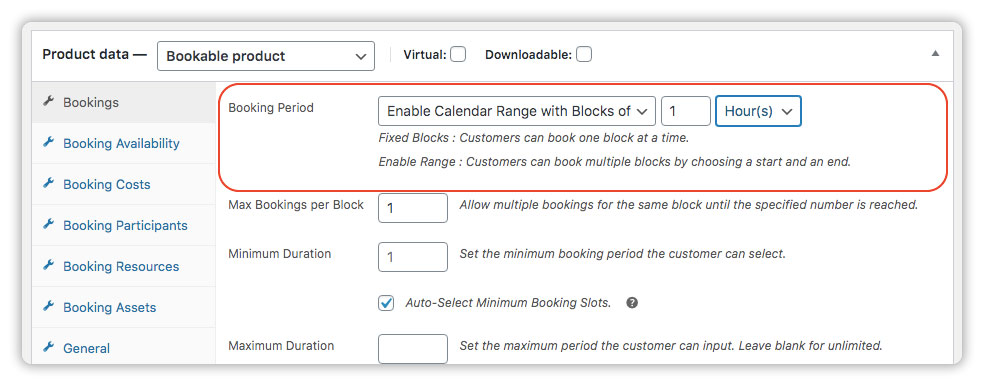
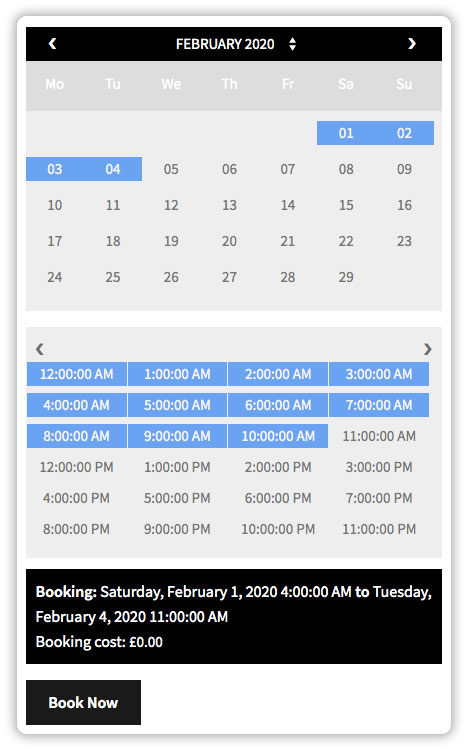
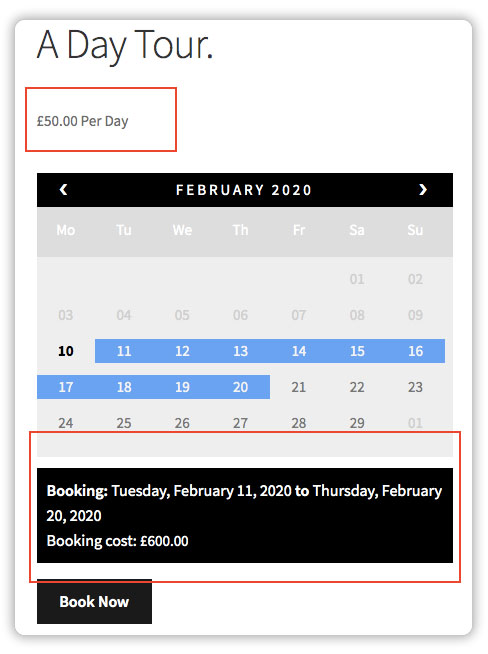
3.2 Multiple Consecutive Days Booking
If you need customers to choose a booking start date and an end date, then use the “Enable Calendar Range with Blocks of 1 day(s)” option.
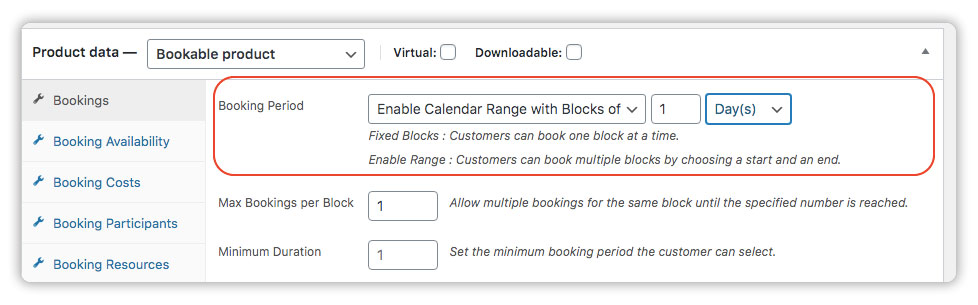
This is how the calendar looks on the front end.
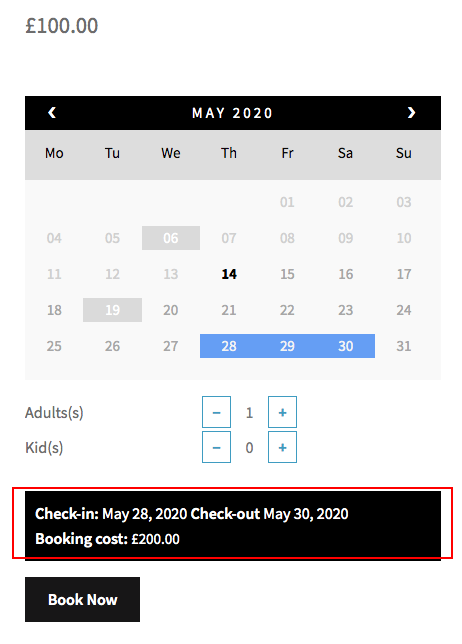
3.3 Multiple consecutive days Booking – Check-in and Check-out
How to ensure the check-out date is available for other bookings and is not included in the cost calculation?
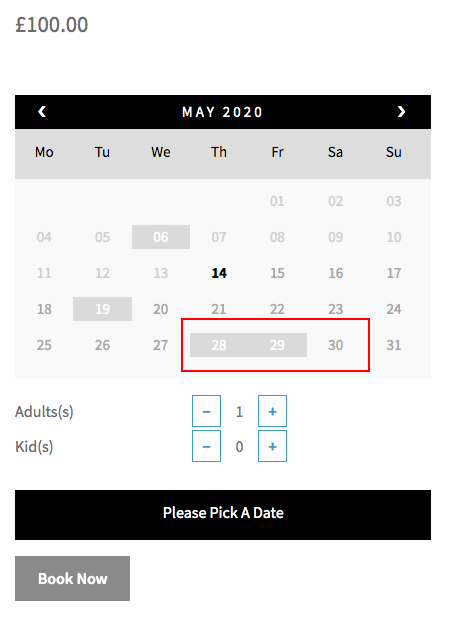
When you need your customers to choose a start date (Check-in) and end date (check-out) and exclude the check-out date from the cost calculation, enable the “Bookings per night” option. This option also ensures that the checkout date is available for other bookings.
In the below image, you will find that enabling this option shows the summary with check-in and check-out dates as May 28 and May 30. However, the cost is calculated for 2 nights- May 28 and May 29.
After the booking is done, May 30th (The checkout date) is still available for other bookings as shown below.
3.4 Single Appointment
If you need the user to choose a date and a time for an appointment, then use the “Fixed Blocks of 1 Hour(s)” option.
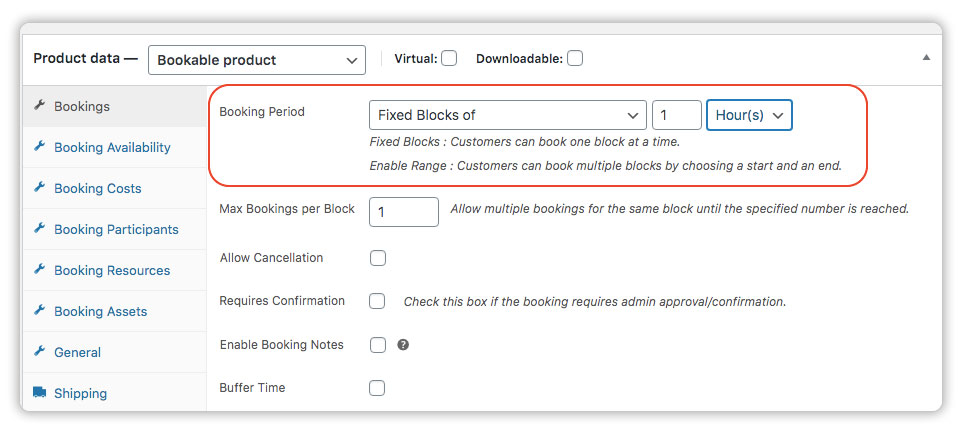
Choose the block of time based on how long your appointment lasts. In this example, we have used a 1-hour block.
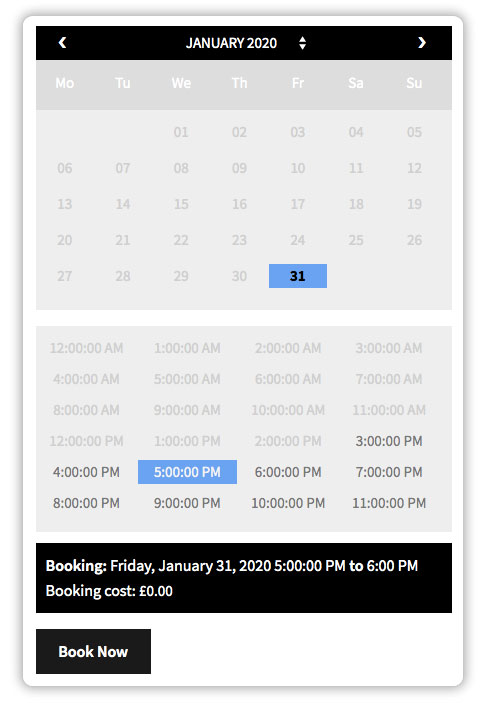
3.5 Multiple Consecutive Appointments
If you need customers to choose a Booking Date and a Start Time and an End time covering multiple booking slots (on a single day) then use the “Enable Calendar Range with Blocks of 1 Hour(s)” option.

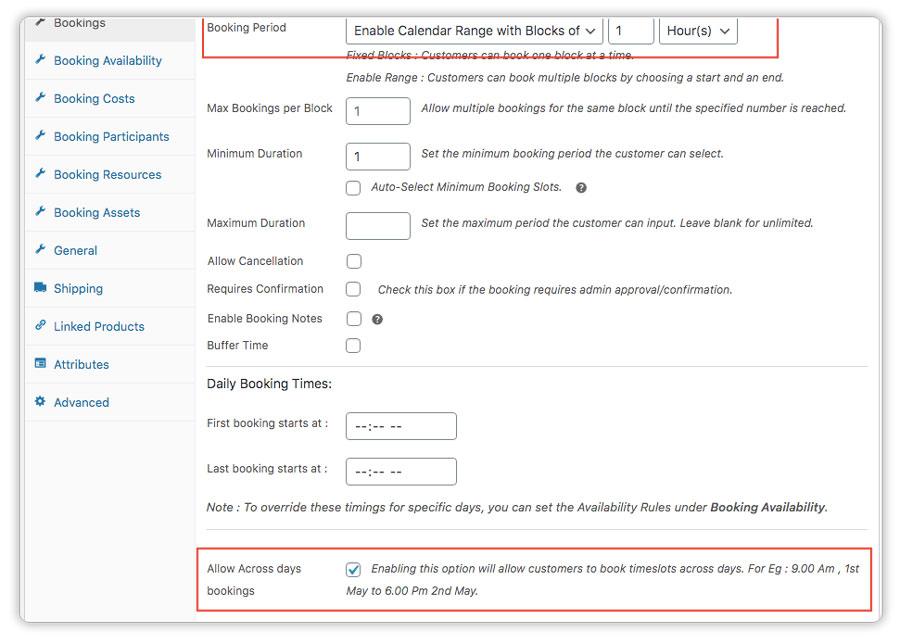
3.6 Multiple Consecutive Appointments Across Days
If you need your user to choose a Booking Start Date & Time with the Booking End Date & Time which spans for more than one day, use the “Enable Calendar Range with Blocks of 1 Hour(s)” option and enable the “Allow Across Days Bookings” option under the same Bookings tab.
Other Ways to Define a Booking Period
It’s likely that you have found the best option that suits your business from the above choices. If not, you can also take a look at the following options that can be achieved using Add-on plugins along with the WooCommerce Bookings and Appointments Plugin.
3.7 WooCommerce Multiple Non-adjacent Bookings Plugin
If you need the user to book multiple dates that could be non-adjacent, use the WooCommerce Multiple Non-Adjacent Bookings Plugin.
Note: This addon has limited cost rules or special prices options compared to the main Bookings plugin.
3.8 WooCommerce Recurring Bookings and Appointments Plugin
If you need the user to make a recurring booking on a daily, weekly, or monthly basis, use the WooCommerce Recurring Bookings and Appointments Plugin.
* This addon plugin provides for recurring bookings with a one-time payment for all bookings.
* It does not provide subscription payments.
Please check out the available features on the product page link given above.
3.9 Custom Time Slots: Let the user choose from a set of time slots defined by you: For eg: 2, 4 or 9 hours or 2, 4 or 9 days
If you need your user to be able to select only from a set of time slots that are defined by you, you can use this custom (paid) addon plugin – “https://www.pluginhive.com/knowledge-base/woocommerce-bookings-custom-booking-interval/“
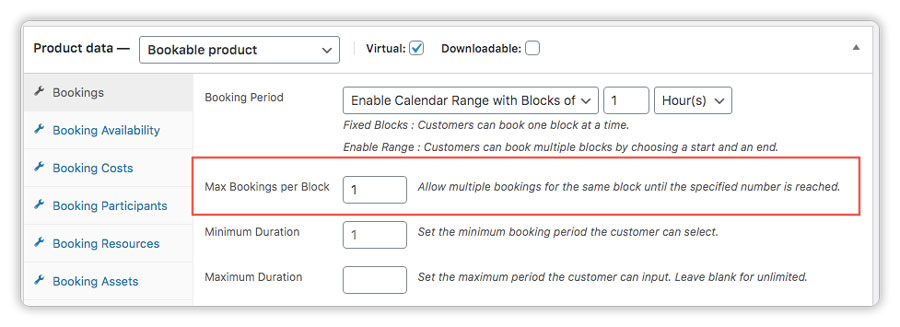
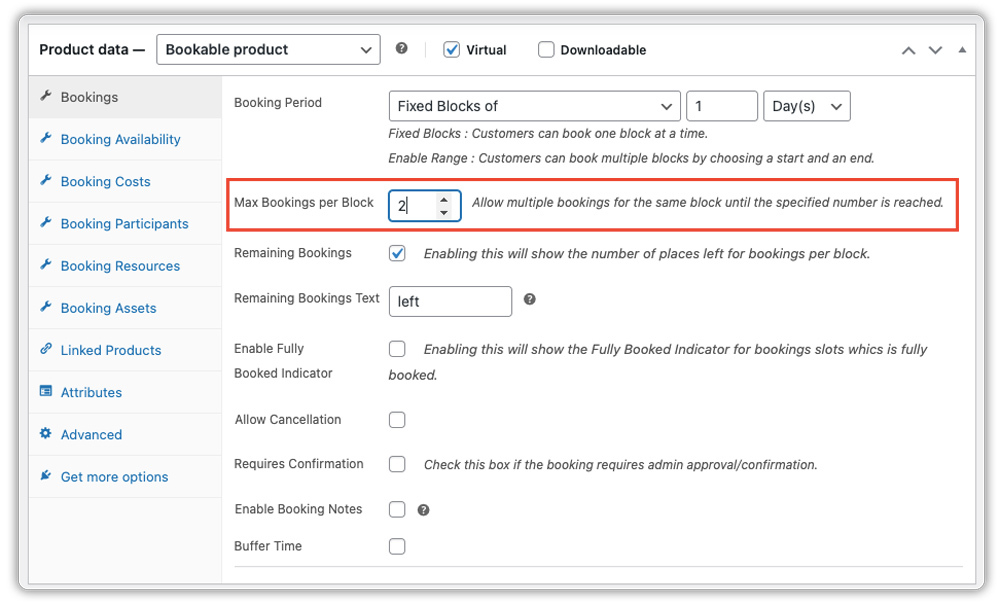
4. Maximum Bookings per Block – How many bookings do you take for the same block?
Set the number of bookings allowed for the same day or time block by using the “Max Bookings per Block” option under Bookings.
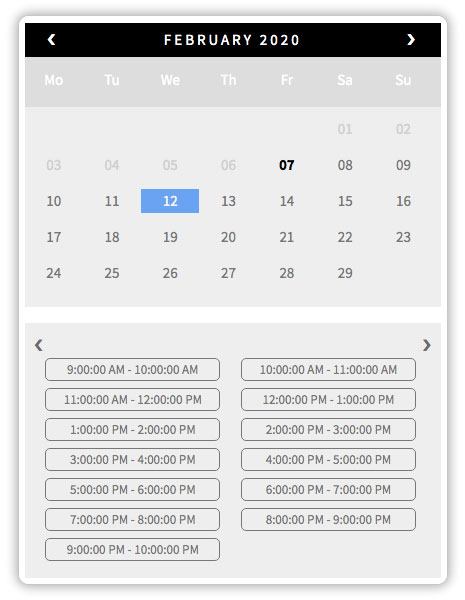
5. Set the Daily Booking Opening and Closing Times
You can set the time you start and end your bookings on a daily basis. In the booking settings page, you will find the ‘Daily Booking Times‘ option.
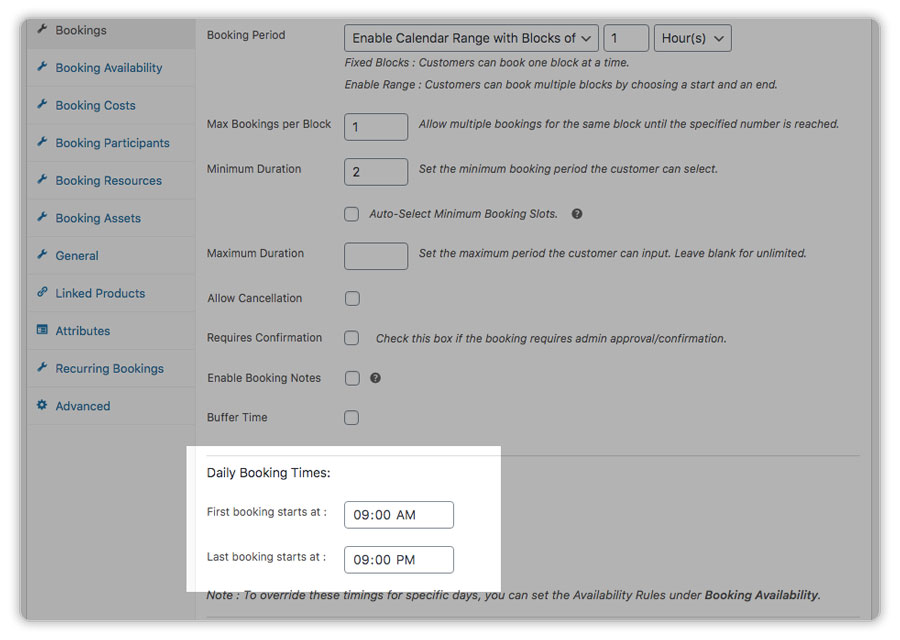
For 1-hour duration appointments starting at 9.00 AM and ending at 10.00 PM (Last appointment starts at 9.00 PM), the booking calendar looks like the following.
*Please note that this option is only applicable to a time-based booking calendar.
6. Booking Duration: What are the Minimum and Maximum duration you allow your users to book in a single booking?
Use the minimum and maximum duration fields to set the minimum and maximum booking durations you allow your users to select at a time. For example,
- The customers can choose a minimum of 2 days and a maximum of 10 days to book a room.
- The customers can book a minimum of half an hour or a maximum of 3 hours of service in 1 booking.
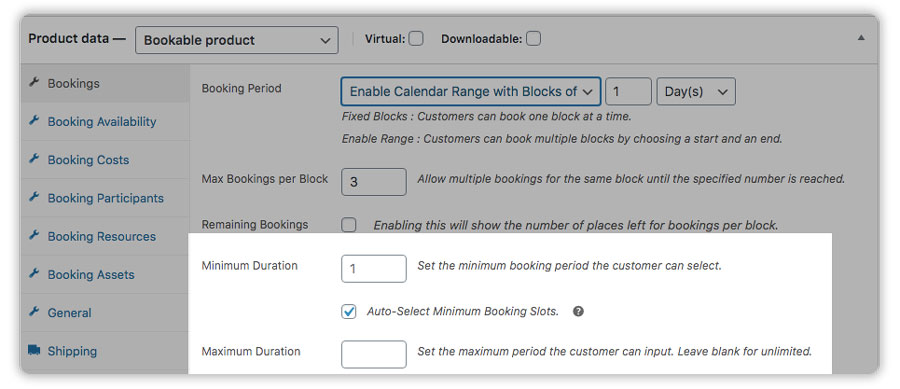
Auto-Select Minimum Booking Slots:
When you give the minimum duration greater than 1, you get the option “Auto-Select Minimum Booking Slots”. This option when enabled ensures that the minimum number of bookings is auto-selected when the user clicks on any available date or time slot. When disabled, the user can select one slot but when the user clicks on “Book Now”, a message is displayed to select the minimum number.
By default, the minimum and maximum duration apply to all the blocks. However, if you need different min and max duration for different days or different blocks, refer to this custom (paid) addon: WooCommerce Bookings Add-ons – Set Minimum/Maximum Booking Duration based on Date
Below given are examples where this addon could be useful :
1. Let Customers book minimum 2 days during Weekends,and 1 or more days during weekdays
2. Let customers book minimum 7 days during the Peak Season – April to July,
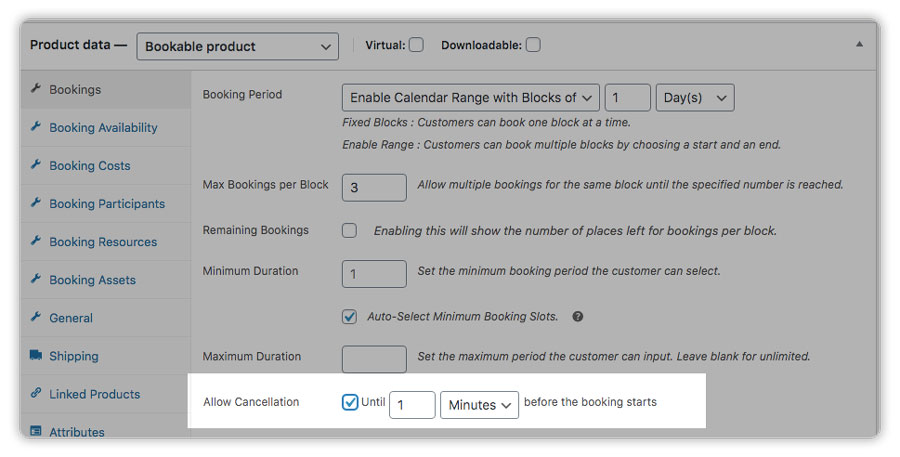
7. Do you Allow Booking Cancellations?
If you allow cancellations, you can use the Product settings ->Bookings – > Allow Cancellation” option.
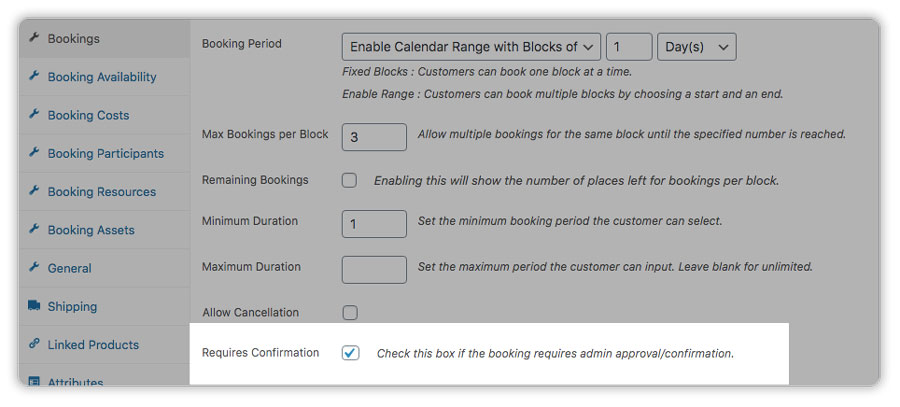
8. Does the Booking require Approval?
If you want the users to request bookings and you would like to approve or reject, use the Requires Confirmation option.
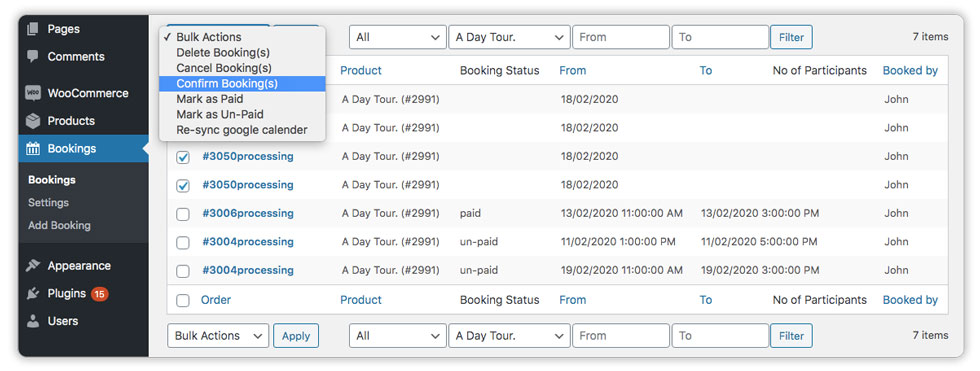
How to Approve or Reject the Bookings?
In order to approve/reject the bookings from within the plugin setting. Please follow the following steps.
- Go to -> Bookings-> All Bookings
- Select the desired booking -> Bulk Actions -> Confirm Booking -> Apply.
For more details on Bookings requiring approvals, Refer: WooCommerce Bookings Confirmation & Payment on Approval
9. Buffer Time: Do you need a Gap Time for Preparation or Travel between Bookings?
Using the Buffer Time option, you can add a before and after buffer time. The plugin will ensure that the corresponding time is blocked when a booking happens.
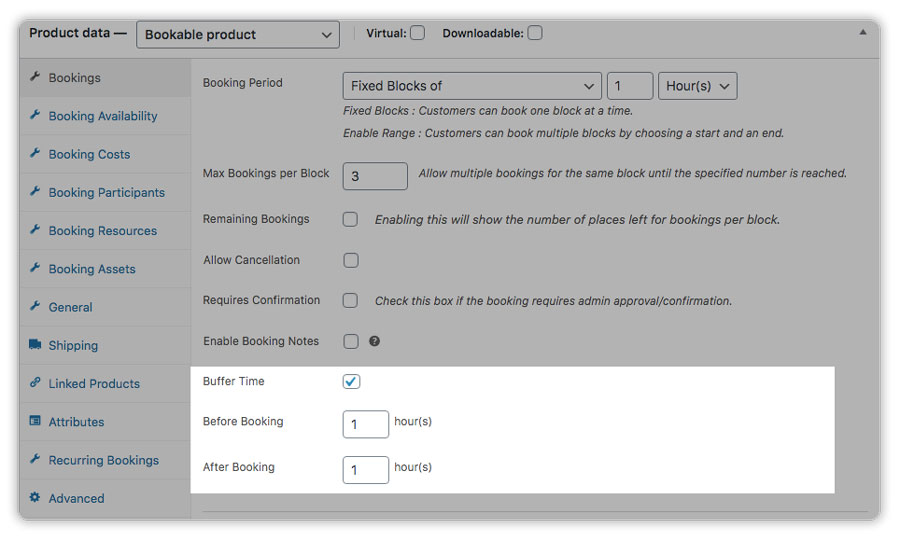
If you need to provide a buffer in minutes(For Eg: 30 mins) when the booking period is in hours (For Eg: 4 hours), you just need to provide the booking period by converting the hours in minutes (ie 240 minutes) or else you will not see the buffer option in minutes.
For more details Refer to How to Set up Buffer Time in WooCommerce Bookings and Appointments?
10. Set up Booking Costs, Discounts, and Special Prices
The WooCommerce Bookings and Appointments Plugin lets you set up the booking costs for your bookings. The following are the available options in the plugin settings.
10.1. Set up the Booking Costs
Go to Bookings – > Booking Costs
- Base Price
This is a one off cost for the booking. It is applied once irrespective of the no. of days/appointments booked in a booking.
- Block Cost
This is the cost that applies to every block.
- Display Cost
Let’s say you wish to display a certain cost in the front end which is different from Base + block cost or you need to have a suffix text displayed with the cost (For example, $50 / Day.), mention it in the Display Cost field.
The Total Price for the booking is Base Cost + Block Cost. For eg; Base Cost $100 and Block Cost $50 result in,
1-day booking cost: $150 (100+50*1)
7-day booking cost: $450 (100+50*7)
The display cost is used to display the amount in the front end and is not directly used for the total price calculation.

For more details, please refer: How to Set Bookings Costs using WooCommerce Bookings and Appointments
10.2. Do you Provide Discounts or Special Prices on your Bookings?
Use the Bookings Cost Rules option.
There are different rules you can create to provide discounts and special prices based on your needs. You can easily do this by using one of the rules.
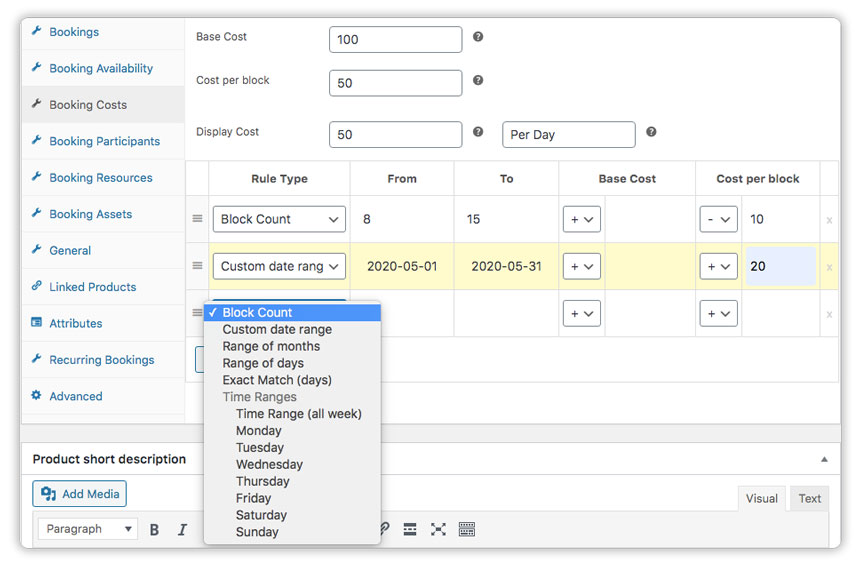
Types of Discounts or Special Prices
- Block Count Rule: Provide a special price based on The number of days or appointments selected by the user. This rule applies when the user selects any number of blocks that fall between the range specified in the rule.
For example,
1. Discounted price for booking more than 10 days.
2. Discounted price for booking between 8 to 15 days.
- Custom Date Range: Provide a special price for a period/ seasons/months/date range or a specific date. This rule applies when the user selects blocks that fall between the range of dates specified in the rule.
For example,
1. Additional cost for high season (April 1st to May 31st).
2. Special Price for booking on May 5th. - Range of months: Provide a special price based on months. This rule applies when the user selects any block within the range of months specified in the rule.
For example,
1. Discounted price for booking in the low season (June to August). - Range of Days: Provide a special price based on which day/days of the week it is. This rule applies when the user selects any day within the range of days specified in the rule.
For example,
1. Discounted price for booking on a Monday
2. Special price for bookings between Friday and Sunday. Here the user gets the special price if he books for Friday, or Saturday or Friday and Saturday, or any combination that falls in the range. - Exact Match (Days): Provide a special price based on the day/days of the week. This rule applies when the user selects all the days from the range of days specified.
For example,
1. Discounted price for booking Monday and Tuesday both
2. Special price for bookings on Friday, Saturday, and Sunday. Here the user gets a special price if he books for Friday, Saturday, and Saturday. - Time Range(All Week): Provide a special price based on what time of the day it is. This rule applies for all days of the week.
For eg; a Special price for booking between 6.00 PM to 8.00 PM. The user gets a special price on all days of the week for booking between 6.00 pm and 8.00 pm. - Weekday and Time: Similarly, you can provide a special price for a specific time on a specific day using the Monday/Tuesday, etc rule.
For eg; Special price for booking on Monday between 6.00 PM to 8.00 PM.
All the rules apply based on the priority. In the case of conflicting rules, the above rule takes preference.
* For discounts based on people involved in the booking, please refer People/Participants in your Booking
* For more information regarding discounts and special prices, please refer : Discounts and Special Prices
11. Booking Availability
Make the calendar dates/times available/unavailable to book based on your availability using the WooCommerce Bookings and Appointments Plugin.
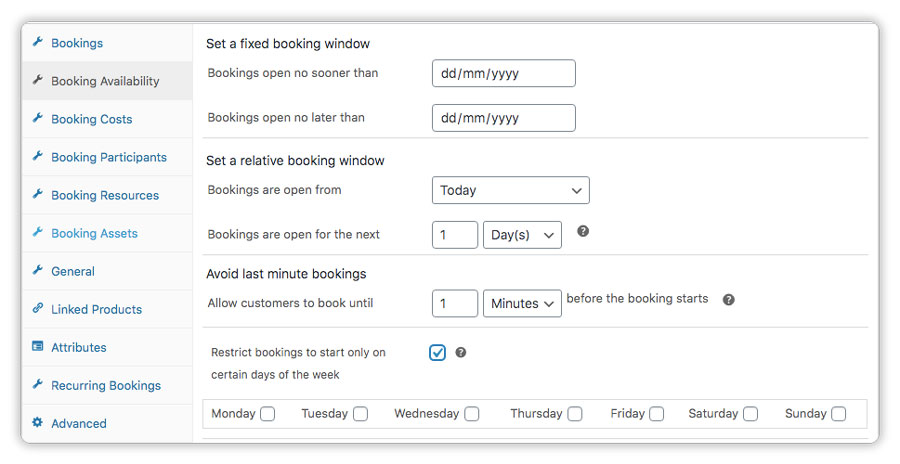
11.1. Set your Bookings Availability Window
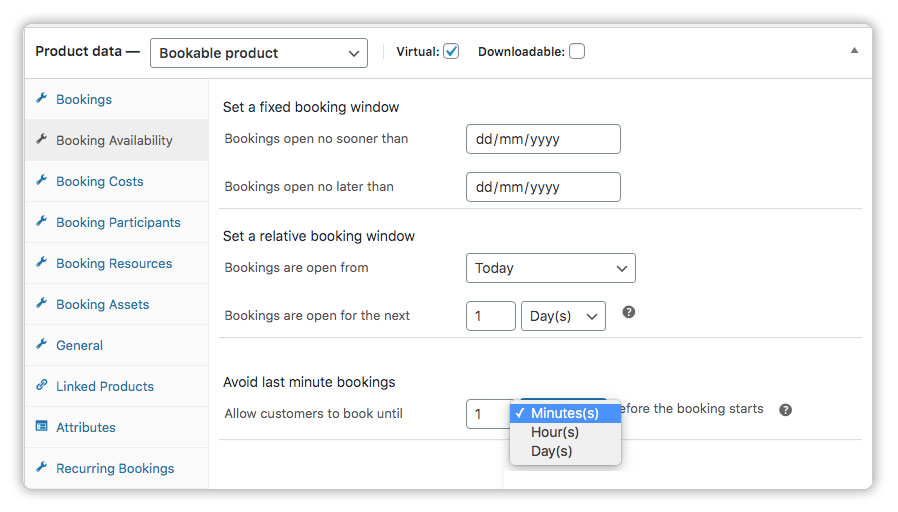
- If you have a fixed date when your bookings open/close, use the “Set a fixed Booking Window” option and choose the start date and end date.
- If you need your bookings to be open for the next “X” number of days from today or from the first available date use the “Set a relative booking window”.
- Avoid last-minute bookings: Avoid last-minute bookings by setting a value for the “Allow customers to book until” X minutes/hours/days before the booking starts.
11.2. Restrict Bookings to Start on Certain Days
Do you allow your customers to start bookings only on Mondays or Tuesdays or any other day? Use the option “Restrict Bookings to start on certain days of the week”.
11.3. Booking Availability Rules
You can make the calendar dates/times available or unavailable to book based on your availability.
Product Settings – > Bookings – > Booking availability – > Availability Rules.
You can create availability rules in two ways.
- All dates are available by default so you set only the rules for the dates you are unavailable by using ‘Bookable = No’.
- Make all dates unavailable by checking this option ‘Make all dates unavailable’ and then create rules for the days you are available by using ‘Bookable = Yes’.
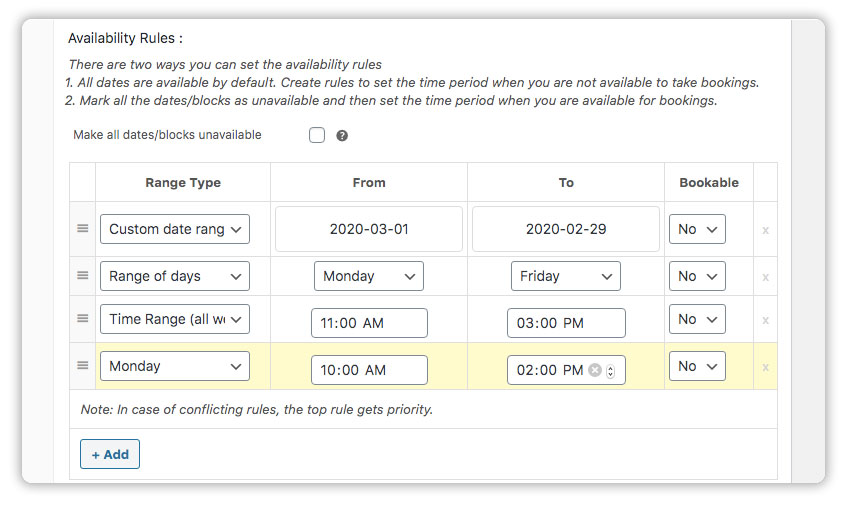
- Custom Date Range Rule: Define a date range by choosing a start date and an end date when you are available or not available to take bookings.
For eg; Bookings are closed between April 1, 2020, to April 10, 2020, or Bookings are closed on May 05th.
- Range of Days: Define the days or range of days when bookings are closed/open by choosing the start day and end day.
For eg; Bookings are closed every Monday (choose Monday to Monday) or Bookings are closed from Saturday to Sunday.
- Range of Months: Define the month or range of months when bookings are closed/open by choosing the start month and end month. For eg; Bookings are closed in December (choose December to December) or Bookings are closed from December to February.
Time Ranges: Below rules are applicable for the time-based calendar.
- Time Range (All Week): Define the time slots for which bookings are open or closed on all the days by selecting the start time and the end time.
For eg; Bookings are closed on all days from 12:00 pm to 2.00 pm.
- Weekday: Define the time slots for which bookings are open or closed on a specific weekday by selecting the start time and the end time.
For example, Bookings are closed on all Sundays from 12:00 pm to 7.00 pm.
- Custom Date Range with time Rule: Define a specific date and start time and end time or a start date and start time and end date and end time when you are available or not available to take bookings.
For eg; Bookings are closed on May 1st, 2020 between 3.00 pm and 6.00 pm or Bookings are closed from May 1st, 2020 3.00 pm to May 10th, 2020 3.00 pm.
If you need to set availability for all your products across the site, visit
Bookings > Settings > Global Availability
You can also override these rules for certain products at the product level.
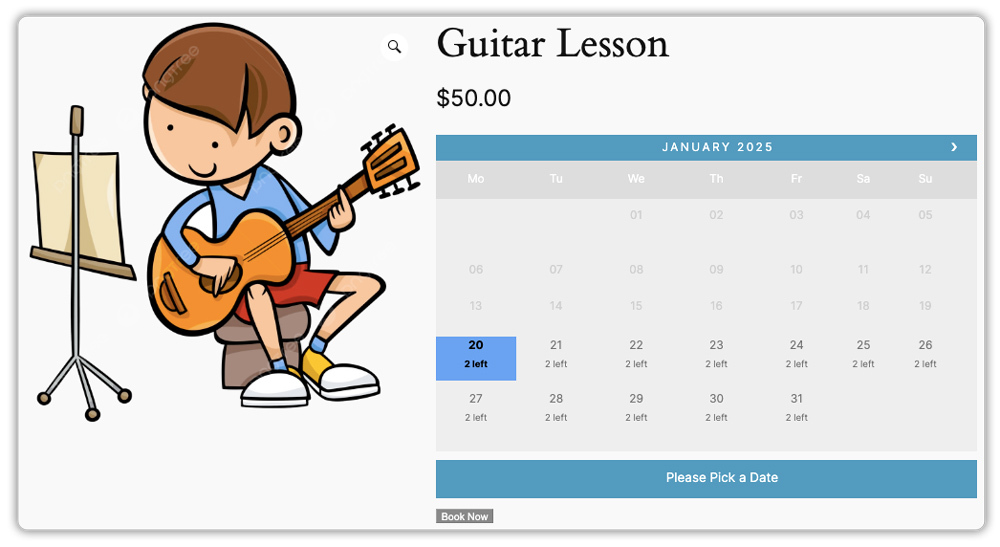
11.4. Custom Message for Remaining slots and Fully booked Slots
You can display the number of slots left per block on the booking calendar and also show a custom message when all slots for a specific date or time are fully booked.
Note: Before setting up these features, ensure that your maximum bookings per block are set to 2 or more, as this feature is only supported for such settings.
Follow the steps below,
Custom Message for Remaining Bookings:
- Product Settings – > Bookings – > Enable Remaining Bookings
- In the “Remaining Bookings Text” field, the text will default display as “left.”
(e.g., if 4 slots are available, it will show “4 left”). If you wish to customize the message, you can type your preferred text. The message can have a maximum of 10 characters.
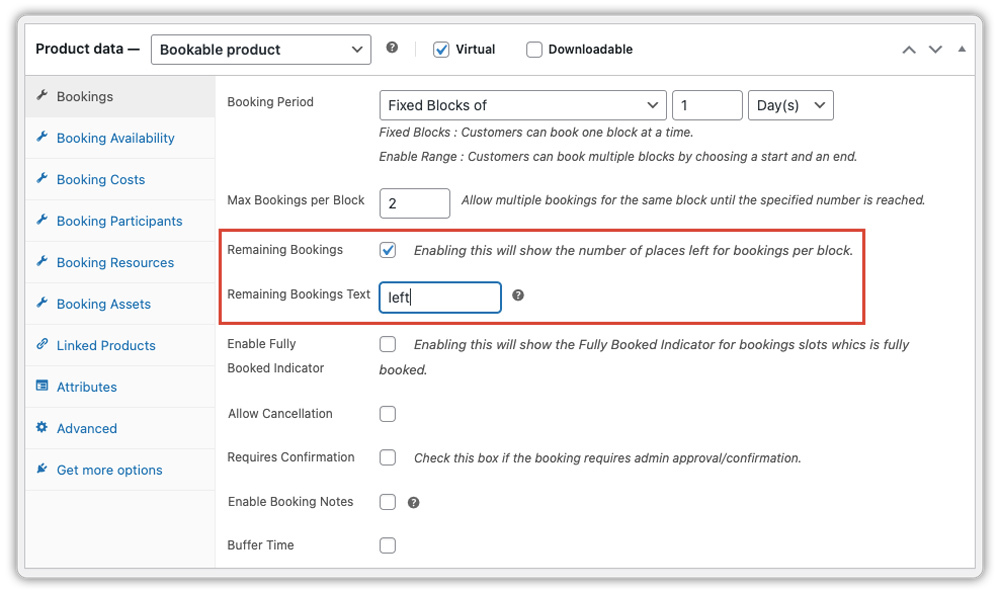
Now, customers will see the number of remaining bookings available per block on the calendar.
Custom Message for a Fully Booked Calendar Slot:
- Enable the Fully Booked Indicator.
- In the “Fully Booked Message” field, the text will default display as “Sold out.” If you wish to customize the message, you can do so by typing your preferred text. The message can have a maximum of 10 characters.
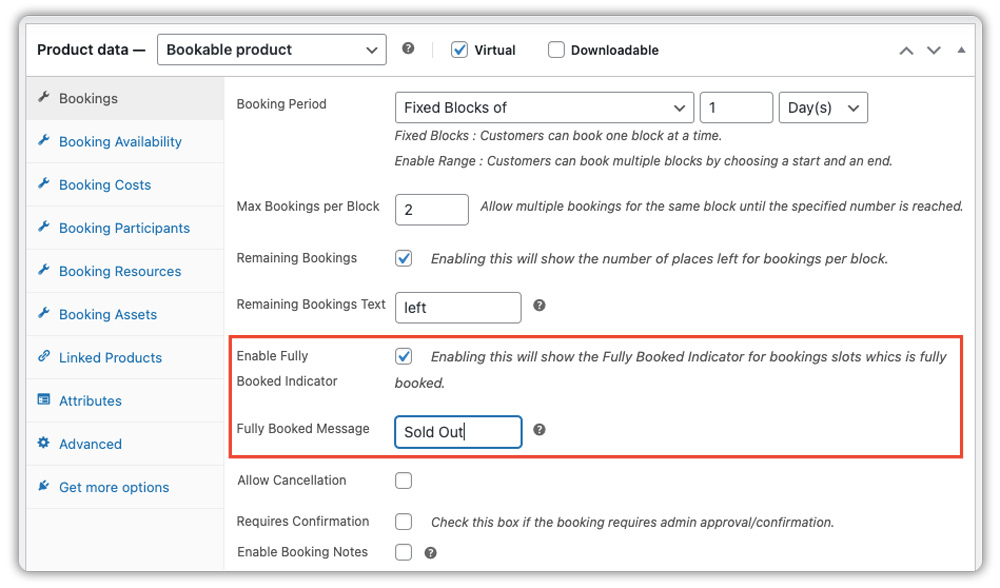
Now at check out customers can see the custom message for fully booked calendar slots.
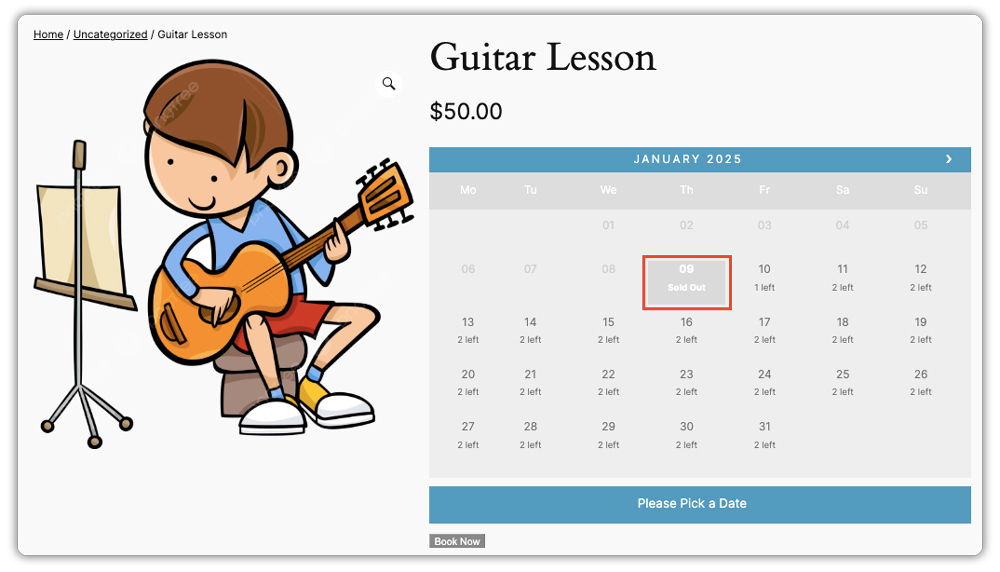
This custom message is applicable only for products that are fully booked with no more slots available. It does not apply to products that are unavailable due to predefined availability rules, such as blackout dates or manual unavailability settings.
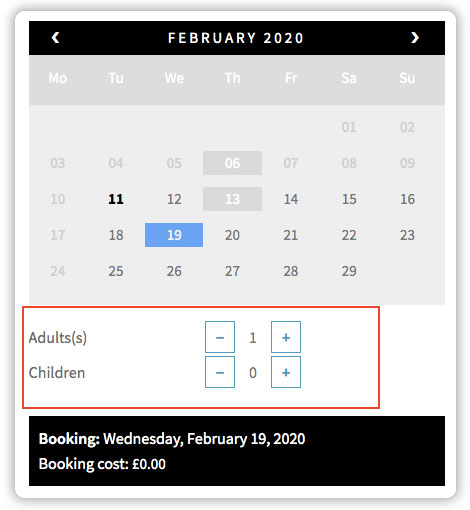
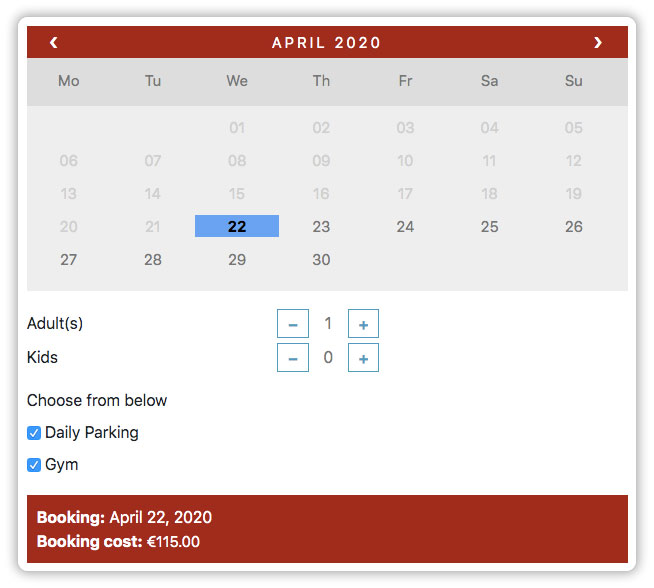
12. Add People/Participants in your Booking
The WooCommerce Bookings and Appointments Plugin lets you add multiple fields to add participants to the booking. The following are the available options in the plugin settings.
12.1. If you have people involved in the booking, use the Booking Participants option
You can define multiple types of persons for booking. For Eg: Adults, Kids, etc. Every Participant can have an associated cost attached.
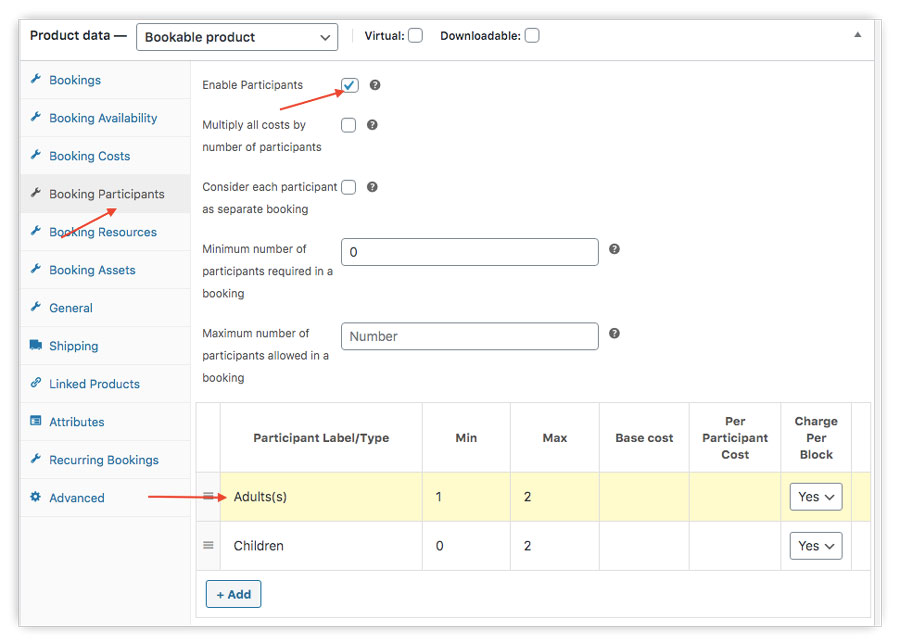
Other than people, you can use the Participants option to add any field/option in the booking that needs a number input from the user.
For example, Number of chairs for the party hall. Here you can create a participant as “No of chairs” and a user can input the number required.
- Charge Per Block: You can choose to charge the participants per block. For Eg: Every Adult is charged $100 per day. (where a day is a block)
- Multiply all costs by the number of participants: Use this option when you want to multiply all the costs involved in the booking by the number of people chosen by the user.
- Consider Each Participant as a separate Booking: Enable this option when you want the count of people to be the number of bookings. Enabling this option will deduct the “Max number of bookings allowed for a block” by the number of participants in a booking. For Eg: Booking for seats in a hall. The maximum seats available are 100. If a booking is done for 12 people, the remaining bookings are 88 (100 -12 )
- Minimum/Maximum number of participants allowed in a booking: This option is applicable when you have multiple participant types and you allow only a minimum or maximum on the combined total number of participants.
For Eg: Participants are Adults and Students in an adventure game. You need at least one participant per booking, it does not matter if it’s an adult or a student. Also, you have max 10 places combined.
12.2. Do you provide Discounts/Special Prices based on People?
You have the option to provide special prices based on people by creating Participant Rules.
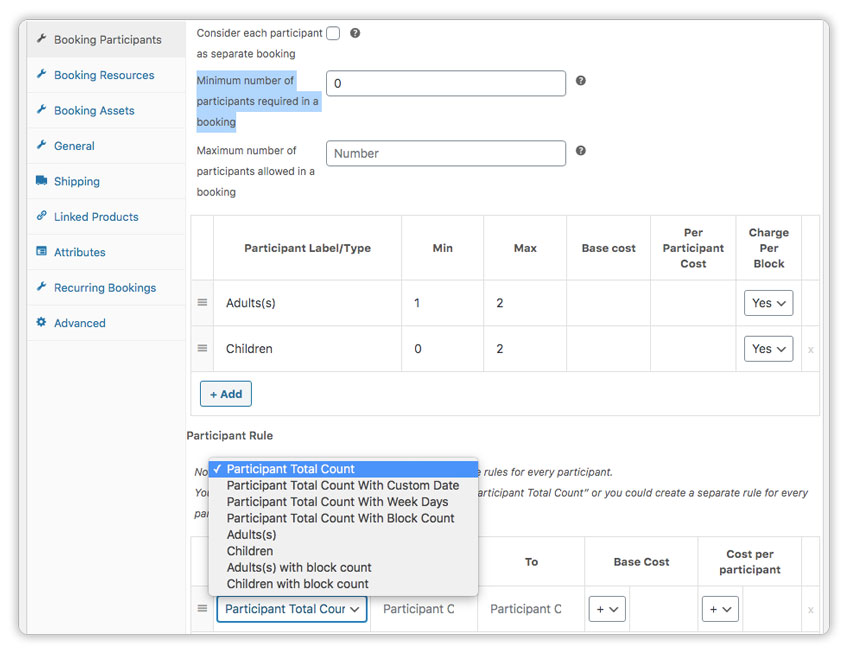
Participant Rules
- Participant Total Count: Use this rule to provide a special price based on The number of people in the booking.
For example, a Special price on booking for 10 or more people.
- Participant Total Count with Block Count: Use this rule to provide a special price based on The number of people and the number of days/blocks booked in the booking.
For example, a Special price on booking 7 or more days for 10 to 15 people.
- Participant Total Count with Custom Date: Use this rule to provide a special price based on The number of people and for a certain period, season, or specific date.
For example,
1. Special price on booking for 10 to 15 people between May 1, 2020, to May 30, 2020.
2. Special price on booking for 10 to 15 people on May 1, 2020.
- Participant Total Count with Week Days: Use this rule to provide a special price based on The number of people and a weekday.
For example,
1. Special price on booking for 10 to 15 people on Sundays.
2. Special charge on booking for 10 to 15 people between Friday and Sunday.
*If you have multiple types of participants (Eg: Adults, children) the total participant count rules work on the total number of people chosen(Eg: Adults+ Children) in the booking.
*If you need rules to work on the specific participants (Eg: Adults only), please save the participant types first to view the participant-specific rule in the rule list.
- Specific Participant: Use this rule to provide a special price based on the number of specific participant types in the booking. For example,
1. Special price on booking for 2 to 5 Adults on Sundays.
2. Special charge on booking for 15 Students between Friday and Sunday.
- Specific Participant with Block Count: Use this rule to provide a special price based on specific participant numbers and the number of days/blocks booked. For example, a Special price on booking 7 or more days for 5 Adults.
13. Add Resources or Add-on Options to your Bookings
If you need to provide extra options for the user to choose from (paid / free) along with your booking, you can do so by using the Resources Option.
Go To Bookings -> Booking Resources
Single Choice Resource type – The plugin displays a drop-down with the options you specify and allows users to select only one option.
Multiple choices – The plugin displays checkboxes with the options you specify in the table and allows users to choose multiple options.
“Automatically Assigned/Let the customer choose” – When an option is automatically assigned, the option is displayed as text in the front end with no option for the user to select.
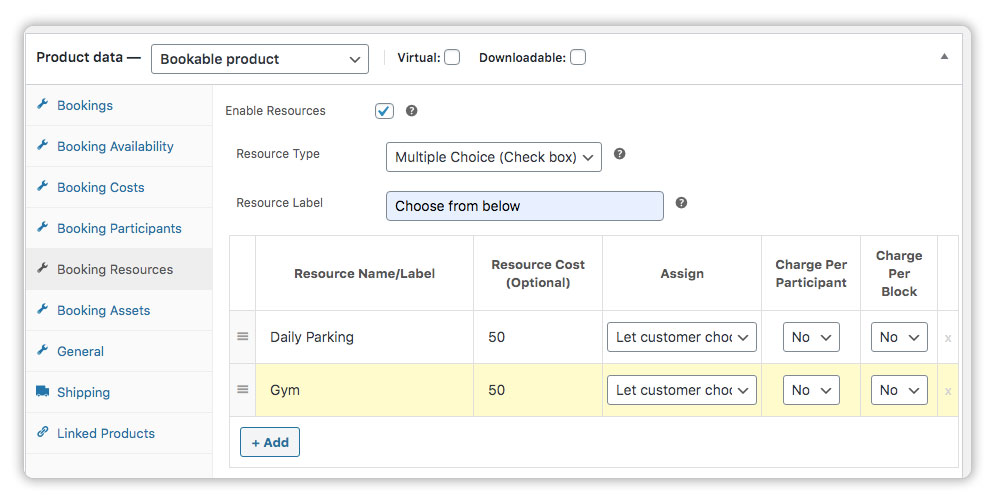
With this plugin, you will be able to provide only 1 resource type with multiple options.
If you need to provide multiple resource types and fields Refer –
Create a WooCommerce Booking Form with additional fields or options for more details.
14. Change the Language & WPML Compatibility
The WooCommerce Bookings and Appointments Plugin is language ready and is available in all popular languages. All you need to do is set your WordPress Language to your preferred native language.
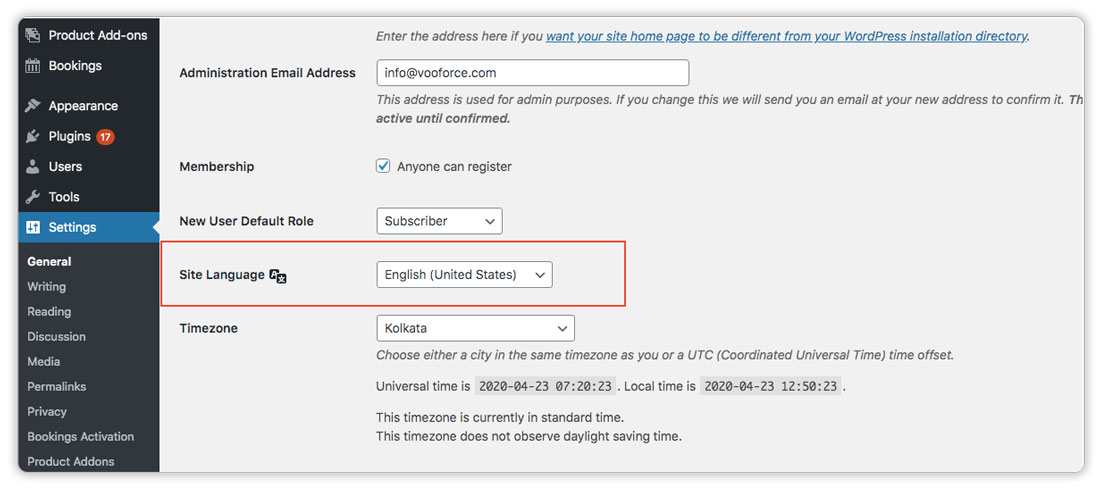
For more details on how to change the calendar language or create a multilingual booking site Refer
How To Set Up a Multilingual WooCommerce Bookings Store?
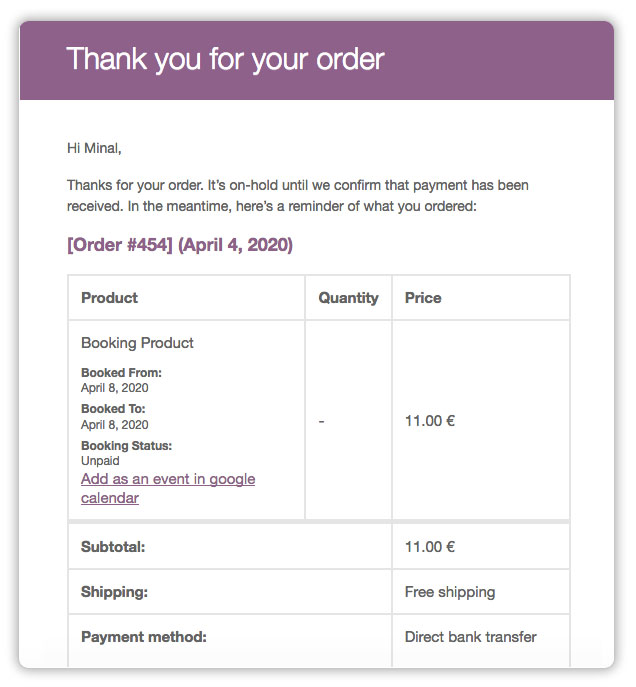
15. Booking Emails
The WooCommerce Bookings and Appointments Plugin automatically sends emails to the Admin and Customer when,
- The customer places a new booking
- The customer cancels an existing booking
- The admin requests, approves or rejects a booking (applies when booking requires approval)
Additionally, you can also configure,
Bookings – > Settings -> Reminder and Follow up Emails
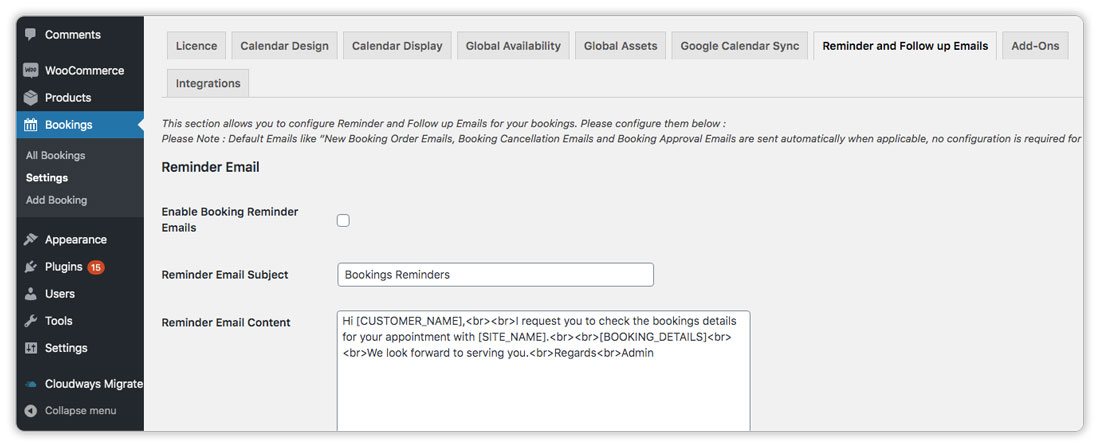
Refer to WooCommerce Bookings Emails, Reminders and Follow up notifications to learn more about the emails sent and the content included in the email.
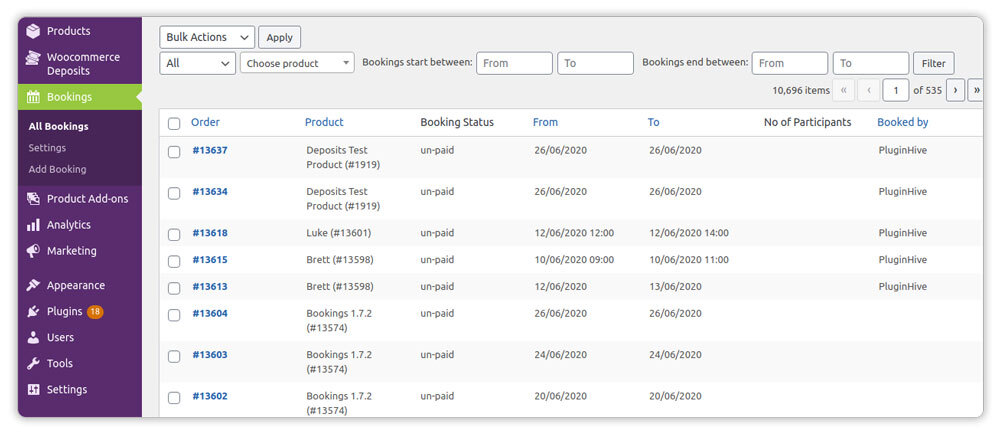
16. Manage your Bookings
PluginHive’s WooCommerce Bookings and Appointments Plugin lets you manage your bookings. Please go through the following available options.
16.1. View and Filter your Bookings
In order to view all your bookings, go to Bookings -> All Bookings. You can filter the bookings by status, product name, from and to dates.
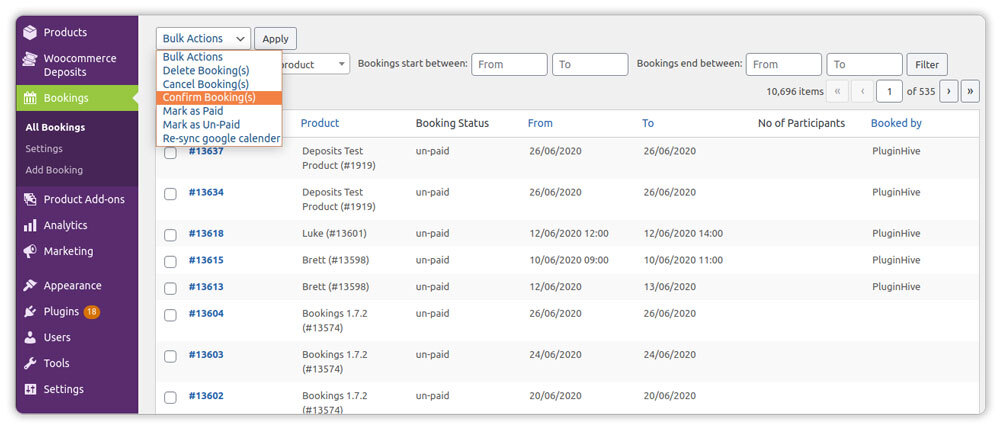
16.2. Approve, Cancel or Delete Bookings
In order to perform actions on your bookings like confirming a booking, canceling a booking or deleting a booking, select the bookings and go to Bulk Actions and click on Apply.
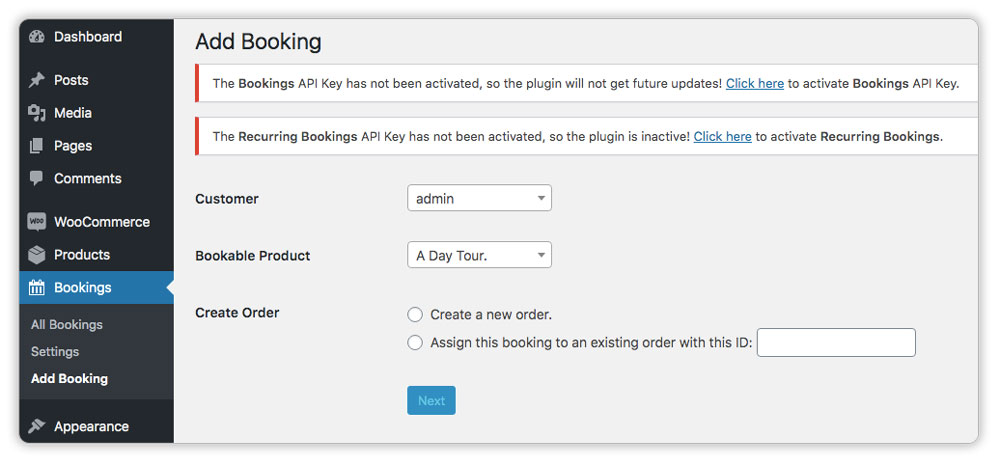
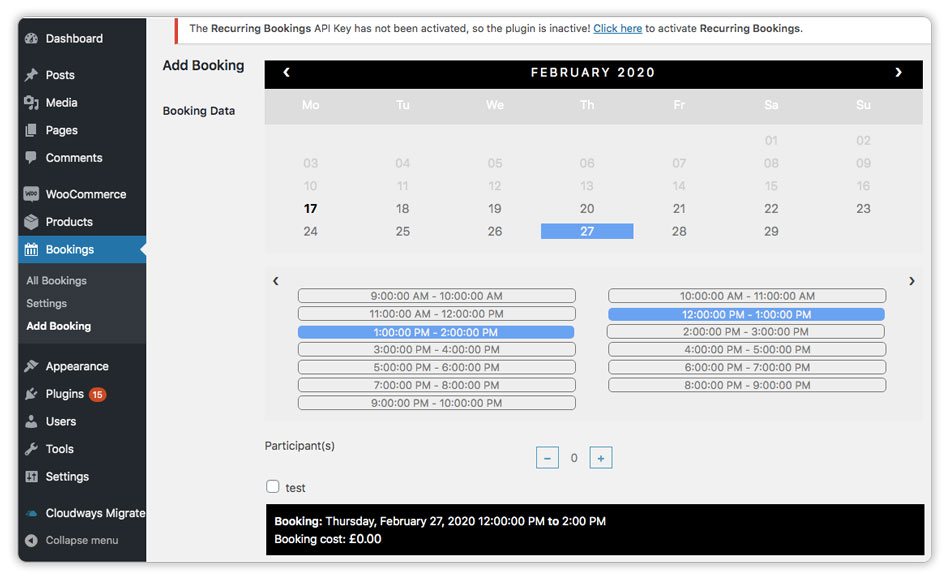
16.3 Create a Booking from the Backend
If you had a customer call in and you would like to create a booking on the customer’s behalf. You can do it from,
Bookings – > Add Booking
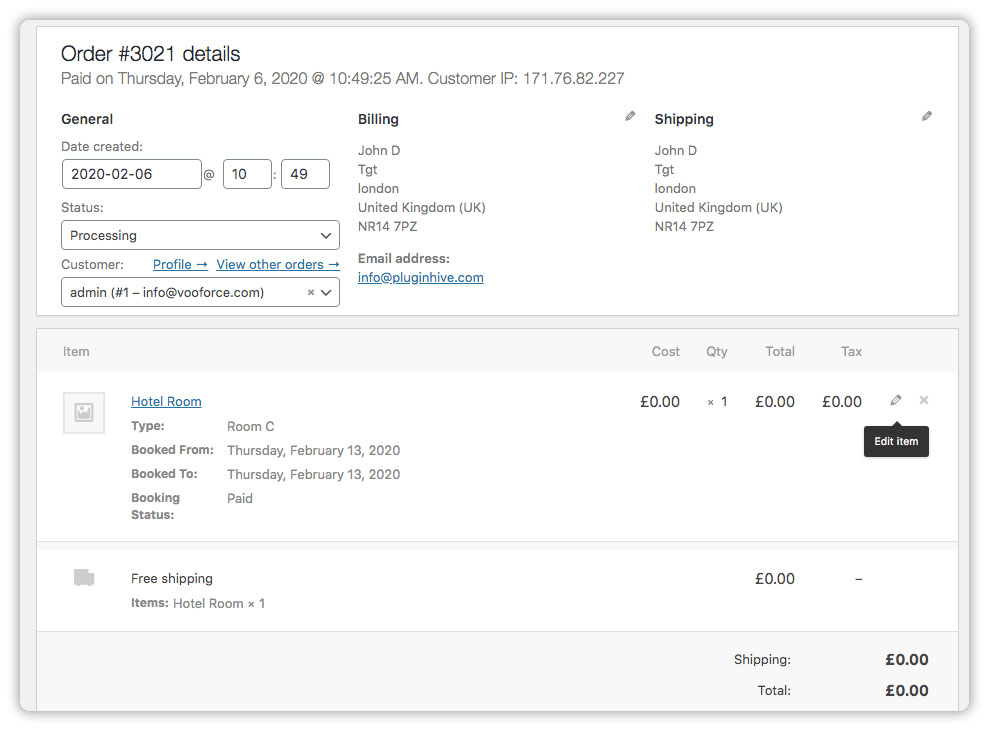
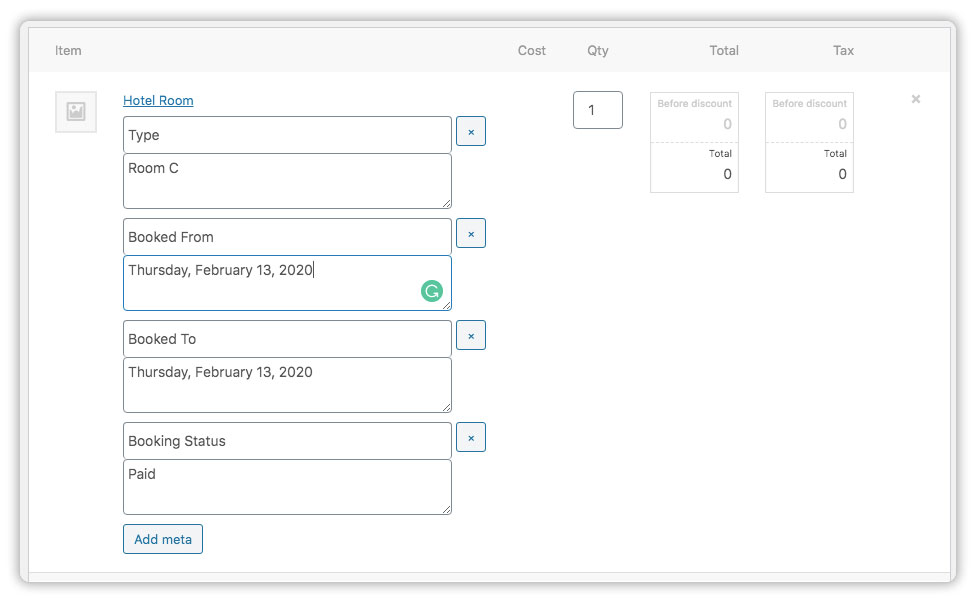
16.4. Change a Booking Date from the Backend
In order to edit the booking dates from the back end, you need to visit,
Bookings > All Bookings > Click on the Booking Order number > Specific Booking Product > Edit Item.
You will be able to edit only the Bookings Dates and the other details in the booking cannot be edited.
17. Customer Booking Process on the Frontend
Let’s check out the booking process of WooCommerce Bookings and Appointments Plugin and how your customers can place a booking.
17.1. Booking Flow for the Customer on the Frontend
- For placing a booking the user clicks on a date/time in the calendar and clicks on ‘Book Now‘.

2. Booking product has been added to the cart. Please check the cart for payment” message is displayed along with a link for ‘View Cart‘.
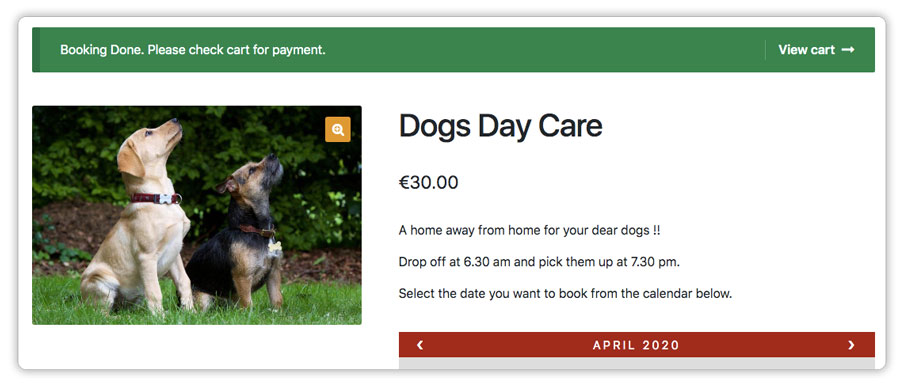
3. The user clicks on ‘View Cart’ and comes to the Cart Page.
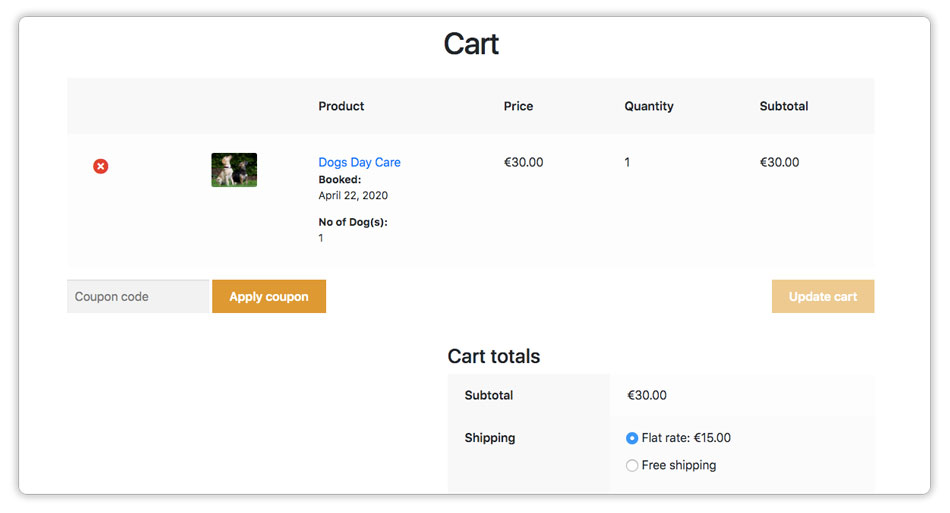
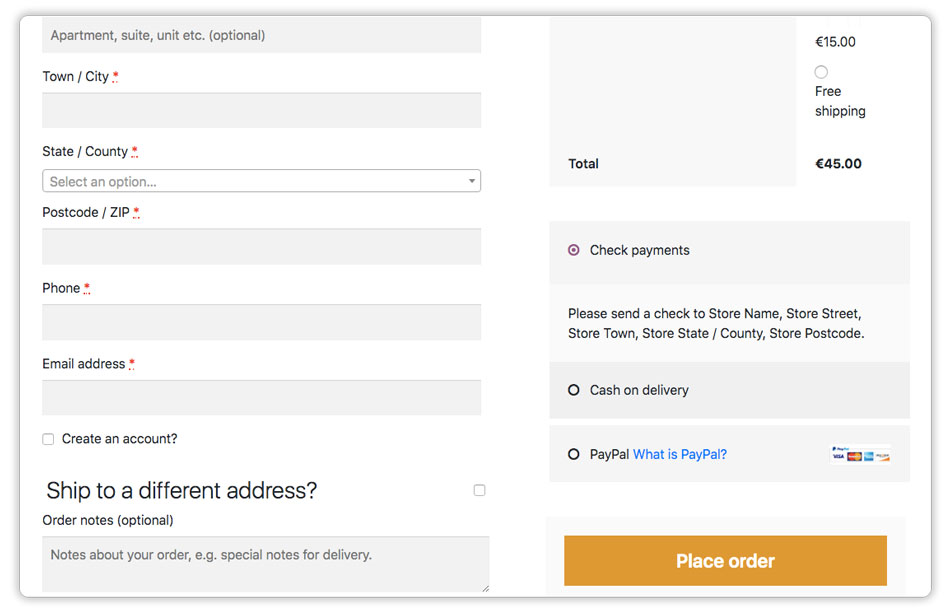
4. The user reviews the details and proceeds to checkout and payment.
5. Once the payment is completed, the user sees the order received page as shown below.
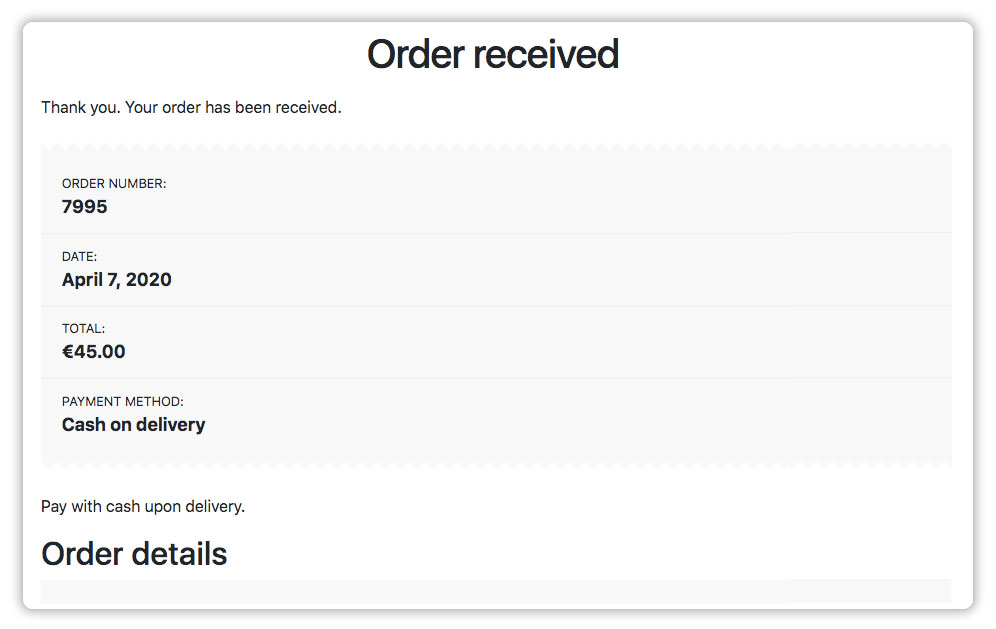
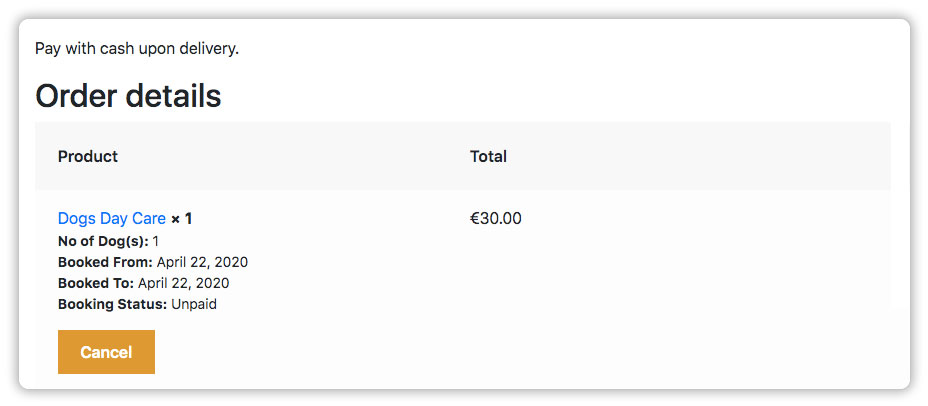
6. The user also receives a new booking order email.
17.2. Bookings Requiring Approvals Flow for the Customer
For Bookings Requiring approvals Refer to WooCommerce Bookings Confirmation & Payment on Approval
17.3. Booking Cancellation Flow for the Customers
18. Staff Member Management
Do you have staff that handles the different services provided in your store? For eg; Masseuse, Dog Walkers, etc? They must have their own working schedule and holidays (availability). Also, each staff may have a different charge based on their experience and service.
The WooCommerce Bookings and Appointments Plugin allows you to define staff, their availability, and cost and attach them to the desired products/services. The bookings are assigned to the staff according to their availability ensuring there are no double bookings.
This plugin does not provide for individual staff members to login and manage their bookings. The plugin provides you a way to define staff, their availability and the bookings are assigned by the plugin accordingly
* For individual staff members to login and manage their own bookings dashboard, you will need a Multi-vendor Solution. This bookings plugin is compatible with Dokan Pro multi vendor solution.
To know more refer : Dokan Integration
18.1. How to set up a Bookable service that is serviced by different staff members who have their own availability and price?
To use the asset feature in order to set up the Staff, visit Bookings > Settings > Global Assets.
Create an asset each for staff members with quantity 1 and define the asset availability – Bookings -> Settings -> Global Assets.
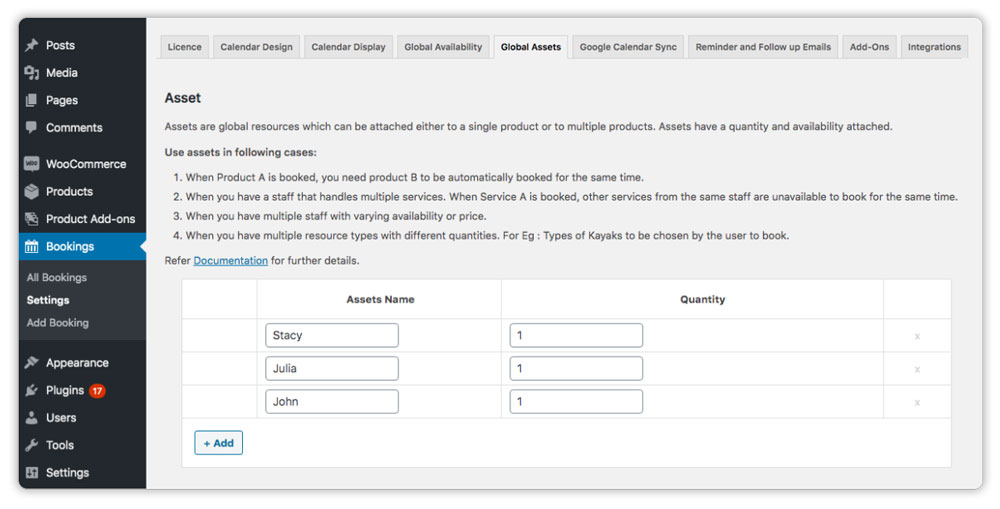
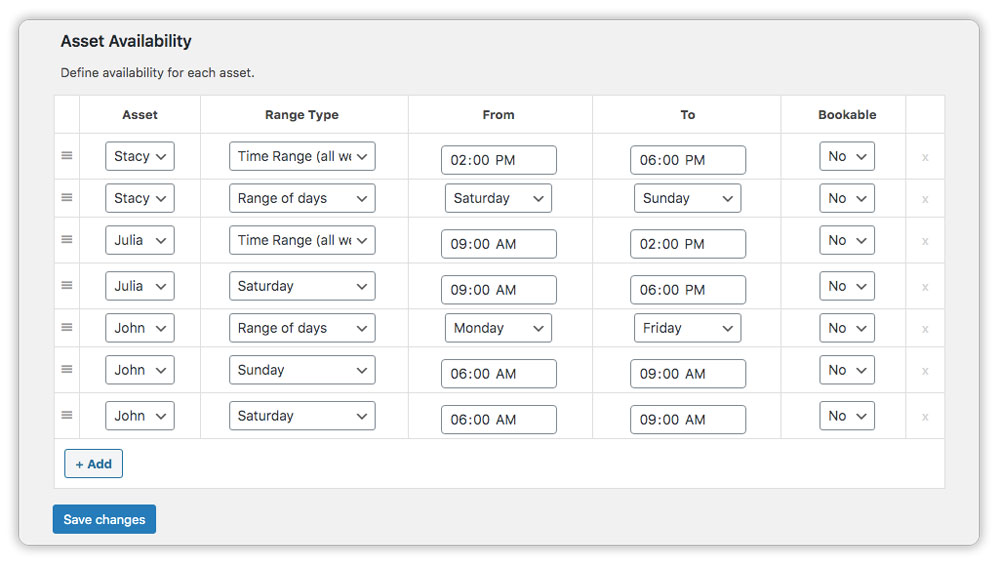
Define availability for each Staff – Bookings -> Settings -> Global Assets -> Asset Availability.
Assign the staff asset to the desired product/service – Product settings -> Booking assets -> Enable Assets.
* If you need the customer to choose the staff – select the “Let customer Choose” option and provide a label for the choice.
* If you want the staff to be assigned internally but not to be chosen by the customer use the “Assign automatically” option.
The product calendar is displayed based on staff availability and the price calculation considers the staff member price.

18.2. How to ensure there are no double bookings when the same staff handles 2 services?
You need to follow the below steps:
- Refer section 18.1 above to create an asset and assign it to a product
- Create an asset with quantity 1 for the staff member
- Assign this staff member to the desired products/services
- The plugin ensures that when a service/product is booked for the staff member for a particular date/time, the same staff member is not available for any other services/products during that time.
19. Syncing Bookings Automatically between Two or more Bookable Products
The WooCommerce Bookings and Appointments Plugin lets you share a resource or asset between two or more bookable products.
19.1. Synching Bookings between Two or more Bookable Products
Let’s say you need a particular product to be automatically booked when some other product is booked. For eg; when Product A is booked, Product B is automatically booked for that period and when Product B is booked, Product A is automatically booked. For Eg: You rent a product for the whole day or half-day (4 hours) and need to be sure that when the product is booked for the whole day, it is not available to book half-day on that date and vice-versa.
You need to follow the below steps:
- Create an asset – Refer section 18.1 to know how to create an asset and assign it to a product. (18.1 explains assets with the example of staff, however same steps can be followed to create any asset)
- Assign the quantity 1 to this asset.
- Assign this asset using the “automatically assigned option” to Product A and B both.
19.2. Using asset for providing the customer a choice between resources having a quantity
Let’s say you provide a service that uses two types of equipment each having different inventory/quantity. For eg; surfboard rentals that provide 3 types of surfboards that have different inventory/quantity of boards.
You need to follow the below steps:
- Refer section 18.1 to create an asset and assign it to a product.
- Create assets for each type of surfboard type with their available quantity. (Soft Top – 10, Soft Top Premium – 15 and Boogie Boards – 8)
- Assign these assets to the Surfboard rental product
- The plugin ensures that the bookings are taken for the available quantity of each surfboard and calculates the cost based on the board cost.
20. Bookings as Calendar Events
WooCommerce Bookings & Appointments plugin v.5.0.0 offers store owners and customers to save bookings to personal calendars including:
- Google Calendar
- Apple iCalendar
- Microsoft Outlook Calendar
20.1 Google Calendar Sync
The WooCommerce Bookings and Appointments Plugin provides 2-way Google Calendar Sync to its users.
- When you create a booking on the WooCommerce online store, the booking automatically gets synced with your Google Calendar.
- When you create a booking in the Google Calendar (using the product id and the format specified by this plugin) the booking automatically gets synced with your online store.
WooCommerce Bookings and Appointments plugin will not sync all the older bookings that were present in your calendar before the plugin was installed and google calendar sync was enabled. The sync happens only for the new bookings that are created after the plugin is installed and sync is enabled.
For more details, please refer,
* How to Set up Google Calendar Sync
* How To Use 2 Way Google Calendar Sync
20.2 Export Bookings to Apple iCalendar
The plugin offers flexibility to the store owners as well as the customers by offering an option to export bookings as a .ics file. This file can be used to import the bookings to iCalendar as an event by both the store owner and customers.
20.3 MS Outlook Calendar Sync
WooCommerce Bookings and Appointments plugin also allows you to sync bookings to your MS Outlook Calendar. This functionality also allows you to send the calendar event to your customers automatically, making sure no customer misses out on their bookings.
For more details, please refer,
* How to Sync WooCommerce Bookings to your Microsoft Outlook Calendar
21. Create WooCommerce Bookings Form with Additional Fields or Options
The WooCommerce Bookings and Appointments Plugin provides you an option to create one additional form field (checkbox or dropdown) having multiple options and one text field.
However, if you need to provide multiple fields or extra options with your Bookings calendar you can make use of the WooCommerce Product Addons Plugin. This plugin is compatible with the Bookings plugin and provides you the flexibility to create any number and type of fields with your booking calendar allowing you to create a complete booking form.
The Booking cost calculation considers the additional options’ costs (set by you) and displays the total cost to the user.
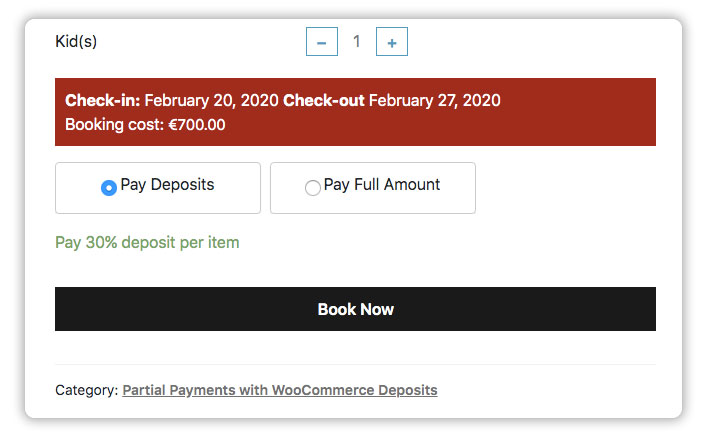
22. Accept Deposit or Partial Payment for your Bookings
If you need your users to book your product or service by making partial payments or paying a deposit, you could make use of the WooCommerce Deposits plugin. This plugin is compatible with the WooCommerce Bookings and Appointments plugin and ensures a seamless payment of deposits for the bookings.

23. Dokan Multi-Vendor Integration with WooCommerce Bookings
The WooCommerce Bookings and Appointments Plugin comes with an integration with the Dokan Multi-Vendor Solution(Dokan Pro Plugin).
If you need multiple sellers/staff members/teachers or service providers to be logged in and be able to manage their own bookings, the Dokan multi-vendor solution for Bookings could be a great choice.
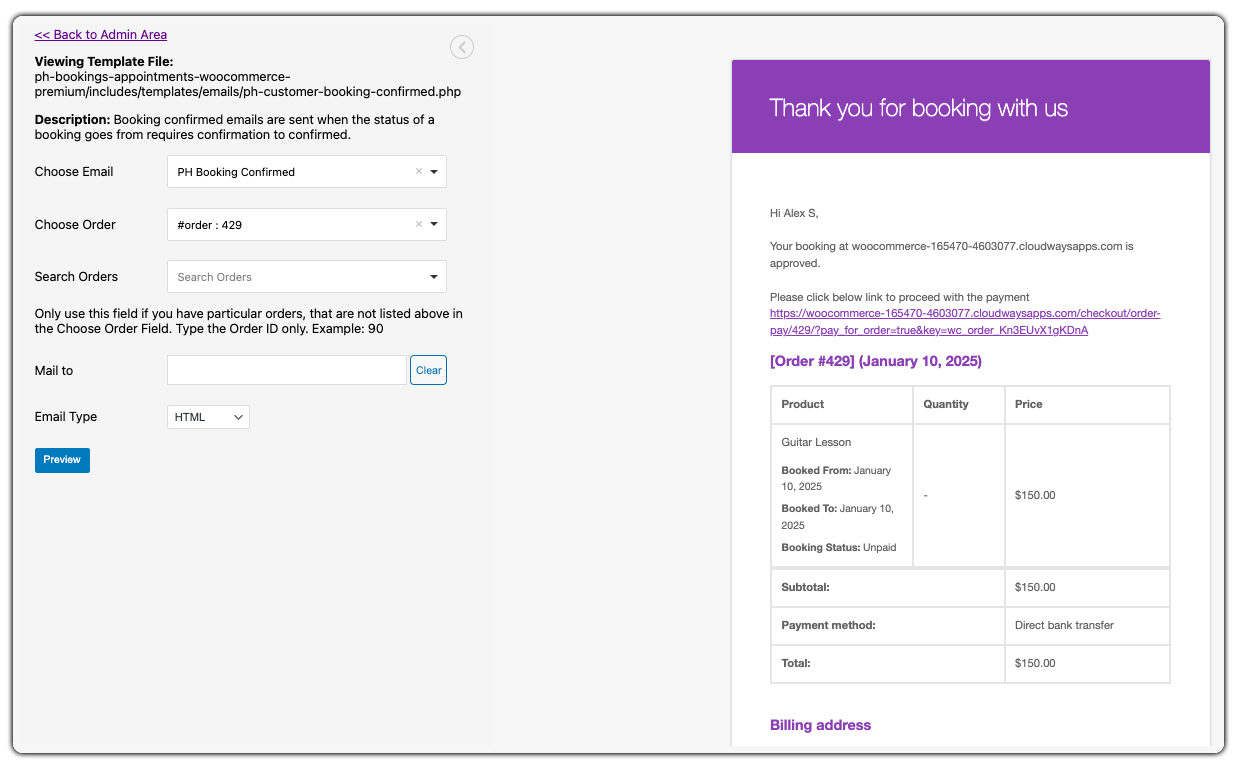
24. Compatibility with Preview E-mails for WooCommerce
The WooCommerce Bookings and Appointments Plugin is fully compatible with the Preview E-mails for WooCommerce plugin. This allows you to preview and test booking-related email templates before sending them to customers.
- Install and activate the Preview E-mails for WooCommerce plugin.
- Enter the email type you want to preview, provide the order number, and click on the Preview button to view the email.
Emails That Can Be Previewed:
- PH Booking Cancelled (for customers)
- PH Booking Cancelled for Admin
- PH Booking Confirmed
- PH Booking Requires Confirmation
- PH Booking Follow-Up
- PH Booking Reminder
- PH Manual Bookings
- PH Waiting for Approval (for Admin)
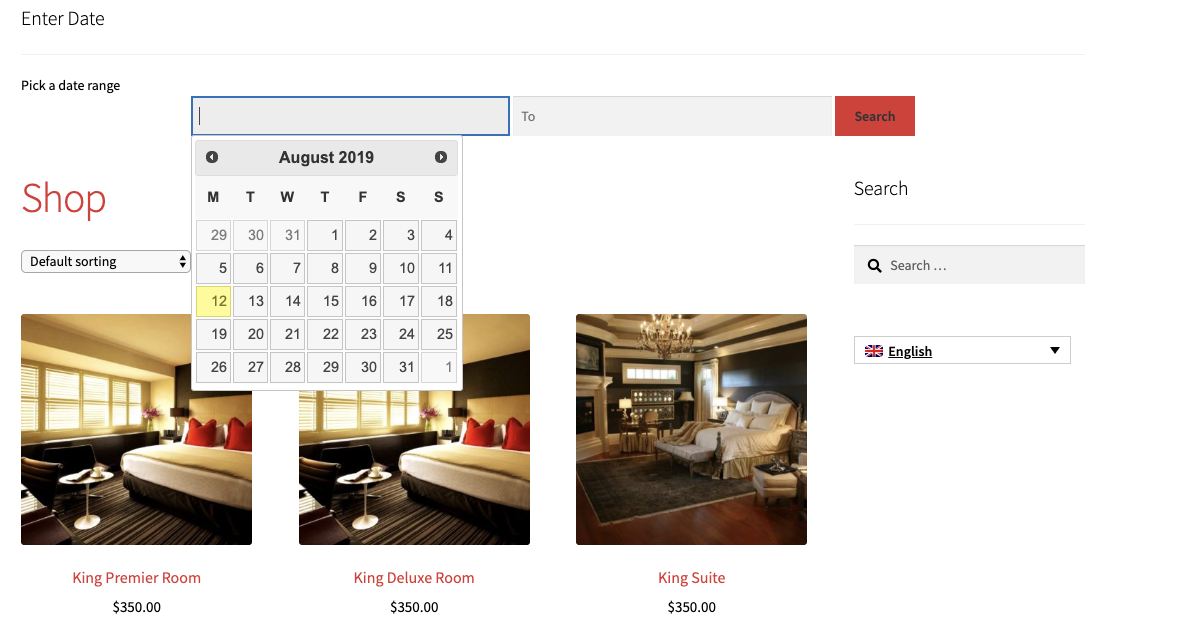
25. Search Bookable Products on the shop page
With the Bookings and Appointments plugin, you will be able to search the products on the shop page based on their availability. The search feature is available to be created as a widget. The widget can be placed on the top bar or the sidebars based on your preference. Please refer to this article to know more about the search widget custom (paid) addon plugin: Bookings Availability Search Widget
26. FAQs
For additional queries related to the Bookings and appointment plugin, please refer Bookings and Appointments FAQs