

A WooCommerce Shipping Zone is a defined geographical region that determines which shipping methods and rates are available to customers at checkout. By configuring WooCommerce Shipping Zones, store owners can control the areas they ship to and assign specific WooCommerce Shipping Methods to each zone, so customers only see the rates relevant to their delivery address.
On This Page
- What are WooCommerce Shipping Zones?
- WooCommerce Shipping Methods for Shipping Zones
- Conclusion
- FAQs
What are WooCommerce Shipping Zones?
A WooCommerce Shipping Zone is a geographical area that you define in your store settings to group customers by location and apply the correct shipping rates to their orders. Each WooCommerce Shipping Zone can have its own set of shipping methods — such as Flat Rate, Free Shipping, or Local Pickup — which are displayed dynamically during checkout based on the customer’s delivery address.
Shipping rates within each WooCommerce Shipping Zone are calculated using two key addresses: the Ship From address configured at the store level, and the Ship To address entered by the customer at checkout. This makes WooCommerce Shipping Zones a powerful tool for offering location-specific shipping pricing across domestic and international destinations.
How to Create a WooCommerce Shipping Zone
Follow the steps below to create a WooCommerce Shipping Zone based on your store’s shipping requirements.
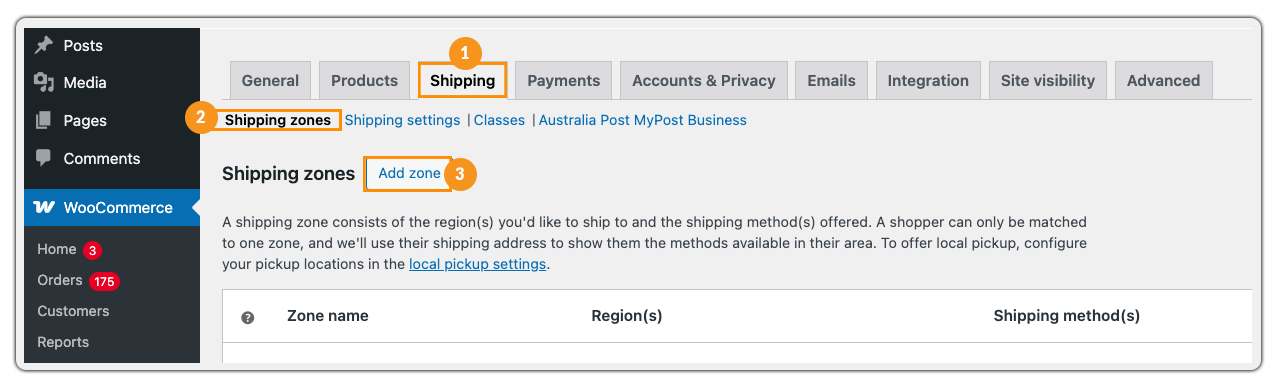
In WooCommerce settings, navigate to Shipping » Shipping Zones » Add Zone to create a new zone. You can create as many zones as you need to cover all the regions you ship to.
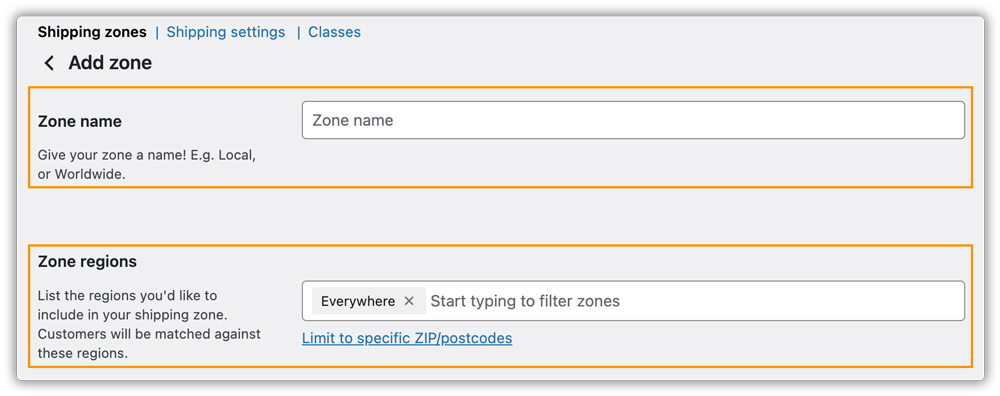
When setting up a WooCommerce Shipping Zone, two fields are required:
- Zone Name — Give the shipping zone a descriptive name, such as “United States” or “Europe”, to identify it easily in your settings.
- Zone Regions — Select the specific countries, states, or postcodes that belong to this zone. For example, for a US zone, you can select the entire United States or narrow it down to individual states or ZIP code ranges.
Once you have configured the Zone Name and Regions, click Save Changes. WooCommerce will now calculate and display shipping rates at checkout based on the shipping methods assigned to that zone.
WooCommerce Shipping Methods for Each Zone
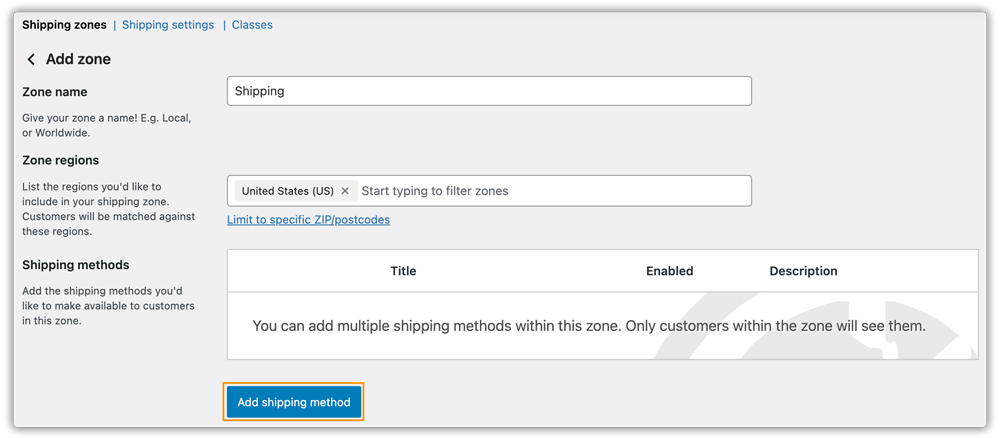
Once you have created a WooCommerce Shipping Zone, the next step is to assign one or more shipping methods to it. These shipping methods determine the rates that customers in that zone see on the cart and checkout pages.
To add a shipping method to a WooCommerce Shipping Zone, open the zone from WooCommerce » Settings » Shipping » Shipping Zones and click Add Shipping Method.
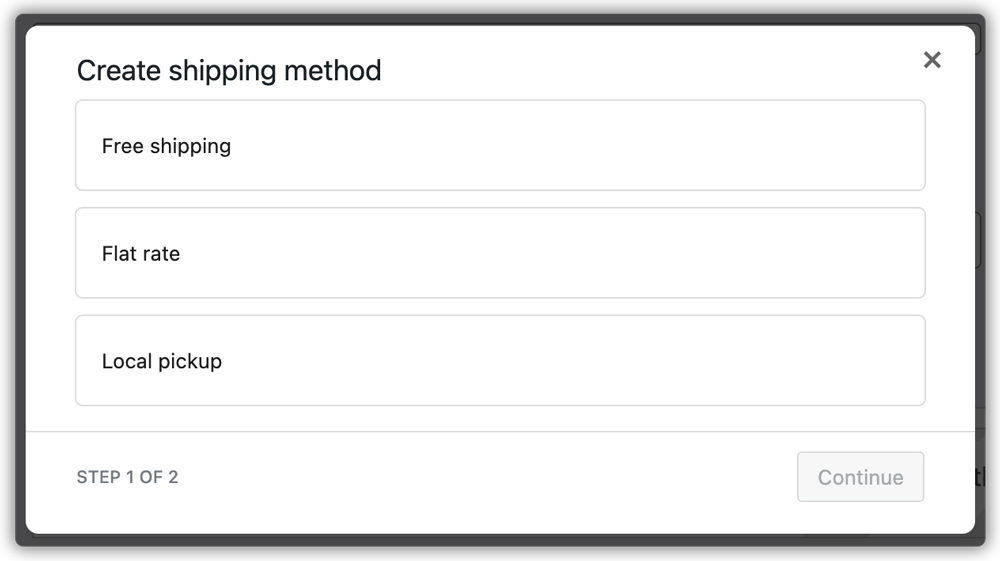
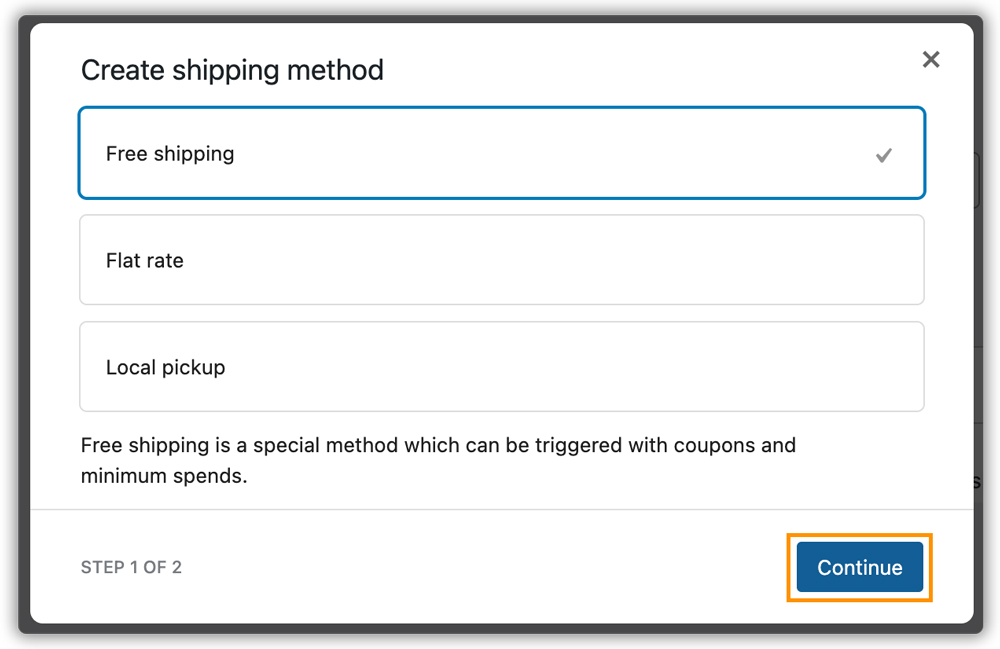
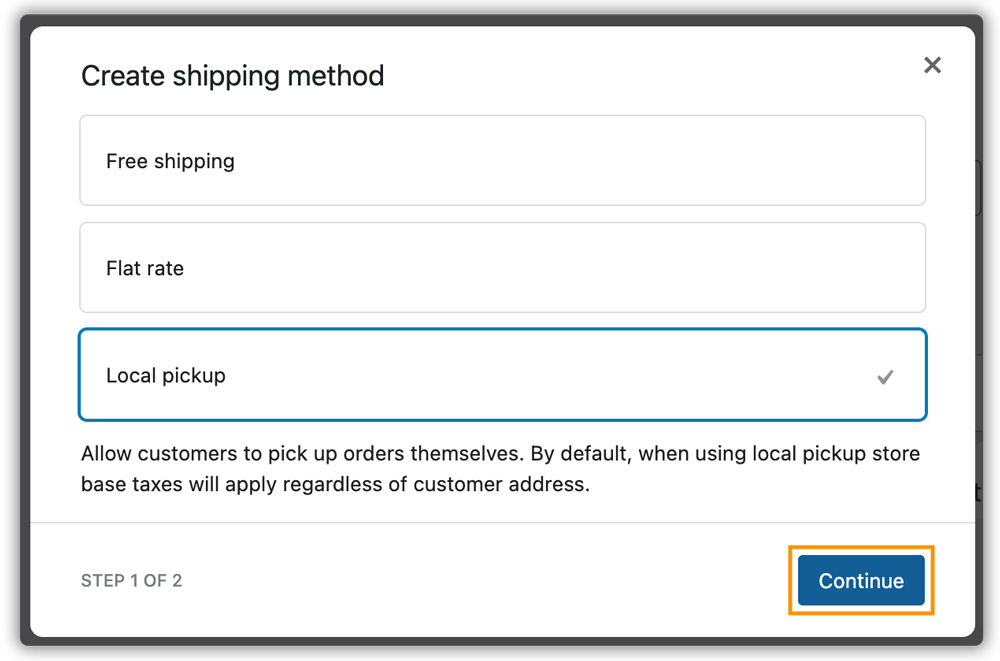
Select one of the three built-in WooCommerce shipping methods:
- Free Shipping
- Flat Rate
- Local Pickup
You can add multiple shipping methods to a single WooCommerce Shipping Zone, and customers will be able to choose between them at checkout based on their preferences.
Flat Rate Shipping
Flat Rate shipping charges a fixed, predetermined amount per order or item, regardless of the actual carrier cost. Store owners commonly use this shipping method in a WooCommerce Shipping Zone because they can set it up easily and customers can understand it without confusion. You can calculate the flat rate amount based on parameters such as product type, destination address, product weight, and product dimensions.
To configure Flat Rate shipping for a WooCommerce Shipping Zone, go to the zone’s shipping methods, click Add Shipping Method, select Flat Rate, and then click Continue to open its settings.

The key fields in the Flat Rate settings are:
- Method Title: This will, by default, appear as Flat Rate. Otherwise, enter Flat Rate in the corresponding box. This will be reflected in the Cart/Checkout page in the shipping calculator.
- Tax Status: Here, select whether the Flat Rate shipping method is taxable or not. There are two options:
- Taxable: This option specifies that the flat rate shipping for that particular zone is taxable.
- None: This option specifies that the Shipping costs will not include taxes.
- Cost Here, enter the Flat Rate shipping cost (excluding taxes). There are three placeholders that you can use alternatively to customize the Flat Rate shipping cost based on different conditions:
- [qty] – If you require a shipping cost calculation based on the number of items, for example, $10 * [qty], it will calculate the shipping cost based on the number of products in the cart and multiply it by the flat rate cost of $10.
- [cost] – If you require a shipping cost calculation based on the total cost of items For Example, $10 * [cost], will calculate shipping cost based on the cart subtotal and multiply it by the flat rate cost of $10.
- [fee percent = “10” min_fee = “20” max_fee = “”] for percentage based fees
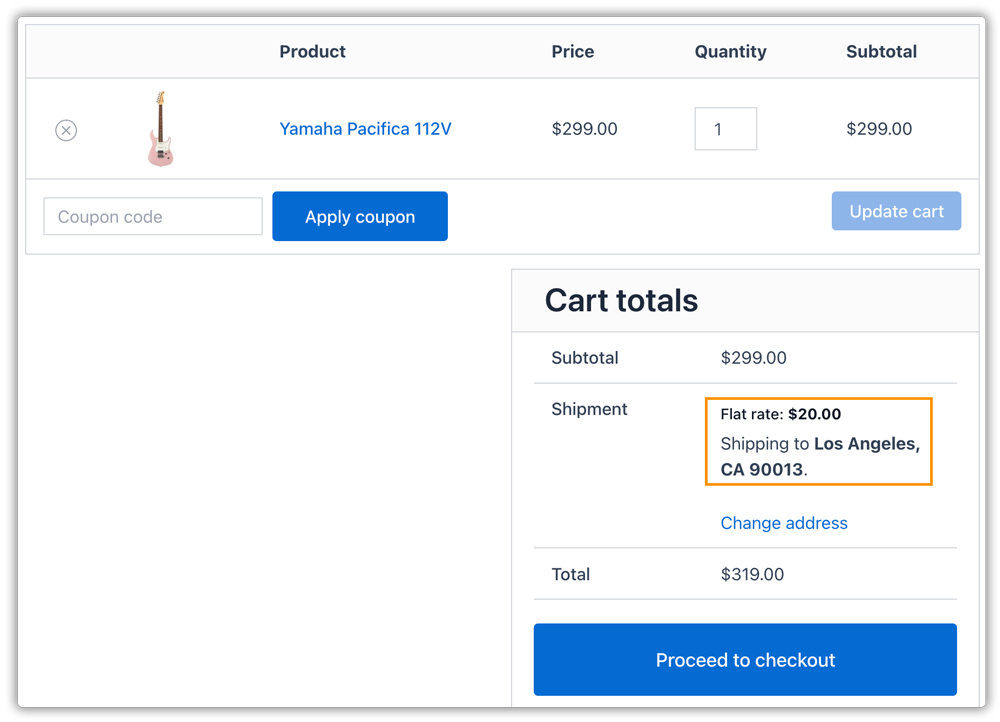
Example: The screenshot below shows a Flat Rate cost of $20 displayed on the cart page after the zone and shipping method have been configured.

Setting Up Flat Rate Shipping Based on WooCommerce Shipping Classes
Within a WooCommerce Shipping Zone, you can configure different flat rate costs for different WooCommerce Shipping Classes. This section appears automatically in the Flat Rate settings when you define shipping classes in your store.
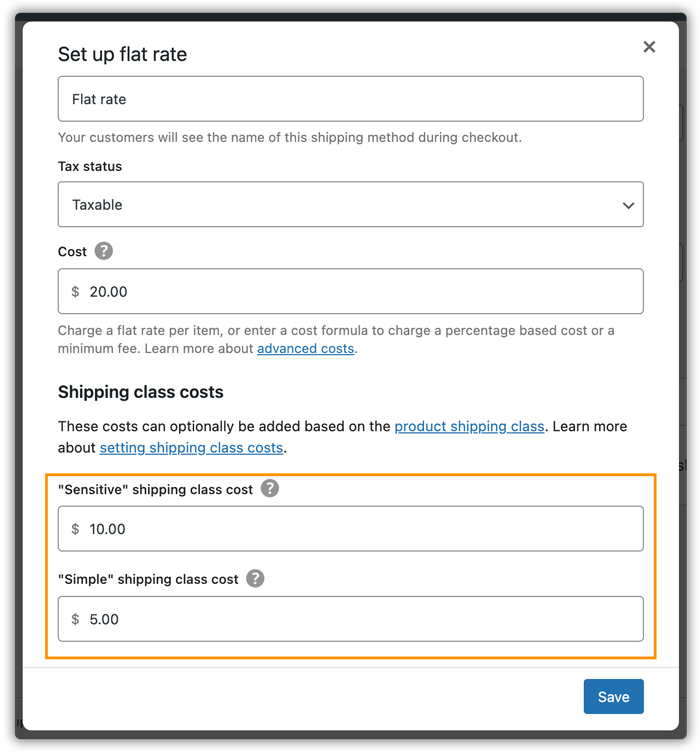
Apart from shipping class options, the other available options in this section are:
- No Shipping Class Cost — Define a fallback cost for products that do not belong to any shipping class.
- Calculation Type — Determines how shipping class costs are totalled for an order. Use the dropdown to select one of the following options:
- Per Class — Charge shipping for each shipping class individually: The store calculates shipping costs separately for each shipping class in the cart and adds them together to determine the total shipping cost.
- Per Order — Charge shipping for the most expensive shipping class: The store charges shipping based only on the most expensive shipping class in the cart, keeping the total shipping cost lower for mixed-product orders.

Free Shipping
You can enable Free Shipping as a conditional shipping method within a WooCommerce Shipping Zone when customers meet specific requirements, such as a minimum order amount, a valid coupon code, or both. It is a popular method for incentivising larger purchases and improving conversion rates in your store.
To add Free Shipping to a WooCommerce Shipping Zone, click Add Shipping Method, select Free Shipping, and click Continue to configure its settings.
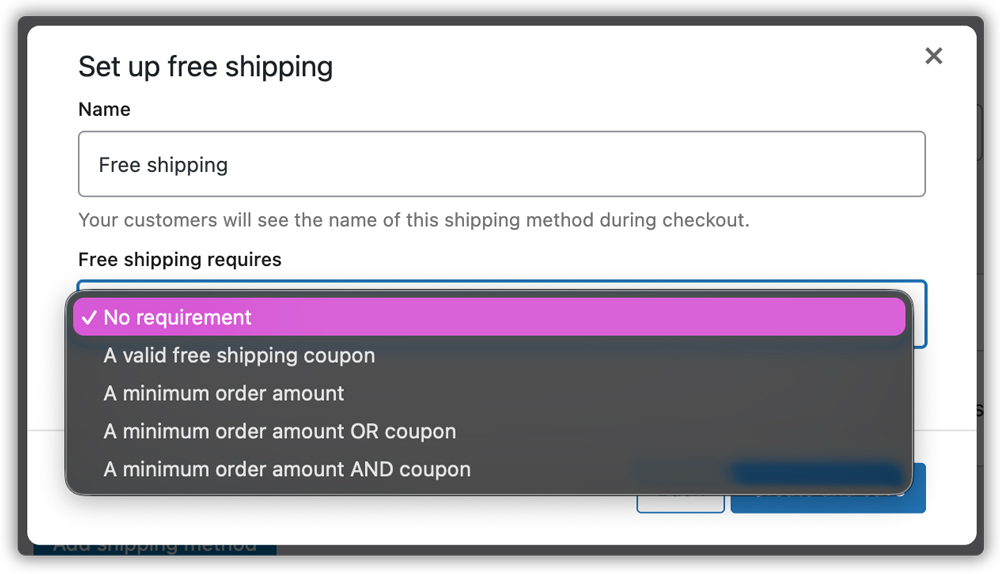
The Free Shipping method has three configuration fields:
- Title — The label displayed on the cart and checkout page. This defaults to “Free Shipping” and can be customised as needed.
- Free Shipping Requires — The condition that must be met for free shipping to be available. The options are:
- N/A — No condition required; free shipping is always available in this zone.
- A valid free shipping coupon — The customer must apply a free shipping coupon code at checkout.
- A minimum order amount — The cart subtotal must reach a defined threshold before free shipping is unlocked.
- A minimum order amount OR a coupon — Either condition satisfies the requirement.
- A minimum order amount AND a coupon — Both conditions must be satisfied simultaneously.
Click Save Changes to apply the Free Shipping settings to the WooCommerce Shipping Zone.
Example: The screenshot below shows a minimum order amount of $200 configured for Free Shipping in the zone settings.
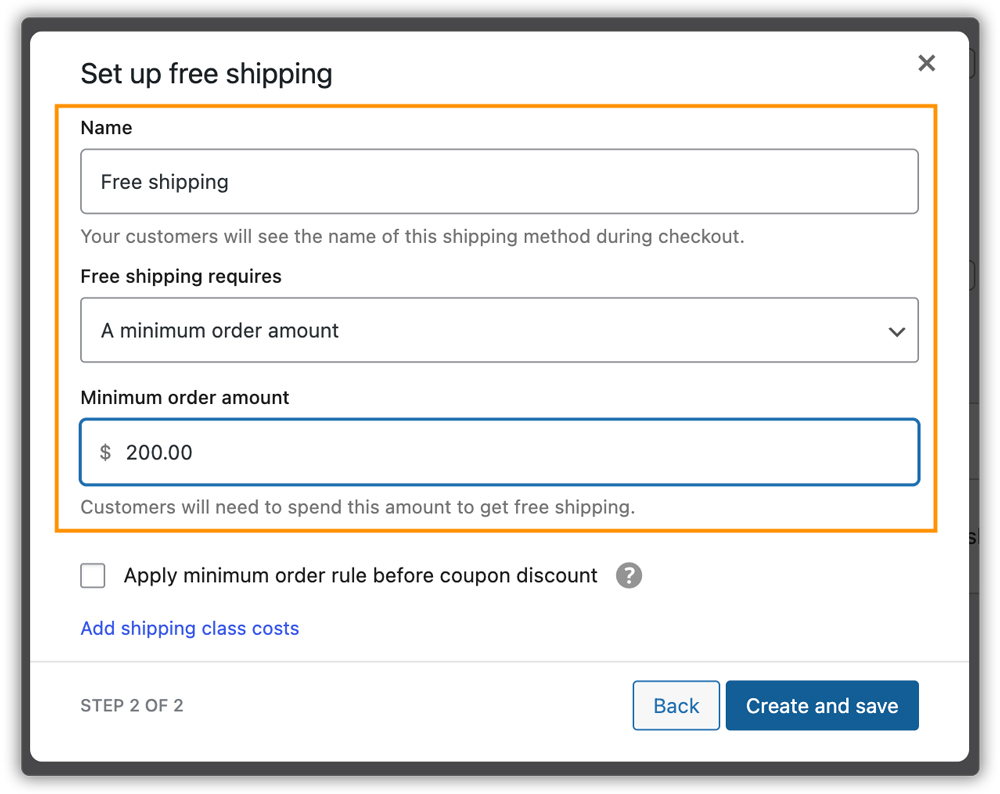
Once the order reaches a minimum amount of $200, the store displays the Free Shipping option to customers on both the cart and checkout pages, as shown below.

Local Pickup
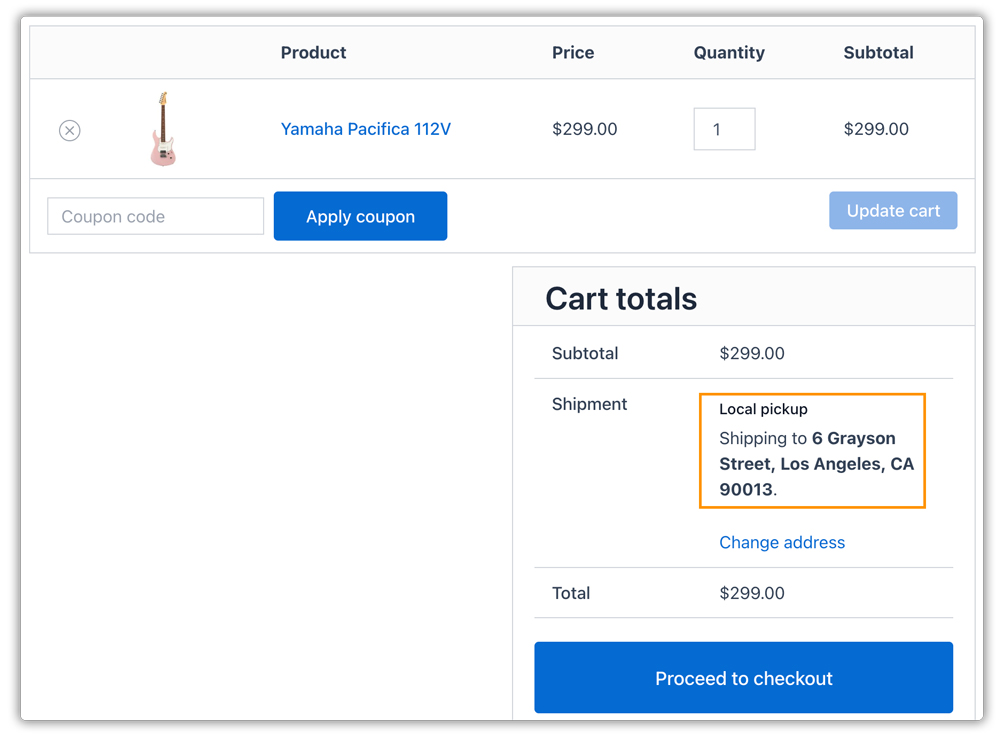
Local Pickup is a shipping method that allows customers to collect their orders directly from your store or a designated pickup location. When you enable this method in a WooCommerce Shipping Zone, the store applies tax rates by default, regardless of the customer’s billing address. You can also offer local pickup at no cost if preferred.
To add Local Pickup to a WooCommerce Shipping Zone, click Add Shipping Method, select Local Pickup, and click Continue.
The Local Pickup method has three configuration fields:
- Title: This will by default appear as Local Pickup. Otherwise, enter the title Local Pickup. This will reflect in the Cart/Checkout page of the store under Shipping Options.
- Tax Status: If the store owner wants to apply a tax rate for local pickup, he can set it up here. There are two options here:
- Taxable: Here, store tax rates will apply regardless of the customer’s shipping address
- None: You can select this option if the store owner wishes to waive taxes on local pickup or local pickup charges altogether
- Cost: This is an optional cost that the store owner can set for local pickup
Click Save Changes to apply the Local Pickup settings to the WooCommerce Shipping Zone.
Example: The screenshot below shows Local Pickup configured for the US shipping zone, displayed as an option on the cart page.
Note: A single WooCommerce Shipping Zone can support multiple shipping methods simultaneously. This means you can also configure both Flat Rate and Free Shipping within the same zone by editing the shipping method.
Conclusion
WooCommerce Shipping Zones allow store owners to precisely control how they present shipping rates to customers based on their location. By creating zones and assigning the right combination of Flat Rate, Free Shipping, and Local Pickup methods, you can build a shipping strategy that is both customer-friendly and cost-effective for your business. For more advanced shipping needs — such as live carrier rates or multi-vendor shipping — explore the related resources below.
- Complete WooCommerce Shipping Guide
- WooCommerce Shipping Classes — How to Set Up and Use
- Choosing the Best Shipping Carrier for Your WooCommerce Store
- Top 10 Plugins for Your WooCommerce Store
FAQs
Q. What happens if a customer’s address does not match any WooCommerce Shipping Zone?
WooCommerce includes a default “Rest of the World” zone that automatically applies to any customer address not covered by your defined zones. You can add shipping methods to this zone to ensure all customers receive a shipping option at checkout.
Q. Can I add multiple regions to a single WooCommerce Shipping Zone?
Yes. A single WooCommerce Shipping Zone can include multiple countries, states, or postcode ranges. This is useful when you want to offer identical shipping rates across several locations without creating separate zones for each.
Q. Can I use carrier-calculated rates like UPS or FedEx within a WooCommerce Shipping Zone?
Yes. Third-party shipping plugins such as the WooCommerce shipping plugins by PluginHive allow you to display real-time carrier rates from UPS, FedEx, USPS, and other carriers within a WooCommerce Shipping Zone. These plugins integrate with your zone settings and show live rates based on the customer’s address and order weight.
Q. Can two WooCommerce Shipping Zones overlap in their regions?
No. Each customer address can only match one WooCommerce Shipping Zone. WooCommerce applies the most specific zone that matches the customer’s address — for example, a zone set to a specific state will take priority over a zone set to the entire country.
Q. Can I create advanced shipping rules based on weight, price, or quantity in a WooCommerce Shipping Zone?
Yes. By default, WooCommerce offers limited rule-based shipping options. However, you can use the WooCommerce Table Rate Shipping Pro Plugin to create advanced shipping rules for shipping zones. This plugin lets you define rates based on weight, cart total, quantity, destination, and more, giving you full control over how shipping costs are calculated for different scenarios.