
Connecting UPS to your WooCommerce store always starts with one thing: your UPS account number. Whether you’re setting up live rate calculations, printing shipping labels, or scheduling carrier pickups, the store needs a valid UPS account number to authenticate with the UPS API. Without it, nothing works. The problem is that many WooCommerce store owners aren’t sure where this number is stored, especially if someone else set up the UPS account originally, or it’s been a while since you last logged in.
This guide covers all methods for finding your UPS account number and entering it correctly in WooCommerce when integrating UPS.
On This Page
- What Is a UPS Account Number
- How to Find Your UPS Account Number for WooCommerce
- How to Connect a UPS Account to a WooCommerce Store
- Steps to Integrate Your UPS Account in WooCommerce
- Conclusion
- FAQs
What Is a UPS Account Number?
A UPS account number is a six-character alphanumeric identifier, something like A1B2C3, assigned to your UPS shipper account when you register as a business shipper. Every label, rate request, and pickup you make through UPS is tied to this number. It also carries your negotiated rates; if UPS has given you volume discounts, they’re attached to this account number and only apply when you ship under it.
How to Find Your UPS Account Number for WooCommerce
Method 1: UPS Online Account (Fastest)
This is the most reliable method. Log in to your account at ups.com, then:
- Click on your name or account icon at the top right.
- Select My UPS from the dropdown.
- Go to Account Summary.
- Your six-character UPS account number appears at the top of the page next to your business name.
Method 2: UPS Invoice
Your UPS account number is printed on every UPS invoice, typically in the top-right area under “Account Number” or “Shipper Number.” If you have a recent invoice in your email or filing system, this is the second-fastest option.
Method 3: Original UPS Registration Email
When you first opened your UPS account, UPS sent a confirmation email with your account details. Search your inbox for emails from UPS with subject lines like “UPS Account Confirmation” or “Welcome to UPS.” Your account number is included in that email.
Method 4: Contact UPS Support
If you’ve lost access to your UPS login and don’t have an invoice, call UPS Customer Service. Have your registered business name, address, and email ready. UPS will verify your identity and provide your account number.
How to Connect a UPS Account to a WooCommerce Store
WooCommerce does not connect to UPS natively. To get live UPS rates at checkout, generate labels, or schedule pickups from inside WooCommerce, you need to link your UPS account to your store through a shipping plugin.
The connection requires three things:
- Your UPS account number
- Your UPS API credentials
- Your store’s origin address
Once those are in place, you can integrate your UPS account in WooCommerce using the WooCommerce UPS Shipping Plugin with Print Label, which communicates directly with the UPS API, pulls rates in real time for every checkout, and generates authenticated labels without you ever visiting UPS.com.
Steps to Integrate Your UPS Account in WooCommerce
After installing the WooCommerce UPS Shipping Plugin with Print Label, follow these steps to connect your UPS account:
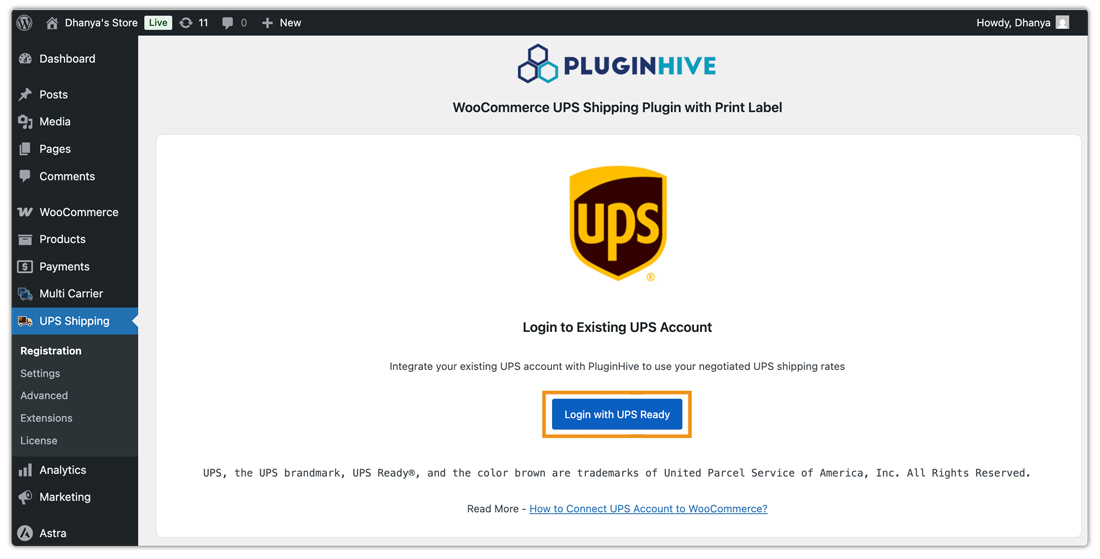
Navigate to UPS Shipping > Registration in your WooCommerce dashboard.
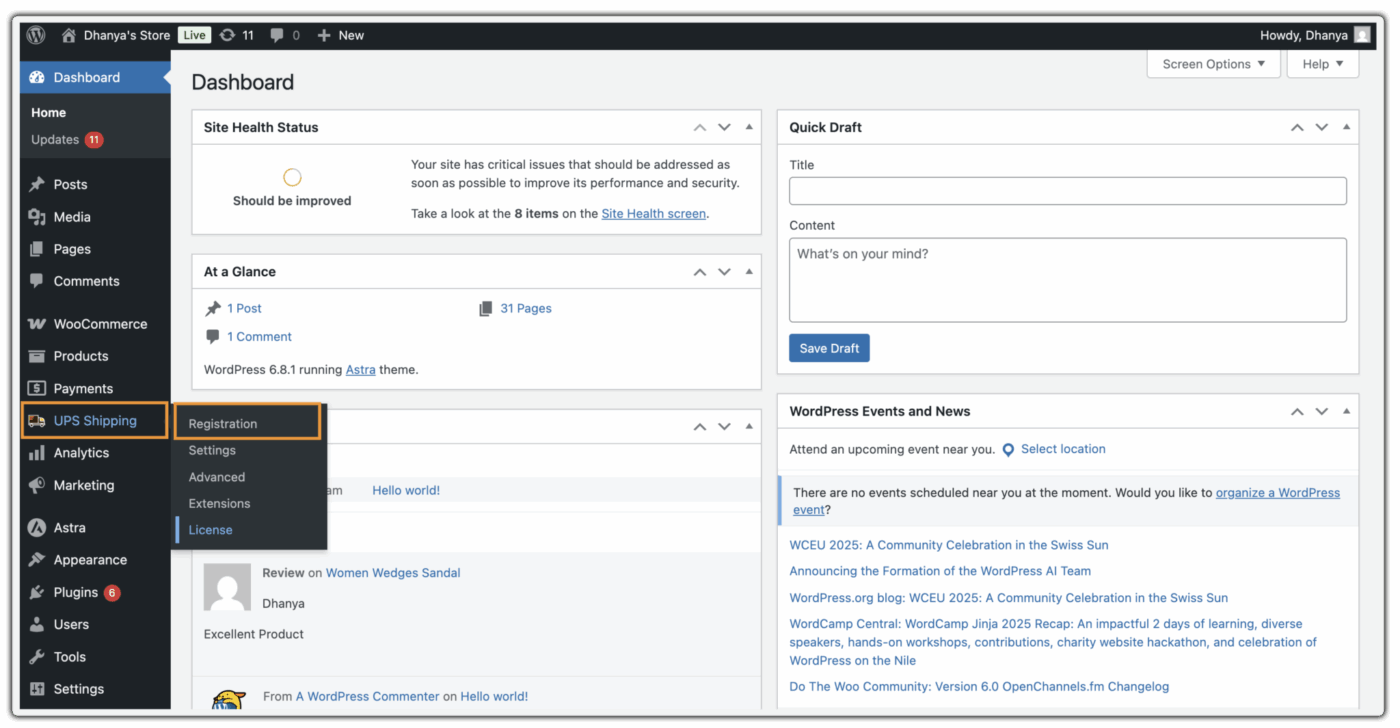
After reviewing the UPS registration information, continue to click on Register with UPS Ready. Then, log in using your UPS Account Number, UPS Username, and Password to authorize the integration.
After successful registration, your WooCommerce store will be able to display live UPS shipping rates, generate shipping labels, and access UPS shipping services directly from your dashboard.

If you ever need to update your UPS account connection, use the Remove & Re-Register option inside the plugin settings and repeat the same process.

For a complete setup walkthrough, refer to the UPS Shipping Plugin Setup Guide .
Conclusion
Your UPS account number is the key that unlocks the full UPS shipping experience in WooCommerce — starting from real-time rates display to order tracking. It takes under a minute to find once you know where to look. Once connected through the WooCommerce UPS Shipping Plugin, your WooCommerce store handles UPS shipping automatically.
For any type of setup help, reach out to PluginHive Support.
FAQs
Q. Can I use the WooCommerce UPS plugin without a UPS account number?
No. The WooCommerce UPS Shipping Plugin with Print Label requires a valid UPS account number to authenticate with the UPS API. Without it, the plugin cannot fetch live shipping rates, generate shipping labels, or access UPS shipping services.
Q. Can I have multiple UPS account numbers for one business?
Yes. Many businesses use multiple UPS account numbers for different warehouses, shipping locations, or billing purposes. You can connect the required account to your WooCommerce store, depending on where orders are fulfilled from.
Q. What happens if I enter the wrong UPS account number?
If the account number is incorrect, the plugin will fail to authenticate with UPS. This can prevent live shipping rates, label generation, and pickup scheduling from working properly.
Q. Do I need a UPS online login along with the account number?
Yes. Along with your UPS account number, you also need your UPS login credentials and API authorization to connect WooCommerce with UPS services.
Q. Can I change my UPS account later in WooCommerce?
Yes. You can disconnect the existing UPS account using the Remove & Re-Register option in the plugin settings and connect a different UPS account anytime.