In an increasingly digital world, businesses that haven’t transitioned to an eCommerce model trail far behind others that have. Shopify businesses are ubiquitous today and are a massive part of the present global business landscape.
Most of us have either experienced shopping on an online store, currently own one, or plan to build an eCommerce business sometime in the future. With a few handy tools at our disposal, anyone can set up a Shopify business in no time.
Most people find it exhilarating to think of their own Shopify store while others may dread the entire idea. While we may have the basics down to a tee, figuring out the nitty-gritty and minute details that go into running an eCommerce platform is easier said than done. However, Shopify makes getting up and running an absolute breeze.
This guide aims to help all aspiring eCommerce entrepreneurs and business owners looking to start and manage an online Shopify business. By the end of this detailed guide, you’ll know the benefits of choosing Shopify, what you’ll need to set up your store, the cost breakdown, and the steps to follow to set up your first Shopify store.
On this Page
- What is a Shopify Business?
- Why Build A Shopify Business?
- What Are The Costs Of Starting A Shopify Business?
- 10 Steps To Start A Shopify Business
What is a Shopify Business?
Shopify is the world’s most popular eCommerce website builder, and with over two million daily active users, it is the tool of choice for any small or medium business to set up shop on the internet. Over 1.7M+ merchants chose to sell online using the Shopify platform. The best part of Shopify is its ease of operation. New users can build an eCommerce website from scratch without any prior knowledge of design or coding.
With straightforward monthly pricing, Shopify provides aspiring store owners with all the tools they require to build, launch, and organize their online business from the backend and the front.
This means Shopify can even help with inventory management and uploading, checkout methods, help set up payment gateways, and even help market your business to the world. While it isn’t the only website offering this service, it is certainly the most trusted in the world.
Users on existing platforms such as Wix or OpenCart can also easily complete a smooth Shopify Plus migration using its built-in migration management tools
Why Build A Shopify Business?
Traditional eCommerce websites can end up costing thousands to hundreds of thousands of dollars to build and maintain. While this is a worthwhile investment for the Amazons and eBays amongst us, this initial start-up cost is too steep for small businesses.
Shopify presents a ready-to-go version of the website they desire and costs far less than what a traditional eCommerce site would.
The eCommerce hosting platform also has several other advantages going for it. Some of them include:
- Shopify has a vast array of tools for designing and customizing an eCommerce site
- They have mobile-friendly templates for websites
- Allows for easy dropshipping setups
- Users can easily set up AMPs (Accelerated Mobile Pages)
- Has a robust and efficient order fulfillment solution
- Their point-of-sale app is considered to be one of the best in the industry
And let’s not forget that Shopify is one of the largest eCommerce platforms in the world today. The website comes with a whole host of plugins, payment solutions, and gateways, and includes Shopify Payments, Point of Sale (POS), etc.
What’s more, is that the platform also offers the best shipping services (Shopify Shipping) at little or no extra cost. Third-party apps can also be integrated easily into their store.
Finally, Shopify is unique in its ability to enable cross-channel selling. This system allows users to integrate their Shopify stores into other sales channels to increase turnover and drive conversion.
Shopify can integrate with Facebook, Instagram, TikTok, and other social media networks, and users can use these platforms to reach bigger and global audiences and convert their followers into customers. Even if they use a tweet scheduler, it can help users reach a wider audience.

Whether your business is related to selling athletic clothes, music equipment, or even providing car brake services, you’ll know exactly where to sell them and how to do it the right way.
Shopify has a lot going for it, but it’s also important to understand its shortcomings before signing up for any of its plans or packages. Consider exploring alternatives to Shopify if you’re looking for more advanced features,
What Are The Costs Of Starting A Shopify Business?
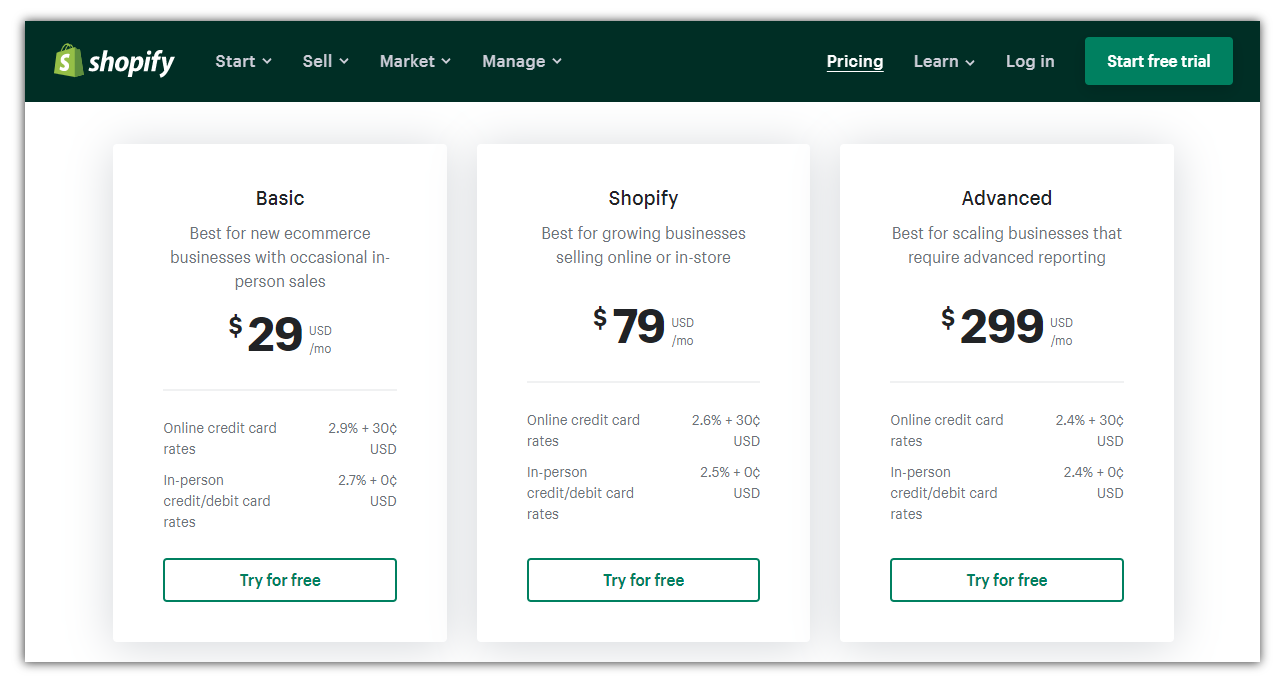
The costs of starting a Shopify business can depend on several things, primarily of which are your needs and budget. Shopify has different plans for businesses with varying budgets and requirements. They also offer a 14-day free trial period to allow users to test the platform and see if it meets the specific needs of their business.
Here are the different pricing plans offered by Shopify:
I. Shopify Lite
The cheapest Shopify plan costs $9 a month. Best for existing websites as it does not come with a Shopify app store and only offers a few additional Shopify features.
II. Basic Shopify Plan
The Basic plan costs $29 a month plus a 2.9% charge and $0.30 in fees per transaction. It also comes with a standalone Shopify store and is the cheapest plan in the bunch to bundle it.
III. Standard Shopify Plan
This plan costs $79 a month plus 2.6% and $0.30 per transaction. It has more available features when compared to the previous plans.
IV. Advanced Shopify Plan
The Advanced plan runs at $299 a month plus 2.4% and $0.30 per transaction. It also has the most features and even ones that are not available in the basic and standard plans.
V. Shopify Plus
Starting at $2000 a month, this plan is meant for large-scale enterprises. It has unique tools and comprehensive solutions for the peculiar needs of a large business.
And if you would like a “.com” suffix with your domain name, factor in the $14 that you would need to pay every year. Shopify has a whole catalog of free themes, but if you’d like something unique, premium Shopify theme options cost additional money. Third-party integrations with apps and services can also cost you extra.
10 Steps To Start A Shopify Business
The biggest reason for Shopify’s popularity, especially among beginner,s is the ease of setting up a new store and running an online store in a matter of minutes. Gone are the days when eCommerce stores required months of planning, dividend calculations, huge budgets, and staff augmentation to manage access workloads.
Let’s now see what setting up a new Shopify website entails and how you can do the same in a few steps. Follow along with these steps that will help your business get up and running in no time
1. Preliminary Research
Like with any other business, conducting sufficient market and brand research is vital to ensure the success of your business. With thousands of brands already on Shopify, you need to ensure yours stands out from the rest.
This planning will include:
- Your business name
- The products you wish to sell
- Determining the USPs
- Conducting ample SEO research to know how to better target them to your audience
- A logo
- Product images
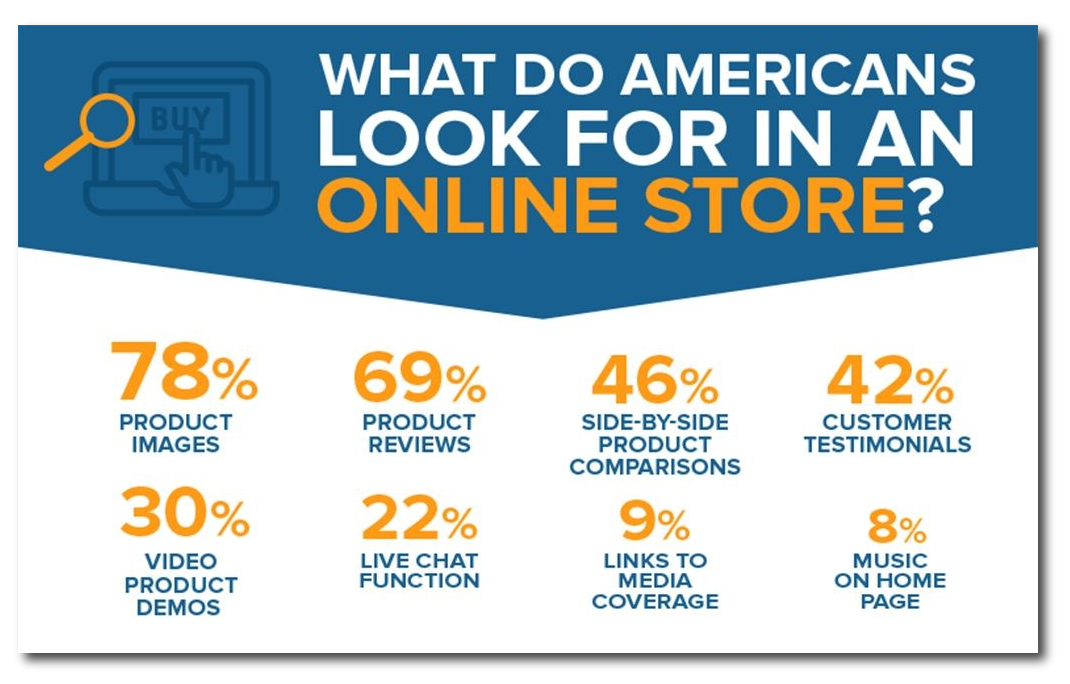
Don’t miss out on product images. Customers need to see what they’re purchasing and adding product descriptions can help them make a purchase decision.
2. Create A Shopify Account
Once you’ve completed your research, create your Shopify account. Enter the desired email address and the password you’ll be using, and proceed to set up your store. Next, you will be requested to fill in a name for the store.
Make sure the name you select is unique, or you won’t be able to purchase domains on Shopify. Do not pick generic names for your store. For instance, if you’re planning on selling fitness gear or workout supplements and drinks, see what everyone else is calling themselves and use a separate name. Don’t use common names like “Fitness Planet”, etc.
Once done, Shopify will ask you for additional details about yourself and your store. This information will be used to configure currencies and taxes for you.
3. Add Products
Next up, you will need to add products to your store. To do this, simply click on the Products tab and select “Add Products”.
Once you’ve added the relevant items to your product page, you will have to add information about them, such as a product image, title, price, and description. This information will help your customers understand the products better and make an informed decision when purchasing.
It is also advised to look for a premium Amazon repricing tool if you’re getting your products dropshipped from Amazon.
Adding labels to better organize your products is also a good practice. Use labels for:
- Product availability
- Vendor tags
- Product Type
- Collections
These labels will help you better group your products and make it easier for customers to locate them.
4. Add Important Pages
Once the products are added, the next step is to add extra pages to your website. Some of the most important pages to keep in mind are
- Contact Us
- About Us
- FAQs
- Blog
- Privacy Policy
- Terms of Service
- Delivery Information
Expert Opinion: If you plan to run Google ads, you will need a privacy policy page. Shopify lets you generate a privacy policy for free once you input your address and email.
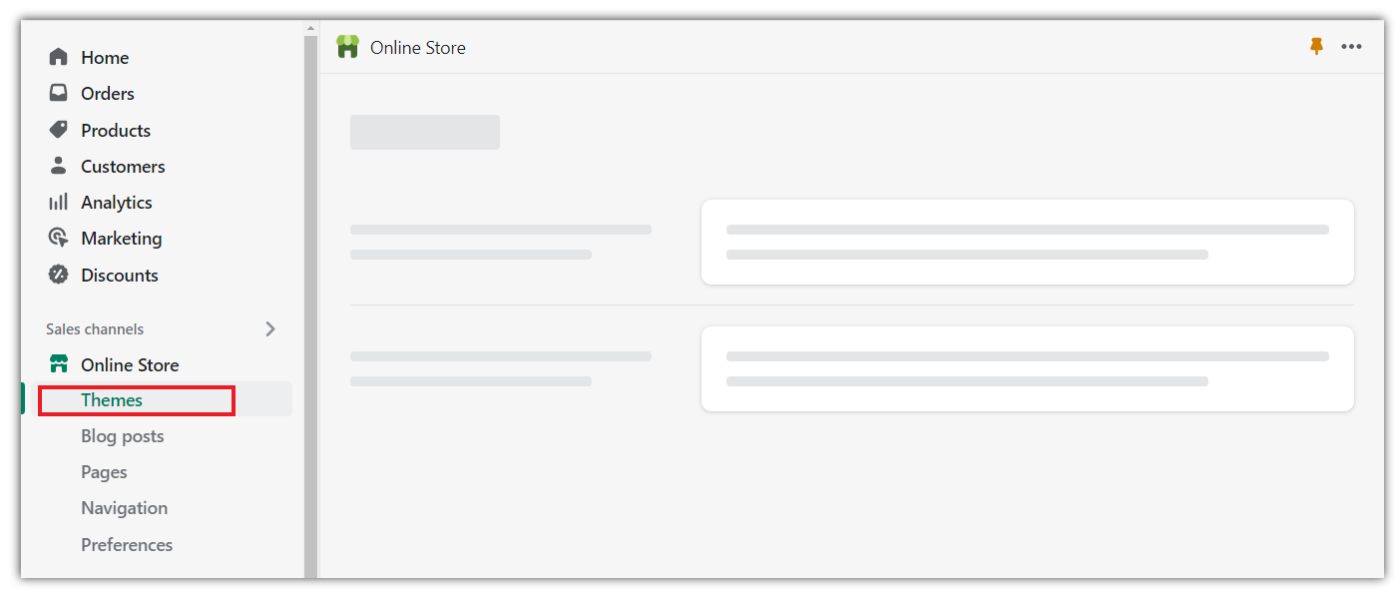
5. Pick A Theme And Customize Your Store
With the basics underway, the next thing to do is build your storefront and customize its appearance. To do that, look for the Online Store tab and select “Themes” under it. Select a high-quality theme you prefer, and from the theme store, you can further customize it to suit your website’s unique look and feel. Shopify has free and paid themes to suit a variety of business types.
Once you’re happy with your theme selection, you can always fine-tune it to make adjustments to the homepage. Some themes may even add additional functionality, so play around with all the settings and elements to see which ones you’d like. You can even experiment with changing Shopify fonts and colors on the site to match your brand.
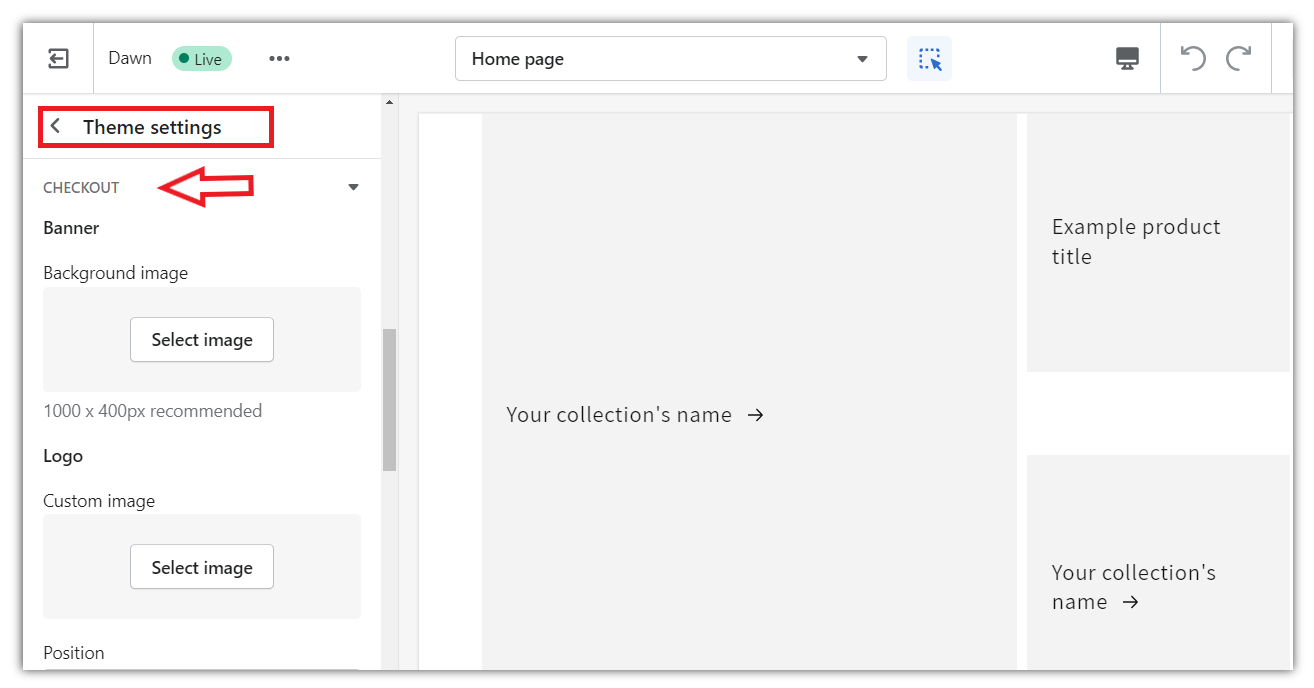
6. Customize The Checkout Page
The checkout page is a vital component of the website and needs to be modified as per the theme and requirements for your store. To do this, go to the Theme Settings tab and select “Checkout”.
No complex scripts would be necessary at this step, and you can even have specific functions like tipping from your customers enabled here, or requiring your customers to check out using their emails. The latter will make it easier to reach through email marketing.
7. Set Up Shipping
Shipping is a crucial aspect of any eCommerce business, and while Shopify makes configuration easy, it shouldn’t be left on the default settings. A lot of factors go into fine-tuning it precisely. These variables include:
- Product weight
- Packaging costs
- Shipping destinations
- Carrier rates
- Marginal profits
To do this, click the Settings tab and select “Shipping”. You can even opt for a third-party delivery company like FedEx if you wish to select a personalized option. If you have custom packaging for your items, you can enter the specifications for them on this page, too.
Additionally, third-party shipping apps can help automate the shipping process for your Shopify business:
- PH Multi-Carrier Shipping Label App – Supports 70+ shipping carriers, including FedEx, UPS, Canada Post, and more, making it ideal for businesses using multiple carriers.
- Ship, Rate, and Track– Best suited if you’re shipping primarily with FedEx, offering real-time rates, label printing, and tracking.
- Australia Post App – Perfect for businesses shipping within or from Australia, streamlining rates, label generation, and tracking with Australia Post.
These apps simplify order fulfillment by automating shipping rates, labels, and tracking, making your process more efficient.
Expert Opinion: Shopify allows users to set up free shipping for their store.
8. Configure Taxes
Like any other business that makes a profit, a small amount has to be remitted to the government on each sale. While this process can seem incredibly daunting at first, most people would be happy to learn that Shopify handles the entirety of this process for you.
The eCommerce platform automatically uses a worldwide sales tax rate and suggests the taxes applicable for each sale.
But even though Shopify’s automated solution works great most of the time, we still advise you to do your research or consult the services of a tax professional to double-check whether you’re paying the correct amount of taxes. You may also consult your local tax office for this information.
9. Payment Gateway Setup
This is the final step in your goal to build a functional Shopify store. Without a payment gateway, your website won’t be able to accept payments and process orders. To set this up, navigate to Settings and then select “Payments”.
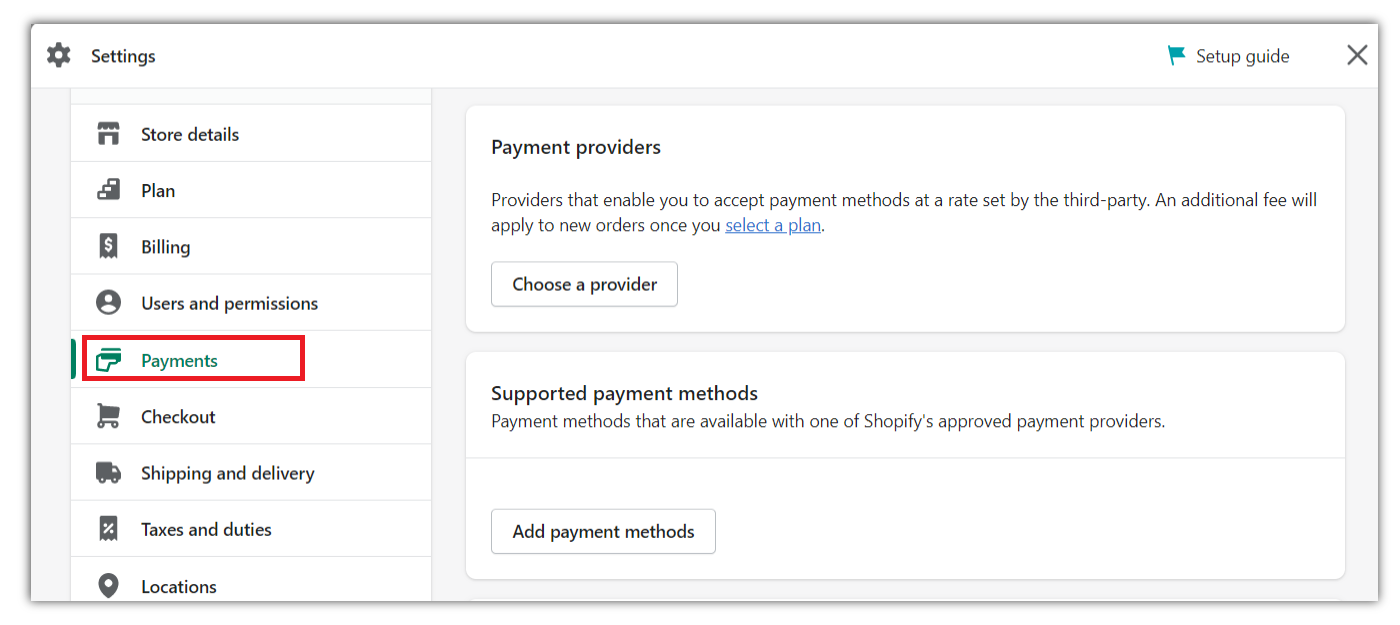
Enter all the necessary details. Setting up is as simple as completing the fields required, and Shopify doesn’t burden you with additional configuration either.
It accepts the most common payment gateway methods, including:
- Visa
- Mastercard
- Most debit and credit cards
- Bank transfers
- PayPal
- Stripe
In total, there are over 100 payment gateways supported on Shopify.
You can even opt for Shopify’s payment gateway, Shopify Payments. With this, you can easily receive payments at no extra cost to you. Once complete, your store is ready for launch.
10. Launch Your Shopify Business
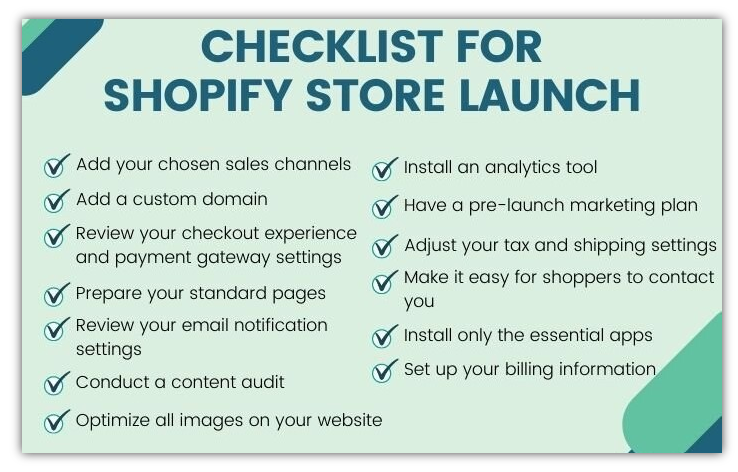
Other than the steps mentioned in our before checklist, there are a few others mentioned in the image above that are worth considering when you launch your store in the world.
Adding a custom domain can be especially helpful when marketing your website online. You may even link an existing domain to your Shopify store, but if you don’t have one, you can always purchase one from the Shopify store. Domains here will cost almost $14 per year for the typical “.com” kind.
Once purchased, it will connect to your store automatically. Purchasing a custom domain is not compulsory. However, if you do not opt for one, your store will run on a Shopify subdomain. If you need expert assistance in setting up or customizing your store, working with a Shopify development agency can streamline the process and ensure a seamless launch
Next, set up analytics. Shopify offers an alternative to popular, mainstream analytics tools that you can use to analyze your online store’s performance and track sales taxes and profits. As your store grows, you can also use Shopify data analytics in Claude to explore sales trends, customer behavior, inventory performance, and other business insights through AI-powered analysis. You even have the option to set up Google Analytics and Facebook Pixel if that’s what you are familiar with or require additional and more in-depth data for better search engine rankings.
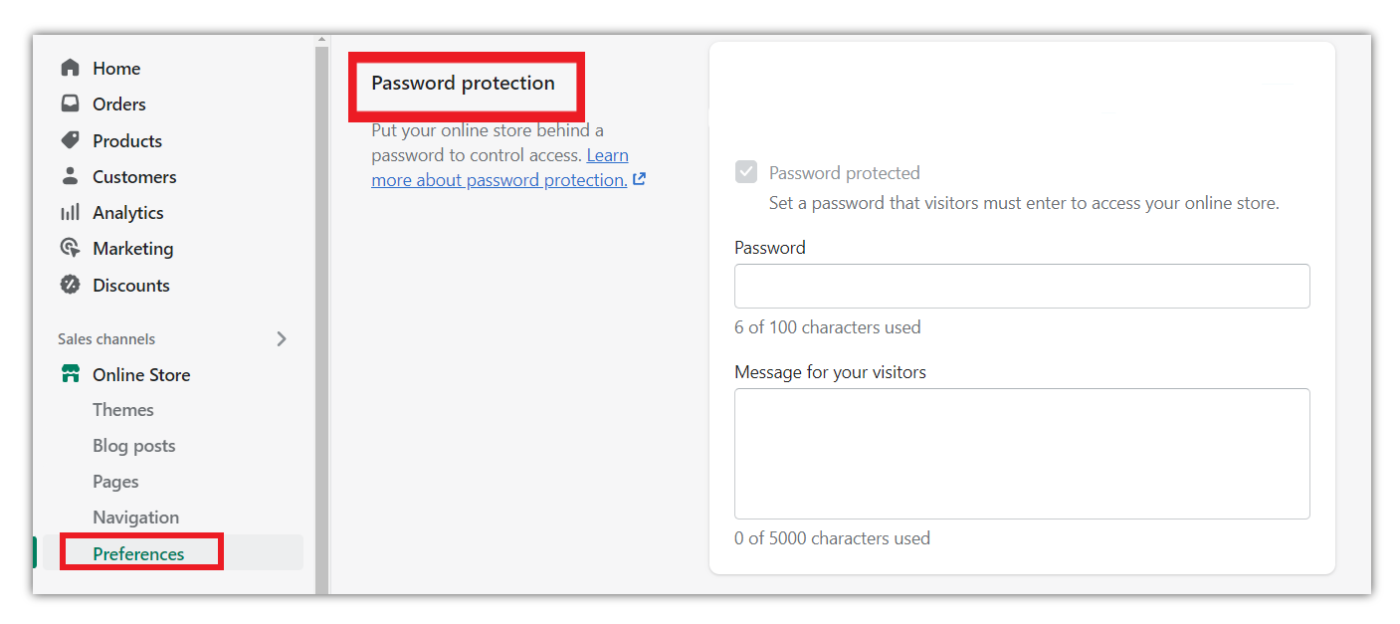
Once all the final touches are underway, you will have completed the development of your custom Shopify eCommerce store. All that remains now is to launch it and make it available to the public. To do this, go to Settings and select the “Preferences” tab.
Scroll down to the bottom of the page and locate a button that removes your password page. Remove the password page, and your website is live.
And that’s about it. An entire online store in record time.
Conclusion
We hope this guide has helped you create and launch your own unique Shopify store from scratch. While the website takes the hassle away from users by automating and speeding up the entire process, it is still an achievement worth celebrating. You are now officially the proud owner of your very own eCommerce store and a Shopify merchant.
All that remains is for you to start profiting from your business venture. We hope that with our extensive guide and Shopify website-building insight, your business can get going on its journey to becoming a prominent member of the eCommerce community.
If you want to push your eCommerce business to new heights, PluginHive is here to help. Visit our site today for more information on starting a Shopify business on social media platforms, the best tools for eCommerce sites, and a lot more.