Getting WooCommerce shipping right is one of the most impactful things you can do for your store. It determines what customers see at checkout, how much you spend on fulfillment, and whether an order actually gets completed. Get it wrong, and customers abandon. Get it right, and it runs in the background without you thinking about it.
This guide walks through the full WooCommerce shipping setup from the initial settings you need to configure to the more advanced scenarios that require an entirely different approach.
Table of Contents
- WooCommerce Shipping Methods
- WooCommerce Shipping Settings
- WooCommerce Shipping Classes
- Common WooCommerce Shipping Scenarios
- WooCommerce Shipping Automation
- Conclusion
- FAQS
WooCommerce Shipping Methods
In WooCommerce, the shipping options shown to customers at the cart and checkout are called shipping methods. These fall into two categories: those WooCommerce includes out of the box and those you add through plugins for more advanced requirements.
Basic WooCommerce Shipping Methods
WooCommerce includes three built-in shipping methods – Flat Rate, Free Shipping, and Local Pickup. These cover the most common scenarios and can be added to any shipping zone directly from WooCommerce > Settings > Shipping > Shipping Zones > Add Shipping Method.

- Flat Rate: charges a fixed amount per order. Works best when your products are consistent in size and weight, and shipping costs don’t vary much.
- Free Shipping: waives the shipping charge when a customer meets a condition – a minimum order amount, a valid coupon, or both. One of the most effective ways to increase average order value.
- Local Pickup: lets customers collect orders from your store or warehouse instead of having them shipped. WooCommerce has two versions of this block-based Local Pickup (recommended for stores on Block Checkout, configured under WooCommerce > Settings > Shipping > Local Pickup) and legacy Local Pickup (added inside a Shipping Zone). Avoid running both at the same time, as it creates duplicate options at checkout.

If you need a step-by-step walkthrough on configuring Flat Rate, Free Shipping, and Local Pickup methods inside shipping zones, check out this detailed guide: WooCommerce Shipping Zones – The Ultimate Guide
Advanced WooCommerce Shipping Methods
When your shipping requirements go beyond the three default methods, you’ll need a plugin. These give you control over rates based on weight, quantity, product type, destination, and more.
WooCommerce Conditional Shipping
Conditional shipping means rates change based on rules you set for cart weight, item quantity, subtotal, shipping class, destination, or a combination. The most powerful plugin for this is PH Table Rate Shipping Pro for WooCommerce, which lets you build unlimited rules across unlimited zones with no code required.
Within Table Rate Shipping, rates can be calculated based on:
- Product weight (per slab or total)
- Number of items in the cart
- Cart subtotal
- Shipping class
- Destination country, state, or postcode
It also includes free add-ons for Per Product Shipping and Bundle Rate Shipping, covering a wide range of scenarios without needing separate plugins.
WooCommerce Carrier Shipping and Live Rates
Live rate plugins connect to carrier APIs and return real-time quotes at checkout based on the customer’s address, the order weight, and package dimensions. Customers see actual carrier services and costs – FedEx Ground, UPS 2-Day Air, USPS Priority Mail and choose what suits them.
PluginHive offers dedicated carrier plugins for:

- FedEx Shipping Plugin for WooCommerce with Print Label – FedEx certified, supports FedEx RESTful API, domestic and international, LTL freight
- WooCommerce UPS Shipping Plugin with Print Label – UPS Ready® certified, real-time rates, label printing, tracking
- PH USPS Shipping Plugin for WooCommerce with Print Label – domestic and international USPS rates, label generation, tracking
- PH DHL Shipping Plugin for WooCommerce with Print Label – DHL Express rates, labels, and tracking
- Canada Post Shipping Plugin for WooCommerce with Print Label – domestic and international rates with label printing and tracking
- PH Australia Post MyPost Business Shipping for WooCommerce – MyPost Business integration with label printing and tracking
- PH Royal Mail Shipping with Tracking for WooCommerce – Royal Mail rates and tracking
If your carrier isn’t listed here, you can browse the full list of WooCommerce shipping plugins on the PluginHive WooCommerce Shipping Plugins page.
If you ship with multiple carriers and want to manage everything from one place, the Multi-Carrier Shipping Plugin for WooCommerce pulls live rates from FedEx, UPS, USPS, DHL Express, and Stamps.com under a single dashboard with built-in flat rate and free shipping rule support alongside carrier rates.
WooCommerce Shipping Settings
Before configuring zones and methods, make sure your store’s base shipping settings are correct. Go to WooCommerce > Settings > General.
Base Location – your store’s ship-from address. This is used for all rate calculations and taxes. Set it to the country and state you actually ship from.

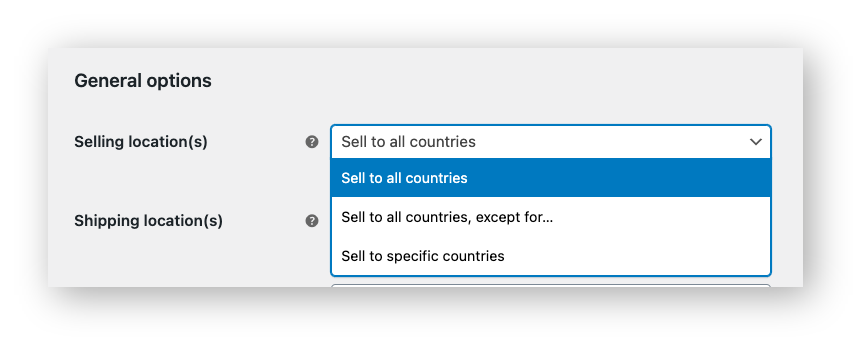
Selling Location – the countries your store sells to:
- Sell to all countries
- Sell to all countries, except specific ones
- Sell to specific countries only
Shipping Location – the countries you ship to (can be different from where you sell):
- Ship to all countries you sell to
- Ship to all countries
- Ship to specific countries only
- Disable shipping and shipping calculations

Default Customer Location – how WooCommerce estimates rates and taxes before a customer enters their address:
- No location by default – nothing is calculated until the customer provides an address
- Shop base address – uses your store location as the assumed delivery point
- Geolocate – estimates the customer’s location using their IP address
- Geolocate (with page caching support) – same as above, but compatible with cached pages

After saving these, go to WooCommerce > Settings > Shipping to configure your zones, options, and methods.
WooCommerce Shipping Zones
A WooCommerce Shipping Zone is a geographic region you define in your settings. When a customer enters their delivery address at checkout, WooCommerce matches it to a zone and displays only the methods assigned to that zone.
To create a zone, go to WooCommerce > Settings > Shipping > Shipping Zones > Add Zone.

Each zone requires:
- Zone Name – a label to identify it, e.g., “United States”, “Europe”, “Rest of World”
- Zone Regions – the countries, states, or postcodes that belong to this zone
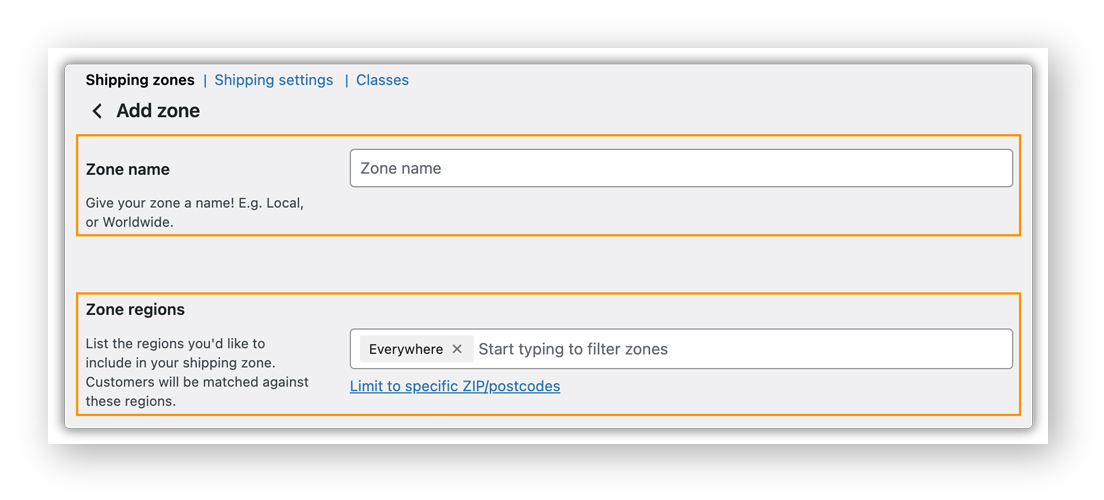
Once saved, click Add Shipping Method inside the zone to assign methods to it. You can add multiple methods to a single zone customers will see all of them and choose. WooCommerce includes a default “Locations not covered by your other zones” fallback. Always assign at least one method here so customers outside your defined zones have an option at checkout.
If you want a more detailed walkthrough of how shipping zones work and how to configure them for different store setups, check out this complete guide on WooCommerce Shipping Zones: WooCommerce Shipping Zones – The Ultimate Guide.
WooCommerce Shipping Options
Under WooCommerce > Settings > Shipping > Shipping Settings, configure how rates are displayed and which address is used for delivery.
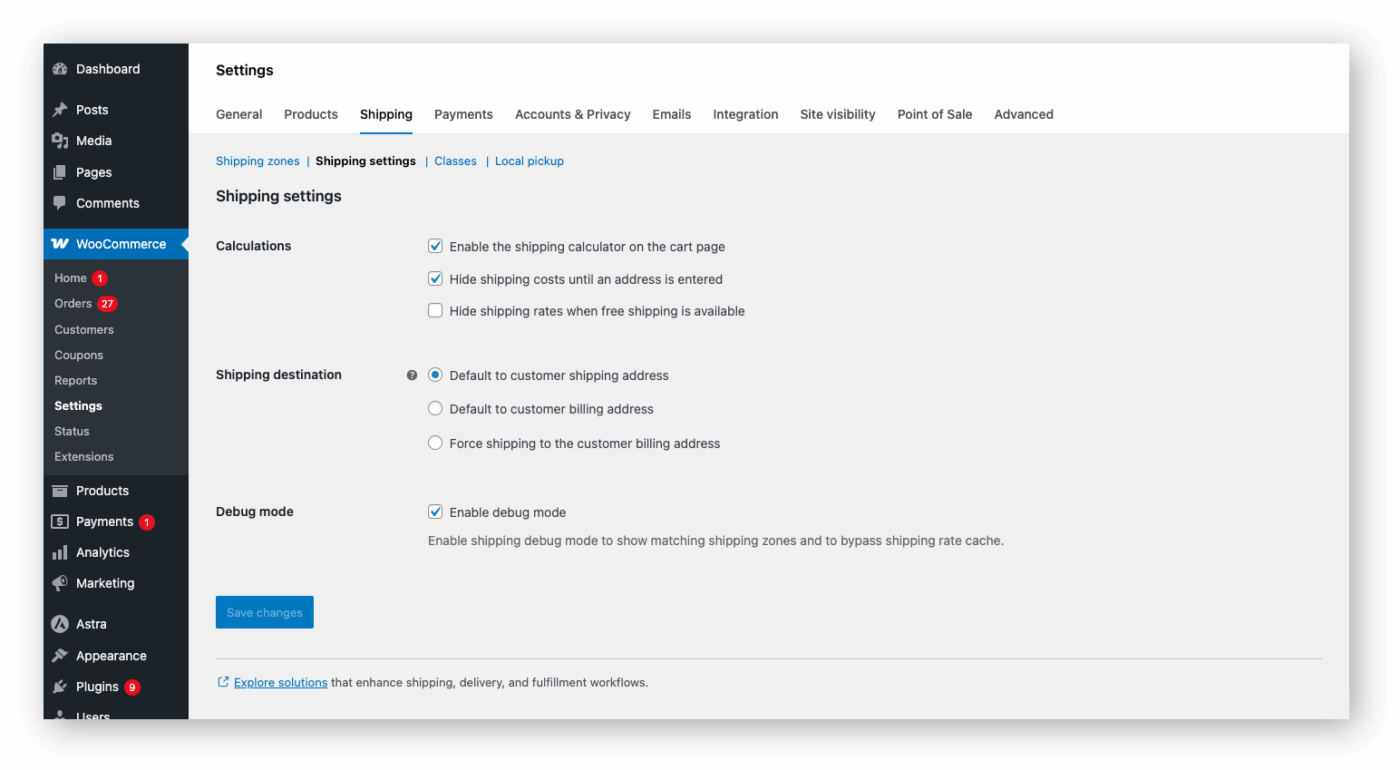
Calculations:
- Enable the shipping calculator on the cart page – let customers check estimated rates before checkout
- Hide shipping costs until an address is entered – rates only show after the customer provides a delivery address
- Hide shipping rates when free shipping is available – hides all other methods when free shipping applies
Shipping Destination:
- Default to customer shipping address – uses the delivery address the customer enters
- Default to customer billing address – uses the billing address by default, but it can be changed
- Force shipping to the customer’s billing address – only the billing address is used for delivery
Debug Mode – shows matching shipping zones on the frontend and bypasses rate cache. Use it to diagnose rate issues, then disable once resolved.
WooCommerce Shipping Classes
A WooCommerce Shipping Class groups products with similar shipping characteristics so you can apply a specific surcharge to them. The class cost adds on top of the base method rate; it doesn’t replace it.
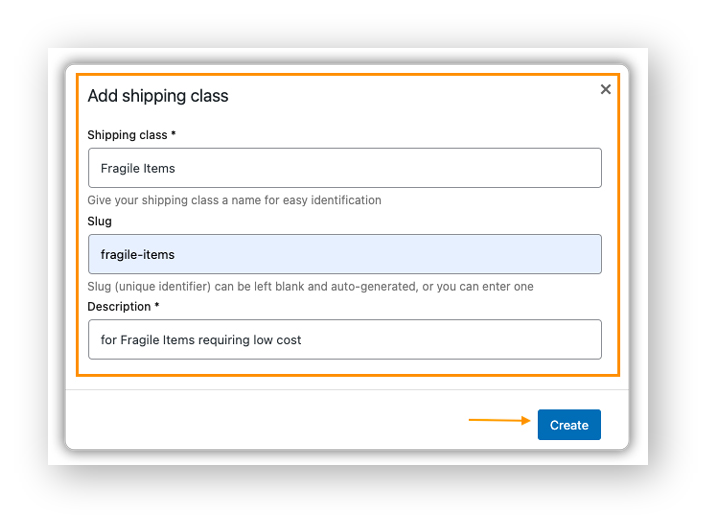
Creating Shipping Classes
Go to WooCommerce > Settings > Shipping > Shipping Classes and click Add Shipping Class.
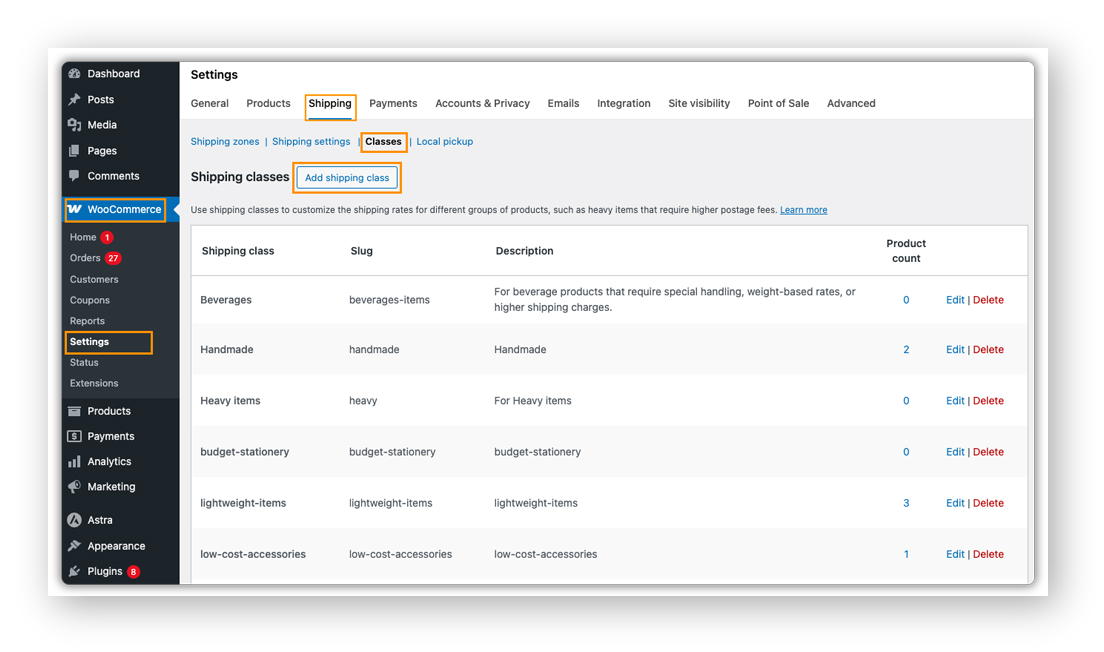
Fill in:
- Shipping Class Name – a descriptive label (e.g., “Heavy Items”, “Fragile Goods”)
- Slug – auto-generated, or enter a custom one
- Description – optional notes about which products belong here
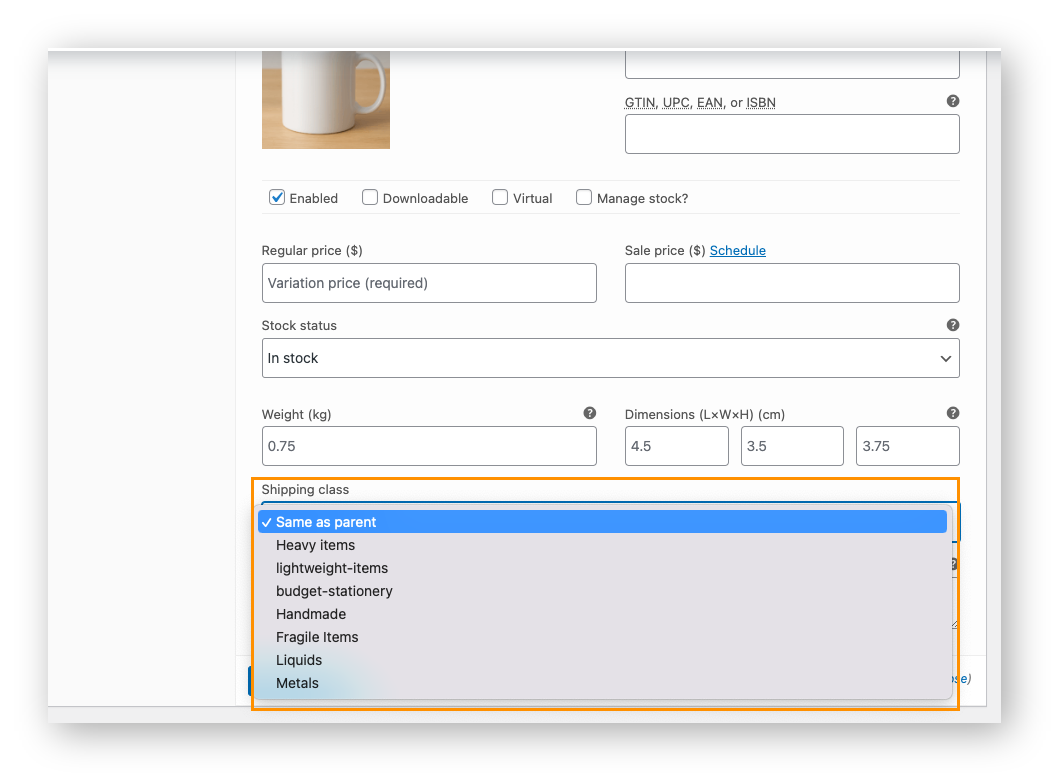
Assigning Shipping Classes to Products
- Open the product in your WooCommerce admin
- Go to Product Data > Shipping
- Select the class from the Shipping Class dropdown
- Click Update

For variable products, go to Product Data > Variations, expand the variation, and set it to Same as Parent or assign a different class per variation if needed.
How class costs work in practice: If a “Fragile” class carries a $15 surcharge and a “Light” class carries $3, a customer ordering one product from each class sees $18 in shipping at checkout. Each class cost is calculated separately and summed up
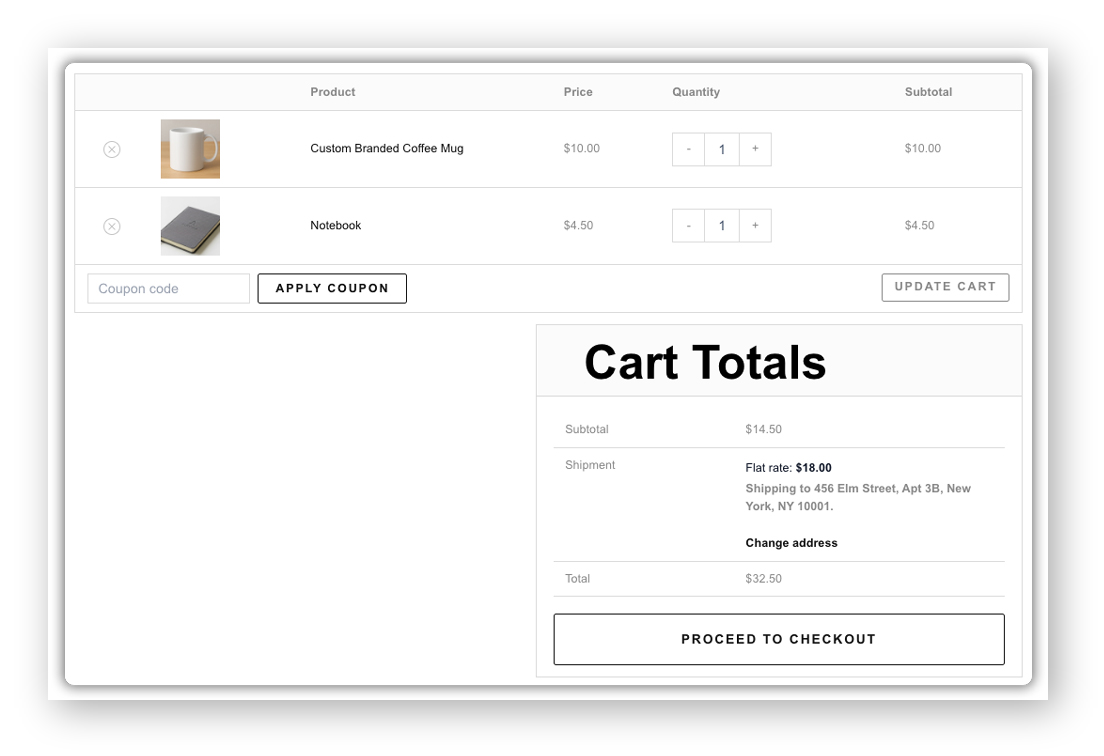
Products with no class assigned use the No Shipping Class Cost fallback. When a cart has products from multiple classes, Per Class sums all class costs while Per Order charges only the highest.
If you want a more detailed walkthrough of how shipping classes work and how to set them up for different product types, check out our complete guide, WooCommerce Shipping Classes – The Ultimate Guide.
Common WooCommerce Shipping Scenarios
Most WooCommerce stores run into the same set of requirements. Here’s how to handle each one with the right method or plugin.
Free Shipping Based on Count, Cost, Destination, or Shipping Class
WooCommerce’s built-in Free Shipping handles minimum-amount and coupon conditions well. For more precise control, free shipping only for certain product categories, specific shipping classes, or a minimum item count, use PH Table Rate Shipping Pro for WooCommerce.
Common setups:
- Free shipping on all orders with no conditions
- Free shipping when the cart total exceeds a set amount
- Free shipping on 10 or more items
- Free shipping for domestic orders; flat rate for international orders
- Free shipping on a specific product category only
Flat Rate Shipping Based on Quantity, Class, Destination, or Cost
Flat rate works best when your products are consistent. The key is calculating an average that doesn’t consistently undercharge on heavier orders or price out customers on smaller ones. If you need a flat rate to change based on conditions, different rates by zone, by class, or by quantity, PH Table Rate Shipping Pro handles this through its rule-based setup.
You can also combine flat rate with live carrier rates in the same store, for example, flat rate for standard domestic orders, carrier rates for heavier or international shipments using the Multi-Carrier Shipping Plugin for WooCommerce.
Weight-Based Shipping
If your products vary significantly in weight, say, a phone case and a set of tools, a flat rate will either overcharge lighter orders or lose money on heavier ones. WooCommerce weight-based shipping charges according to the total cart weight in tiered slabs.
A typical setup using PH Table Rate Shipping Pro:
- 0–2 kg → $5
- 2–5 kg → $9
- 5–10 kg → $14
- 10 kg+ → $20
You can combine weight slabs with destination rules in the same zone, with different rates by both weight and region.
Shipping by Cart Total and Quantity
For stores that need to discount per-item shipping rates at volume or switch to free shipping once the cart crosses a value, WooCommerce’s built-in methods can’t handle this level of logic. PH Table Rate Shipping Pro lets you set rules based on cart subtotal or item count, with the right rate applied automatically.
Shipping by Product Category or Shipping Class
Different product types often have different shipping costs – books shipped flat in envelopes versus furniture requiring freight. Shipping Classes let you group these products and add a surcharge per group on top of your base rate. Combined with Table Rate Shipping, you can define entirely separate rate tables per class, not just a cost add-on.
Per Product Shipping
For speciality or one-off items, antiques, custom builds, oversized goods where no general rule applies, per product shipping lets you define a rate at the product or variation level. WooCommerce sums these rates at checkout. This is available as a free add-on within PH Table Rate Shipping Pro.
Local Pickup or In-Store Pickup
If you have a physical location, the built-in Local Pickup handles the basics. For multiple pickup points with per-location pricing, use the block-based Local Pickup under WooCommerce > Settings > Shipping > Local Pickup, the recommended option for stores on Block Checkout.
For managing both shipping and pickup options in the same zone, PH Table Rate Shipping Pro lets you set rules that show pickup for eligible products and shipping rates for the rest – read more: WooCommerce Table Rate Shipping: Pickup & Shipping Choices.
Live Carrier Rates
Live rate plugins fetch real-time quotes from carrier APIs the moment a customer enters their address. They see actual carrier services and costs and choose what suits their budget and timeline. This is the most transparent approach – no markup, no flat approximation.
Each PluginHive carrier plugin connects to the carrier’s official API and supports rate display, label printing, and tracking from within WooCommerce. See the full list of carrier plugins above.
Table Rate Shipping
When your requirements combine multiple conditions, free shipping domestically, weight-based rates internationally, and a surcharge for a specific class, the built-in methods can’t handle it. PH Table Rate Shipping Pro for WooCommerce is built for exactly this. You define rules per zone, each specifying the condition and the rate that applies when a cart matches. Rules support bulk CSV import and export, and the plugin integrates directly with WooCommerce’s native zone structure.
Bundle Rate Shipping
Bundle rate shipping charges a fixed rate per multiple of an item: $1 for 1–5 items, $2 for 6–10, and so on. This works well for consumables, accessories, or products typically bought in quantity. Available as a free add-on within PH Table Rate Shipping Pro, it also covers cases like free shipping on a secondary product when purchased alongside a primary one.
WooCommerce Shipping Automation
Once order volume grows, manual shipping tasks become the bottleneck. The right plugins automate label generation, tracking updates, and order exports so fulfillment runs without touching every order individually.
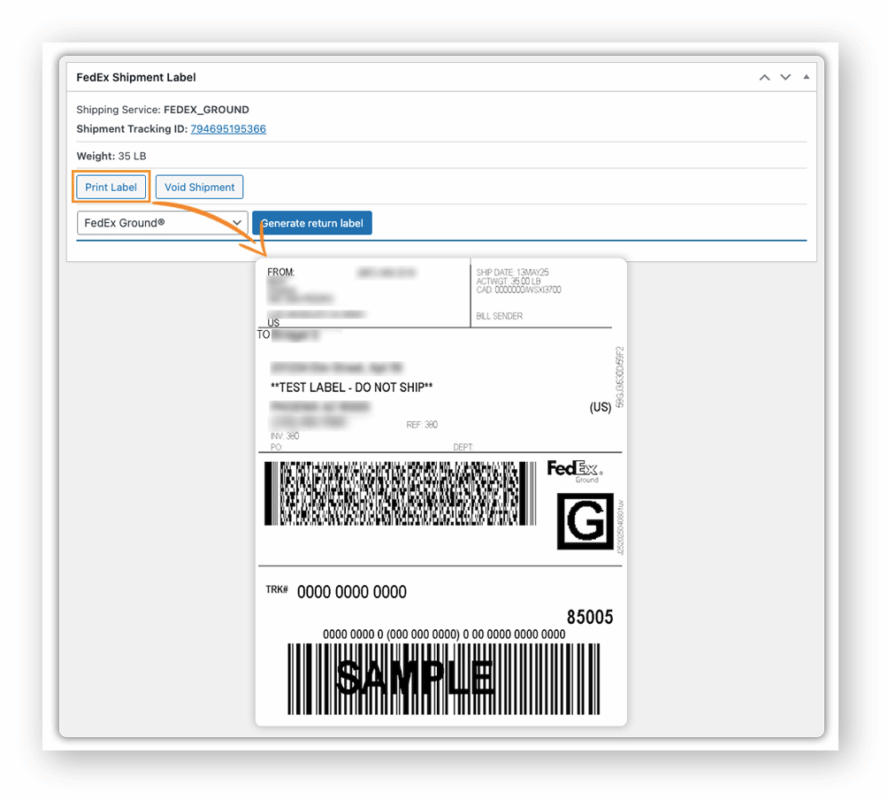
Print Shipping Labels and Invoices
WooCommerce doesn’t include label printing natively. PluginHive’s carrier plugins generate labels directly from the WooCommerce orders page automatically when an order is placed, or manually in bulk without logging into a carrier portal.
For international shipments, they also generate the commercial invoices required for customs clearance.
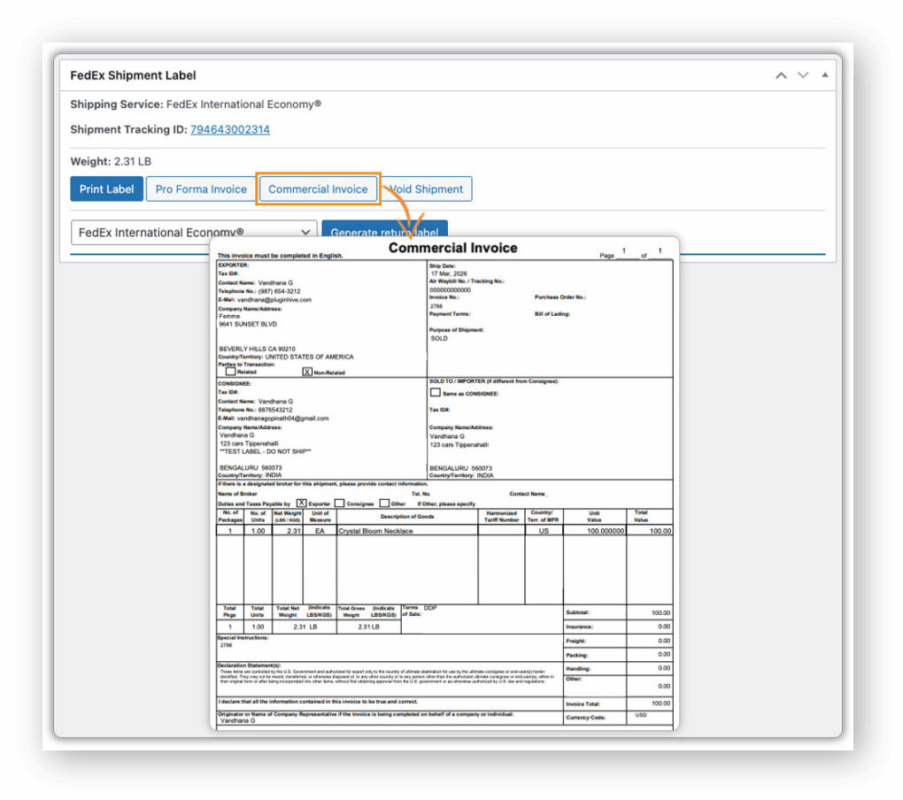
All PluginHive carrier plugins – FedEx, UPS, USPS, DHL, Canada Post, Australia Post and more support label printing from within the WooCommerce admin. See: Create Shipping Labels Directly from WooCommerce.
Set Up Shipment Tracking
After an order ships, your customer has one question – where is it? If you don’t have tracking in place, that question becomes a support ticket.
Shipment Tracking Pro for WooCommerce handles that automatically. Here’s how:
- Supports 80+ carriers with direct API connections to UPS, FedEx, USPS, DHL Express, Canada Post, Australia Post, and more
- Import tracking data in bulk via CSV, FTP, or SFTP – no manual entry, order by order
- Schedule imports to run automatically and mark orders as complete without touching them
For your customers
- Tracking information is sent directly in the order completion email – carrier name, tracking number, and a live tracking link
- A dedicated Tracking Lookup Page on your store lets them check their order status anytime using just their order number – no need to visit the carrier’s website
Already using a PluginHive carrier plugin for FedEx, UPS, DHL, or Canada Post? Tracking is built in. You may not need a separate plugin at all.
Conclusion
WooCommerce gives you a solid shipping foundation out of the box and a plugin ecosystem that handles anything more complex. Start with the right settings and zones, configure your methods, layer in shipping classes where needed, and add a plugin once your requirements outgrow the defaults.
If you need help configuring any of the plugins mentioned in this guide, reach out to the PluginHive support team – We’ll help you get the right setup for your store.
FAQS
1. What are the default WooCommerce shipping methods?
WooCommerce includes three built-in shipping methods: Flat Rate, Free Shipping, and Local Pickup. These cover basic shipping needs and can be configured within shipping zones.
2. When should I use advanced WooCommerce shipping methods?
Advanced shipping methods are useful when your store requires rules based on weight, quantity, cart total, shipping class, or destination. These scenarios typically need a plugin for better control.
3. How do WooCommerce shipping zones work?
Shipping zones are geographic regions you define. When a customer enters their address at checkout, WooCommerce matches it to a zone and displays the shipping methods assigned to that zone.
4. What are WooCommerce shipping classes?
Shipping classes group products with similar shipping requirements. You can assign additional costs to these classes, which are added to the base shipping rate.