With this WooCommerce shipping guide, we’ll help you set up the various WooCommerce shipping methods, WooCommerce options, WooCommerce zones, WooCommerce classes, and more on your online store. WooCommerce has been designed for store owners to successfully fulfill their business needs. One of the major sectors where this plugin excels is WooCommerce shipping. With little or no knowledge of programming, you could easily set up WooCommerce shipping methods and prices. Read this detailed guide to learn how to set up WooCommerce shipping and the complete delivery system on your online store.
WooCommerce shipping basics
The term WooCommerce Shipping is typically associated with products that can be shipped or delivered from one place to another. But before we actually get into the setting up part, let’s go through some of the WooCommerce shipping basics and terminologies.
WooCommerce product weight and dimensions
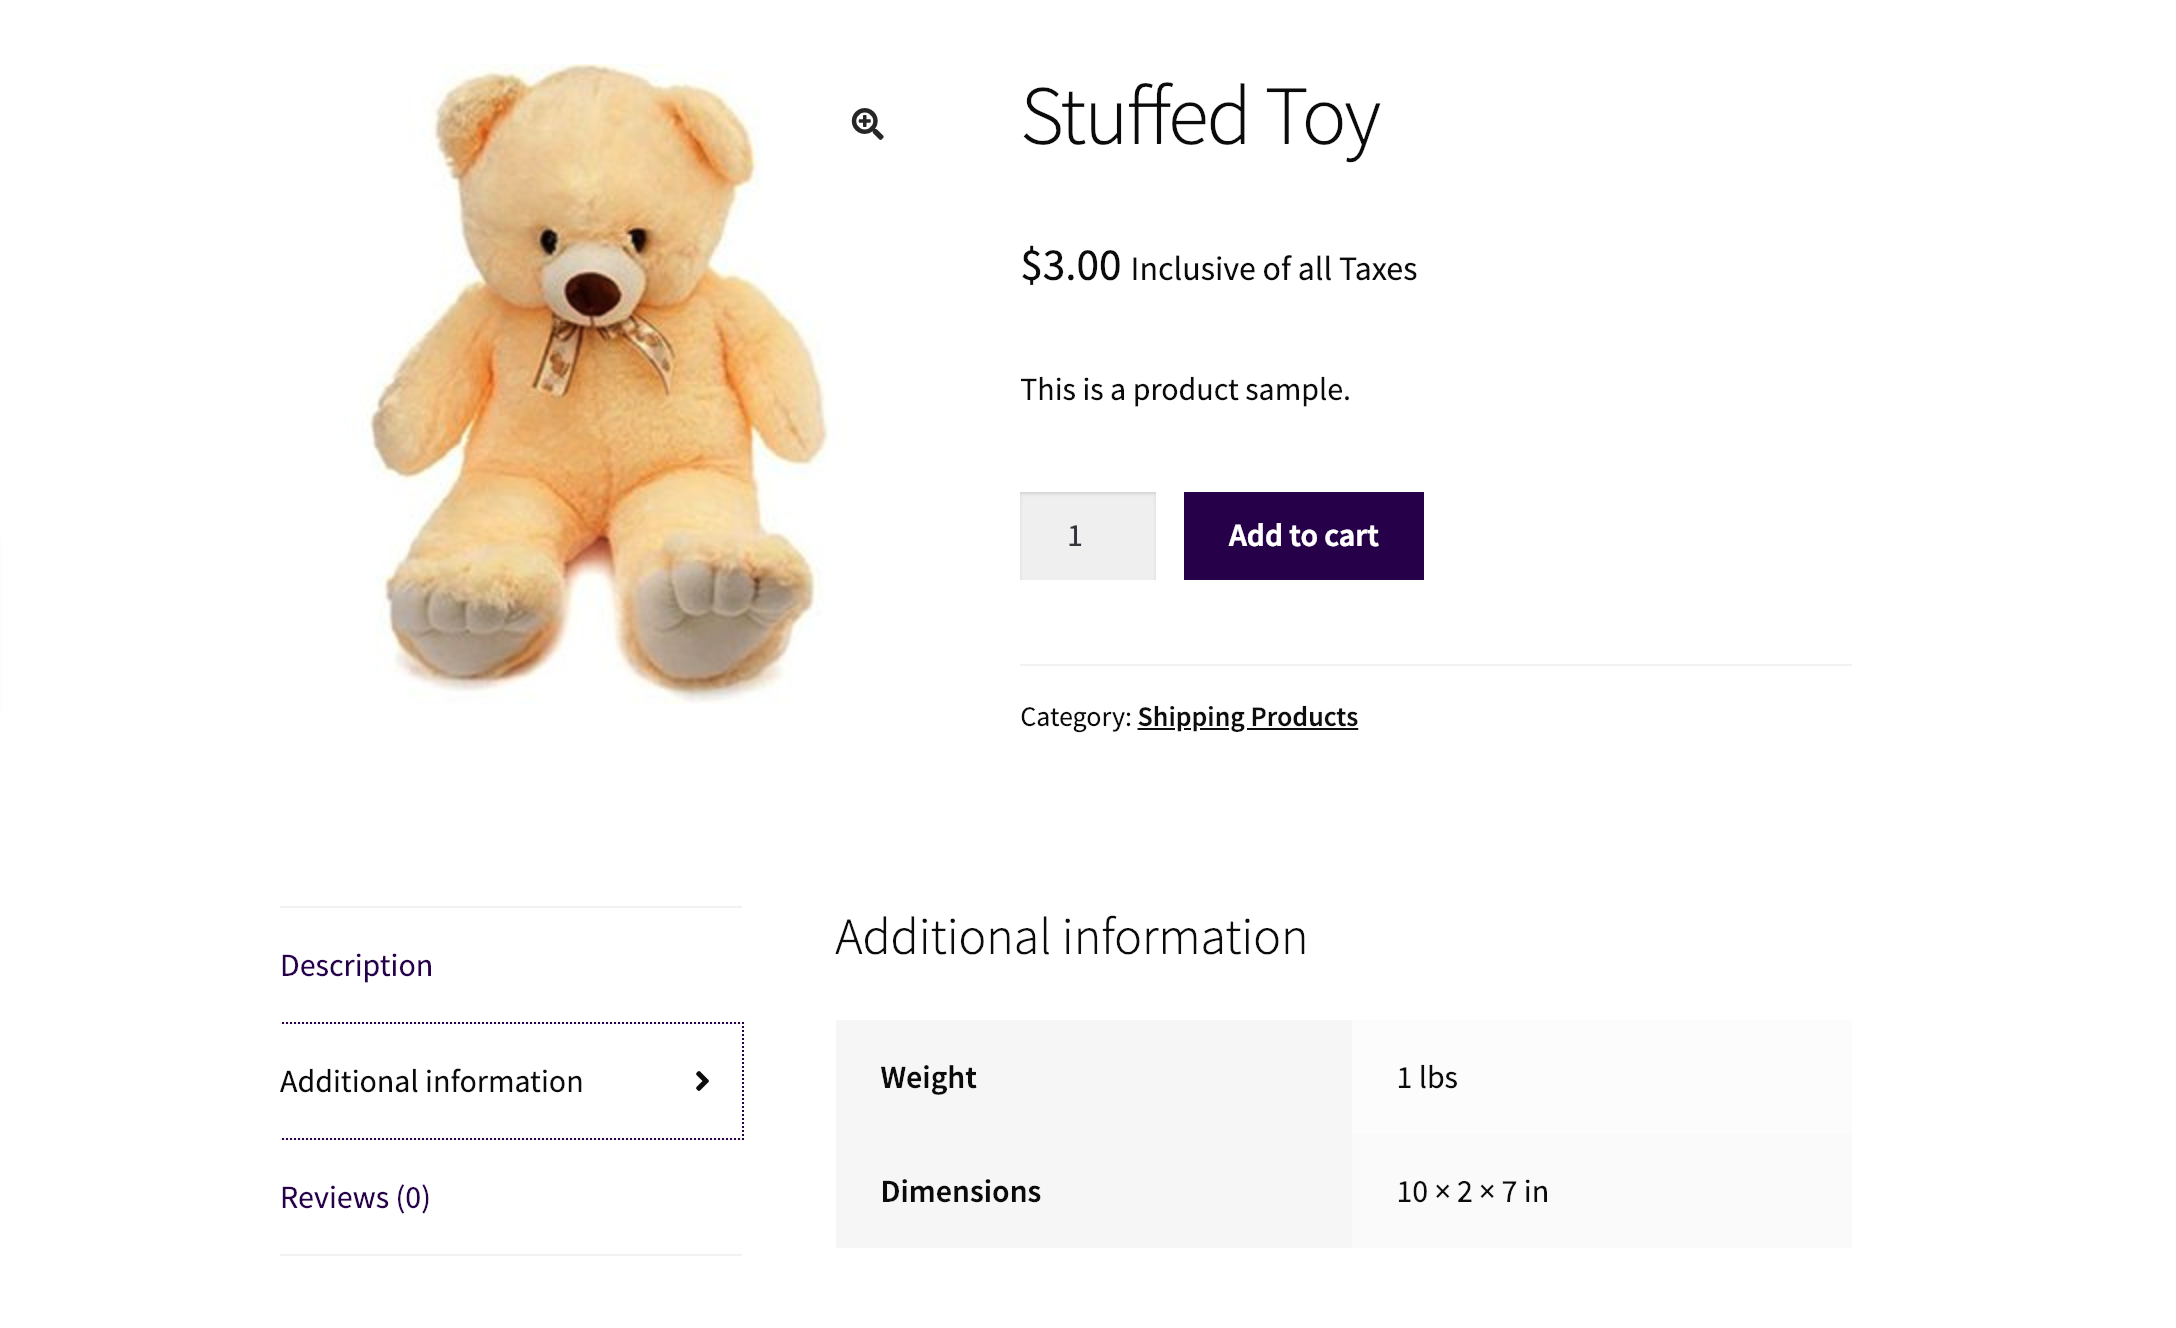
A WooCommerce product that is required to be delivered should a defined weight and dimensions. Products that have no weight or no dimensions, or both, would not be considered for shipping calculation and thus, cannot be considered as physical products. Almost all carriers and postal services you see consider weight and dimensions as essential parameters required to calculate the shipping charges. You might have noticed agents working in your local post office or logistics centers taking your package and measuring its weight and dimensions. They do that for the purpose mentioned above. Have a look at the image below showing the physical attributes of the sample product(Stuffed Toy) under the Additional Information section.
WooCommerce shipping address
Most logistics and courier services use shipping addresses as a parameter to calculate the shipping charges. They usually need the Ship from and Ship to addresses. The ship from address could be your store’s or warehouse’s address, or anywhere else where the product is going to be picked up from. The ship-to address, on the other hand, is the destination address your customers enter on the Checkout page. Your customers must enter the correct address during the checkout process. Doing otherwise might result in the unavailability of any shipping method on the Checkout page or incorrect shipping estimates. To ensure that never happens, most shipping carriers now offer a feature known as the Address Validation Service. FedEx, for example, has an address validation service. Learn more about WooCommerce FedEx Address Validation.
Types of WooCommerce shipping methods
There are about five different types of WooCommerce shipping methods. These shipping methods can be divided into two separate categories, i.e, domestic and international.
- Flat rate
- Free shipping
- Local pickup
- Carrier-specific shipping
- Table rate or conditional shipping
The first three shipping methods (i.e, Flat rate, Free shipping, and Local pickup) are shipping methods offered by WooCommerce, by default. Carrier-specific shipping refer to the shipping methods offered by logistics companies like UPS, USPS, and DHL. With their delivery network, transportation services and facilities, they are capable of delivering items to domestic and international locations. The final option, WooCommerce table rate shipping, is an advanced form of shipping that is usually required to fulfil complex business cases. To understand these WooCommerce shipping methods, it’s highly recommended that you learn about two of things – WooCommerce Shipping Zones and WooCommerce Shipping Classes.
WooCommerce Flat rate shipping
Flat Rate Shipping comes in-built with WooCommerce. With this shipping method in place, you can ship any type of item at the same pre-defined price. To be specific, this option allows you to define a standard shipping rate for each item, or each order, or Shipping Class.
Setting up Flat rate shipping
To set up the Flat rate shipping method, you first need to add it to the desired shipping zone(refer to the shipping zone guide above) or follow these simple steps.
Step 1
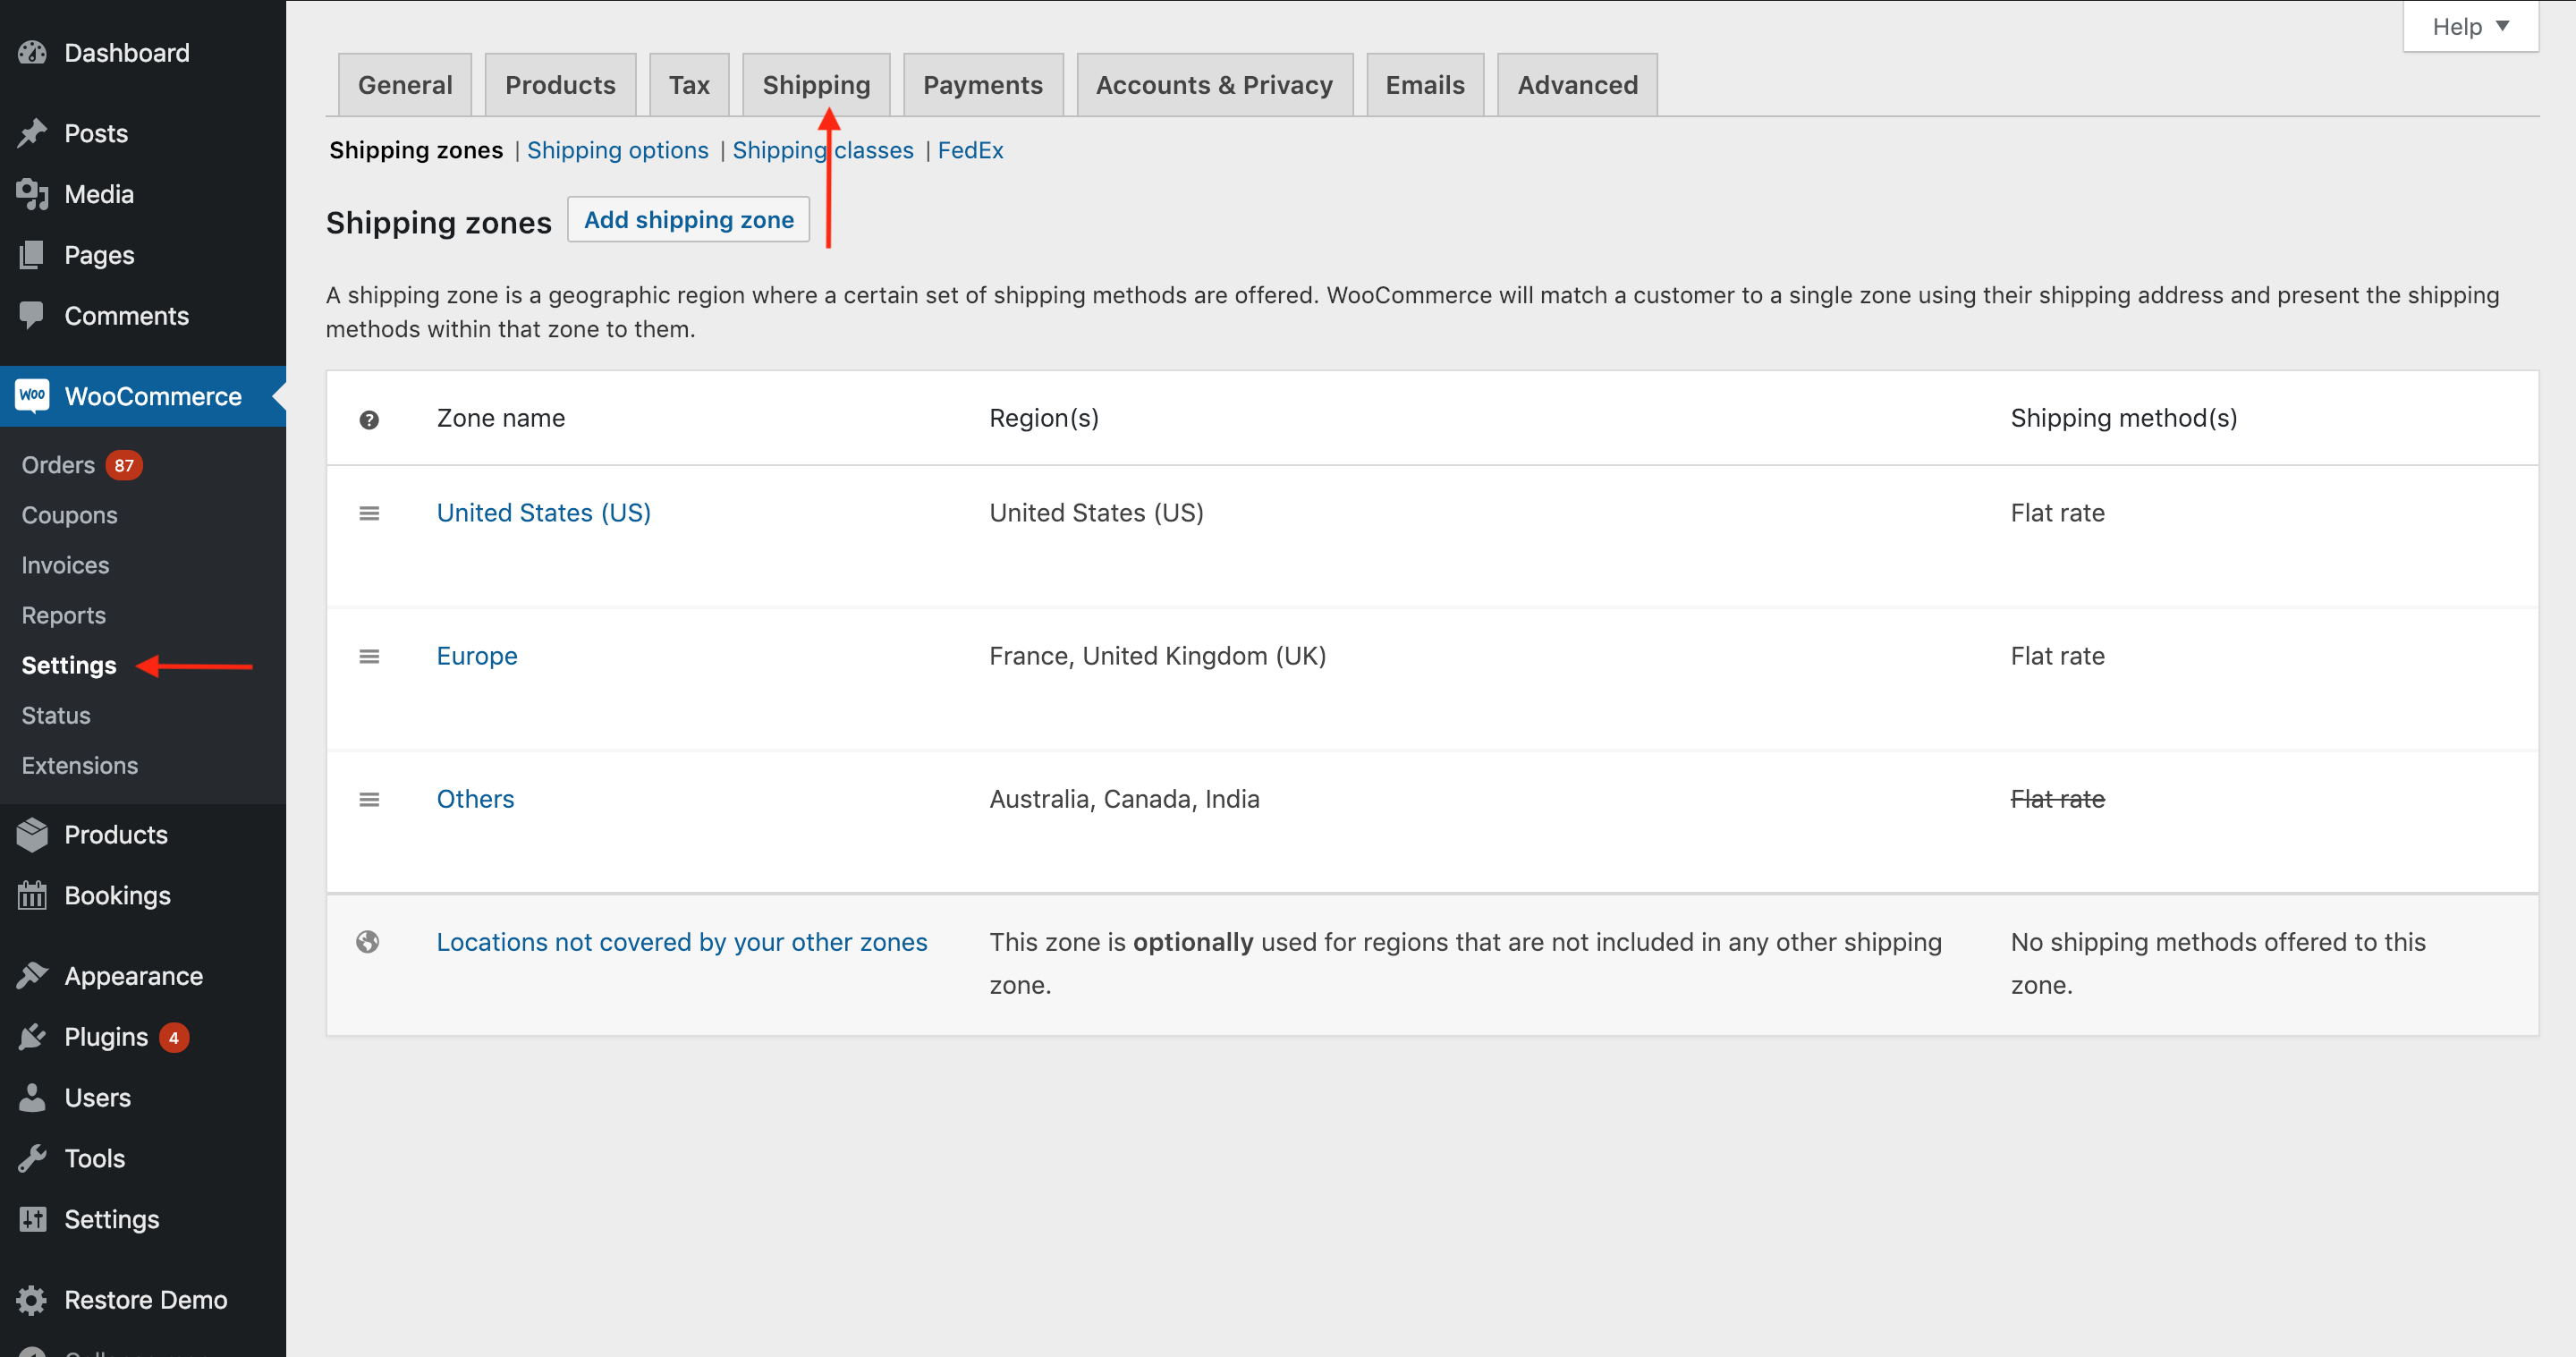
Open your WordPress Dashboard and then click on WooCommerce → Settings → Shipping.
Step 2
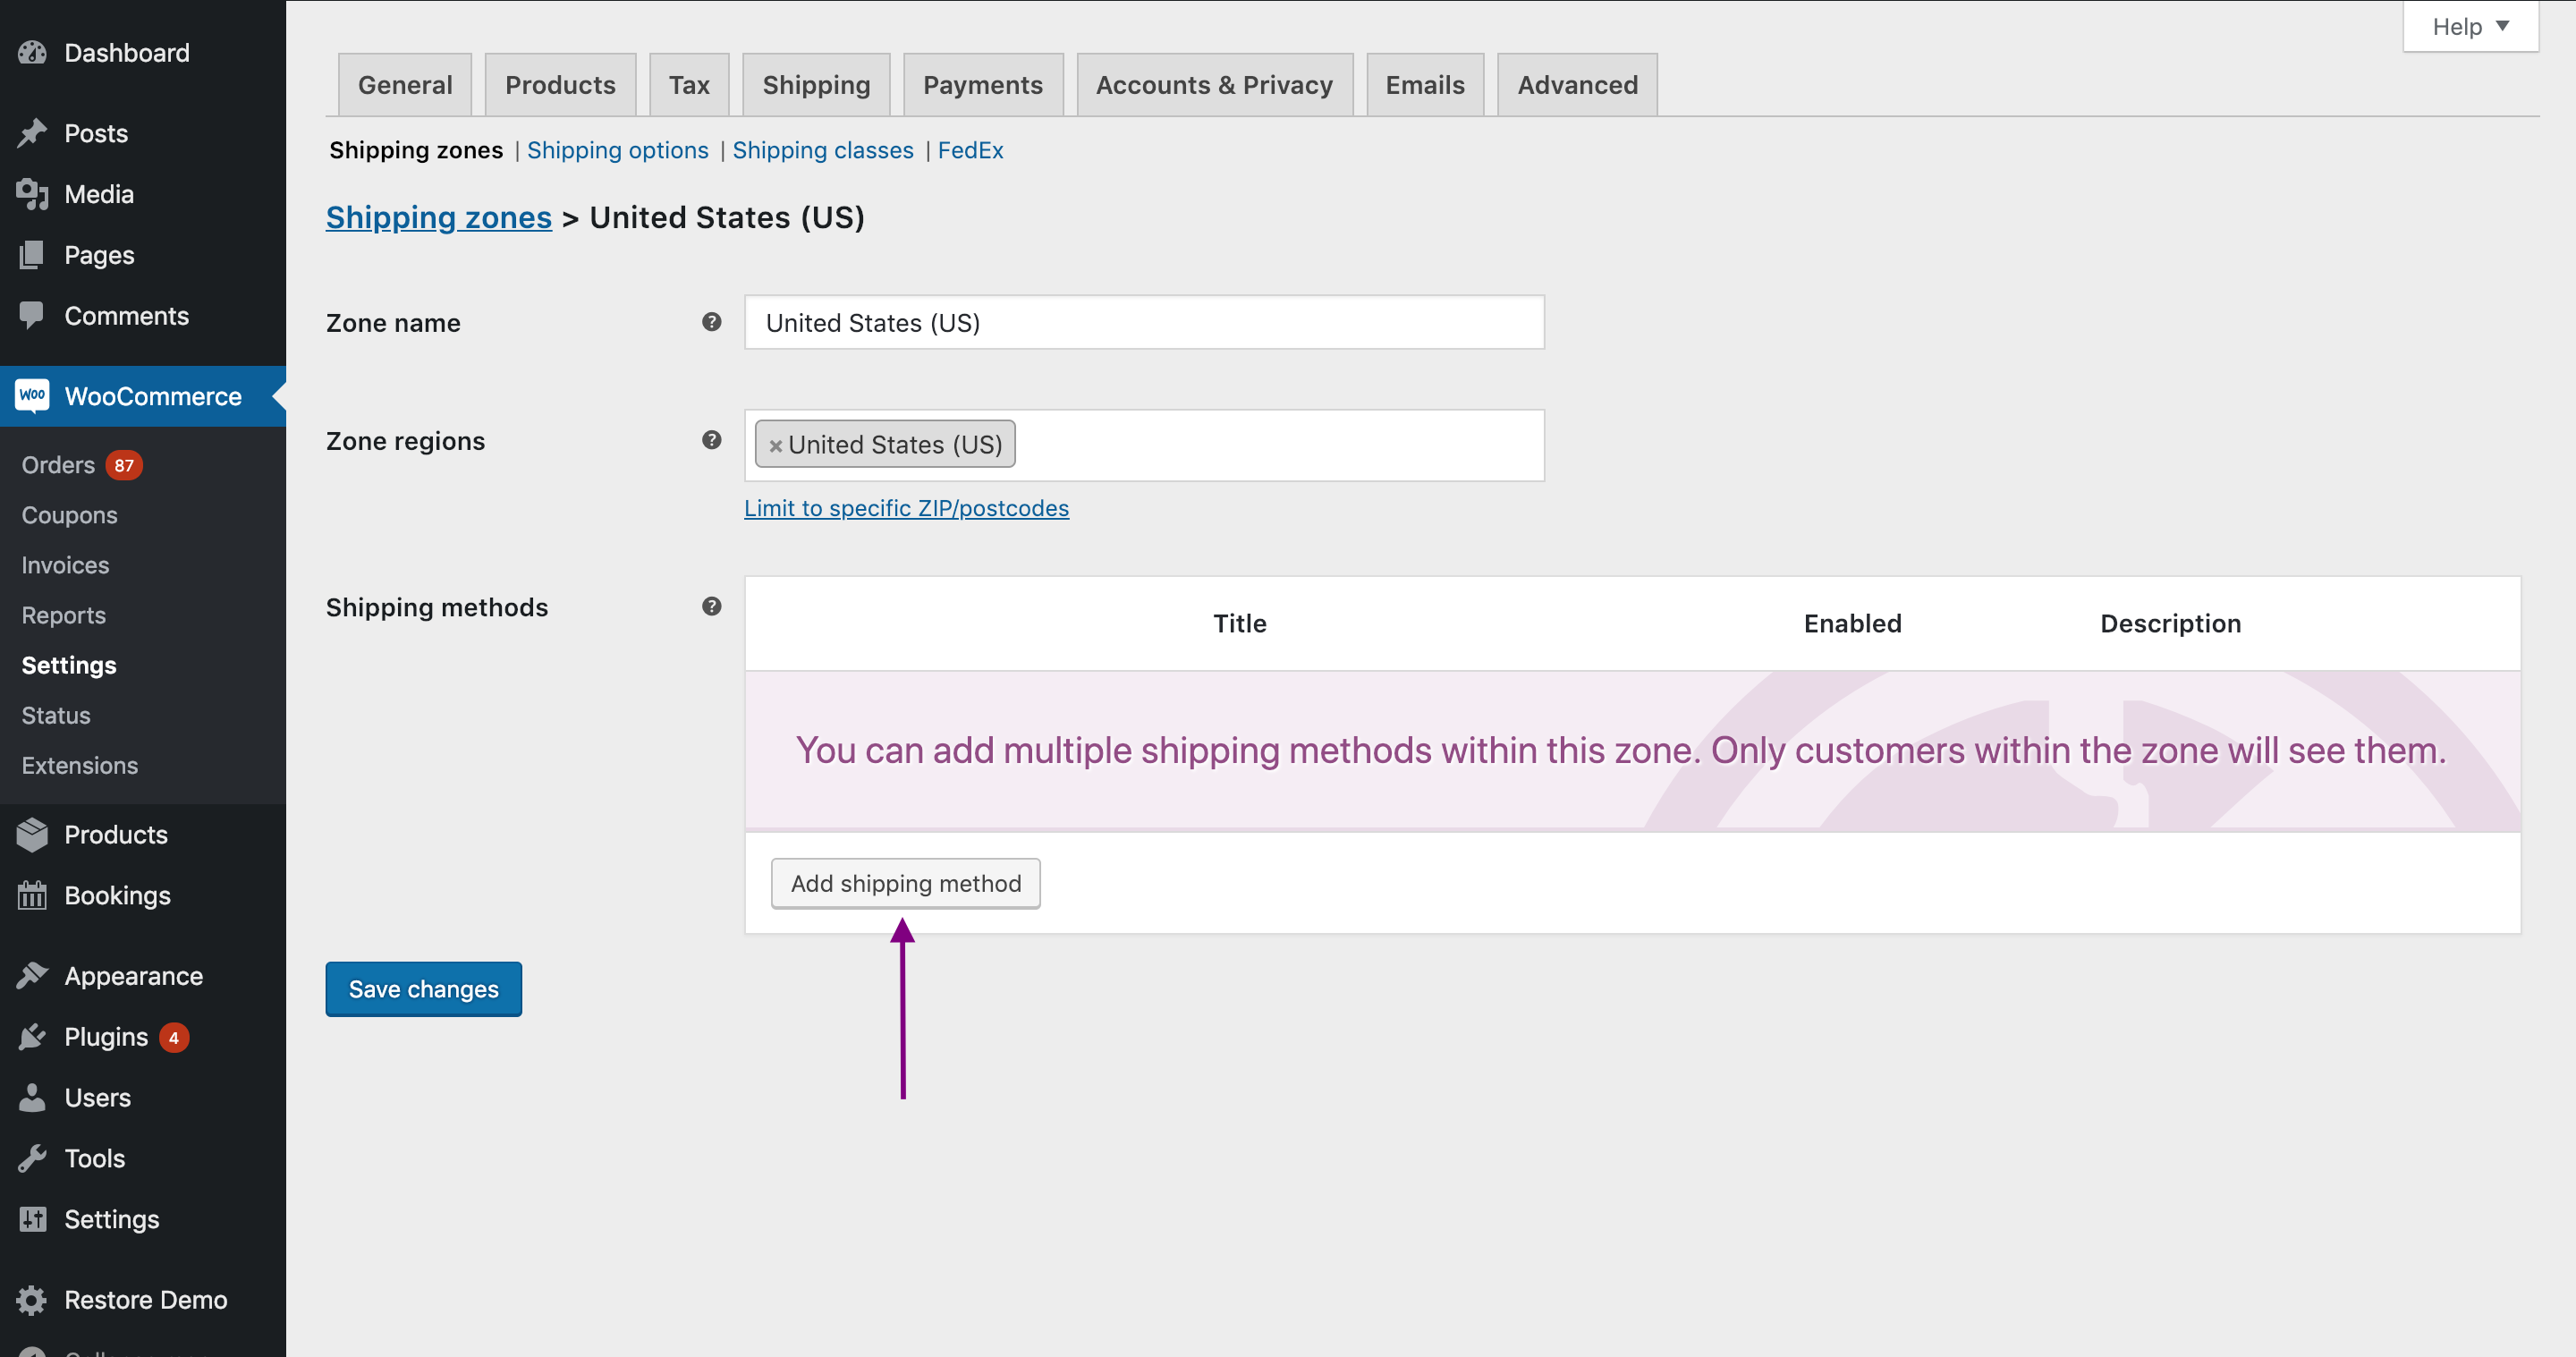
Once you’re in, select any shipping you wish to provide Flat rate shipping. After that, click on Edit and then Add shipping method as shown in the image below.
Step 3
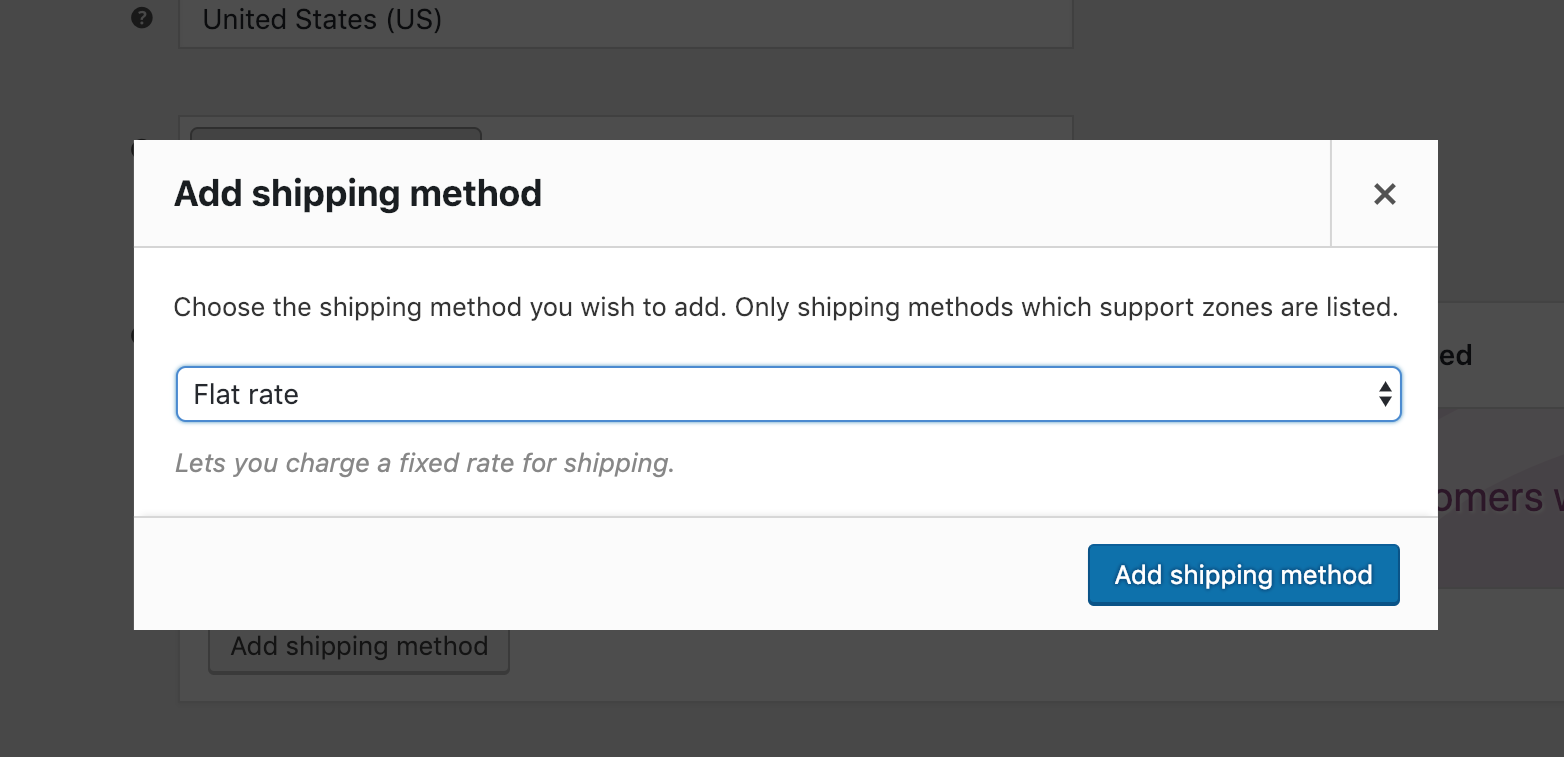
Select Flat rate from the dropdown and click on the Add shipping method option as displayed in the image below.
Step 4
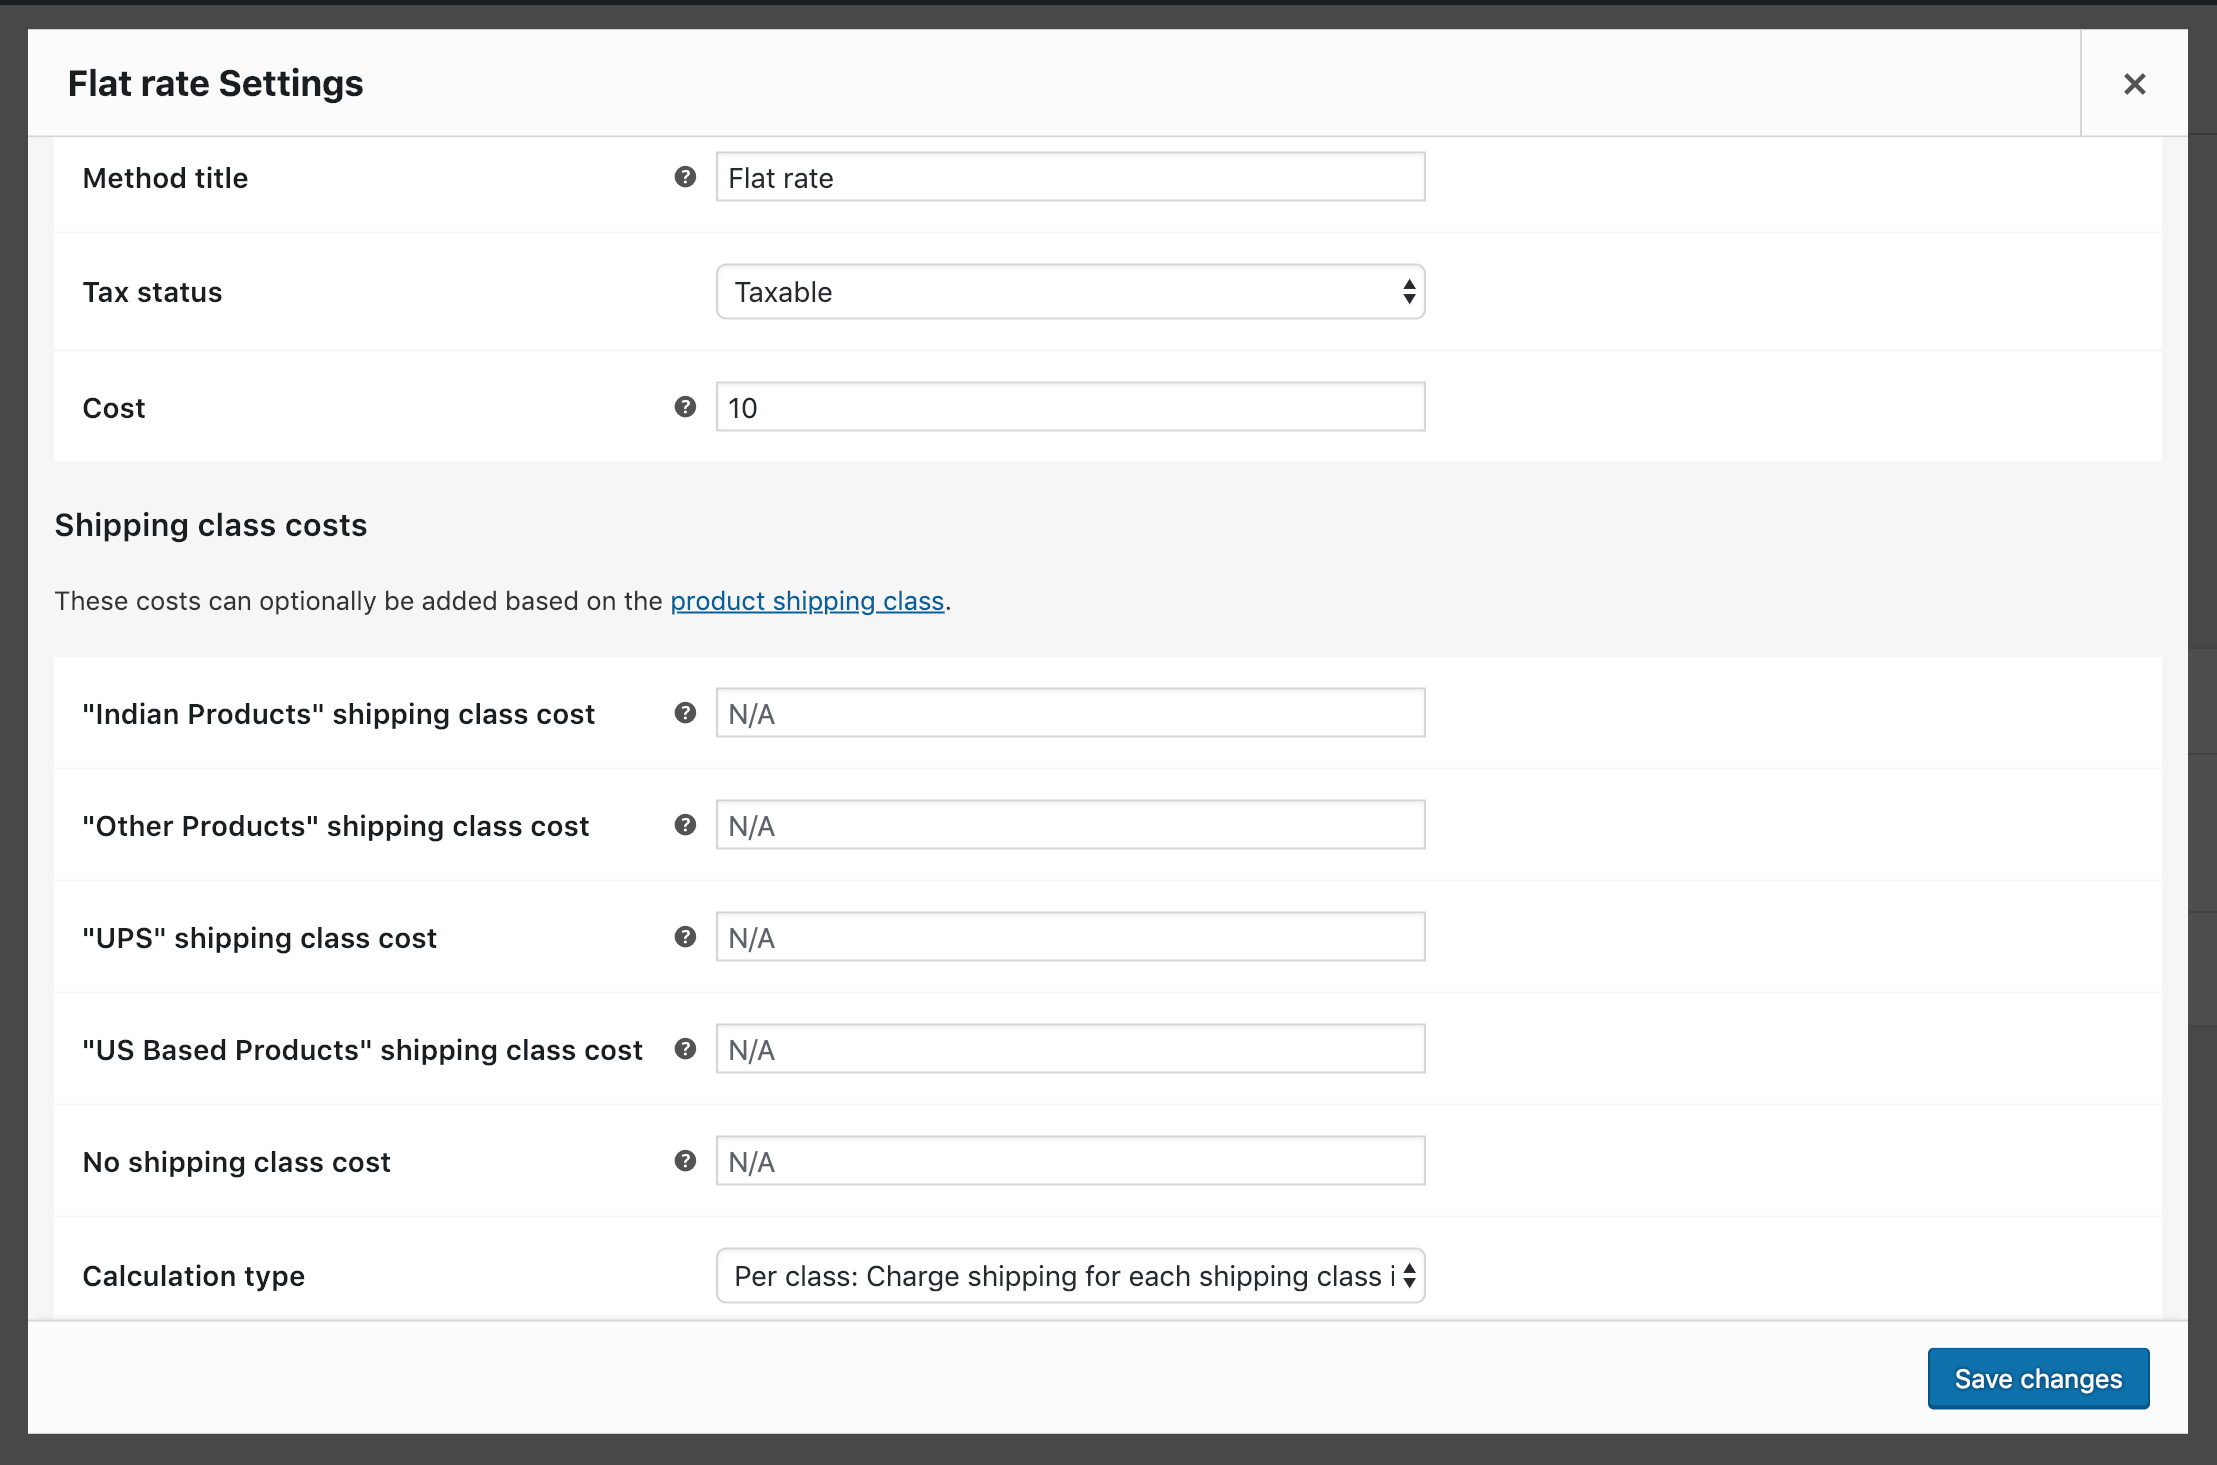
Now you need to click on Edit option right under the Flat Rate shipping option. You’ll be then greeted to the following screen where you can make most of the changes related to Flat rate. You can add a method title(people usually go with Standard Shipping), choose whether or not tax is required, set up the desired price, and define the shipping class. Note: If you don’t know much about product shipping class and how it works then we recommend you check out this guide. It should help you get started.
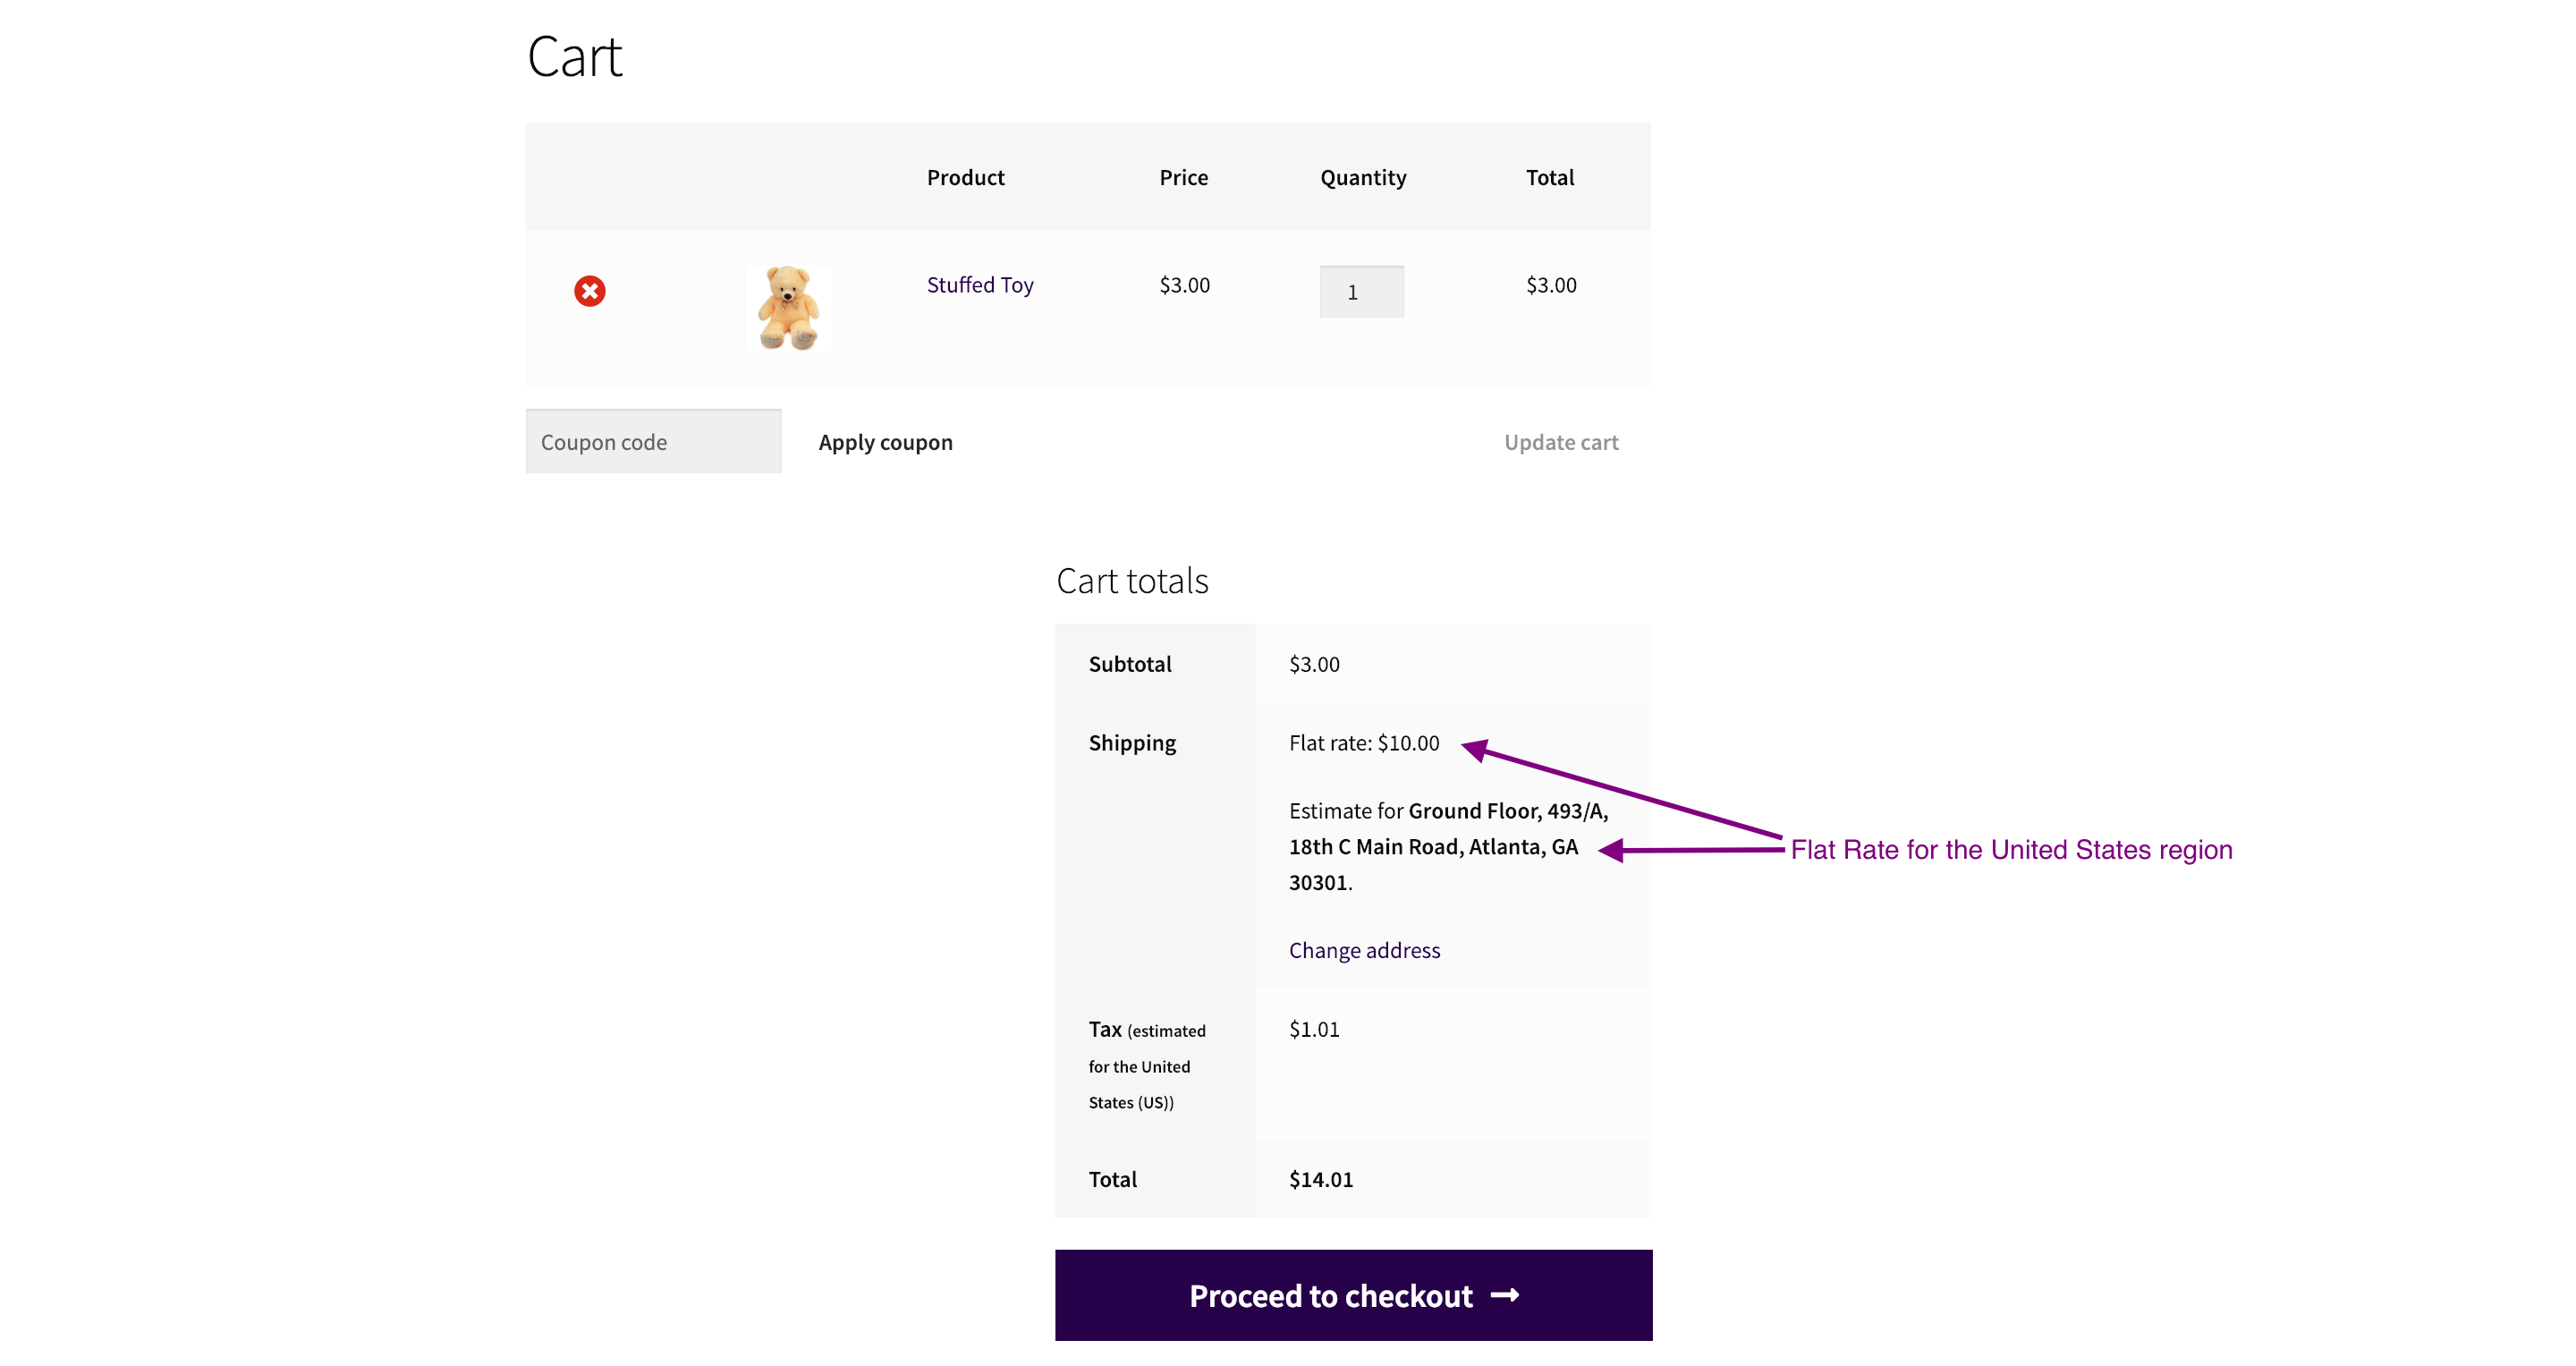
Once you’re done with the steps, you can go ahead and move a product into the Cart. As soon as you enter the address, the Flat Rate shipping option will appear. Have a look at the following sample image.
WooCommerce Free shipping
WooCommerce Free shipping another default shipping method offered by WooCommerce. As the name suggests, you cannot set any desired cost or value to use this shipping method. Many store owners and retailers across the globe offer free shipping to encourage new buyers to purchase their products. Most of them predetermine the approximate shipping cost and include it along with the product cost, as a hidden cost. The above strategy allows them not to actually lose money on the shipping. This strategy also helps people to sell items that are don’t have enough spark left in them.
Setting up Free Shipping
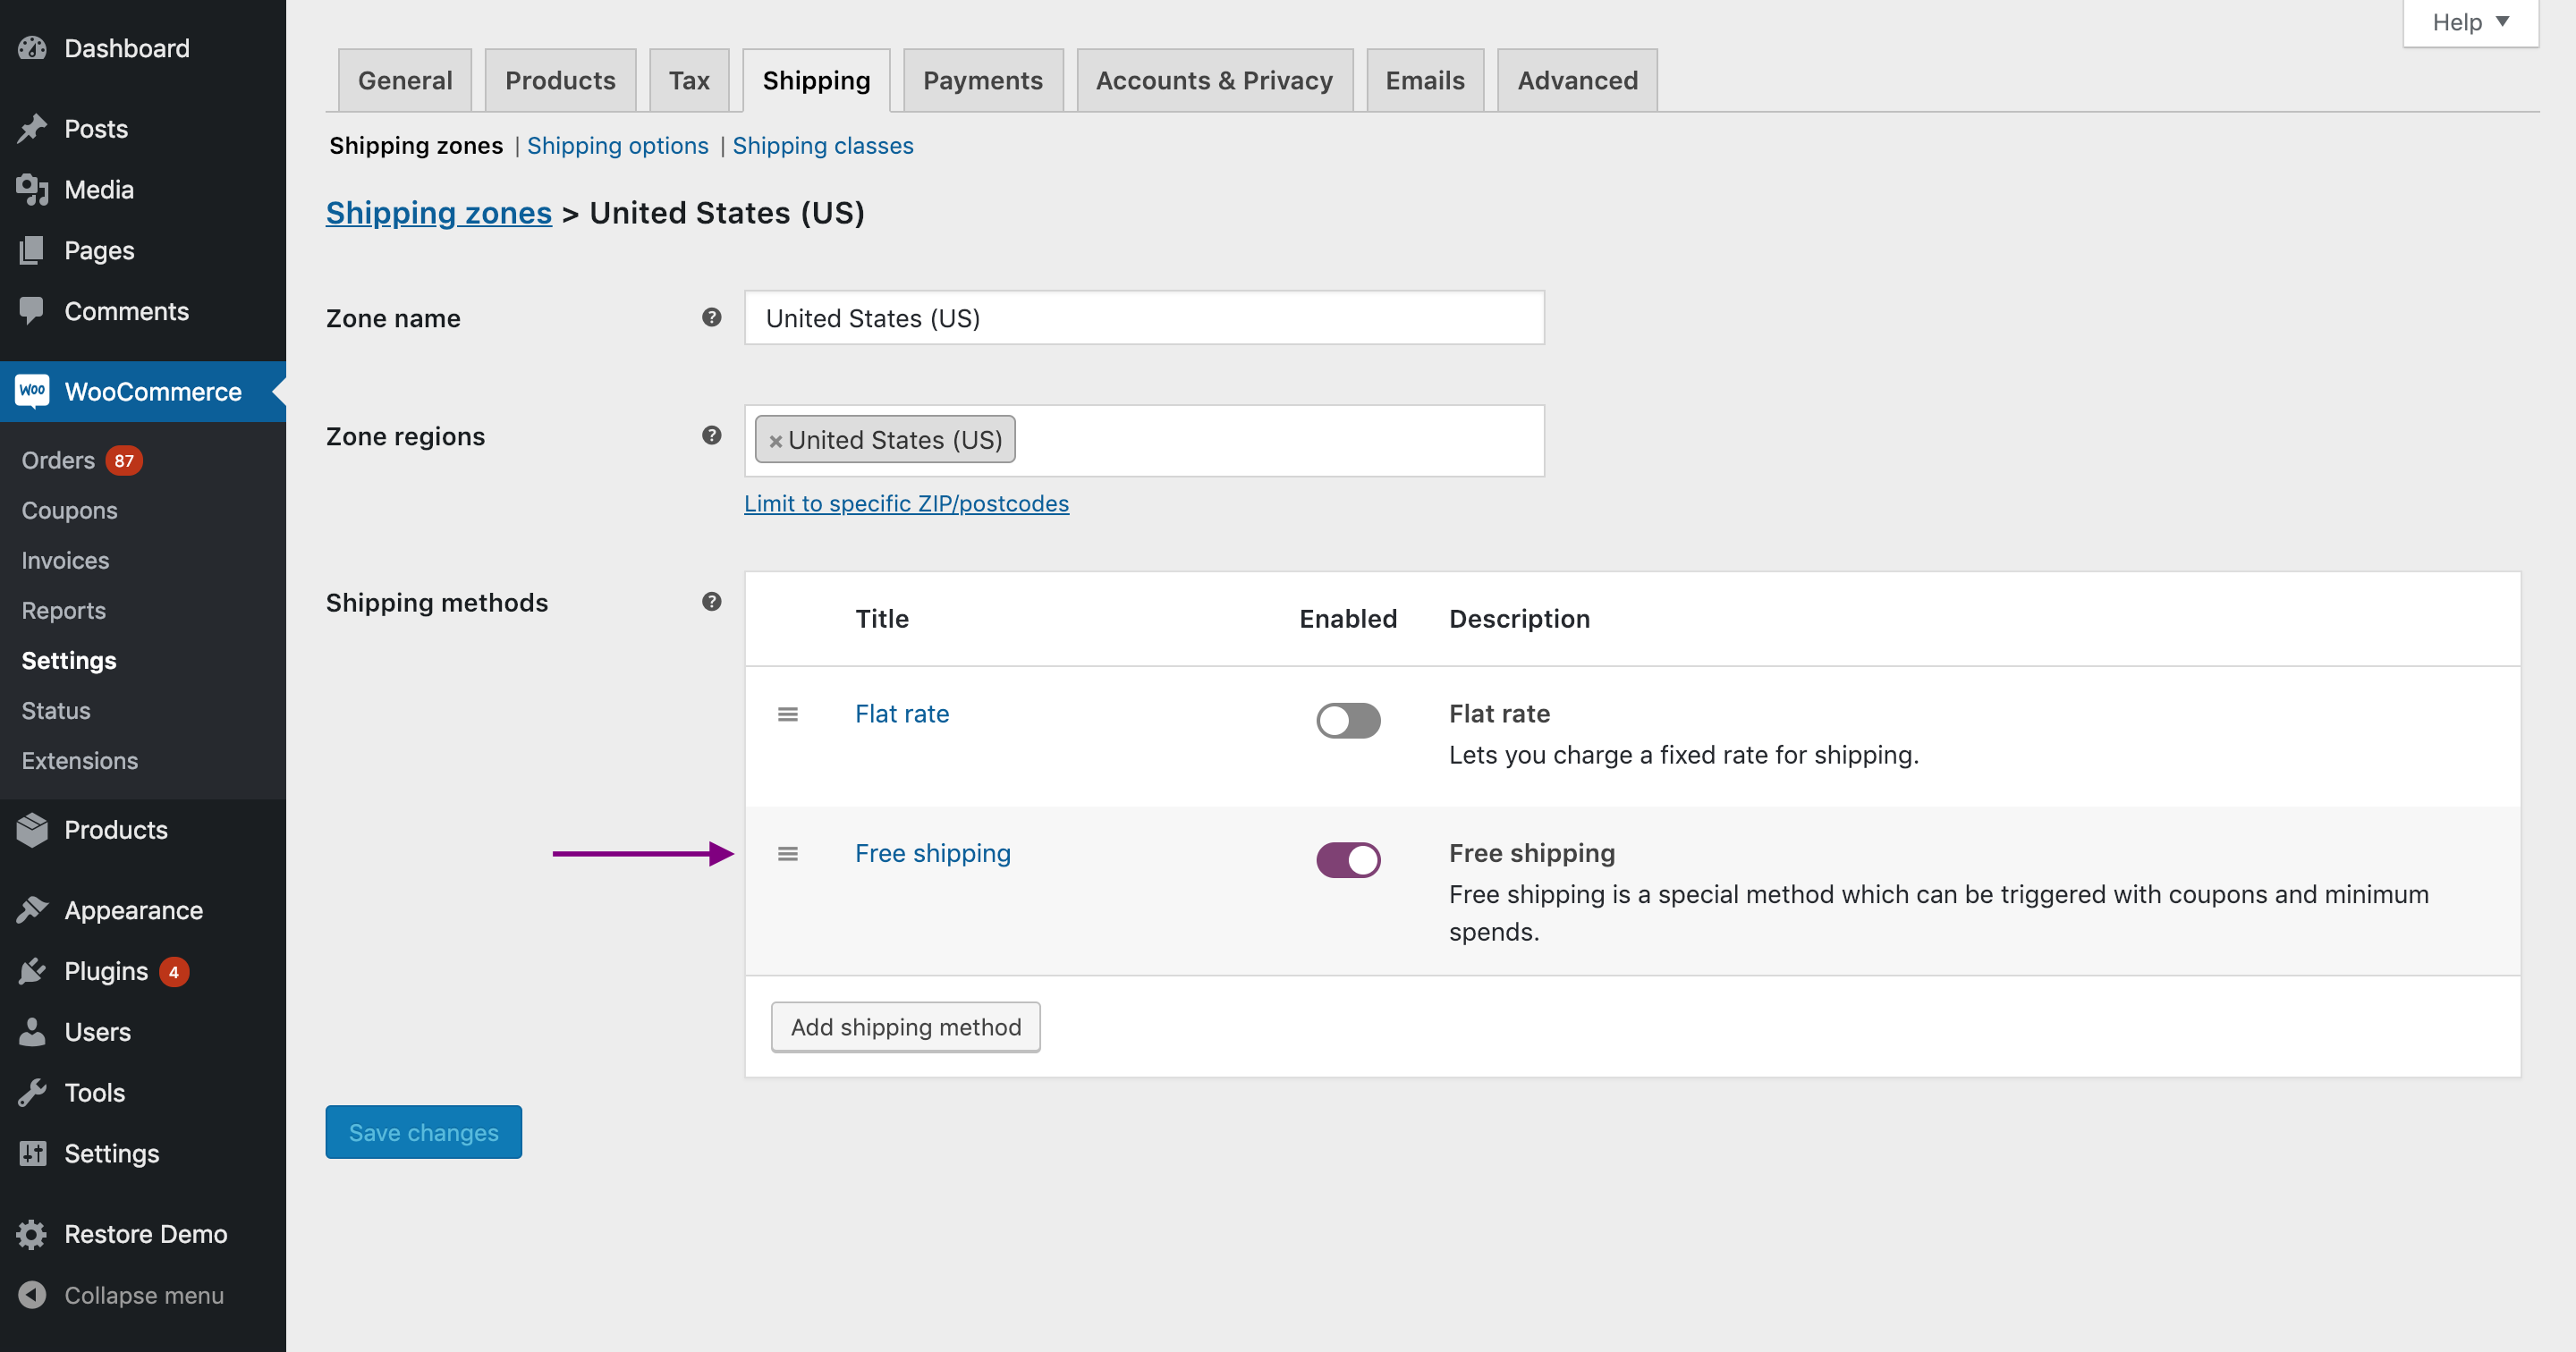
The setting up process for free shipping is similar to that of setting up flat rate shipping. Basically, once you’re in the WooCommerce Setting option, you need to again navigate to the desired Shipping Zone and then click on Add shipping method. Upon doing that, you will again the pop-window asking you to choose the shipping method. You need to select the Free Shipping option from the drop-down option here. Have a look at the following image.
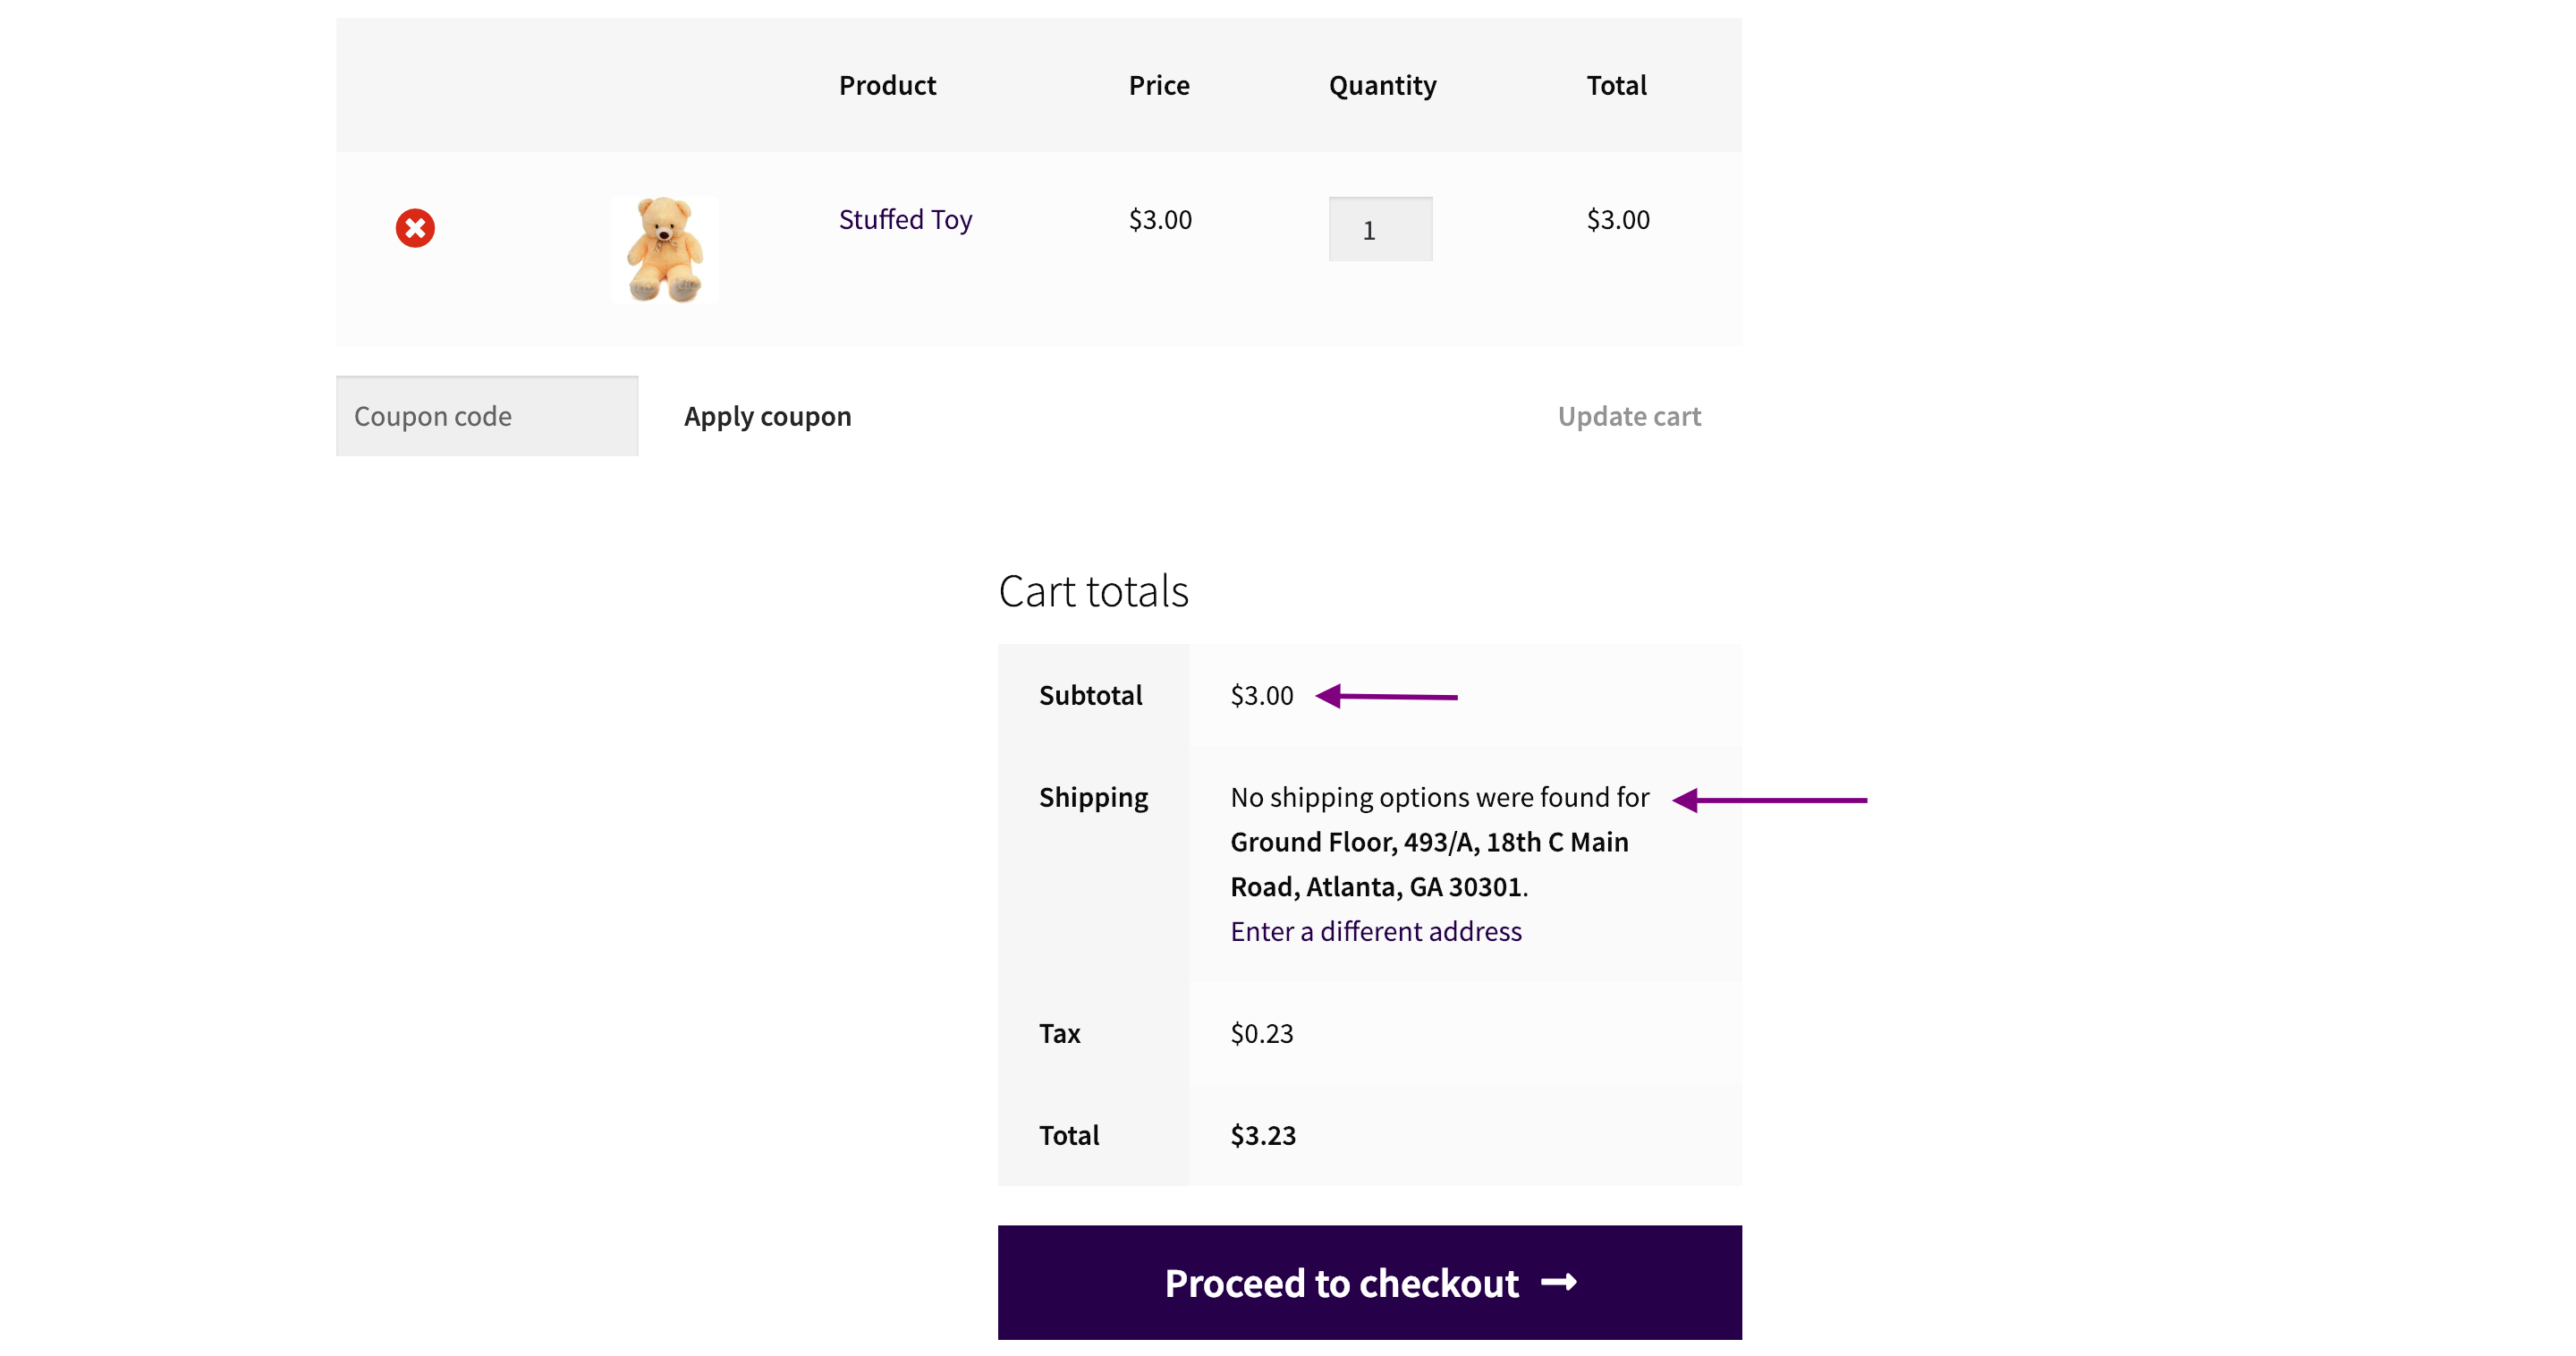
Again, you need to click on the Edit option under the Free shipping option. You will then enter into the setting page where you can do things like changing the method title (people usually go with Free Shipping/Free Delivery), set the conditions for the free shipping to appear on the Cart page, and finally set the amount for those conditions. Let’s take an example to understand the conditions and how to use them. Suppose you want to provide free shipping to orders having a minimum value of $6. So if the worth of the Cart is below $6, then your customers won’t be able to see the Free Shipping option.
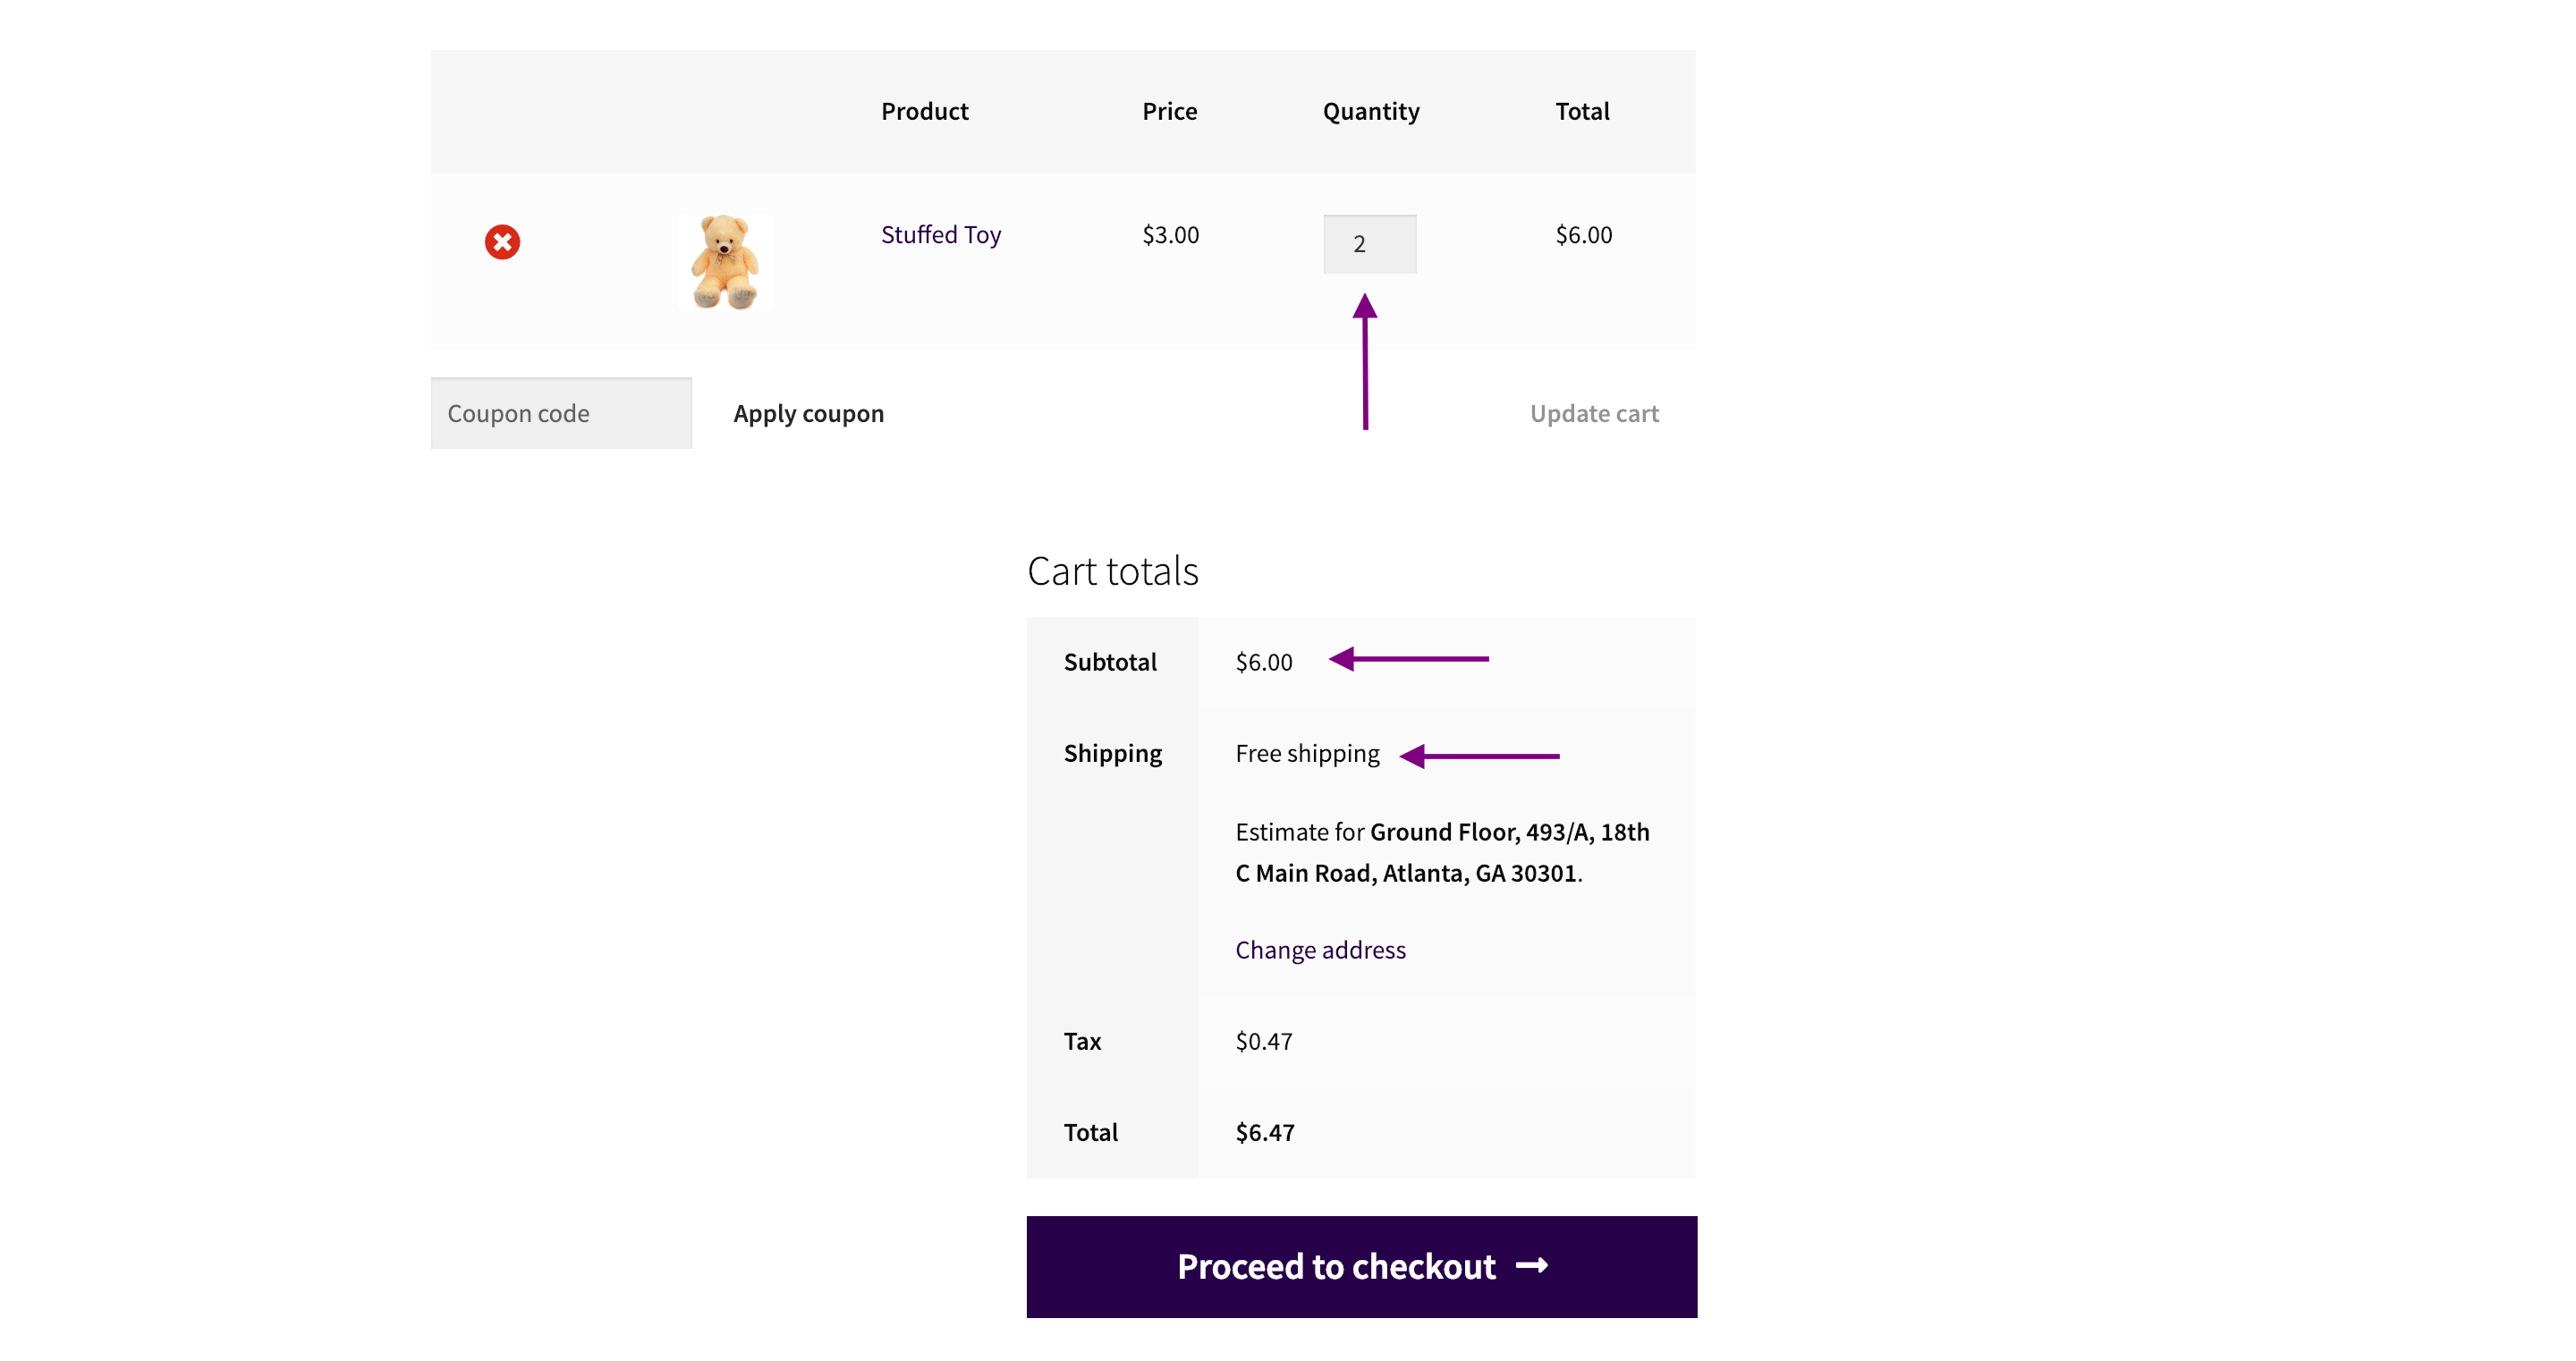
Now if the item quantity is increased to 2, the subtotal becomes $6 which is eligible for Free shipping. Have a look at the following image of the same Cart when the quantity is increased.
You can also use Free Shipping along with the Flat Rate Shipping option. So in the similar case above, if the Cart value is less than $6, you will charge a flat rate of $1.5. And if the Cart value is $6 and above the Free shipping option will appear. This is one of the most common implementations of these two shipping methods.
WooCommerce Local pickup
The WooCommerce Local pickup option means exactly how it sounds. So if a buyer reads local pickup and selects it in under the shipping options, the buyer is responsible to come down to a pickup center and collect his or her order. So no shipping is going to be offered here. Many sellers and store owners sometimes offer both Local pickup and a shipping option. Generally and most usually sellers who practice this, imply that the buyer would have to pay in cash when they come to collect their order. The only thing is your buyers should be aware of your pickup centers.
Setting up Local pickup
Again, you need to go to the WooCommerce Shipping option and then click on the Add shipping method option under the desired Shipping Zone. Have a look at the image below.
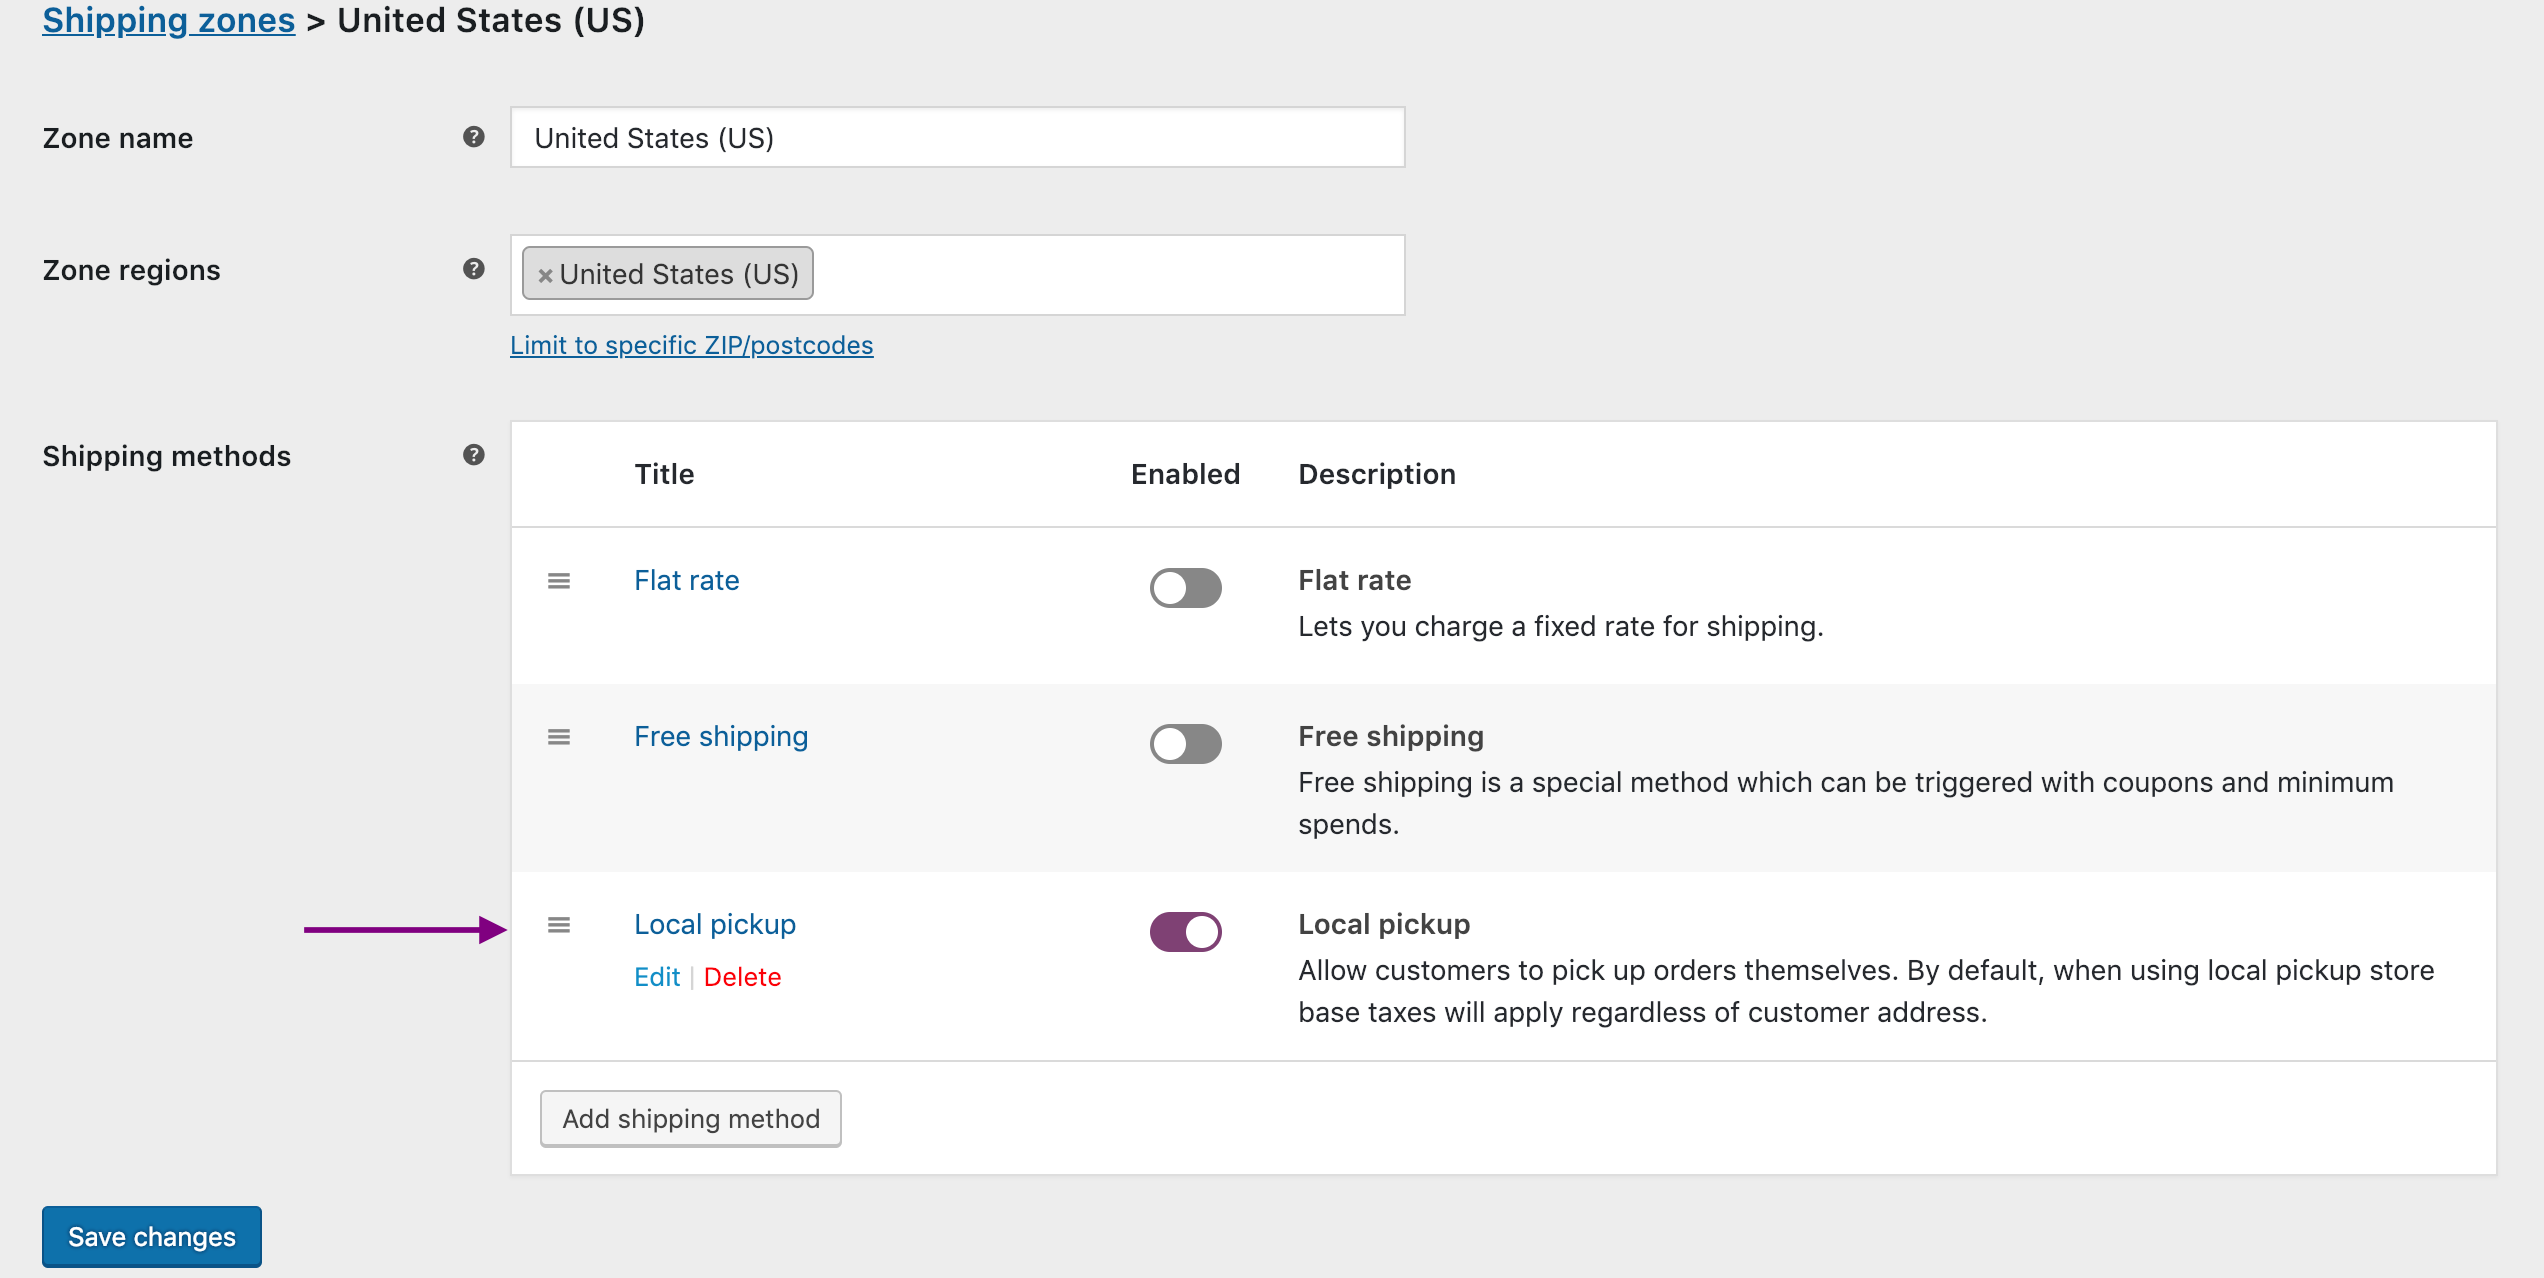
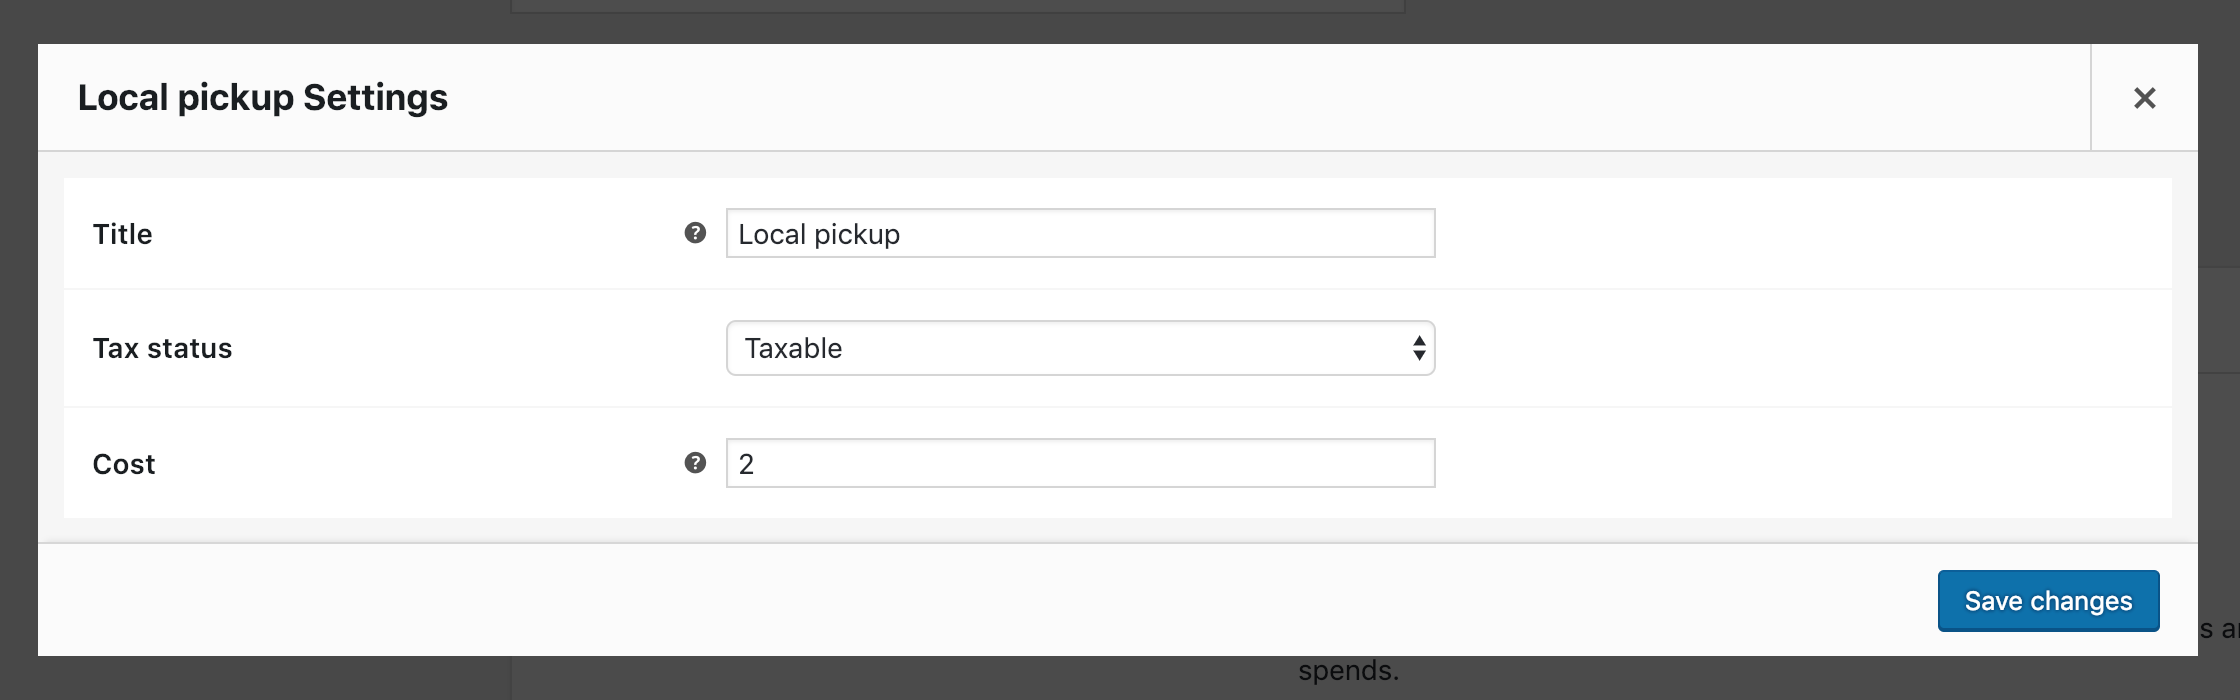
You can then click on the Edit option as shown in the image above. Doing that will open up a new window where you can change the title (people usually mention their pickup center name), choose whether or not tax is required, and define the cost for the local pickup cost. Have a look at the following image showing the local pickup settings. Once done click on Save changes option.
Let’s take an example. Suppose you have a warehouse/store where you allow local pickups but you also provide shipping at a higher price. WooCommerce populates the Cart when an item is moved into it and it displays the two shipping options. Have a look at the following image.
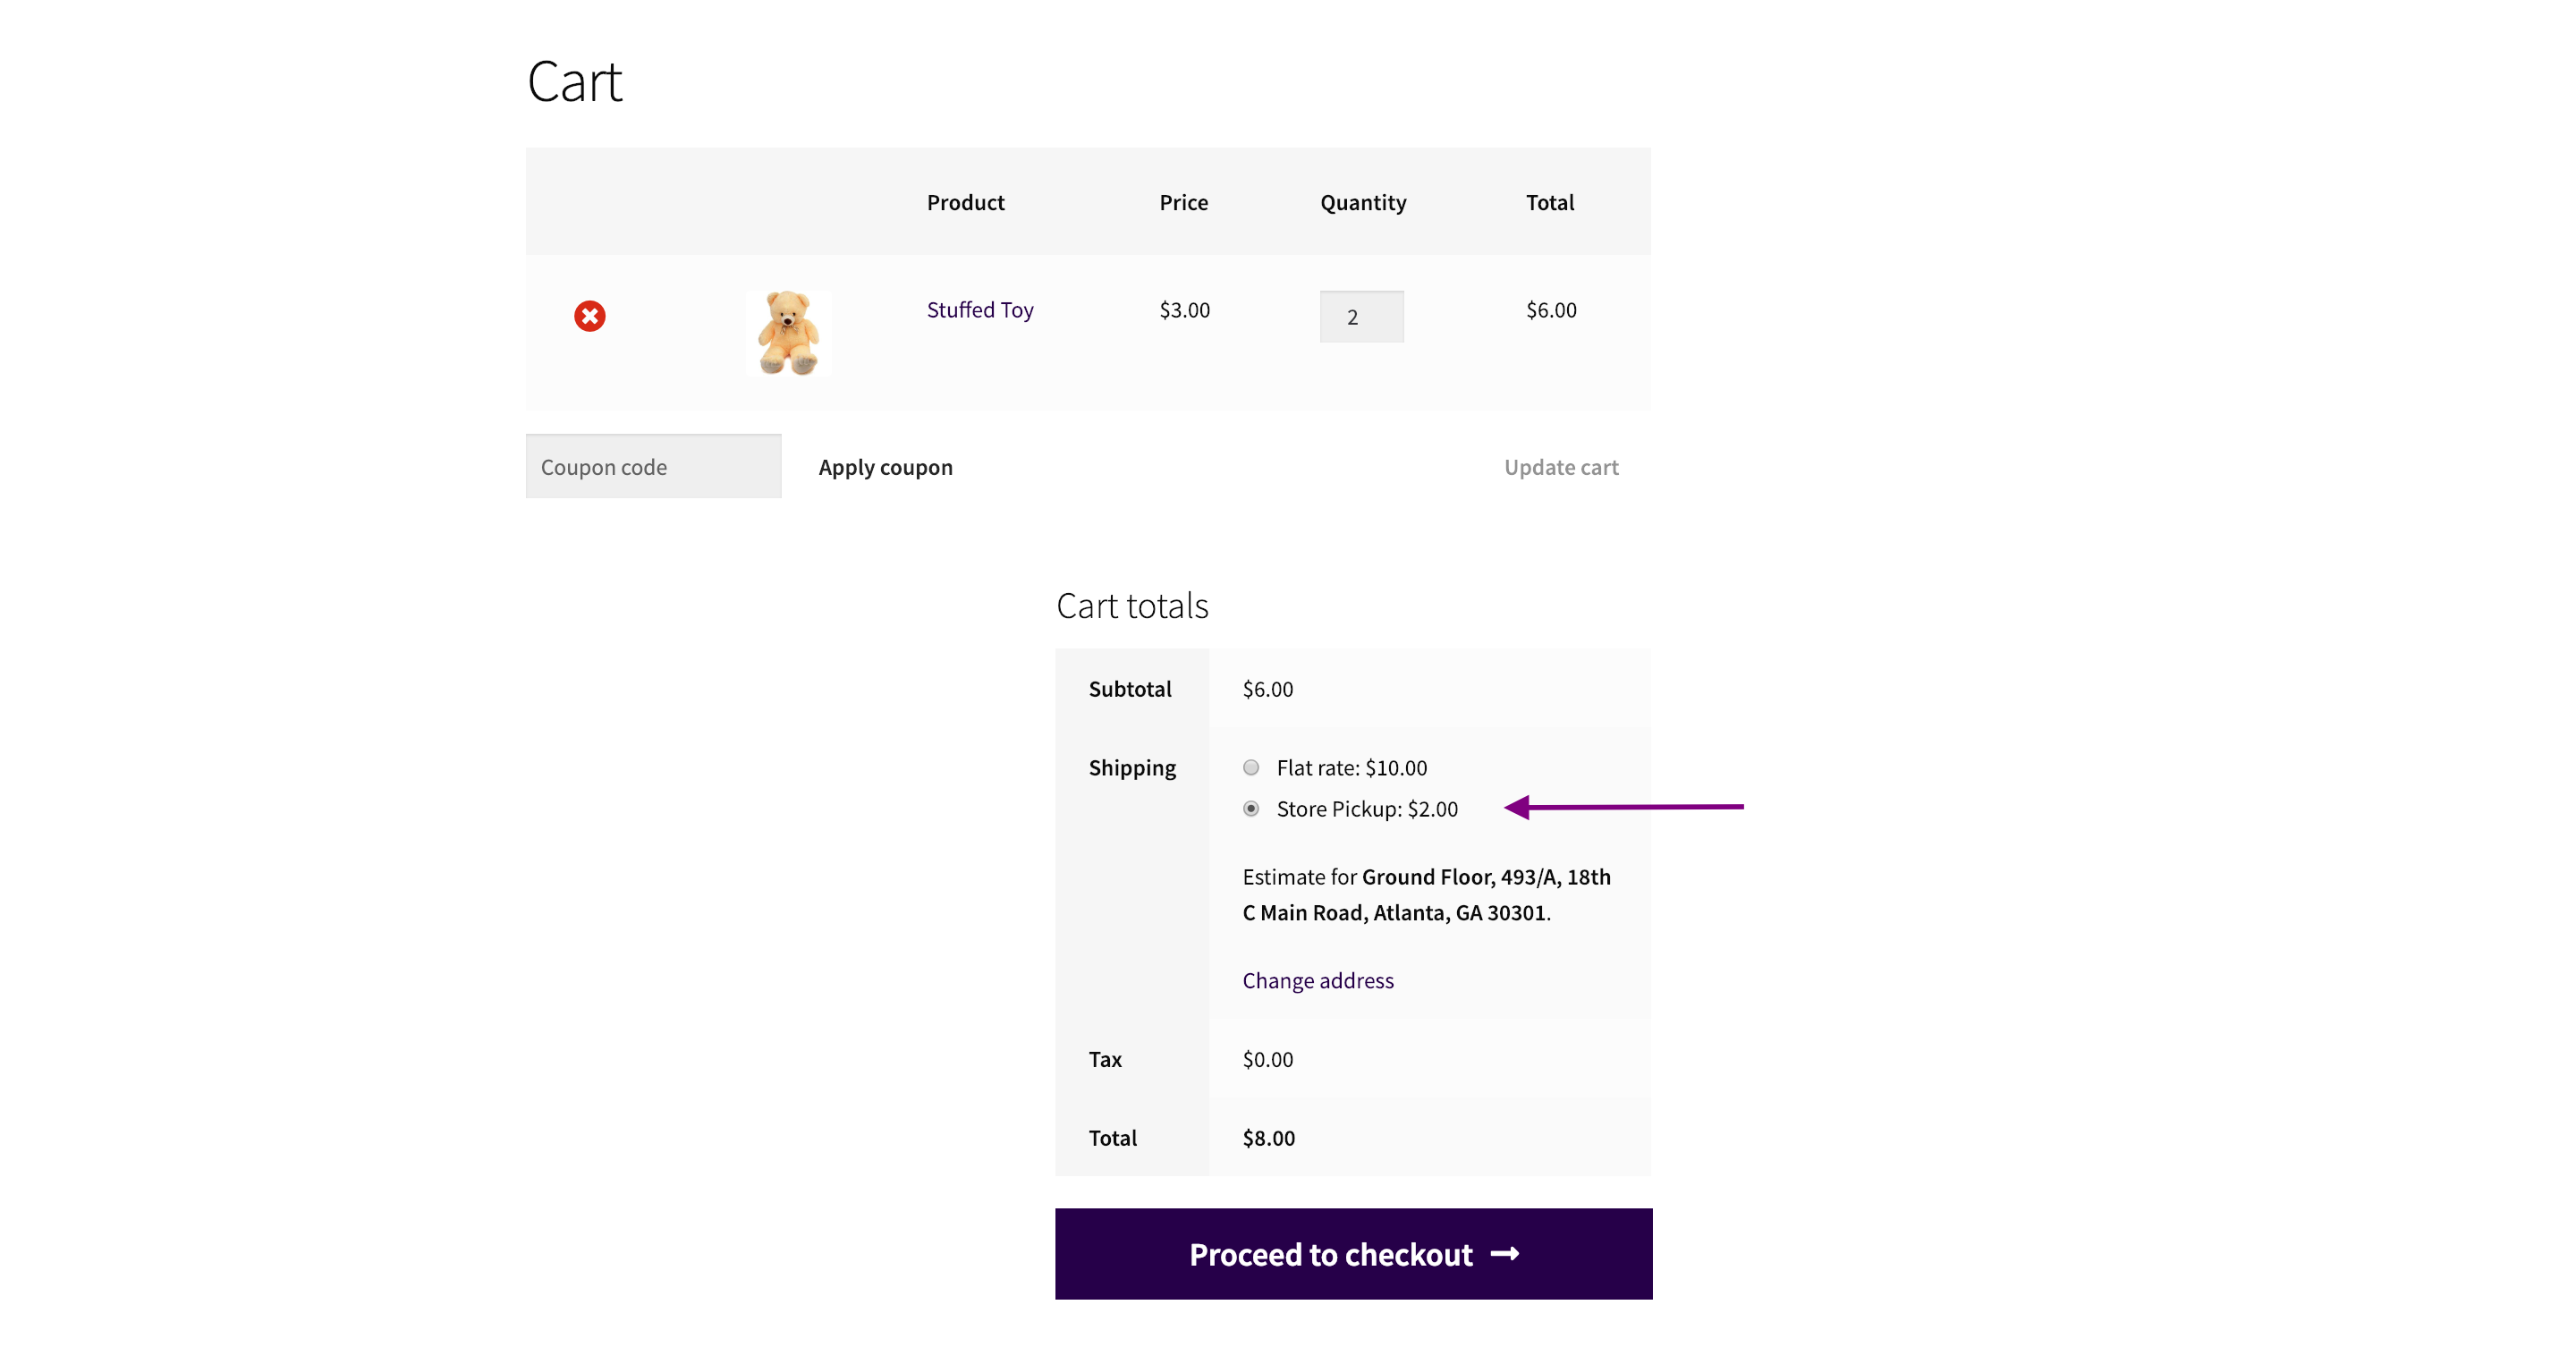
As you can see in the image above, the Cart offers Flat Rate Shipping at $10 and Store Pickup option at $2. Customers who are okay with going to the store by themselves can save money while those who don’t have time to do so could opt for the flat rate shipping.
Carrier-specific WooCommerce shipping
Now you’re entering into a rather different dimension of shipping altogether. In the carrier-specific shipping, you can provide shipping options to your customers with the help of logistics and courier services like UPS, FedEx, USPS, DHL, etc., The benefits of using this type of shipping method are endless. But let’s try to cover some of them.
Delivery speed
Couriers and logistics services usually deliver parcels and packages using their own vehicles. So they would be held responsible for any delay in the final delivery—which of course they avoid at all times. It is safe to say that WooCommerce shipping services can easily get your package to your customers on or before the estimated delivery date and time.
Parcel security
Package security is another area where the WooCommerce shipping services excel. With courier agents handling the packages personally, it is exponentially less likely for the items inside to get damaged or lost in between the delivery process. Shipping couriers pay even more attention to the packages that are insured.
Economical shipping rates
Since these couriers handle a lot of shipments each day, the overall maintenance and operation cost is less. Which is why, for example, UPS Ground is the most famous shipping service provided by UPS. UPS Ground service offer rather cheap shipping charges and most businesses use it to deliver their orders to their customers. Just to give you a number to show how cheap exactly, it takes about $8 for UPS Ground to ship a small package from New York to Atlanta, Georgia.
Ease of use
The fact is that the locality of courier services make them more accessible and accountable to their customers. Using courier services is easier when they are easy to contact, and your delivery order can be specified. You don’t have to navigate the hassles of climbing over hurdles with larger national chains or other types of delivery services. Coming back to WooCommerce, there are some really good WooCommerce shipping plugins which provide exceptional carrier-specific shipping experience with best-in-class features.
- WooCommerce UPS Shipping Plugin with Print Label
- WooCommerce FedEx Shipping Plugin with Print Label
- Multiple Carrier Shipping Plugin for WooCommerce
- WooCommerce Canada Post Shipping Plugin with Print Label
- WooCommerce Royal Mail Shipping Plugin with Tracking
Let’s check out the basic features of these plugins and see them working in action. And since almost all the plugins are somewhat similar and offer similar features, let’s begin with the WooCommerce FedEx Shipping plugin.
Displaying WooCommmerce FedEx Shipping rates
As we had explained earlier in the article, domestic shipping allows you to ship items within states or country. In order to set up the plugin for domestic shipping, you need to perform the following steps. Step 1: Install and activate the plugin on your website. Please refer the documentation for the complete process. Step 2: Once done, Open your WordPress Dashboard and then click on WooCommerce→Settings→Shipping→FedEx.Step 3: As soon as you enter the plugin settings, you need to enable the Real-time shipping rates in order to see the shipping rates on the Cart/Checkout page. Note: Please refer to the complete Setting-up documentation in order to correctly configure the plugin. You also need to get your FedEx account details (Account number, Meter Number, Services Key, Services Password) in order to make the plugin work accordingly.
Setting up domestic FedEx shipping rates
So now that you’re ready, you need to go to the Cart page and enter any domestic address. Have a look at the image below.
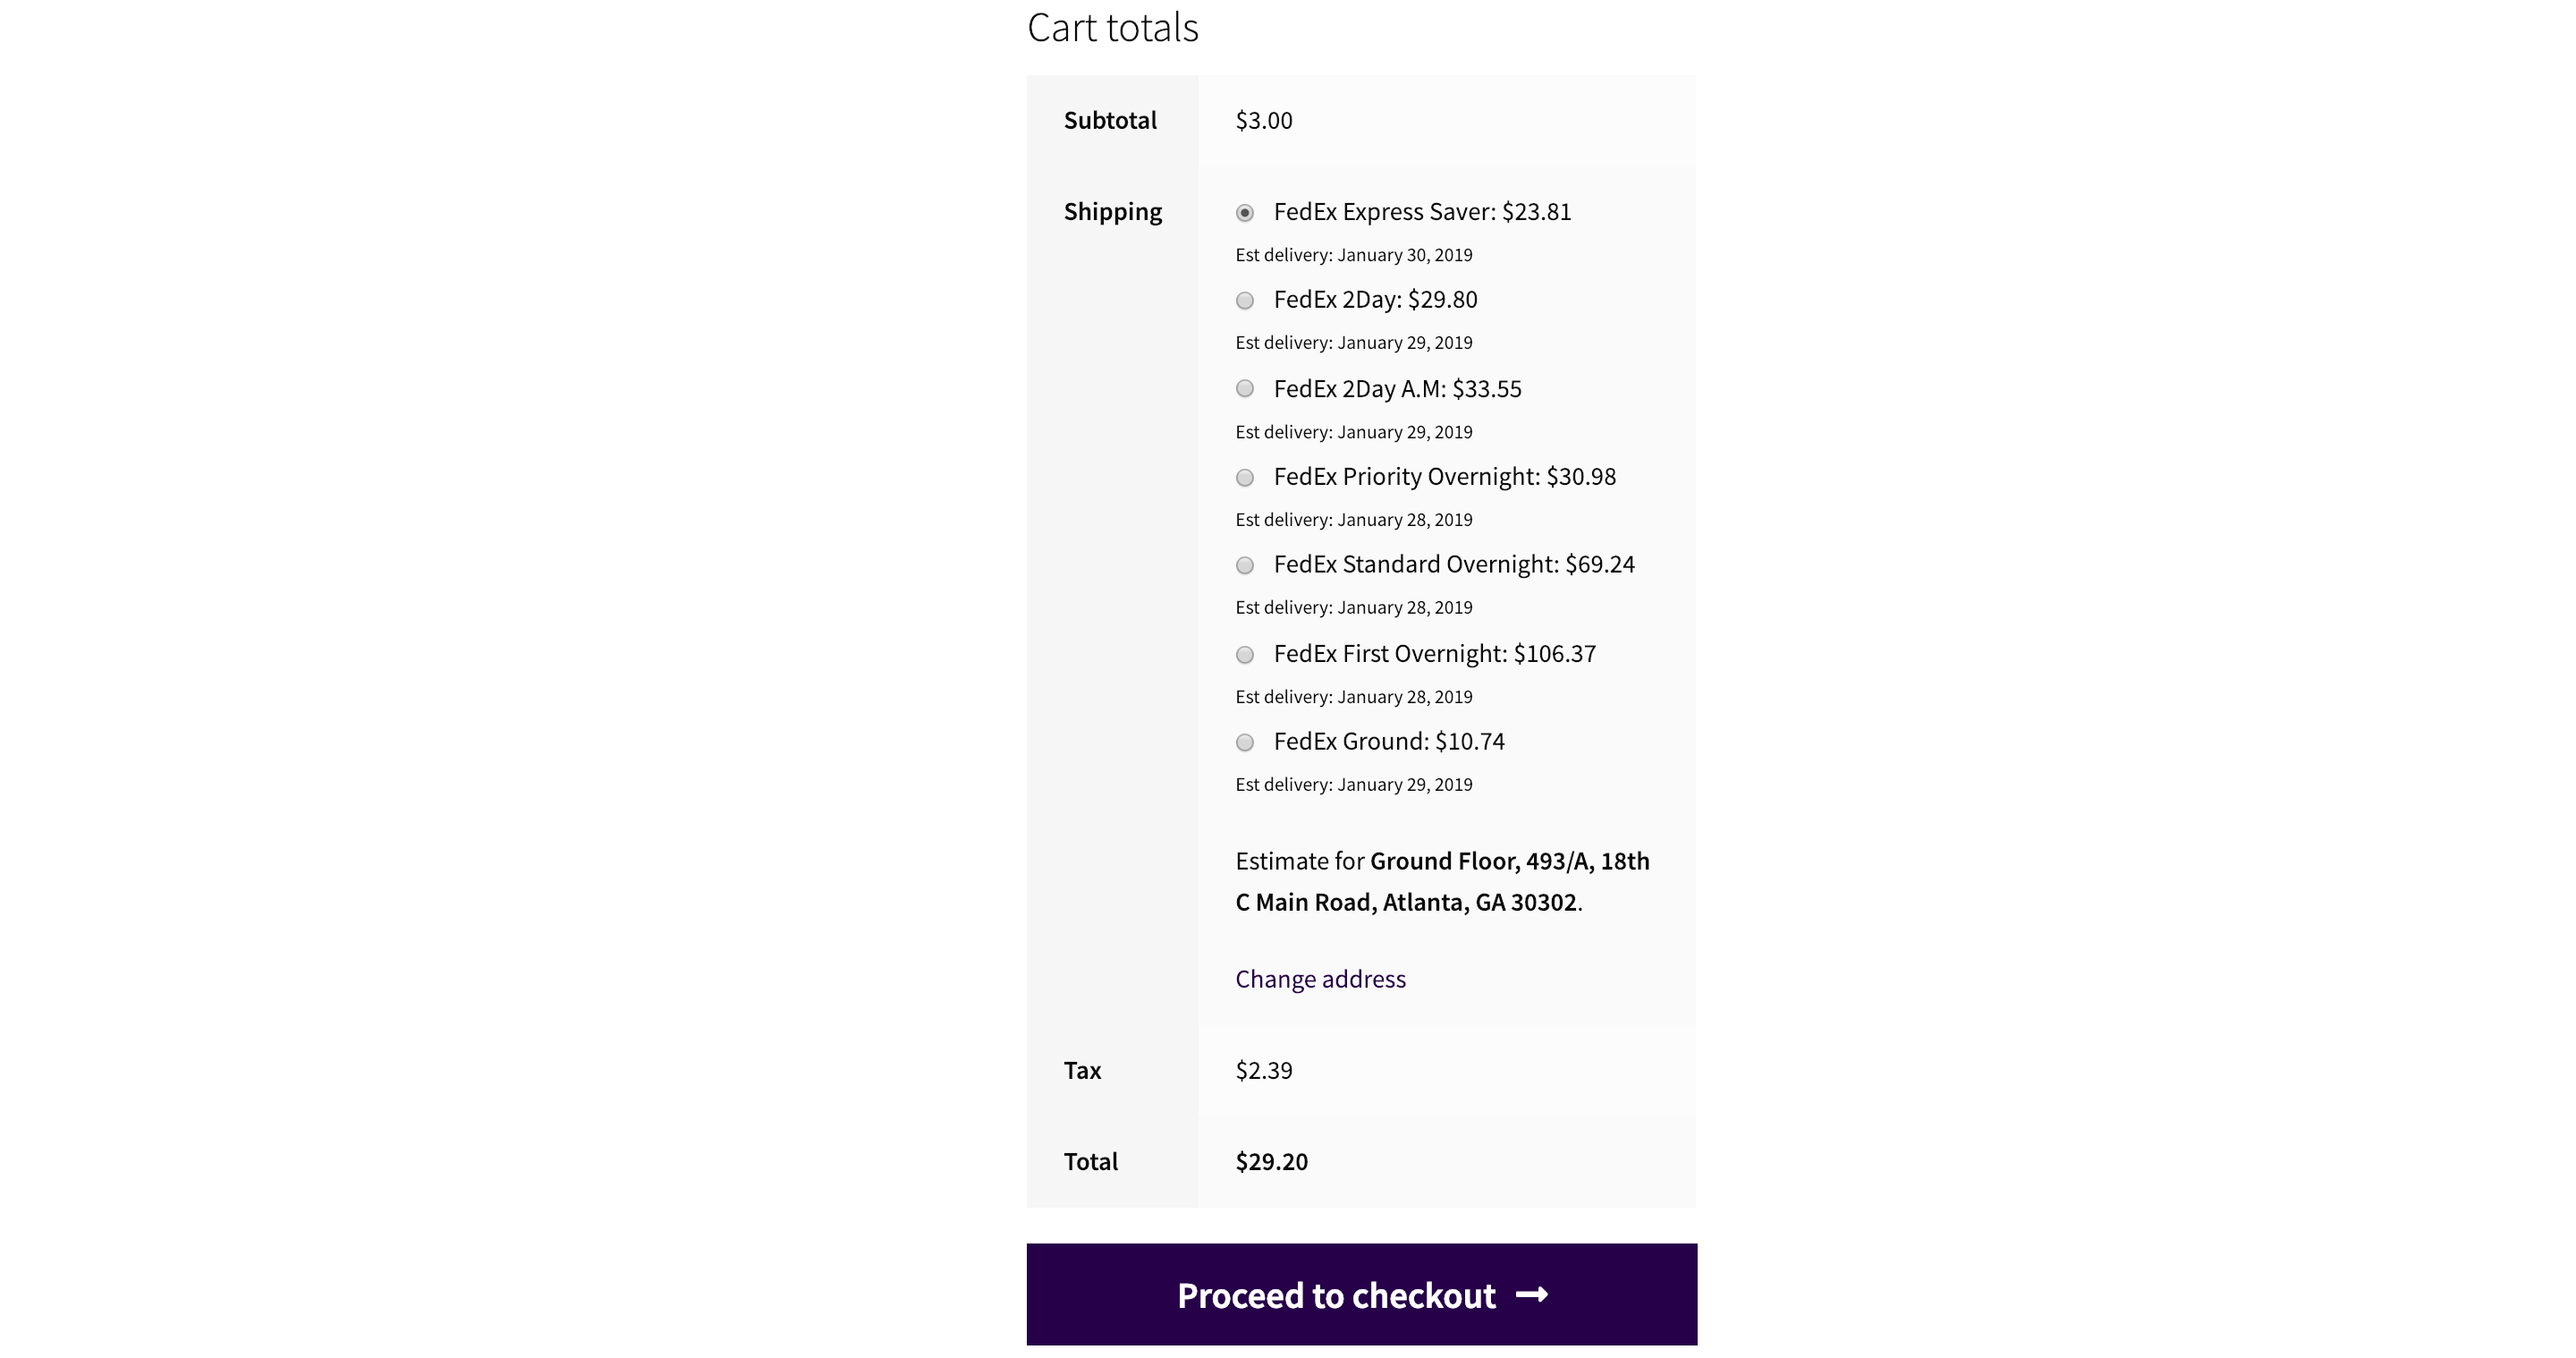
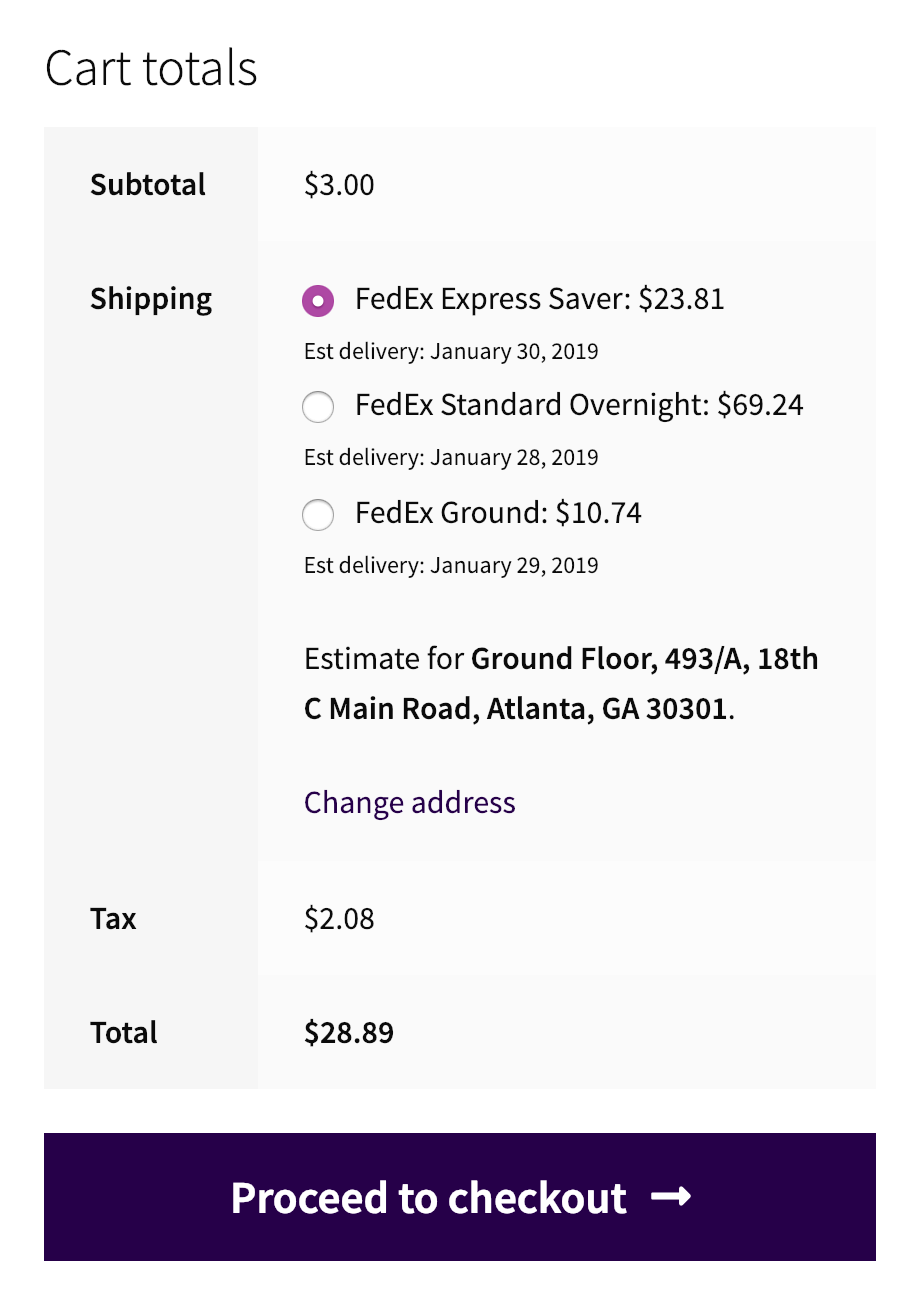
As you can see all the necessary domestic shipping services are being displayed on the Cart page. The shipping rates for the respective shipping services along with the estimated delivery dates are also displayed on the Cart page. Now if you don’t want to display all the WooCommerce shipping services and instead would like to show one or two, then you can configure that in the settings page of the plugin. You just need to disable the services that are not required as shown in the image below.
Now let’s see what modifications you can do to your products. Once you go to the Edit Product page, you would find the following options.
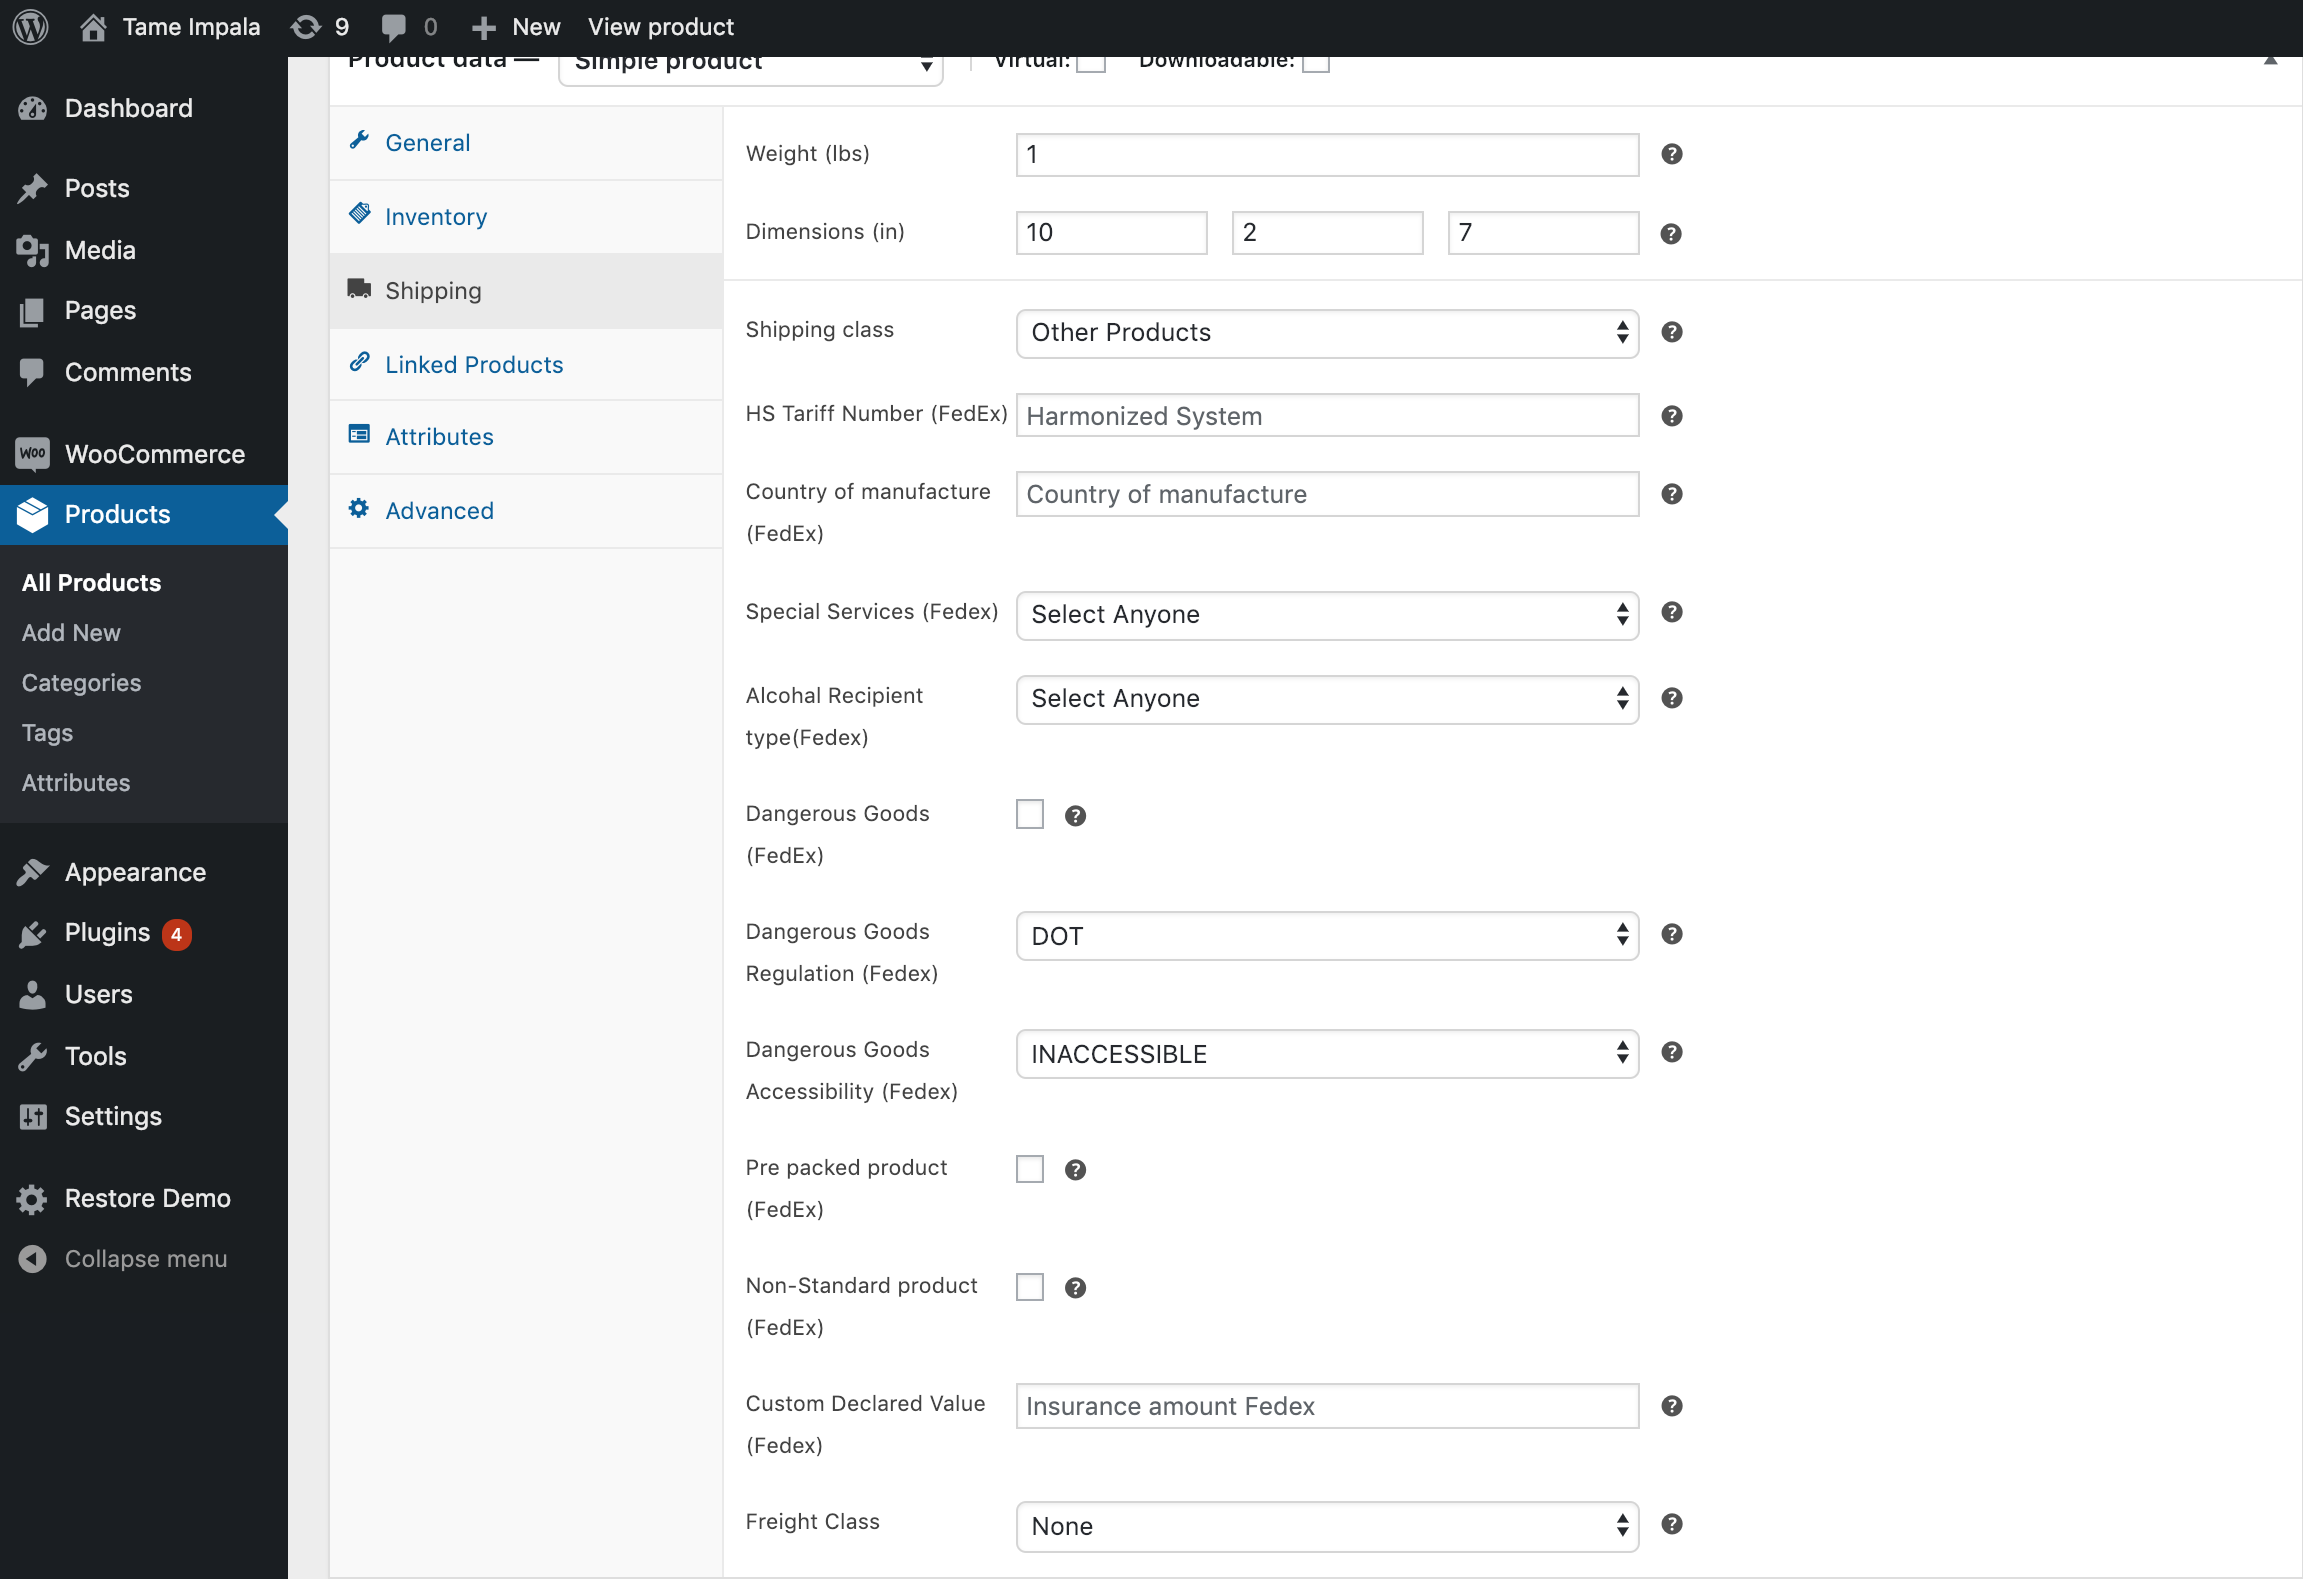
Here you can mention things like the HF Tariff Number, county of manufacture, Select special services (Alcohol), Alcohol Recipient type (if Alcohol is selected), Dangerous Goods, etc., These options help you legally ship alcohol and wines via FedEx services, and also pack dry ice to ship frozen items in FedEx boxes.
Setting up international FedEx shipping rates
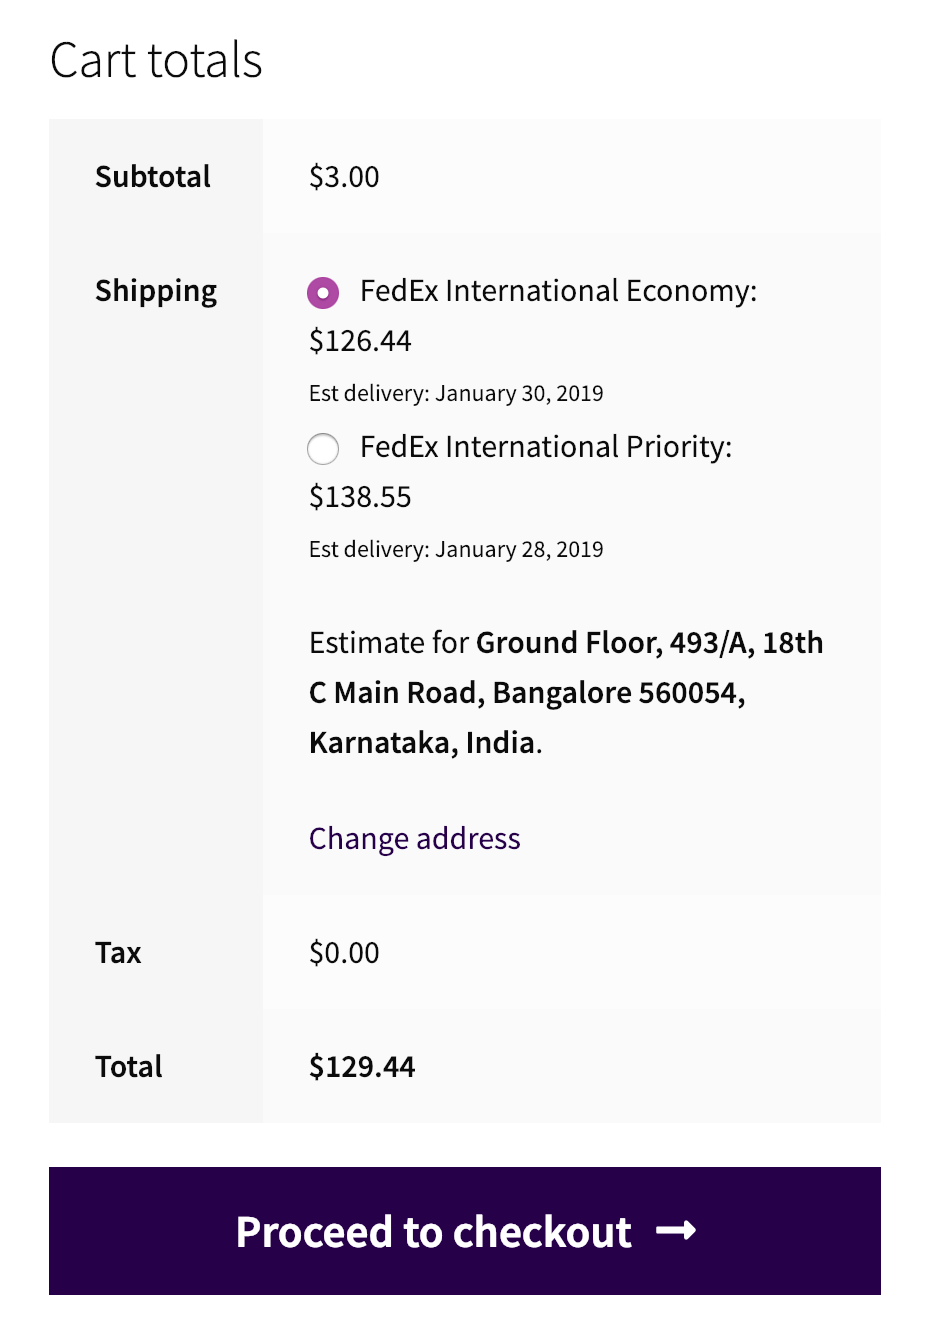
The FedEx international shipping rates also work in a similar fashion. If you have the international services enabled, your customers should be able to see the services along with the WooCommerce shipping rates on the Cart page like before. Have a look at the image when an international destination is entered.
Printing FedEx shipping labels from WooCommerce
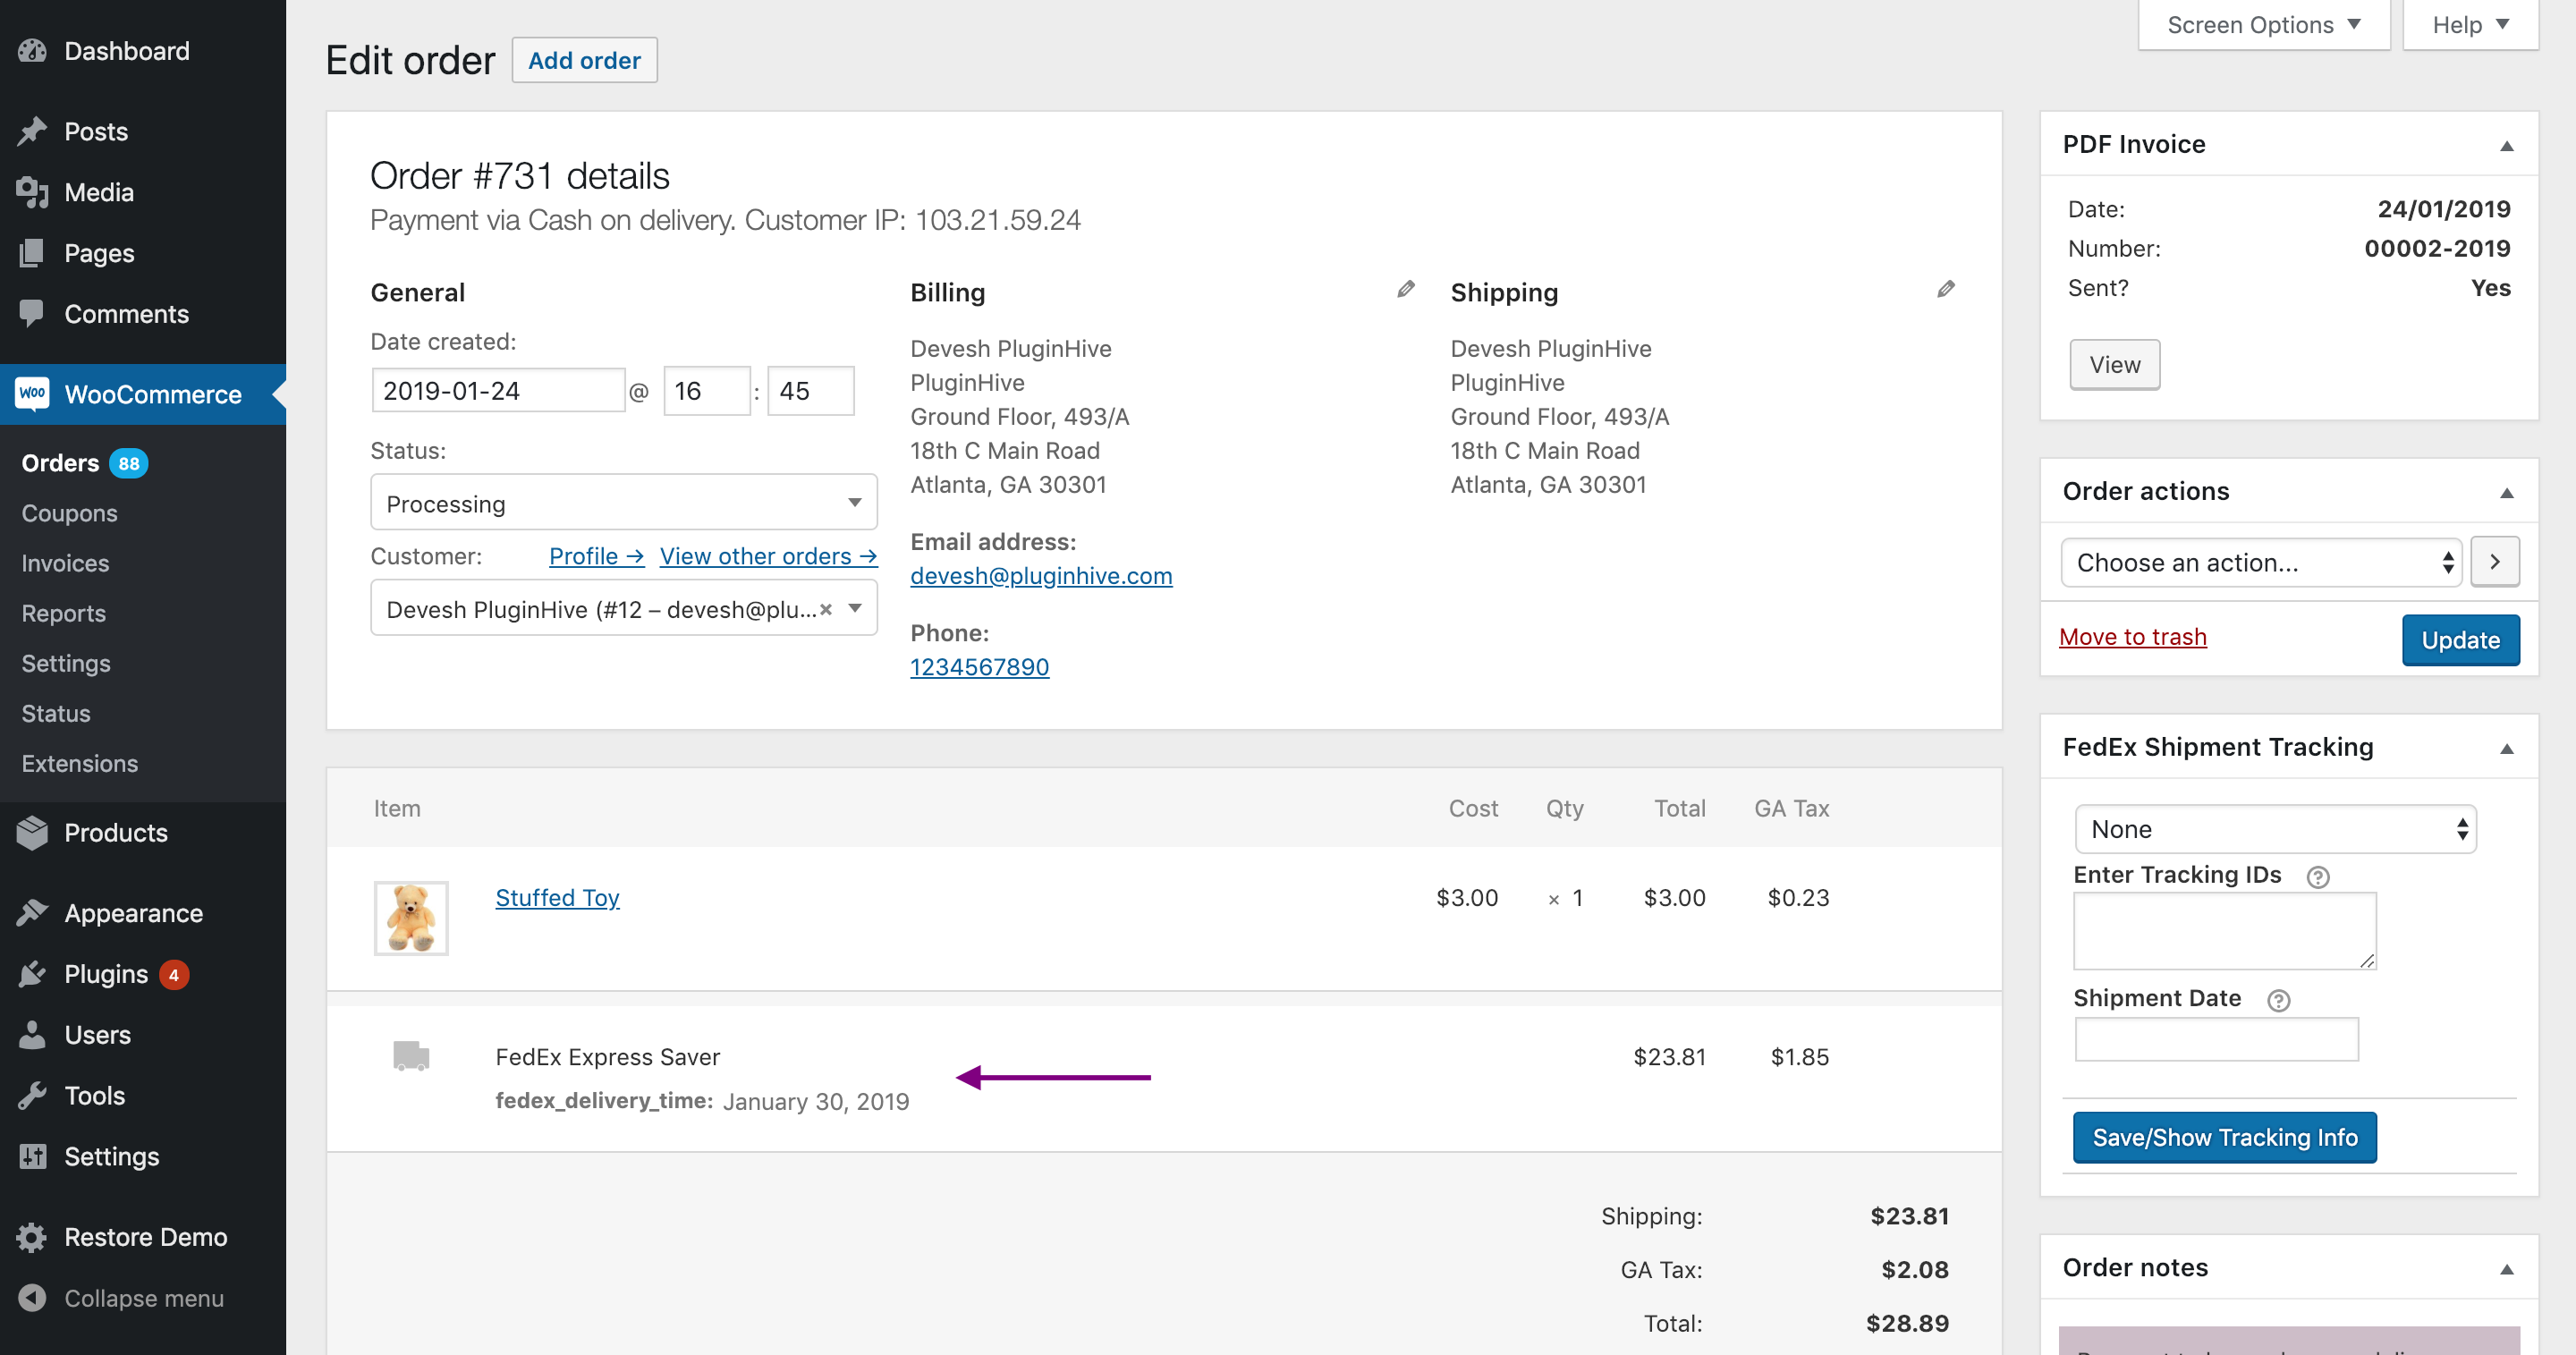
Now let’s explore another feature of the WooCommerce FedEx Shipping plugin—printing shipping labels. You need to go to the plugin settings page and set up the label printing option. Please refer to the setting up documentation again to see how to do that. Let’s go ahead and print the WooCommerce shipping label for the following order. As you can see in the image below, the FedEx shipping service is attached along with the order.
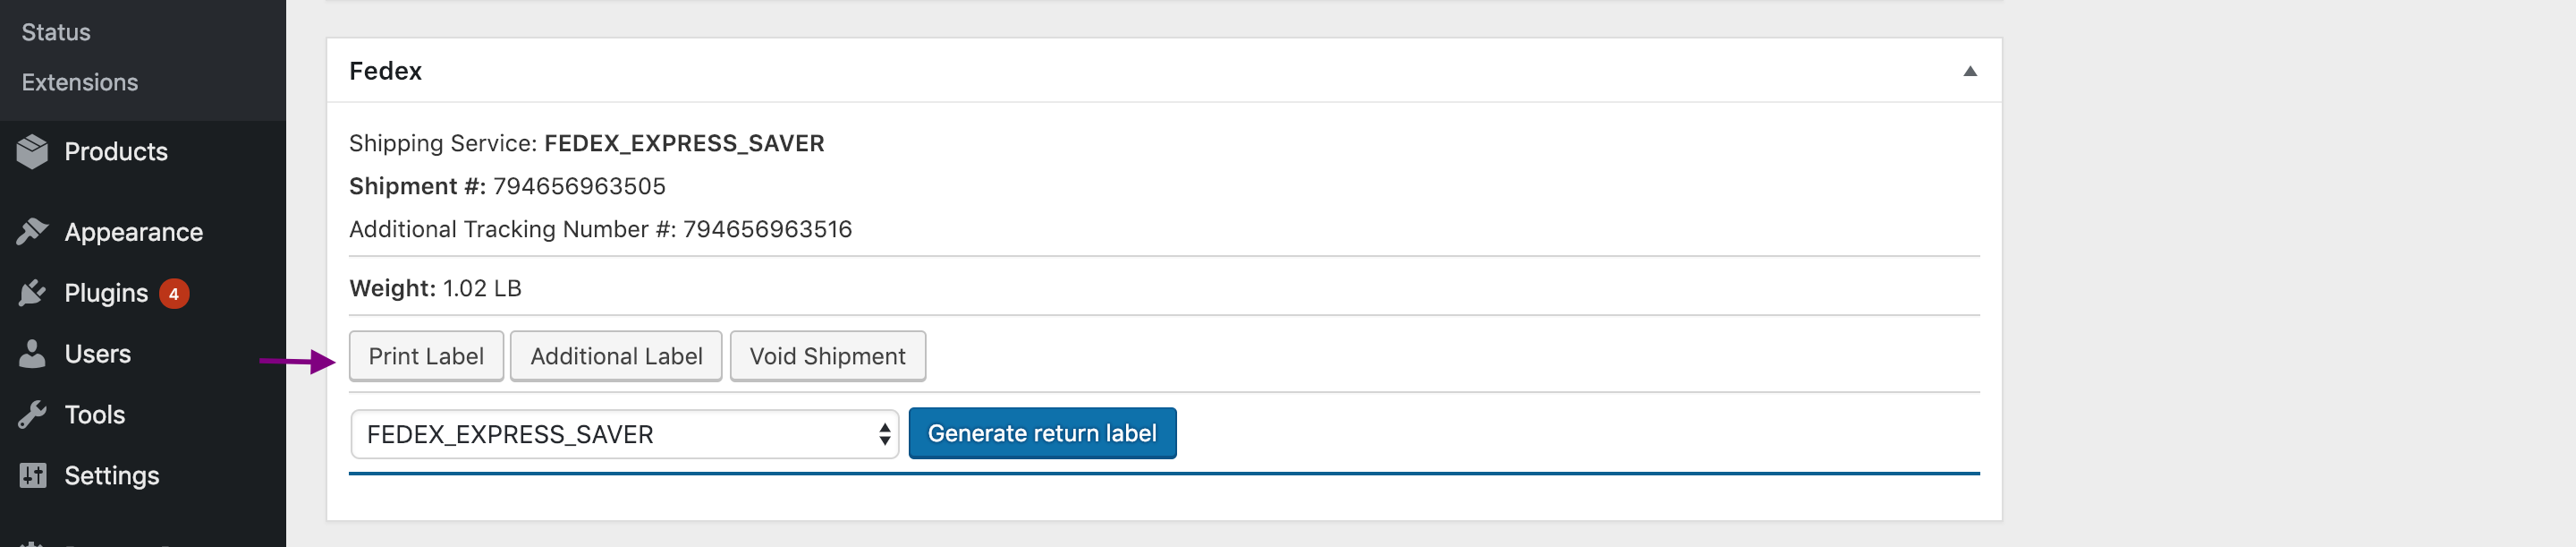
If you scroll down below, you would be able to find the FedEx option where you could generate the packages. You can automate this process, and for that, you need to configure it inside the plugin.

As soon as you click on that option, you would find options where you can add additional packages or change the shipping service. And once you click on the Create shipment option, the plugin will display the following options to print the WooCommerce shipping labels.
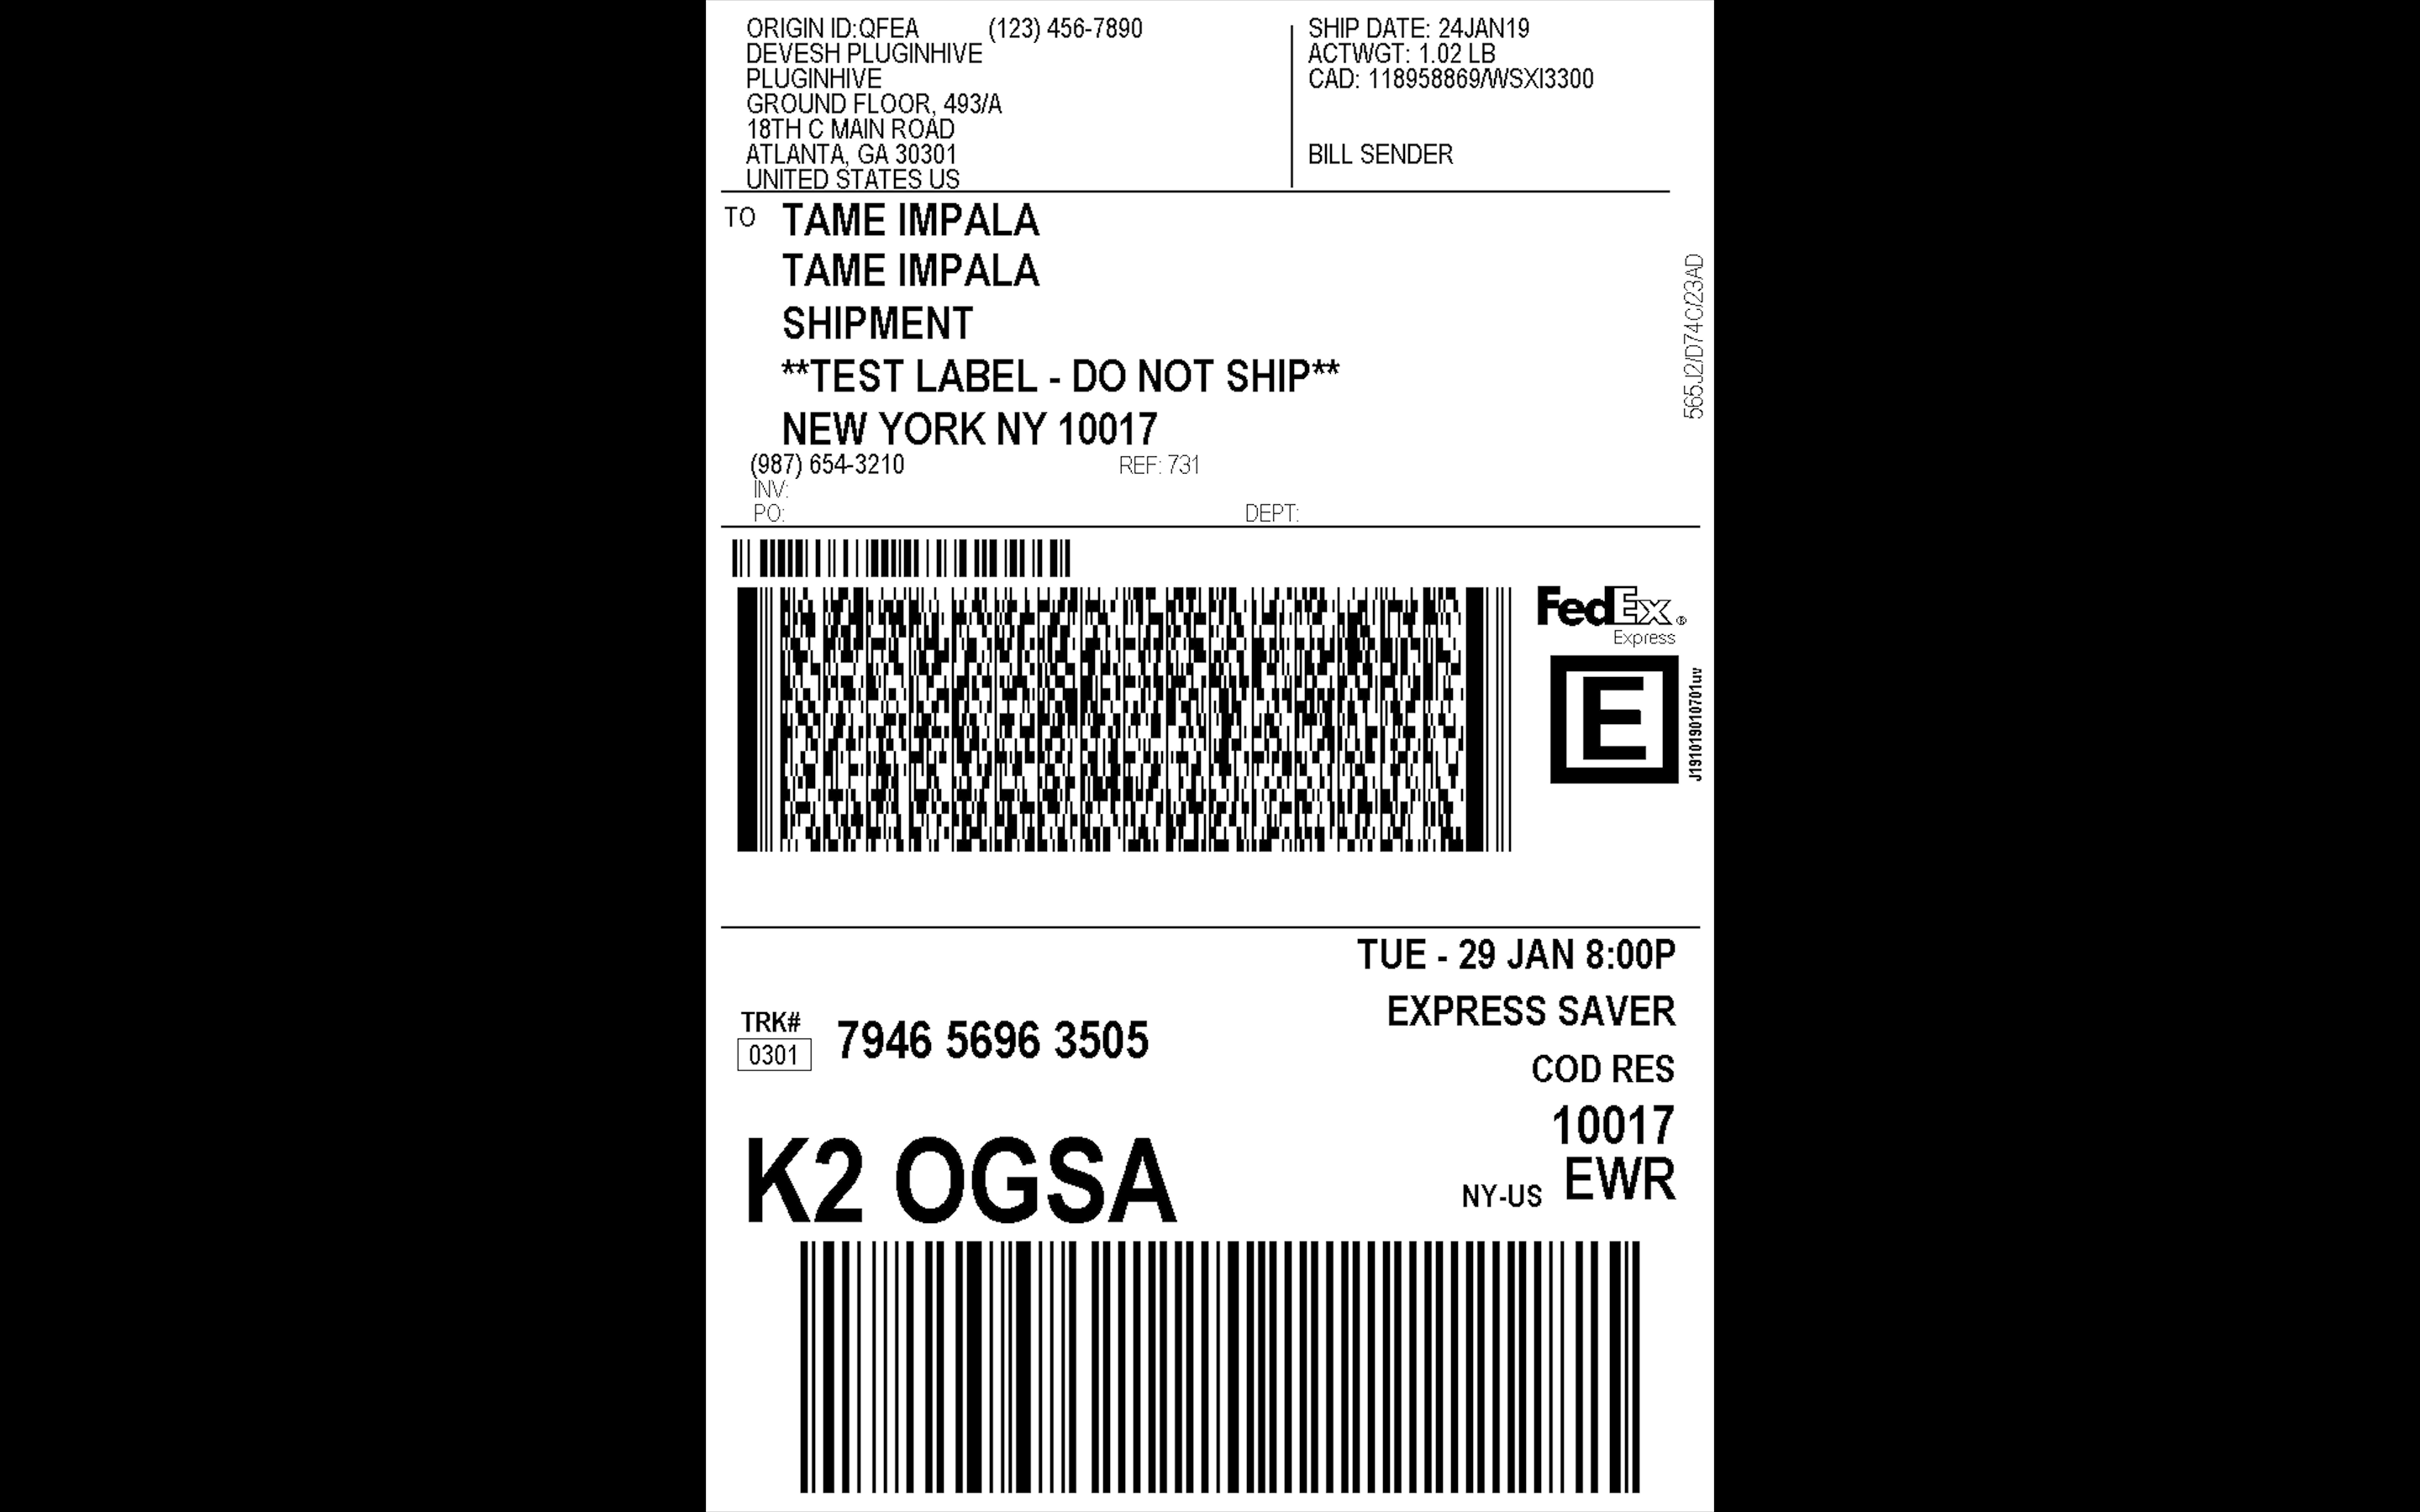
Here’s a sample WooCommerce shipping label which you could attach to your package.
WooCommerce shipment tracking for FedEx packages
As soon as you create the shipment, you would see that the tracking information is automatically filled in the shipment tracking option as shown in the image below.
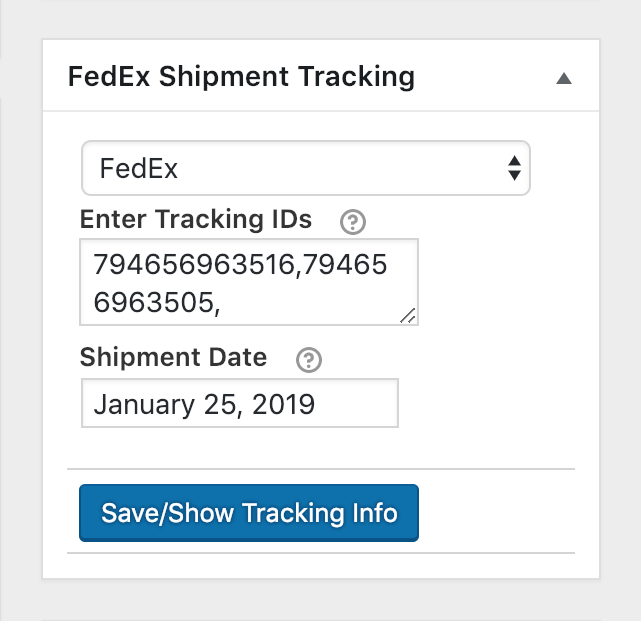
This tracking information will also be sent to the customer via the Order completion email generated by WooCommerce. Customers can click on the tracking link and directly go to the tracking page on FedEx. Here are some amazing articles that you should check to see this plugin working.
- Create And Ship WooCommerce Custom Product Assortments via FedEx
- Volumetric Weight Based Shipping
- How to handle Shipping with FedEx Non-Standard Packages?
- Understanding FedEx WooCommerce Shipping Plugin Packing Methods
- Generating Bulk Shipping Labels Made Easy
You can also check out a few other guides on the WooCommerce FedEx Shipping Plugins documentation page. Other shipping plugins like the WooCommerce UPS Shipping, WooCommerce Canada Post Shipping, and WooCommerce Royal Mail Shipping plugins work in a similar way. The only exception is the Royal Mail plugin where you don’t get the print shipping label option as it’s not provided by the Royal Mail API.
Offering multiple shipping options with WooCommerce Multi-Carrier Shipping plugin
You can offer multiple shipping options from shipping carriers like UPS, FedEx, DHL, USPS, and Stamps.com USPS. For that, you need to define the shipping rules in the Multi-Carrier plugin. And to be specific, you can set the shipping rates based on the rules based on Country, State, Post Code, Product Category, Shipping Class, Product Weight, Shipping Company, and Shipping Service. You can either create the shipping rules outside and then import it using the CSV upload feature. You can check out this guide to see how to do that. Here is a sample of shipping rules including the shipping carriers—UPS, FedEx, and USPS.
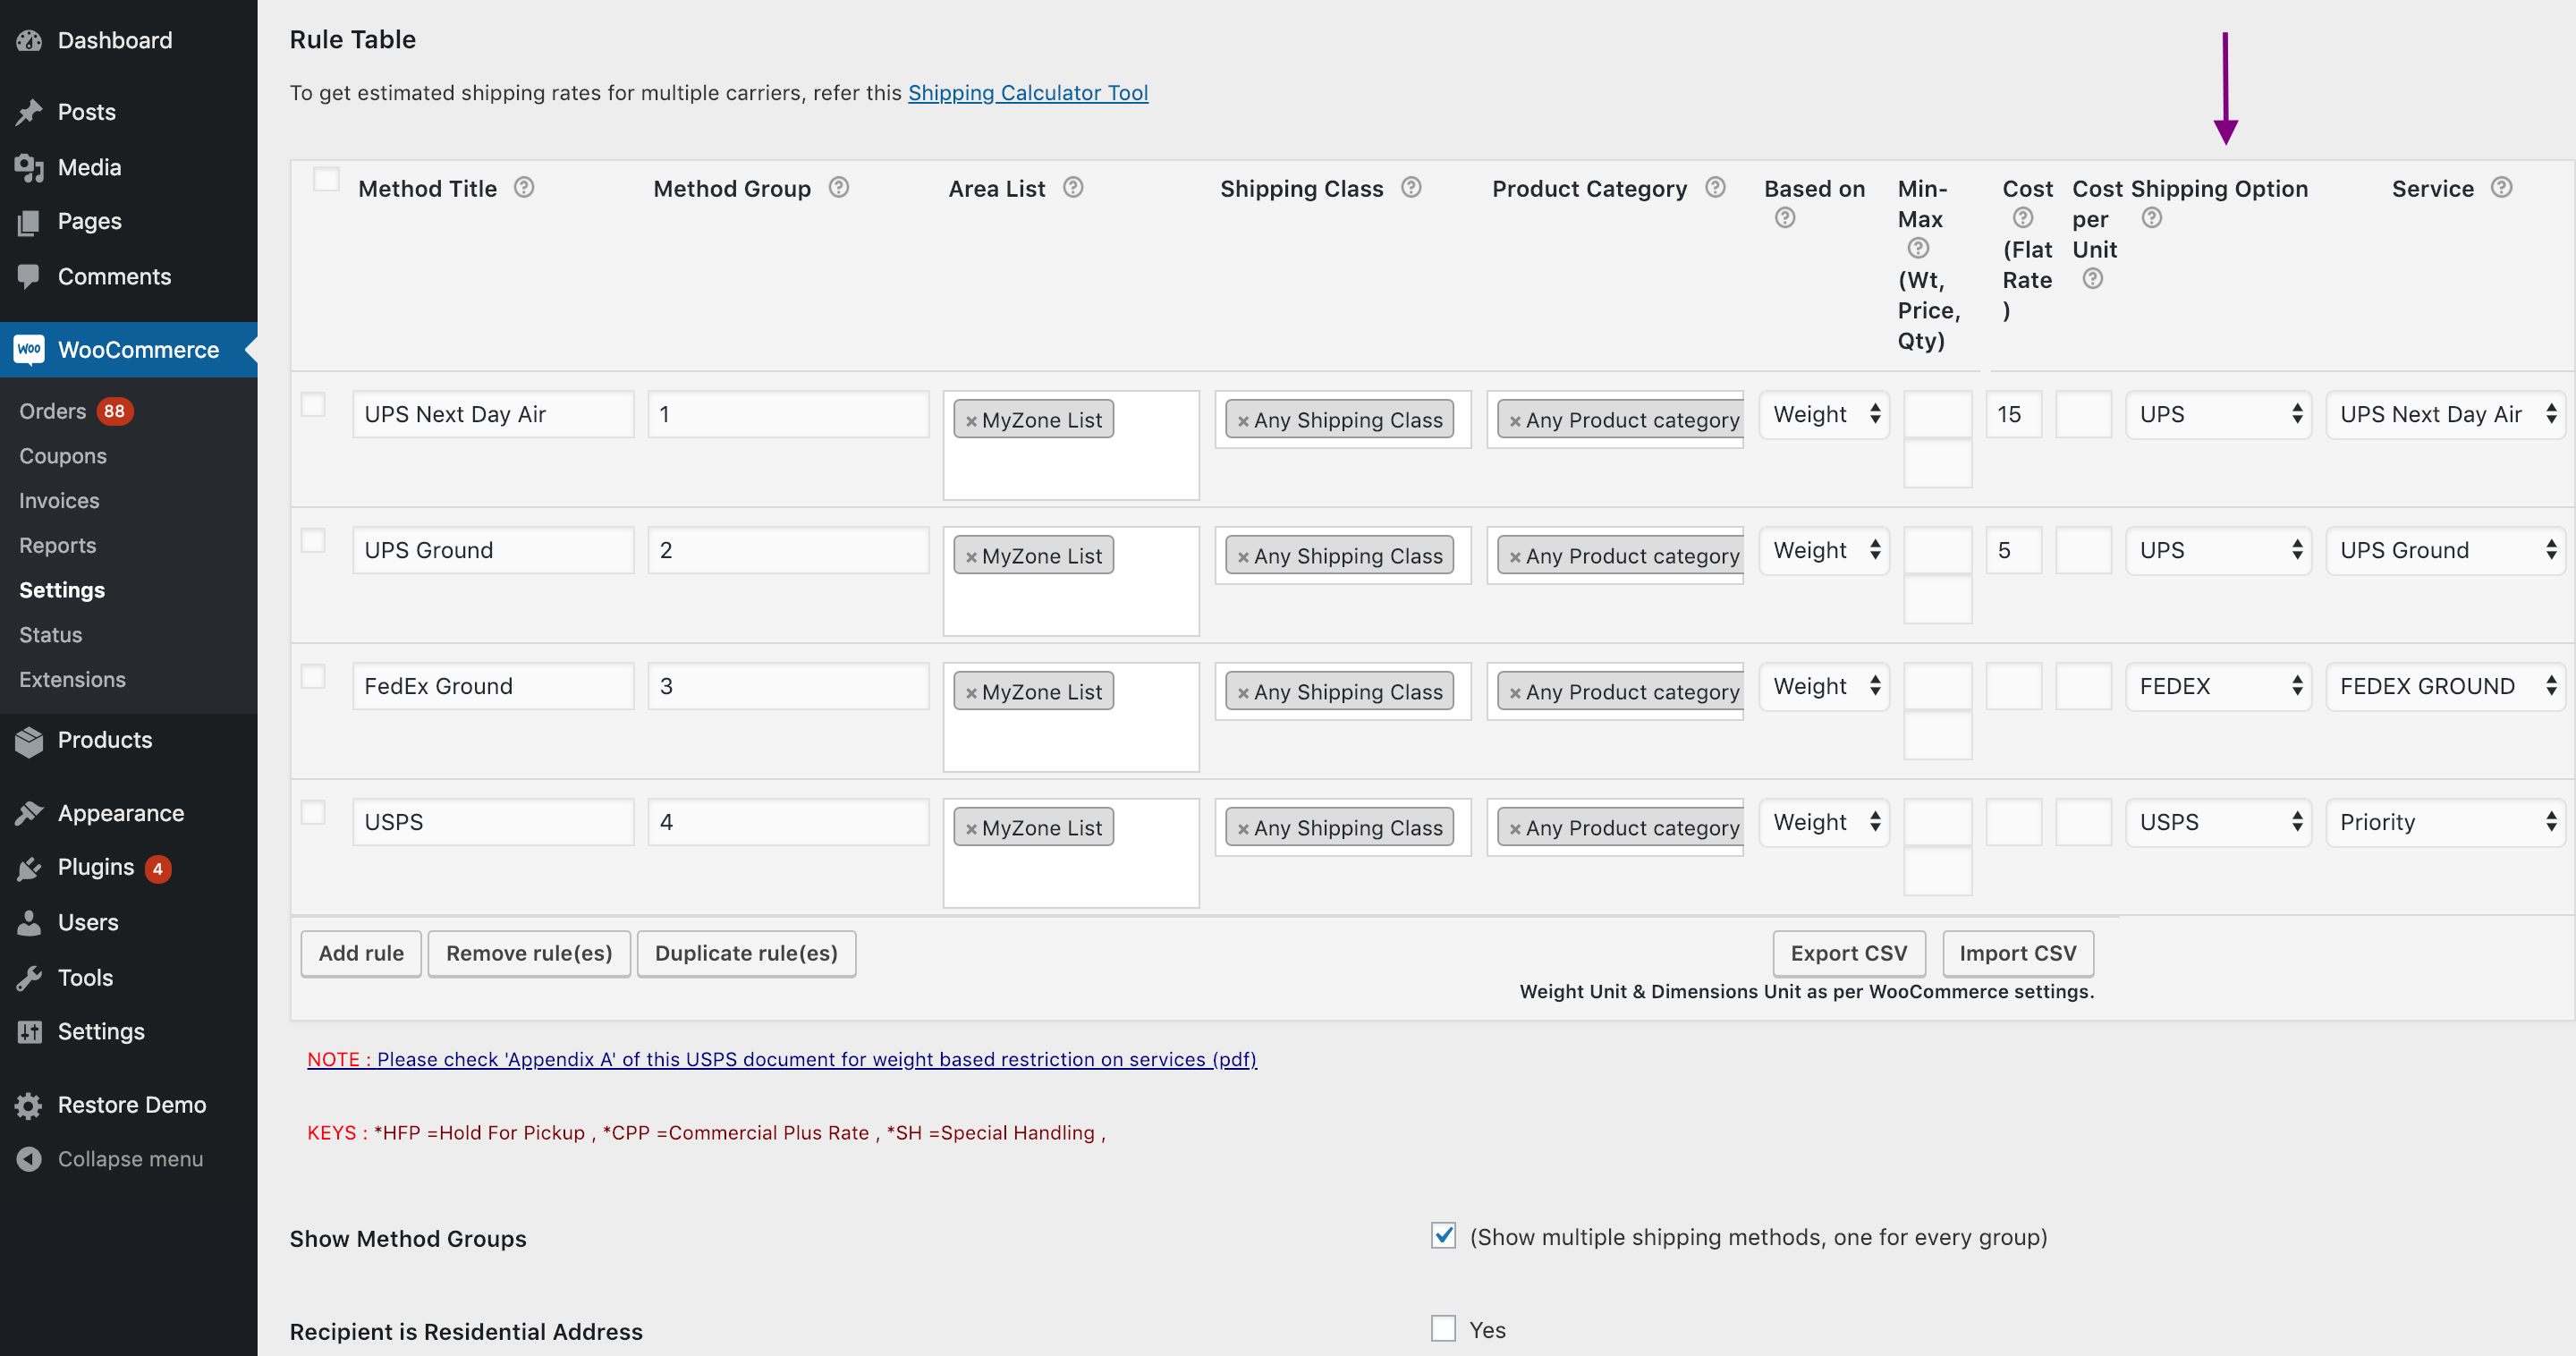
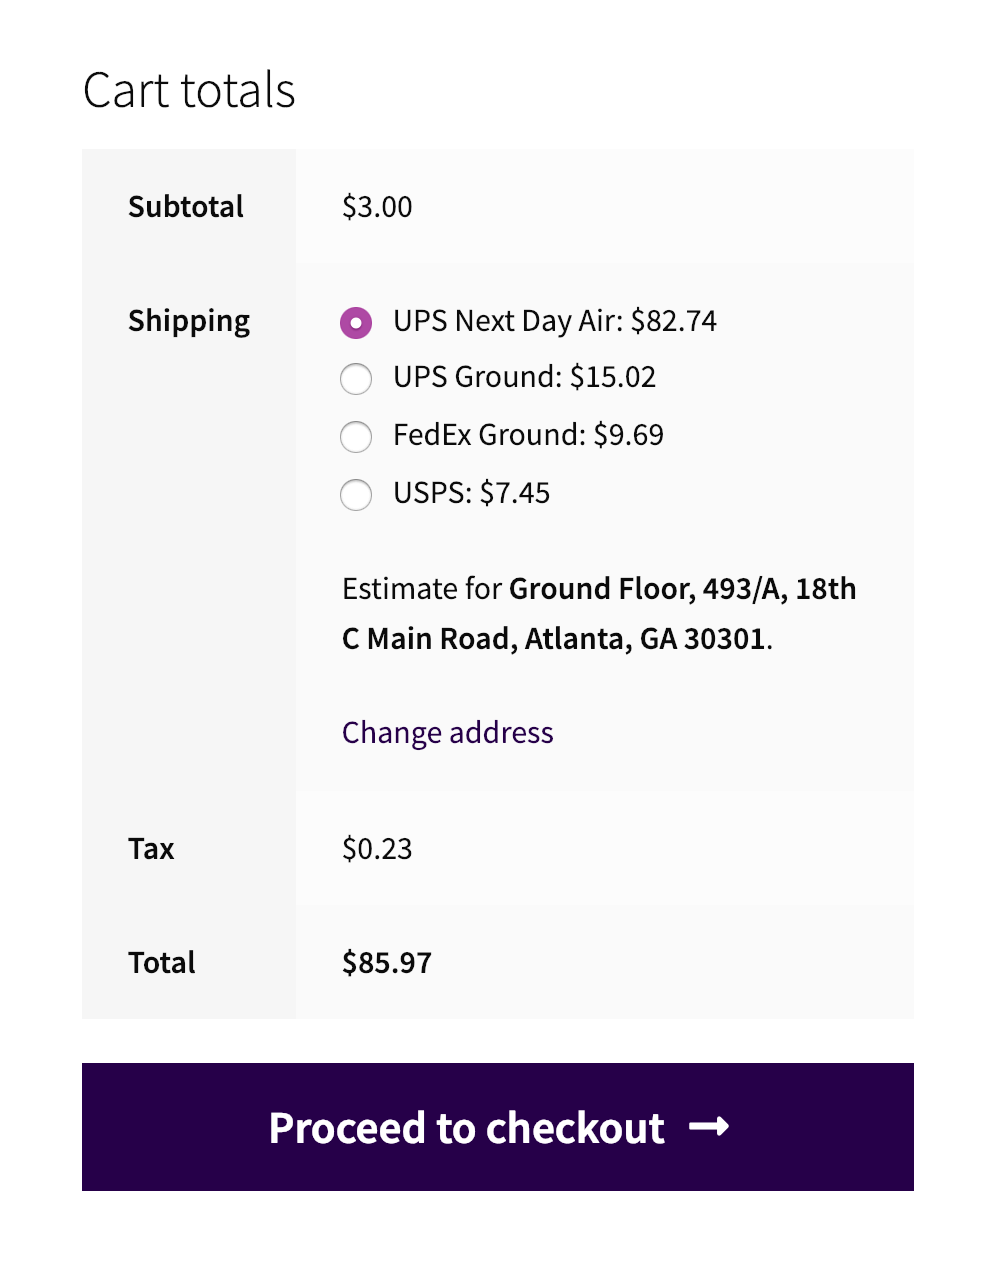
As you can see, you can set rules based on parameters like the area list, shipping class, product category, etc., and choose the appropriate shipping options and services. Here’s how the Cart page would like if you enter an item in it.
Here are some amazing use cases where you can use the WooCommerce Multi-Carrier Shipping plugin to implement your business case. Please go through all of them.
- Allow Customers to choose Shipping Service from Different Carriers
- Save Shipping Cost by providing USPS Flat Rate for Domestic Shipments and UPS for International Shipments
- Add Extra Charges to the Shipping Rates
- How to select a shipping method based on the total weight of the cart, USPS for under 10 LBS, and UPS for the rest?
You can check out more in the WooCommerce Multi-Carrier Shipping Plugin documentation.
WooCommerce table rate shipping
WooCommerce table rate shipping, most commonly known as WooCommerce conditional shipping, is one of the most advanced ways of configuring WooCommerce shipping on your online store. This special kind of WooCommerce shipping practice will give you supreme control over the shipping and how your products behave on the Cart page. The best part is you don’t have to be a genius to put two and two together. With the WooCommerce Table Rate Shipping Pro, you can set up rules in order to calculate the shipping rates for a combination of conditions. If the user’s cart matches the conditions in the rule, the WooCommerce shipping cost you have defined in that rule is applied.
WooCommerce conditional shipping based on various parameters
The WooCommerce Table Rate Shipping plugin allows you to set and define the shipping rules based on the following parameters.
- Product/Order Total Weight
- Product Quantity in Cart
- Total Price of all Products in Cart
- Different Product Categories
- WooCommerce Shipping Classes
- WooCommerce Shipping Zones
- Destination Country
- Destination Address Fields such as City and State
- Different ZIP Codes
You can also set the things like WooCommerce Per Product Shipping and WooCommerce Bundled Rate shipping using the add-ons. The WooCommerce Table Rate Shipping plugin works like the WooCommerce Multi-Carrier Shipping plugin. The only difference is that you don’t have to select any shipping service or shipping option. Now let’s take two examples and see how the plugin works in general.
WooCommerce Shipping based on city
Let’s consider a shipping scenario where a store owner, Sam, wants to run an online electronics store. Most of his customers are from the three cities of Dubai, Sharjah and Abu Dhabi. So to promote sales further, Sam wants to provide Free Shipping to all his customers in those cities. WooCommerce Table Rate Shipping has a number of matrix columns based on which it allows customers to configure shipping rates. It offers a dedicated matrix column to the name of the city where the store owner wants to ship. The only difference is that unlike other columns such as Country, State, etc, City column doesn’t have a list. The store owner has to write the name of the cities in that column.
So based on Sam’s scenario the shipping rules will be something like this,

Setting up WooCommerce shipping based on city
Based on this information we can easily configure the shipping rules using the WooCommerce Table Rate Shipping plugin. Once configured, the above-mentioned shipping rules will be applied in WooCommerce Table Rate Shipping Pro in a manner similar to the image below.

The above image clearly shows the shipping rules mentioned for the cities of Dubai, Abu Dhabi and Sharjah. Also, since Sam requires standard shipping for the rest of the cities, he will have to keep the city field blank for that rule. By default, that rule will be applicable to all the cities in UAE. One more thing worth noticing is that since those three cities are also in UAE, the standard shipping will also apply to them. To avoid such a scenario, the shipping rules in WooCommerce Table Rate Shipping need to be configured in such a way that if multiple rules are matched, the rule with minimum shipping value must be selected. Have a look at the following video:
WooCommerce Shipping based on quantity
Let’s consider the example of Joe, who owns an online retail store based in California, US. Joe has a variety of products which he sells across the country. But to keep the demand going, and his customers happy, he has found a way that will make him the first choice when it comes to his customers. According to Joe, his top customers purchase products in bulk. Most of the time they have to face a heavy shipping price. But Joe is planning to counter that with a solution that will allow him to personalize his WooCommerce shipping cost per item, and not per weight. According to Joe, he wants his customers to pay shipping cost based on the following factors:
- Free Shipping if there is only one product in the cart.
- The shipping cost of $10 up to 3 items in the cart.
- The shipping cost of $15 up to 5 items in the cart.
- Up to 10 items shipping will be charged $24.
- If the cart contains more than 10 items then the shipping will be charged like $30 fixed and $0.5 per additional item.
Now let’s check out how this shipping scenario can be configured using WooCommerce Table Rate Shipping Pro plugin.
Setting up WooCommerce shipping based on quantity
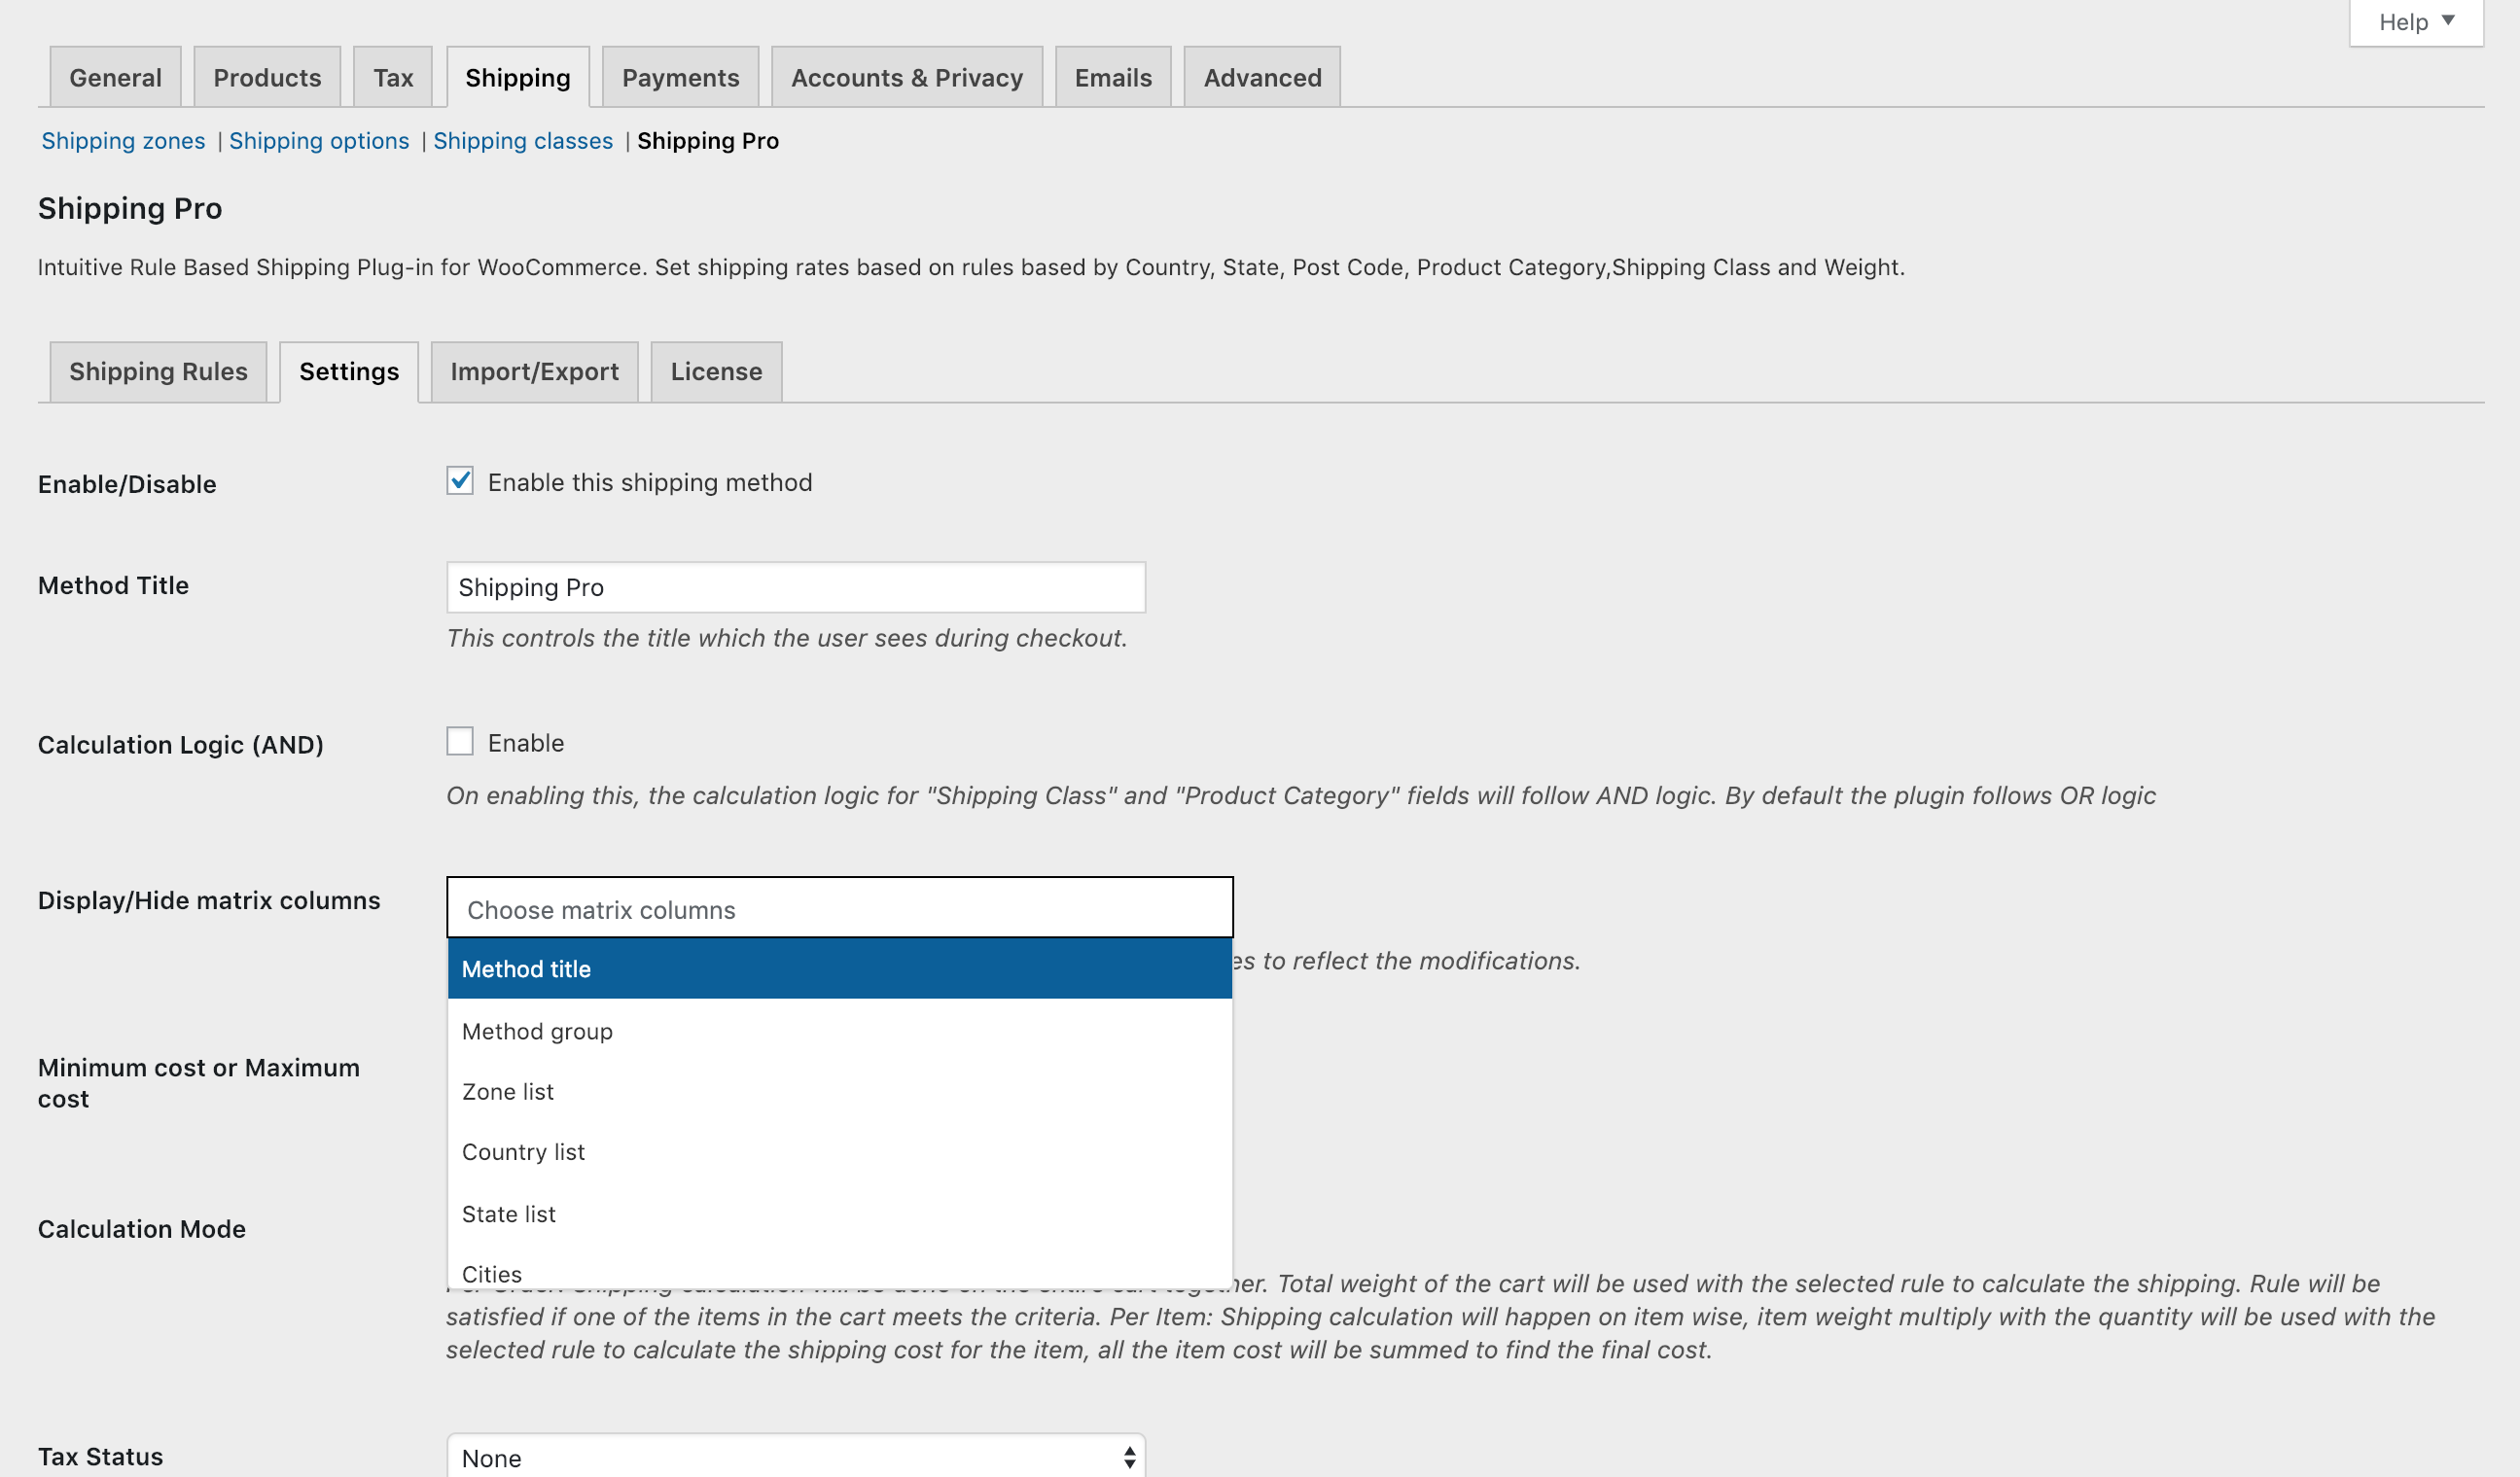
In the plugin settings, you can easily find Matrix Columns containing all the factors based on which shipping can be configured. Take a look at the matrix columns below.
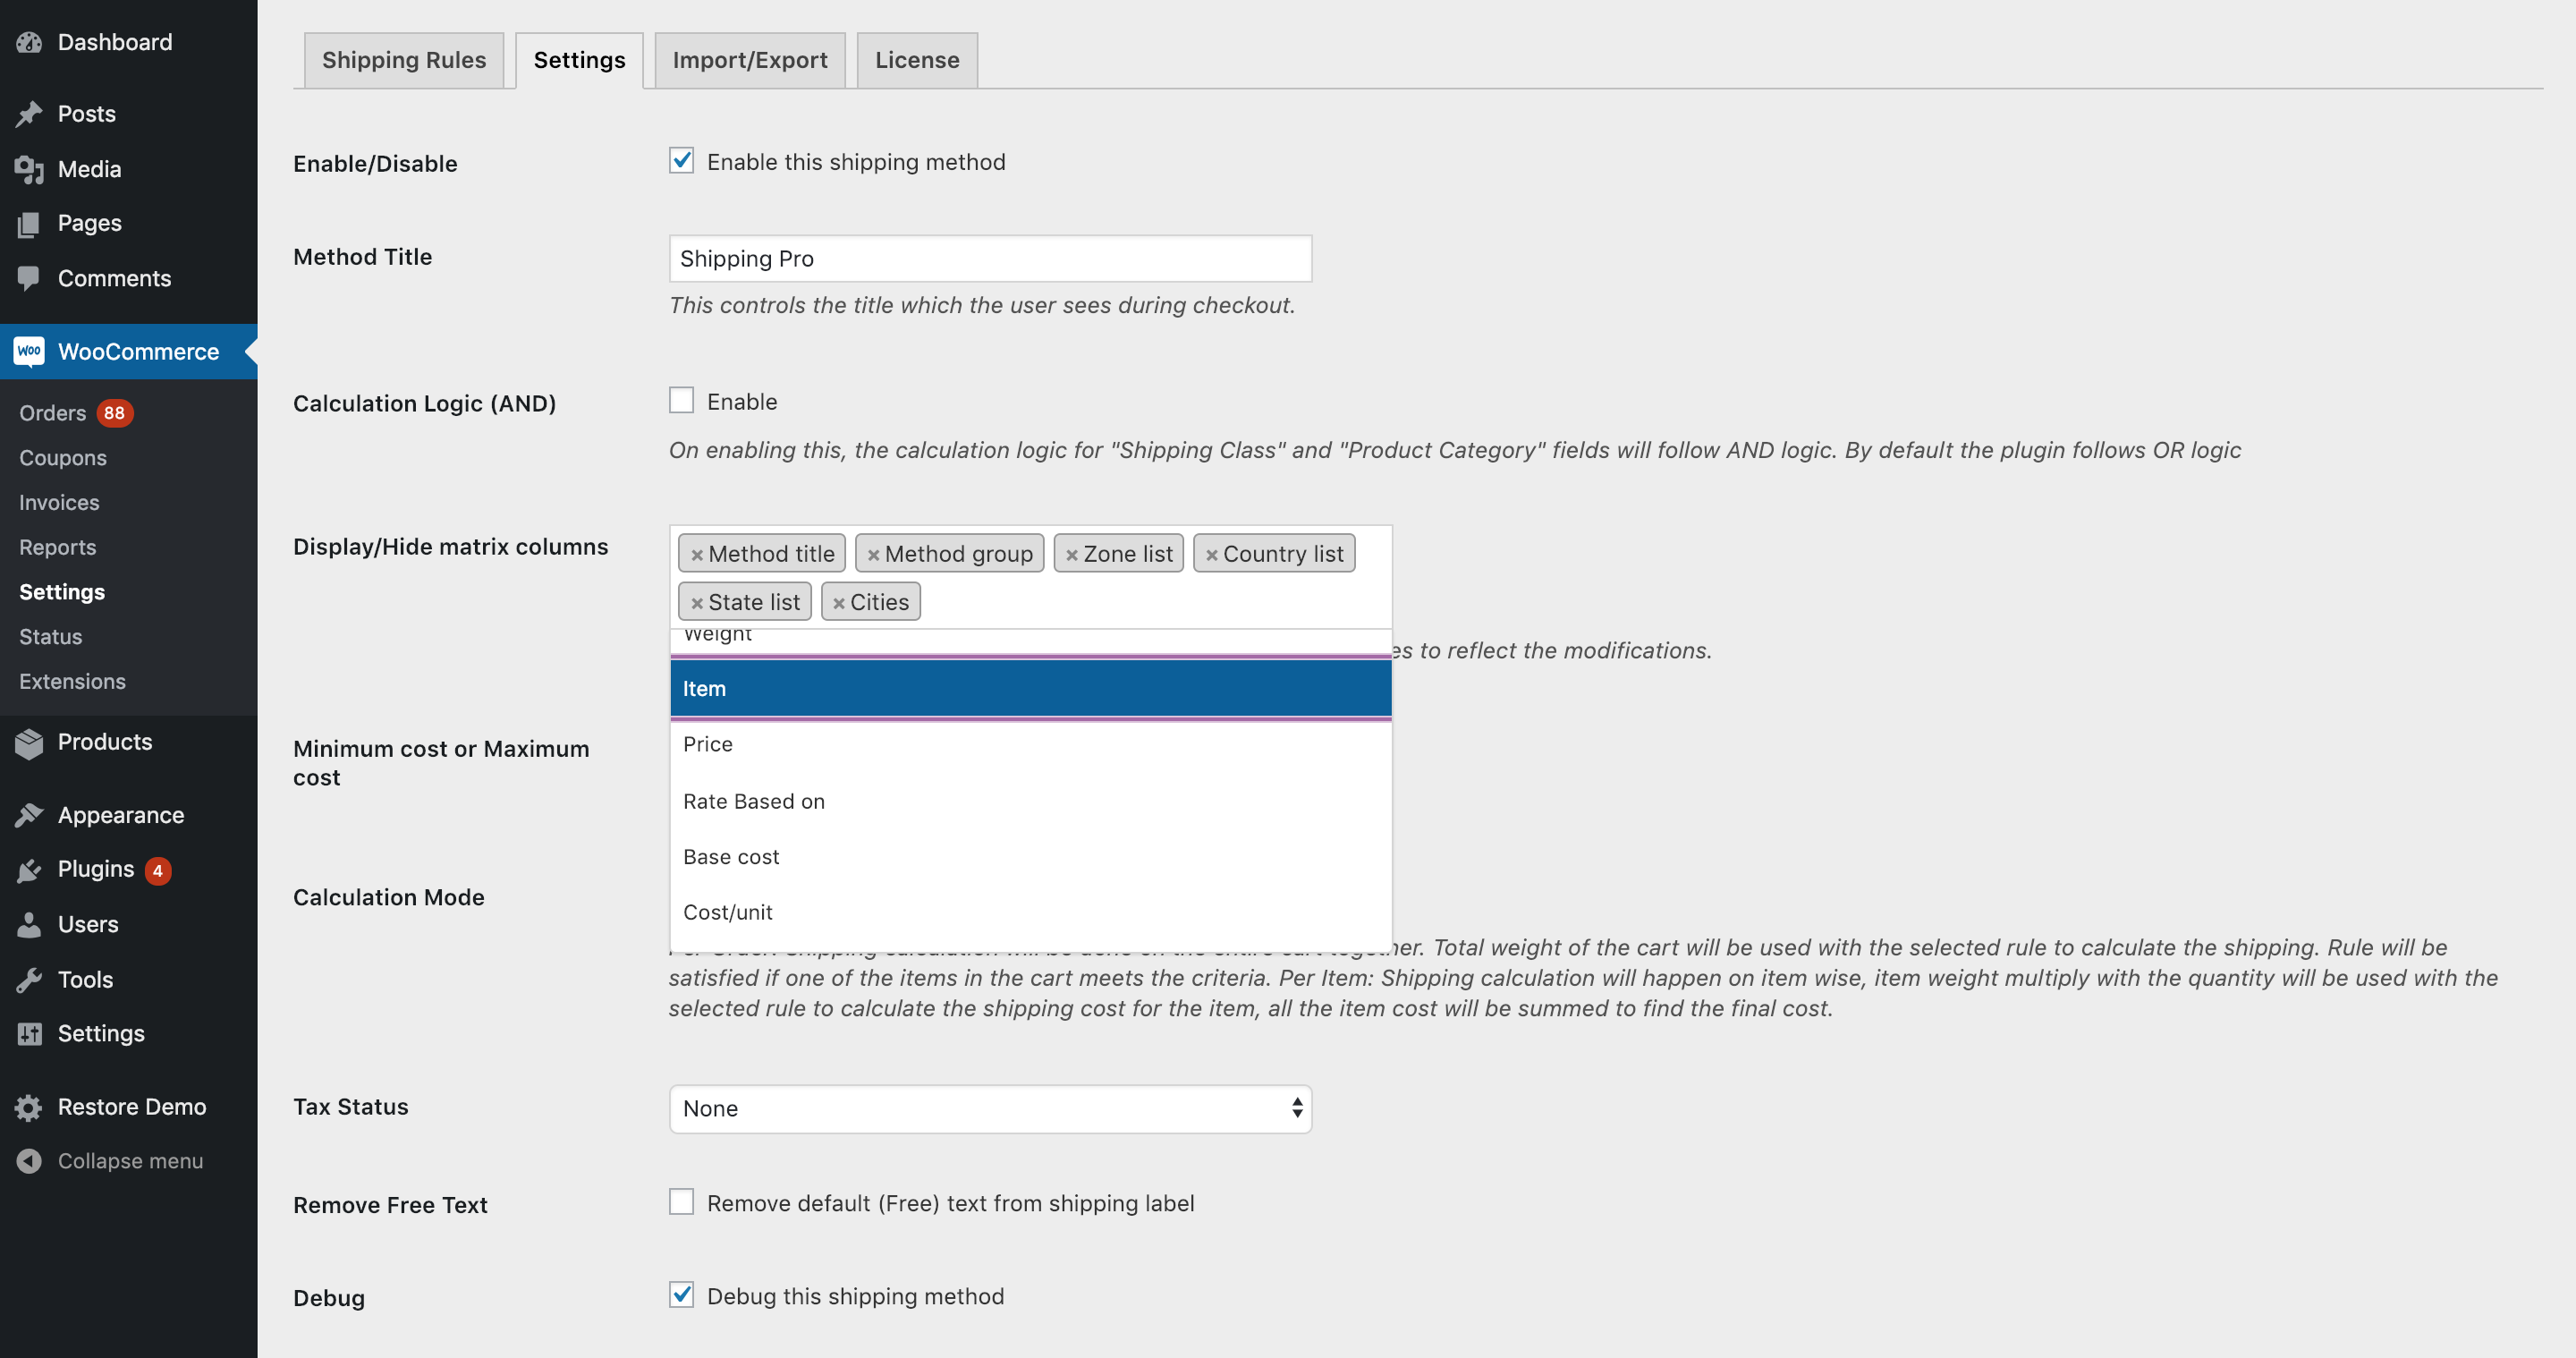
The matrix column named Item is clearly visible among all the others. Along with this, you need to select the Rate Based On matrix column. This will allow shipping rates to be modified based on factors like weight, price and the number of items in the cart. Apart from these two columns, you need to select other columns as Method title, Method Group, Base Cost and Cost per Unit. Once these are selected, all you need to do is create shipping rules based on your preference. Take a look at the shipping rules configured using WooCommerce Table Rate Shipping Pro for Joe’s shipping scenario.

It is clearly visible that the WooCommerce shipping rules are placed in one group so that under no circumstances, more than one shipping cost is shown to the customers. Also, it’s pretty easy to configure the whole scenario. You have check out the following video to see it working. Here are some amazing articles that you should check to see this plugin working.
- Setting Minimum Shipping Cost for Various WooCommerce Shipping Methods
- Setting A Default Product Weight and Dimensions To Ship Your Products
- Allow Customers to Choose between Pickup Option and Shipping
- Calculate Shipping Cost Per Quantity of Products
- Calculate Shipping Rates for Different Types of Products in the Cart
You can check out more in the WooCommerce Table Rate Shipping documentation.
Conclusion
We hope this WooCommerce shipping guide has helped you set up WooCommerce shipping on your online store. The WooCommerce Shipping plugins mentioned in this guide offer some of the most commendable features that can help you achieve any business case. You can Contact PluginHive Customer Support if you need any help or have any doubts about the plugin. The team will help you through and out so you don’t have to worry. Happy Selling! 🙂