Troubleshooting WooCommerce Shipping Services
PluginHive’s WooCommerce Shipping Services provide shipping automation for WooCommerce store owners for the top shipping carriers like UPS, FedEx, USPS, DHL Express, Stamps, Canada Post, Australia Post, etc.
This article is a troubleshooting guide that will help you resolve some of the common issues that happen because of the configuration mistakes made while setting up WooCommerce Shipping Services.
If you are using WooCommerce Shipping Services and need help with the plugin, check out the points below for assistance. If your queries are not listed below, contact PluginHive support for a quick resolution.
Below mentioned are some common issues and the steps you need to perform to resolve them:
On this page
- Orders are not displayed after importing
- Orders are in Initial state with an error
- No shipping rates are displayed on WooCommerce cart and checkout page
- Inaccurate shipping rates are displayed on WooCommerce cart and checkout page
- Carrier discounted/negotiated shipping rates are not displayed
- Shipping labels say ‘Test – Do Not Ship’
- Shipping labels are not printed properly
- WooCommerce orders are not marked as fulfilled even though the shipping label is generated
- “WSS Account already exists.” Message while registering
Orders are not displayed after importing
After placing the orders, WooCommerce Shipping Services automatically imports the orders so that you can fulfill them easily. However, the plugin imports all the WooCommerce orders that are marked as Processing.
If the plugin is not able to import the WooCommerce orders, visit WooCommerce > Orders and select all the orders that are not imported, as shown below.
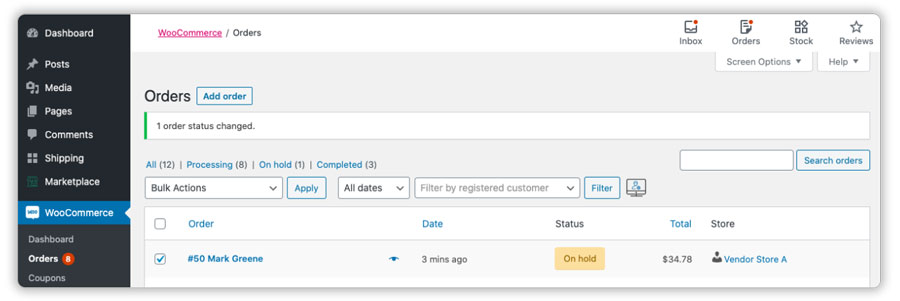
Under Bulk Actions, select Change Status to Processing and click on Apply, as shown below.

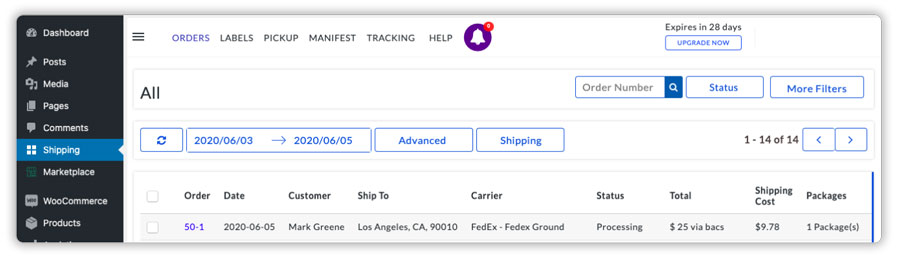
Once the order is marked as Processing, WooCommerce Shipping Services automatically imports the order and prepares it for fulfillment.
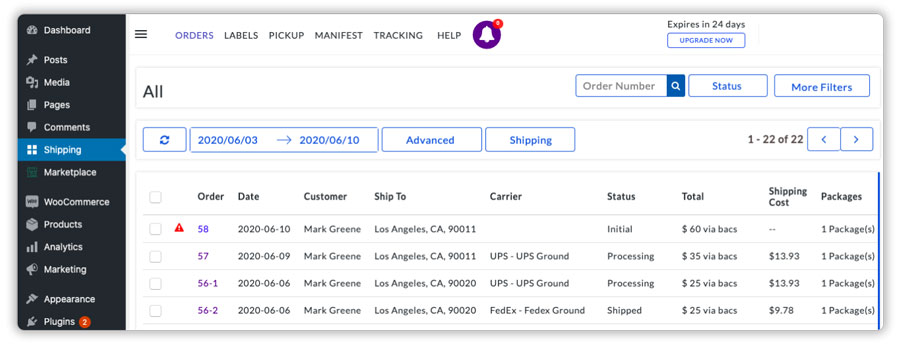
Orders are in the Initial state with an error
While an order is imported by WooCommerce Shipping Services plugin, it is in the Initial state. After verifying the shipping carriers, shipping services customer, and shipper address, the plugin prepares the orders for fulfillment and puts the orders in the Processing state.
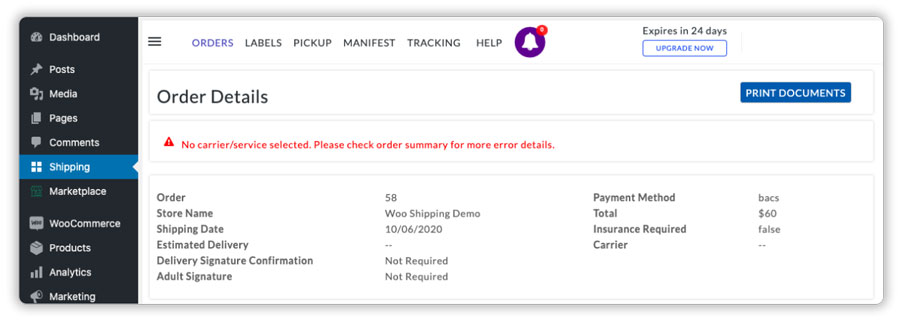
However, if there is an issue with the orders, the plugin keeps the orders in the Initial state and displays the error within the order, as shown below.
You can click on the order and view the error, as shown below.
To resolve the error, visit the orders page and select the order with the errors. Now click on Change Carrier/Services to set the shipping carriers and the shipping service to the order, as shown below.
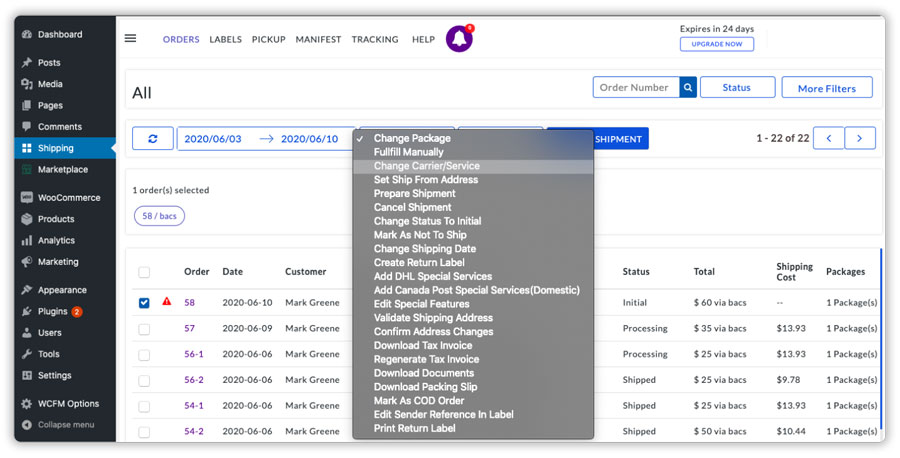
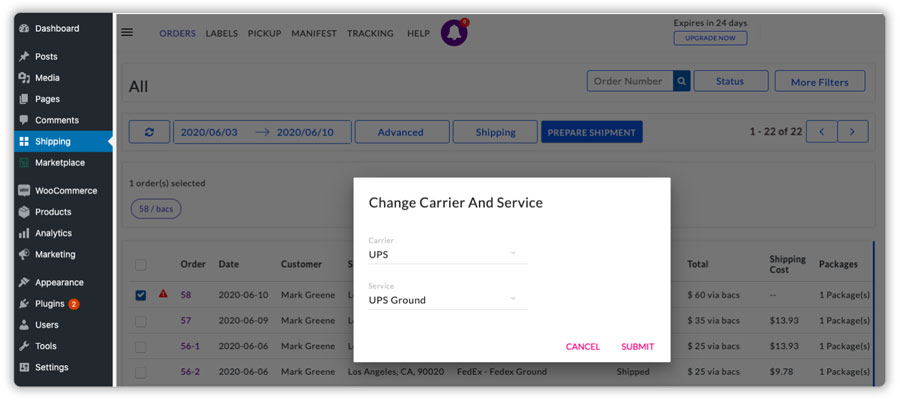
Select your preferred shipping carrier and assign a shipping service to the order, as shown below.
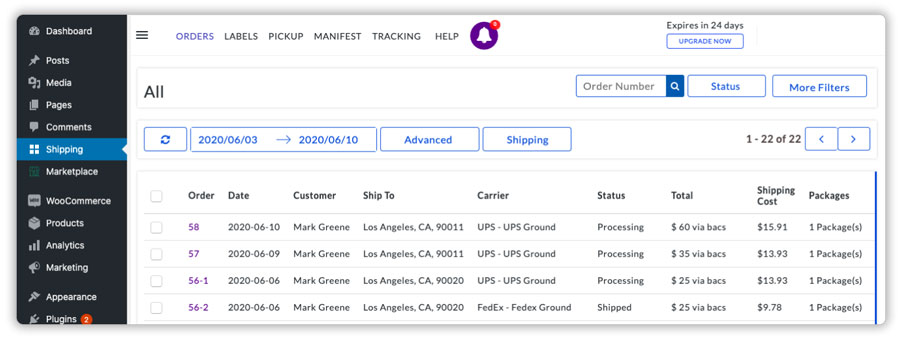
After correcting the errors, select the order again and click on Prepare Shipment, as shown below.

You can see in the image below that the order will now be in the Processing state and ready for fulfillment.
No shipping rates are displayed on the WooCommerce cart and checkout page
“Not being able to display shipping rates on the WooCommerce cart and checkout page” is among the most common issues store owners face. However, there are quite a few reasons shipping rates don’t display on the WooCommerce cart and checkout page.
a. Shipping rate automation rules are not enabled for the shipping carriers
After adding a shipping carrier to the plugin, the plugin automatically creates shipping rate automation rules that display the shipping rates of all the available shipping services on the cart and checkout page.
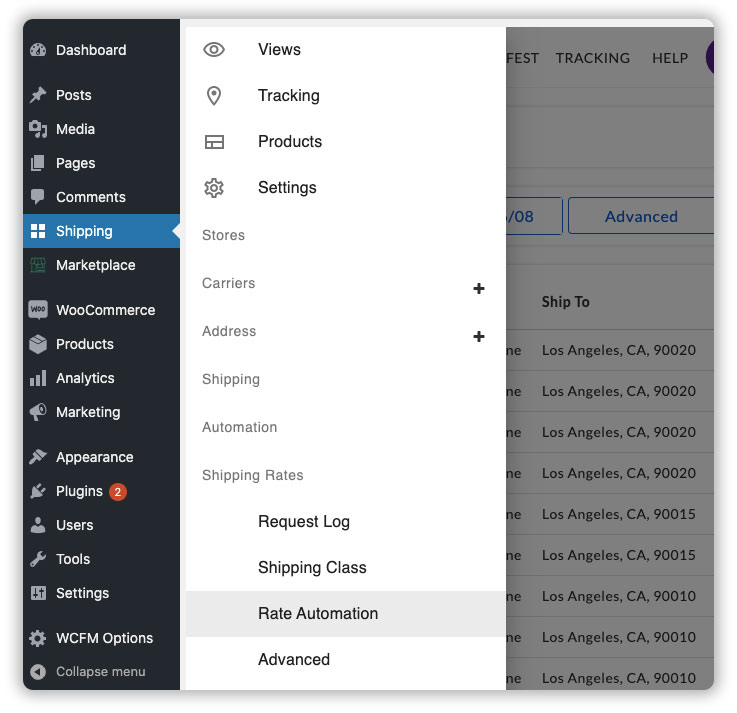
To verify that your carrier has an associated shipping rate automation rule and it is enabled in the plugin settings, please click on the (≡) icon and visit Settings > Shipping Rates > Rate Automation, as shown below.
You can check the status of the shipping rate automation rule under the Active option as shown below.

If the rule is not active, click on the Edit button and enable the shipping rate automation rule by enabling the Activate option, as shown below.
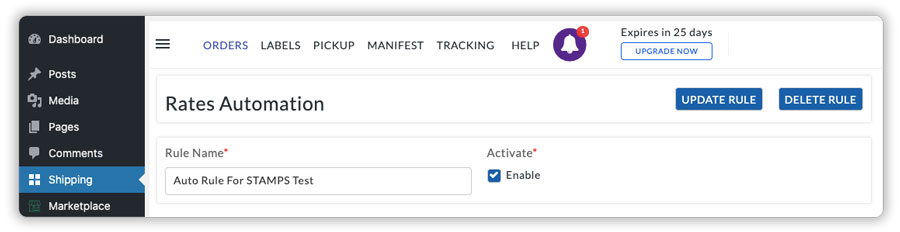
Click on Update Rule to save the changes.
b. No product weight and dimensions for the WooCommerce products
Shipping carriers require the product weight and in some cases, product dimensions to calculate the shipping cost accurately.
Hence, if your products are not having weight and dimensions, the shipping carriers will not be able to calculate the shipping rates and hence the plugin will not display any shipping rates.
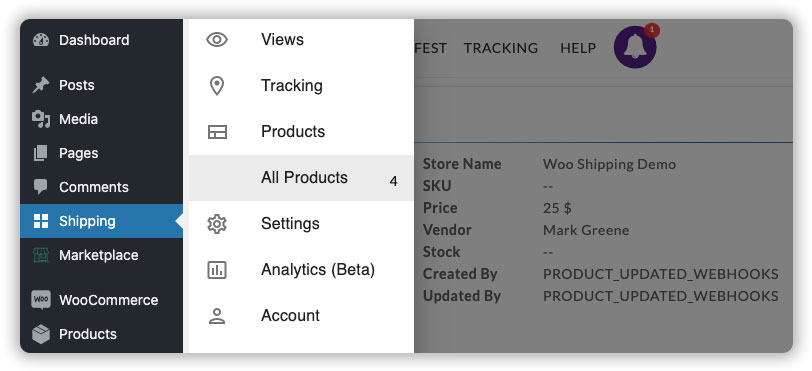
To fix this issue, you can click on the (≡) icon and visit Products > All Products, as shown below.
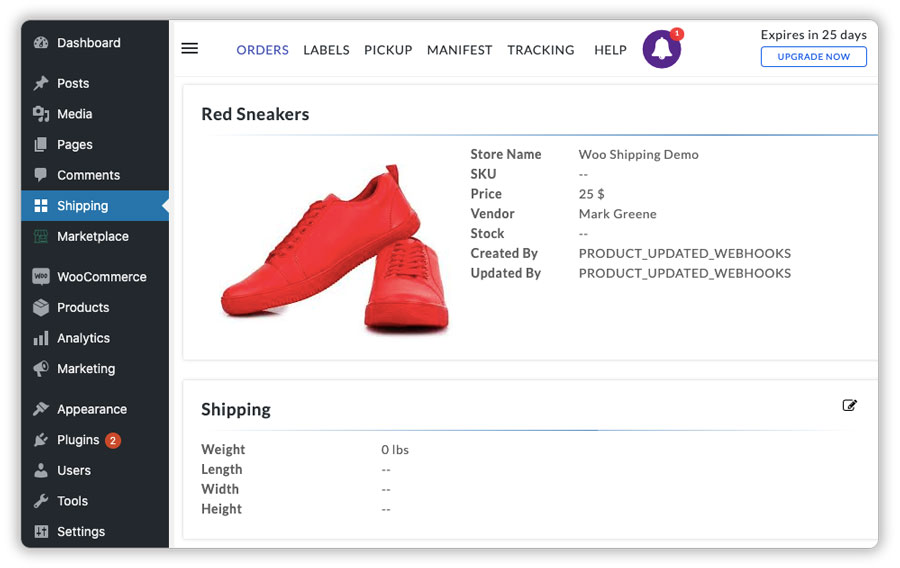
Select the product and verify whether it has weight and dimensions set up, as shown below.
To add product weight and dimensions, click on the edit icon under the Shipping tab and enter the weight and the dimensions of the product as shown below.
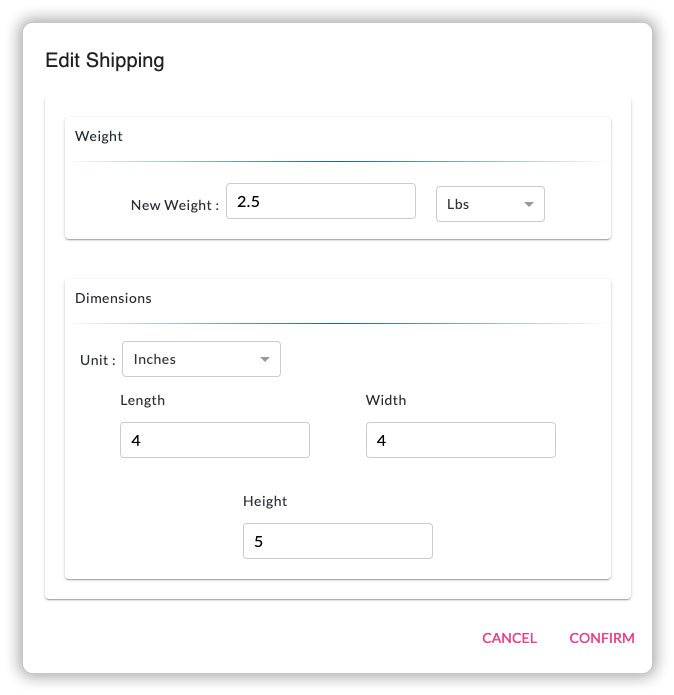
Click on Confirm to save the changes.
c. The shipping carrier details are not entered correctly
The plugin requires shipping carrier account details to display the shipping rates on the WooCommerce cart and checkout page accurately. The shipping carrier account details that are required may vary from carrier to carrier.
Hence, you are required to enter the correct shipping carrier account details within the plugin.
If you want more details regarding the carrier account details that are required to use this plugin, please refer the following animated Gifs form more details.
* UPS
* Canada Post
* FedEx
* Stamps
* Delhivery
* DHL Express
d. The shipper or warehouse address is not correct
Another reason why the shipping rates will not be displayed is when the shipper address or the warehouse address from where you ship your products, is not configured correctly within the plugin.
To verify and correct the shipper address, you can click on the (≡) icon and visit Addresses, and click on your store address, as shown below.
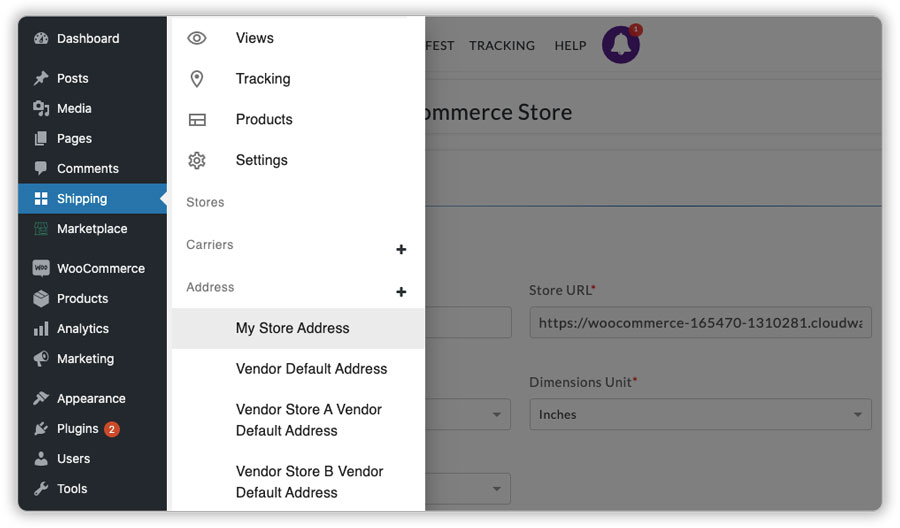
Here you can verify your store address and make the changes if any field is missing, as shown below.

Telephone number is a mandatory field for shipping carriers like FedEx. Hence, please make sure you enter the telephone number correctly.
Click on Save to save the changes.
e. The shipping services are not available for the customer’s address
Shipping carriers calculate the shipping cost based on the source and destination of the shipment. Hence, the shipping services vary from location to location.
There may be cases, where certain shipping services may be available for one location and not for the other locations. In such a case, the shipping carrier will only display the shipping services that are available for that location.
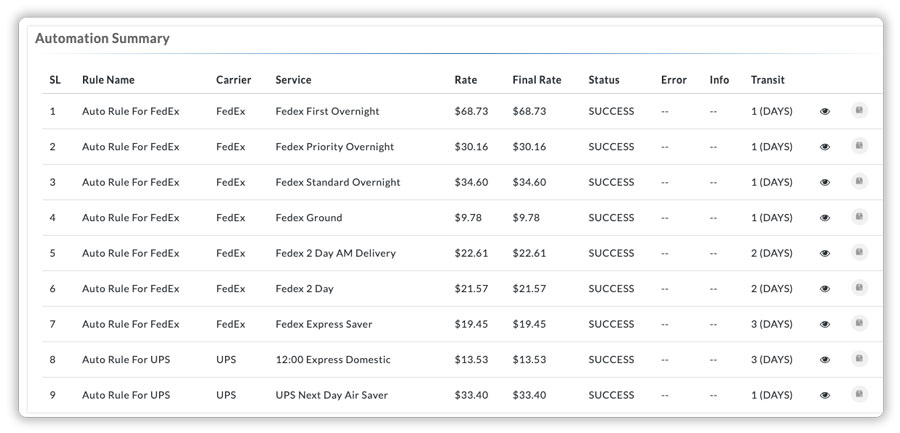
To verify this, you can click on the (≡) icon and visit Settings > Shipping Rates > Request Log, and click on the most recent request. You will be able to see the shipping rates only for the shipping services that are available for the destination address under the Automation Summary, as shown below.
Inaccurate shipping rates are displayed
There are times when the shipping rates will be displayed on the WooCommerce cart and checkout page successfully. However, the shipping rates may be higher or lower than the official rates calculated by the carrier.
In such cases, it is important that you first compare the shipping rates to the online shipping rate calculator of your preferred shipping carrier.
To compare the shipping rates that you get on your WooCommerce cart and checkout page, please visit the respective online shipping calculator for your shipping carriers listed below.
* UPS
* FedEx
* USPS
* Canada Post
* Australia Post
* Delhivery
* DHL Express
* Aramex
* TNT
* Blue Dart
* Parcelforce Worldwide
Enter the correct weight and dimensions of your shipment along with the shipper address and shipping address to get the accurate shipping rate estimates for comparison.
After you get the online shipping quotes, make sure you verify the following within the plugin.
a. Product weight and dimensions
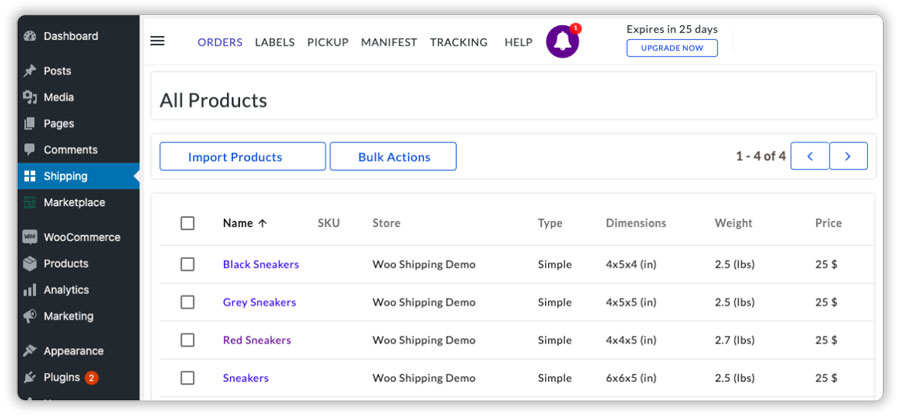
Click on the (≡) icon and visit Products > All Products, and verify the product weight and dimensions, as shown below.
b. The parcel packing method and package details
WooCommerce Shipping Services’ parcel packing methods play a very important role when it comes to calculating shipping rates and efficiently packing the products into boxes.
While selecting the parcel packing methods make sure you choose the method that is suitable for your requirements.
- Weight Based
The weight-based packing method is mainly used when you do not have predefined boxes to pack and ship your products. Using this method you can set a max weight that you generally ship and the plugin divides the orders based on that weight limit.
- Box Packing
If you use predefined boxes to pack and ship your products you can select this packing method and create the boxes using weight and dimensions within the plugin. The plugin will identify the best fitting box based on the weight and dimensions of your products and the box that you have created.
- Stack Packing
This method is useful if you pack your products by stacking them. This method allows you to create shipping boxes with weight and dimensions and finds the perfect box that will fill all the products by stacking them one on top of another.
- Quantity Based
This packing method allows you to limit the number of products that you pack and ship within one box. You can set a quantity-based limit to your shipping boxes and the plugin will pack the products according to the limit that you have set.
c. Additional value-added services are enabled for your products within the plugin
On the Products tab, you can ensure whether you have special services enabled for your products like the ones shown below. All these services, if enabled, result in additional shipping charges for different shipping services.
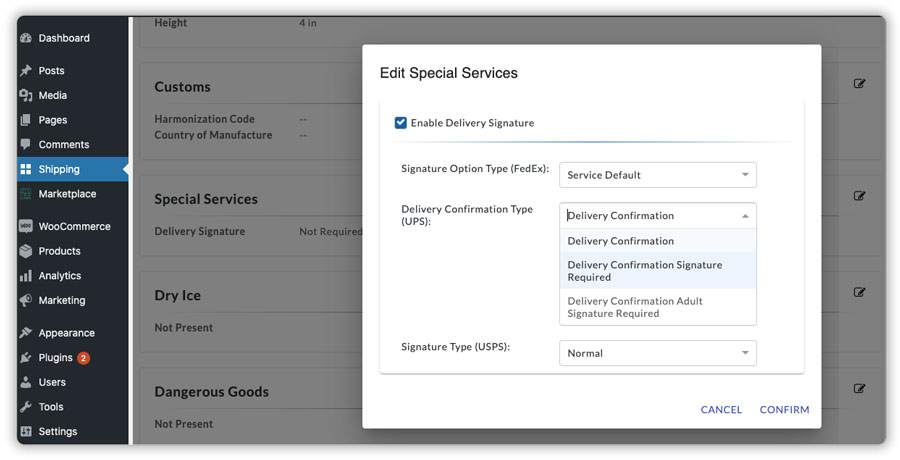
Delivery Confirmation with Signature
This service makes it mandatory for the delivery agent to confirm that the shipments are delivered to the customers using the customer’s signature on delivery. By default, WooCommerce Shipping Services support the delivery confirmation for the following shipping carriers.
- UPS
- USPS
- FedEx
To enable this option for your products, visit the Products tab and select the product for which you require the delivery confirmation, and click the Edit icon under the Special Services option, as shown below.
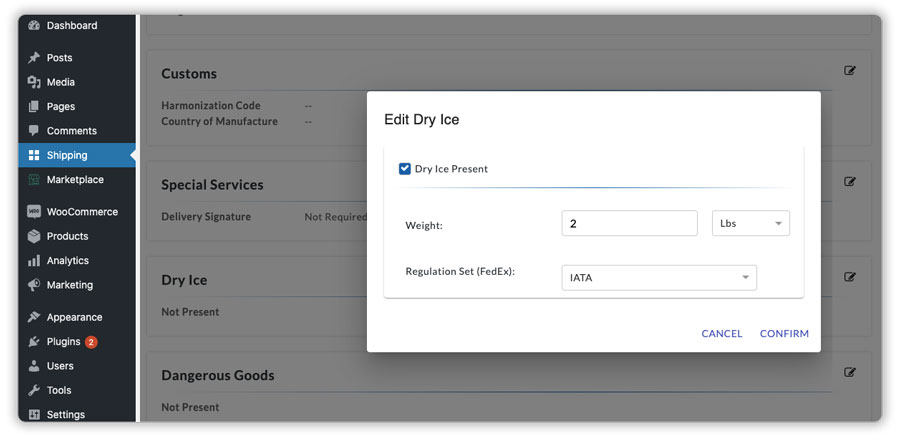
Perishable Goods with Dry Ice Shipping
WooCommerce Shipping Services also has the option to enable Dry Ice shipping for your perishable products. Enabling this option would mark the product under dry ice shipping and an additional shipping cost would be charged.
To enable dry ice shipping for your products, click on the Edit icon under the Dry Ice option and enter the weight of the dry ice required for the product, as shown below.
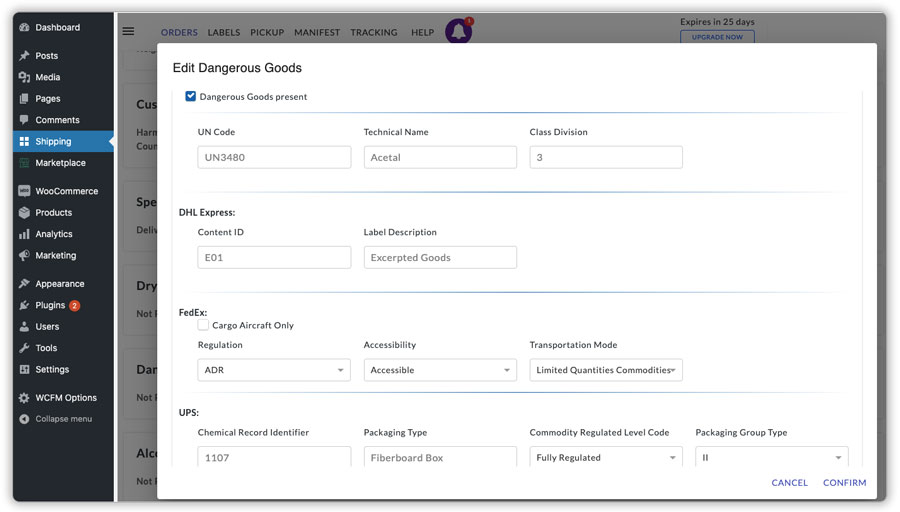
HazMat/Dangerous Goods
WooCommerce Shipping Services supports hazmat or dangerous goods shipping for the following shipping carriers.
- UPS
- FedEx
- Australia Post
- DHL Express
You can mark a product as a dangerous good by clicking the Edit icon under the Dangerous Goods option and then filling in all the details required by your preferred shipping carrier, as shown below.
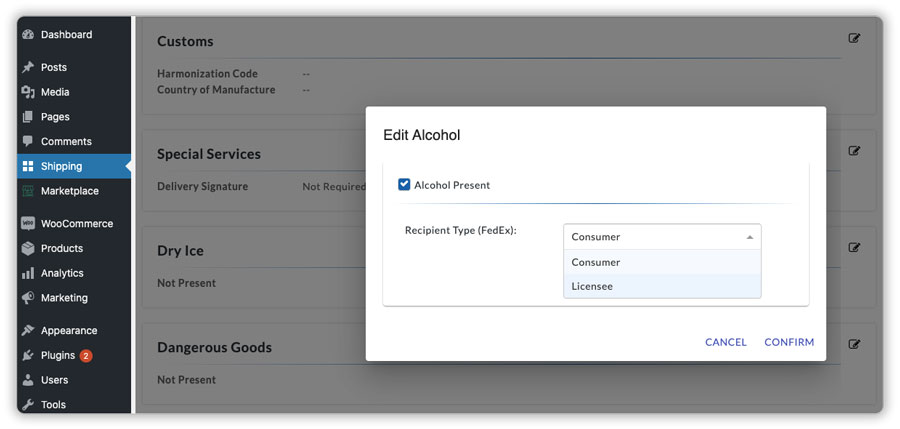
Alcohol Shipping
You can use WooCommerce Shipping Services’ Alcohol Shipping option if you ship alcohol or alcohol-based products to your WooCommerce store.
Click on the Edit icon under the Alcohol option and enable the option to mark the product eligible for alcohol shipping, as shown below.
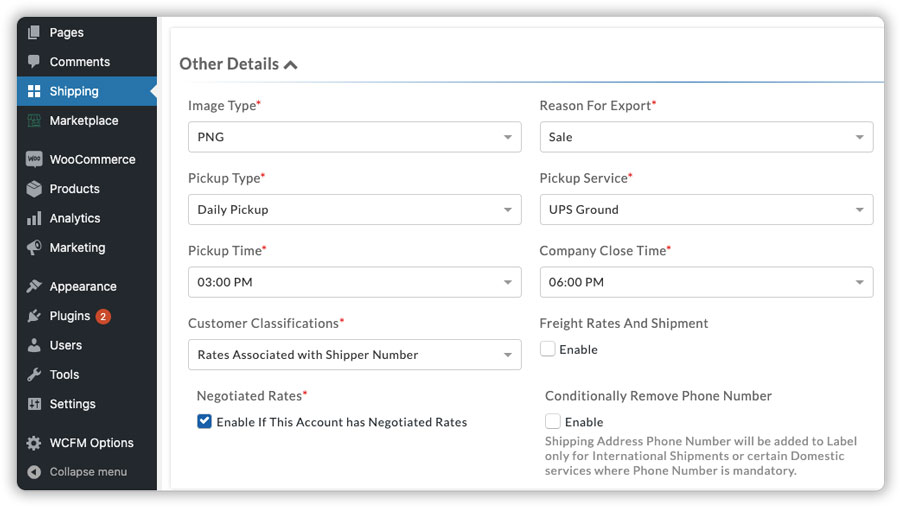
Carrier discounted/negotiated shipping rates are not displayed
Most shipping carriers provide discounted shipping rates to account holders based on different factors. These discounted shipping rates vary from one carrier account to another and are termed Negotiated or Account rates for different shipping carriers.
If you are not able to display the discounted shipping rates offered to you by your carrier, please visit the Carriers tab and click on your preferred shipping carrier.
For example, for UPS, you can enable the Negotiated Rates option under the Other Details tab, as shown below.
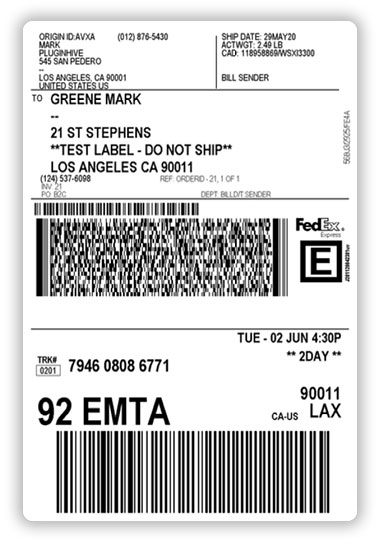
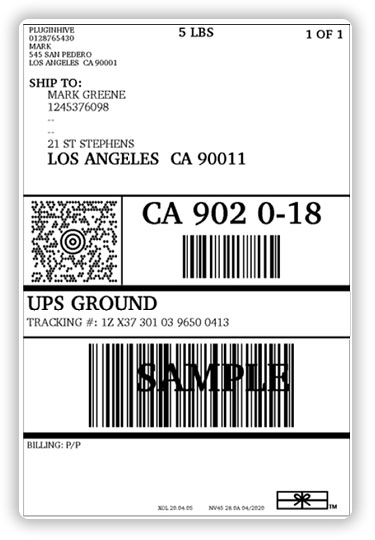
Shipping labels say ‘Test – Do Not Ship’ or ‘Sample’
While adding the shipping carriers to the plugin, requires the carrier shipping account credentials to display shipping rates and print shipping labels using your own carrier account. However, almost all shipping carriers provide you with two separate carrier account credentials.
- Test Account Credentials
The Test credentials are mainly used to test the shipping solutions on your website without actually charging you the shipping cost - Live/Production Account Credentials
The Live credentials come into play once the testing is done and the system is stable enough to handle actual shipping and order fulfillment.
The test credentials of the shipping carriers result in printing a test label that can not be used for shipping and has “Test – Do Not Ship” or “Sample” mentioned on the shipping label, as shown below.
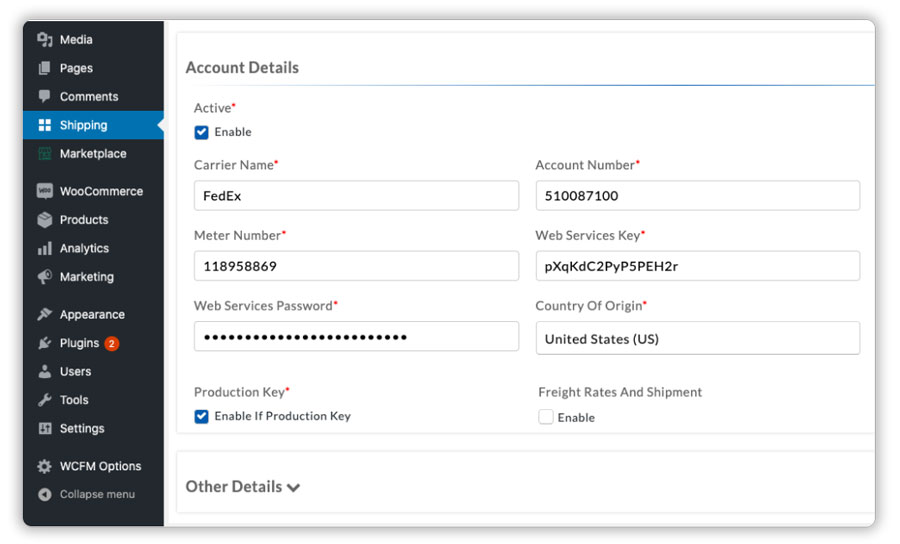
In order to get the actual shipping labels that can be used to ship your products, visit the Carriers tab, and click on the shipping carrier that you have added to the plugin.
Enter the production/live credentials of your carrier and click on Enable if Product Key option under Account Details.
Shipping labels are not printed properly
The WooCommerce Shipping Services plugin allows you to print shipping labels and additional documents for WooCommerce orders like,
- Shipping Labels
- Return Shipping Labels
- COD Labels
- Commercial Invoice
- Packing Slips
- Tax Invoice
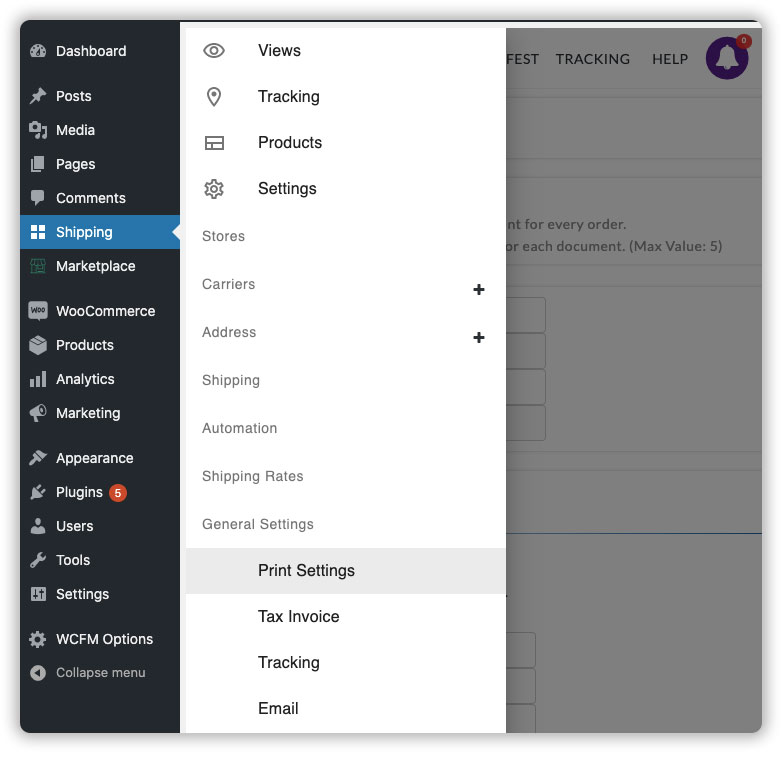
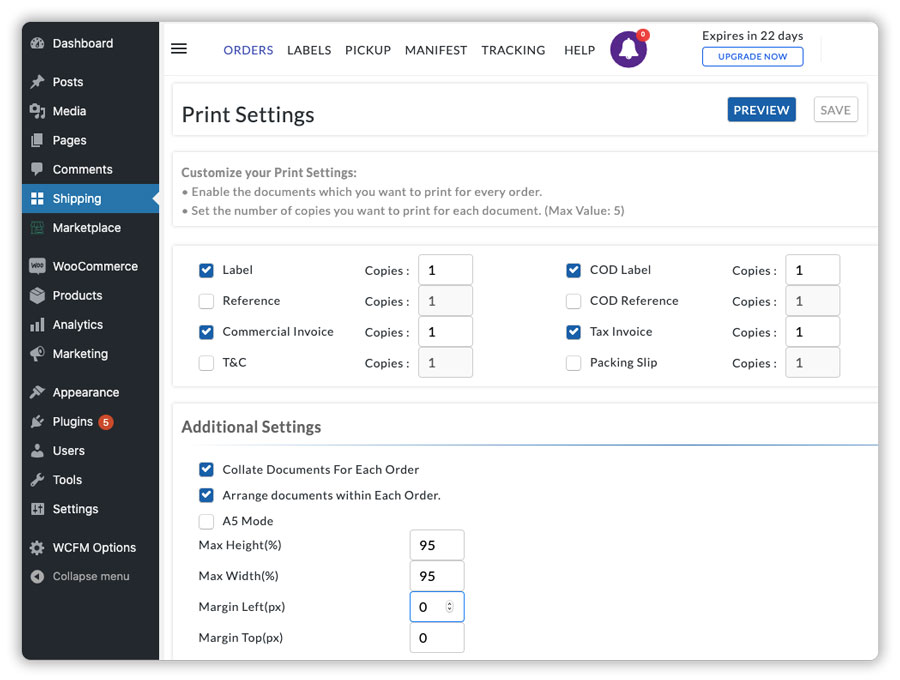
Visit General Settings > Print Settings to set your printing preferences and the number of copies you require for each document, as shown below.
Here you can enable the documents that you require for each WooCommerce order along with the number of copies for the documents, as shown below.
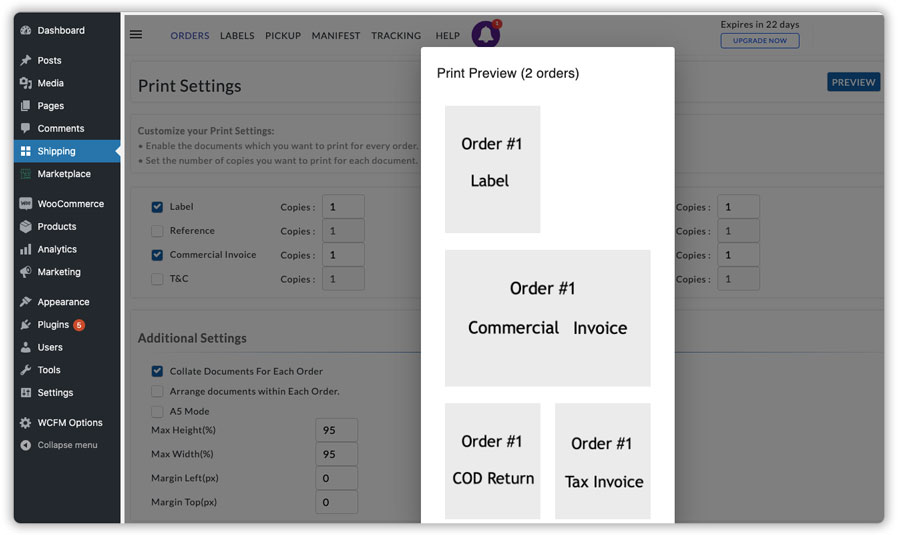
Once you have selected the documents and the number of copies for each document, you can also preview the documents as they will be printed by your printer. Click on Preview to view the print preview, as shown below.
WooCommerce orders are not marked as fulfilled even though the shipping label is generated
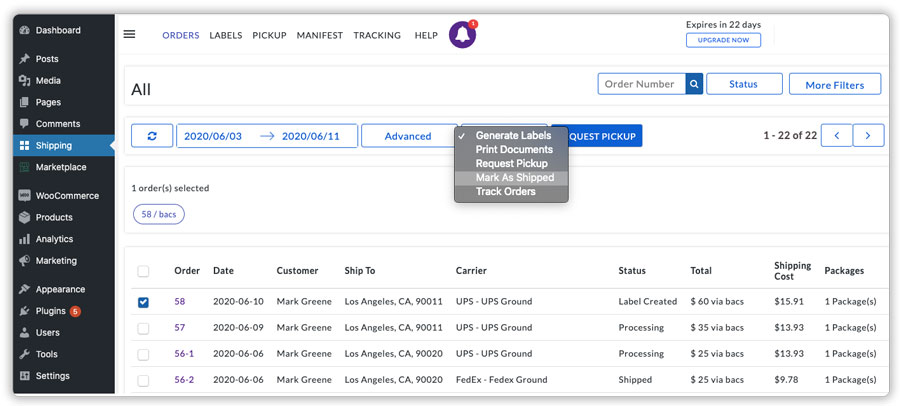
After generating and printing the shipping labels, the plugin changes the order status to Label Printed automatically. However, to make sure the order tracking details are synced to the WooCommerce orders and the orders are marked as Completed, you need to select the orders and then click Mark As Shipped under the Shipping tab, as shown below.
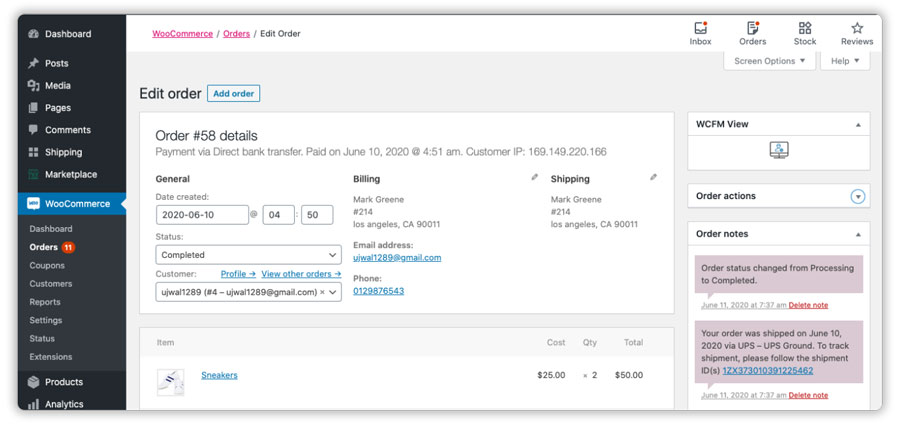
After marking the order as shipped, the tracking details are synced to the WooCommerce orders and the orders are automatically marked as completed, as shown below.
“WSS Account Already Exist” Message while registering
WooCommerce Shipping Services plugin supports only one WooCommerce store registration using a single email ID. So you may get the message “WSS Account Already Exist” while registering your WooCommerce store if you are already using the plugin in any other store or on a staging/testing website.
If you are seeing this message we recommend the following options:
- Registering with another email ID
- Remove the old store registration if you do not wish to use it
Registering with another email ID
You can update the email ID for your current WooCommerce store by visiting the WordPress Settings -> General -> Change Administration Email Address, as shown below
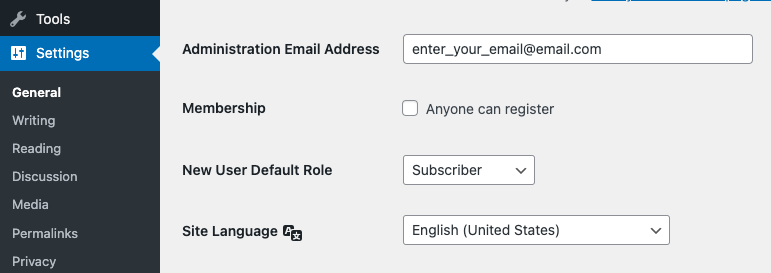
Once done, you can try registering your WooCommerce store again.
Remove the old/unused WooCommerce store registration if you do not wish to use it
Alternatively, if you are through with the plugin testing on the staging website and wish to use the plugin with your actual website, you can delete the previous registration.
Visit the WooCommerce Shipping Services plugin settings -> click on Delete WSS Account And Clear Plugin Data button -> Clear Data, as shown below.
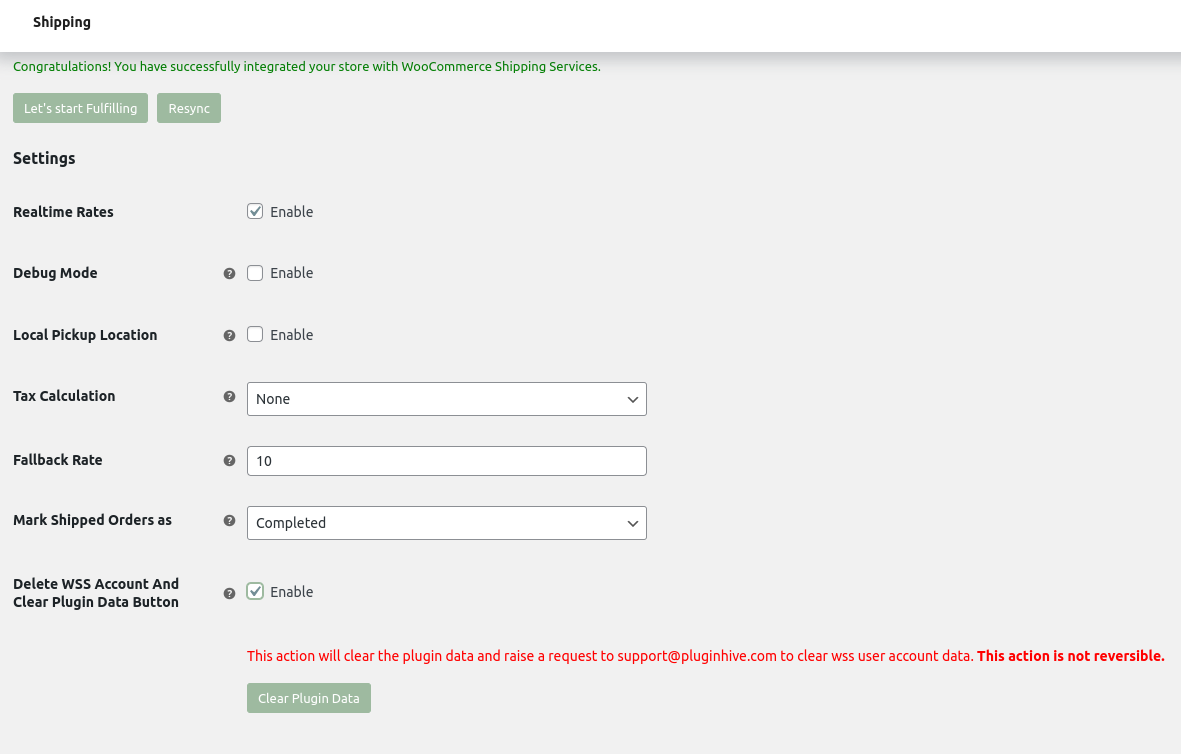
Once done, reach out to PluginHive Support to confirm clearing the old account for you.
If you face any issues or have any queries on setting up the WooCommerce Shipping Services plugin, contact PluginHive Support.