Set Up the Shopify Australia Post Shipping App
The Shopify Australia Post app reduces your efforts by automating Australia Post Shipping on your Shopify store. With this app, you can display live real-time shipping rates on your Shopify checkout page, print shipping labels, and enable order tracking from within your Shopify store.
This guide will help you set up the Australia Post Rates and Labels app on your Shopify store.
On This Page
- Installation of Shopify Australia Post App
- Learn To Use Australia Post Rates and Labels App on your Shopify Store
- Verify Shipper Address
- Check Your Products on Shopify Australia Post App
- Configure Your Packaging Methods
- Configure Australia Post Shipping Services
- Display Live Australia Post Shipping Rates on the Checkout Page
- Print Australia Post Labels
- Generating Australia Post Manifest for the Shopify Orders
- Schedule Australia Post Pickup
- Track your Shopify Australia Post Shipments
- Frequently Asked Questions (FAQs)
Installation of Shopify Australia Post App
1. Add Shopify Australia Post App
Navigate to Shopify Settings → Apps and sales channels → Shopify App Store as shown below:

Search for the Australia Post Rates and Labels. Click on the app and select Install.

2. Install the Shopify Australia Post App
Once the Australia Post app is added to your Shopify, click on Install to start the setup process,

3. Activate the Shopify Australia Post App
Activate the app by clicking on “Approve” on the Approve Subscription page as shown below:

Once you activate the app, on the App Installation page, fill in your email and phone number and check that I agree with the Terms and Conditions and Privacy Policy.
Once you have filled out the details, click on Get Started and proceed with the setup wizard.

4. Choose Your Australia Post Carrier
As the next step, select your carrier between Australia Post and MyPost Business Account.
Australia Post Account
If you want to use Australia Post eParcel services, select your carrier as Australia Post and proceed with clicking Next as shown below:

In the Account Details page, add
- Australia Post Account Number
- API Key
- API Password
Ensure enabling This is an Australia Post Production Key, and click on Save.

Click on Finish and now, your Australia Post Account Setup is complete.

MyPost Business Account
If you want to use the Australia Post MyPost Business, select your carrier as Australia Post MyPost Business Account and click on Next.

In the Account Details page, add your Merchant Token number. Ensure enabling This is a MyPost Business Production Key, and click on Save.

Click on Finish and now, your MyPost Business Account Setup is complete.

MyPost Payment Methods
Once the setup is complete, go to Settings → Account Details, and choose your payment method.
There are two options for setting up your payment method with Australia MyPost:
- Stored Payment: You will be charged immediately for each shipping label you generate. The payment will be deducted from the credit or debit card associated with your MyPost account.
- Charge Payment: If you opt for charge payment, you’ll need to provide your Charge Payment Account Number, from which the label cost will be deducted.

Learn To Use Australia Post Rates and Labels App on your Shopify Store
The following video shows how to use the Shopify Australia Post Rates and Labels App on your online store.
Verify Your Shipper Address
The shipper address is one of the most important aspects of getting accurate shipping rates on the checkout page.
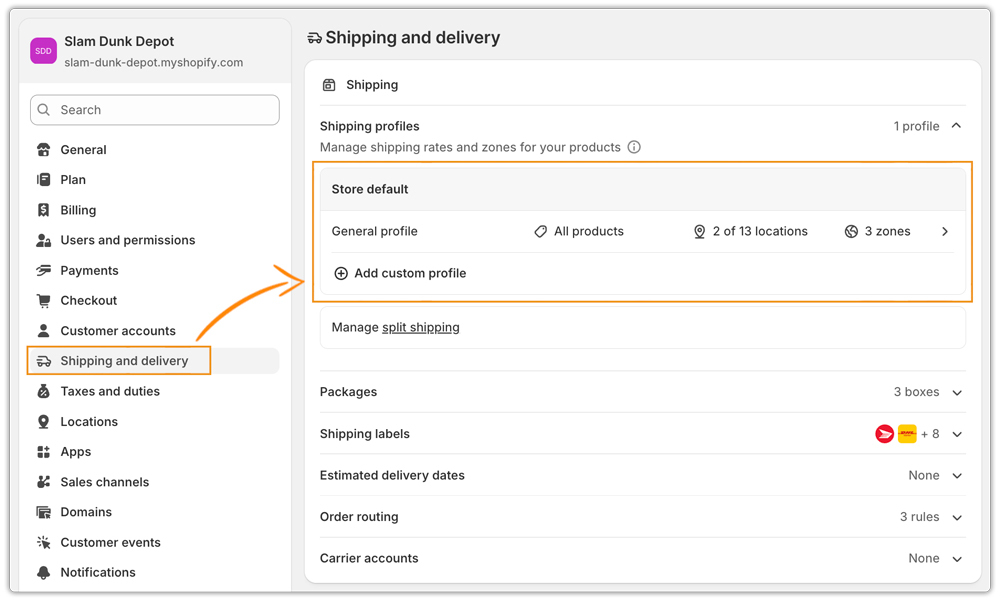
You can add multiple locations within your Shopify store and set any of the addresses as Default. The address marked as Default will be used to process shipments.
Navigate to Shopify Settings → Locations to verify your store locations.

You can add your shop details like first name, last name, and company name in the app’s Shop Contact Details settings as shown below:

If you face any issues or have any queries about the app’s setup, feel free to contact our customer support.
Check product details within Shopify Australia Post App
Based on the type of product, the shipping rates will differ. So be sure to check the product details to get more accurate shipping rates.
- Add price to your Shopify products
- Add Product Weight and Dimensions
- Check product stock for store location(s)
- Products shipped internationally
- Products that require Delivery Confirmation (Signature)
- Products that require Shipping Insurance
- Products considered Dangerous Goods
1. Add Price to Your Shopify Products
If you are shipping internationally, you need to ensure the products’ price is a non-zero value to meet customs compliance for export.
Add a price to your product by visiting Shopify Store → Products and enter the price under the Pricing section, as shown below:

2. Verify Your Shopify Shipping Profiles
Before configuring product shipping settings, make sure your Shopify Shipping Profiles are set up correctly. Shipping profiles control how shipping rates are displayed at checkout and determine which products can use carrier or app-calculated shipping rates.
Things to check:
- Ensure the product is assigned to the correct shipping profile.
- Verify that the required shipping zones are configured within the profile.
- Confirm the appropriate fulfillment locations are enabled.
- If you use live carrier rates, ensure the profile is configured with Carrier or App Calculated Rates.
- Review any custom shipping rules that may affect checkout rates.
For a detailed setup guide, refer to: Shopify Shipping Profiles: How to Set Up Product-Based Shipping Rules
3. Add Product Weight and Dimensions
Make sure to add weight to your Shopify products. The Shopify Australia Post app will use the weight and dimensions to calculate the shipping cost and display it on the Shopify checkout page.
Navigate to Shopify → Products and enter the weight under the Shipping tab, as shown below:

Once you set up the product weight, navigate to Shopify Australia Post App → Products. This section will display all the products with their price, weight as shown below:

Now click on the name of the product to add dimensions, as shown below:

You can also set the default weight and dimension of your product by navigating to Settings → Packaging → Product Settings as shown below:
NOTE: The app will use this default weight and dimension while you are using auto-label generation.

4. Check Product Stock for Store Location(s)
Navigate to Shopify → Products, select the product, and ensure your product is in stock under the Inventory section for the location(s).

5. Products Shipped Internationally
If you are shipping internationally for your overseas customer, you need to fill in additional details like,
- HS Tariff Code
- Country Of Manufacture
Navigate to Shopify → Products, select the product, and enter the details under the Shipping section as shown below.

Add the custom information like Country of Manufacture, Harmonization code, and Product description by navigating to Shopify Australia Post App → Products → Customs information as shown below:

6. Products That Require Delivery Confirmation (Signature)
If you want to add delivery confirmation to your orders, you need to enable Delivery Confirmation with Signature within the app.
Navigate to Settings → Additional Settings → Is Delivery Signature Needed. In this section, you can choose whether you need the signature or not.

If you require delivery confirmation for a specific product, visit the Products section and click on the product.
Select your preferred delivery confirmation option for the specific product under Supplementary Details → Is Signature Needed as shown below:

7. Products That Require Shipping Insurance
If you want to keep your shipments safe from getting lost, delayed, damaged, or misdelivered, you can enable Insurance and set up a declared value for your product.
Insurance is very important for international orders, as there are more chances of the package getting lost or stolen than for domestic orders.
Navigate to Settings → Additional Settings → Enable “Is Insurance Required For Forward Shipments?” as shown below:

Note: The settings that you configure in the Auto Label Settings are applicable only for auto-label generation.
Add the declared value for each product under the Products section and set up a custom-declared value, as shown below:

8. Products Considered Dangerous Goods
If your products are considered hazardous goods, you can mark them as Dangerous Goods within the app by visiting the Products → Select the product → Enable the “Is Dangerous Goods” option.
Make sure to enter the following details regarding the dangerous goods shipping:
- UN Code
- Technical Name
- Class Division
- Transportable by Air
- Dangerous Goods Declaration

If you face any issues or have any queries about the app’s setup, feel free to contact our customer support.
Configure Your Packaging Methods
The Shopify Australia Post App provides different packing methods to pack your orders mentioned below,
- Prepacked products
- Weight-based packing
- Box packing method
- Volumetric weight-based packing
1. Prepacked Products
Some products, like electronics, shoes, etc., typically come in their own boxes; those products are called Prepacked.
You can mark your product as Prepacked by navigating to Products → Select the product → Enable “Is this a Pre-Packed product?”
NOTE: Ensure that you provide dimensions for the prepacked products.

2. Weight-Based Packing
Select the weight-based packing method if you want to pack the products purely based on their weight. This method allows you to pack different products together in a single package.
Navigating to Settings → Packaging → Edit. Under the packaging method, select Weight-Based and Save as shown below:

- Max Weight: You can set the maximum weight so that all the products can be packed in a single package. If the weight of the products exceeds this “maximum weight” the app will pack the remaining products into the next package.
3. Box Packing Method
The box packing method uses pre-defined boxes configured in the app, which include Australia Post Boxes and Custom Boxes.
Navigate to Settings → Packaging → Edit. Under the packaging method, select Box Packing and Save as shown below:

The app considers the below factors and allows you to pack all the items in the order into boxes in the most efficient manner:
- Box Dimensions and Product Dimensions
- Box Weight and Product Weight
Add your custom box by clicking on Add Custom Box and providing the dimensions. Click on the Add Box as shown below:

NOTE: If none of the boxes are capable of fitting an item, then that specific item will come under Your Package.
4. Volumetric Weight-Based Packing
Products such as cotton balls, pillows, etc. don’t have much weight, but they take up more space. In such cases, volumetric weight is used.
If the volumetric weight is enabled, the volumetric weight of all the products is calculated. The actual weight of the product and the volumetric weight are compared, and the highest among them is chosen for the packing process. So, the product weight will be the highest of these weights.
Navigate to Settings → Packaging and enable Use Volumetric Weight For Package Generation as shown below:

NOTE: The volumetric weight option is available only for Weight-Based Packaging.
Configure Australia Post Shipping Services
The app supports both domestic and international shipping services from Australia Post. Enable the services according to your requirements, and the same will be displayed at the Shopify checkout.
Navigate to Settings → Rates Settings → Carrier Services.


You can also provide an Adjustment Value ($) and Adjustment (%) for the shipping services, which allows you to add charge to the shipping cost.
Rename the shipping service in the Display Name section if you don’t want to show the actual shipping service name on the checkout page.
If you face any issues or have any queries about the app’s setup, feel free to contact our customer support.
Display Live Australia Post Shipping Rates on the Checkout Page
After configuring your Australia Post account, verifying the location and products, and enabling the Australia Post shipping services as per your requirements, the rates will be displayed on the Shopify checkout page.
Visit your Shopify store, add a product to your cart, and proceed with checkout. When the receiver address is filled, the app will display the rates as shown below:


Print Australia Post Labels
Before printing Australia Post labels, navigate to Settings → Documents/Labels Settings to configure your label preferences.
Documents/Labels Settings
The below section discusses the settings for Australia Post eParcel, MyPost Business, and StarTrack label and document configurations.
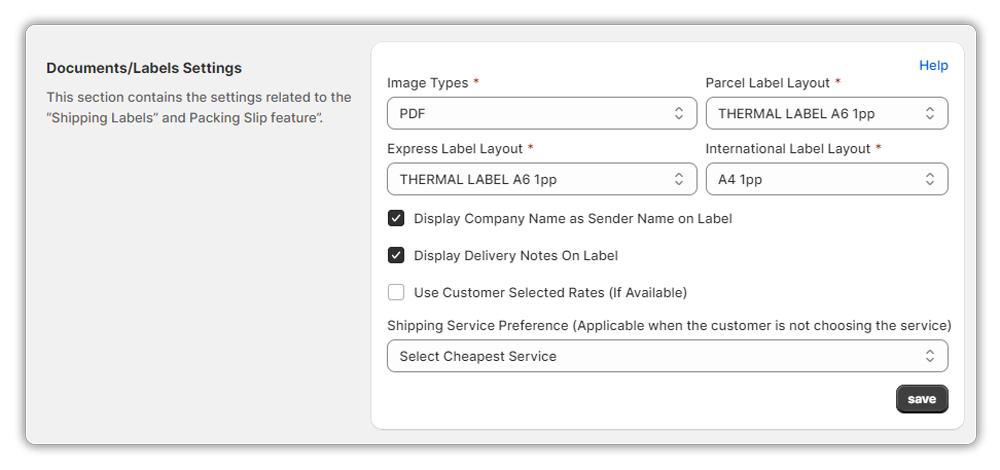
Austalia Post e-Parcel Label Settings
Select the Label Layout and Image Type according to your preferences. If you want to show the company name as the sender name, enable Display Company Name as Sender Name on the Label.
If you want to show the Australia Post branding on the label, enable Show Australia Post Branding On Labels as shown below:

The other settings available are:
- Display Delivery Notes On Label: This displays the note provided by your customer on the shipping label.
- Show References On Labels: This shows the order reference number on the shipping label.
- Use Customer Selected Rates (If Available): When generating labels in bulk, the service selected by the customer will be used if it is available.
MyPost Business Label Settings
Choose your preferred Image Types and Label Layouts. You can enable Display Delivery Notes On Label to show the notes given by your customer on the shipping label.
Other options include:
- Display Delivery Notes On Label: Your company name will be printed in the sender’s name field.
- Using Customer Selected Rates (if available): When generating labels in bulk, the service selected by the customer will be used if available.
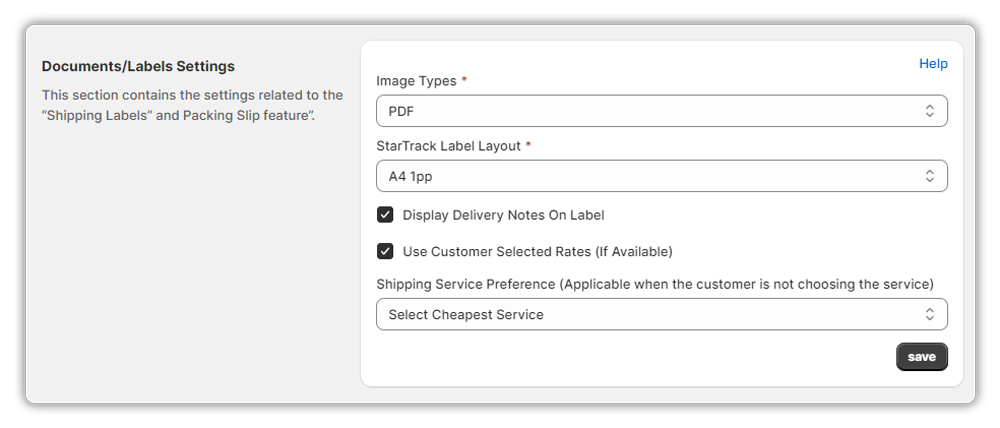
Star Track Label Settings
Select your preferred Image Type and StarTrack Label Layout. Additionally, you have the option to display delivery notes on the label, which will show any notes provided by your customer.
Also, when generating labels in bulk, the system will use rates selected by the customer if they are available.
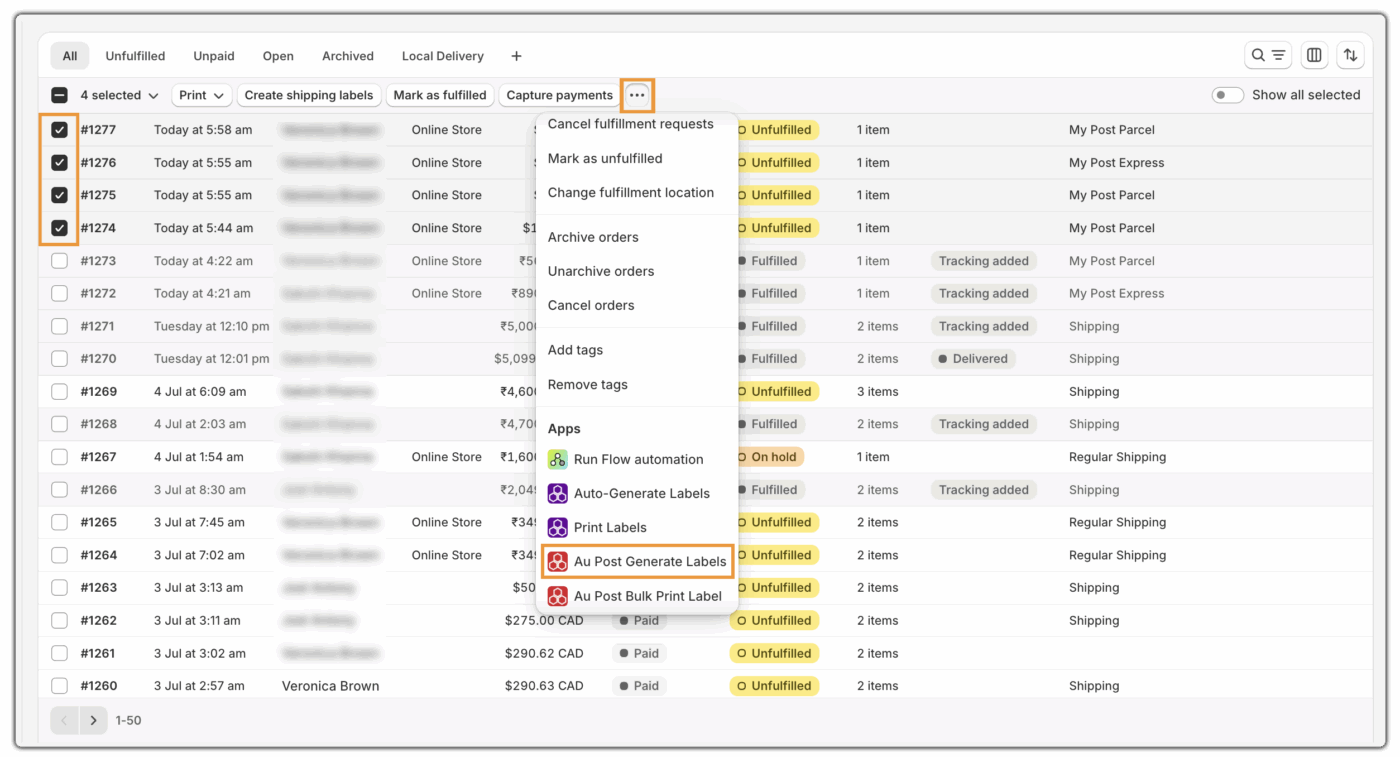
1. Print Australia Post Shipping Labels for Multiple Orders
To print Australia Post shipping labels for multiple orders, follow these steps:
- Navigate to Shopify Orders → Select the orders → Click on More Actions → Au Post Generate Labels, to generate Australia Post labels for all the selected orders, as shown below:
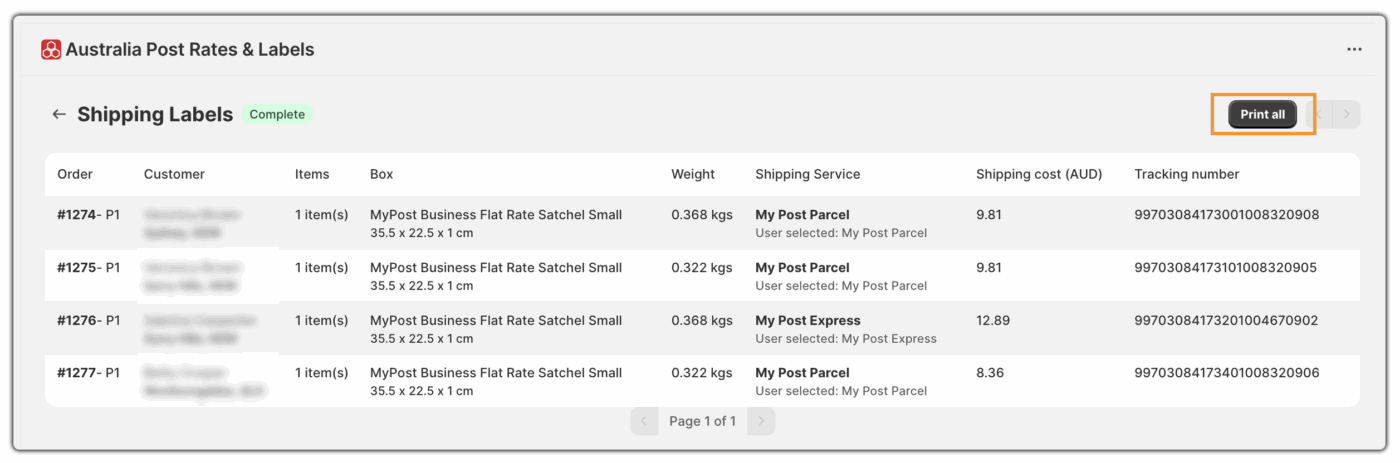
- This action takes you to the Australia Post app, where it generates shipping labels for all the selected orders. You’ll see a batch containing the label details displayed in bulk. To print the labels, simply click Print All.
Note: Once the labels are generated, the orders are automatically marked as fulfilled in Shopify.
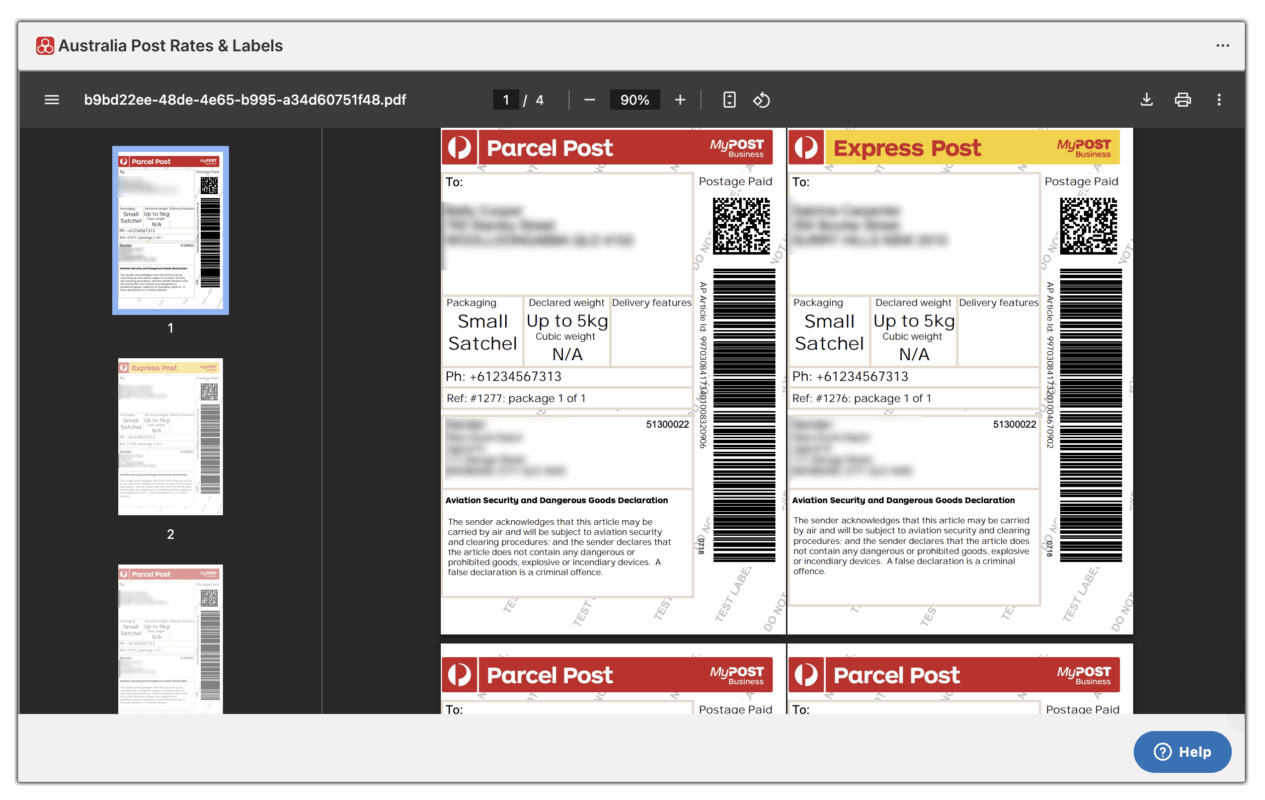
- The app then redirects you to the print page, where you can print the shipping labels along with additional documents such as the tax invoice, packing slip (if required).
- The app also provides you with the flexibility of printing labels directly from your Shopify Orders page.
- Go to your Shopify Orders → Select the fulfilled orders you want to print labels for → Click on More Actions→ choose Au Post Bulk Print Label.

- The app will then redirect you to the Australia Post app, where you can print labels for the selected orders, as shown below.
Tip: This is the most efficient method when you have multiple batches of shipping labels ready and want to print them all at once
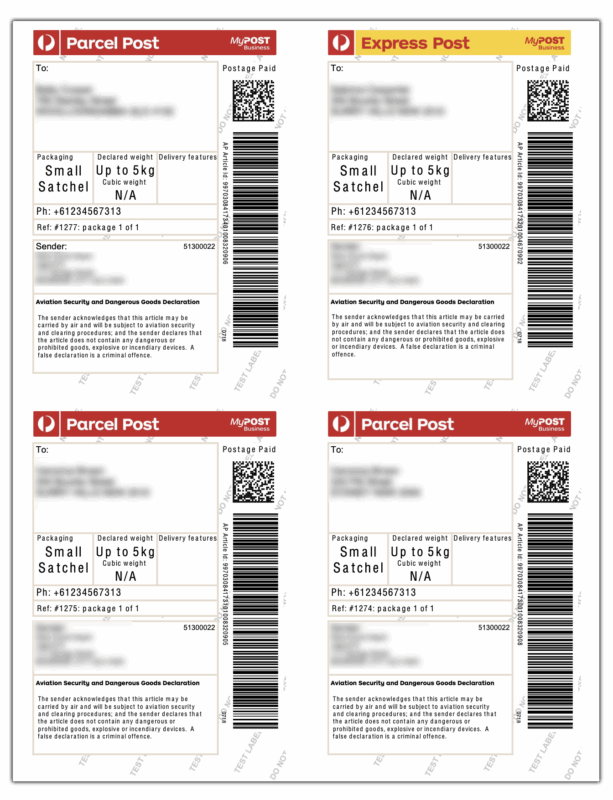
- Here, have a look at the sample Australia Post eParcel label:

- Here, have a look at the sample Australia Post MyPost Business label:

2. Print an Australia Post Shipping Label for a Single Order (Manual Mode With Custom Options)
To print the Australia Post Shipping Label for a single order using the Manual Mode, follow the steps below:
- Navigate to the Order Details Page → More Actions → Au Post Generate Label as shown below:

- On the Manual Label Generation Page, you can edit and delete the package, add insurance, and signature, as shown below:

- You can add Insurance details by clicking on the edit icon near the Insurance package? option.
- Click on Edit to unpack and pack products from the package, and select Shipping Box according to your requirements.

- After editing, select the shipping service and click on Generate Labels to initiate the label printing, as shown below:

- Print the shipping document by clicking on Print Documents.

3. Cancel the Australia Post Shipping Label
To cancel the Australia Post shipping label, follow the steps below:
- Go to the Shipping section in the Shopify Australia Post App.
- Click on the Label Generated dropdown and select Cancel Label to cancel the shipment as shown in the below image.

Please note that label cancellation is not available for the Australia Post MyPost Business Account.
4. Australia Post Return Labels
Navigate to Shipping → Label Generated, and in the order summary page, click on Return Packages. Click on the Create Return Label.


Select the return product quantity and the shipping service, and proceed by clicking on Generate Return Label. A return label will be printed.

1. Return shipping is only supported for Australia Post eParcel domestic shipments.
2. Please note that return label printing is not available for MyPost Business accounts.
If you face any issues or have any queries about the app’s setup, feel free to contact our customer support.
Generating Australia Post Manifest for the Shopify Orders
To generate the Australia Post manifest, follow these steps:
- Under the Shipping tab, select the orders for which you want to generate a manifest and click on Generate Manifest as shown below:

- Check out the sample Australia Post Manifest:

Please note that Manifest generation is not available for MyPost Business accounts.
Schedule Australia Post Pickup
Navigate to Settings → Pickup Settings to modify the settings as per your preferences.
- Pickup Start Time: It indicates the time after which Australia Post can provide pickup for your packages.
- Company Close Time: It indicates the time after which Australia Post cannot provide pickup for your packages.
- Pickup Point: Set the pickup point in your store from where Australia Post can pick up your packages, like the front reception, back door, etc.

Schedule your Australia Post Pickups under Shipping → Select the orders → More Actions → Request Pick Up as shown below:

Please note that Pickup is not available for MyPost Business accounts.
Track Your Shopify Australia Post Shipments
To achieve Australia Post Tracking, go to Shipping → Label Generated, click the Label Generated drop-down, and select Track Shipment. The app will redirect to the Australia Post official website, where you can track your orders.

Conclusion
Hence, these are the settings of the Shopify Australia Post App and how you can set up the app based on your shipping requirements. We also discussed how to get live Australia Post shipping rates at the Shopify checkout page. If you face any issues or have any queries about the app’s setup, feel free to contact our customer support.