Setting Up PH WooCommerce Deposits plugin
PluginHive’s WooCommerce Deposits plugin allows you to provide customers an option to pay a deposit upfront and pay the balance later. With this plugin, you get complete control over the payment by forcing deposits or providing customers a choice between the deposit or full payment. Also, the WooCommerce Deposits plugin allows you to create flexible payment plans that offer daily, weekly or monthly payment options to the customers.
Now let us take you through a step by step setup of WooCommerce Deposits plugin on your WooCommerce store.
On this page
Install and activate WooCommerce Deposits plugin
Visit the PH WooCommerce Deposits plugin page and purchase the plugin. After a successful purchase, the plugin will be available to download at My Accounts > API Downloads. Download the plugin and install it on your WooCommerce store.
For more information on the installation adn activation of the plugin, please refer – How to install a PluginHive WooCommerce Plugin?
Set up an optional or a mandatory deposit for customers
If you allow customers to purchase any of your products without paying the full amount, you can set up the deposit payment for all your products by following the steps below.
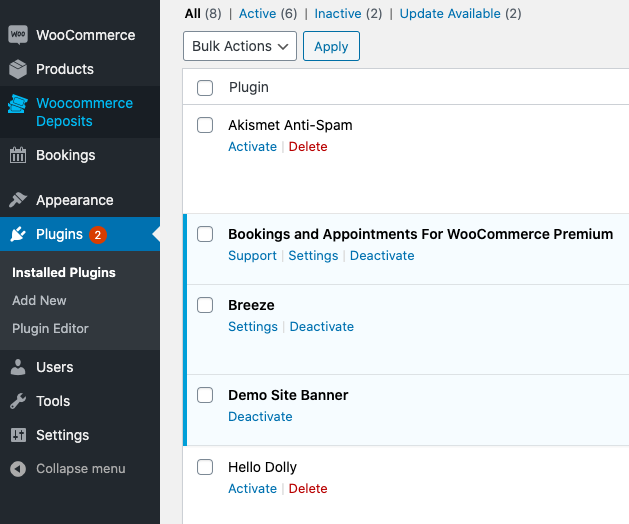
After the installation and activation, visit the plugin settings by clicking on the Settings option from the WooCommerce plugins page or click on the WooCommerce Deposits option as shown below.
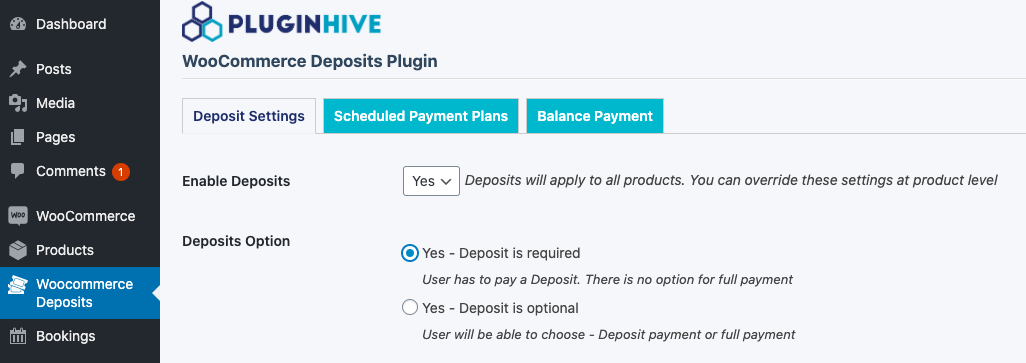
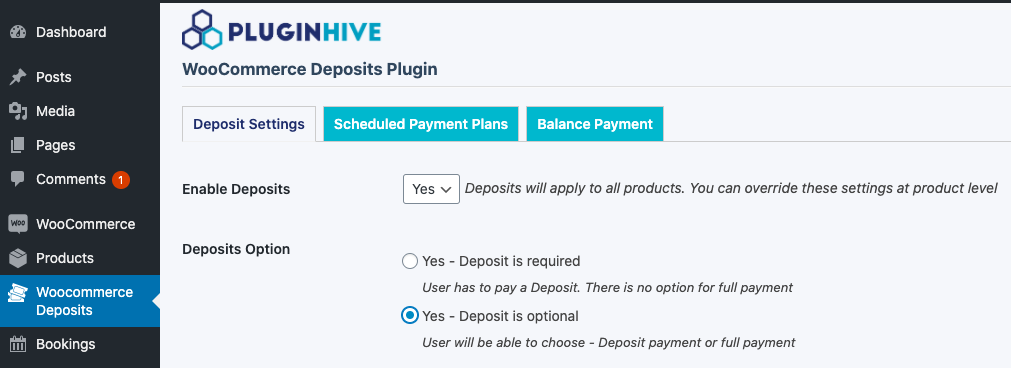
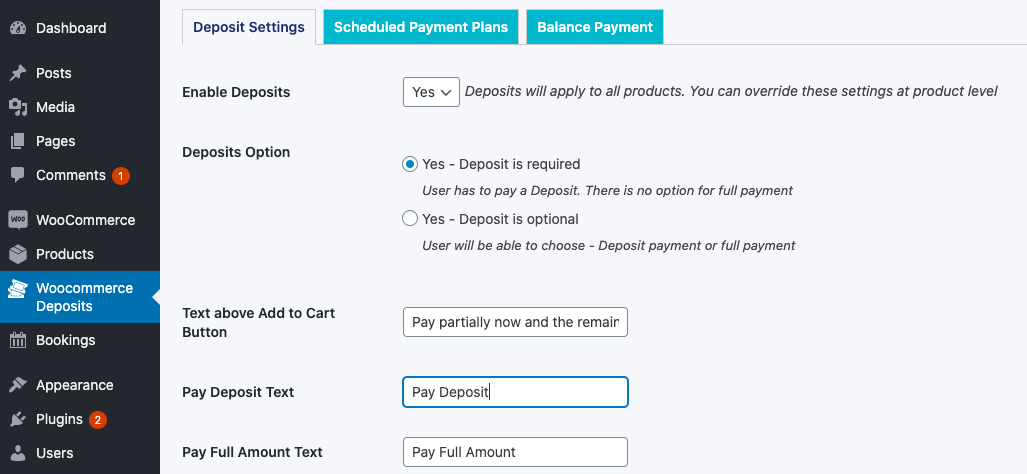
Under the Deposit Settings tab, select Yes for the Enable Deposits option, as shown below.

Under the Deposit Option, you can choose whether to provide customers with a deposit-only payment option or a deposit as well as the full payment option while purchasing.
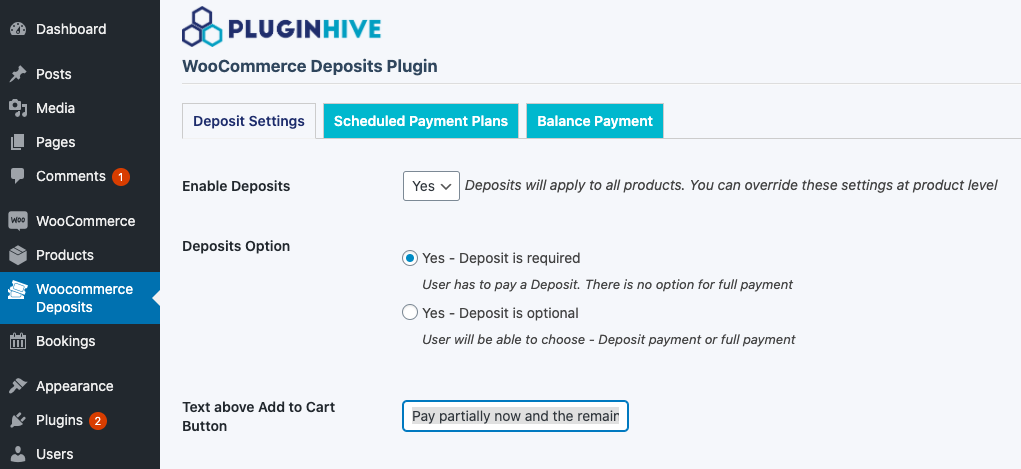
Select the Yes – Deposit is required option if you want your customers to always pay partially as per your preference.
Or, select the Yes – Deposit is optional option if you want your customers to choose from the partial payment or the full payment option while purchasing.
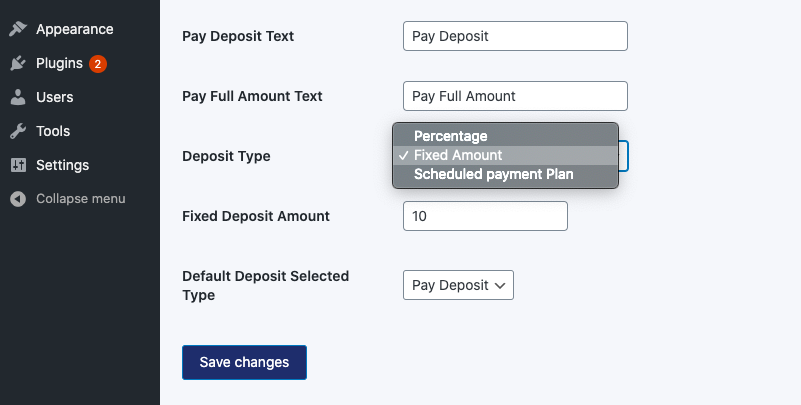
Enter the text you want to display on the product landing page regarding the payment option, under the Text above Add to Cart Button option, as shown below.
Now you can customize the button text for both the Deposit Payment and Full Payment buttons that will be displayed to the customers while purchasing.
Choose from fixed or percentage deposit amount
WooCommerce Deposits plugin allows you to choose from a fixed deposit amount or the percentage of the selling price of your products.
You can choose from the following options,
- Percentage
You can choose any percentage of the total price of the product and the customer has to pay that much amount while purchasing - Fixed Amount
You can choose a fixed price which the customer has to pay while purchasing - Scheduled Payment plans
If you want customers to pay the upfront fee and then proceed with a daily, weekly or a monthly payment, select the Payment Plans option.
Percentage Deposit
You can select this option if you want customers to pay a percentage of the total price of the products as a deposit upfront and then pay the remaining amount later.
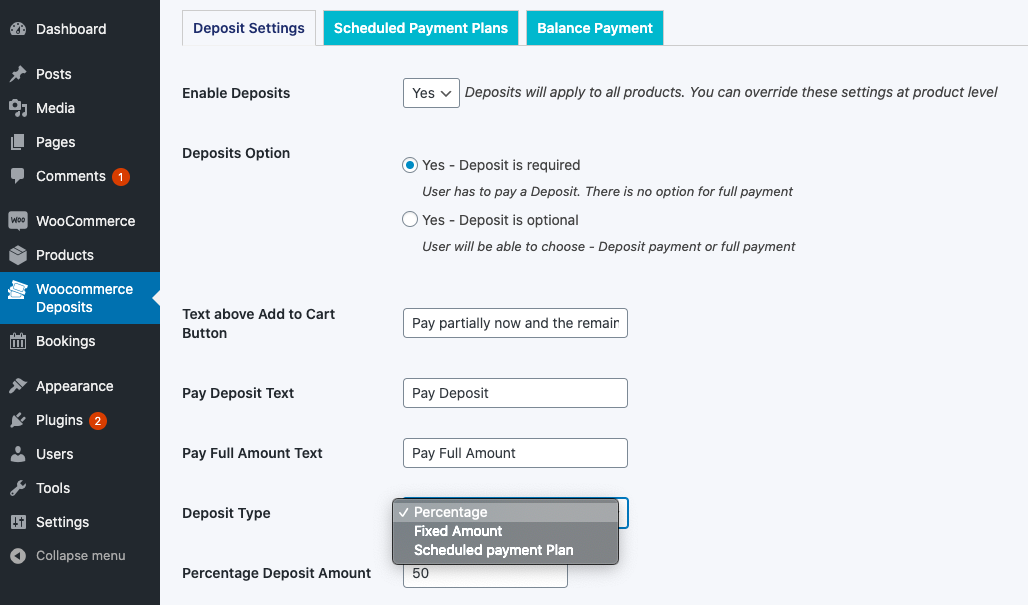
After selecting the option you can enter the percentage deposit as shown below.
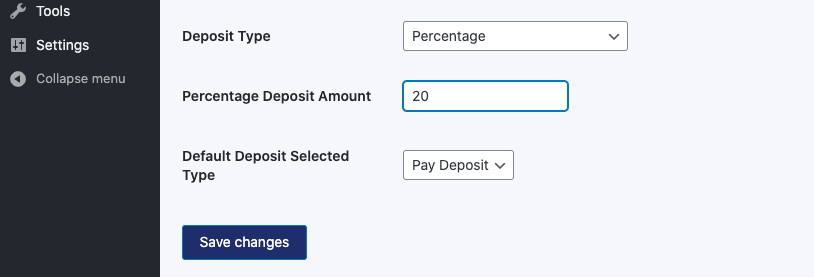
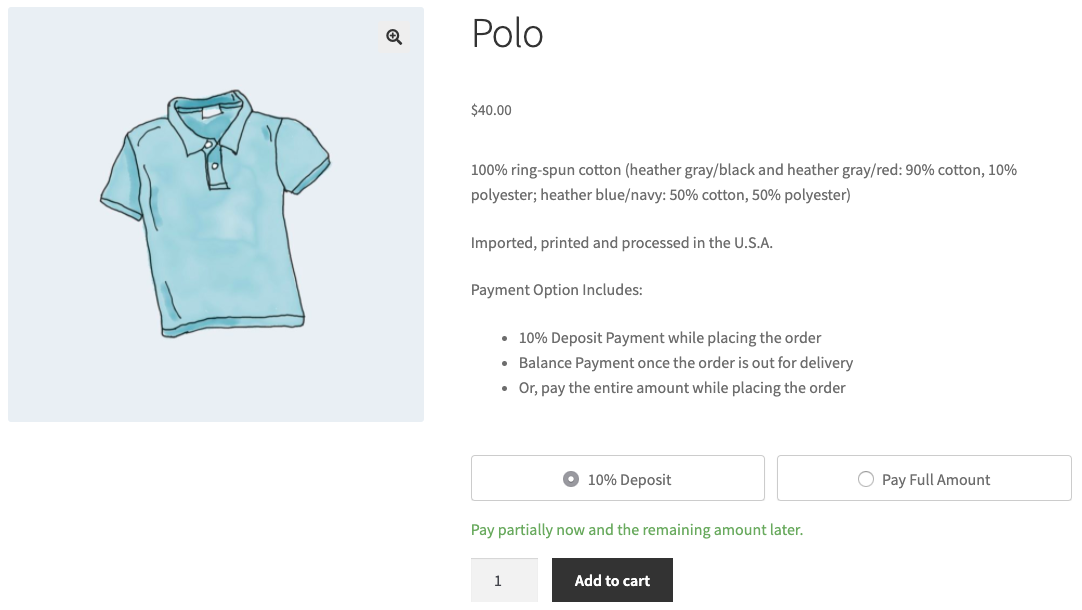
Once you save the settings, the customers will be able to choose from the 10% deposit option and the full payment option as shown below.
Fixed Deposit
You can select this option if you want customers to pay a particular amount upfront, irrespective of the price of the product.
After selecting the option you can enter the fixed deposit amount as shown below.
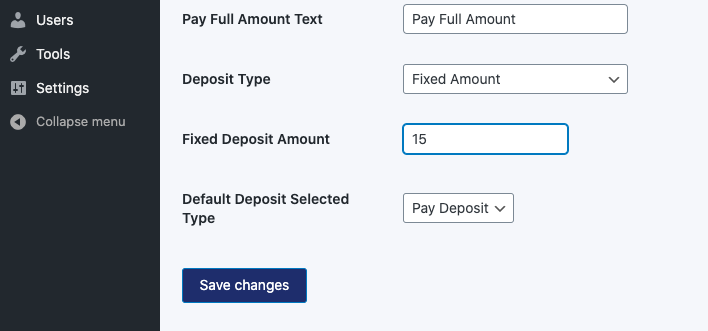
Once you have selected the type of deposit you want customers to pay, select the default option that will be selected for the customers while purchasing, as shown below.

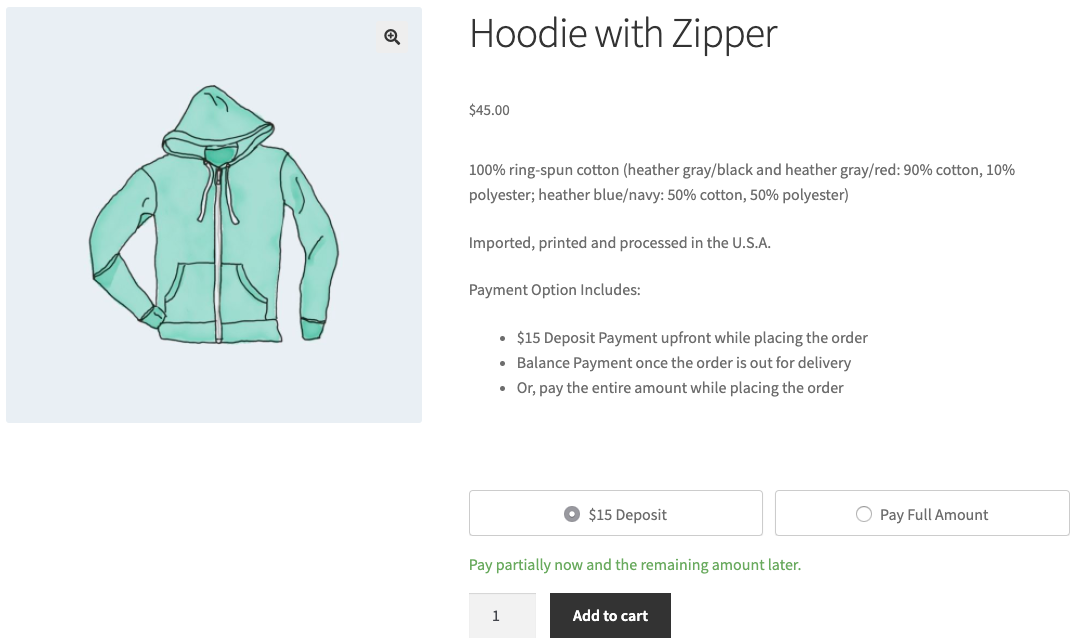
After saving the settings, the customers will be able to choose from the $15 deposit option and the full payment option as shown below.
Create scheduled payment plans for customers
Payment plans allow more flexibility to you and let customers pay the total amount by dividing the remaining amount based on daily, weekly, or monthly plans.
Based on your requirements, you can create a dedicated payment plan for each of your WooCommerce products.
Visit the Scheduled Payment Plans tab to create new payment plans for your products, as shown below.
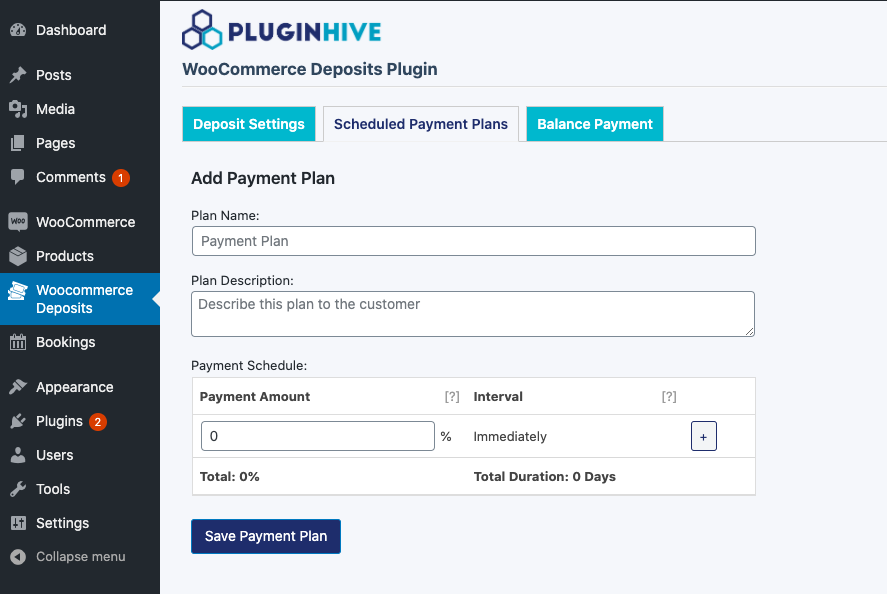
Enter the Payment Plan Name and Plan Description, as shown below.
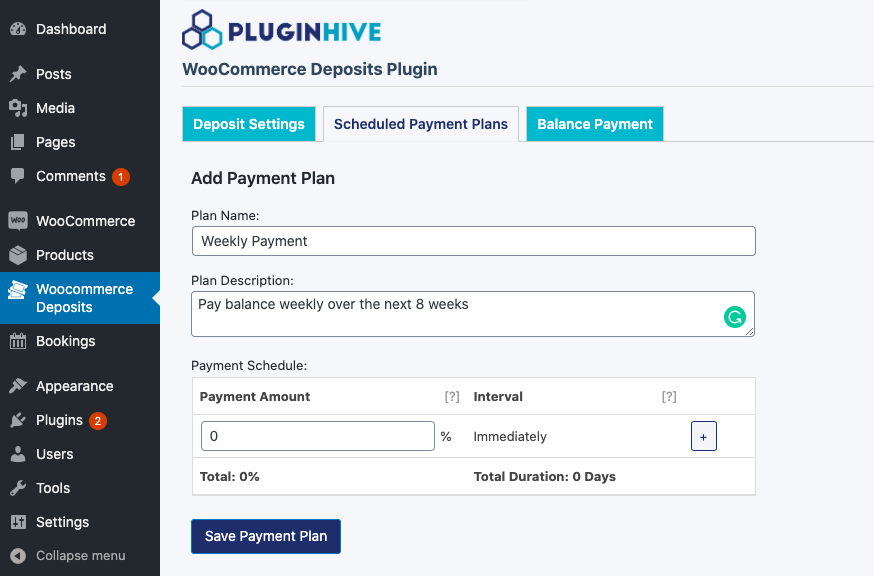
Now you can enter the Payment Amount and the Interval at which the customers will be paying the upfront fee and the remaining amount.
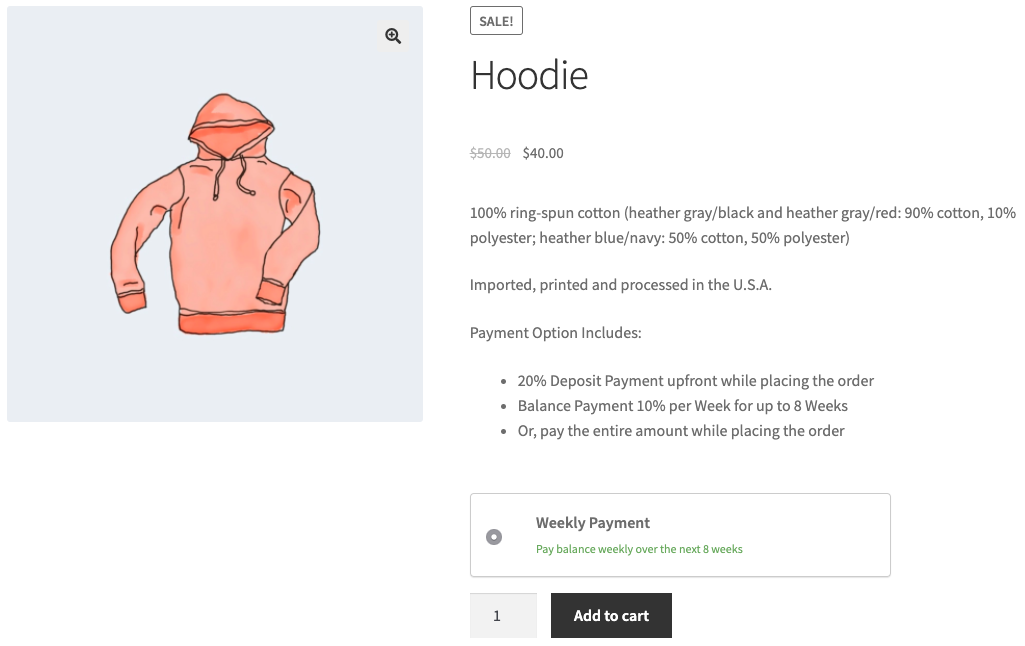
For Example, let us create an 8-week payment plan that allows customers to pay,
- 20% amount upfront
- 10% amount every week for the next 8 weeks
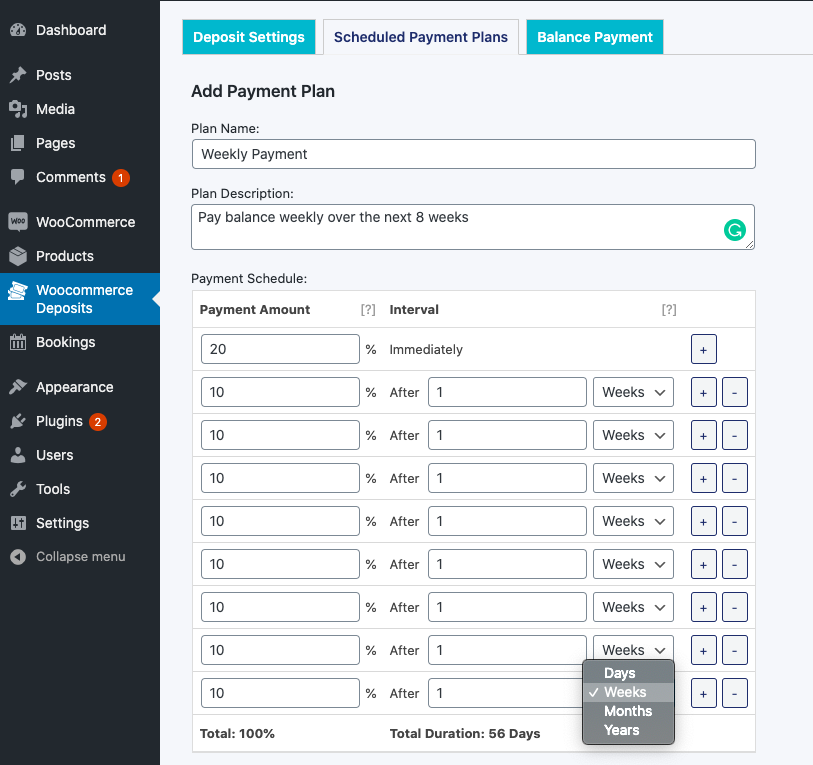
Similarly, create payment as per your requirements and click on Save Payment Plan to save the changes.
Now visit the Deposit Settings tab and select the Scheduled Payment Plans option under Deposit Type.

Now select the payment plan that you want to set for deposit throughout the WooCommerce store for every product.
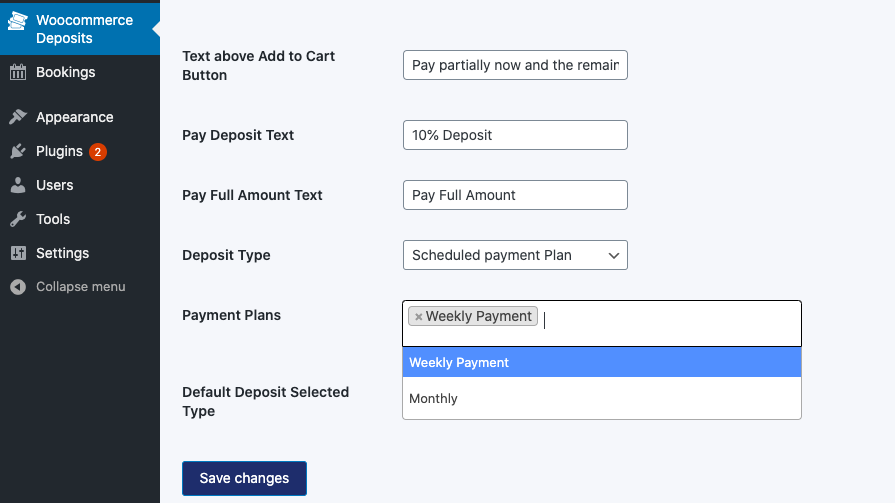
Click on Save Changes to save the settings. After saving the changes, the customers will be able to choose from the payment plans that you have created and the full payment.
Once a customer places an order using the payment plans, the plugin gives you the flexibility to set up payment reminder emails for the customers.
Visit the Balance Payment tab, and you can enable the reminder emails by setting Enable Email Reminders to Yes, as shown below.
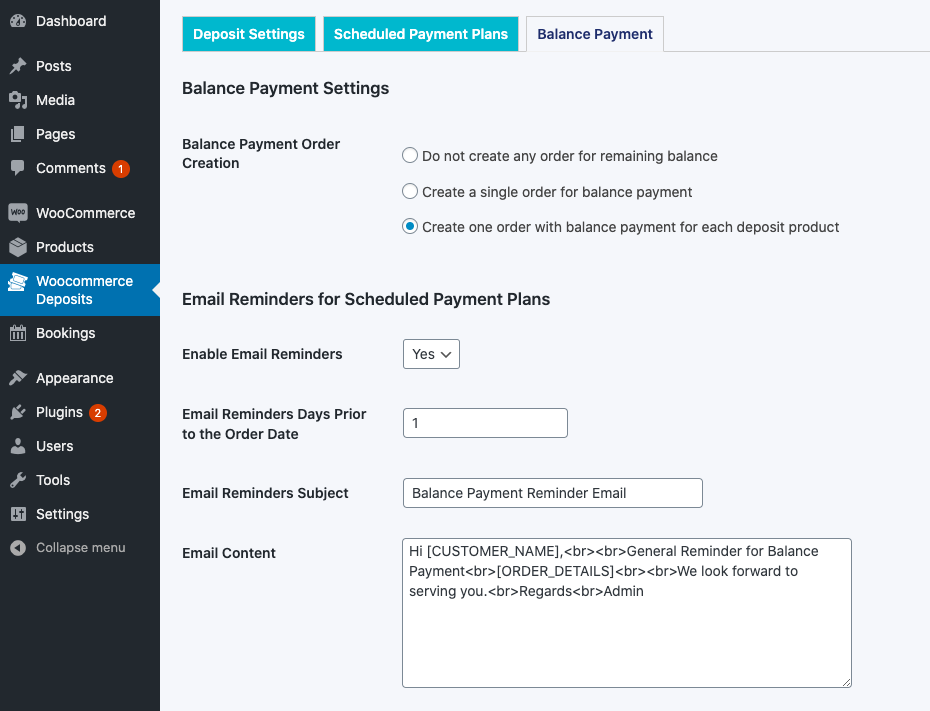
The plugin also allows you to set the number of days prior to the order date when the email will be sent to the customers. All you need to do is set the Email Reminder Days Prior to the Order Date to your preferred number of days.
For example, if you want customers to get the reminder email a day before the payment date, you can set the option to 1.
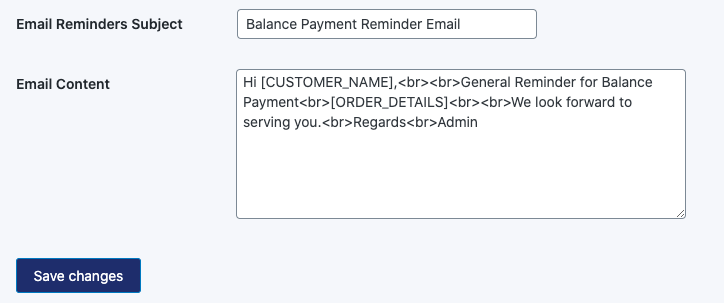
Also, you have the flexibility to set a custom email subject and an email template as shown below.
Set up specific deposits for specific products
If you do not want to have a dedicated deposit option for all your products and instead want to provide different options for different products, you can create deposits at a product level.
Visit Products > All Products and edit the product for which you want to create the deposit.
On the product edit page, visit the Deposits tab as shown below.
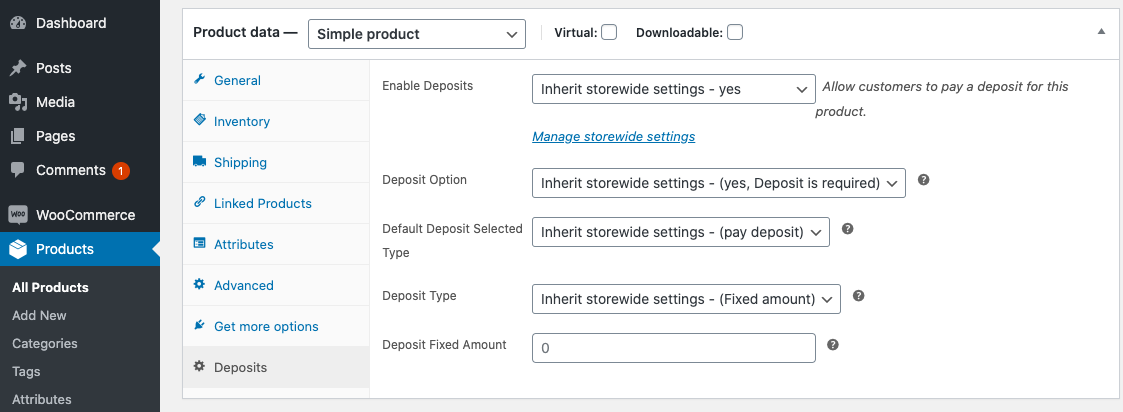
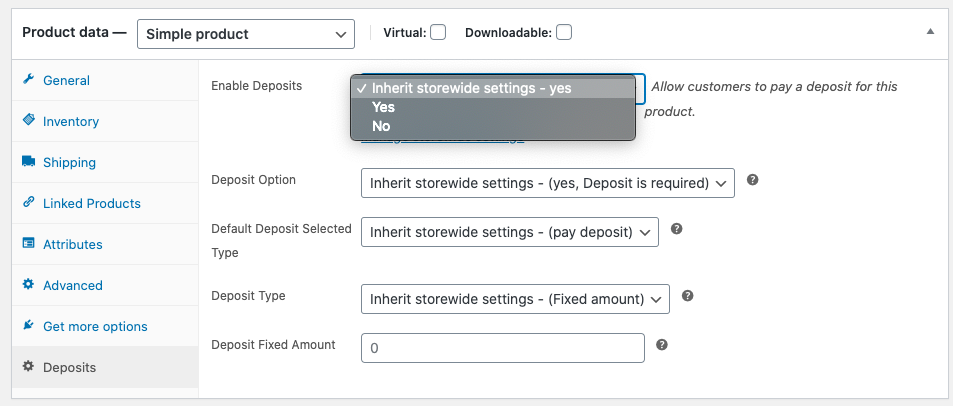
Under Enable Deposits select,
- Inherit Storewide Settings
If you want to set the same settings to this product that you have set in the plugin settings - Yes
If you want to enable deposit payment for this product - No
If you do not want to enable deposit payment for this product
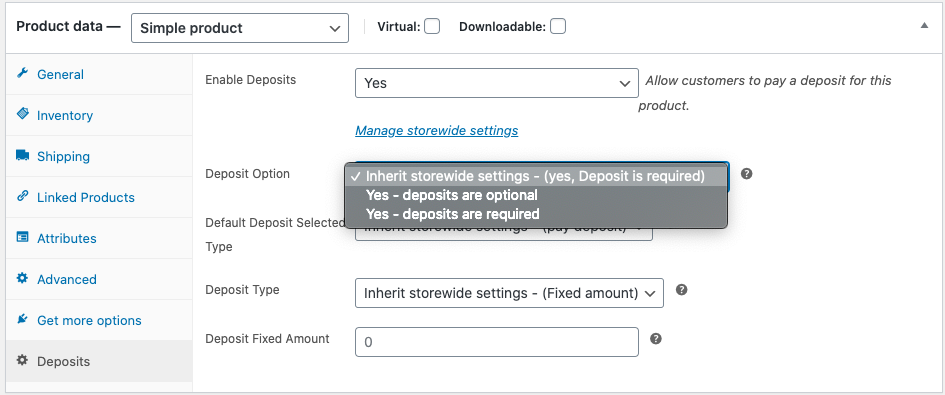
Under the Deposit Option, select,
- Inherit Storewide Settings
If you want to set the same settings to this product that you have set in the plugin settings - Yes, Deposits are optional
If you want customers to have an option of the deposit payment of full payment - Yes, Deposits are required
If you want customers to proceed with only the deposit payment
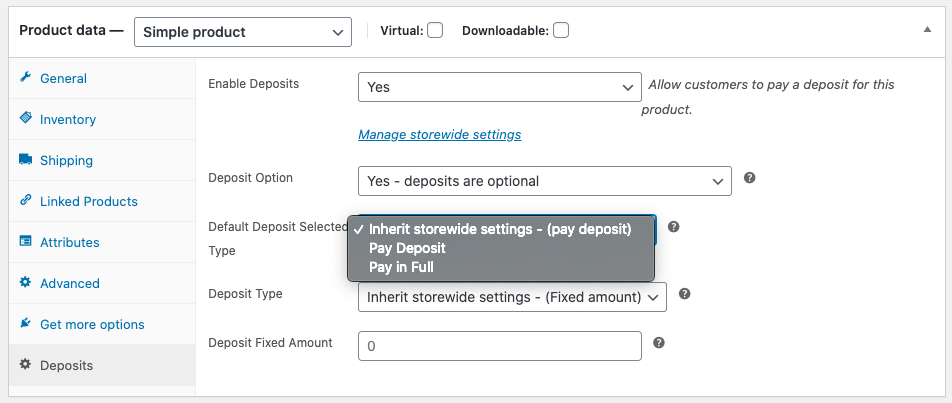
Under the Default Deposit Selection Type, select,
- Inherit Storewide Settings
If you want to set the same settings to this product that you have set in the plugin settings - Pay Deposit
If you want the Deposit Payment to be the default selection for the customers - Pay in Full
If you want the Full Payment to be the default selection for the customers
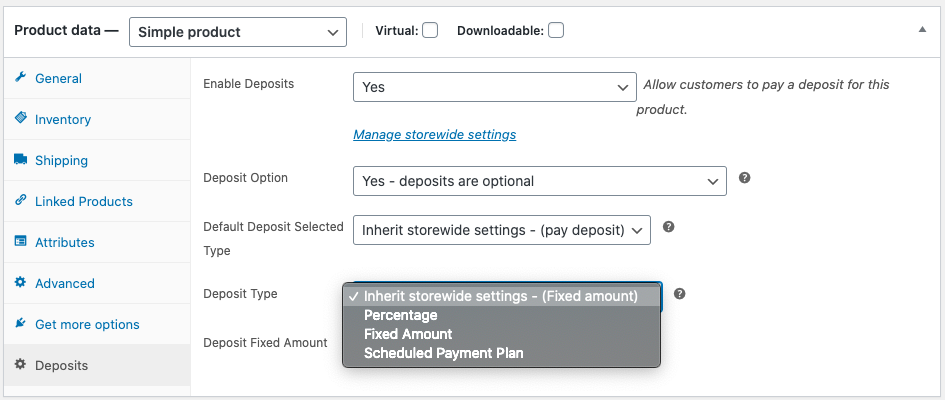
Under the Deposit Type option, select,
- Inherit Storewide Settings
If you want to set the same settings to this product that you have set in the plugin settings - Percentage
If you want to set a Percentage Deposit for the product - Fixed Amount
If you want to set a Fixed Deposit Amount for the product - Scheduled Payment Plan
If you want to set a Scheduled Payment Plan for the product
Based on your selection, set the following,
- Deposit Percentage Amount
If you have selected the Percentage option above, set the percentage deposit amount that you want customers to pay while purchasing - Deposit Fixed Amount
If you have selected the Fixed Amount option above, set the fixed amount that you want customers to pay while purchasing - Payment Plans
If you have selected the Scheduled Payment Plan option above, select from the available payment plans for the product
Manage deposit orders and orders with payment plans
After setting up deposits and creating flexible payment plans for your customers, you can choose how the orders will be managed within WooCommerce.
Managing Deposit Orders
Under the Balance Payment tab in the plugin settings, you can find the options shown below.
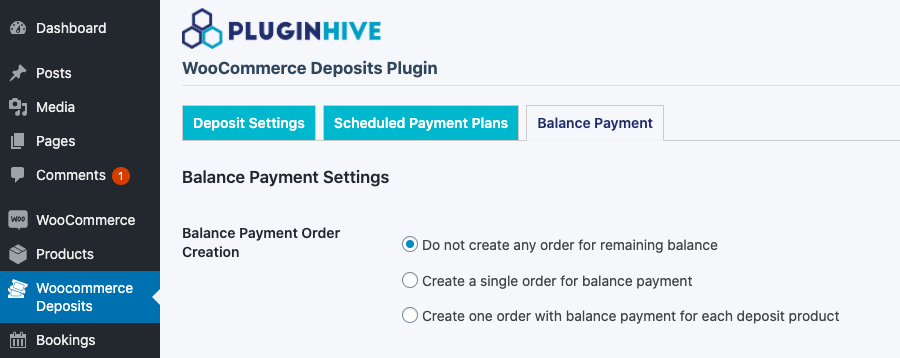
You can choose any of these options based on your preferences.
1. Do not create any order for the remaining balance
On selecting this option, if a customer places an order with a deposit payment, the plugin will automatically calculate the balance payment and display it within the same order. The plugin will not create a new invoice/order automatically unless the store owner requires the invoice.
You can select the order and click on the Generate Remaining Balance Invoice button as shown below.
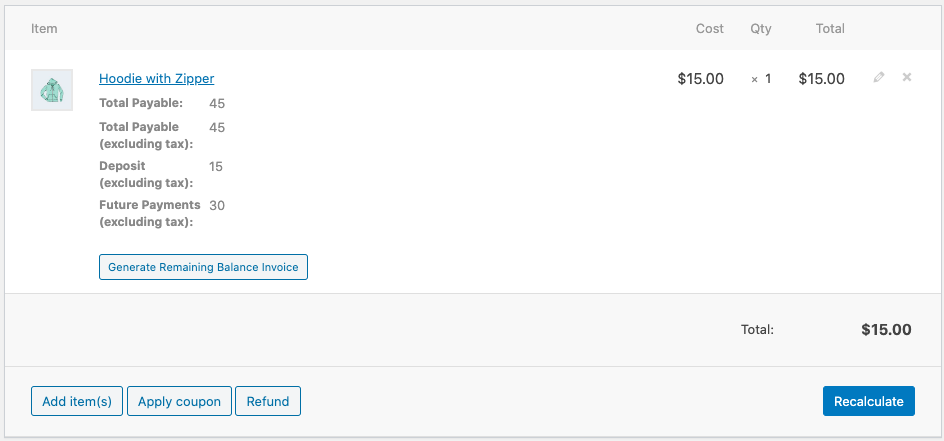
This will create another order with the balance payment, as shown below.
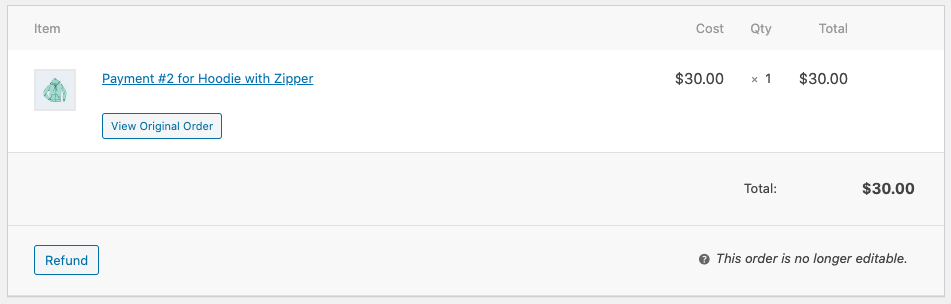
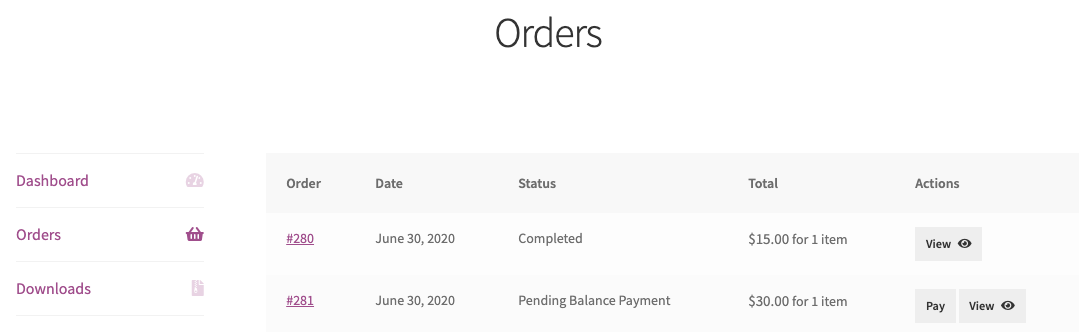
The same invoice will be reflected on the customers’ My Account page, as shown below.
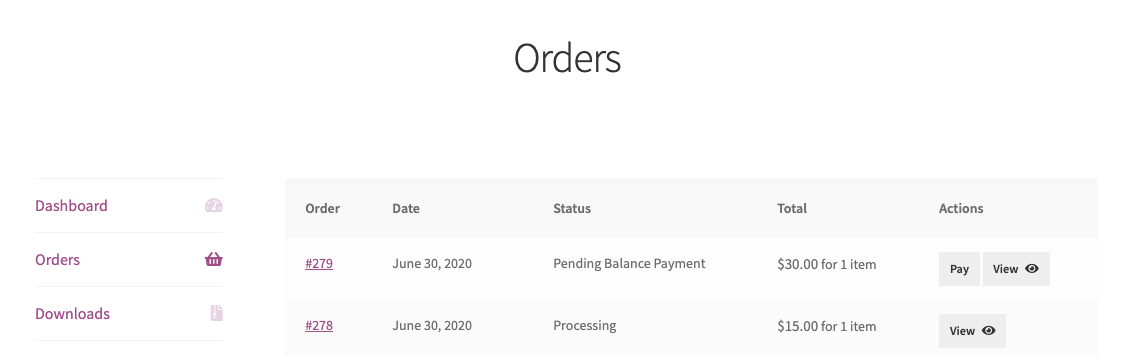
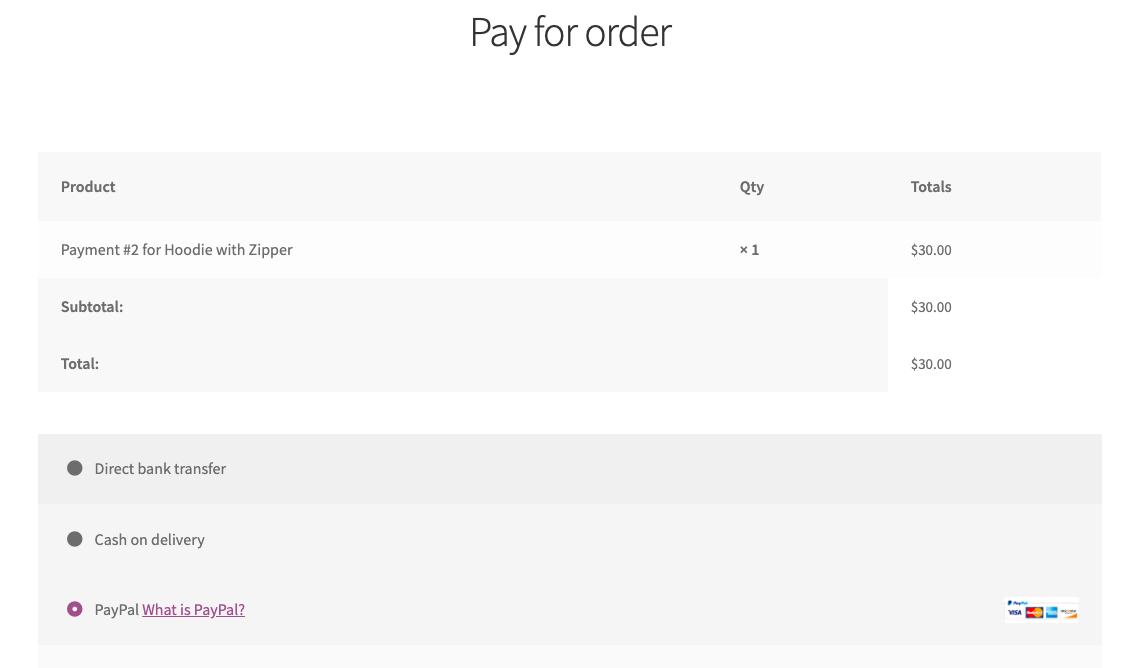
The customers can click on Pay and will be redirected to the payment page for the balance amount for the order.
2. Create a single order for the balance payment
On selecting this option, the plugin will automatically create a balance payment order for the customers.
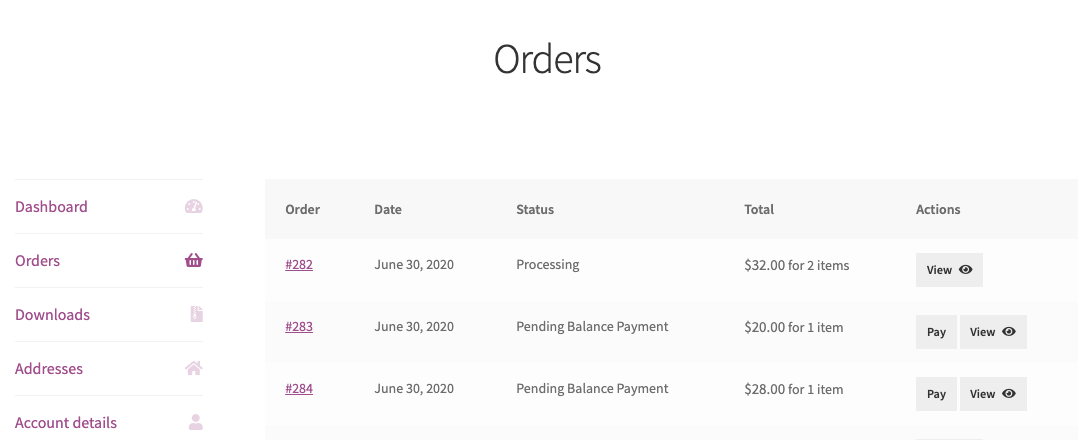
Once the customer places the order, the plugin will create two orders and reflect them on the customer’s My Account page, as shown below.
Similarly, customers can click on the Pay button and proceed to pay the balance amount.
3. Create one order with a balance payment for each deposit product
This option allows you to create a dedicated WooCommerce order for the balance payment of each product within an order.
This option is useful if you have multiple products with different partial payment options. Hence, when a customer purchases multiple products, the plugin automatically creates orders reflecting the balance payment for each product separately.
Customers can view their orders under My Accounts page where they can proceed with the payment for each product separately, as shown below.
Managing orders with payment plans
When a customer places an order and chooses to pay based on the scheduled payment plans, the plugin handles the orders in an organized way.
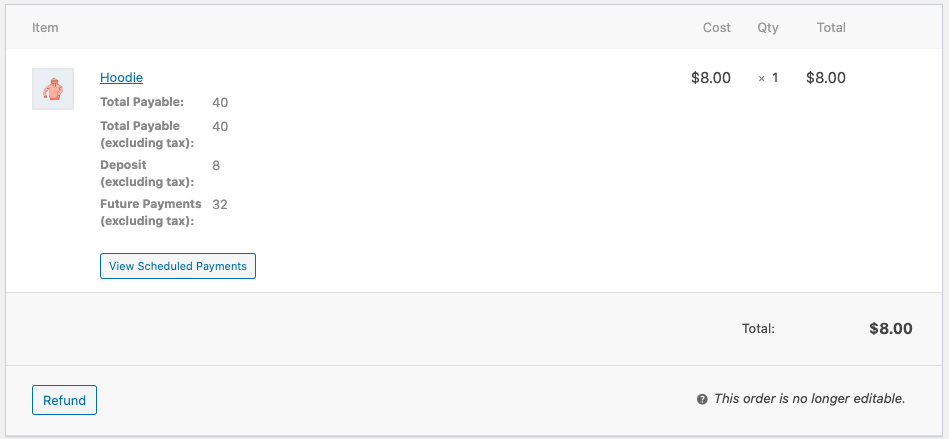
As soon as the order is placed, the plugin automatically creates scheduled payment invoices/orders. The store owner can access these orders by visiting the order and clicking on the View Scheduled Payments button, as shown below.
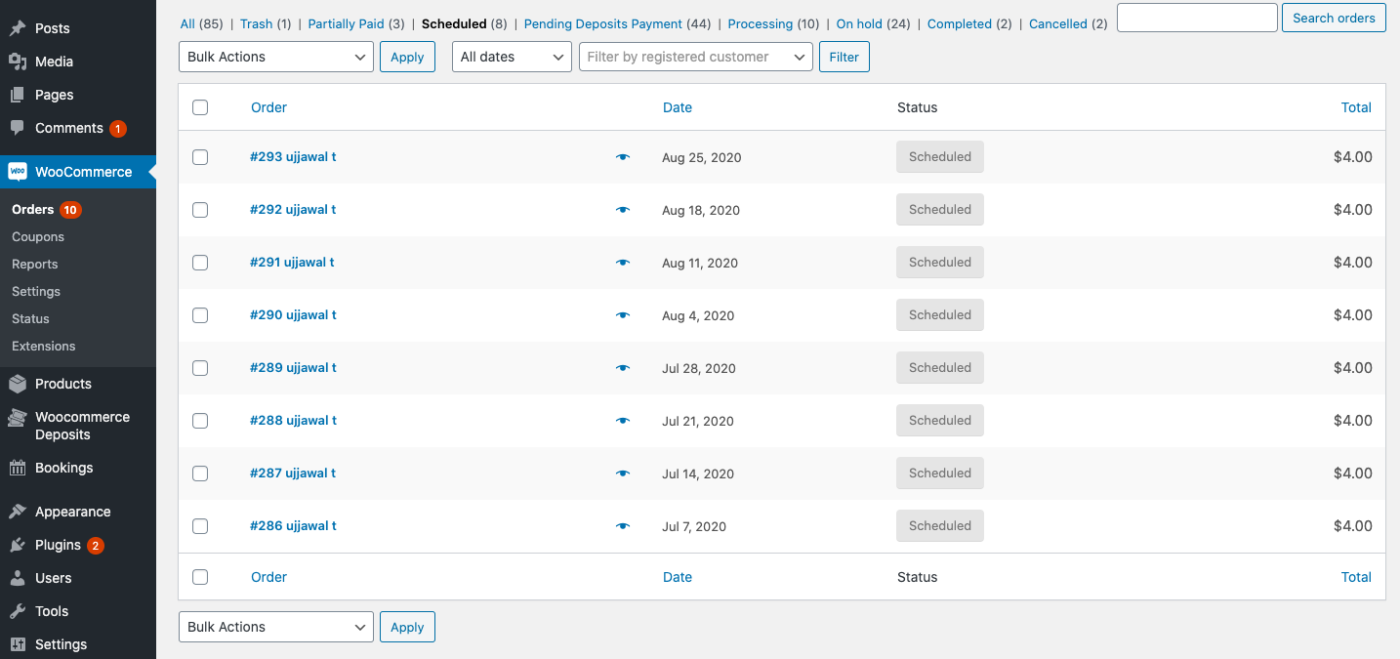
This will redirect the admin to the scheduled orders listed on the WooCommerce Orders page, as shown below.
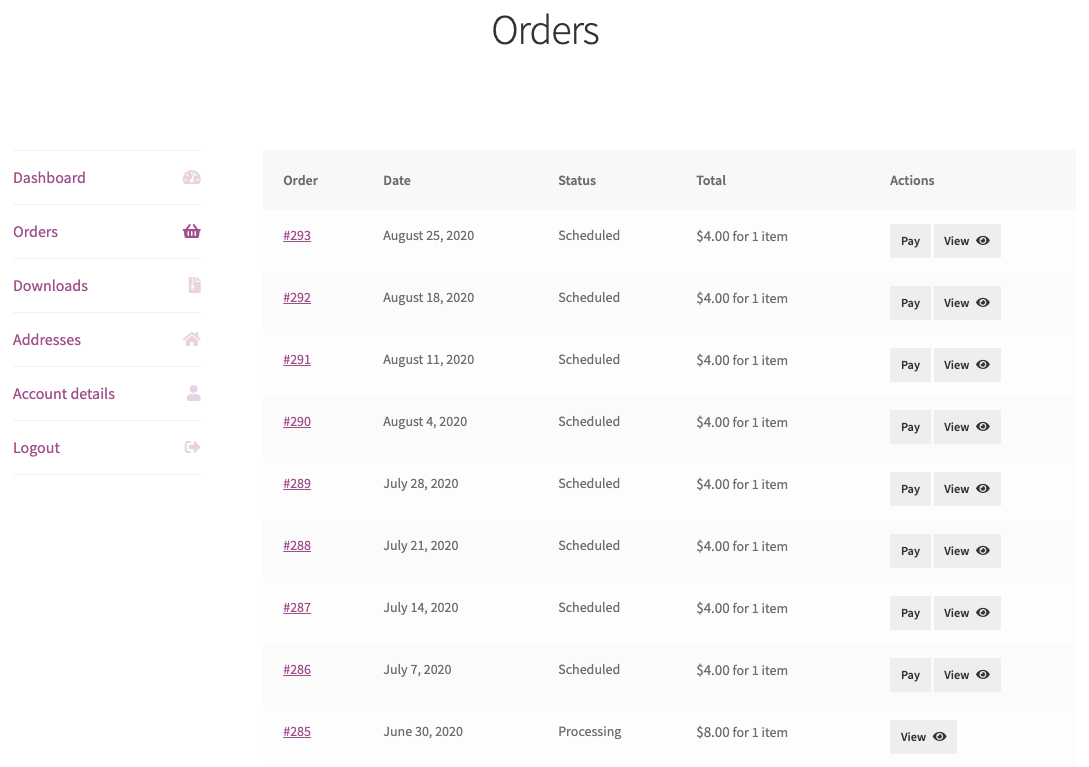
As for the customers, they can view their scheduled orders by visiting the Orders tab under the My Account page, as shown below.
We hope this article would have helped you set up the WooCommerce Deposits plugin on your WooCommerce website. If you have trouble using it or need help setting it up then feel free to contact PluginHive Customers Support. Our team will definitely help you out.