-
WooCommerce Bookings and Appointments
-
- Setup Guide for WooCommerce Bookings & Appointments plugin
- Set Booking Cost with WooCommerce Bookings and Appointments
- Set Booking Participants with WooCommerce Bookings and Appointments
- Setup Google Calendar with WooCommerce Bookings and Appointments
- Set up Buffer Time in WooCommerce Bookings and Appointments
- Set Booking Availability with WooCommerce Bookings & Appointments
- Set Booking Resources with WooCommerce Bookings and Appointments
- Set Booking Assets with WooCommerce Bookings and Appointments
- How To Use 2 Way Google Calendar Sync with WooCommerce Bookings and Appointments plugin?
- Set Up Discount for WooCommerce Bookings - An Ultimate Guide
- Set Up WooCommerce Bookings Cost based on Different Seasons
- How To Set Up a Multilingual WooCommerce Bookings Store?
- WooCommerce Bookings Email Notification
- WooCommerce Bookings Confirmation & Payment on Approval
- WooCommerce Bookings Cancellation
- WooCommerce Bookings and Appointments plugin FAQs
- Export WooCommerce Bookings and Appointments to a CSV File
- How to Export WooCommerce Bookings to iCalendar
- How to Sync WooCommerce Bookings to Microsoft Outlook Calendar
- How to Display WooCommerce Bookings Search Availability Widget on your store
- Show all articles ( 5 ) Collapse Articles
-
- Book Online Diving Adventure with Additional Services using WooCommerce Bookings
- Set up Event Booking with WooCommerce Bookings Plugin
- Farmhouse Accommodation-Set up using WooCommerce Bookings plugin and Product Add-on
- How to Book Gaming Slots Online with WooCommerce Bookings Plugin
- Book Meal Slots & Provide Multiple Meal Selections to Customers
- How to Reserve Meeting Rooms with WooCommerce Bookings and Appointments plugin
- How to Set up Bike Rental using WooCommerce Bookings and Appointments plugin
- How to Set up Bookings for Wine Tasting Session using WooCommerce Bookings Plugin
- Set Up Community Hall Availabilities and Pricing with WooCommerce Bookings and Appointments
- How to Set Up Online Boat-Rental using WooCommerce Bookings and Appointments
- How to Set up Weaving and Fibre Arts Studio using WooCommerce Bookings and Appointments
- How to Share a Service with Multiple Bookable products using WooCommerce Bookings and Appointments plugin
- Indoor Arena Rentals — Set up using WooCommerce Bookings Plugin
- Offer Online Booking for Music Lessons With the WooCommerce Bookings and Appointments plugin
- Online Dog Walking & Overnight Pet Care with WooCommerce Bookings
- Create a Motorbike Rental Website with Multiple Engine Capacities
- Online Tour Booking — Set up using WooCommerce Bookings Plugin
- Set up Recurring Online Courses with WooCommerce Bookings
- Set up an Equipment Rental Website with WooCommerce Bookings
- Set Up Online Hotel Booking with WooCommerce Bookings
- Staff Management with WooCommerce Bookings Plugin
- Subscription-Based Booking for Fitness Center-WooCommerce Bookings
- WooCommerce Bookings - Customize Your Booking with Time Duration of 2, 11 and 47 hours
- How to set up museum tours using WooCommerce Bookings and Appointments plugin
- Show all articles ( 9 ) Collapse Articles
-
- Advanced Add-Ons to Extend WooCommerce Bookings and Appointment Plugin's Functionality
- Set up Discounted Rates for Different Seasons with WooCommerce Bookings and Cost Adjustment Add-on
- Recurring Bookings - How to set up using WooCommerce Bookings and Appointments plugin?
- WooCommerce Bookings Add-ons - Set Minimum/Maximum Booking Duration based on Date
- WooCommerce Bookings Add-ons - Conditional Discount based on Participants
- Accept WooCommerce Bookings in Groups of People, Families & Team Members
- WooCommerce Bookings Availability Search Widget
- Set Up Custom Booking Interval using WooCommerce Bookings and Appointment plugin
- WooCommerce Bookings Add-ons – Book Dates Across Unavailable Days
- WooCommerce Bookings Add-ons – Select First Available Time of the Day
- WooCommerce Bookings Add-ons – Auto-Select Available Date for Customer
- WooCommerce Bookings Add-ons – Skip cart & checkout while bookings
- WooCommerce Bookings Add-ons – Block Product Availability Based on Other Bookings
- WooCommerce Bookings Add-ons - Allow store owners to make last-minute Bookings
- WooCommerce Bookings Add-ons – Customise Maximum Bookings Per Slot
- WooCommerce Bookings addons - Resource quantity & availability
- WooCommerce Bookings for Custom Order Status
- WooCommerce Bookings Add-ons – Customize Maximum Bookings Per Slot for All Week
- Show all articles ( 3 ) Collapse Articles
-
WooCommerce Shipping Plugin for FedEx with Print Label
-
- How to Ship WooCommerce Custom Product Boxes via FedEx
- Volumetric Weight-Based Shipping with WooCommerce FedEx Shipping Plugin
- Handle FedEx Non-Standard Packages on WooCommerce
- Understand the Packing Methods of WooCommerce FedEx Plugin
- Print FedEx Shipping Labels in Bulk for WooCommerce
- WPML & FedEx shipping - WooCommerce store translation
- Extend the Estimated Delivery Day in WooCommerce FedEx Plugin
- Troubleshoot - Different FedEx Shipping Rates in Cart/Checkout
- Convert WooCommerce FedEx Shipping Rates to Base Currency
- Specify Dangerous Goods with WooCommerce FedEx Plugin
- Why FedEx option is not under WooCommerce shipping zones
- Print FedEx Shipping Labels using Zebra Thermal Printers
- FedEx Home Delivery for Residential Addresses
- FedEx Box or Custom Boxes for Packing WooCommerce Orders
- Use WooCommerce Shipping Plugin to Print FedEx Labels
- Fix "Invalid Country Code" Error with WooCommerce FedEx Plugin
- I need a WooCommerce Shipping Plugin so that my Vendors can Print their Labels with Postage Paid
- Exclude WooCommerce Shipping Costs from Tax Calculations
- Where can I find the Web Services Password for FedEx?
- How to Resolve Authentication Error with FedEx Production Keys
- It always seems to overlook the FedEx Ground and not include it as an option at checkout
- Debug Error: [HighestSeverity] => ERROR
- When I try to create a label for my orders, error message I get: FedEx Create Shipment Error: Severity: ERROR
- Add handling fees to FedEX shipping services in WooCommerce
- How to solve Error: SoapFault Object ( [message:protected] => Could not connect to host when using WooCommerce FedEx Shipping Plugin?
- Debug Error: “Authentication Failed"
- FedEx Address Validation & Residential Shipping for WooCommerce
- Why does FedEx overnight deliveries shows Delivery - TUE instead of next business day, Monday?
- I have an issue with printing the FedEx Shipping label
- Print FedEx Labels & Commercial Invoices on WooCommerce
- Add FedEx WooCommerce Tracking Number to Order Completion Email
- WooCommerce FedEx Plugin: Calculate Rates by Weight & Dimensions
- Debug Error: Product # is missing weight. Aborting.
- Fix the error message “There are no valid services available” for FedEx Mexico
- How to exclude certain product variations from the FedEx shipping calculation
- Create two FedEx Pak shipments, for two different FedEx Pak orders
- Integrate FedEx Shipping Calculator with WooCommerce website
- Print Order number on the WooCommerce Shipping Label
- I have input the Postal code and City into the checkout cart form and it still doesn’t show the FedEx info
- Configure FedEx International Shipping with WooCommerce
- During the test mode, should I use my FedEx account number or test account number?
- Manage Return Shipments with WooCommerce FedEx Plugin
- Weight-based Packing with WooCommerce FedEx Shipping Plugin
- How to Generate Packages Automatically using WooCommerce Shipping Plugin for FedEx
- Display Delivery Date with WooCommerce FedEx Shipping plugin
- Adjust WooCommerce FedEx Shipping Rates by Shipping Class
- How to Generate FedEx B13A Document for Canada Exports using WooCommerce Shipping FedEx Plugin
- How to Display other Domestic Services apart from FedEx Ground using WooCommerce Shipping plugin for FedEx
- Ship Certain Items with FedEx and Provide Flat-Rate Shipping for others with WooCommerce FedEx Shipping Plugin
- How to Ship Frozen Food With WooCommerce FedEx Plugin
- WooCommerce FedEx Shipping Rates in Multiple Currencies
- Debug Error: FedEx ADDRESS VALIDATION RESPONSE
- FedEx Hold At Location at WooCommerce Checkout
- "There are no shipping methods available" on WooCommerce
- WooCommerce Currency Conversion - FedEx Europe
- Show all articles ( 40 ) Collapse Articles
-
- WooCommerce PDF Invoices with FedEx Shipping Plugin
- Shipping Cost Optimization: WooCommerce FedEx Shipping Plugin
- Packaging Cost by Product Quantity for Shopify & WooCommerce
- Send Prepaid FedEx Labels to WooCommerce Customers
- Print Multiple WooCommerce FedEx Labels for Single Orders
- A Guide to Ship Perishable Items with WooCommerce FedEx
- WooCommerce FedEx Shipping with Measurement Price Calculator Plugin
- Best way to Ship Food items along with Dry Ice and using Efficient FedEx Shipping Services
- How to Ship Frozen Items with Dry Ice via FedEx
- How to Legally Ship Alcohol Products via FedEx
- WooCommerce FedEx Shipping Plugin 4.0.3: Alcohol Support & Improvements
- WooCommerce Automated Emails and Shipment Delivery Updates
- Auto-Send WooCommerce Fedex Labels to Multiple Vendors
- Choose Right FedEx Shipping Method for WooCommerce Store
- How to Print WooCommerce FedEx Shipping Labels: Guide
- Why is FedEx Integration Good for your WooCommerce Store
- Print FedEx Shipping Labels in Multiple Sizes in WooCommerce
- Enable FedEx as the only Shipping Method for WooCommerce
- Insights into the FedEx Boxes for WooCommerce
- Create Multiple FedEx Shipments in WooCommerce for Multiple Orders
- FedEx Tracking & Schedule FedEx Pickups in WooCommerce
- FedEx Shipping Rates for WooCommerce and Shopify
- Optimize FedEx Packages for Better Shipments in WooCommerce
- Print FedEx Shipping Labels Directly from WooCommerce Store
- How to Save Shipping Cost using FedEx One Rate
- WooCommerce Shipping with FedEx: GST Implementation in India
- WooCommerce FedEx Shipping- Pack Some Items Separately & the Rest Together in a Box
- WooCommerce FedEx Shipping - Broker for handling customs clearance
- WooCommerce FedEx Shipping: Choose Warehouse Based on Destination
- Auto-Printing WooCommerce Shipping Labels for UPS and FedEx
- Ship from a Warehouse located in a Different country with WooCommerce FedEx Shipping Plugin
- WooCommerce Bookings- Shipping Rented Items Via FedEx
- Will WooCommerce FedEx Shipping Plugin work with Country Colombia and currency Colombian Peso?
- Great Tips to Sale in WooCommerce Store during Holiday Season
- WooCommerce Order Fulfilment -Carriers Model vs Dropshipping.
- Display Delivery Date with WooCommerce FedEx Shipping plugin
- Adjust WooCommerce FedEx Shipping Rates by Shipping Class
- Ship Products from Multiple Warehouses with WooCommerce FedEx Shipping Plugin
- Show all articles ( 23 ) Collapse Articles
-
- Set Minimum Shipping Cost for WooCommerce Shipping Methods
- Set up WooCommerce Shipping by Product Weight and Size
- Hide UPS Services for Shipments Weighing more than 10lbs and Show only FedEx
- Customize Delivery Date formats in WooCommerce FedEx plugin
- WooCommerce Shipping - Set a particular service as default in Cart
- Add Purchase Order(PO), Invoice, Customer Reference, and Department numbers to your WooCommerce Shipping Labels
- Hide 'FedEx Ground' for specific zip code
- Code snippet to display the Shipping phone number on the WooCommerce Shipping label instead of the Billing phone number
- WooCommerce Shipping for FedEx - Change Customs Duty Payer based on the Destination country
- How to Add Custom Text in Delivery Estimates Format using PluginHive Plugin for FedEx Shipping?
-
WooCommerce UPS Shipping Plugin with Print Label
-
- WooCommerce UPS Freight Shipping based on Product's Weight
- UPS Boxes for WooCommerce Shipping
- UPS Packaging Charges with WooCommerce UPS Shipping Plugin
- Auto-Print WooCommerce Shipping Labels for UPS Shipments
- Configure WooCommerce UPS Shipping Methods by Country Code
- Decoding Debug Data of WooCommerce UPS Plugin
- WooCommerce UPS Shipping Plugin [Error Code 10001] -The XML document is not well formed
- How to resolve differences between rates returned by the plugin and the UPS shipping calculator
- How to resolve printing issue with Dymo label printer?
- Enable Delivery Signature for WooCommerce Shipments with UPS
- Do I need to Set Product Weight and Dimensions for the WooCommerce UPS Shipping Plugin to work?
- [Error Code:120053] - Shippers UPS Account is in SurePost test mode
- Can I set Free UPS SurePost Shipping for orders above $30 in WooCommerce?
- How to print the label correctly on a thermal printer?
- Can I pack multiple units of the same product together with WooCommerce UPS Shipping Plugin?
- WooCommerce Shipping from the United States -Product Weight Units in Pounds
- How to get the UPS Access Key?
- How to get a product key from UPS?
- Display tax-inclusive WooCommerce UPS Rates at Checkout
- Efficient Parcel Packing with WooCommerce UPS Plugin
- UPS Box Packing - Calculation of shipping rates based on weights and dimensions
- Add WooCommerce Tracking Number in the Order Completion Email
- Print UPS Shipping Labels with Thermal Printers from WooCommerce & Shopify
- Use UPS Negotiated Rates with WooCommerce Shipping
- [Error Code: 120100] - "Missing or invalid shipper number"
- Does UPS Deliver On Saturday? – Provide Estimated Delivery Dates on WooCommerce
- WooCommerce UPS Plugin v.3.9.15: Estimated Delivery Options, Bulk Label Printing
- UPS Collect-On-Delivery with WooCommerce UPS Shipping plugin
- WooCommerce Minimum Order Amount for UPS Shipping
- Pack & Ship WooCommerce Product Bundles with UPS
- Simplify Product Packaging with WooCommerce UPS Plugin
- Print Shipping Labels in Bulk with WooCommerce UPS Plugin
- Dokan Integration with WooCommerce UPS Shipping Plugin
- WPML Compatibility with WooCommerce UPS Shipping Plugin
- WPML WooCommerce Shipping Solutions for Multilingual Sites
- Why is My Paypal not Receiving Shipping Cost ?
- Add Handling Charges to WooCommerce UPS Shipment
- Troubleshoot - Invalid Service for Shipment Origin [ Error Code:121100]
- Print UPS Shipping Label for WooCommerce Orders
- Optimize UPS Shipping plugin based on your UPS Account Currency
- Packing a Product that Ships in Two Boxes using UPS Box Packing
- Troubleshoot - No Option to Print Return Shipping Label!
- Residential or Commercial Address in WooCommerce UPS Plugin
- UPS Shipping Plugin for Label Printing & Order Tracking in WooCommerce
- How to Adjust the Size of UPS Shipping Label?
- Print UPS Return Label for WooCommerce & Shopify Shipments
- UPS Access Point in WooCommerce Shipments
- Ship from the US to Puerto Rico with WooCommerce UPS Plugin
- UPS Paperless Invoice for WooCommerce International Shipping
- Attach UPS MRN (Movement Reference Number) with WooCommerce Order
- Customize Product Description on Label with WooCommerce UPS Plugin
- WooCommerce Address Validation With UPS Shipping Plugin
- WooCommerce UPS Shipping - Create NAFTA Certificate of Origin
- Control Log and Recipient Tax Identification Number with WooCommerce UPS Shipping plugin
- Pack a Product into Multiple Packages: WooCommerce UPS Shipping Plugin
- Display UPS Shipping Rates Based On WooCommerce Shipping Zones
- Exclude Gift Products from being Charged for UPS Shipping on your WooCommerce Store
- WooCommerce UPS Shipping – Can a Third-Party’s UPS account pay the Shipping Charges?
- Blind Shipping with UPS for WooCommerce
- Show all articles ( 44 ) Collapse Articles
-
- How to Show/Hide UPS Negotiated Rates?
- Weight-based Packing with WooCommerce UPS Shipping plugin
- Troubleshoot- Getting Higher Rates in UPS Shipping Plugin..!
- Why UPS Shipping Methods are not listed under WooCommerce Shipping Zones?
- WooCommerce UPS Tracking Guide
- What to do when my country doesn't have a zip/postal code?
- Enable Delivery Signature for WooCommerce Shipments with UPS
- UPS Insurance Policy with WooCommerce UPS Shipping plugin
- WooCommerce UPS Shipping Plugin Frequently Asked Questions
-
- A radical shift from physical invoices to paperless shipping!
- Add Pallet and Special Padding cost to UPS LTL Freight shipments for Woocommerce
- UPS Collect-On-Delivery with WooCommerce UPS Shipping plugin
- WooCommerce UPS Shipping Rate for US-US & Europe-Europe
- Configure WooCommerce UPS Shipping Methods by Country Code
- Create UPS Ground Shipment from your WooCommerce store
- Effectively handling pre-packaged products in WooCommerce using UPS shipping carrier
- Generate Return Label & Drop Package at the UPS Access Point
- WooCommerce UPS Rates & Free Shipping Based on the Product Category
- How to Get the Best Shipping Rates for WooCommerce Orders
- Pre-Paid UPS Return Label for WooCommerce Store
- Package Tracking and Returns with WooCommerce UPS Plugin
- Restrict WooCommerce Shipping by State for Products like Ammunition and Alcohol
- Scheduling UPS Pickup for WooCommerce Shipments
- Secure Shipping: Choose UPS Direct Delivery for Precious Items
- Send WooCommerce UPS Shipping Label via Email
- Set Up Freight Shipping with WooCommerce UPS
- Ship Physical Products along with WooCommerce Subscription Products with the WooCommerce UPS plugin
- Adjust WooCommerce UPS Rates based on Destination Country
- WooCommerce Shipping - Managing Units of Measurement
- WPML WooCommerce Shipping Solutions for Multilingual Sites
- UPS Label Format Supported by WooCommerce UPS plugin
- Show all articles ( 7 ) Collapse Articles
-
- Set Minimum Shipping Cost for WooCommerce Shipping Methods
- Hide UPS Services for Shipments Weighing more than 10lbs and Show only FedEx
- WooCommerce UPS Shipping Rate for US-US & Europe-Europe
- Adjust WooCommerce UPS Rates based on Destination Country
- Add an Additional Cost to the Shipping Service based on WooCommerce Shipping Class
-
WooCommerce Canada Post Shipping Plugin
-
- Set Minimum Shipping Cost for WooCommerce Shipping Methods
- Set up WooCommerce Shipping by Product Weight and Size
- WooCommerce Canada Post Shipping Plugin with WPML Support
- WPML & WooCommerce Canada Post Shipping for Multilingual Sites
- WooCommerce Canada Post Plugin compatible with XStore Theme
- An Insight into Canada Post Manifest for WooCommerce Orders
- The only label that prints are a testing one even though I have switched to live
- I have downloaded this plugin and it seems to be working fine. The only thing that isn't showing up is the letter mail option
- Can I have shipments go out from my contractor's factory but the shipping costs are charged on my commercial account?
- WooCommerce Canada Post Shipping Plugin 2.1.0: Now with return shipping labels
- Find Pickup Point ID for Canada Post Deposits on WooCommerce
-
- WooCommerce Canada Post Manifests for Domestic & International Shipments
- Does WooCommerce Canada Post Shipping Plugin Supports Different Weights for Variable Products?
- Offer Free Shipping to Customers and still allow them to Track their Shipment using the WooCommerce Canada Post Shipping plugin
- Print Canada Post Shipping Labels for Orders with Multiple Products
- Canada Post Labels for Multiple Packages with WooCommerce
- Sell both WooCommerce Digital products and Physical goods
- Ship Canada Post Lettermail & Parcel together on WooCommerce
- Add WooCommerce Canada Post Insurance cost to Shipping Rates
- Best WooCommerce Canada Post Shipping plugin
- Does WooCommerce Canada Post Shipping plugin works with Currency USD?
-
WooCommerce Shipment Tracking Pro
-
- Efficient WooCommerce Shipment Tracking: Top Methodologies
- Choose The Best WooCommerce Shipment Tracking Plugin
- WooCommerce Basic Order Numbers Plugin: Streamline Order Tracking
- WPML Compatibility with WooCommerce Shipment Tracking Pro
- Using WPML with WooCommerce Shipment Tracking Pro plugin for Multilingual Sites
- Import WooCommerce Order Tracking Details via FTP & CSV
- Bulk Import WooCommerce Shipment Tracking Details via CSV
- WooCommerce Shipment Tracking: Send Shipping IDs via Email
-
WooCommerce Table Rate Shipping Pro Plugin
-
- WooCommerce Shipping Pro - Chapter 2: Solving Business Case
- Setting Up WooCommerce Per Product Shipping Add-on
- WooCommerce Weight-Based Shipping with Table Rate Shipping Plugin
- WooCommerce Shipping Pro - Chapter 8 : Business cases handled by WooCommerce Weight and Country based shipping
- WooCommerce Shipping Pro- Chapter 7: Extend using Add-ons
- WooCommerce Shipping Pro- Chapter 6: Per Shipping Class
- WooCommerce Shipping Pro- Chapter 5: United Kingdom Counties/States
- WooCommerce Shipping Pro - Chapter 4: Usability Features
- WooCommerce Table Rate Shipping Pro - Chapter 3: Bundle Rate Shipping
- WooCommerce Shipping Pro Chapter-1: Setting Up
- Set up WooCommerce Shipping Methods for Different Product Categories with WooCommerce Table Rate Shipping Pro
- Advanced Addons for WooCommerce Table Rate Shipping Pro
-
- Set Minimum Shipping Cost for WooCommerce Shipping Methods
- Set up WooCommerce Shipping by Product Weight and Size
- WooCommerce Measurement Price Calculator with Table Rate Shipping
- WooCommerce Table Rate Shipping: Pickup & Shipping Choices
- WooCommerce Table Rate Shipping Pro plugin With WPML for Multilingual sites
- Is it possible to Configure Two Shipping Carriers, La Poste and UPS, for each Packaging and Product?
- How to configure WooCommerce shipping cost by weight for different zones in the Netherlands?
- Set up WooCommerce Table Rate Shipping with Divi Theme
- WooCommerce Free Shipping only for Some of the Products
- Setting up Weight Based Shipping Rates using Shipping Pro
- Troubleshoot - Getting Multiple Shipping Options with No Price!
- I added 36 line and when I try to add more rows I'm faced with this error "action failed
- I need a Plugin that allows our store to Calculate WooCommerce Shipping based on Weight and Destination City
- La Poste Colissimo Shipping for WooCommerce
- Steps to configure La Poste Colissimo with WooCommerce Table Rate Shipping
- Universal Shipping Calculator for La Poste Colissimo on WooCommerce
- La Poste Add-on: Weight-Based Shipping for La Poste Colissimo
- Shipping Pro - Case based on weight and price
- What are the default units of weight, dimensions, and price for Shipping Pro?
- Per Product Shipping Plugin for WooCommerce
- My concern is that it's going to take 1,500 rules since it goes off per pound up to 150#
- Can I allow the pickup items to remain in the order, while charging for the dump truck items?
- How can I set “All the World” instead of typing all the countries names?
- WPML Compatibility with WooCommerce Table Rate Shipping
- WooCommerce Table Rate Shipping: Set up Shipping Rates Based On Order Quantity and Price
- WooCommerce UPS Shipping - Provide Live Rates and Free Shipping for Some Products based on Cart Subtotal
- Set up WooCommerce Shipping by State and Shipping Class using Table Rate Shipping plugin
- How to Configure State-based Rules Manually Using the WooCommerce Table Rate Shipping Plugin
- How to Set Shipping Rates based on Product Categories Using the WooCommerce Table Rate Shipping Plugin?
- Show all articles ( 14 ) Collapse Articles
-
- Calculate Price Based and Per Item Shipping Rates using WooCommerce Table Rate Shipping Pro
- Calculate Shipping Cost Per Quantity of Products- WooCommerce Table Rate Shipping Pro
- Calculate Shipping Rates for Different Types of Products in the Cart
- Calculate Shipping Rates for Pickup and Non Pickup Products
- Configure Normal & Priority shipping rates for Swiss Post with WooCommerce Table Rate Shipping Pro
- Coupon Behavior During Calculation of Shipping Charges
- How to Change the Order of WooCommerce Calculated Shipping Options and Pickup on the Cart page?
- Kalium Theme Compatible with WooCommerce Table Rate Shipping
- Per Product Shipping Plugin for WooCommerce
- Recover Postage Expenses by including the UK Postal-Code Surcharges to your Shipping Rates using WooCommerce Table Rate Shipping Pro
- Flat Rate Shipping based on Product Quantity - WooCommerce Multi Carrier plugin
- WooCommerce Free Shipping Based on Quantity- Table Rate Shipping
- WooCommerce Table Rate Shipping - Setup Costs based on Shipping Class & Quantity
-
Multi Carrier Shipping Plugin for WooCommerce
-
- How to setup Multi-Carrier Shipping Plugin for WooCommerce?
- How to get DHL Account Number?
- Setting up Stamps.com Account
- Setting up USPS Account
- How to set up a UPS Account?
- Setting up FedEx Account
- UPS and USPS - Display WooCommerce Shipping Rates with Price Adjustment
- WooCommerce Shipping - Configure Shipping Area Management for Multiple Carriers
-
- WooCommerce Shipping Plugins Comparison Chart - Multiple vs. Individual Carrier-Integration
- WPML Support with WooCommerce Multi Carrier Shipping Plugin
- Dokan Integration With WooCommerce Multi-Carrier Shipping
- Shipping Rates Calculator : Get Rates from Multiple Carriers with Multiple Services
- Customise your WooCommerce Shipping by Providing Flat Rates on Some Products and Ship Others via UPS and USPS
-
- Using WPML with WooCommerce Multi-Carrier Shipping plugin for Multilingual Sites
- Offer WooCommerce Shipping Options from Different Carriers
- Add Extra Charges to the Shipping Rates in WooCommerce
- Difference between WooCommerce Multi Carrier & Woo UPS plugin
- Select a shipping method based on the total weight of the cart, USPS for under 10 LBS and UPS for the rest
- WooCommerce Conditional Shipping with Multi-Carrier Shipping Plugin
- Set Shipping Rates in WooCommerce with Multi-Carrier Shipping Plugin
- Shipping Prohibited Items in WooCommerce
- How does Multi-Carrier Shipping Plugin for WooCommerce work?
- Does WooCommerce Multi Carrier Shipping support DHL & FedEx in Mexico?
- Most Common Shipping Mistakes You Need To Avoid
- Customise your WooCommerce Shipping by Providing Flat Rates on Some Products and Ship Others via UPS and USPS
-
Estimated Delivery Date Plugin for WooCommerce
-
- WooCommerce Estimated Delivery Date plugin with WPML Support
- Using WPML with WooCommerce Estimated Delivery Date plugin for Multilingual Sites
- How to Show Weekends as Non-Delivery Days using Estimated Delivery Date and Time Plugin for WooCommerce
- Set Estimated Delivery Dates for Different WooCommerce Shipping Zones
- WooCommerce: Set Estimated Delivery Dates for Multiple Methods
- Provide Standard or Priority Shipping with Different Shipping Cost and Delivery Time on your WooCommerce store
- Offer Local Delivery Date Estimates to Three different Shipping Zones with WooCommerce Estimated Delivery Date plugin
-
- Estimated Shipping Date for WooCommerce Product Variations
- Display Estimated Delivery Date Formats in WooCommerce
- Display Delivery Estimates on your WooCommerce Store
- Set Up the Estimated Delivery Date for Products Shiping from Different Locations
- Show WooCommerce Estimated Delivery Date on the Product Page
- Will the WooCommerce Estimated Delivery Date plugin work with Shipping Classes and Shipping Zones, both at a time?
-
WooCommerce Royal Mail Shipping with Tracking
-
WooCommerce Multi Vendor Shipping Addon
-
- WooCommerce Marketplace with Multiple Shipping Carriers using Product Vendors
- FedEx Multi Vendor Shipping with WooCommerce Product Vendors
- WooCommerce Multi Vendor FedEx Shipping Guide with WCFM Marketplace
- UPS Shipping for WooCommerce Multi Vendor with WCFM Marketplace
- UPS Shipping Guide for Multi Vendor using WooCommerce Product Vendors
- FedEx Shipping Guide for WooCommerce Multi-Vendor with Dokan
- WooCommerce Multi Vendor Shipping with Dokan
- UPS Shipping Guide for WooCommerce Multi Vendor with Dokan
- Set up a Multi-Vendor store with WooCommerce DHL Express & Dokan
- UPS Shipping Guide for WooCommerce Multi Vendor with WC Vendors
- FedEx Shipping with WC Vendors Marketplace for WooCommerce
-
PH WooCommerce Product Addons
-
PH WooCommerce Deposits
-
Shopify Australia Post Shipping App with Rates, Label & Tracking
-
- Australia Post Automatic Shipping Label Printing for Shopify
- Display Real-time Australia Post Shipping Rates on Shopify Store
- Shopify Australia Post Shipment Tracking and Scheduling Pickups
- Print Shipping Labels With Shopify Australia Post App
- Pack Products Optimally with the Shopify Australia Post App
- Shopify Australia Post Shipping Label Printing Preferences
- Shopify Australia Post International Shipping - Simplified
-
Shopify Ship, Rate, and Track for FedEx
-
- FedEx Tracking and Schedule FedEx Pickups in Shopify
- Understanding FedEx Shipping Rates in your Shopify Store
- Bulk FedEx Shipping Label Generation for Shopify
- Display FedEx Shipping Methods With Real-Time Rates on Shopify Store
- Print Shipping Labels with Shopify FedEx App
- How to Pack Products Optimally and Save Shipping Costs with Shopify Ship, Rate and Track for FedEx
- How to set up Shopify Shipping for FedEx Special Shipments
- Setting up FedEx SameDay City on Shopify
- Print FedEx Shipping Labels for the Shopify Store
- Print FedEx CSB-V label for Shopify
- Box Packing Methods with Shopify FedEx App
- FedEx Freight shipping with Shopify
- FedEx Saturday Delivery on your Shopify store
- FedEx SmartPost/Ground Economy shipping with Shopify
- FedEx One Rate shipping with Shopify
- FedEx Return Shipping on Shopify store
- Show all articles ( 1 ) Collapse Articles
-
Shopify Shipment Tracking & Notifications App
-
WooCommerce Shipping Services
-
Shopify Multi Carrier Shipping Label App
-
- Setting up Shopify Multi Carrier Shipping Label App
- Set up Shopify Purolator Shipping with Multi Carrier Shipping Label App
- Setting Up Shopify Carrier Calculated Shipping Rates
- Open a Free UPS Account and Get Exclusive Shipping Discounts in Europe
- Shopify UPS Shipping Guide
- Shopify USPS Shipping Guide
- FedEx Hold at Location at Shopify Checkout
- Shopify Stamps.com Shipping Guide
- Integrating USPS Via EasyPost on Shopify
-
- How to configure carrier account in the Shopify Multi Carrier Shipping Label app?
- Packing Methods in the Shopify Multi-Carrier Shipping Label App
- Calculate shipping costs based on Shopify shipping zones
- Accurate Customs Amount on Commercial Invoice for Easy Customs Clearance
- Product Descriptions on Commercial Invoice for Easy Customs Clearance
- Print Shipping Labels for Shopify Flat Rate Shipping
- Postnord Service Point for Shopify
- Shopify Alcohol Shipping with Adult Signature
-
-
Multi Carrier Shipping Label for Magento
-
FedEx Ship, Rate & Track App for BigCommerce
-
WooCommerce Mobile App
-
Stamps.com USPS Shipping Extension with Postage for Magento
-
WordPress Tips and Tricks
-
PostNord WooCommerce Shipping Plugin with Print Label
-
WooCommerce Amazon Shipping
Troubleshooting WooCommerce UPS Plugin

In this guide, we will show you how you can troubleshoot your WooCommerce UPS Shipping Plugin and resolve a few common issues regarding real-time UPS shipping rates, shipping labels, and live UPS tracking. This document contains all the steps to debug and resolve all the issues which you may come across while using the plugin.
Troubleshooting for not getting UPS rates at all
If you are not getting rates at all, there might be some reasons for not fetching real-time shipping rates from UPS APIs. The list of reasons is as given below:
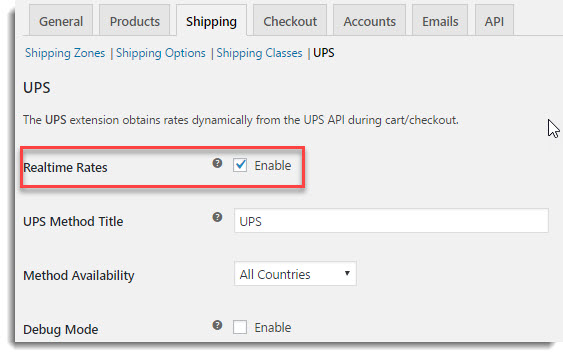
Enable Shipping: That sounds a bit trivial. But sometimes we forget to select the Enable Real-time Rates checkbox. By default, it is disabled. So this should be your first check. You should select the checkbox in the Admin WooCommerce Settings as shown below:
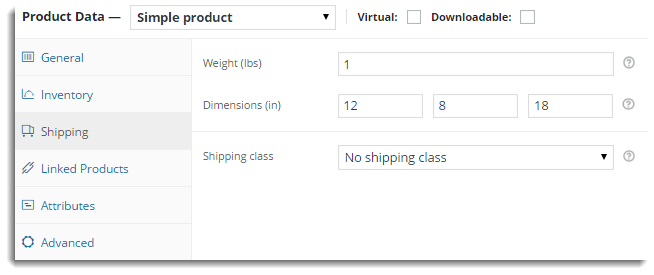
Weight and Dimensions: UPS shipping carrier uses the weight and the dimensions of your product (Length, Width & Height) to calculate the shipping cost (besides using the origin and destination address). So, make sure you enter the Weight and the Dimension of your product in the Product Settings as shown below:
Fallback Field Check: Make sure you enter the numeric value in the field or Keep the Fallback field empty. The Fallback field is as shown below:

Note: Do not enter text in the Fallback field.
If you have done the above basic checks and still not getting rates, then you must enable debug mode to get exact reason for not getting rates.
Debug Mode
If you are not getting proper rates (lesser or higher than expected), not getting all the available shipping options, not getting rates at all or not getting Print Labels, then you need to enable Debug option to find the error(s). You can also see the warning(s) through the UPS plugin.
By enabling the debug mode, you can trace the issue using the log. You can see information about debugging at the top of the Cart and Checkout page. Select the Debug checkbox in the UPS Plugin Settings to enable debug mode as shown below:

Note: To enable the debug mode, you need to first enable the Shipping Debug Mode by navigating to WooCommerce > System Status as shown below:

After enabling the debug mode, add a product to cart. Go to the checkout page to see the debugging information. Ensure that you have entered a proper shipping address. If you are not getting rates at all, then you need to check the response sent by the UPS to know the exact reason for not showing the rates. The cases are explained in the section below.
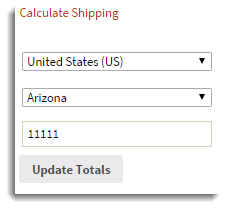
Shipping Address Error: In case, the customer does not enter the correct postal code, then the UPS will not display the rates. The customer gets a message as shown below:
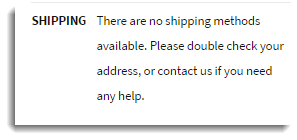
To know the reason, you need to check the response sent by the UPS as shown below:
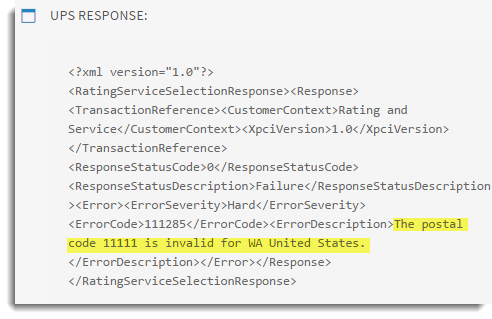
From the above response, you can clearly see that the postal code is incorrect. So fix it by clicking on Calculate Shipping on the Cart/Checkout page as shown below:
Authentication Error: In Case, the credentials of the UPS are incorrect, then the UPS will not display the rates. You will get a message as shown below:
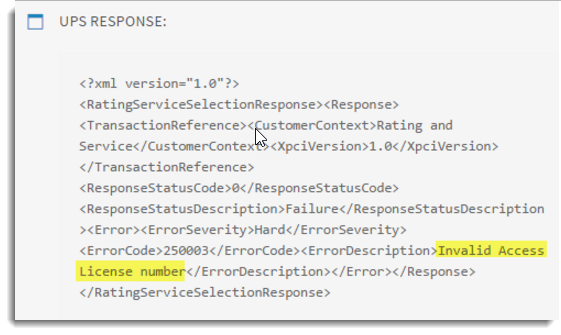
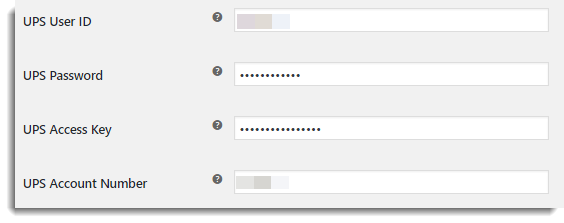
From this response, you can clearly see that there is a problem with the authorization. Hence, you can enter the correct credentials in the UPS Plugin Settings page as shown below:
Troubleshooting for Correct UPS Rates
The Request is sent to the UPS by the plugin with an Address of source, destination, dimensions of the product, etc. The sample Request to the UPS is as shown below:
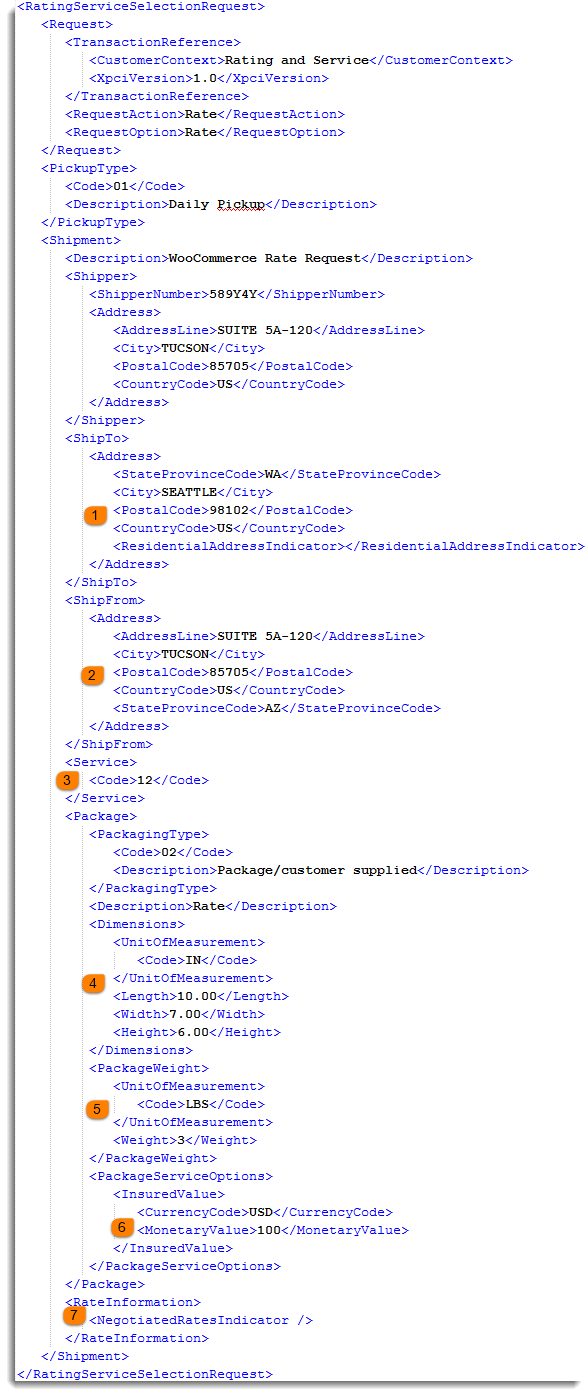
Recheck the ShipTo node (at location 1 in the UPS Request screenshot). According to your requirement, if the recipient address is not correct, you can fix it by navigating to the Cart/Checkout page as mentioned below:
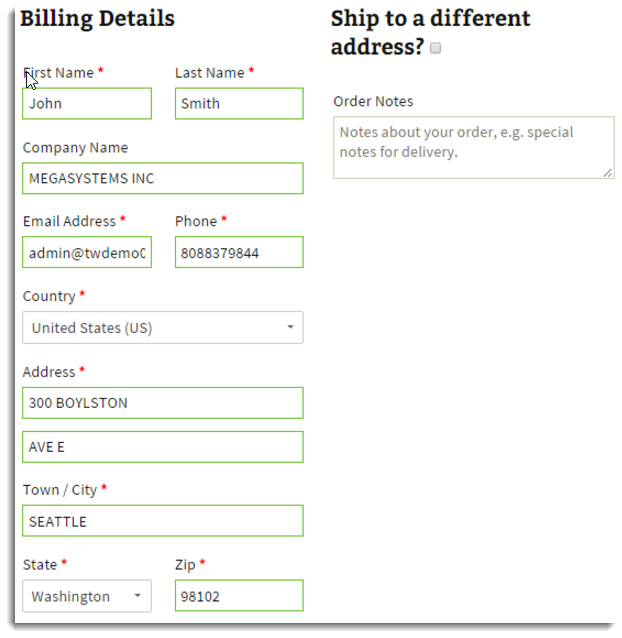
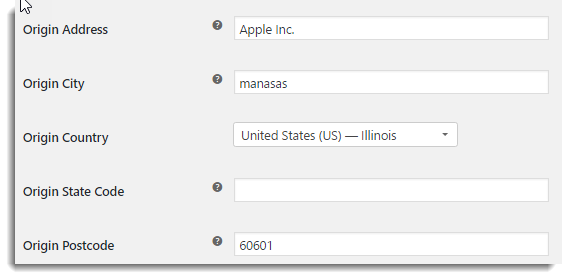
Recheck the ShipFrom node. According to your requirement, if the Shipper address is not correct, you can fix it by navigating to the UPS Plugin Settings as shown below:
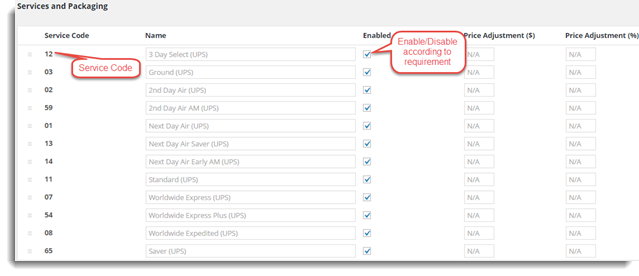
You can see the service code for this particular request. According to your requirement, you can enable or disable the service by navigating to the UPS Plugin Settings as shown below:
Similarly, you get the request and response for all the enabled services in the debug mode.
Recheck the Dimensions of the product with units(under Code node). If the product dimensions are not correct according to you, correct it by navigating to the Admin Product settings as shown below:
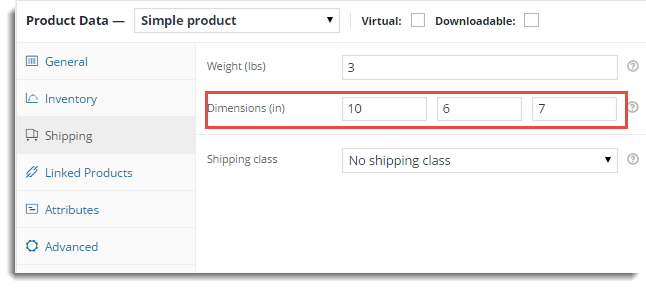
Recheck the weight of the product with units (under Code node). You can change the weight of the product according to a requirement by navigating to the Admin Product settings as shown below:
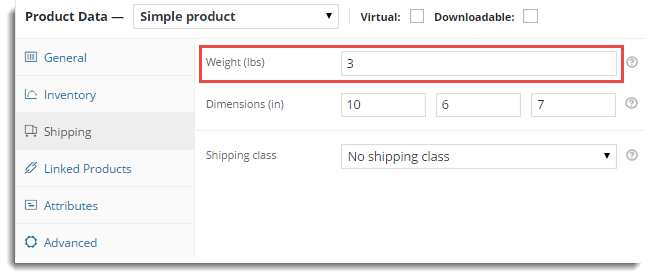
Recheck if the product is insured or not. In case it is not correct as per your requirement, change it by navigating to the UPS Plugin Settings of the plugin as shown below:

Recheck for if the Negotiated rates are enabled or not. According to your requirement, enable/disable it by navigating to the UPS plugin settings and correct it as shown below:

Note: If all the information sent to the UPS is valid, you can contact the UPS or go to the UPS site and log in with your credentials. After logging in, enter the same information in the UPS Calculator to get the quote.
- UPS Response: You get the Response sent by the UPS with rates for different services. You can see the response to analyze the information sent from the UPS.
Troubleshooting for Print Labels
If you are not able to print labels, it could be because of a reason listed below:
- Product Existence: Sometimes, we try to print the label for the product that is removed from the shop. So check if the product still exists in your shop.
- Weight and Dimensions: While printing labels, the weight and dimensions are needed to calculate the shipping cost. So make sure you have set the Weight and Dimensions of your products correctly.
- Service Eligibility: If the selected service in the Admin Order page (shown in the below screenshot) is not available for the particular location/product, you will get the error about service eligibility.
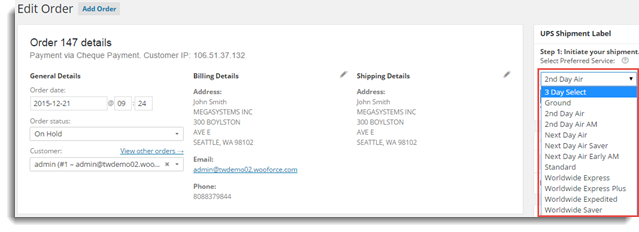
To know details about the available services for the required location/product contact the UPS.
- Authentication Error: If the authentication information incorrect, you get the error as shown below:

From the above screenshot, you can clearly see that there is a problem with the authorization. Correct it in the settings page as shown below:
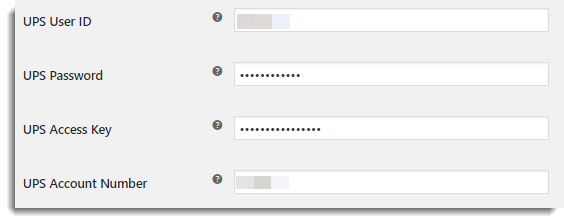
How to see the boxes seleted for an order?
With WooCommerce UPS Shipping Plugin, you can see the boxes/packages selected in an order before the money is deducted from your UPS account for postage. You can even check parameters like the package weight, dimensions, shipping rates , shipping service name, surcharges, address, etc., for that particular order.
Follow the following steps to see the boxes selected for a particular order.
- Enable Debug Mode in the plugin settings
- Add the item(s) in the Cart
- Move to the Cart or Checkout page to view the Package, UPS Request, and UPS Response
Let us take an example to understand the steps better.
Assume that we have placed an order for 2 products that are packed inside a single box. With the help of the Debug option, you can see 3 code blocks on the front end(cart page/checkout page). By analyzing these 3 code blocks, you can come to know about the boxes selected in an order.
- Package: This section provides information about the item(s) including product dimensions and box dimensions(if the custom box is selected).
- UPS Request: This section provides the information regarding the request sent to UPS from our plugin which includes the box dimensions.
- UPS Response: This section provides the information regarding the Response that has come from the UPS. Please note that the information included in this section is directly from UPS servers and not from within the plugin.
Package
This section shows the dimensions of the 2 products marked by points 1 & 2 in the screenshot and also dimensions of the box in which packing will be done(marked by point 3 in the screenshot below).
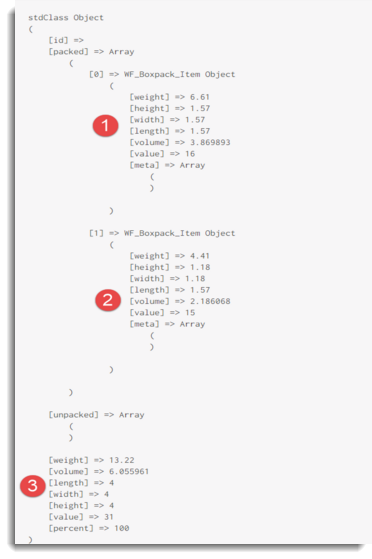
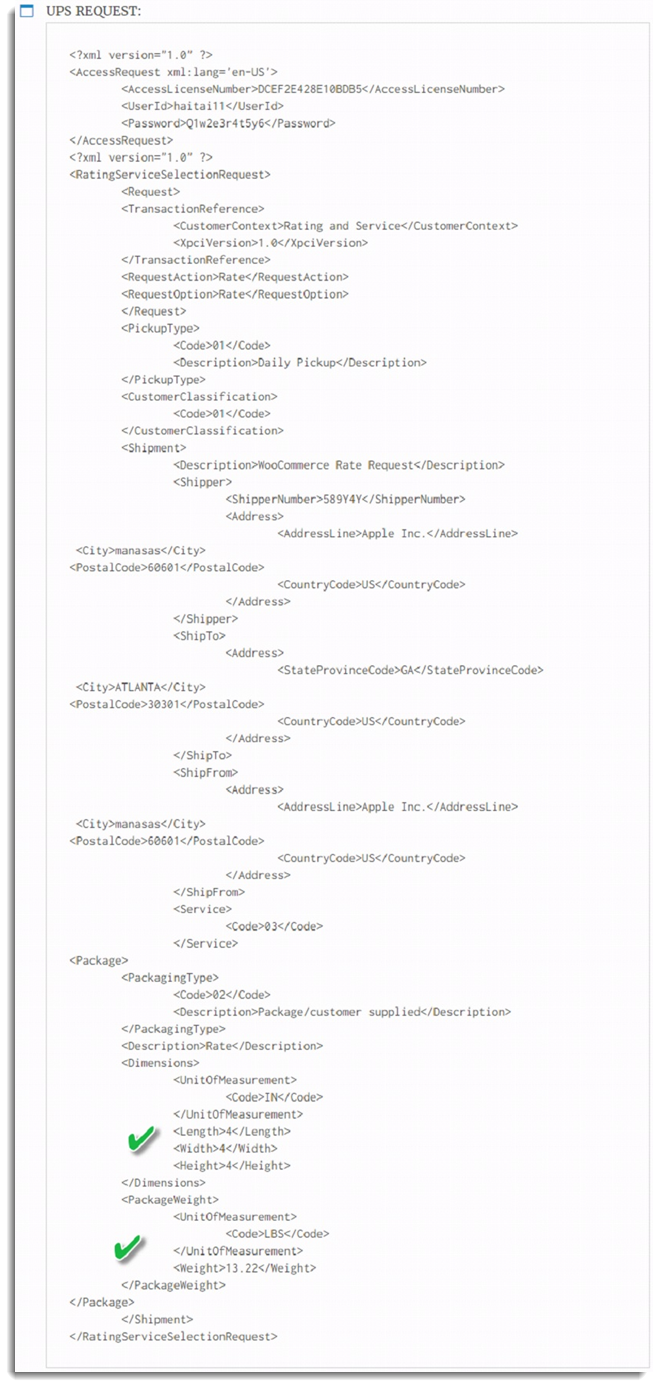
UPS Request
This section shows the request sent from plugin side to UPS. We can see the final box dimensions and weight of the total package as shown below.
UPS Response
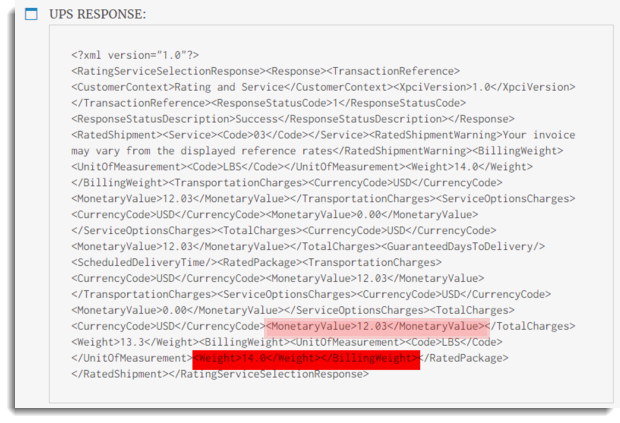
The response that comes from the UPS side shows the total shipping price charged and also the total billable weight as shown in screenshot.
Conclusion
Check out the product page to know more about the WooCommerce UPS Shipping Plugin and the features this plugin offers.
If you have any concerns or need help setting up UPS Shipping on your WooCommerce then Contact PluginHive Customer Support. Our support team will help you out.
Good luck! 🙂
4 thoughts on “Troubleshooting WooCommerce UPS Plugin”
Comments are closed.

The whole backend of my site was brought down when I uploaded this plugin. I can only see a blank page when I view the “plugins” page. Can you guys help me out?
Hi Casey,
We apologize for the problem.
Can you please raise this as a ticket to PluginHive Support.
We will surely check and help you. In the ticket, we request you to provide the server log so that our team can check the error and get back to you.
Woocommerce today said that the UPS app hasn’t caught up with their software. Guys, do you have a solution? We are losing orders by the minute. Here is the error. Please help.
Fatal error: Call to a member function get_packtype() on null in /home/content/p3pnexwpnas09_data01/55/2688055/html/wp-content/plugins/ups-woocommerce-shipping/includes/class-wf-packing.php on line 155
Hi Brian,
Our team has already replied to you via the ticket. There we have provided the UPS version which has the fix.
Can you please check and confirm?