Setting up Shopify Ship, Rate and Track for FedEx
This guide explains how to set up the Shopify Ship, Rate and Track for FedEx to get live/real-time shipping estimates, print labels, pickup, and track shipments on your Shopify store.
About the Shopify Ship, Rate and Track for FedEx
The Shopify Ship, Rate and Track for FedEx helps the store owners in three main fields of the shipping process:
- Automating FedEx domestic, international, and freight shipping rates, including negotiated rates for your account, directly on the checkout page.
- Printing FedEx shipping labels directly from your Shopify store is now possible with a single click.
- Schedule FedEx pickups, update the tracking numbers automatically for the orders and provide shipment tracking details to your customers via email.
On This Page
- Setting up Shopify Ship, Rate and Track for FedEx
- How to Use Shopify Ship, Rate and Track for FedEx on Your Store?
- How to Show Live FedEx Rates on the Checkout Page?
- How to Print FedEx Shipping Labels Through the Single Label Generation Process?
- How to Print FedEx Shipping Labels Through the Bulk Label Generation Process?
- How to Cancel the FedEx Shipping Labels That Are Generated?
- How to Request FedEx Pickup and Track Shipments, Directly from your Shopify Store?
Setting up Shopify Ship, Rate and Track for FedEx
Before setting up the app, you have to install and activate the Shopify Ship, Rate and Track for FedEx perfectly. To know more about this process, visit the installation and activation page.
After the activation of the app, you will be redirected to the Shipping tab which contains the information about the label as shown below:
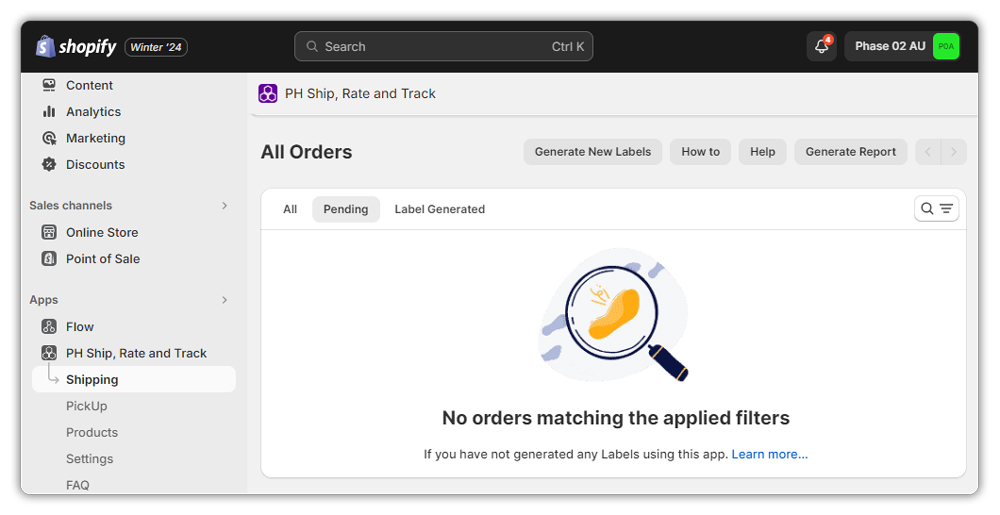
Initially, there won’t be any orders seen in the Shipping tab, until you generate one using the app.
Read More – Print FedEx Shipping Labels
Before getting into the label generation, we need to know the different sections of the Shopify Ship, Rate and Track for FedEx app:
- Shipping
This section contains all the shipping labels generated and the pending orders. This section has three divisions, as follows:
- All: This section includes all the orders regardless of their status, like label generated, label failed, label canceled, etc.
- Pending: This section includes the orders for which the labels have failed or been canceled. It also includes an error message explaining why the label was not generated.
- Label Generated: This section includes the orders for which the labels are generated.
- All: This section includes all the orders regardless of their status, like label generated, label failed, label canceled, etc.
- Pickups
This section contains the pickup history of all the orders. You can view all the pickups that have been scheduled. - Products
This section has the details of the products on your Shopify Store. - Settings
This section contains all the options to set up the App, including the FedEx account, shipping services, shipping label, packing, and much more. - FAQ
This section shows the Frequently Asked Questions regarding Shopify Ship, Rate and Track for FedEx.
Settings
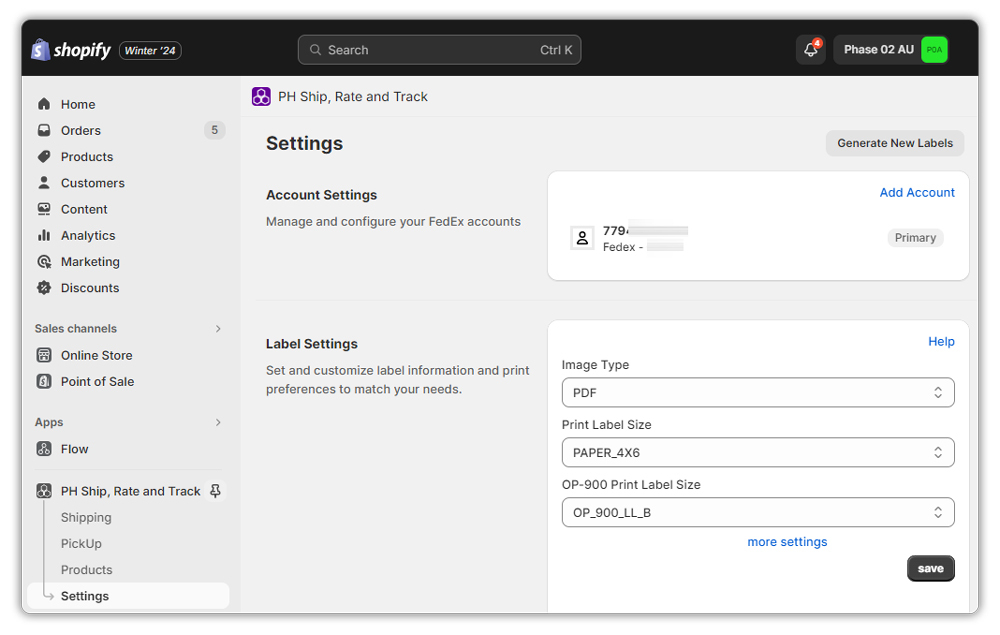
Under “Settings” you can find different options:
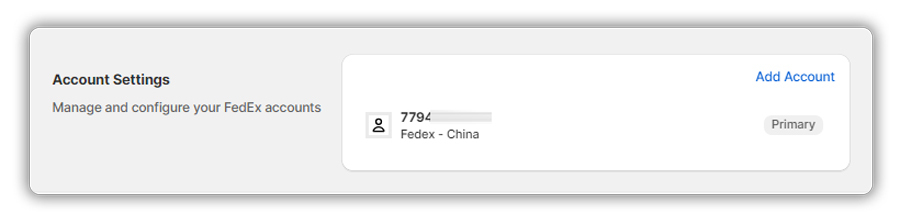
Account Settings
This section contains the settings related to the FedEx Account Details. You can register your FedEx account with the app and add additional FedEx accounts.
Registering a FedEx Account automatically using the Account Number
PluginHive has partnered with FedEx to make account registration simpler and more convenient for merchants. All you need to do is enter the FedEx Account Name, FedEx Account Number, and Billing Details associated with the account, as shown below:

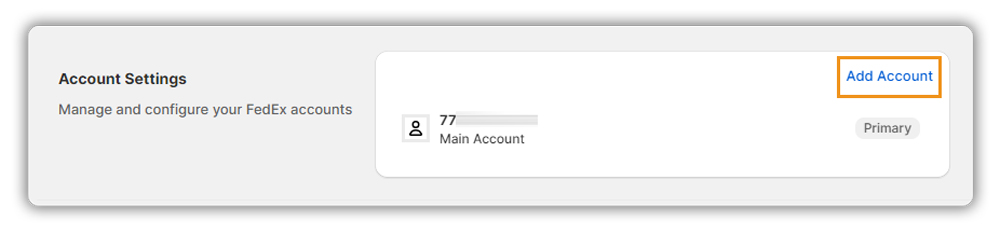
Adding Additional FedEx Accounts
You can also add additional FedEx accounts by navigating to Settings → Account Settings → Add Account as shown below:
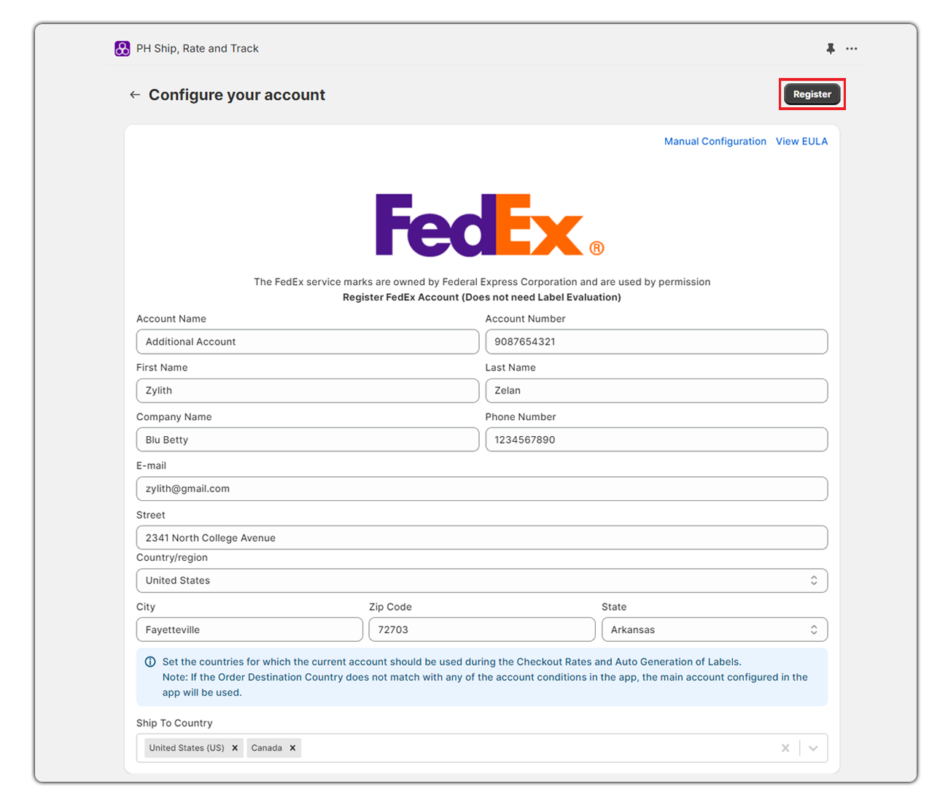
This will redirect you to the Configure Your Account page. Here, add your FedEx Account Number, Account Name, Company Name, and other Billing Details and click on the Register Button as shown below:
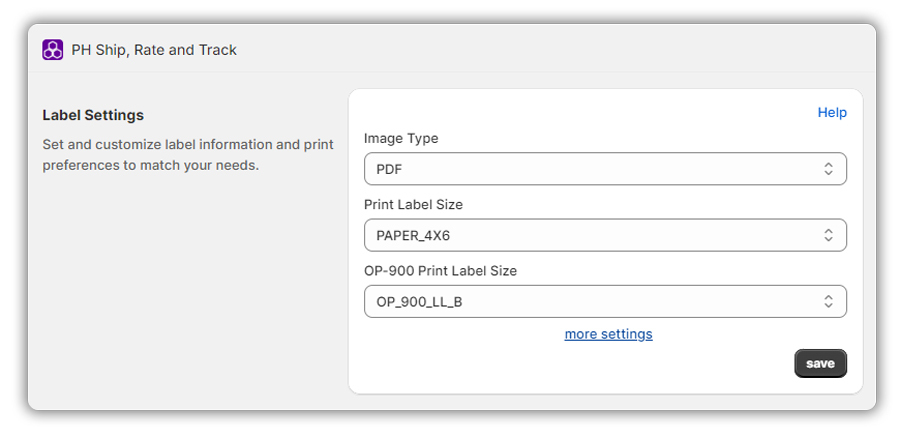
Label
Label settings contain the information on the Print Label Size and the Image Type. You can select the type of label from the drop-down list and choose the Shipping Label Type from the following options:
- PNG
- DPL
- ZPLII
- EPL2
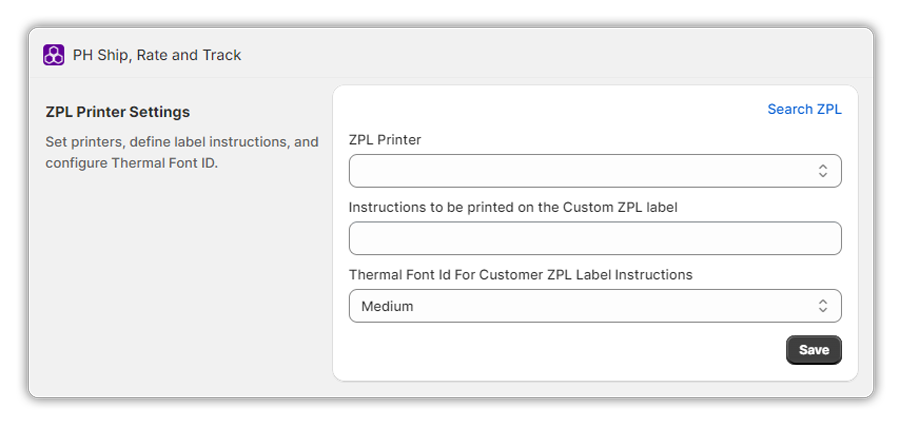
ZPL Printer Settings
To print ZPL labels, you can set the Image Type as ZPLII in the Label Settings and configure font size in the ZPL Printer Settings as shown below:
Auto Settings
In the Auto settings, you can configure the following options:
- Forward Labels: This section includes options like FedEx delivery signature, rate selection strategy, and drop-off type.
- Return Labels: This section includes options to generate return labels along with forward labels, reason for return, FedEx delivery signature for return, and return packaging type.
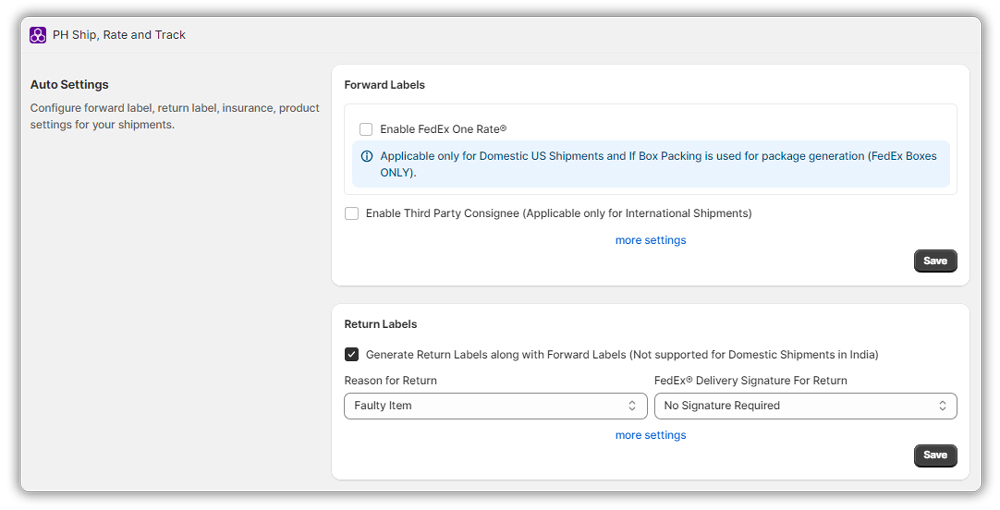
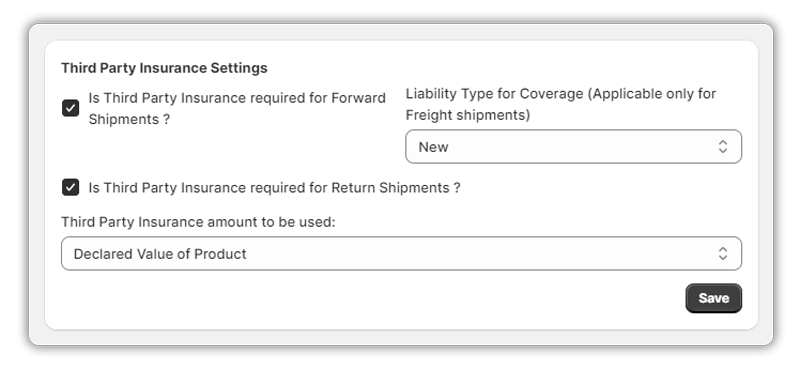
- Third Party Insurance Settings: This section includes options to add third-party insurance for your forward shipping and specify the liability type for coverage.
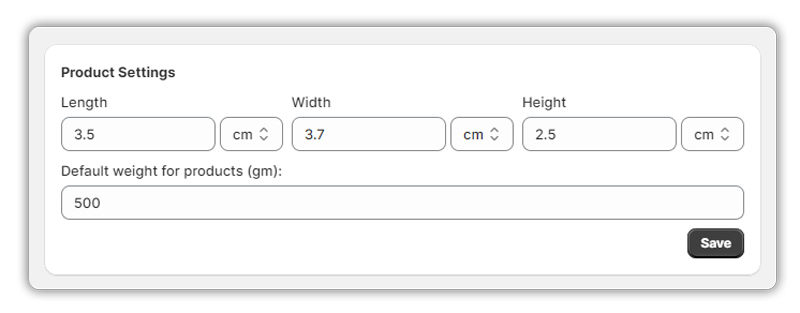
- Product Settings: This section includes the product’s default dimensions and weight.
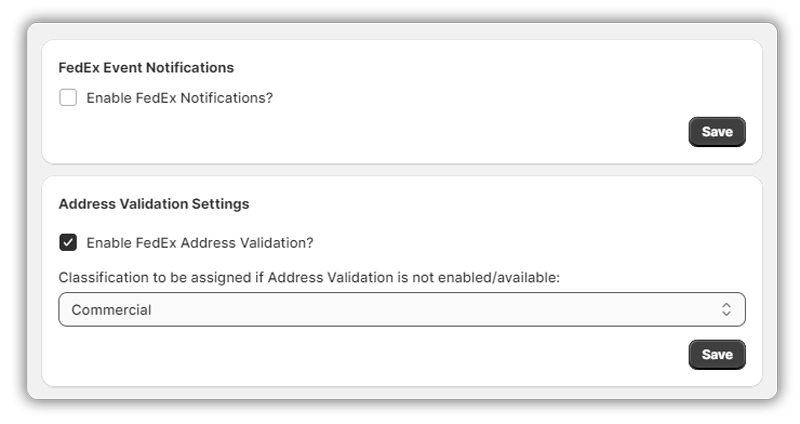
- FedEx Event Notifications: This section is used to send emails to customers automatically.
- Address Validation Settings: This section is used to confirm if the address entered by the customer is categorized as a Residential Address or a Commercial Address automatically.
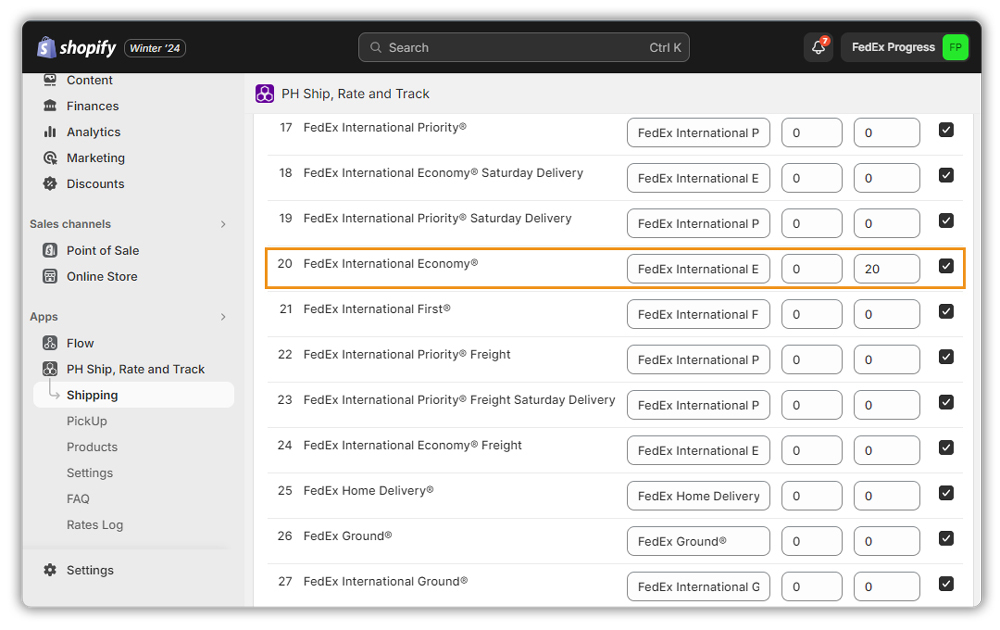
Carrier Service and Fallback Service Settings
This page shows the available services of FedEx. You can rename the service name in the Display Name box. Also, you can enable or disable the services according to your preference.
Navigate to Setting → Carrier Service and Fallback Service Settings → Carrier Services and enable the services you need as shown below:

- Display Name: Here you can rename the service name if you wish not to show the service’s original name.
- Adjustment Value ($): This is a fixed extra amount that the store owner can add along with the actual shipping rate.
- Adjustment (%): This is a percentage (%) addition along with the actual shipping cost by the store owner.

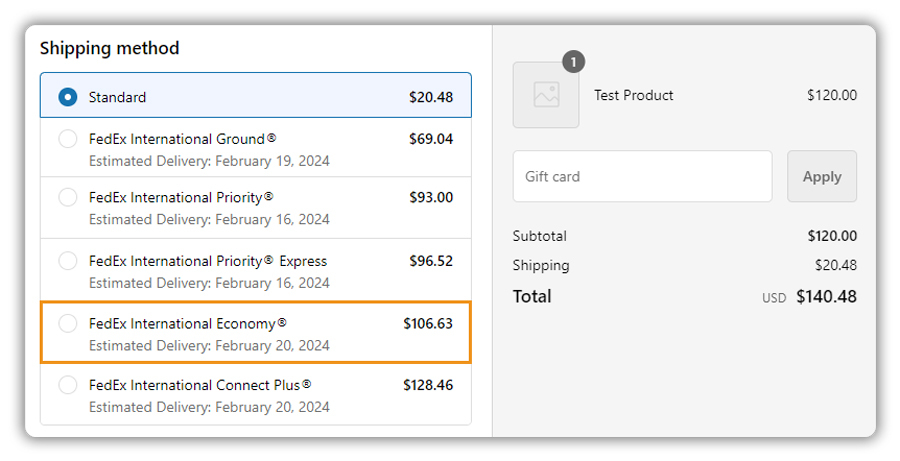
The above image shows the FedEx shipping rate for a product without adding any Adjustment Value or Percentage.
Now if an Adjustment % of 20 is added to the FedEx International Economy Service as shown in the image below, then the total shipping rate will increase by 20 percentage.
So, you can see that the FedEx International Economy Service rate has increased by 20 percentage of the actual value, ie. the rate has increased from $88.86 to $106.63 in the below image:
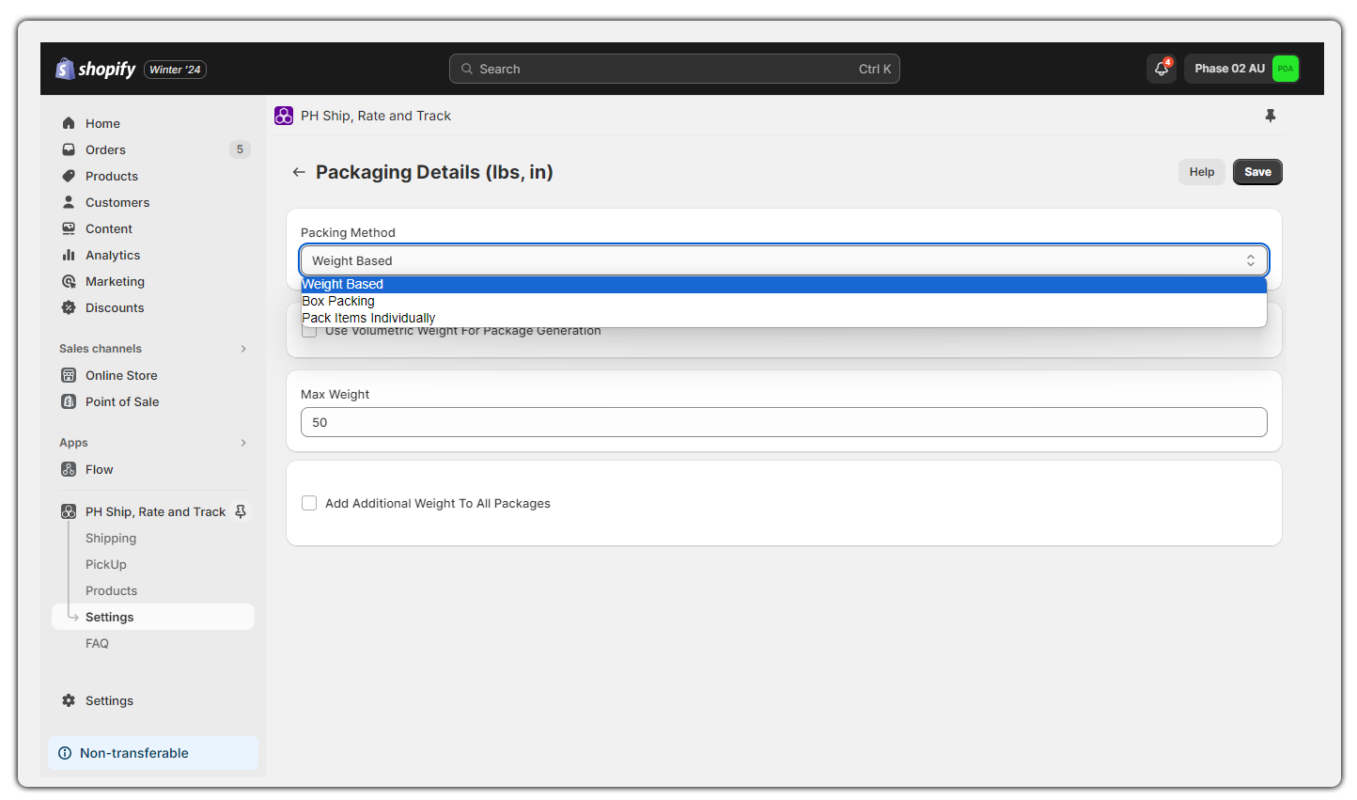
Packaging
This includes the settings related to the package used for shipping.
- Packing Method: Select this method if you want to pack the products based on their weight. This will allow you to pack multiple products in one package.
- Max Weight: This will be the maximum weight you can pack in a single box. If the weight of the products exceeds this Max Weight the app will pack the remaining products into the next package.
You can refer to the below image for packaging types:
Pickup
This includes the pickup-related settings for your store as shown below:
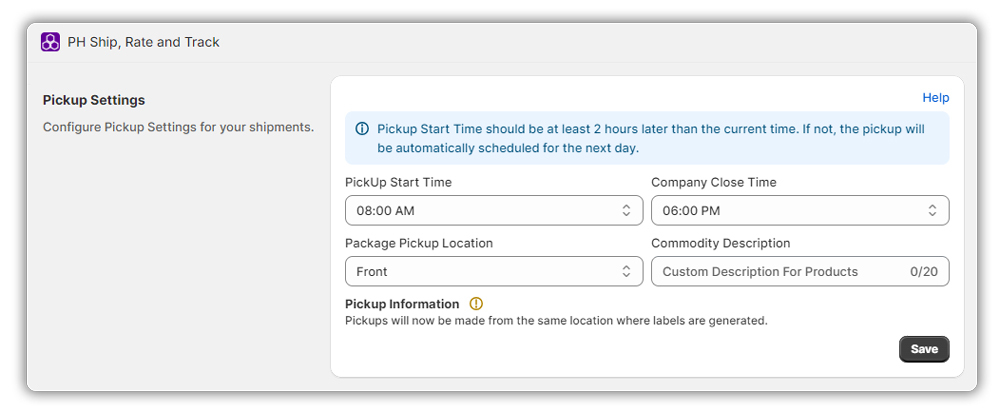
- Pickup Start Time: Specify the time after which FedEx can provide pickup for your packages.
- Company Close Time: Specify the time after which FedEx cannot provide pickup for your packages.
- Package Pickup Location: Set the pickup point in your store from where FedEx can pick up your packages, like the front reception, back door, etc.
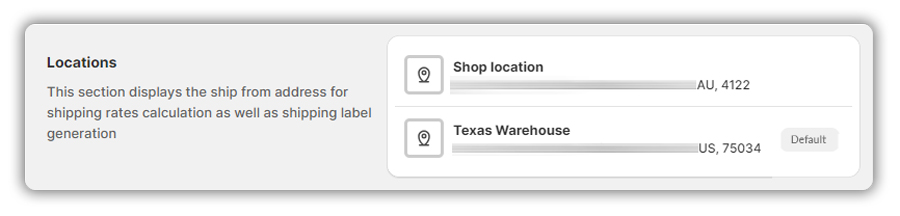
Location
This section shows the shipping from the address for calculating the rates, as well as generating the shipping labels. All the stores you add to your Shopify store will be displayed here.
Read More – How to Set up the Ship, Rate, and Track app for FedEx on your Shopify Store?
How to Use Shopify Ship, Rate and Track for FedEx on Your Store?
The Shopify Ship, Rate and Track for FedEx can be used to automate FedEx shipping rates and display them on the checkout page, print FedEx shipping labels directly from your Shopify store, generate and update FedEx tracking numbers automatically for each order, and provide shipment tracking details to your customers.
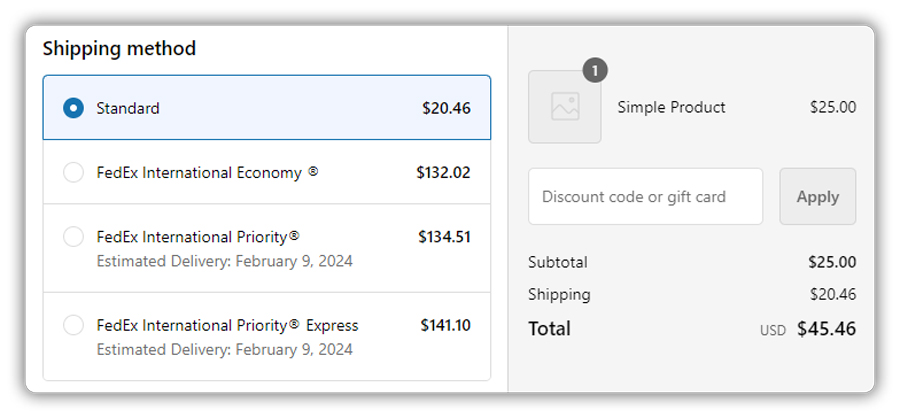
How to Show Live FedEx Rates on the Checkout Page?
For showing the live rates on the checkout page, follow these steps:
Step 1: Configure your FedEx account using the FedEx credentials that you have received. Navigate to the Settings → Account Settings as shown below:
Step 2: Check whether you have enabled the services you need in the Carrier Services

Step 3: Add a product to the cart and checkout. You will be able to see the live FedEx rates on the checkout page as shown below:
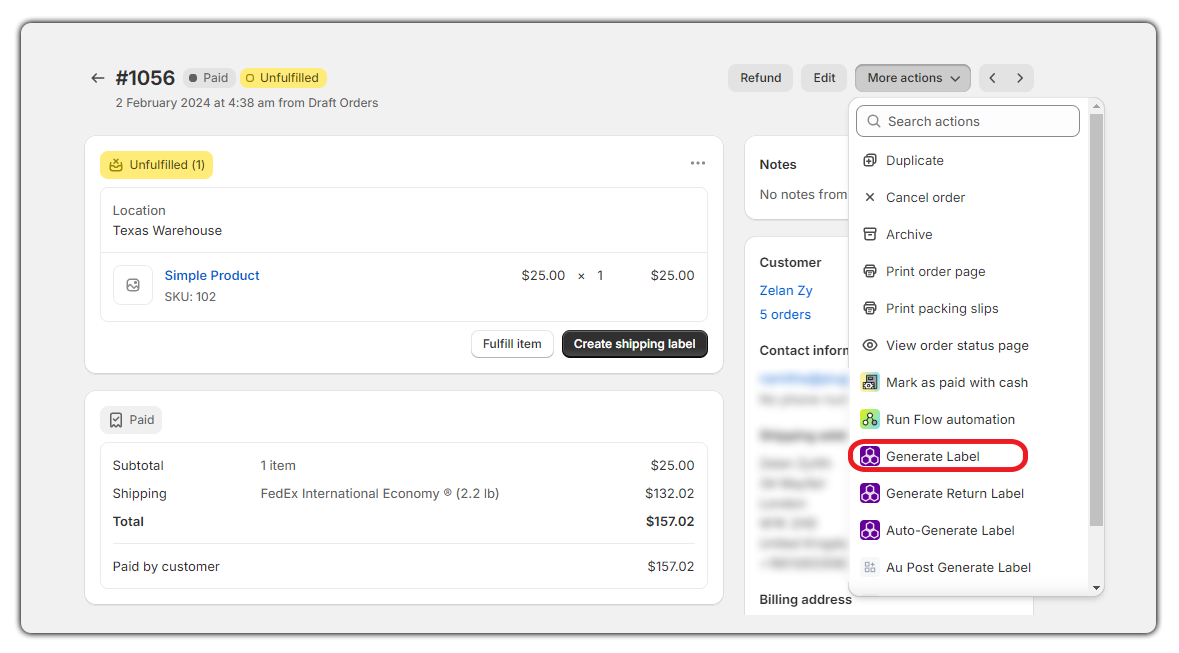
How to Print FedEx Shipping Labels Through the Single Label Generation Process?
To print the FedEx shipping label for a single order with custom options, follow the steps below:
- Go to the Shopify Order details page.
- Select the order for which you want to generate a FedEx shipping label.
- Under More actions, click on Generate Label to manually generate FedEx shipping labels for the selected order as shown below:
Click on Generate Package to generate the packages as shown below:
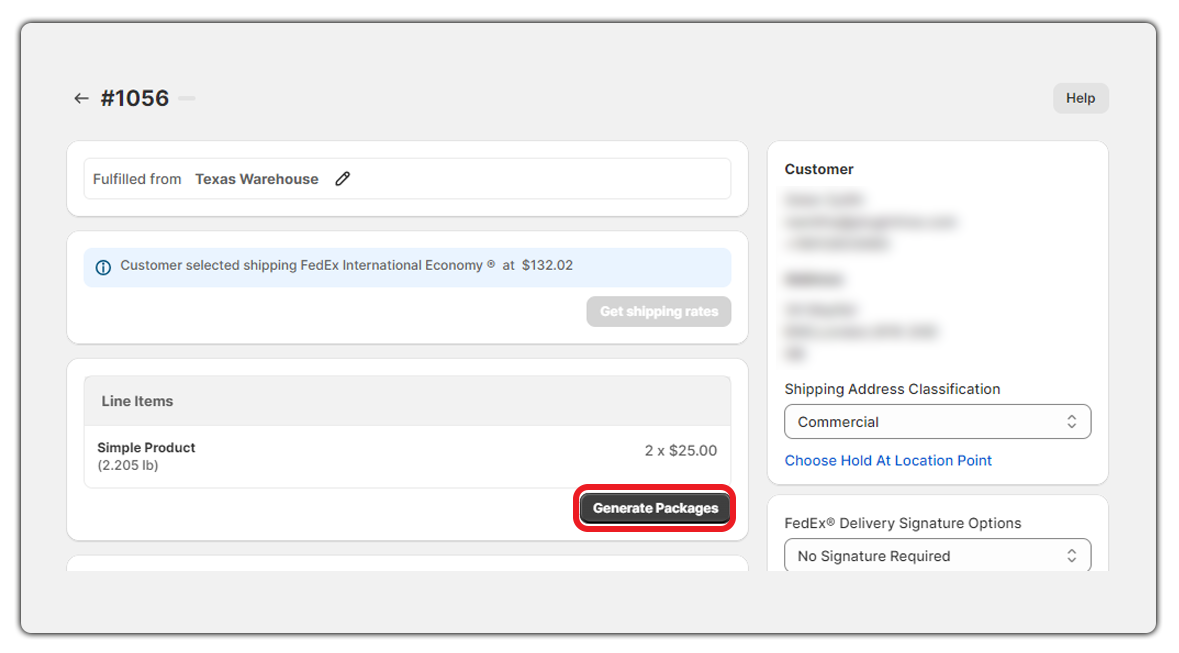
Now you can edit, split, remove, or regenerate the packages according to your requirements as shown below:
- Edit A Package: Click on Edit to select the shipping box and the number of products to be added to the box as shown below:
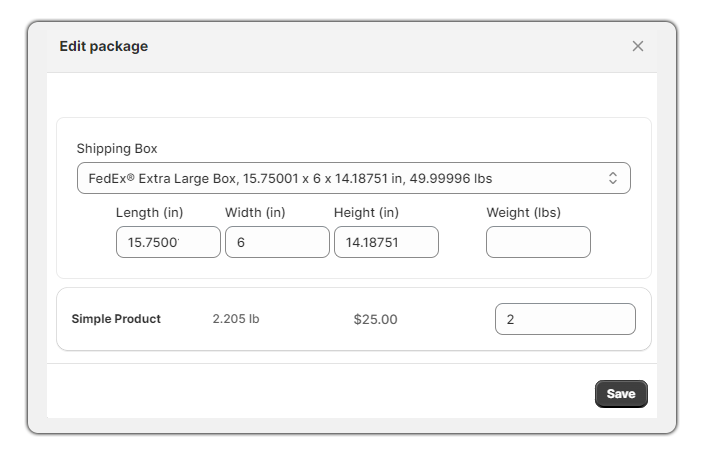
Note: Only when you choose Custom Box as Shipping Box, the weight will be shown.
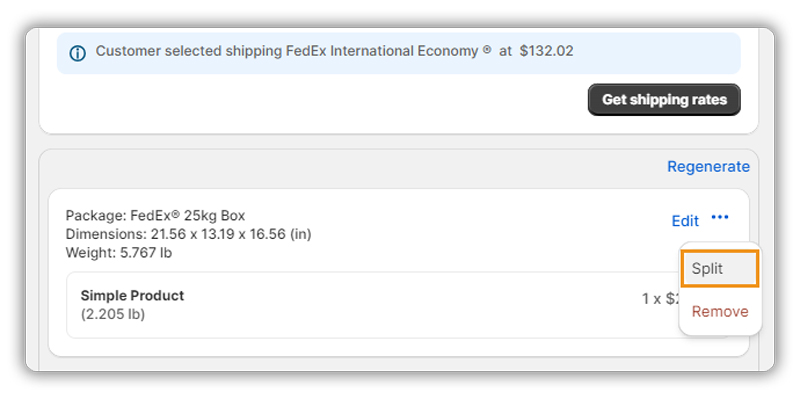
- Split A Package: You can split a package into the required number of boxes using the Split option. You need to ensure that only a single product is packed into a box, to use this option.
- Click on Split as shown below:
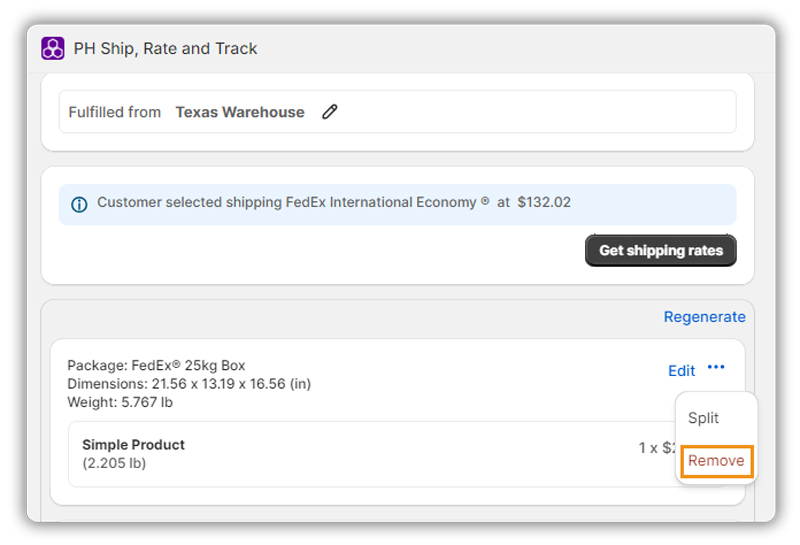
- Remove a package: Now, if you want to remove the existing package click on Remove as shown below:
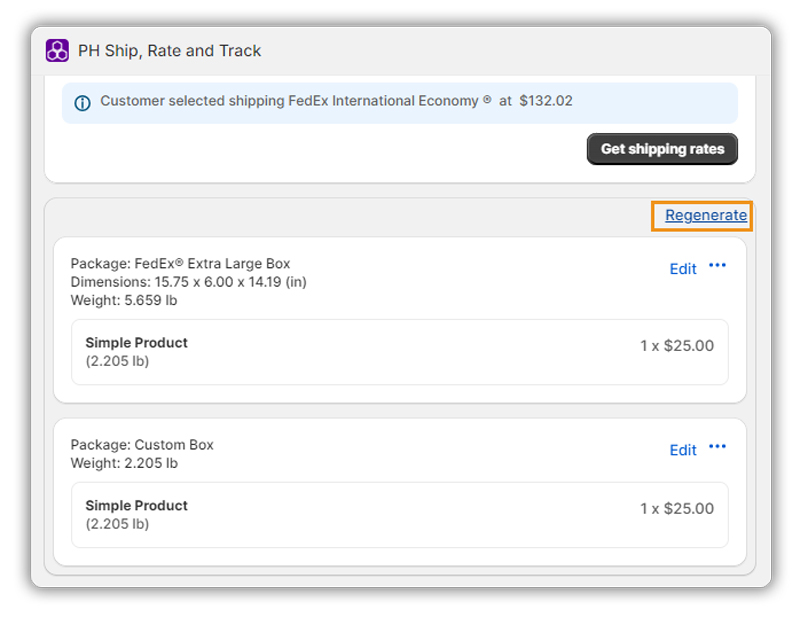
- Regenerate A Package: Click on Regenerate to regenerate the package as shown below:
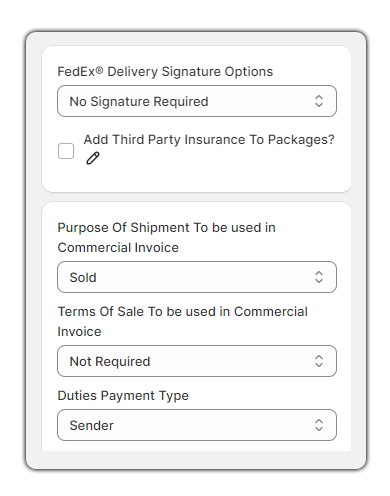
- Insurance (if applicable): To add insurance for your packages enable Add Third Party Insurance To Packages.
- Signature: To add the signature on delivery click on FedEx® Delivery Signature Options and select one from the dropdown.
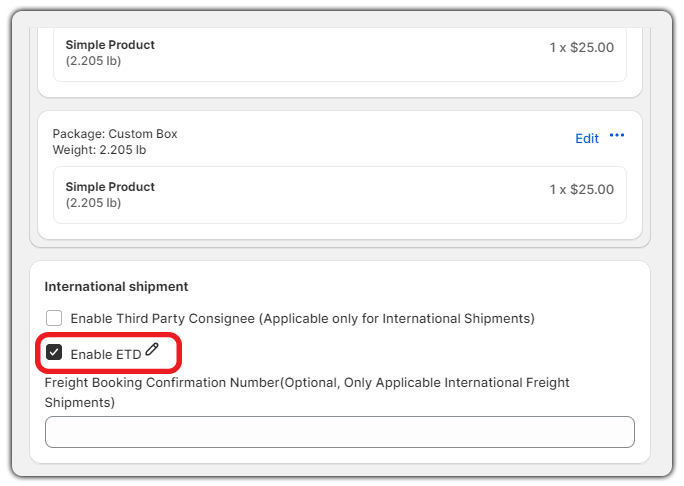
- Customs duties payer & terms of the sale: For international shipments choose the Duties Payment Type from the dropdown.
Refer to the below image for the options:
Check the Enable ETD to Electronically Trade Documents as shown below:
Click Get Shipping Rates to get shipping rates as shown below:
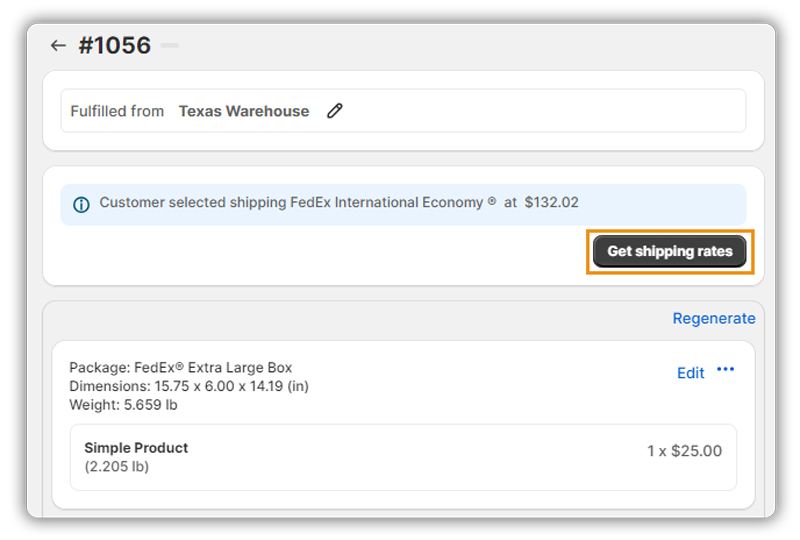
Now choose a service and click on Generate Label as shown below:

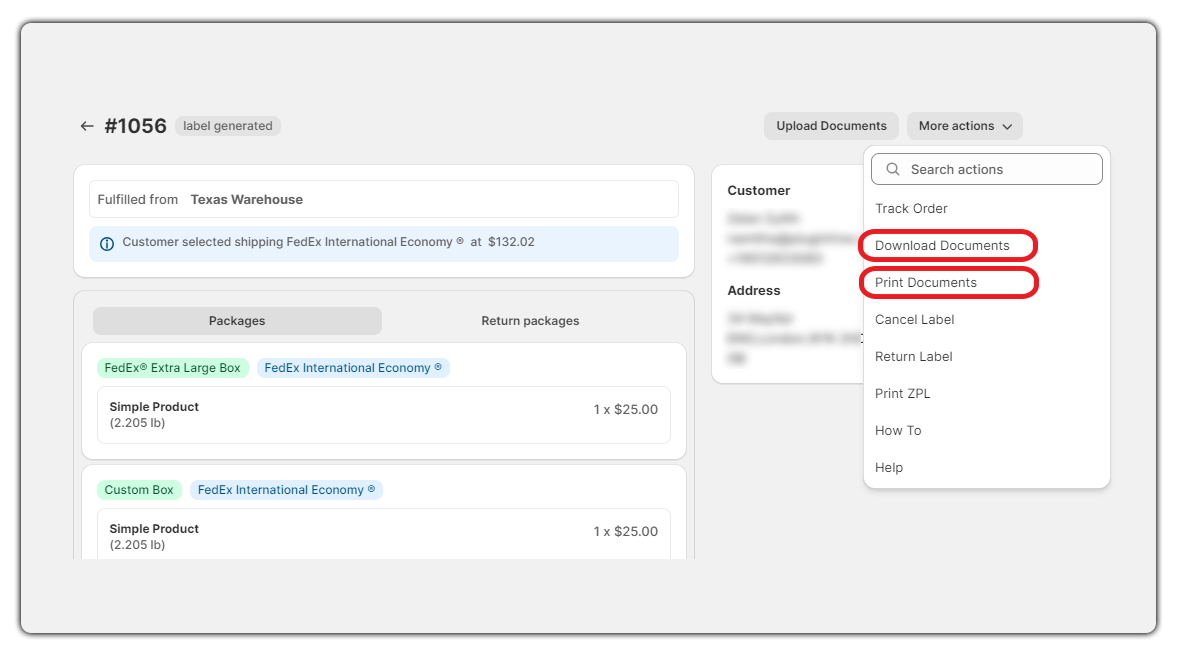
You will be taken to the order summary page. Click on More Action to print or download documents.
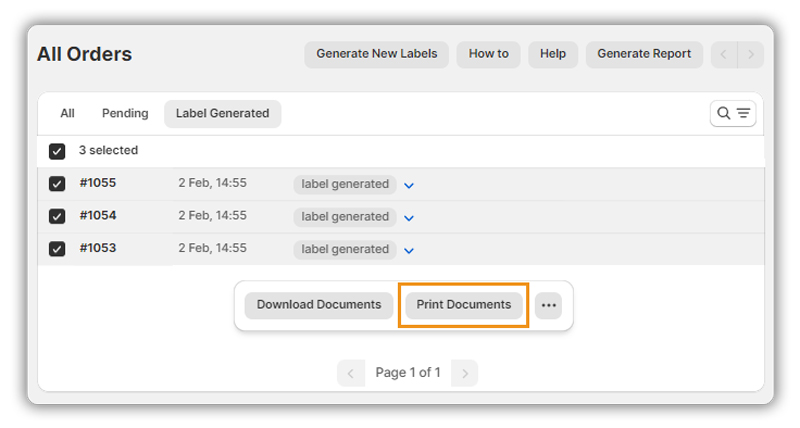
How to Print FedEx Shipping Labels Through the Bulk Label Generation Process?
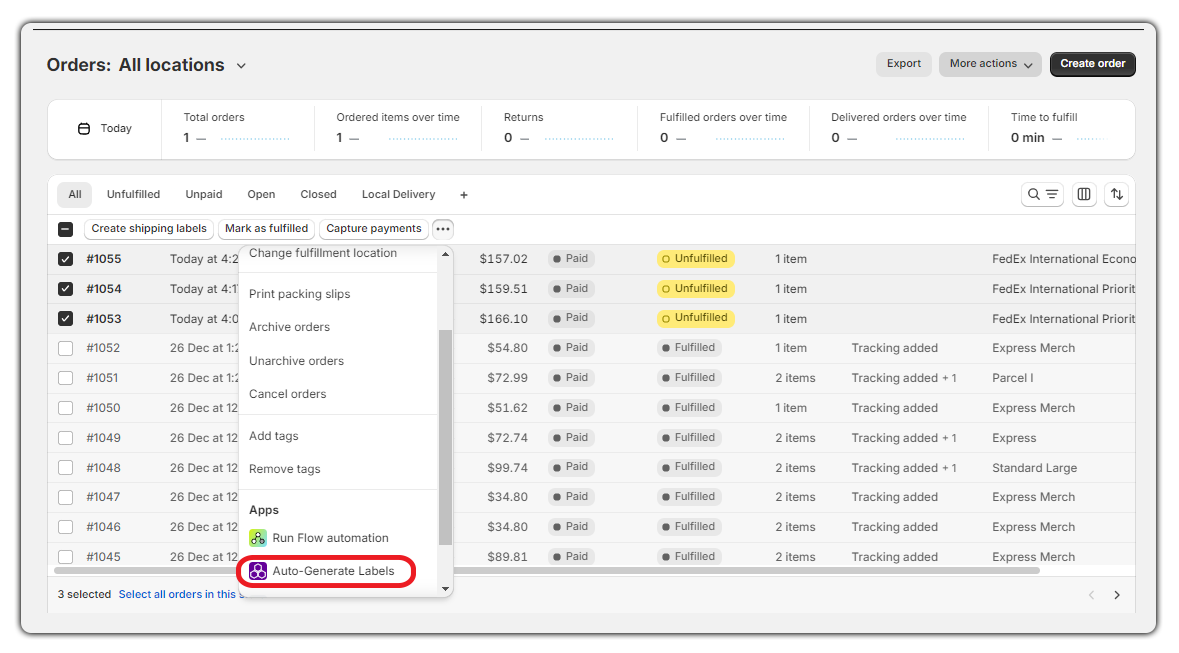
To print FedEx shipping labels for multiple orders from your Shopify, follow the steps below:
- Go to the Shopify Order details page.
- Select the order for which you want to generate a FedEx shipping label.
- Under More Actions, click on Auto-Generate Labels, as shown below:
- This will redirect you to the Shipping section. Under the Label Generated section, print FedEx shipping labels for all the orders by clicking on the Print Documents option as shown below:
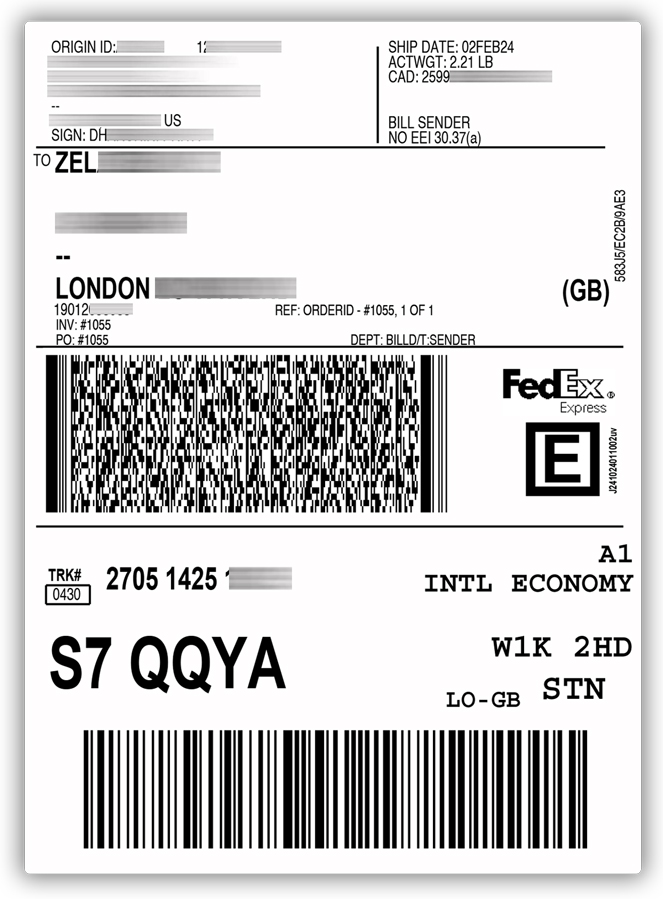
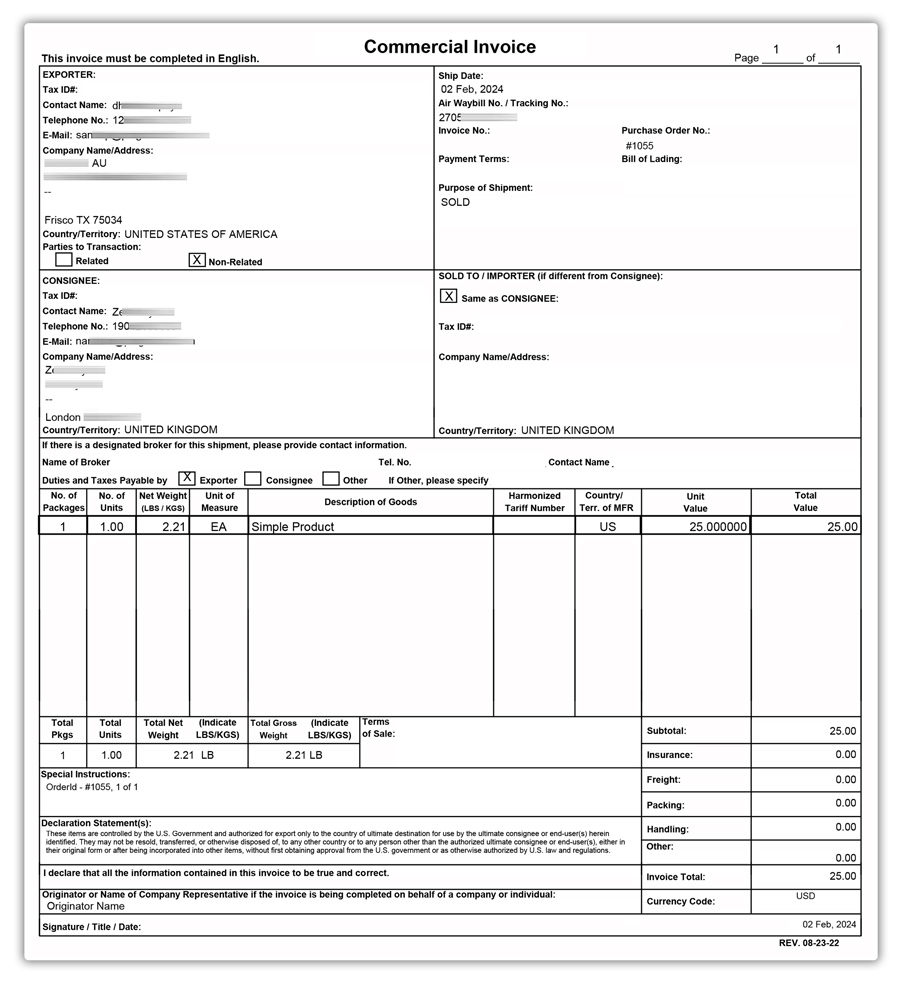
Sample FedEx shipping label and Commercial Invoice is shown below:
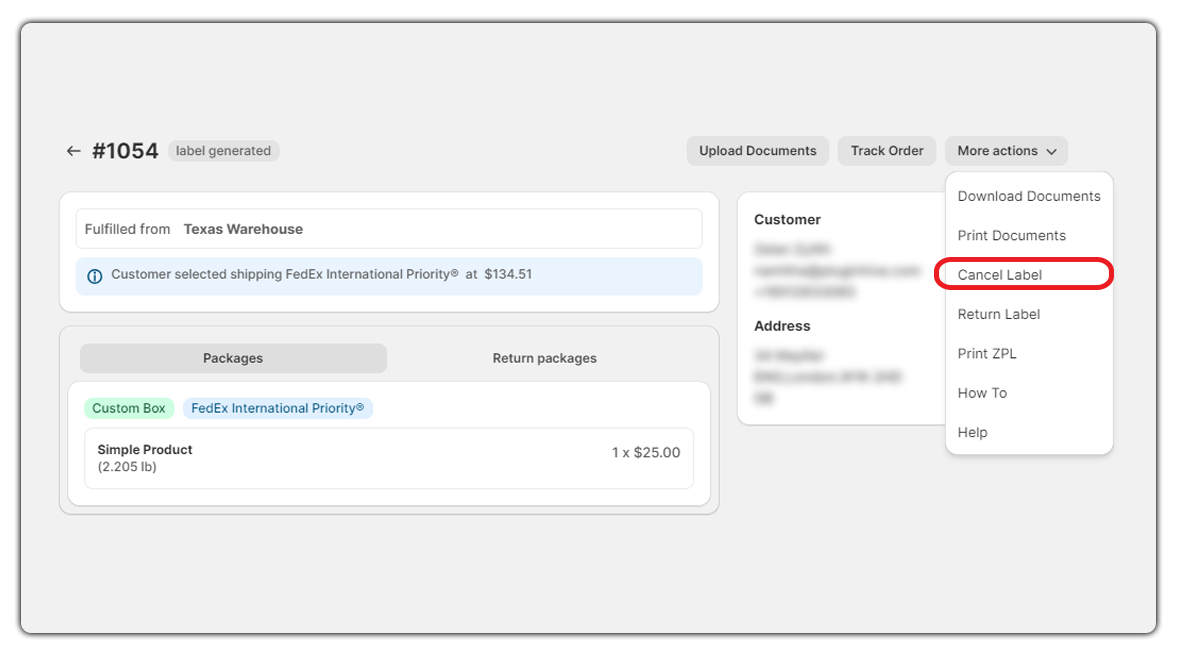
How to Cancel the FedEx Shipping Labels That Are Generated?
To cancel the FedEx shipping label follow the steps below:
- Go to the Shipping tab under the FedEx Rates, Labels & Tracking App.
- Navigate to the Label Generated section. Click on the order and select More Actions → Cancel Label as shown below:
- To create a new label for the label canceled order, select the label and click on Retry/Create New button as shown below:

You will not be able to cancel the following labels using the application:
1. The shipping labels that are generated past 24 hours
2. FedEx LTL Freight shipping labels (Freight Economy & Freight Priority)
To know more on how to cancel these labels, please reach out to your FedEx Account Representative.
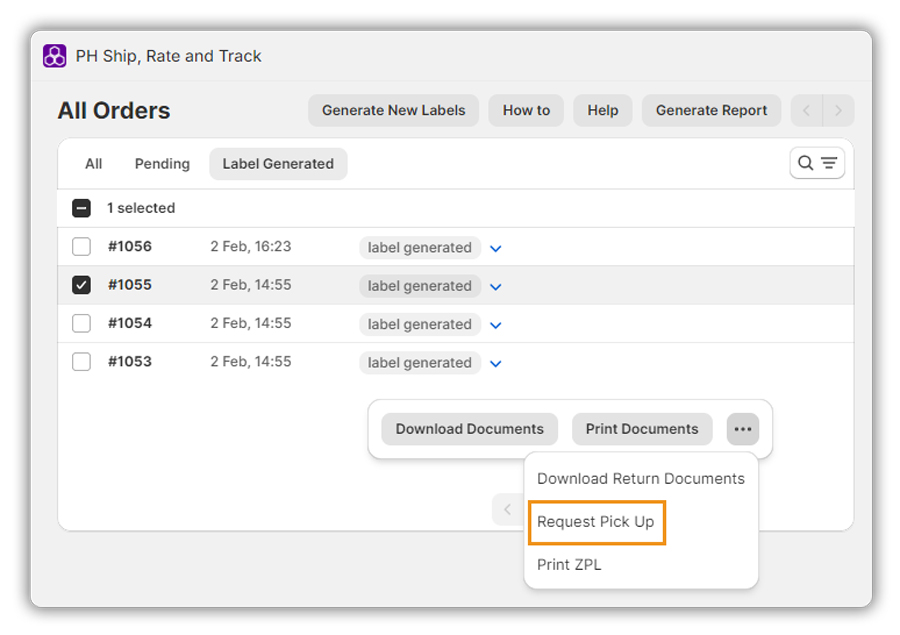
How to Request FedEx Pickup and Track Shipments, Directly From Your Shopify Store?
To request FedEx Pickup, navigate to the Shipping tab under the app settings and select the orders you want to request.
Click on Request Pickup to initiate the request for FedEx Pickup as shown below:
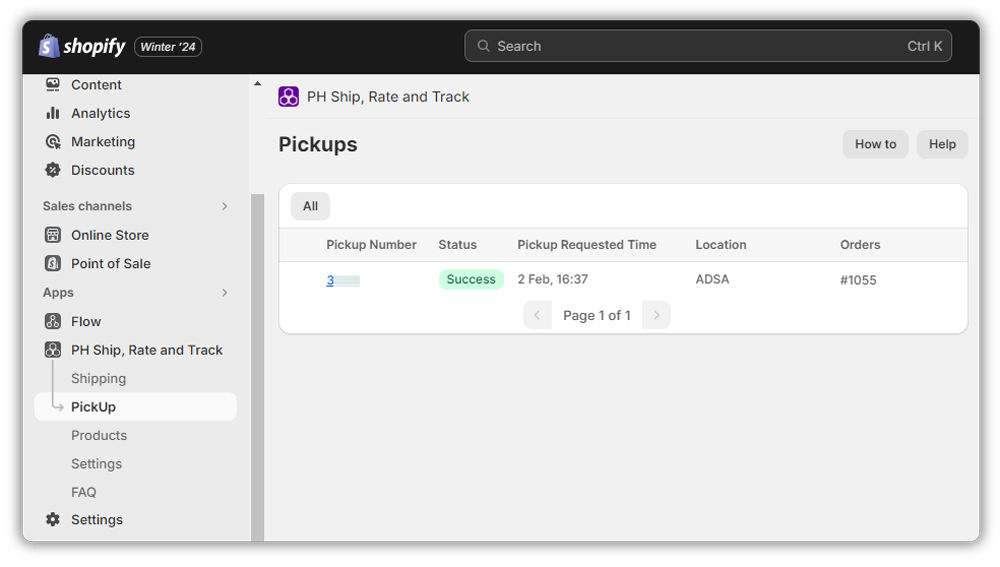
The Pickup page displays the current pickup status along with the pickup number, location, and order number as shown below:
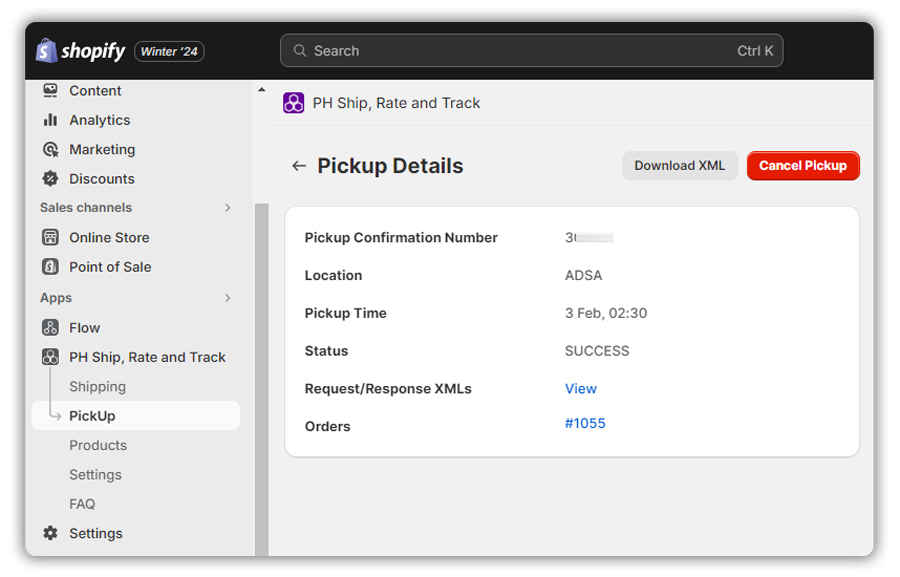
Click on the Pickup Number, to see the Pickup Details as shown below:
When the FedEx agent picks up the package, you can start tracking your orders.
To know the tracking details, click on the Label Generated dropdown, and select Track Shipment as shown below.
To understand the complete process of FedEx pickup and tracking, visit Shopify FedEx shipment tracking and scheduling Pickups
If you face any issues or have any queries, feel free to contact our customer support.
Conclusion
Hence, these are the settings of the Shopify Ship, Rate and Track for FedEx and how you can use the app based on your shipping requirements. To know more about the FedEx rates, labels, and tracking app, visit Shopify Ship, Rate and Track for FedEx.
In case you face any issues or have any questions regarding the application, please contact us and we will help you resolve any issues.