Setting Up WooCommerce PostNord Shipping Plugin
This comprehensive guide will show you how to easily set up the WooCommerce PostNord Shipping Plugin with Print Label on your WooCommerce store to print shipping labels, enable order tracking, and much more.
With step-by-step instructions, images, and crucial notes along the way, you will be easily able to configure the WooCommerce PostNord plugin’s features. You can go through the complete setup tutorial or select a specific section in the index for your specific needs. (If you are new here, we recommend you begin from the start).
In this Guide
- Download, Install and Activate the Plugin
- Navigate to PostNord Plugin Settings
- Activate your Plugin License
- Register your PostNord Account
- Verify your Product Settings
- PostNord Shipping Rates
- PostNord Shipping Services
- Configure Parcel Package Settings
- Print PostNord shipping labels
- Printing your first PostNord Shipping Label
- Print PostNord Shipping Labels Automatically
- Print PostNord Shipping Labels for Multiple Orders in Bulk
- Generate PostNord Return Labels and QR Code
- Allow Customers to Download Return Label and QR Code
- Email PostNord Shipping Label to Customer and Admin
- Cancel PostNord Shipping Labels
- Display PostNord Service Points at Checkout
- How to set up PostNord Tracking
- How to Set up PostNord International Shipping
Download, Install, and Activate the Plugin
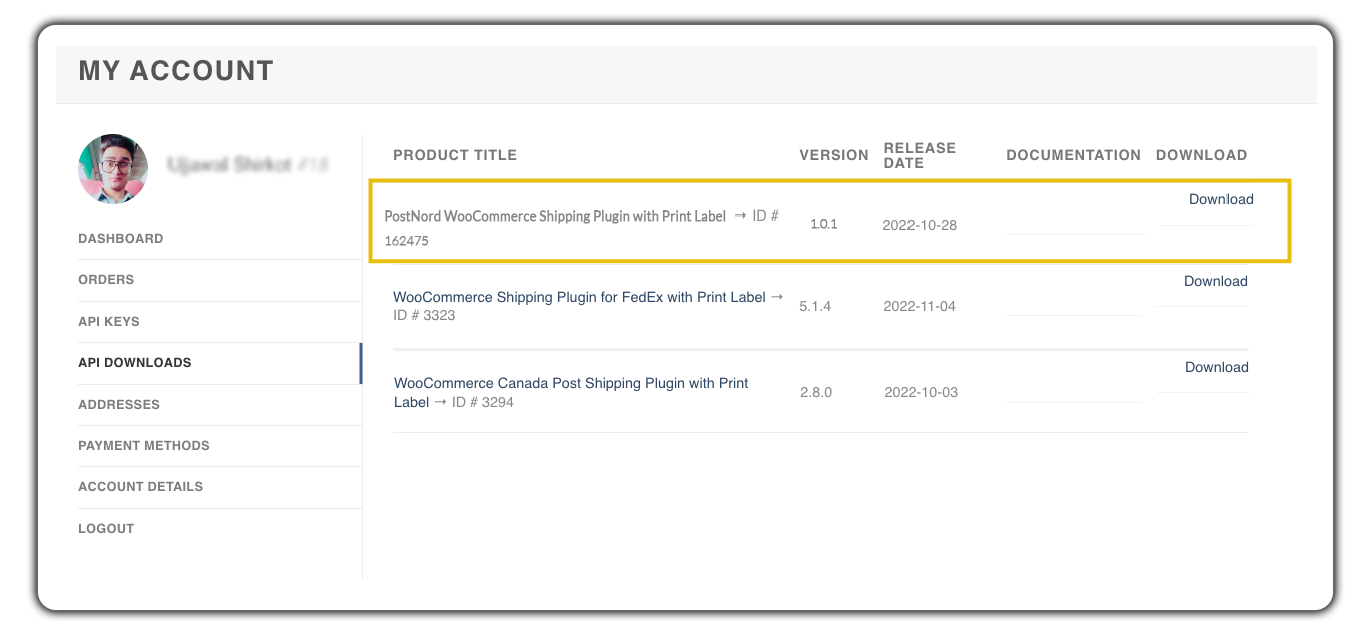
After purchasing, the plugin Zip file is available in API DOWNLOADS.
- Download the .zip file from API DOWNLOADS by logging into MY ACCOUNTS page.
- Log in as the WordPress Admin of your online store
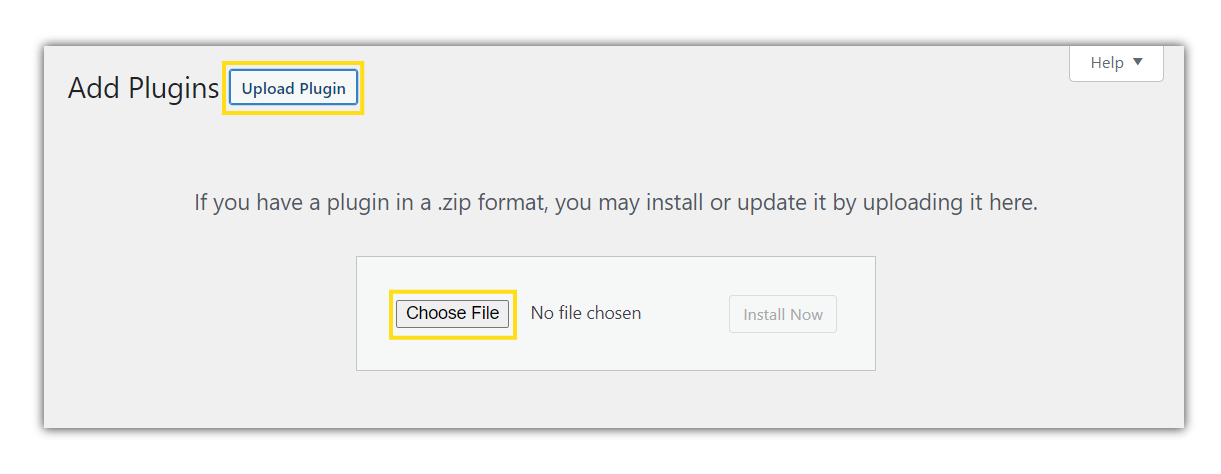
- Navigate to Plugins > Add New to upload the downloaded WooCommerce PostNord Shipping Plugin

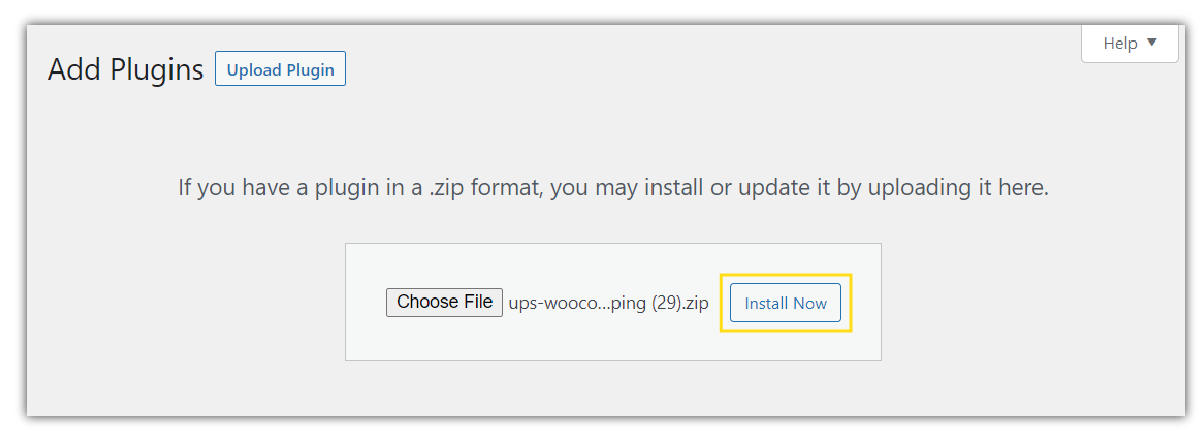
- Upload the plugin to the WooCommerce Store and Click on Install
- Click on Install Now
- Activate the WooCommerce PostNord Shipping Plugin

The plugin is activated and ready to use.
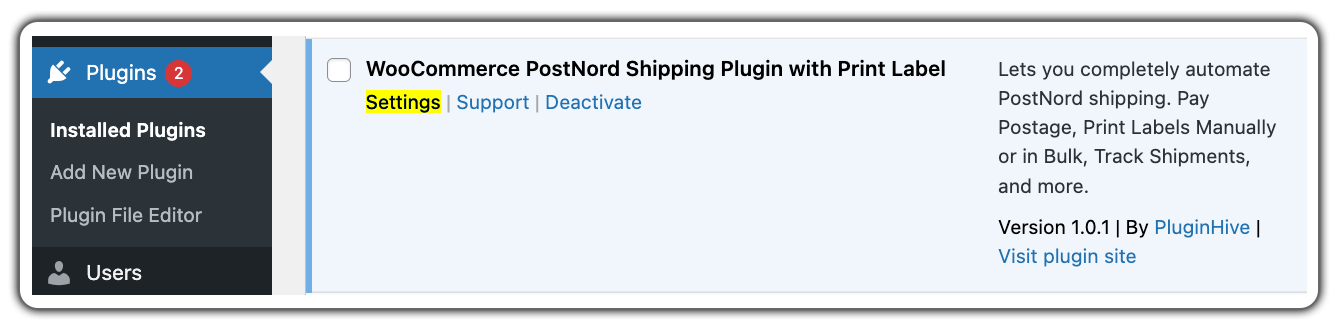
Navigate to PostNord Plugin Settings
After installing and activating the plugin, a new shipping method, ‘PostNord’, is added to WooCommerce Shipping settings. Now you can configure this PostNord Shipping method as per your requirement. You can navigate to settings in two ways, as shown below:
- Navigate to WooCommerce> Settings > Shipping > PostNord
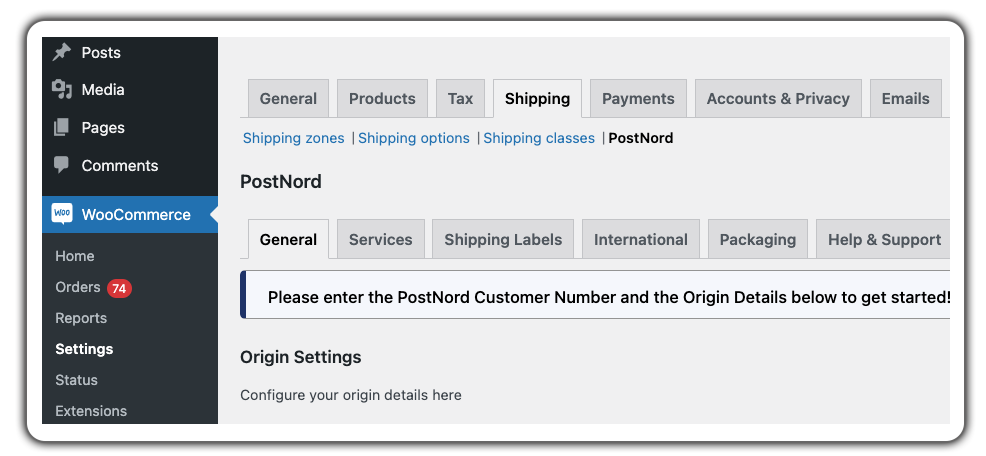
- Or, navigate to Plugins > Installed Plugins > WooCommerce PostNord Shipping Plugin > Settings
You will be able to see the following Shipping related options in detail
- General
- Services
- Shipping Labels
- International
- Packaging
- Help & Support
Activate the plugin license
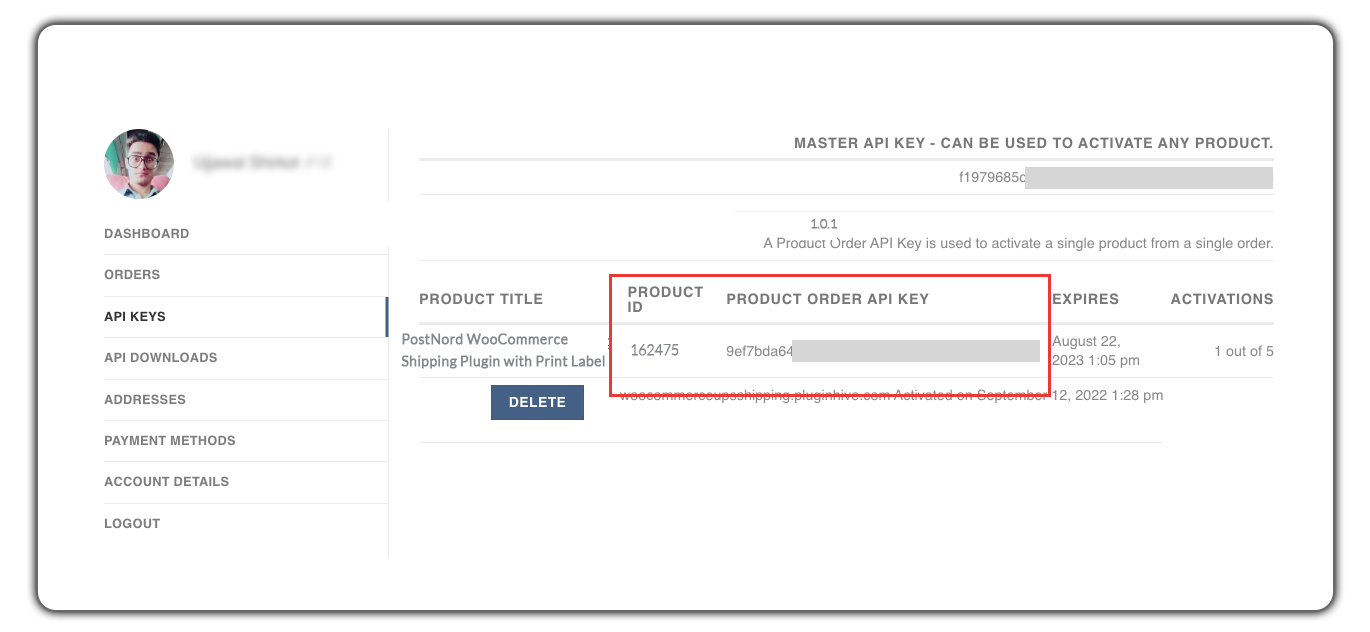
To activate the license key, you need to enter the Product Order API Key and the Product ID used for the purchase.
- To get the API Key, go to the My Account section of PluginHive. Navigate down to API KEYS.
* Without an active plugin license the customers will not be able to utilize the plugin functionality and the plugin will stop functioning.
* Hence, our team strongly recommends activating the lincense & renewing it promptly when expired to avoid any disruption in the shipping capabilities.
- Now Go to Dashboard > PostNord > License Activation

Click on API Key Activation. On the license activation page, enter your API Key and click Save Changes. Once saved, your License Status will show as Activated.

You can move your license key from development sites to live sites seamlessly. However, make sure to deactivate the license on the development environment before activating it on the live store.
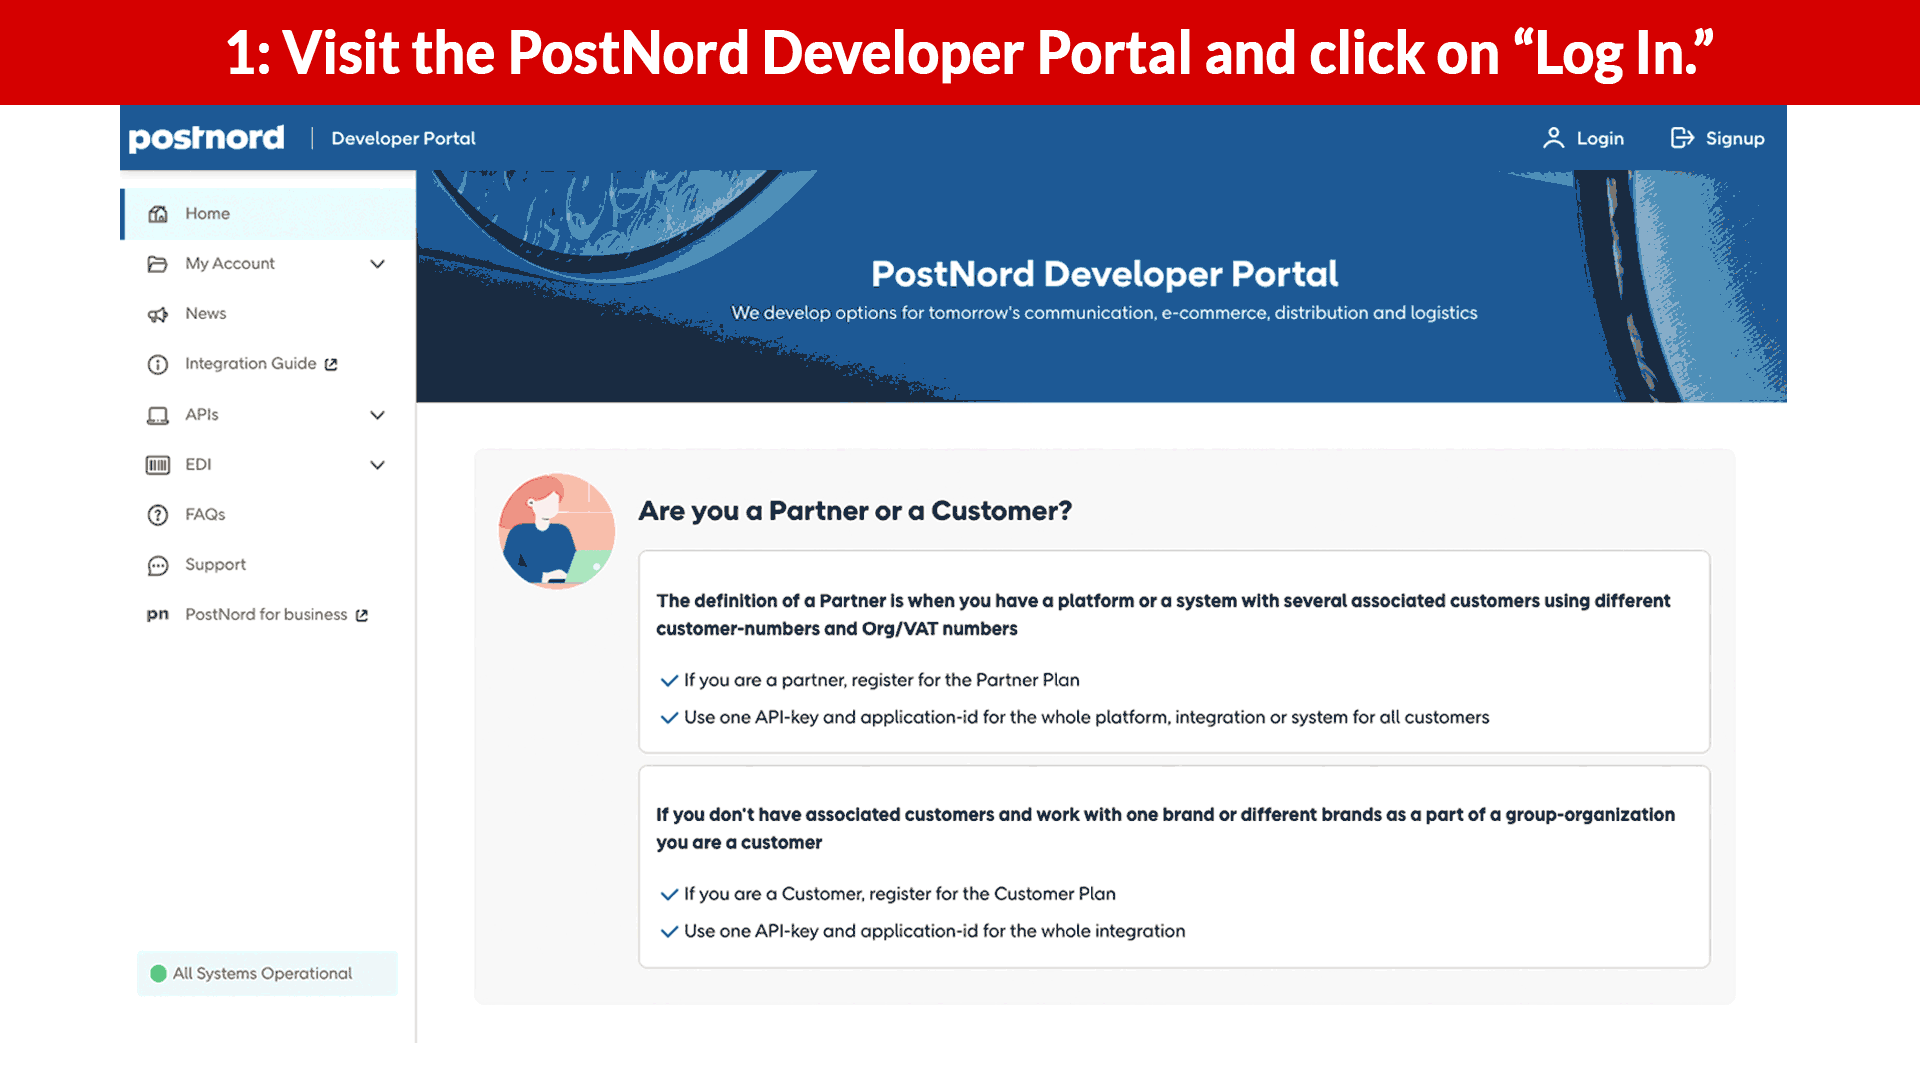
Register your PostNord Account
- Visit the Plugin Settings > General Tab > Enter the Customer Number and Shipper’s Address as shown below.
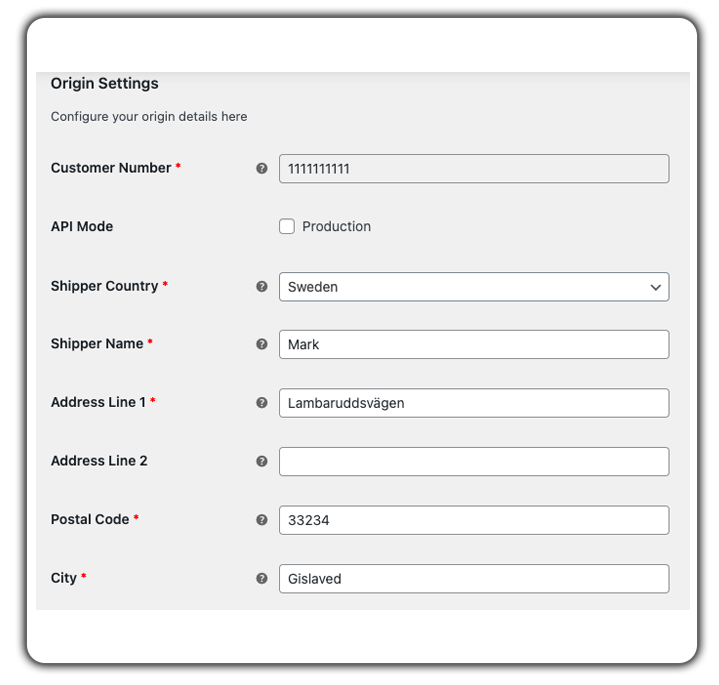
- To know how you can find the Customer Number, please follow the steps shown in the animation below:
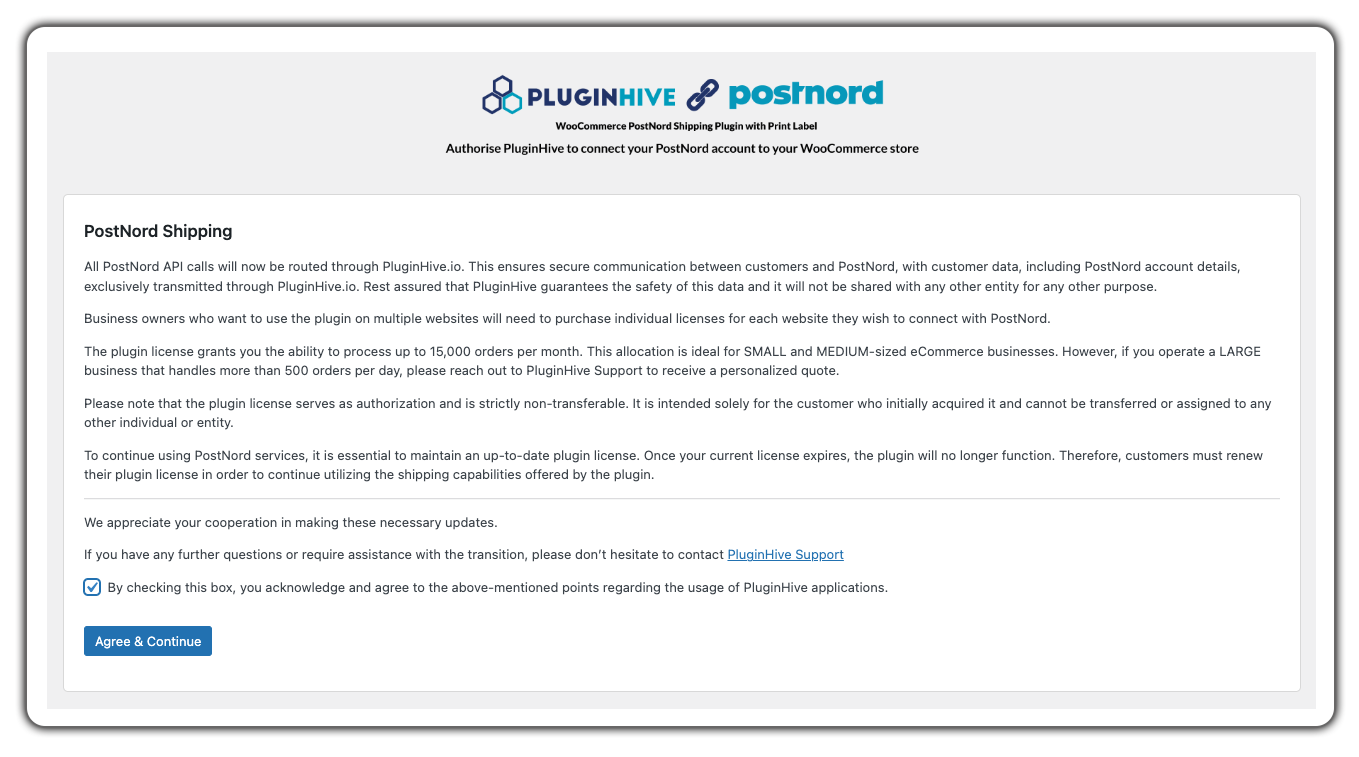
Once done, save changes and click on Connect. The next screen will show important information about the plugin license and the way the plugin integrates with your PostNord account. Read the information carefully, click on the check box, and Agree and Continue.
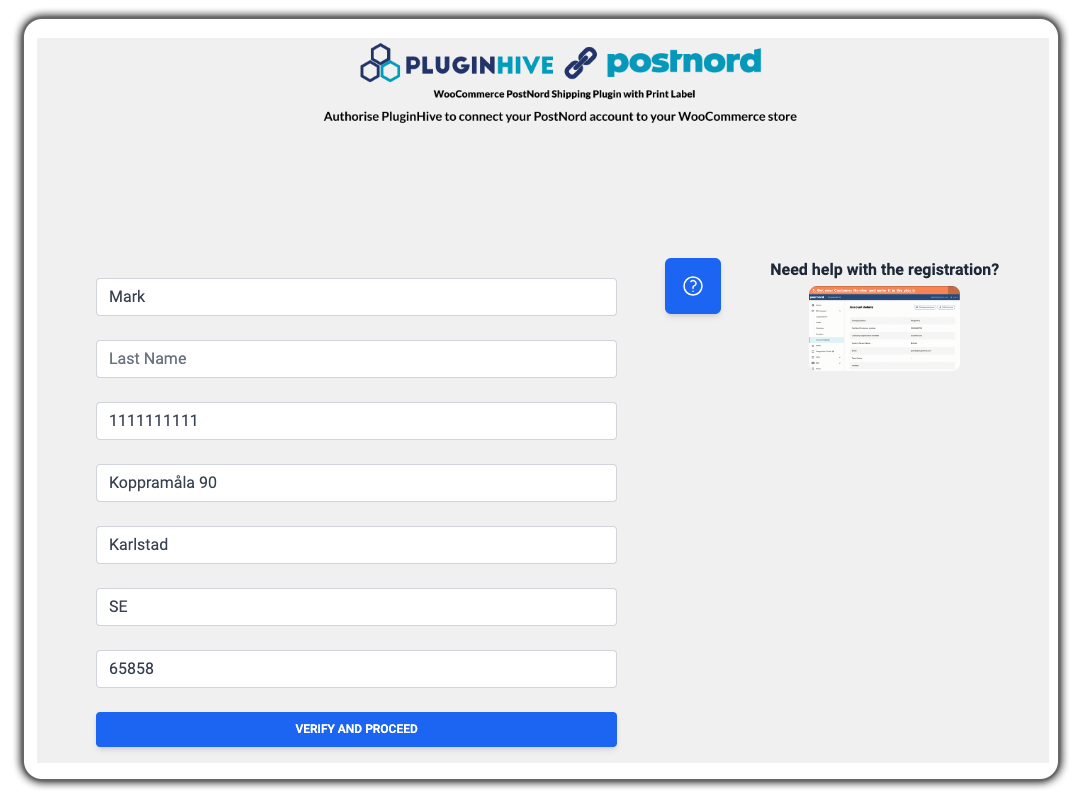
Verify the PostNord account details and click on Verify and Proceed.
Once done, the plugin will successfully integrate with your PostNord account and display the following message.

Verify your Product Settings
Add Product Weight and Dimensions
- Select the product you want to edit
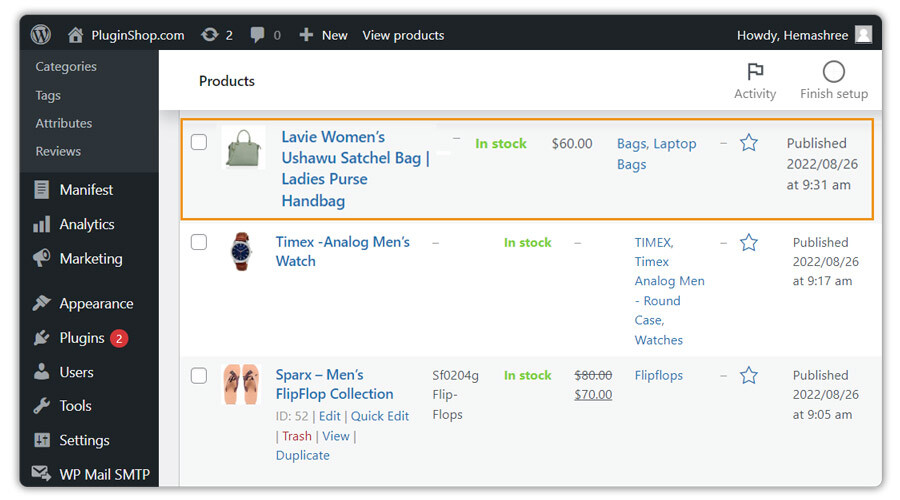
- Under the Edit Product section, Go to Product Data < Shipping settings
- Provide the Product Weight and Dimensions in the fields as shown in the image
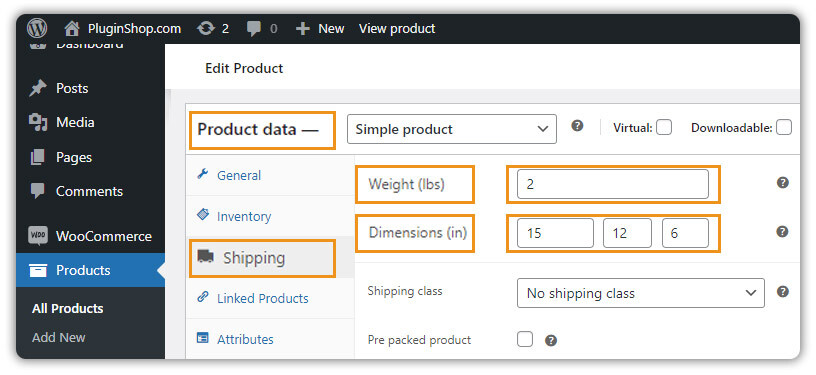
If the weights and dimensions of your product are not configured, you might face some issues ahead.
Set Product Weight/Dimensions Unit
When creating a product on the WooCommerce Store, it is essential to provide the product dimensions and assign product weight with the correct units. Weight and Dimensions Units can be assigned depending on your shipper address.
- Select WooCommerce > Settings > Products
- Set the accurate weight and dimensions units under the Measurement section, as shown below
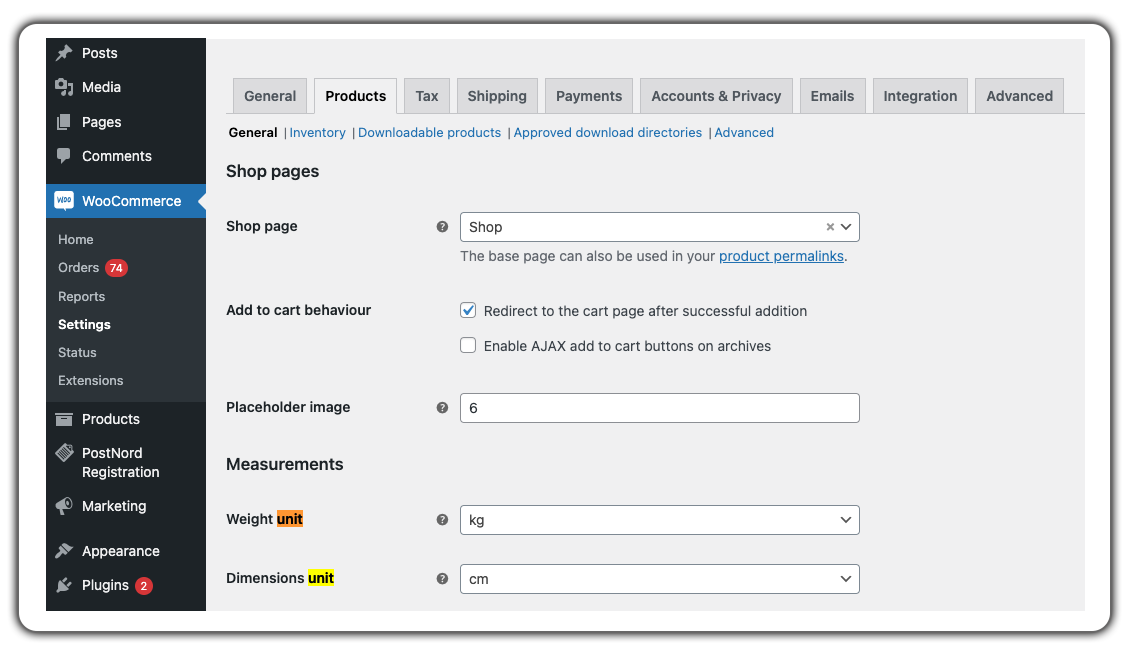
- LB/IN: Product weight and dimensions will be in pounds (lb) and inches (in).
- KG/CM: Product weight and dimensions get converted to kilograms (kg) and centimeters (cm).
PostNord Shipping Rates
As PostNord Shipping API does not support live shipping rates calculation, we recommend setting up WooCommerce Flat Rates or shipping rates based on Shipping Zones. You can also set approximate shipping costs based on various factors like weight, product quantity, product type, and cart value using the WooCommerce Table Rate Shipping plugin.
PostNord Shipping Services for Label Printing
The plugin supports PostNord services based on the shipper’s address. These services will vary for Sweden, Denmark, Finland and Norway.
- Visit the Services section in the plugin settings and enable the shipping services you require to ship products from your store to the customer.
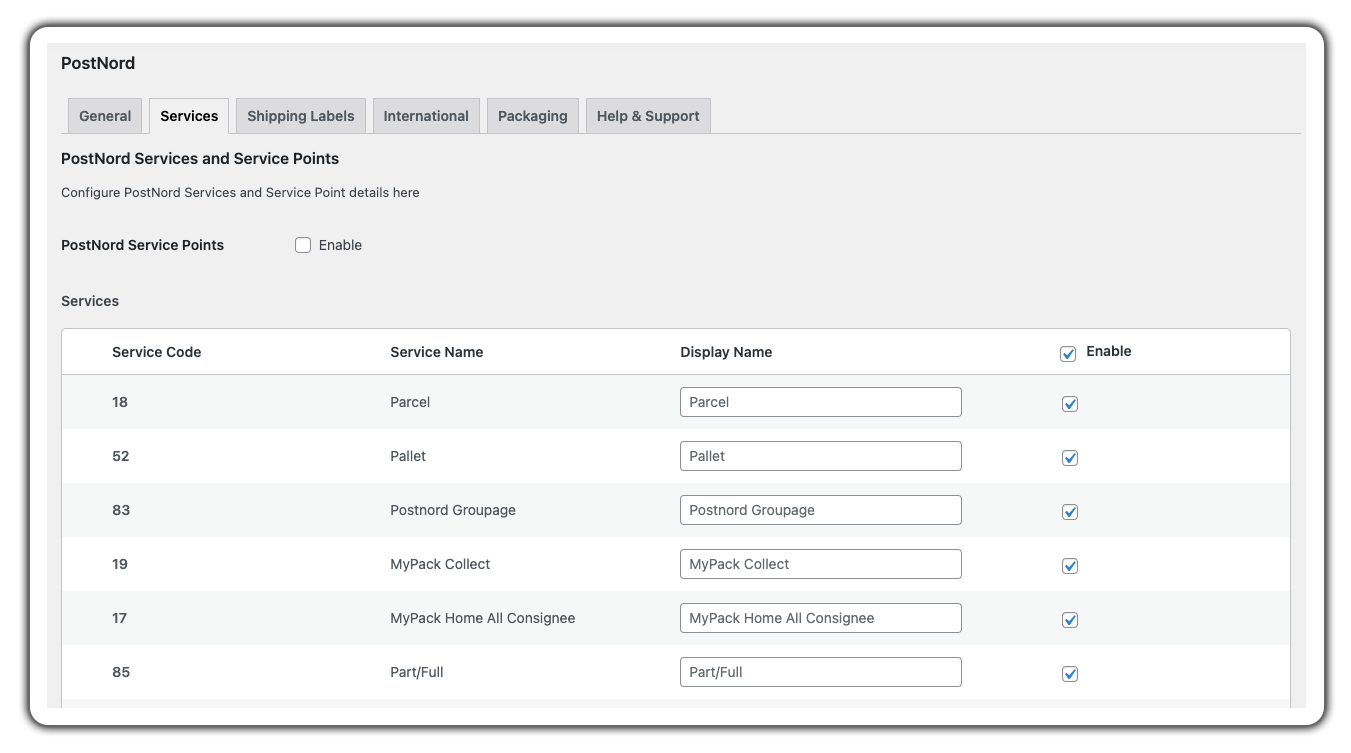
- Click on Save Changes to proceed.
Configure Parcel Package Settings
WooCommerce PostNord Shipping Plugin has three primary packing options available. based on your requirements, you can set the packing method in the plugin settings.
- Select WooCommerce > Settings > Shipping > PostNord
- Click on Packaging and select the suitable Parcel Packing Method option in the drop-down
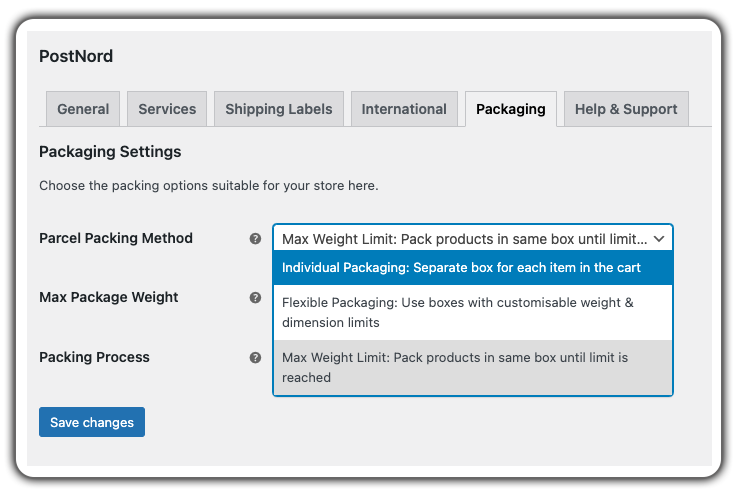
Individual Packaging
If you pack each item in the cart separately, you can select this option. The total shipping cost is calculated by adding the shipping cost for each item in the cart. Hence, the plugin will print the shipping labels separately.
For example, the shipping cost of Item A is $10. If the customer adds two units of item A to the cart, then the total shipping cost is $10 x 2, which is $20. In this case, the plugin will print two shipping labels for each box.
Flexible Packaging – Use boxes with customizable weights and dimensions
If you pack your products in dedicated boxes with distinct weights and sizes, you can select this option. The plugin will allow you to add box weight and dimensions as per your preference. The plugin will then select the best-fitting box automatically and print the shipping labels according to the weight and dimensions.
Max Weight Limit
If you pack all your products in a single box with a maximum weight capacity, then you can select this option. You can define the Max Weight which will determine the maximum weight that can be packed in a single box. The plugin will assume all the products up to the Max Weight to be packed inside a single package and once the Max Weight is reached, the plugin will add another box.
Printing PostNord Shipping Labels
After setting up the WooCommerce PostNord plugin configuration, you can print PostNord shipping labels directly from the WooCommerce orders page.
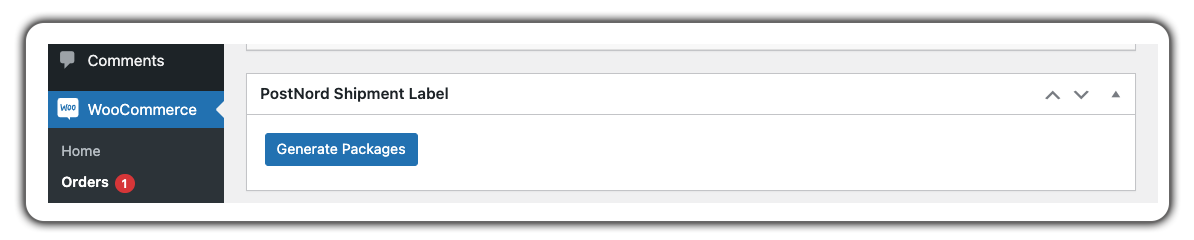
Printing your first PostNord Shipping Label
- Navigate to Dashboard > WooCommerce > Orders.
- On the order page, click #OrderNumber for which you want to create and print the label.
- Click on Generate Packages
- Once the package is successfully created, click on Select a PostNord Service and choose the service you want to use for shipping
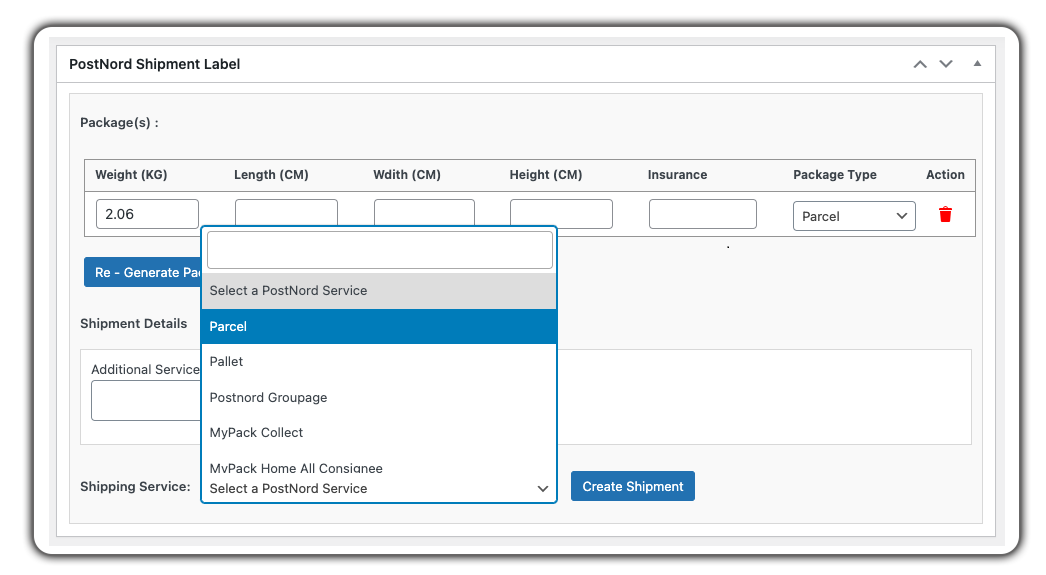
- Click on the Create Shipment option to get the shipping labels
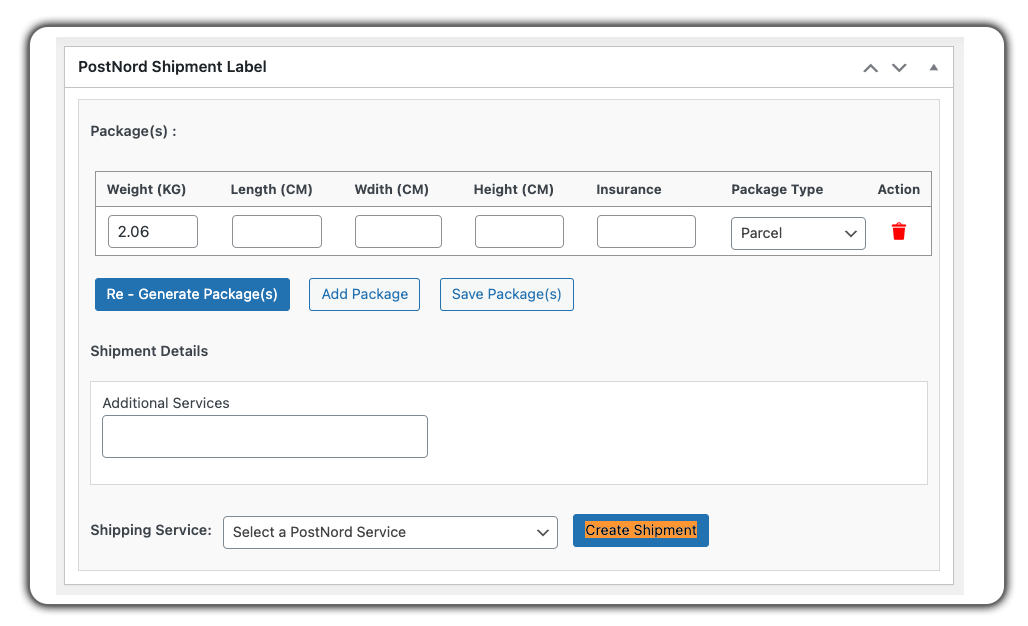
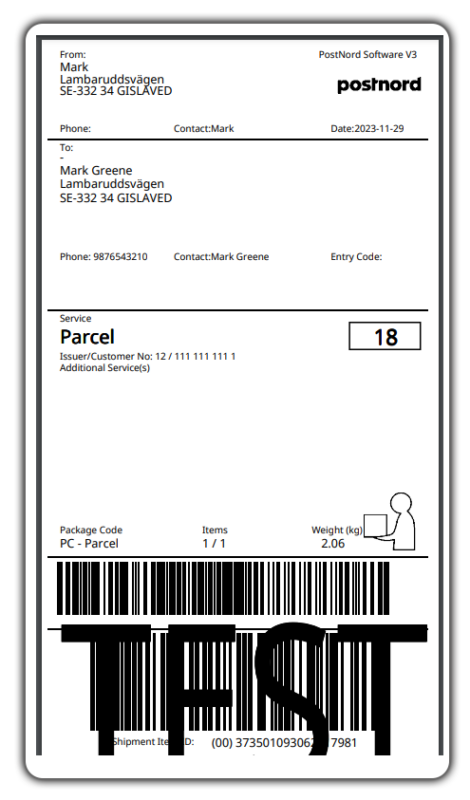
- The plugin will generate a PostNord shipping label along with the shipment tracking ID automatically
- Click on the Print Label button to print the shipping label
Print PostNord Shipping Labels Automatically
To print PostNord shipping labels automatically, go to WooCommerce > Settings > Shipping > PostNord > Shipping Label and enable the following options:
- Auto-create packages
- Auto-generate shipping labels

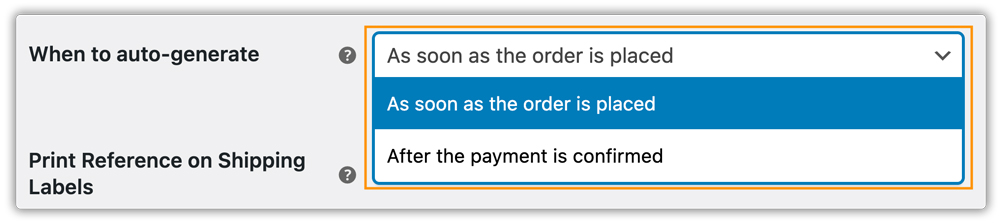
You also need to set when automatic label generation should be triggered. You can choose between:
- As soon as the order is placed (Default)
- After the payment is confirmed
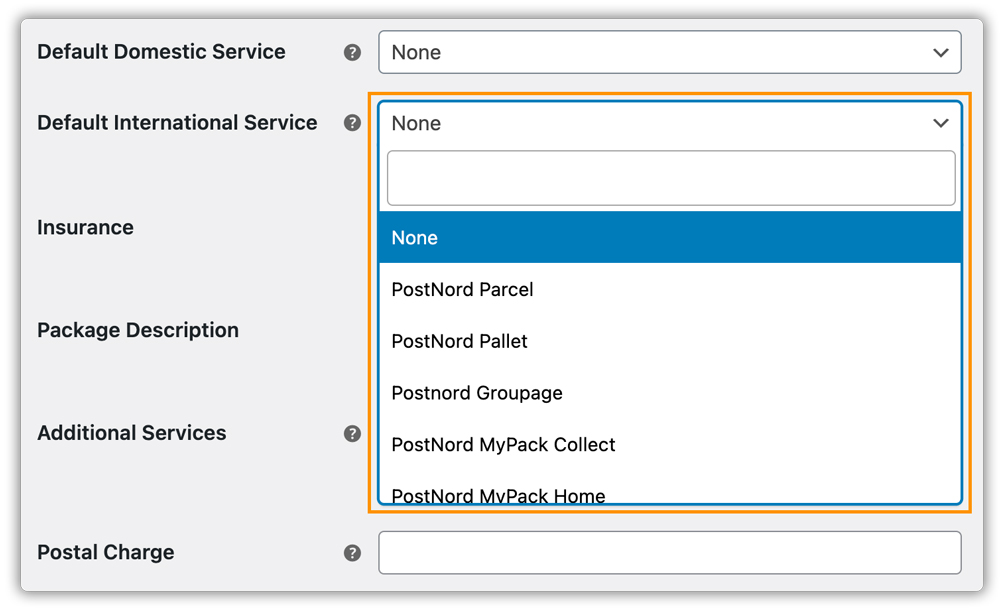
Next, assign the default PostNord services that the plugin should use while generating labels:
- Default Service for Domestic – Select the default PostNord domestic shipping service
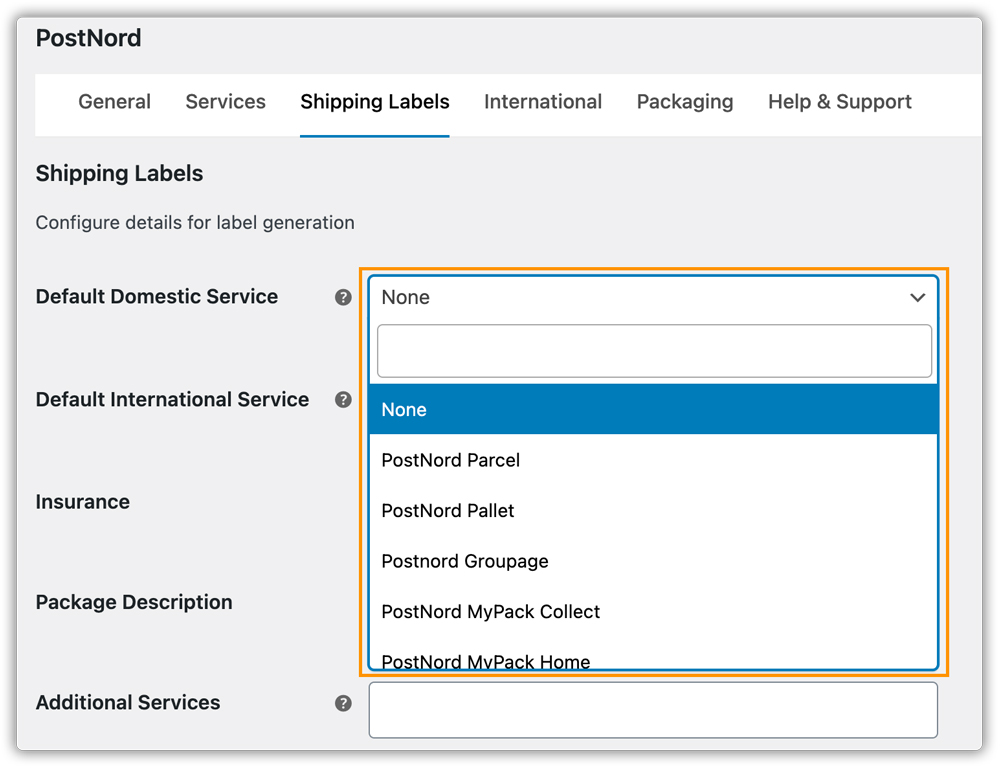
- Default Service for International – Select the default PostNord international shipping service
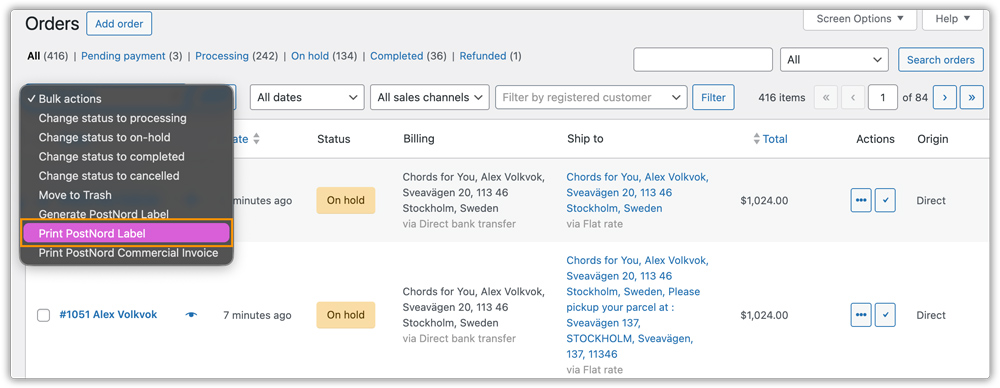
Once an order is placed, the PostNord shipping label will be generated automatically. You can then print the label directly from the WooCommerce Orders page by selecting the order, as shown in the image below.
Print PostNord Shipping Labels for Multiple Orders in Bulk
The plugin supports bulk label printing, allowing you to generate and download PostNord labels for multiple orders at once as a single merged PDF. This saves time during high-volume fulfillment periods without switching between individual orders.
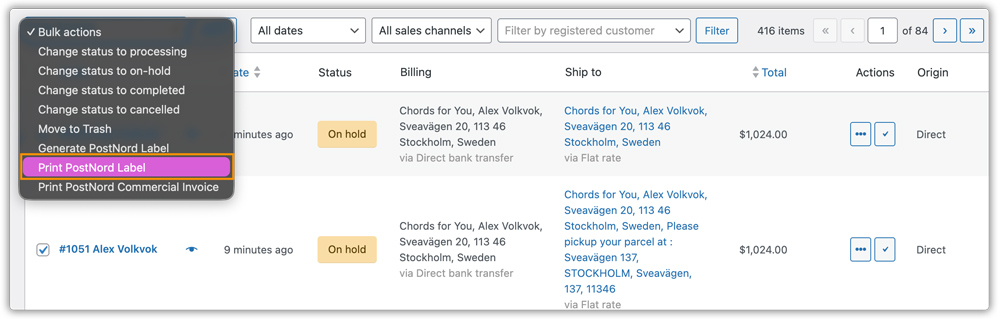
To print PostNord labels in bulk:
- Navigate to Dashboard > WooCommerce > Orders.
- Select all the orders for which you want to generate PostNord shipping labels.
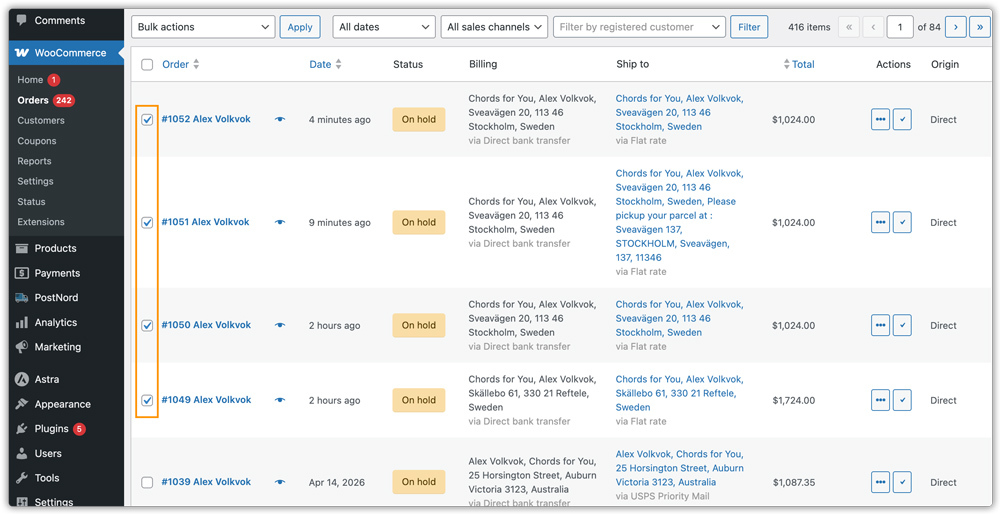
- From the Bulk Actions dropdown, select the option to generate PostNord shipping labels.
- Click Apply.
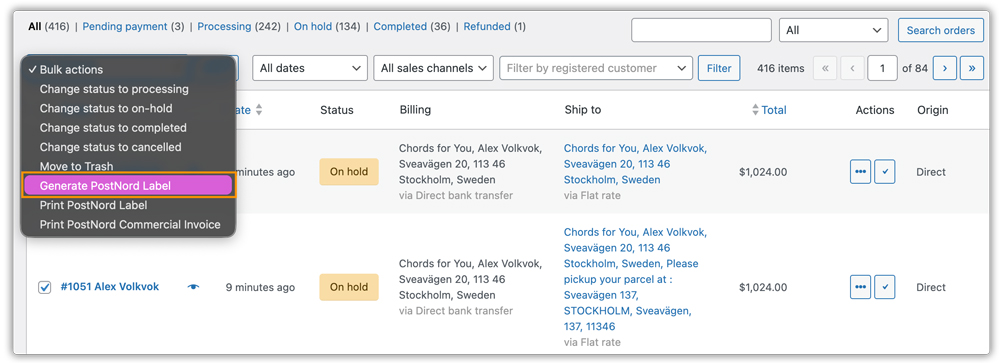
Then the plugin will generate PostNord shipping labels for all of the orders that you have selected and merge them into a single PDF for download. Once you have successfully generated the shipping label, you need to select the order you want to get the shipping label for and click on Print PostNord Label.
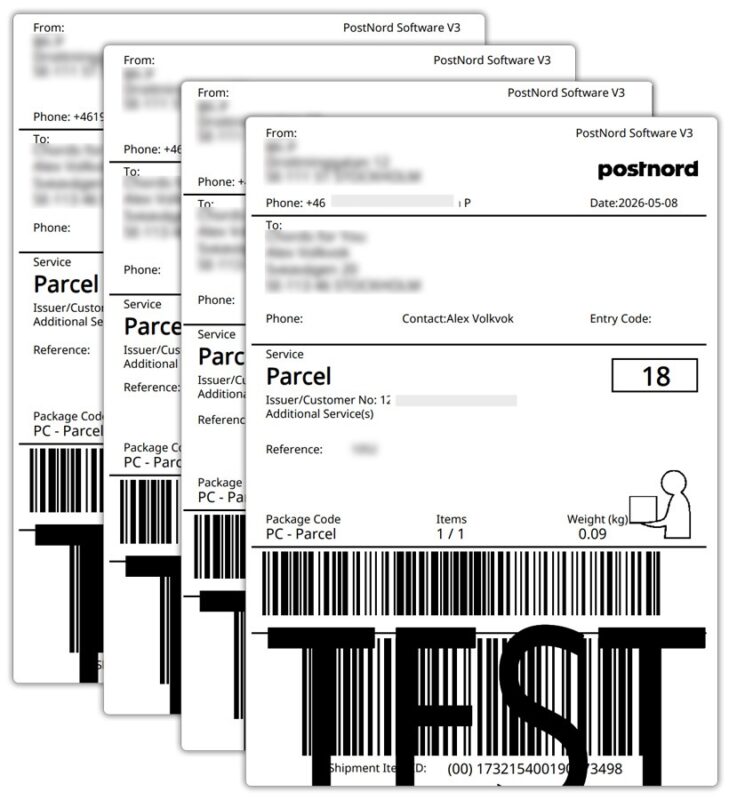
Here are the printed labels:
Note: You can also bulk print commercial invoices for selected orders using the same Bulk Actions workflow.
Generate PostNord Return Labels & QR Code
Once the outbound shipping label is generated, you can generate a return label and access the return QR code directly from the WooCommerce order page.
- Navigate to Dashboard > WooCommerce > Orders.
- Open the order for which you want to generate a return label.
- Scroll down to the PostNord shipment Label section, where you can see the existing Shipping Service and Shipment ID.

- Under Select Return Service, choose the desired return service from the dropdown – Rek Retur, Varubrev Retur, PostNord Return, or PostNord Return Pickup.
- Click on Generate Return Label.

Once generated, the Return Service and Return Shipment ID will appear on the order page.
- Click Print Return Label to download and print the return shipping label.

- Click View QR to access the return QR code. A modal will appear displaying the QR code along with the QR reference code. Click Download QR to save the QR code image.

Allow Customers to Download Return Label & QR Code
To allow customers to access the return label and QR code from their account, enable the Allow Customers to Print Return Label option under WooCommerce > Settings > Shipping > PostNord > Shipping Label.

Once enabled, customers can visit My Account > Order Details to find the Return Shipment Details section with the Download Return Label and View QR options.

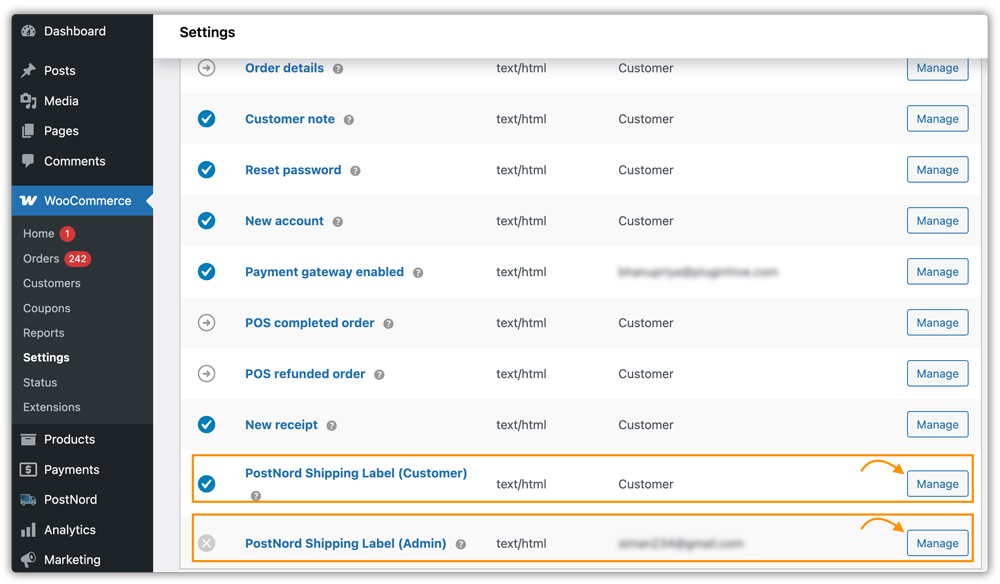
Email PostNord Shipping Label to Customer and Admin
The plugin can automatically email the PostNord shipping label PDF to the customer and your store admin as soon as a label is generated, including return labels.
To configure this, go to WooCommerce > Settings > Emails. You will find two PostNord-specific email notifications listed:
- PostNord Shipping Label (Customer): Sends the customer a copy of the PostNord shipping label PDF as soon as it is generated. Also, fires when a return label is generated, so the customer can print and use it.
- PostNord Shipping Label (Admin): Sends a copy of the PostNord shipping label PDF to your shop email so the team has a record. Useful if the team prints labels centrally rather than from the order page.
Click Manage next to either notification to configure it.
Customer Email Configuration
For the PostNord Shipping Label (Customer) email, you can configure the following options:
- Enable/Disable – Enable this email notification to automatically send labels to customers.
- Subject – Customize the subject line of the email. Example: Your shipping label for order #{order_number}
- Email Heading – Configure the heading displayed inside the email.
- Additional Content – Add extra instructions or messages such as return instructions, delivery notes, or thank-you text.
- Email Type – Choose the email format: Plain Text, HTML, or Multipart.

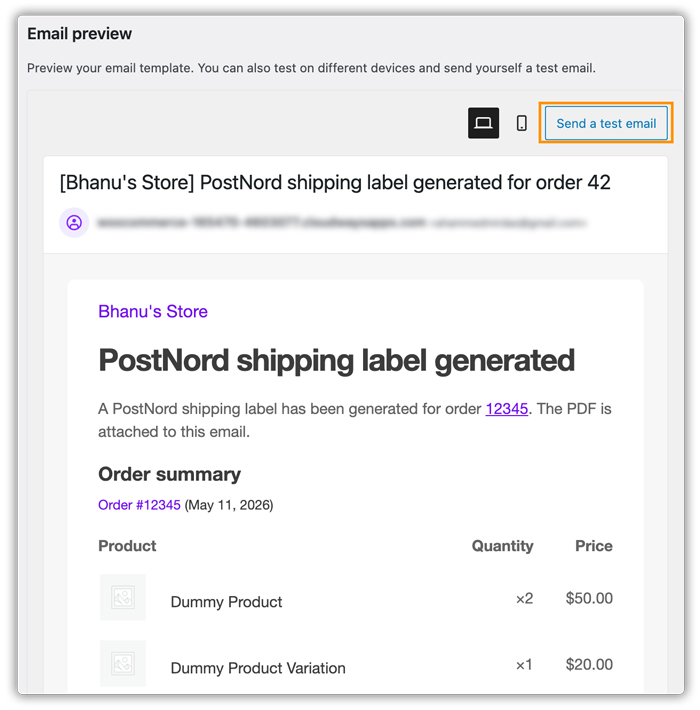
Use the Email Preview section at the bottom to preview how the email appears before saving. You can also click Send a test email to verify delivery and formatting.
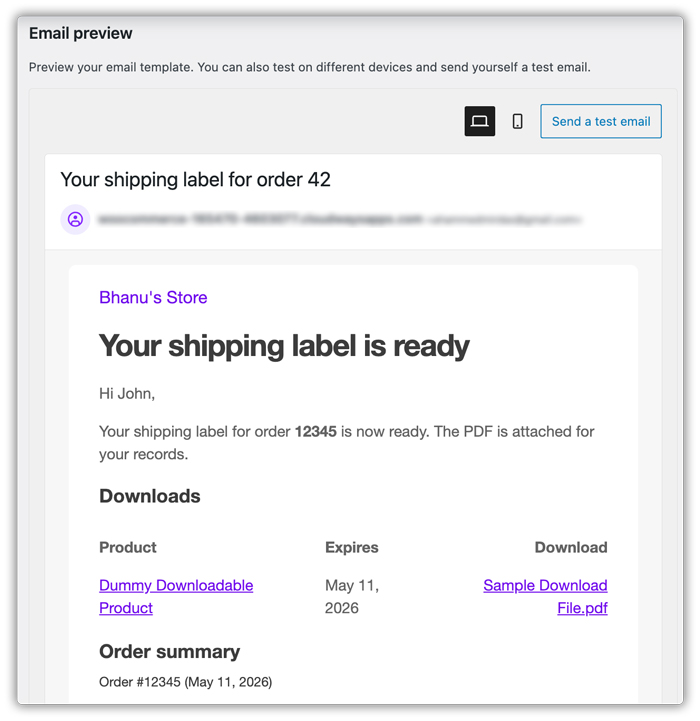
Once configured, the shipping label PDF will be automatically emailed whenever a PostNord shipping label or return label is generated.
Admin Email Configuration
For the PostNord Shipping Label (Admin) email, you can configure the following settings:
- Enable/Disable – Enable this notification to automatically send label PDFs to the admin or fulfillment team.
- Recipient(s) – Enter the primary email address that should receive the label notifications. By default, the plugin uses the shop email configured in the PostNord shipping settings.
- CC Recipients – Add additional email addresses separated by commas. This is useful for warehouse staff, logistics teams, or shared fulfillment inboxes.
- Subject – Customize the subject line used for admin label emails.
- Email Heading – Configure the heading displayed inside the email body.
- Additional Content – Add custom instructions or notes for the fulfillment team, such as printing instructions or packaging reminders.
- Email Type – Select the preferred email format: Plain Text, HTML, or Multipart.
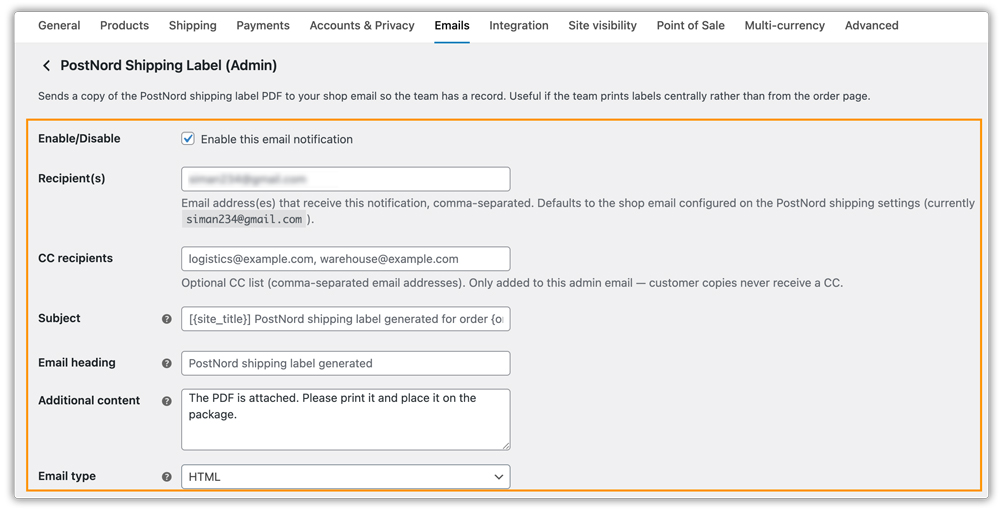
Here, you can also preview and send a test email to verify the format and text. Once saved, the plugin will automatically send a copy of every generated PostNord shipping label PDF to the configured admin email addresses.
Cancel PostNord Shipping Label
To cancel a shipping label, use the Void Label button.
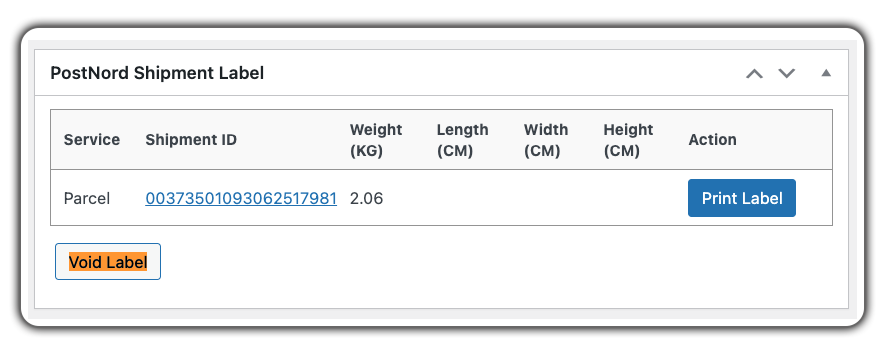
Please note that Void Label deletes the label for the order – it does not cancel the actual shipment with PostNord. The label remains valid until it is cancelled from your PostNord account dashboard or by contacting PostNord support.
We recommend following this order:
- Cancel the shipment from your PostNord account dashboard or contact PostNord support first.
- Before voiding, note the Shipment ID, as all shipment details will be removed from the order page once it is voided.
- Once the cancellation with PostNord is complete, click Void Label.
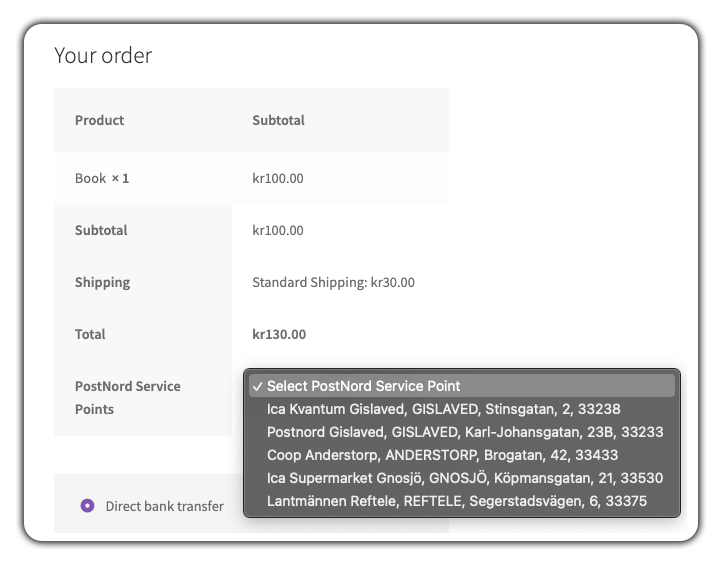
Display PostNord Service Points at Checkout
WooCommerce PostNord shipping plugin supports PostNord service points and lets your customers choose from the list of service points while placing the order.
- Visit the plugin settings and click on the Services tab
- Enable the PostNord Service Points option
- Select the type of PostNord service points you want to display for your customers

The plugin will display the PostNord service points on the WooCommerce checkout page based on the customer’s address, as shown below:
PostNord Tracking
WooCommerce PostNord shipping plugin also supports PostNord tracking. The plugin generates a tracking ID along with the PostNord tracking URL with every shipping label. These tracking details can be sent to the customers via WooCommerce order completion emails.
- Visit plugin settings and click on the Shipping Label tab
- Enable the Tracking Details in Email option
- This will allow you to add a section within the WooCommerce order completion email where you can customize the section title as well as the tracking message as shown below
Once you save the settings, the customers will receive the PostNord tracking details within the WooCommerce order completion email as shown below.
PostNord International Shipping
If you plan to ship products internationally, the plugin allows you to use PostNord international shipping services directly within your WooCommerce store. For this, you must configure the required international shipment details in both the plugin settings and product settings.
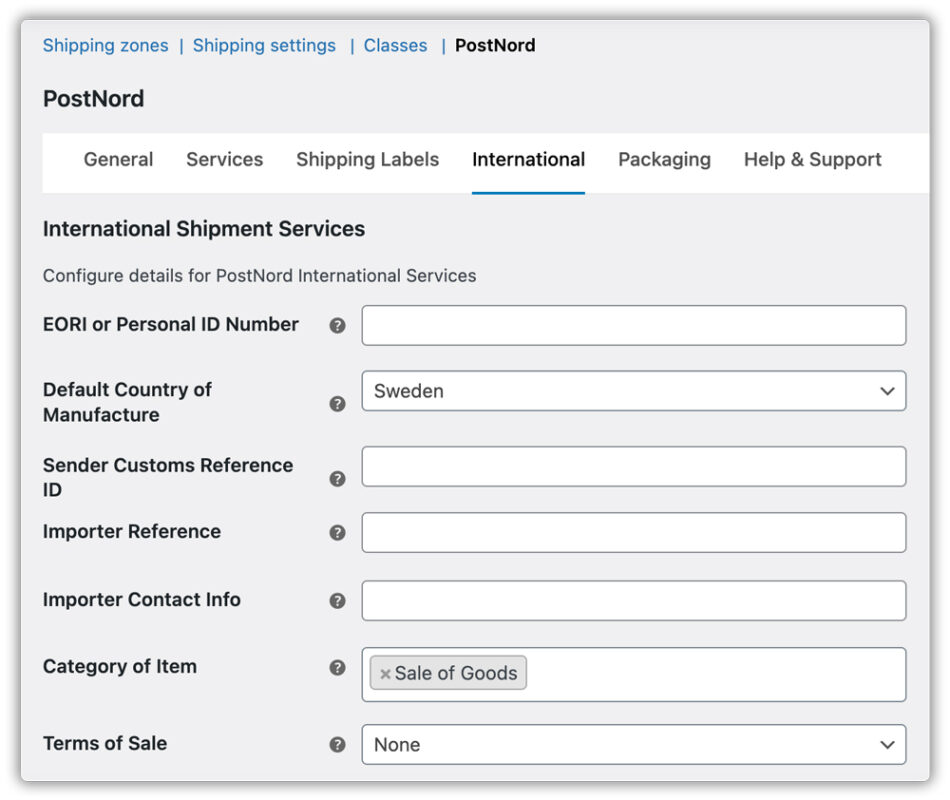
Configure International Shipping Settings
Go to WooCommerce > Settings > Shipping > PostNord > International tab and configure the required shipment details.
The following fields are commonly required for international shipments:
- EORI or Personal ID Number – Used for customs identification in many countries.
- Default Country of Manufacture – Select the default country where your products are manufactured. This value will be applied to all products that do not have a country of manufacture configured at the product level. If a different country is configured for an individual product, the product-level value will override the global setting.
- Sender Customs Reference ID – Customs reference number for the sender, if applicable.
- Importer Reference – Reference details for the importer or receiver.
- Importer Contact Info – Contact details of the importer.
- Category of Item – Define the shipment type, such as Sale of Goods.
- Terms of Sale – Select the applicable Incoterms or sales terms.
Configure Product-Level International Shipping Details
Next, go to WooCommerce > Products, edit the required product, and open the Shipping tab under the Product data section.
Under PostNord Shipping Details, configure the following:
- HS Tariff Code – Enter the HS Tariff Code used for customs classification.
- Country of Manufacture – Select the country where the product was manufactured. This value overrides the global default country of manufacture configured in the plugin settings.
- Insurance Amount – Enter the insured value for the shipment, if required.
- Product Description – Enter a short and accurate product description used for CN22, CN23, and commercial invoices.
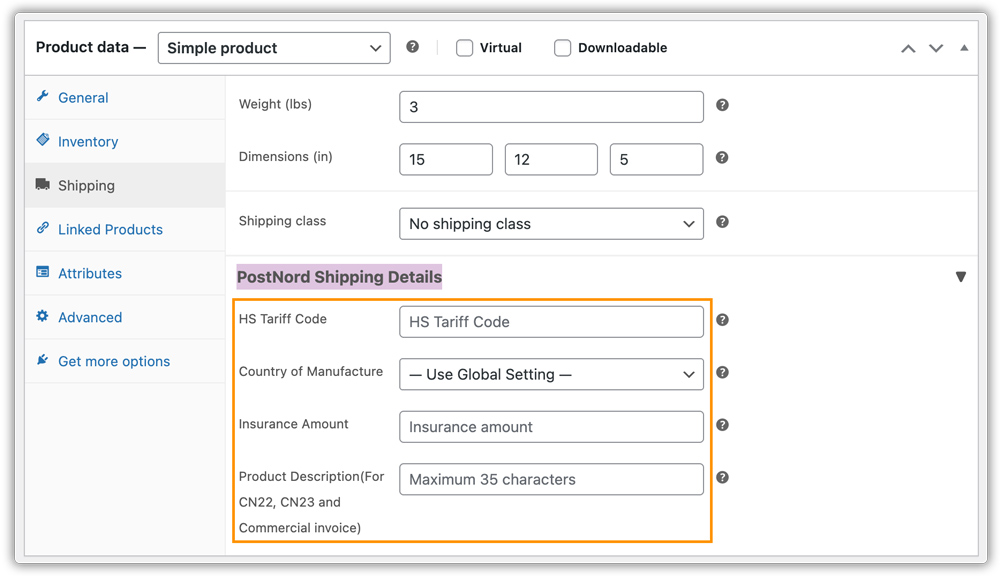
Make sure the product description is clear and concise to help avoid customs delays.
Printing PostNord Labels for International Shipments
- Visit the WooCommerce orders page and edit the international orders
- Click on Generate Packages
- Select the appropriate PostNord international service and then click on the Create Shipment option
- The plugin will generate the following documents for your international shipment
- PostNord Shipping Label
- CN22 or CN23 international form
- Commercial Invoice
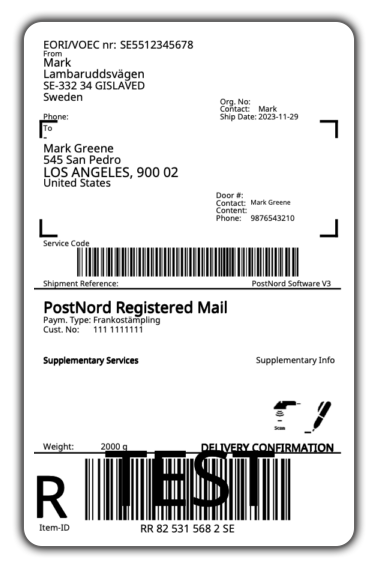
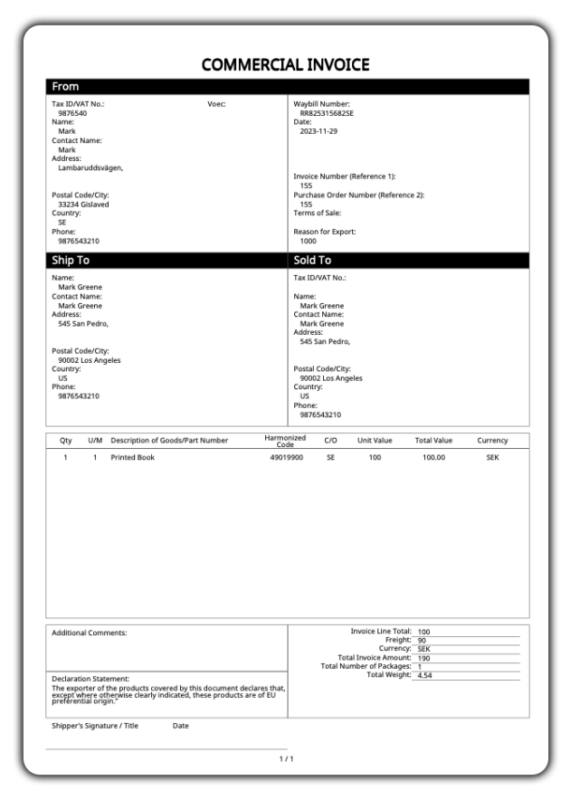
Here are the sample documents generated by the plugin for a shipment from Sweden to the US.
- PostNord Internation Shipping Label
- Commercial Invoice
- CN22 or CN23 international form

For more details on setting up the WooCommerce PostNord shipping plugin or any queries, reach out to the PluginHive support team.