Setting up Shopify Multi Carrier Shipping Label App
The Shopify Multi-Carrier Shipping Label app simplifies your entire shipping process by automating key tasks directly from within your Shopify store.
With this app, you can:
- Display the Real-Time Shipping Rates at checkout
- Pay for Postage and Print Shipping Labels
- Schedule Carrier Pickups
- Enable end-to-end Shipment Tracking
This setup guide will walk you through the steps to install and configure the app, helping you get started in just a few minutes.
On This Page
- Install and Activate the Shopify Multi-Carrier Shipping Label App
- Setup your Pickup / Store Location
- Manage your Store Address in the App
- Choose Your Shipping Carrier and Configure Your Account
- Verify Shopify Store Units
- Manage Products within the app
- Set Up Packaging Methods
- How to Create Shipping Zones
- Shipping Carrier Rates & Services for Checkout and Fulfilment
- Optimising your Shipping and Printing configuration
- Manage App Subscriptions
- Understand the Orders Grid
- Advanced/ More Actions on the Order Grid
- Display Live Rates at Checkout
- Generate Shipping Labels One by One
- Generate Shipping Labels in Bulk
Install and Activate the Shopify Multi-Carrier Shipping Label app
Follow the steps below to install and activate the PH Multi Carrier Shipping Label app on your Shopify store:
1. From your Shopify Admin Dashboard, navigate to the Apps section.
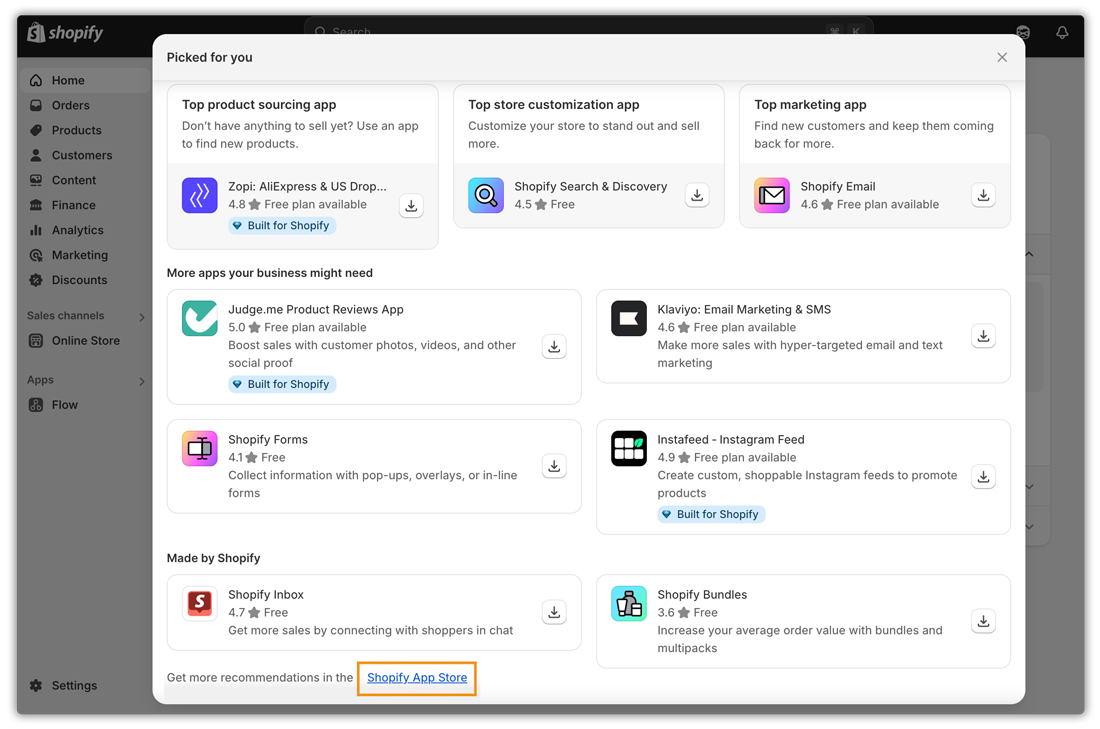
2. Click on All Recommended Apps > Shopify App Store.
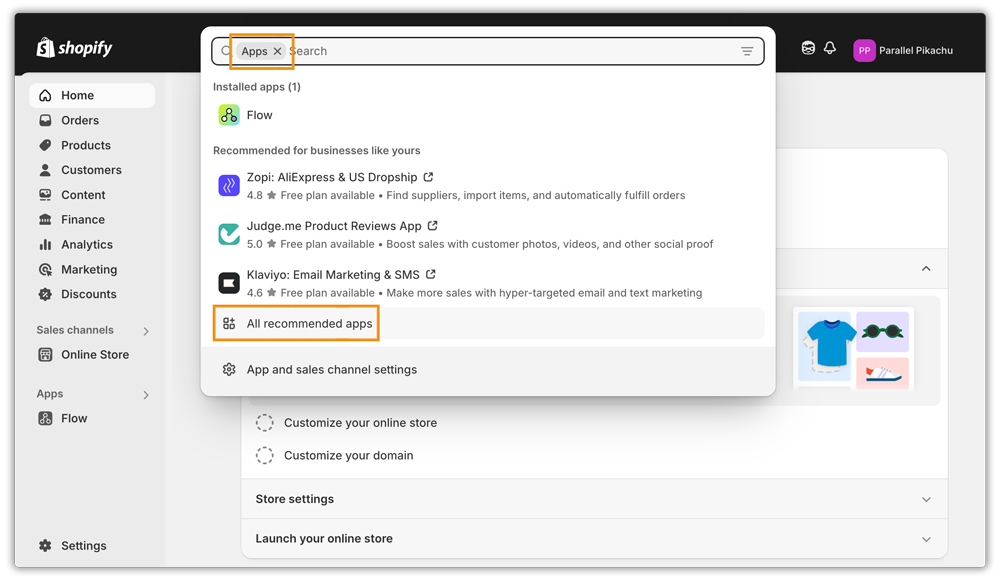
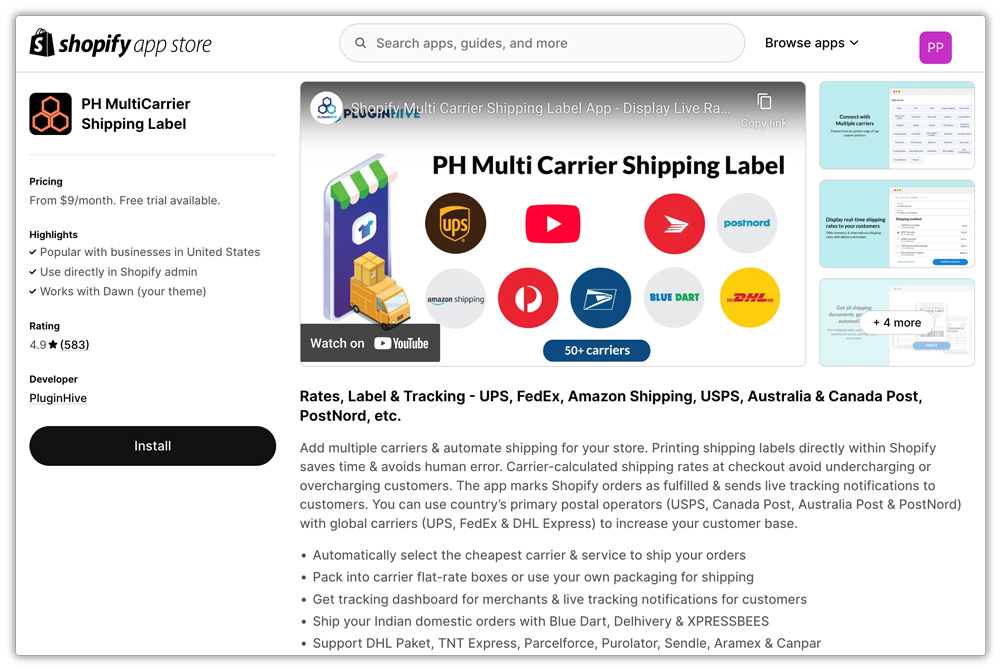
3. In the App Store, search for “PH Multi Carrier Shipping Label”.
4. Click on the app listing and select Install.

5. You will be redirected to the Install App page. Click Install to proceed.
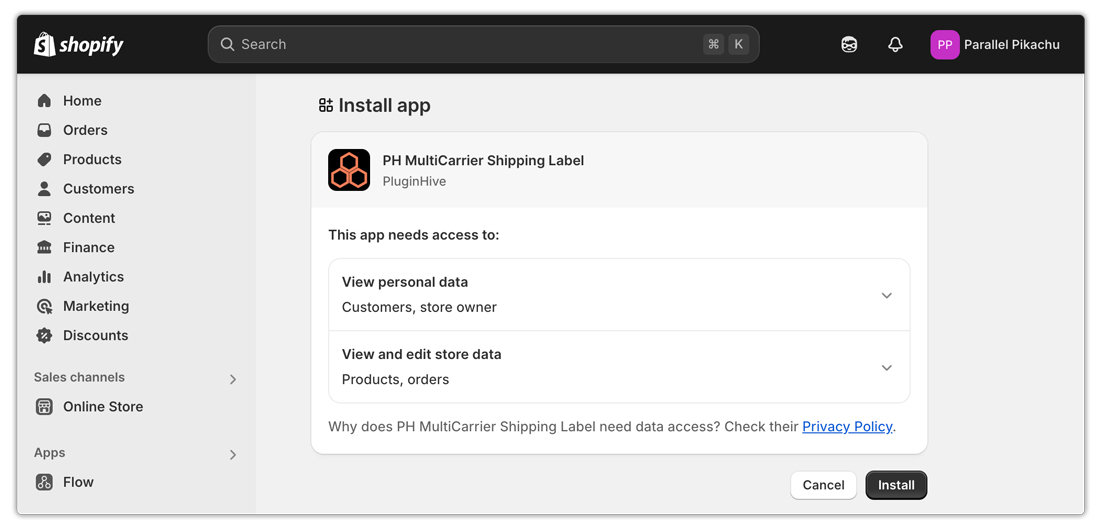
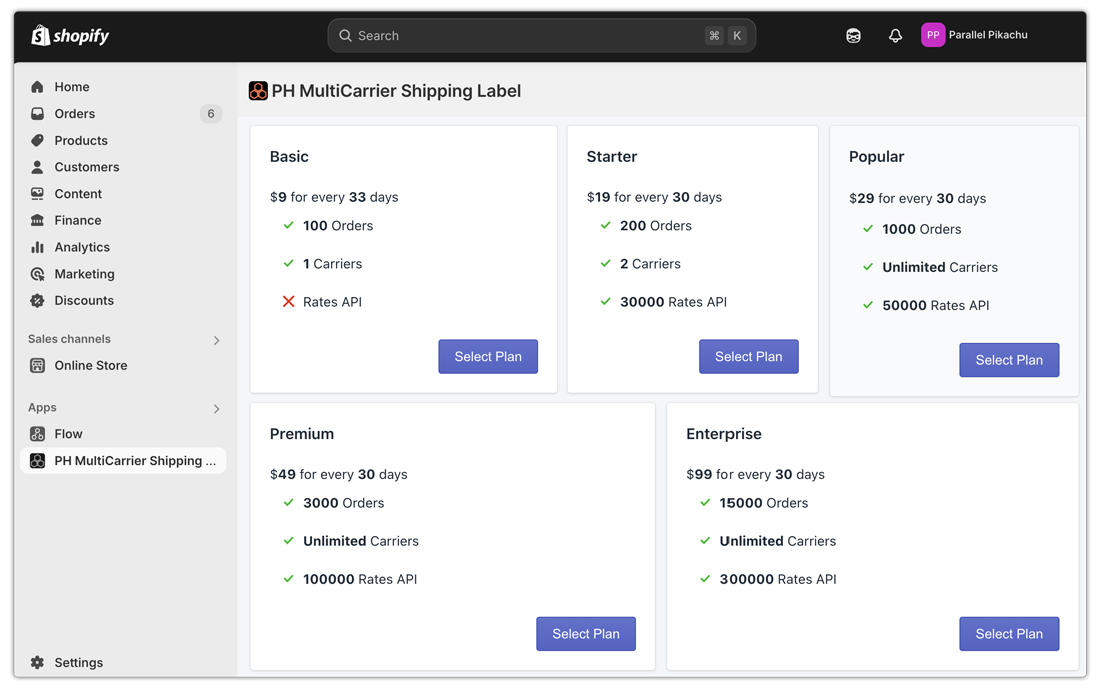
6. Once the app is installed, choose a subscription plan to get started.
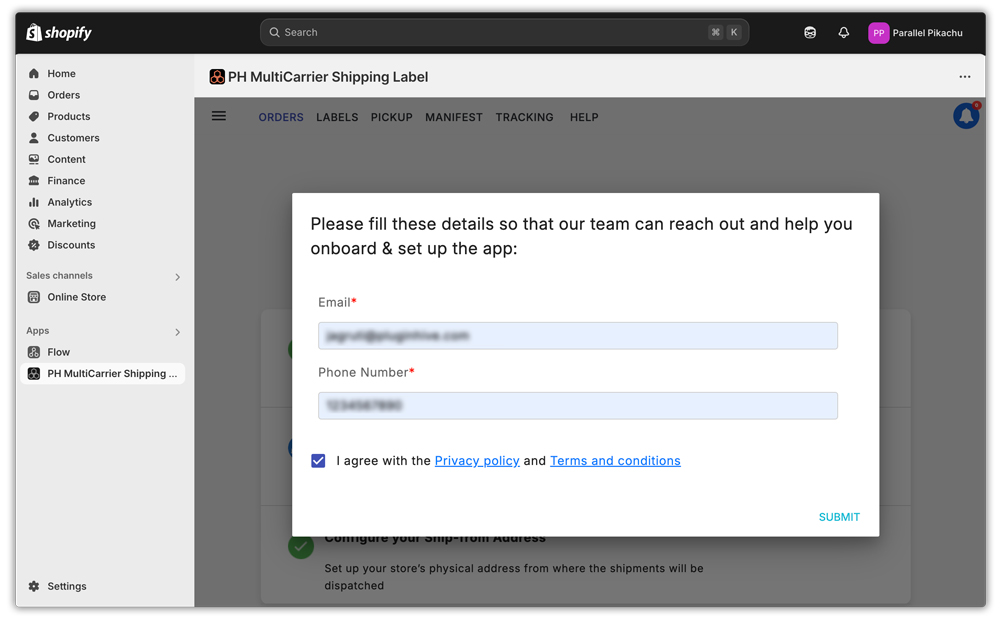
7. Provide your email address and phone number to help our team assist you effectively during the onboarding and setup process.
Setup your Pickup / Store Location
Proper store location configuration ensures accurate rate calculation, smooth label generation, and successful carrier pickups. Here’s how you can verify and manage your store address effectively using the PH Multi-Carrier Shipping Label app.
Verifying Your Store Location in Shopify
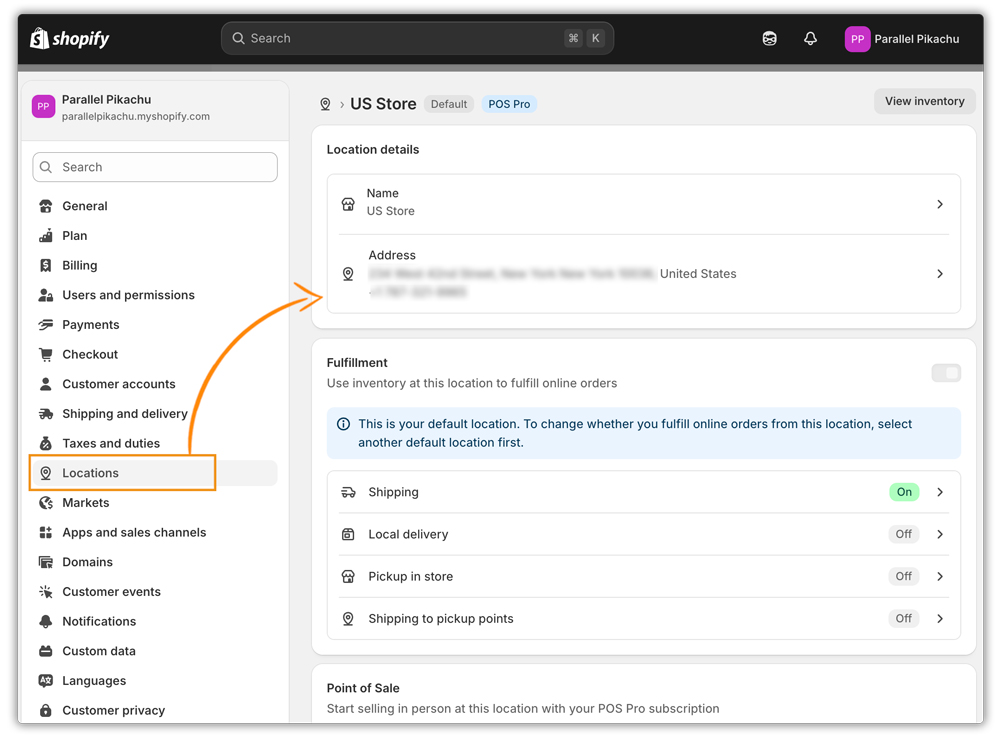
Once you install and activate the PH Multi-Carrier Shipping Label app, your primary store location is automatically set as the shipping origin that is in Shopify settings > Locations. This address is critical because it is used to:
- Calculate accurate shipping rates
- Schedule carrier pickups
Warning: If the address is incorrect, shipping rates may be inaccurate, and pickups may be scheduled for the wrong location.
Accessing the Store Address Settings in the app
1. Open the app from your Shopify dashboard.
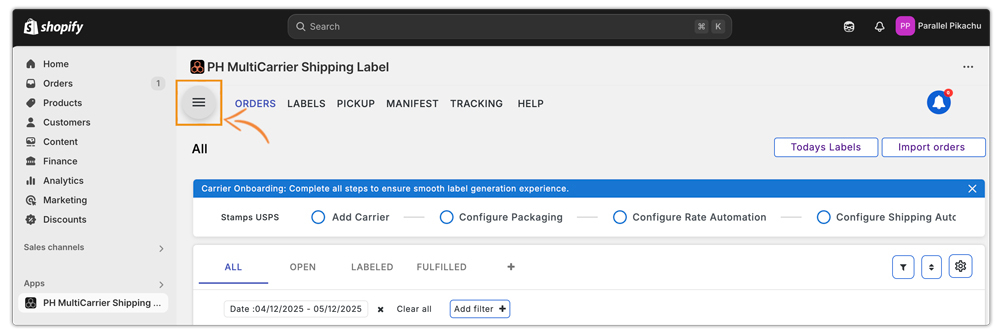
2. On the app’s landing page, locate the ☰ icon (hamburger menu) at the top left corner.
3. Click the icon to open the navigation menu. You’ll see various setup options listed.
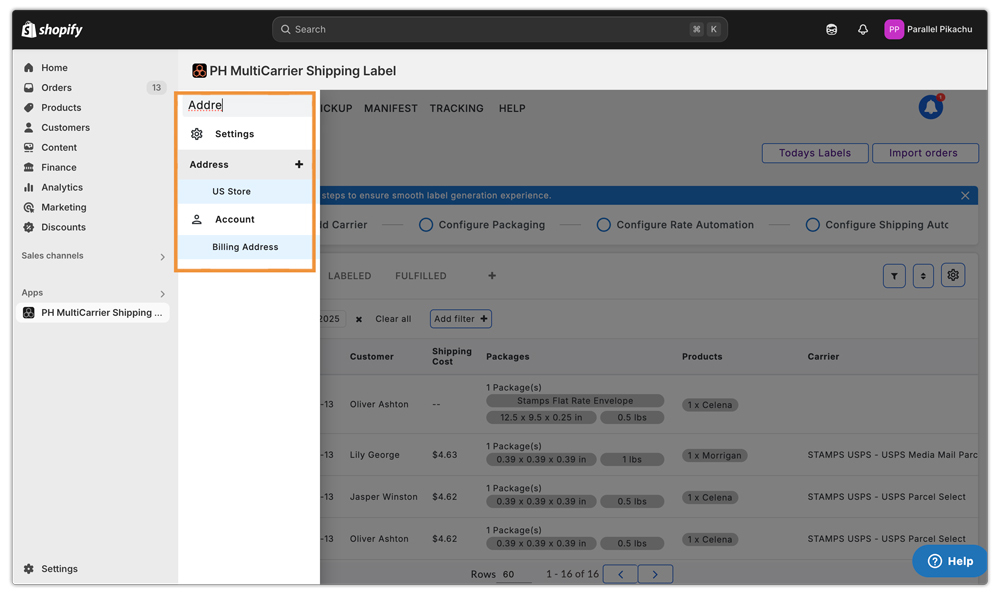
4. Use the Search bar at the top of the menu for quick access.
- For example, type “Address” and it will highlight the full path to the setting:
☰ Menu > Settings > Address > US Store
This search feature helps you find settings even if you’re not sure where to look.
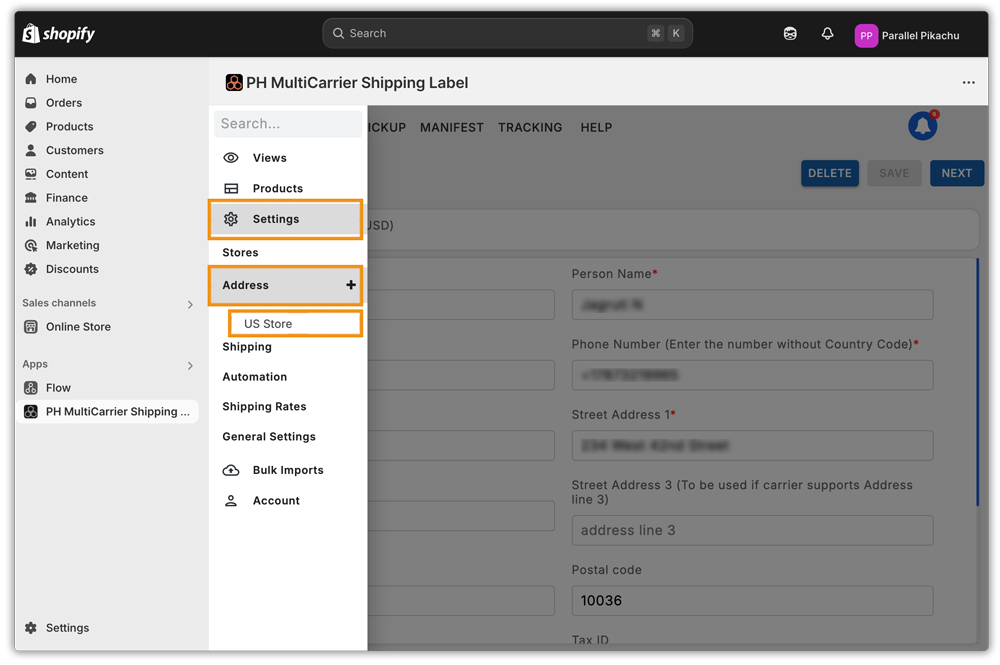
Manage your Store Address in the PH Multi Carrier App
- Modify Location(s): To update the default address that is pulled from your Shopify store settings, you will need to navigate to ☰ Menu > Settings > Address > ‘your store location’(example: US Store, as shown below).
- Add Location(s): You can add multiple store locations based on your business needs by clicking on the plus(➕) icon next to ‘Address’.
- Delete Location(s): You can also delete store locations if they are no longer in use by clicking on the Delete option at the top right.
If you’re only shipping from one or two specific locations, we recommend removing any unused addresses to keep your shipping setup clear and efficient.
Only active store locations will be considered for shipping rate calculations and label generation.
The address provided here serves as both:
- The pickup location for the courier agents
- The warehouse or shipping origin is printed on the shipping labels.
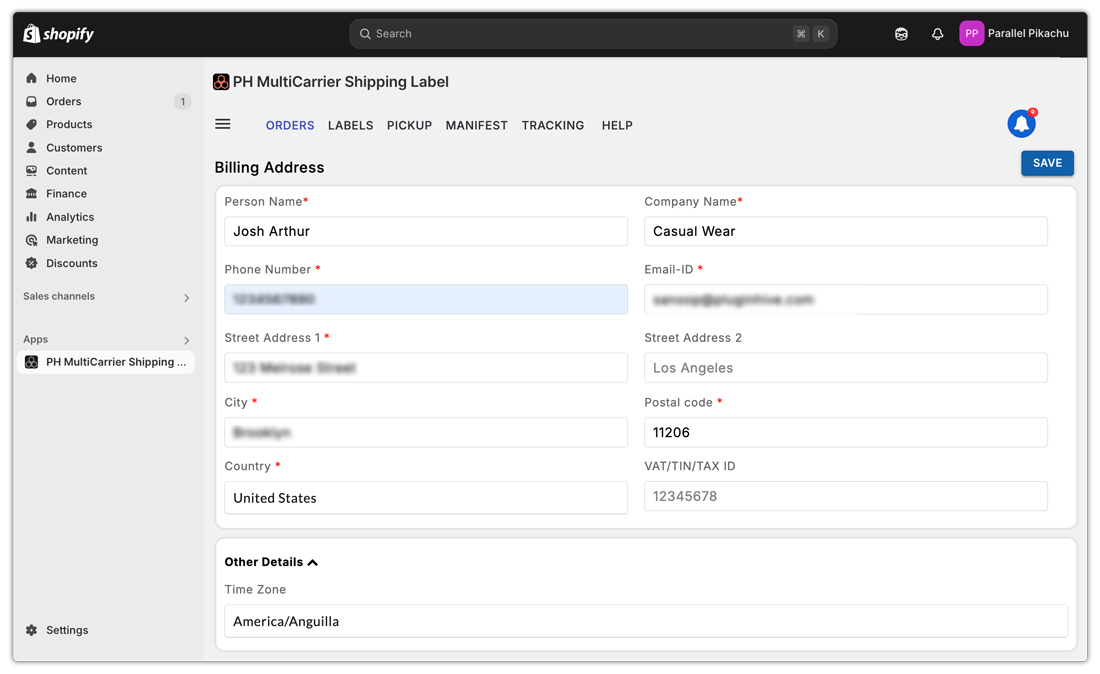
From Address – Fields Overview:
- Address Name: This is just a label to help you identify the address in the app (like “Main Warehouse” or “Brooklyn Office”). It’s not shared with the carrier or printed on the shipping label.
- Person Name: The name of the individual responsible for shipments from this location.
- Company Name: The name of your business or store.
- Phone Number: A contact number for pickup agents or carriers to reach out in case of pickup issues or delivery clarifications.
- Email ID: Used for communication regarding shipping updates, failed pickups, or any required verification.
- Street Address 1, 2 & 3: The complete street address, including building number, street name, floor, suite, or any additional location details.
- City: The city where the pickup location is based.
- Postal Code: The ZIP or postal code for the pickup address.
- Country: The country where this address is located.
- Tax ID: The registered tax identification number for your business, required for invoicing and customs (especially for international shipping).
- Tax ID Type: Specifies the type of tax identification provided (e.g., GSTIN, VAT, EIN), depending on your country’s tax structure.
- Signature Image: Upload the shipper’s signature as a JPEG, JPG, PNG, or GIF file (max size: 950 KB).
Provide the contact details of the person in your team who manages shipping. These details help carriers coordinate pickups or resolve any delivery issues. The Person Name will be printed on the shipping label, so if you prefer not to display your personal name, you can enter a name like your brand name instead. The Phone Number and Email ID are used only for communication purposes and will not appear on the label.
Make sure the pickup address entered here exactly matches the one you’ve registered with your carrier. Some carriers have strict requirements and may reject pickups or label generation if the address doesn’t match the one in their system.

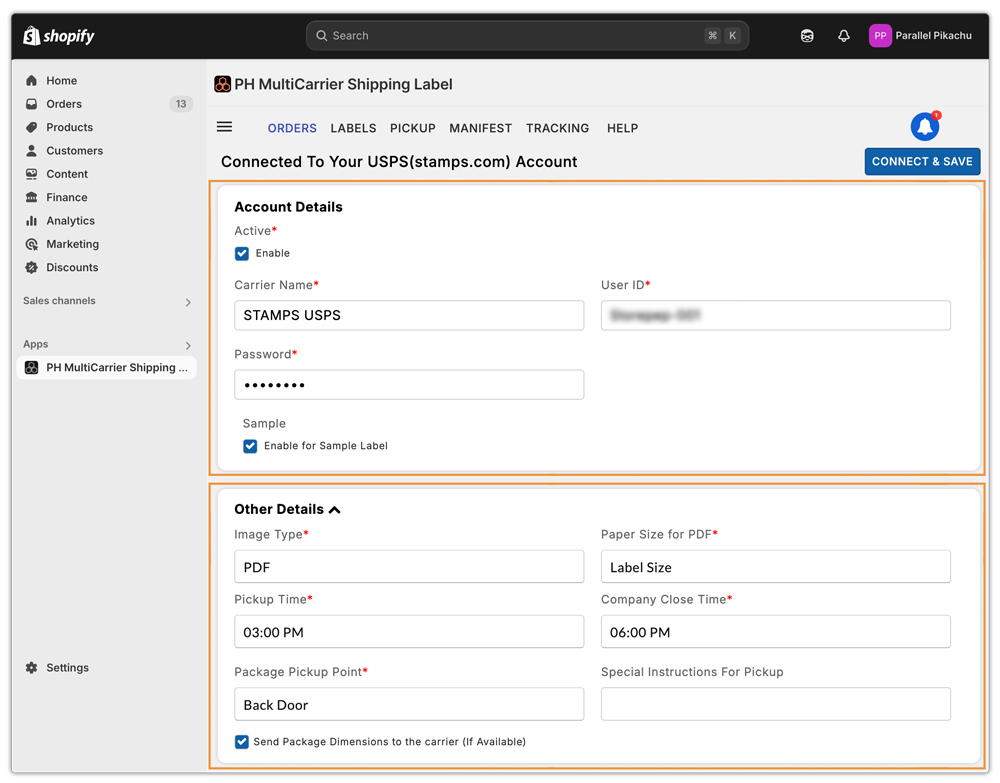
Choose the shipping carrier and configure your account
The PH Multi-Carrier Shipping Label app supports direct integration with 30+ shipping carriers using your own carrier accounts. When you first install the app, no carrier is connected by default, you’ll land on the Add Carrier page.
To connect your preferred carrier:
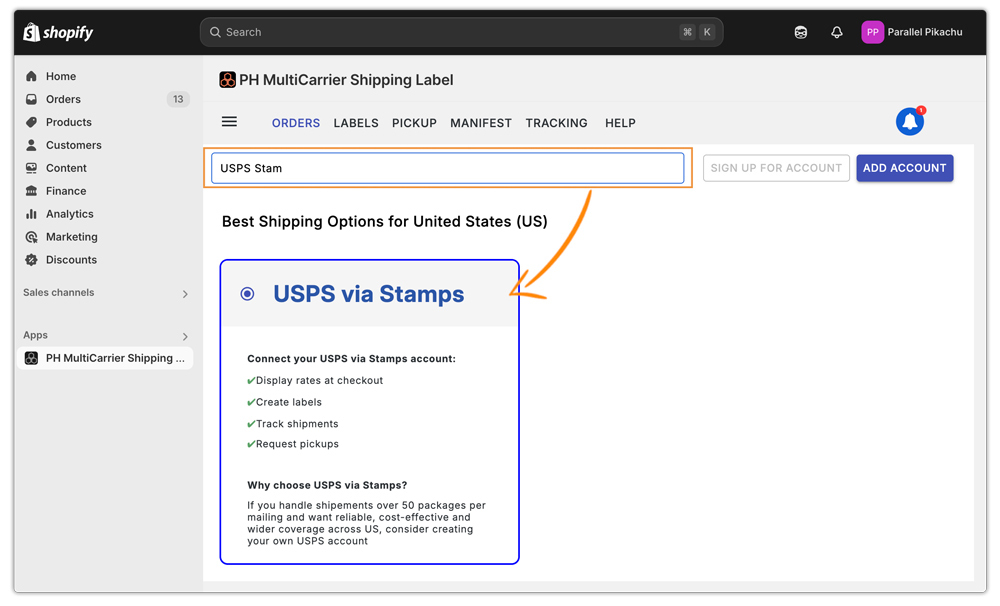
1. Select a carrier from the list or use the Search Bar to quickly find the one you use.
Example: If you’re using USPS via Stamps.com, type “USPS Stamps” and select it.
2. Select the carrier name (example: USPS via Stamps) and click the ‘Add Account’ option.
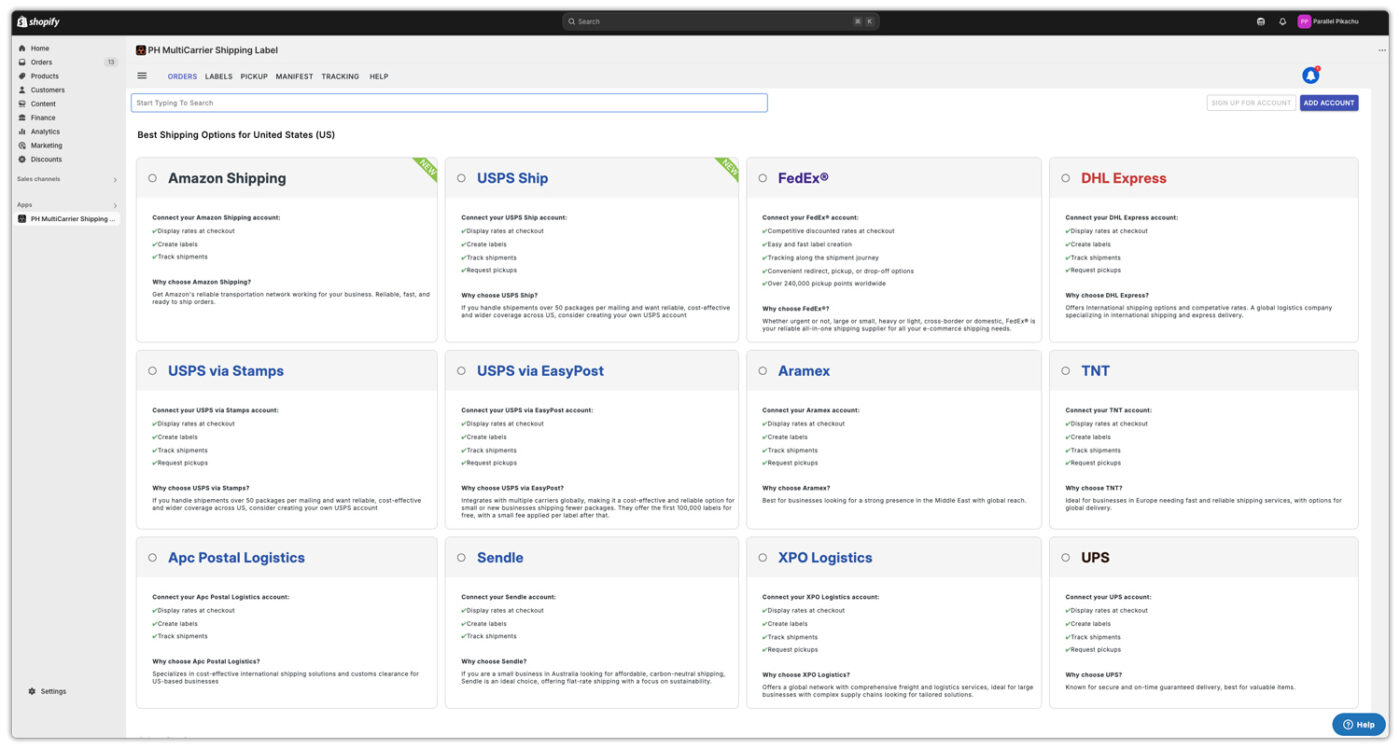
3. Enter your carrier account credentials (e.g., User ID and Password for USPS via Stamps.com).
For all carriers, you’ll need to enter the account credentials provided by your shipping provider. Once connected, the app will begin fetching live shipping rates and allow label generation.
4. Activate the Account: Enabling the activation checkbox means your account is set to production mode. This ensures that all Shopify orders are processed in live mode, and the shipping labels you generate are real, ready-to-use labels for actual shipments.
5. After adding the account details, head to the Other Details section to complete any required carrier-specific fields, such as the below for USPS Stamps:
- Image Type: Choose your preferred label format. PDF is widely recommended for easy printing.
- Paper Size for PDF: Select the correct paper size (e.g., A4 or standard 4×6 label format).
- Pickup Time: Enter the earliest time carriers can begin collecting shipments (e.g., 03:00 PM).
- Company Close Time: Specify your business’s closing time (e.g., 06:00 PM) to help carriers plan pickups accordingly.
- Package Pickup Point: Choose where packages will be collected from (e.g., Front Door, Reception, Mail Room, etc.).
Pick a visible and accessible location to avoid missed pickups.
- Special Instructions for Pickup: Add any helpful directions such as entry codes, parking info, or a contact person.
- Send Package Dimensions: Ensure this option is enabled. This allows carriers to receive accurate package size details, reducing the chances of surcharges or delivery issues.
6. Once done, click Connect & Save to finalize the setup.
To Configure more Carrier(s):
- Navigate to ☰ Menu > Settings, and click the ‘➕’ icon next to Carriers to add another one.

To View the added Carrier(s):
- Navigate to ☰ Menu > Settings, and click on Carriers to see the added carrier(s) below.
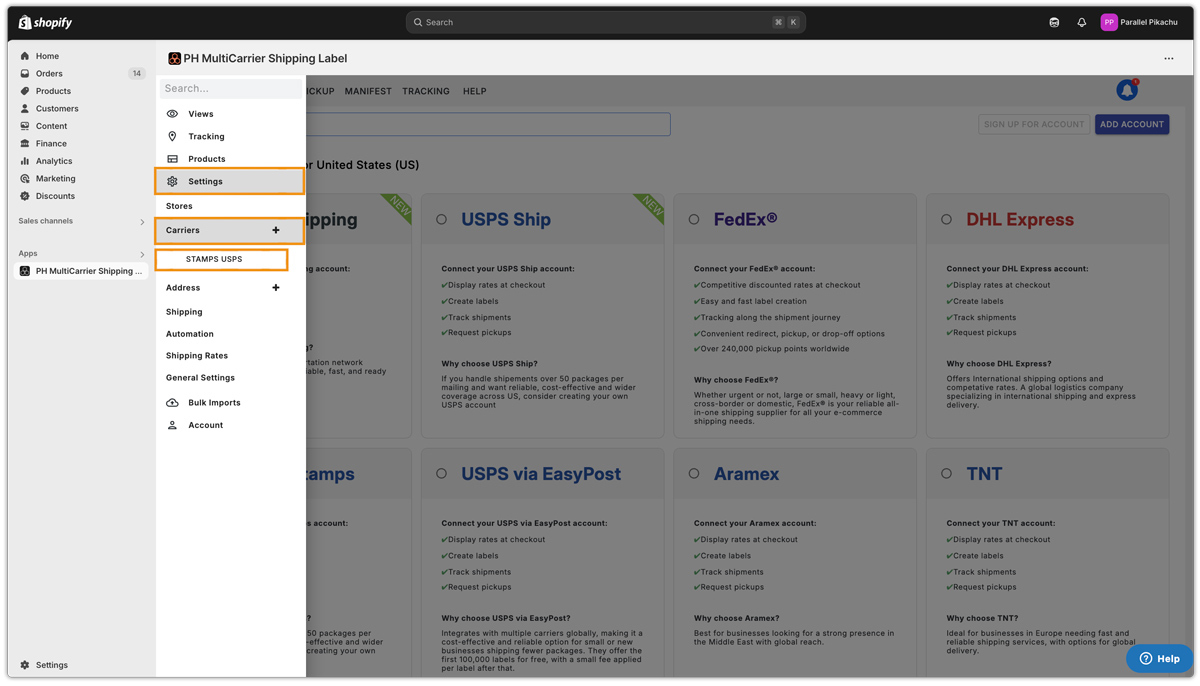
Managing Your Shipping Carriers:
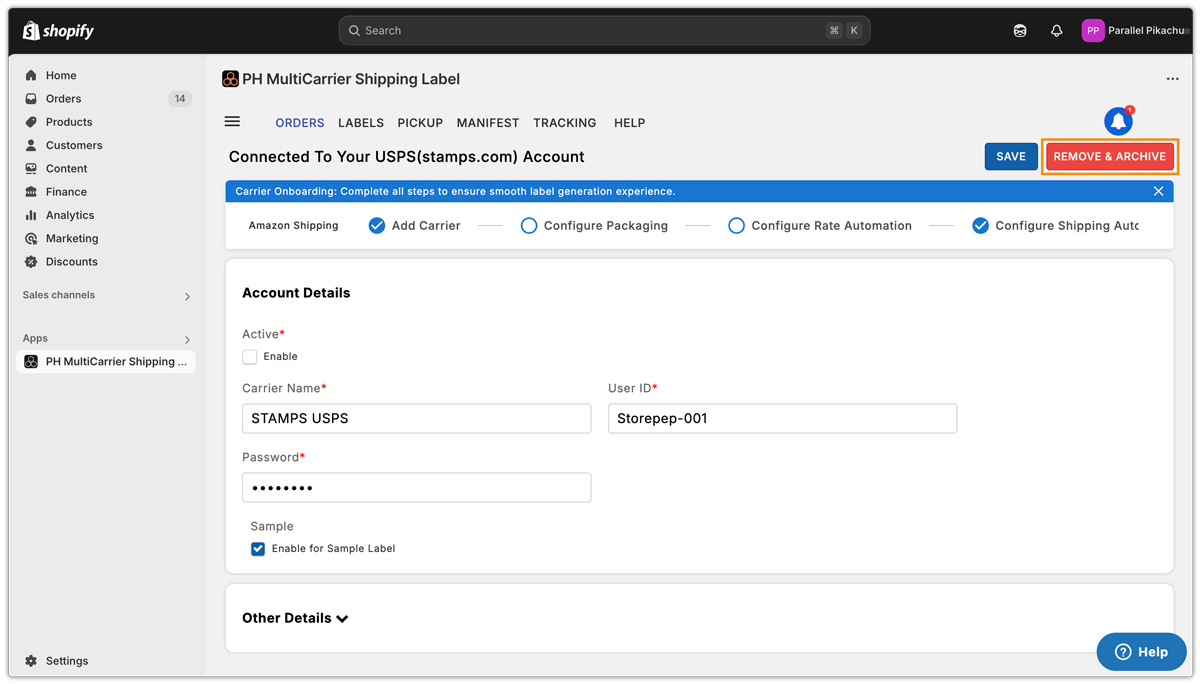
- Edit Carrier Details: You can revisit any added shipping carrier at any time to update the Account Information or Other Details as needed.
- Delete Carrier: If a shipping carrier is no longer in use, you can remove and archive it from your list of configured carriers.
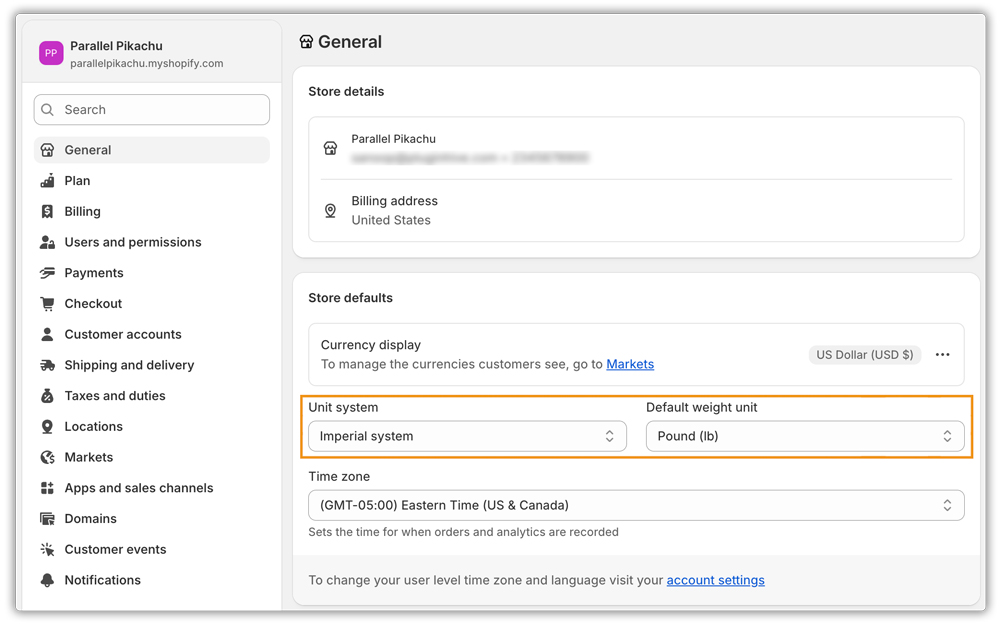
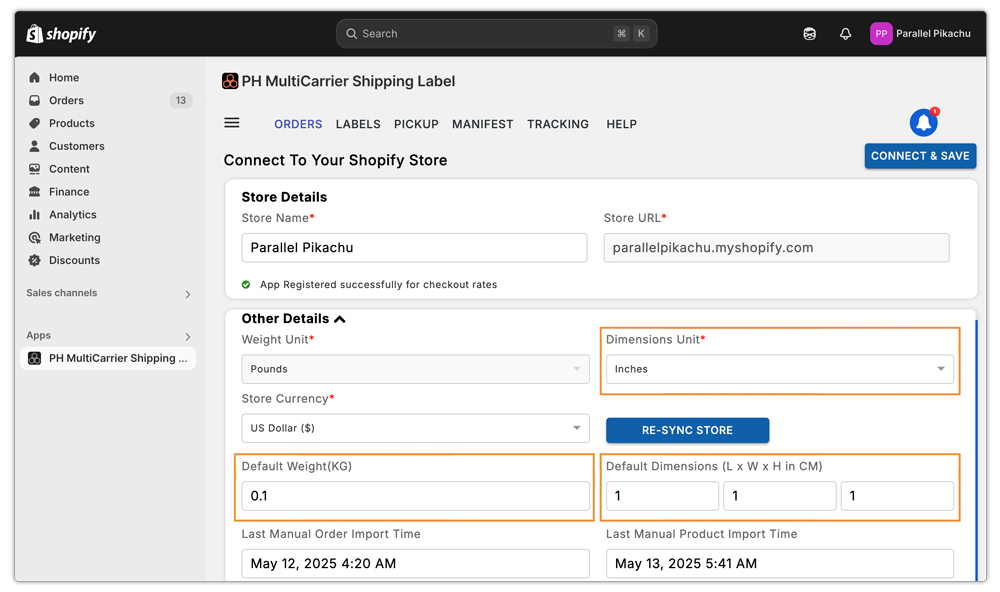
Verify Shopify Store Units For Accurate Rates & Labels
To generate accurate shipping rates and shipping labels, it’s essential to make sure that both your Shopify store and the PH Multi-Carrier Shipping Label app are using the correct measurement units.
Here’s what you need to review:
1. Shopify Store Settings:
Go to Shopify Admin > Settings > Store Details. Under Store Defaults, confirm the following:
- Unit System (e.g., Metric or Imperial)
- Default Weight Unit: Make sure it matches the standards of the country you’re shipping from.
These values directly affect how shipping rates are calculated and how labels are generated.
2. App Settings:
In the app, go to ☰ (Hamburger Menu) > Settings > Stores, and check:
- Dimension Unit: Ensure it aligns with your store’s unit system (e.g., cm or inches).
- Default Package Details: set a Default Weight (kg) and Default Dimensions (L × W × H in cm) to speed up order processing and label generation.
The app automatically pulls the weight unit from your Shopify store. This unit cannot be modified within the app.
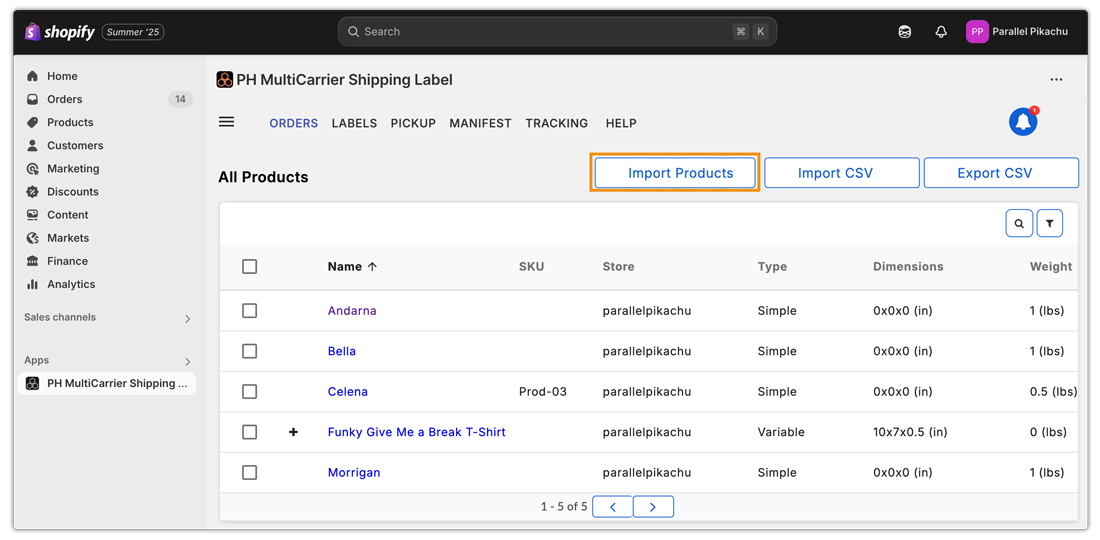
Managing your Products within the app
The Products section in the PH Multi Carrier Shipping Label app allows you to quickly set up, manage, and update your product shipping details.
Accessing Your Products
- Navigate to ☰ Menu > Products > All Products.
- All Shopify store products sync automatically, so no manual steps are required.
- Any changes you make to products in Shopify (like name, weight, or dimensions) will reflect in the app.
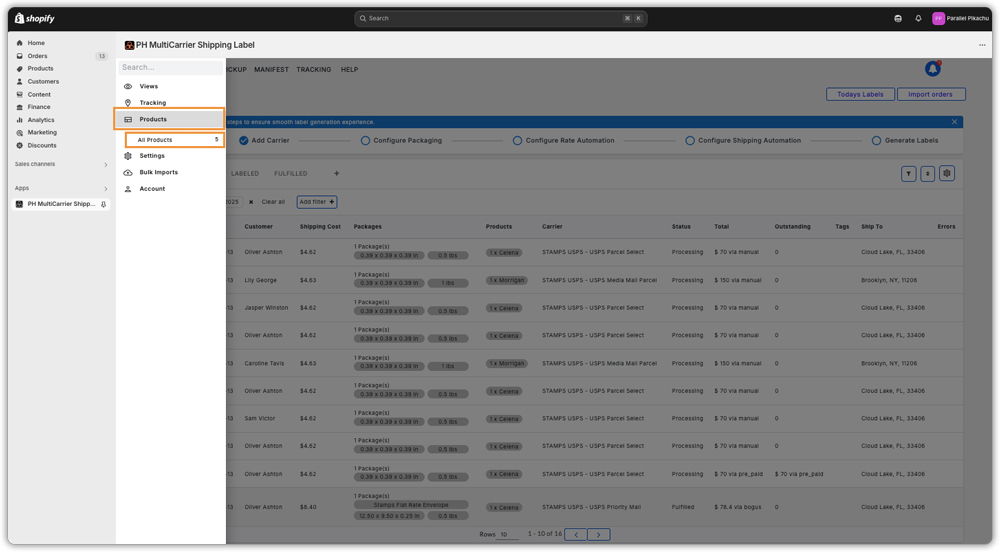
Working with Simple & Variant Products
- The app supports both simple and variant products.
- For products with variants, click the ➕ icon next to a product to expand and view all variants with their shipping details.
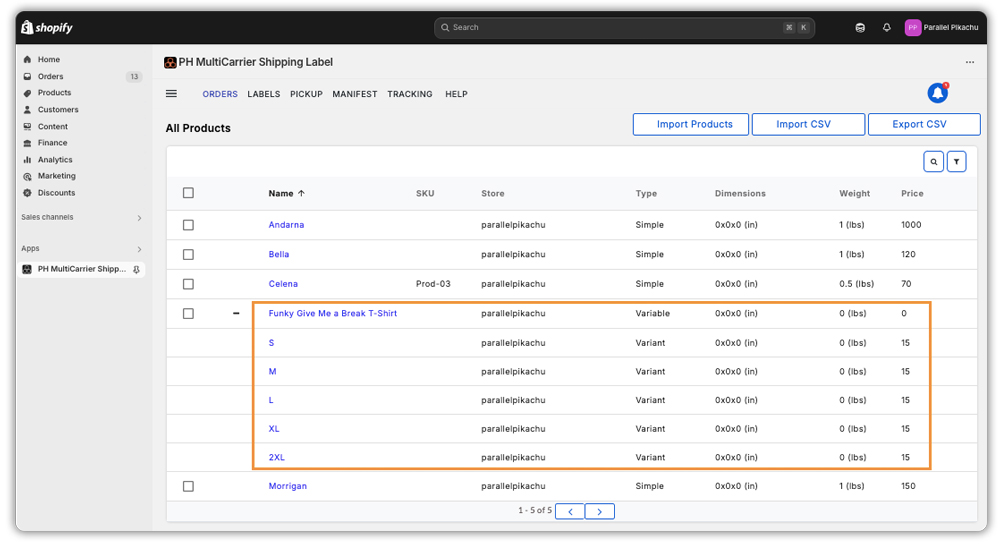
Import Products
If the product hasn’t been imported automatically into the app from Shopify, although this is unlikely, here’s what you should do.
Steps to Manually Import Products:
- In the All Products section, click Import Products.
- The app will instantly fetch all your latest Shopify products.
When to use Import Products:
- You’ve recently added products in Shopify
- You’ve modified some existing products in Shopify
This quick manual sync updates the product list immediately, ensuring all the Shopify products are available and ready for configuration in the app, without waiting for the next auto-update.
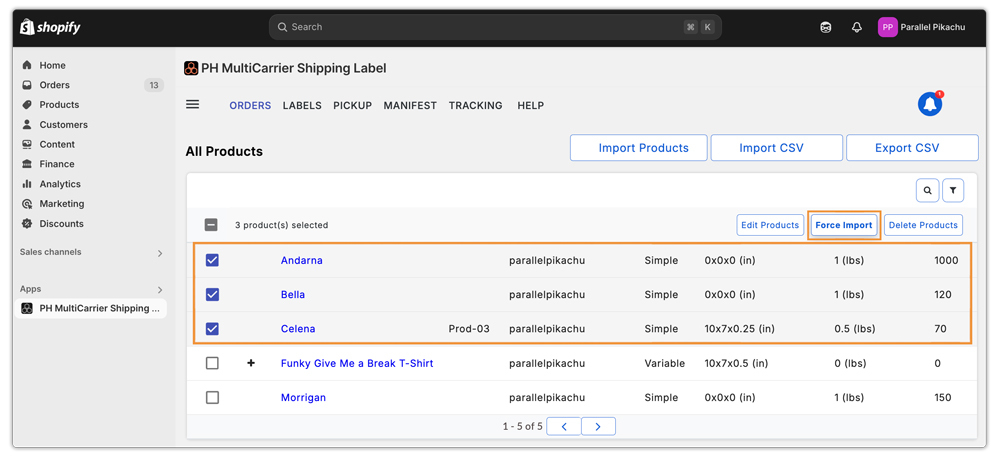
Force Import Products
The app typically auto-syncs products from your Shopify store. If some products aren’t updated, start by using the Import Products option. If the issue persists, use the Force Import feature to fetch the latest product details like names, weights, and dimensions, ensuring everything stays up to date in the app.
Here’s how to use it:
- Select the products you want to update.
- Click on the Force Import option.
The app will cross-check your selected products with your Shopify store products and fetch any missing or updated details to ensure everything is synchronised.
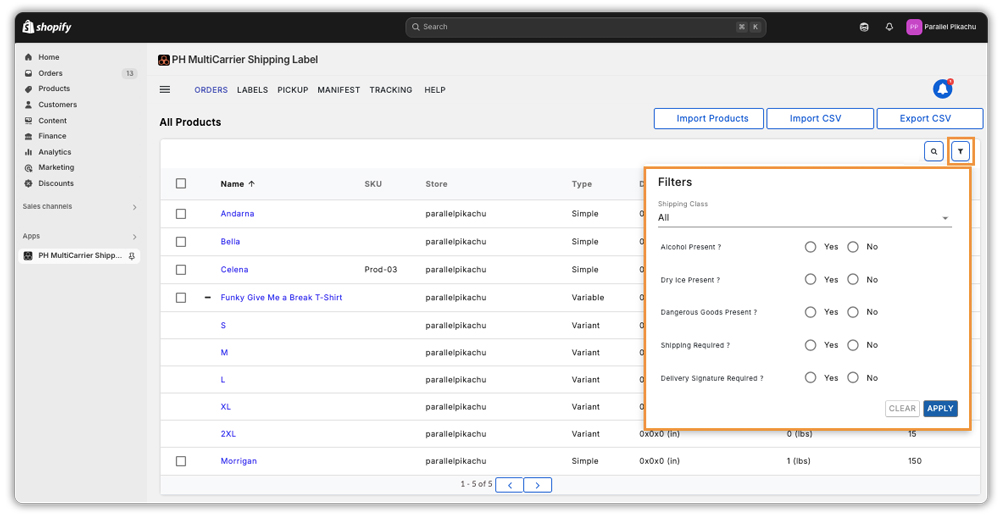
Search and Filter Options
Looking for a specific product? Use the search bar to quickly find it. You can also apply filters to narrow down the list and manage products more efficiently.
These filters are based on your product configurations. if you’ve set any of the options below for a product, you can use them to filter and view only those specific items:
- Shipping class (product groups)
- Alcohol presence
- Dry ice
- Dangerous goods
- Shipping required
- Delivery signature required
Filters help you easily organize and manage large product catalogs based on key shipping-related attributes.
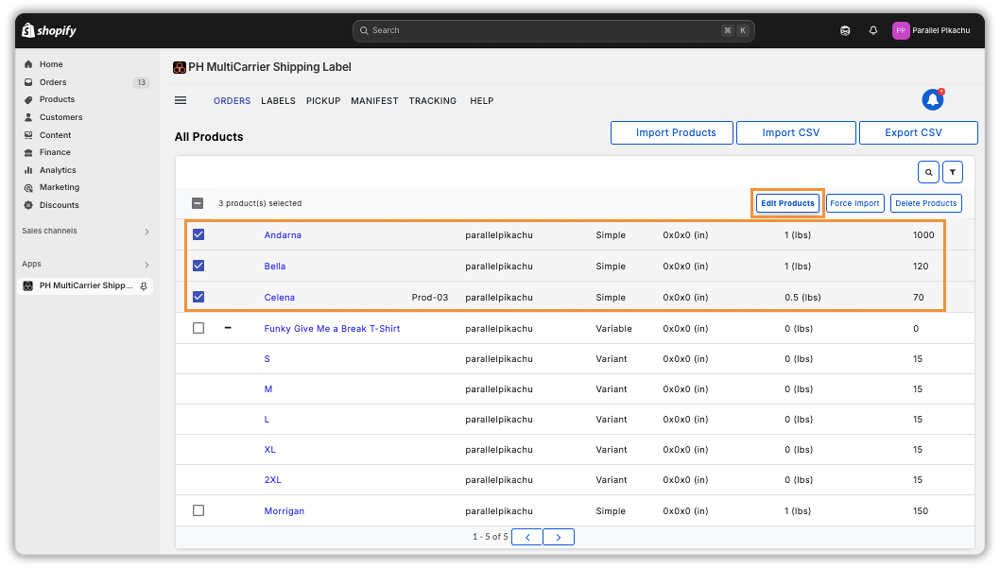
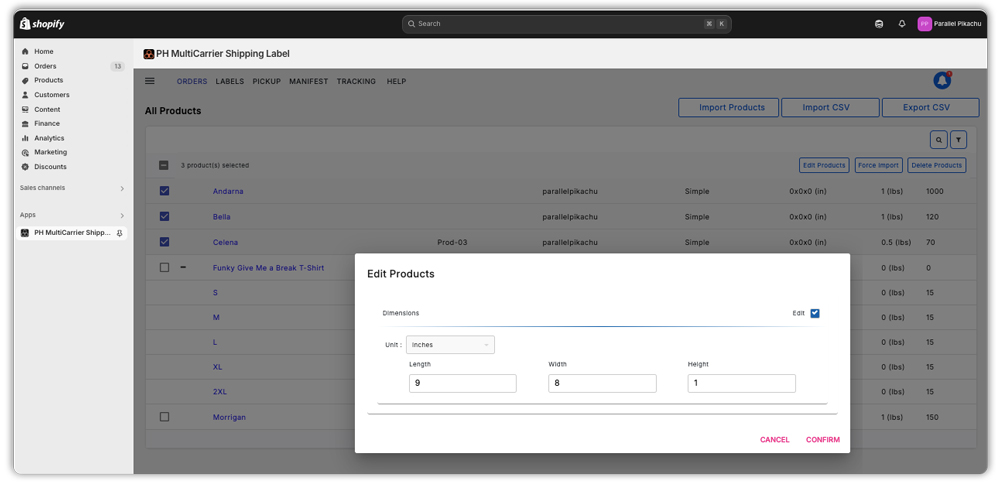
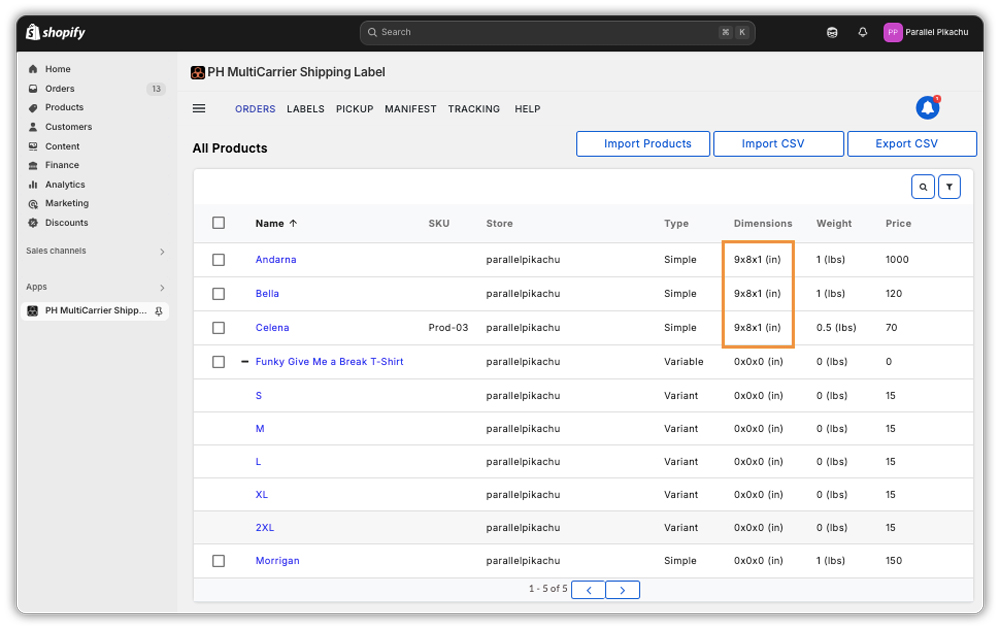
Bulk Edit Product Details
Want to update packaging details for multiple items?
- Select the required products from the All Products page.
- Click on the Edit Product option.
- Enter the length, width, and height, and these values will be applied to all selected products (perfect for items with similar packaging).
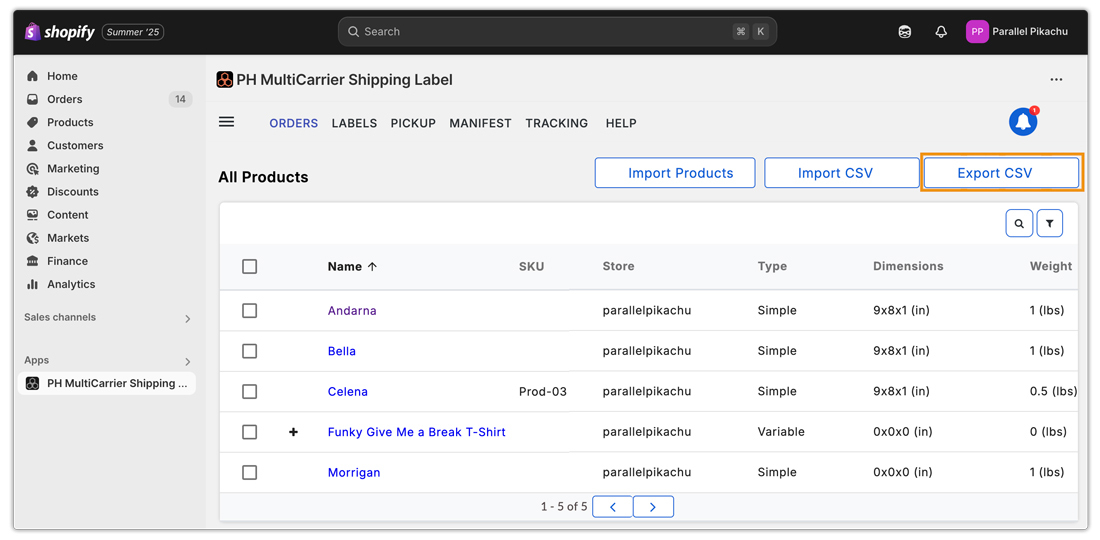
CSV Export & Import for Bulk Updates
If your products have different sizes, customs information, or other unique details, the Export CSV and Import CSV options help you make bulk updates quickly and efficiently.
How Export & Import CSV Works?
- In the All Products page, click the Export CSV button to download a file with your current product data.
- Open the file and update the necessary fields, such as:
- Length, Width, Height
- Harmonisation (HS) code
- Country and state of origin
- Declared value
- Delivery signature requirements
- Custom product descriptions
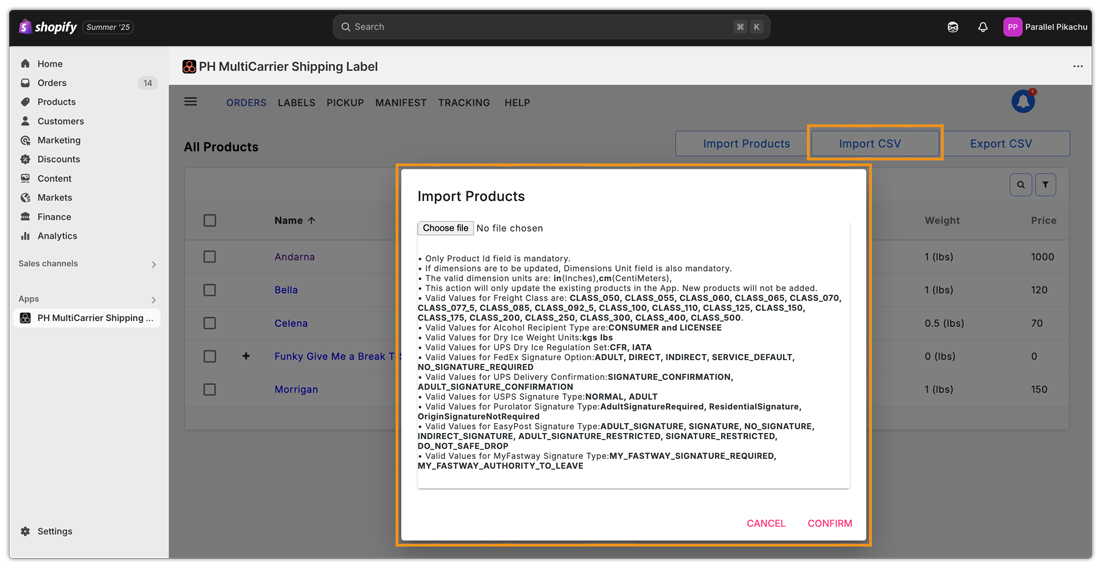
- After editing, return to the same page and click Import CSV.
- A pop-up will appear where you can upload your updated file. A sample CSV and format guide are also available to ensure everything is structured correctly.
Bulk Import Page
After using the Import CSV option or clicking on Import Product, you will be redirected to the Bulk Import page. This page helps you monitor the progress and results of your import.
You can track:
- Total number of products that are completed or still pending
- Batch status, such as In Progress, Batch Complete, or Failed
- Any errors, with specific reasons provided, to help you take corrective action
This helps you take the right action quickly and ensure all your product data is complete and ready for shipping.

Exploring the Product Detail Page
Once you’ve located a product, clicking on its name opens a detailed page where you can edit its shipping attributes, customs information, and optional delivery services.
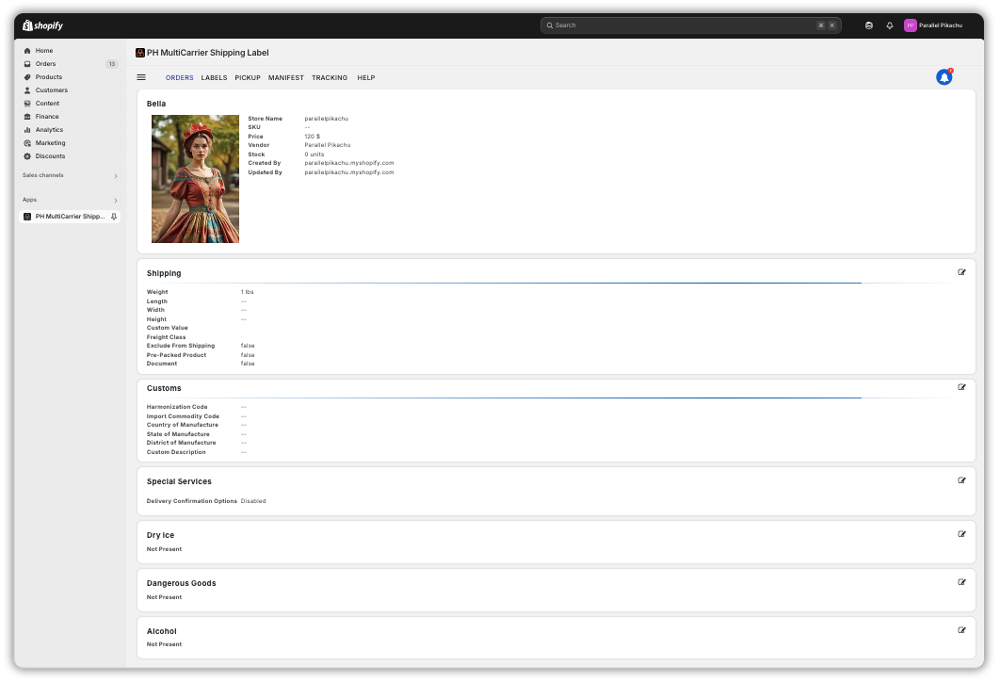
Shipping Section
In this section, you can view and manage the physical and shipping-related details of the product:
- Weight: The product’s actual weight is used to calculate shipping rates.
- Length, Width, Height: Dimensions of the product for volumetric weight and packaging decisions.
- Custom Value: The declared value of the product, often used for customs and insurance.
- Freight Class: Classification used for freight shipments, based on density and handling requirements.
- Exclude From Shipping: If enabled, the product will be excluded from shipping.
- Pre-Packed Product:
- This means the product is already packed and ready to be shipped on its own.
- It will be shipped separately, not grouped with other items.
- This setting overrides your general packaging rules.
Example:
If a customer orders three items, one marked as pre-packed and two that are not, the pre-packed item will be shipped separately, while the other two will be packed and shipped together.
- Document: Marks the product as a document, not a physical item, for applicable carriers.
Everything you need to prepare this item for accurate shipping is just a few clicks away.
Customs Section
This section is important when shipping internationally, as it ensures your products clear customs smoothly. Here’s what you can configure:
- Harmonization Code (mandatory): A 6-digit code used by customs to classify the product. Required for international shipments to calculate duties and taxes accurately.
- Import Commodity Code: Used in some countries for additional classification of goods during import.
- Country of Manufacture (mandatory): Specifies where the product was made; essential for customs and trade compliance.
- State of Manufacture: Adds more detail to the origin of the product, especially useful for domestic classification.
- District of Manufacture: Helps identify the specific production area when required by certain trade agreements or regulations.
- Custom Description: By default, the product name is used, but you can enter a more detailed description if it helps customs better understand the item.
These details ensure your product clears customs without delays or compliance issues.
Special Services
Need delivery confirmation for this product? Just head to this section and enable the Delivery Confirmation option. Choose between options like Adult Signature Required, Direct Signature, and more, based on what’s required for that item.
Dry Ice Shipping
This option is used when your shipment contains dry ice (solid carbon dioxide), commonly used for preserving perishable items like food or medical supplies.
- Specify the weight of the dry ice and the units used (kgs / lbs)
Dangerous Goods Shipping
Use this option if the shipment contains hazardous materials such as chemicals, batteries, or flammable liquids.
- You may need to provide a dangerous goods code or packaging type.
- Include the UN number. This setting ensures compliance with shipping regulations.
- Ensures safe handling and legal compliance. Carrier limitations or documentation requirements may apply.
Alcohol Shipping
Enable this option if the shipment contains alcoholic beverages.
- Requires adult signature on delivery.
- Subject to specific carrier and regional regulations. Commonly used for shipping wine, spirits, and similar products.
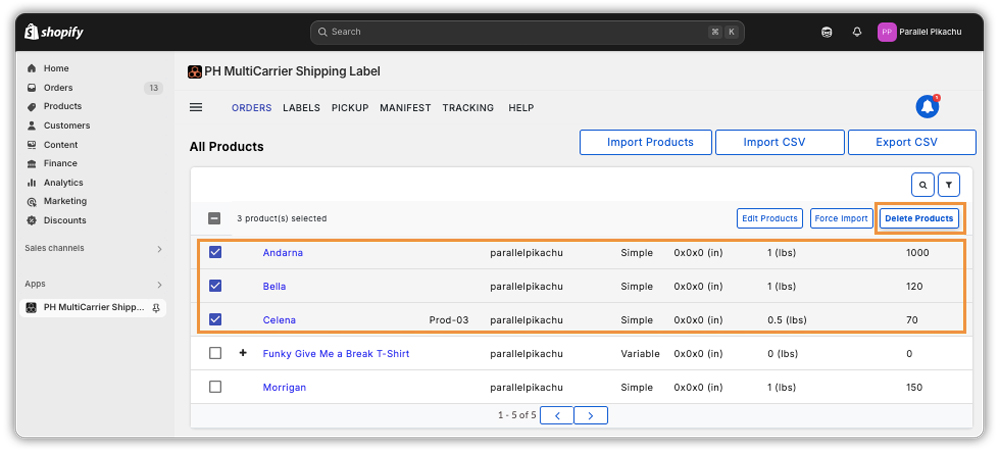
Deleting Products from the App
Need to remove a product from the app view?
- In the All Products page, select the product and click Delete.
This removes it only from the app, not from your actual store.
With these simple steps, you’re now ready to manage your product catalogue smoothly and confidently!
Set Up Packaging Methods
In the App, Packaging refers to how your products are arranged into parcels or boxes for shipment. Configuring packaging correctly enables the app to calculate accurate shipping rates, print labels, and ensure the carrier receives the correct weight and dimensions.
Proper packaging setup also prevents carrier reweighing surcharges and streamlines your shipping workflow.
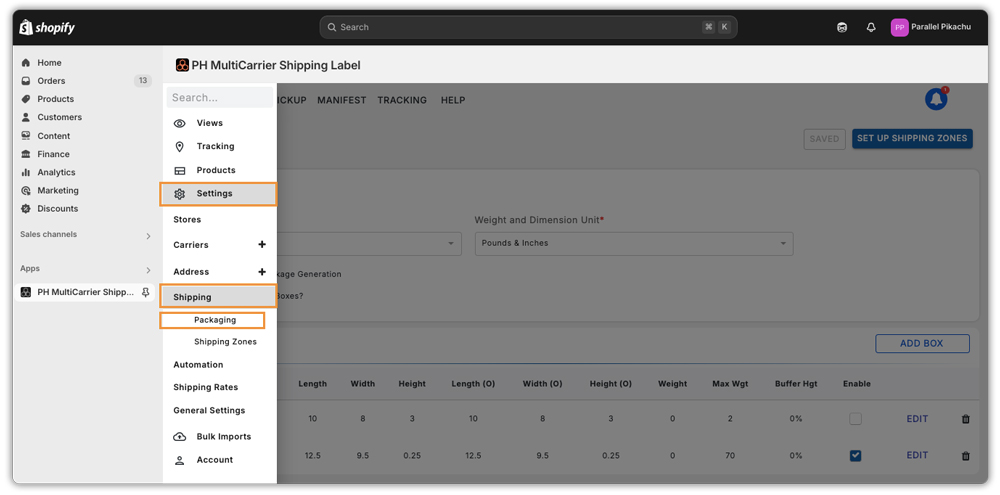
To configure packaging, navigate to ☰ Icon > App Settings > Shipping > Packaging and select your preferred method.
Available Packaging Methods
The app offers five distinct packing strategies:
- Weight-Based Packing
- Box Packing
- Stack Packing
- Quantity-Based Packing
- Weight and Volume-Based Packing
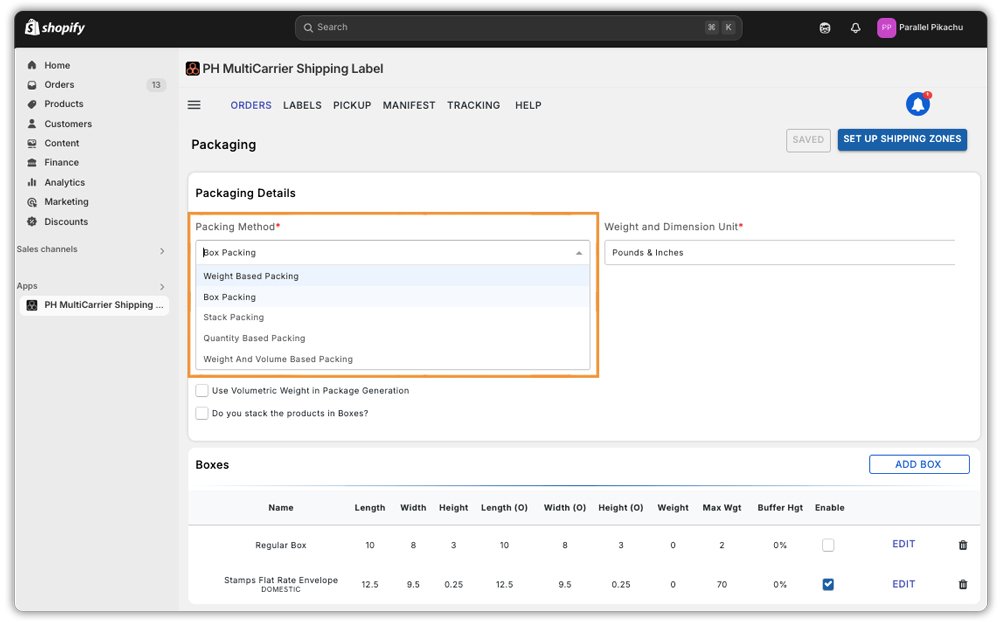
Check the packaging weight and dimension units in the Packaging section. These units will reflect in the order summary, so it is important to configure them correctly.
If you’re using carrier-provided boxes, you can easily set them up within the app as well.
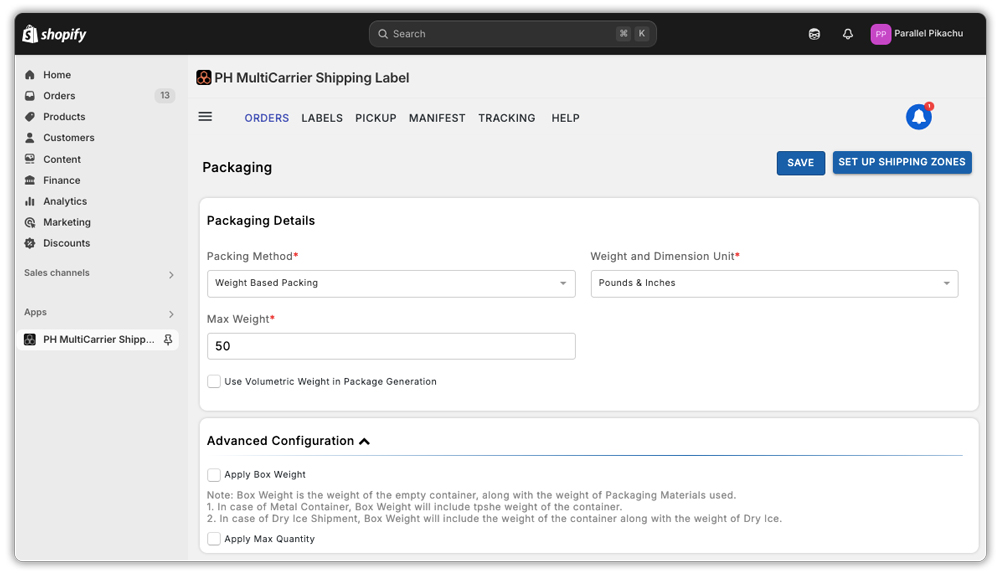
1. Weight-Based Packing
This method considers the total product weight for packing. You can define a maximum weight limit for each box, and the app will automatically pack products accordingly. You can set up the maximum weight limit depending on the products you have and how you would like to ship them.
If the total weight of items exceeds this limit, the system automatically starts packing the remaining items into a new box.
- Max weight: This sets the maximum weight allowed per package or box. It primarily determines how many packages are created for an order.
- Use Volumetric Weight in Package Generation: This option allows shipping rates to be calculated based on the space a package occupies (volumetric weight), rather than just its actual weight. Since carriers charge based on whichever is greater, actual or volumetric weight, enabling this ensures more accurate shipping costs for larger, lightweight items.
Under the Advanced Configuration, you can:
- Apply Box Weight: This setting factors in the weight of the empty box and any extra packing materials when calculating the total shipping weight. This helps get more accurate shipping rates, since carriers charge based on the full weight of what’s being shipped, not just the products.
- Apply Max Quantity: When this option is enabled, it limits the number of items that can be packed into one box,based not only on quantity but also considering the max weight setting.
Example: If your box can hold up to 10 kg and the total order weighs 12 kg.
The app will split it into 2 boxes.
- 1 box with 10 kg
- 1 box with 2 kg
Two packages will be created based on the maximum weight that is set.
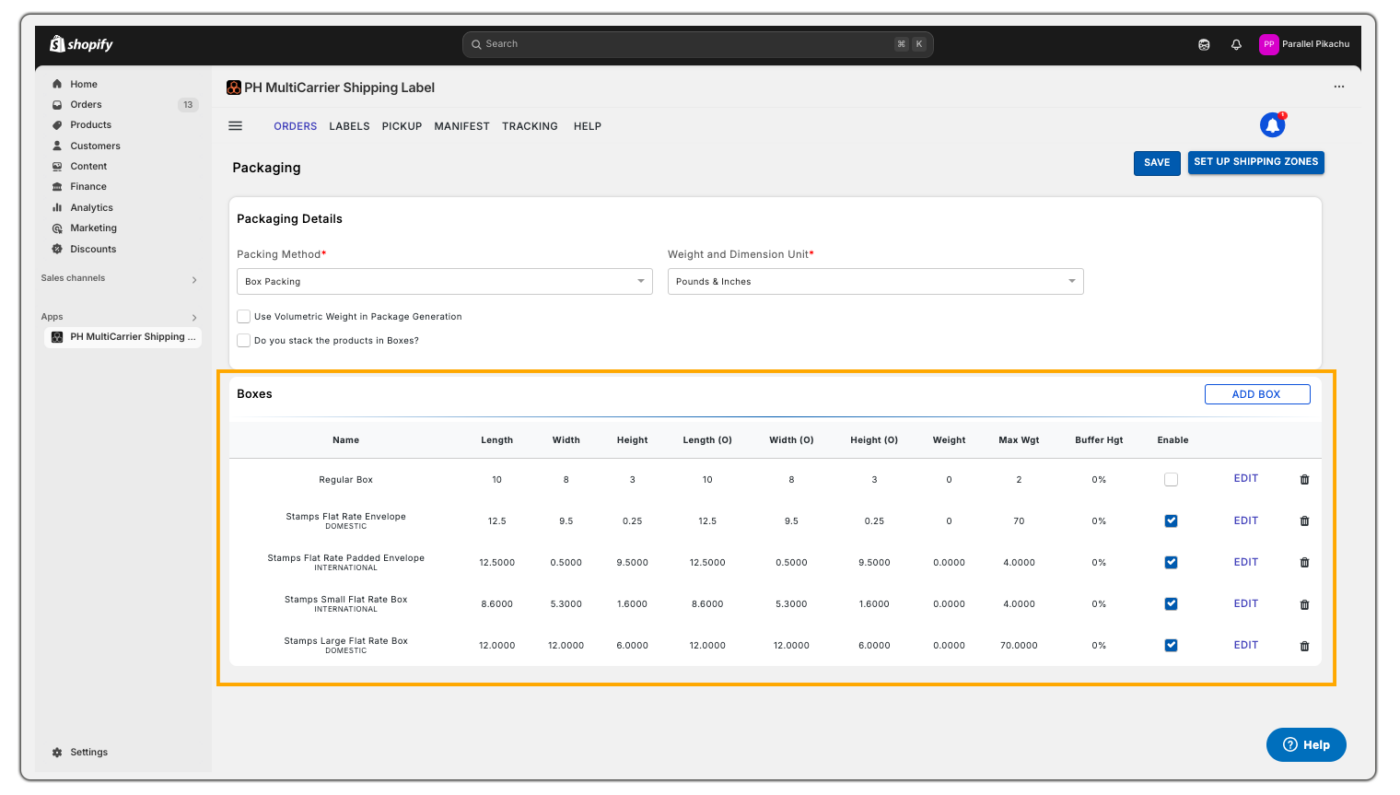
2. Box Packing
This method of packing is useful for businesses using custom or carrier-provided boxes.The app considers the box dimensions, weight, and volume to determine how products are packed.
To use the box packing method, make sure you have entered the product dimensions under the Products section.
The app automatically chooses the right box and decides how many items to pack in each one based on the size and weight limits you set. This helps ensure accurate shipping rates and correct label generation.
Box Packing is ideal if:
- You use custom-sized boxes for shipping.
- You rely on carrier-provided boxes (example: Stamps USPS, FedEx, UPS, Australia Post, UPS, Canada Post, Puralotor).
- Your products have a fixed size (example: nuts, bolts, or automobile parts) where dimensions matter for accurate packaging and shipping costs.
Under Box Packing settings, you’ll see two optional features that can be enabled based on your packaging needs:
- Use Volumetric Weight in Package Generation:
This option allows shipping rates to be calculated based on the space a package occupies (volumetric weight), rather than just its actual weight. Since carriers charge based on whichever is greater — actual or volumetric weight — enabling this ensures more accurate shipping costs for larger, lightweight items. - Do You Stack the Products in Boxes?:
Enable this if your products can be stacked vertically within a box (like books or flat packets). This helps optimize space during packing. If your items are better placed side by side or can’t be safely stacked, you can leave this option disabled.
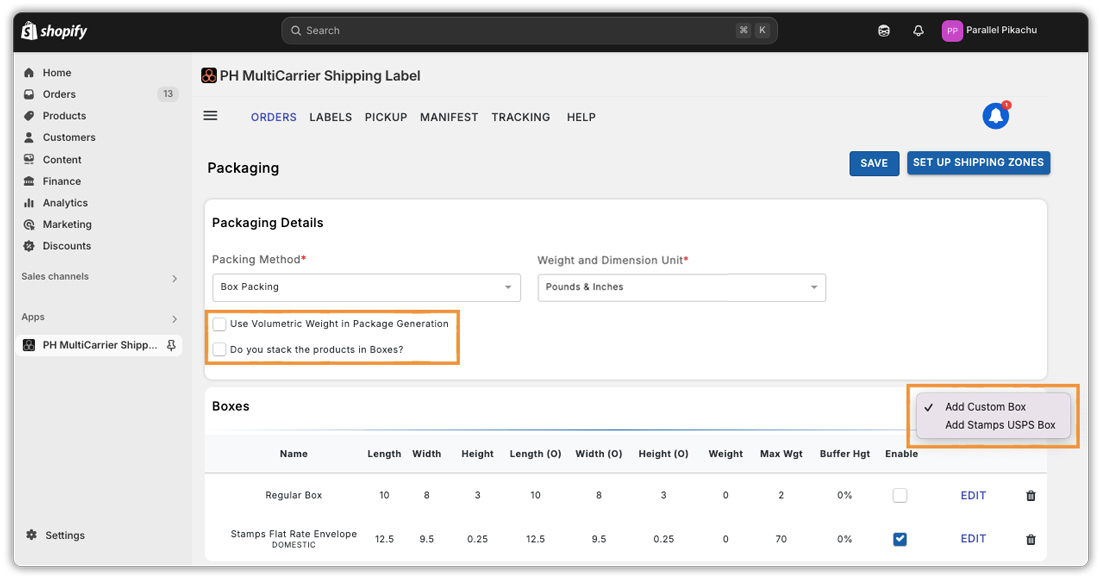
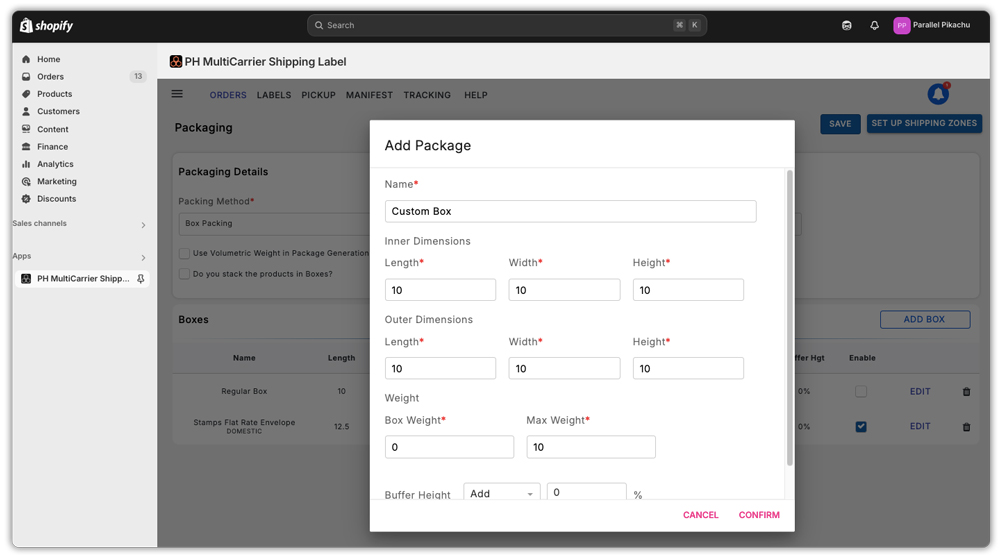
Steps to Add a Custom Box:
- Click Add Box and select Add Custom Box.
- In the Add Package section, enter a custom name for the box.
- Input the inner and outer dimensions (length x width x height).
- Enter the empty box weight and the maximum weight capacity of the box.
- Review all details and click Confirm.
Your custom box will now be added.
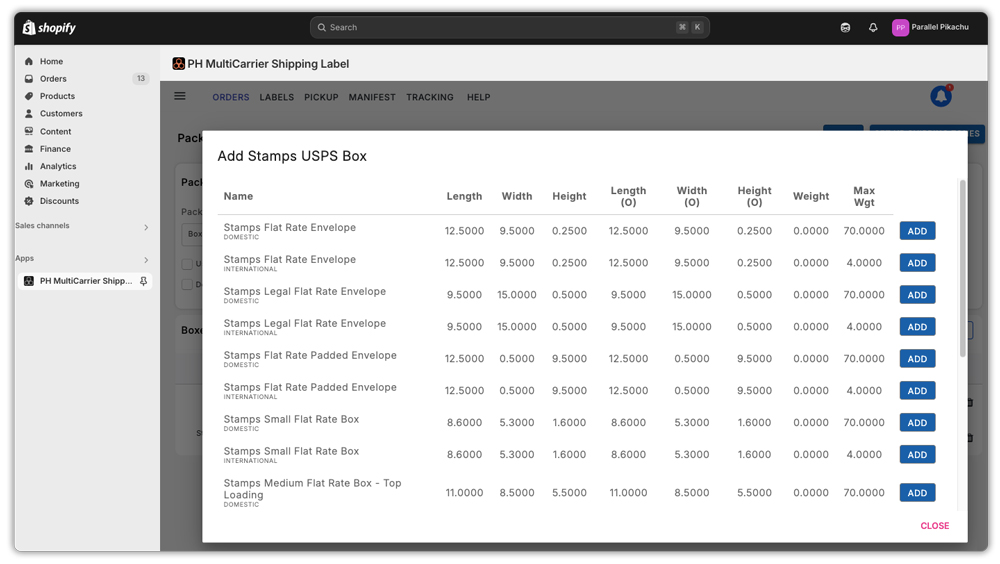
Steps to Add Carrier-Integrated Boxes (e.g., Stamps USPS Boxes):
- Click Add Box and Select Add Custom Box
- Choose your preferred carrier boxes from the list
- Click on Add to add the box of your choice and Close to collapse the view.
- Click Save once you’ve added the desired boxes
You’ll find two important options to enable under Box Packing:
- Enable “Use Volumetric Weight in Package Generation.”
Turn on this option if you want the system to consider volumetric weight (the space a package occupies) instead of just the actual weight. - Enable “Do You Stack the Products in Boxes?”
Select this option if your products can be safely stacked vertically inside a box (like books, cartons, or packets).
How Does Box Packing Work?
Suppose you’ve added a custom box with dimensions 10×10×10 cm and a maximum weight limit of 5 kg. Now, you receive an order for a product weighing 3 kg with dimensions 3×3×3 cm. Here’s how the app processes it:
- Weight Check: The product weighs less than the box’s 5 kg limit, so it passes the weight check.
- Volume Check: The product’s volume is 27 cm³ (3×3×3), and the box volume is 1000 cm³, so it fits comfortably.
- Dimension Fit: The app checks if the product’s longest side fits within the box dimensions; in this case, it does.
- Final Fit Check: It ensures both the total weight and volume are within the box’s limits.
- Sorting: The app sorts products and boxes by treating the longest side as the length for accurate packing.
- Box Selection: Based on all checks, the app automatically selects the most suitable box for shipping.
Refer to the Box Packing Strategy for eCommerce platforms for more information on Box Packing.
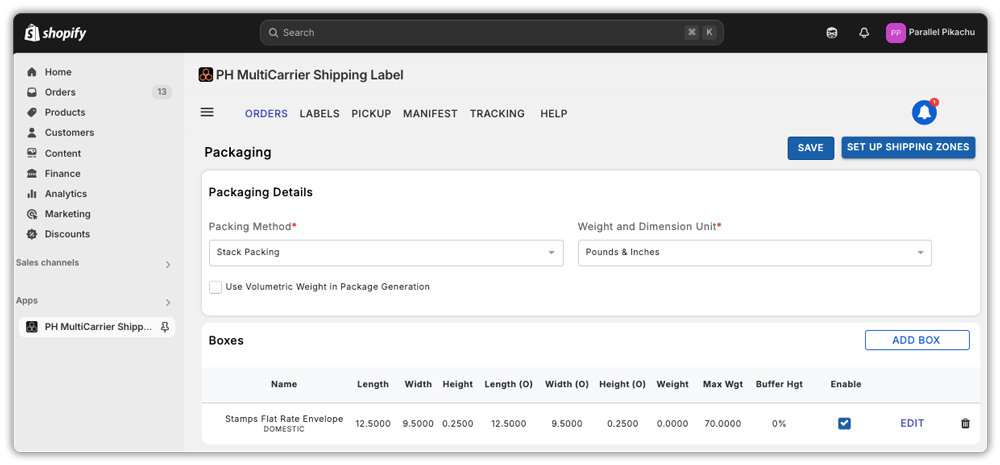
3. Stack Packing
This method packs your products vertically based on their height. The app stacks products one over another inside the box using this configuration. You can configure:
- Box dimensions.
- Buffer Height (optional) – extra vertical space to prevent items from being compressed.
Example: If your product height is 10 cm, and you add a 2 cm buffer height, the box should be 12 cm tall to fit the item comfortably.
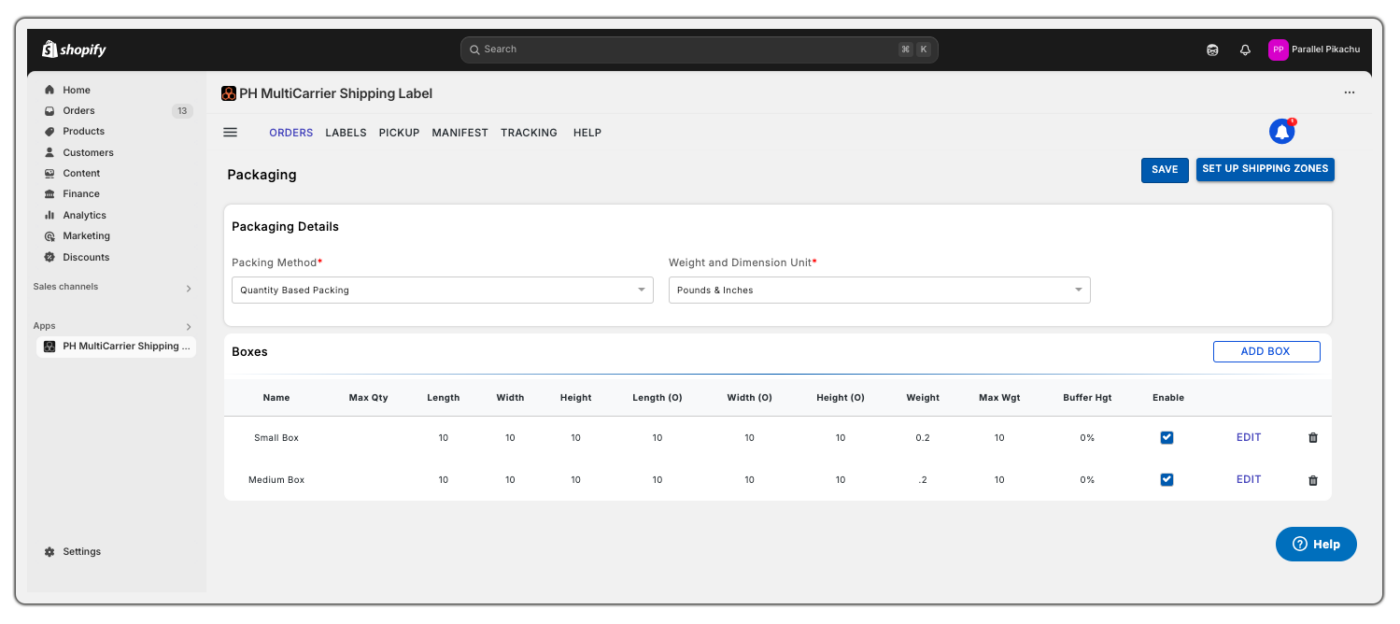
4. Quantity-based packing
This method relies solely on the number of units per box. It is not based on their size, weight, or shape.
For example, if you set 4 items per box and someone orders 10 items, the system will pack them into 3 boxes: 4, 4, and 2 items.
It is best used when:
- You have a fixed number of items that fit in each box.
- Products are lightweight or uniform in size.
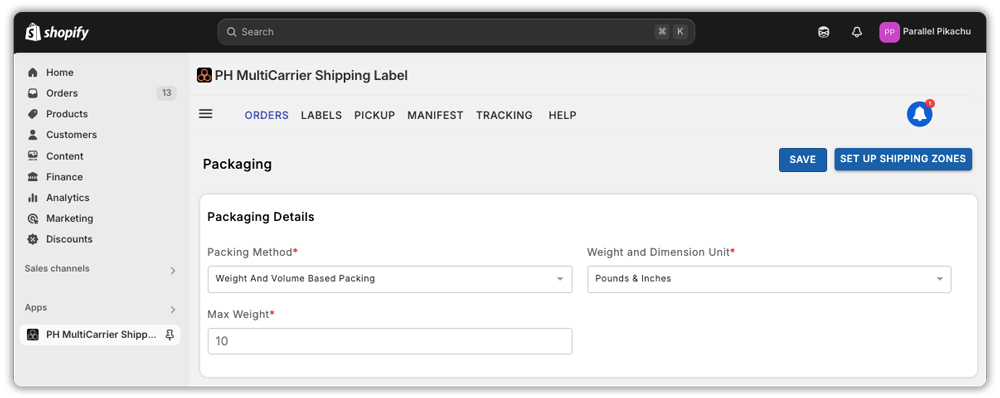
5. Weight- and Volume-based Packing
This advanced method takes into account both the product’s weight and volume. It’s ideal for shipping items that are either:
- Lightweight but bulky (e.g., cotton shirts)
- Heavy but compact (e.g., ceramic mugs)
The app balances both factors to determine the most efficient packaging strategy.
Overall, choosing the right packing method in the PH Multi Carrier Shipping Label App ensures accurate rates, optimised packaging, and smoother shipping operations.
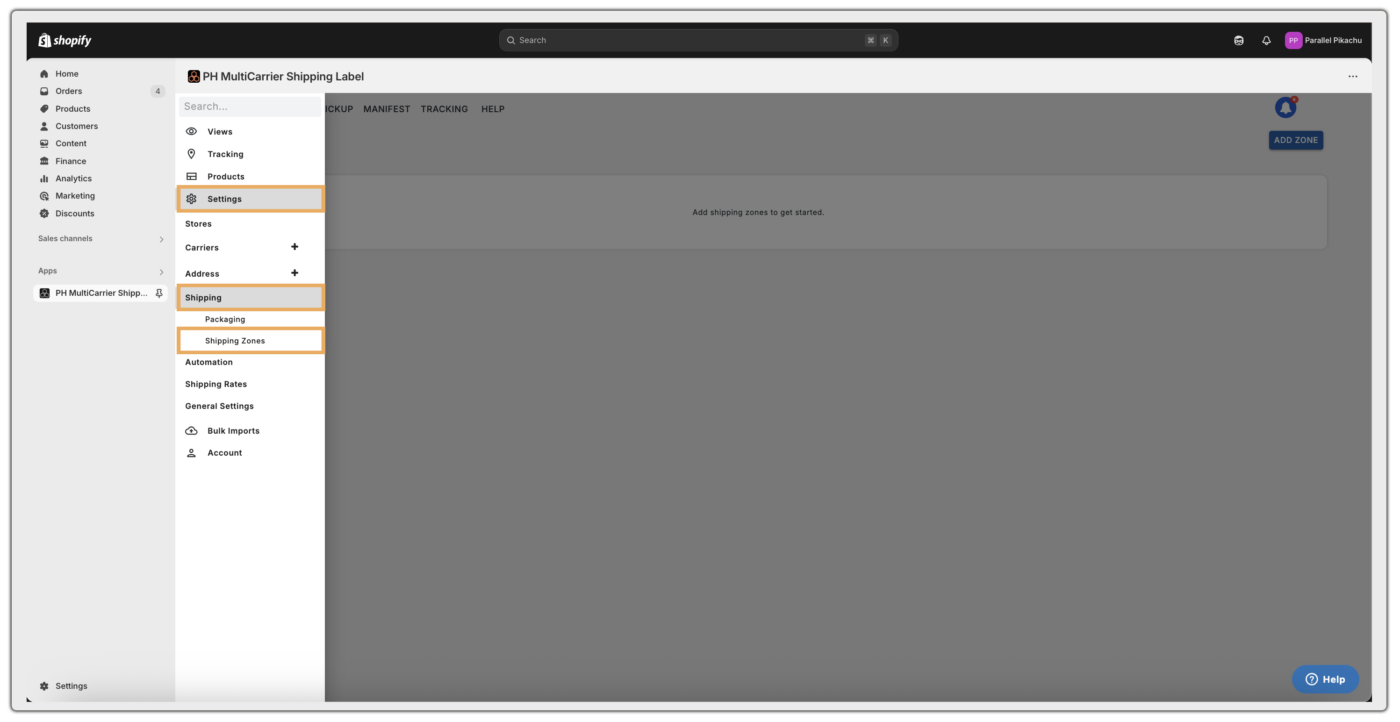
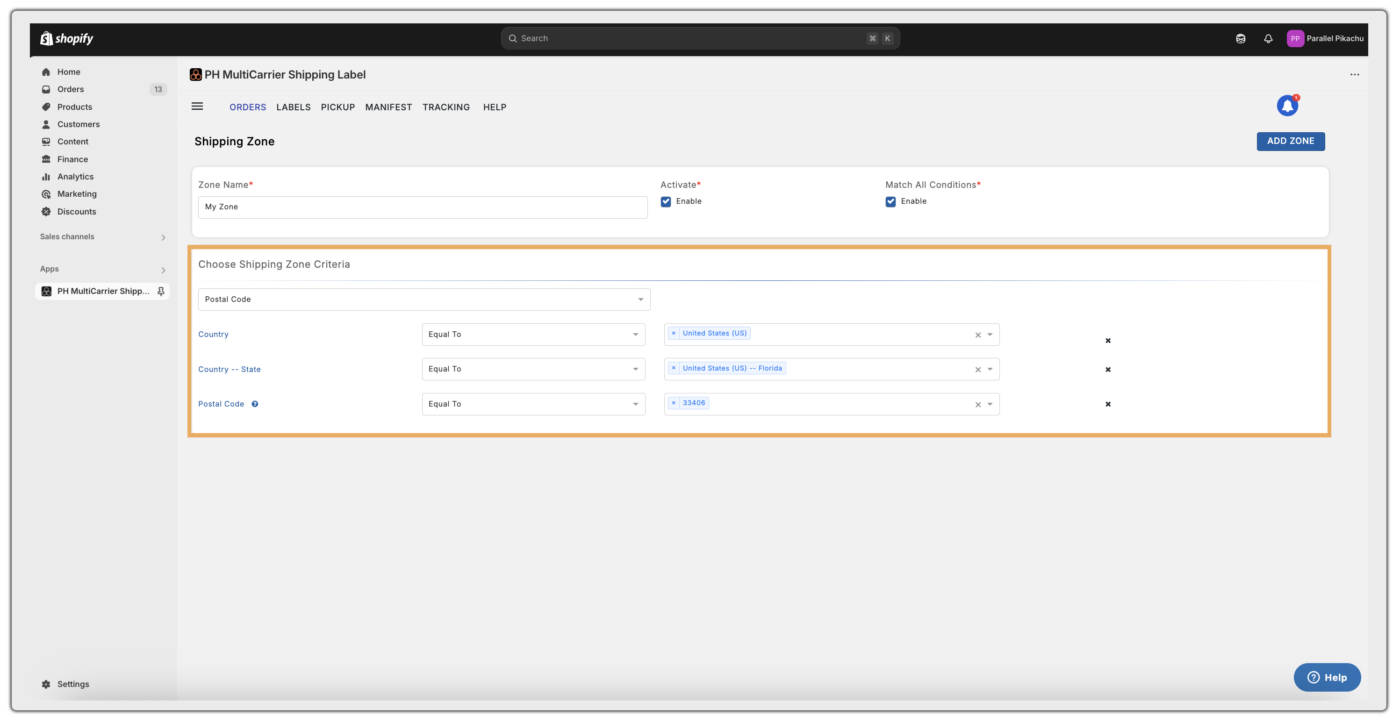
How to Create Shipping Zones?
Shipping zones help tailor shipping rates, estimated delivery times, and available carrier services based on your customer’s location, making your shipping setup more accurate and efficient.
While Shopify’s default zones cover basic criteria like country and state, the PH Multi-Carrier Shipping Label app offers additional flexibility. You can optionally define custom zones based on:
- Country
- Country + State
- Specific Postal Codes
Configuring shipping zones in the app is not mandatory. It’s only recommended if your business requires more control over specific shipping regions or markets.
This added flexibility lets you fine-tune your shipping strategy for better rate accuracy.
To set up the custom shipping zones, navigate to ☰ Menu > App Settings > Shipping > Shipping Zones > Add Zone.

Set Up Shipping Carrier Rates & Services for Checkout and Fulfilment
Setting up shipping carrier rates and services ensures that your customers see accurate shipping costs at checkout and that you can generate the right labels for order fulfillment.
The PH Multi-Carrier Shipping Label app offers two sets of automation rules: one for
- Automating Label Generation: Automatically applies shipping actions during label creation.
- Customising Checkout Rates: Automatically display tailored shipping rates during checkout using advanced rule sets.
- Request Log – To view detailed records of rate calculations for each checkout transaction.
- Local Pickup Location Request Log – To track and manage customer selections of Hold-at-Location services (e.g., for FedEx, PostNord).
- Shipping Classes – Groups similar products under one shipping category for better rate and carrier control.
- Rate Automation Enhancements – Additional rule options that enhance how rates are displayed during checkout.
- Carrier Service Customization – To customize how carrier names appear to customers at checkout.
- Advanced Settings – To exclude specific products from rate calculations or include landed cost in DHL Express quotes.
Shipping Rule Configuration for Label Generation
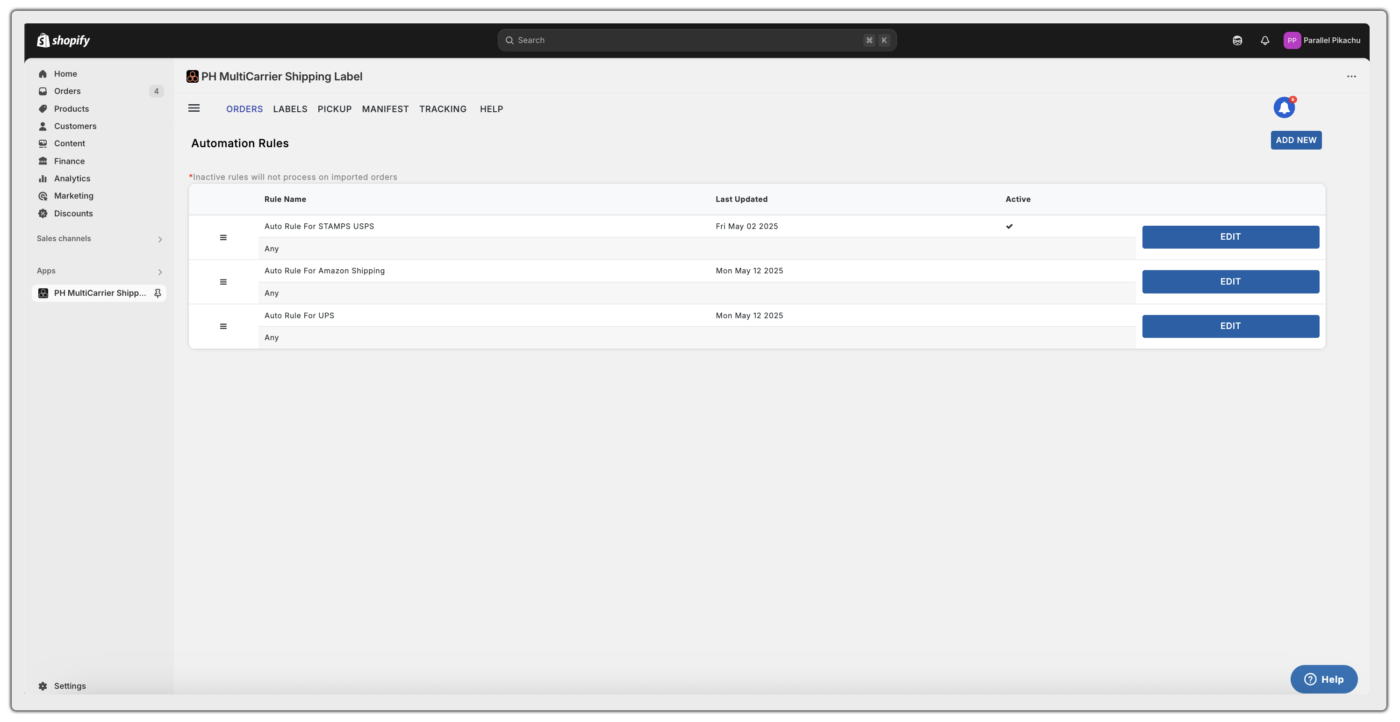
The automation rules under this section are applied during the label generation process. Once a shipping carrier is integrated, the app, by default, creates the required rules to streamline how shipping labels are generated. To set up the rules:
- Navigate to App Settings > Automation > Setup. By default, there will be an automation rule created once you have integrated the shipping carrier.
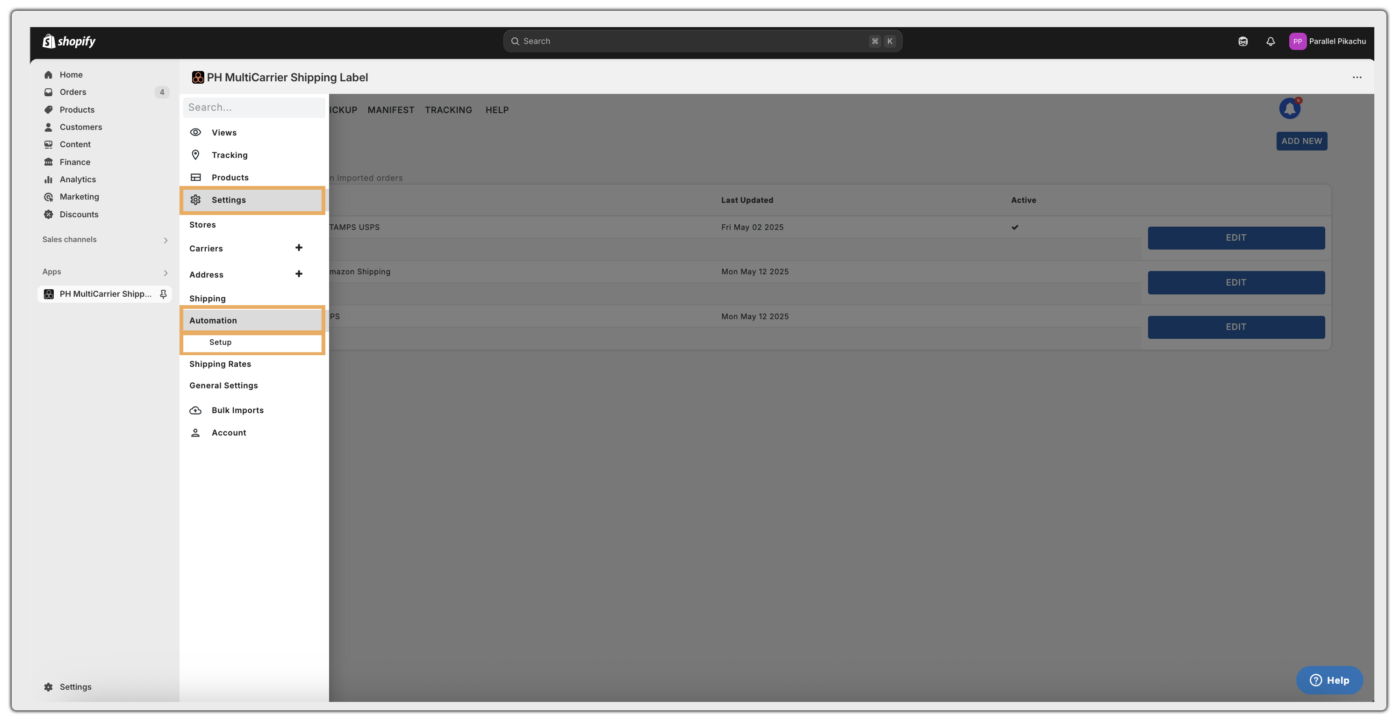
- Click on the Edit option, to edit the rule
- Click on the Add New option, to add a new rule.
In the Setup Automation rules, there are two sections, based on which the rules can be created and used for label generation:
- Automation Criteria
- Action Details
1. Automation Criteria
The following are the Criteria based on which the automation rule can be created.
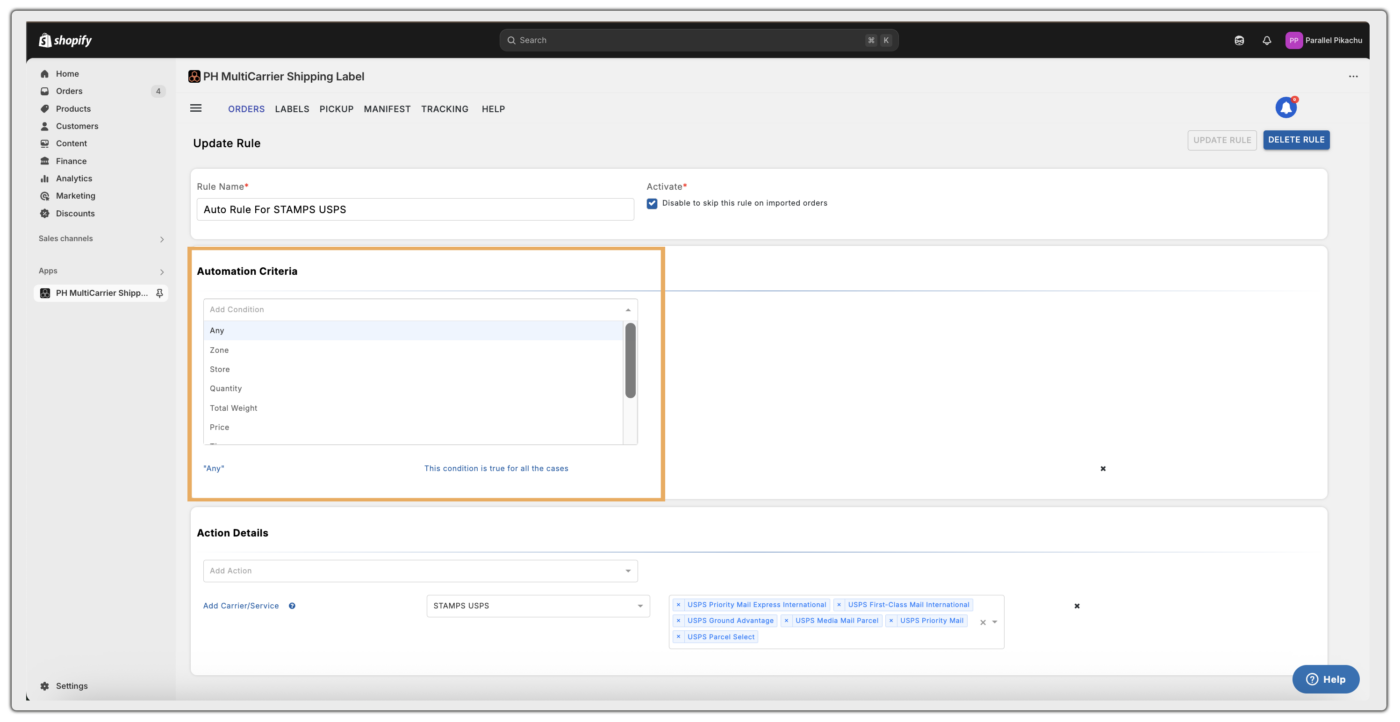
- Any – Applies rates to all orders, regardless of conditions.
- Zone – Applies rules based on specific shipping zones.
- Quantity – Applicable based on the product quantities in the order.
- Total Weight – Applicable when the total order weight meets defined conditions.
- Price – Applicable based on certain order price conditions
- Time – Applies rates based on the time the order was created.
- Total Weight Range – Applicable based on the specific order weight range
- Total Price Range – Applicable based on the specific order price range
- Shipping Method – Used to map the custom shipping options, such as – flat rates, free shipping to the specific carrier services.
2. Action Details
The following are the Action Details where the carrier services, special services and other necessary actions can be configured.
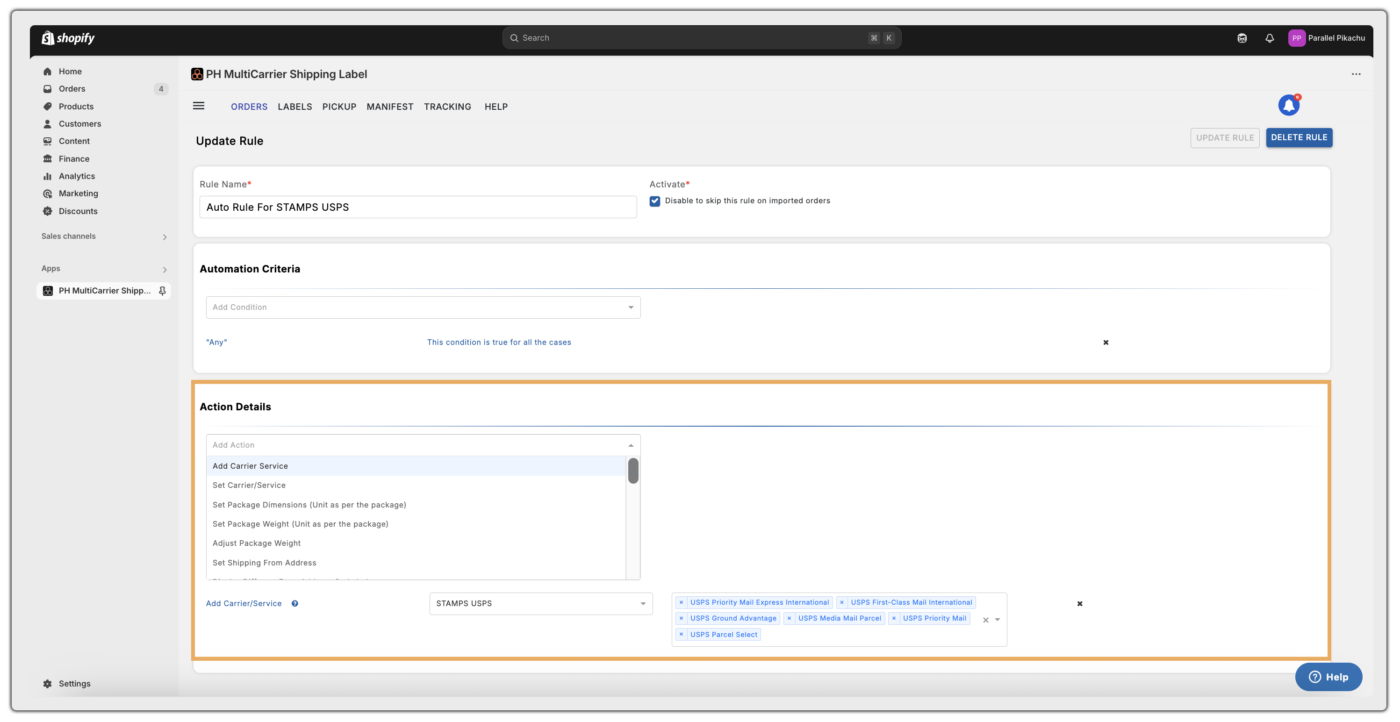
Carrier & Package Configuration
- Add Carrier Service – Select preferred carrier and shipping services for label generation
- Set Carrier Service – When a rule is configured with the Set Carrier Service option and the order matches the rule’s conditions, all other shipping rules are overridden by it.
- Set Package Dimensions – Override any pre-selected package dimensions with the values configured here
- Set Package Weight – Override any pre-selected package weight with the values configured here
- Adjust Package Weight – Add a percentage to the actual weight; the adjusted weight will be used for label generation
Address Configuration
- Set Shipping From Address – Set a default origin address when multiple addresses are configured
- Display Different From Address on Label – Show a different address on the label instead of the actual ship-from address.
- Set Sold to Address – Display a “Sold To” address on UPS labels
- Map Order Meta Fields to Shipping Address – Map order meta fields to the shipping address using the Prefix and Meta Key.
Shipping Preferences
- Add Insurance/Extra Cover – Providing Insurance to the label-generated orders
- Add Delivery Confirmation – Providing Signature Confirmation (Normal or Adult Signature) for the label generated orders
- Enable Auto-Generate Label – Automatically generate shipping labels when orders are imported
- Enable Saturday Delivery – Automatically apply Saturday delivery for UPS orders
- Enable Auto Address Correction – Automatically correct shipping addresses during label generation
- Not to Ship – Automatically move unshippable orders to the “Not to Ship” section
Carrier-Specific Special Services
- Add DHL Special Services – Enable options like Saturday Delivery, Direct Signature, No Signature Required, and Paperless Trade (PLT)
- Add DHL Freight Sweden Special Services – Enable Doorstep Delivery
- Add Aramex MyFastway Special Services (Domestic) – Enable Signature Required, Authority to Leave, and Standard Shipping (Domestic only)
- Add Aramex Special Services – Enable services like First Delivery, First Domicile, Hold for Pickup, Noon Delivery, and Signature.
- Add Canada Post Special Services (Domestic) – Enable services like Proof of Age (18/19), Card for Pickup, Do Not Safe Drop, and Leave at Door (Domestic only)
- Add Canpar Special Services – Enable Saturday Delivery, Extra Care, No Signature, and other delivery options.
- Add New Zealand Post Special Services (Domestic) – Enable specific services for domestic orders
- Add XPO Logistics Special Services – Enable applicable special services for XPO Logistics orders
Third-Party & Billing Options (UPS)
- Third Party Shipment Charges Payer (UPS) – Set a third-party payer by providing the account number and address.
- Duties and Taxes Payer (UPS) – Define the payer for duties and taxes as either the sender or third party.
Shipping Rule Configuration for Checkout Rates
This section in the app settings consists of the following options related to the checkout rates.
Request Log
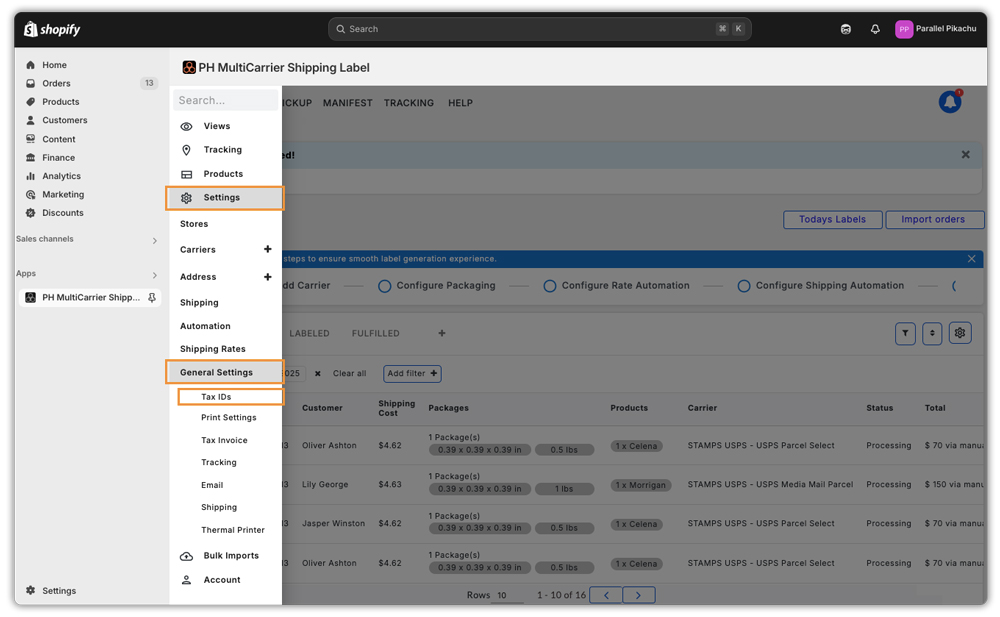
Request Log section helps you track all checkout rate transactions, where rate log IDs get created for each transaction. You can find the logs by navigating to ☰ Menu > App Settings > Shipping Rates > Request Log.
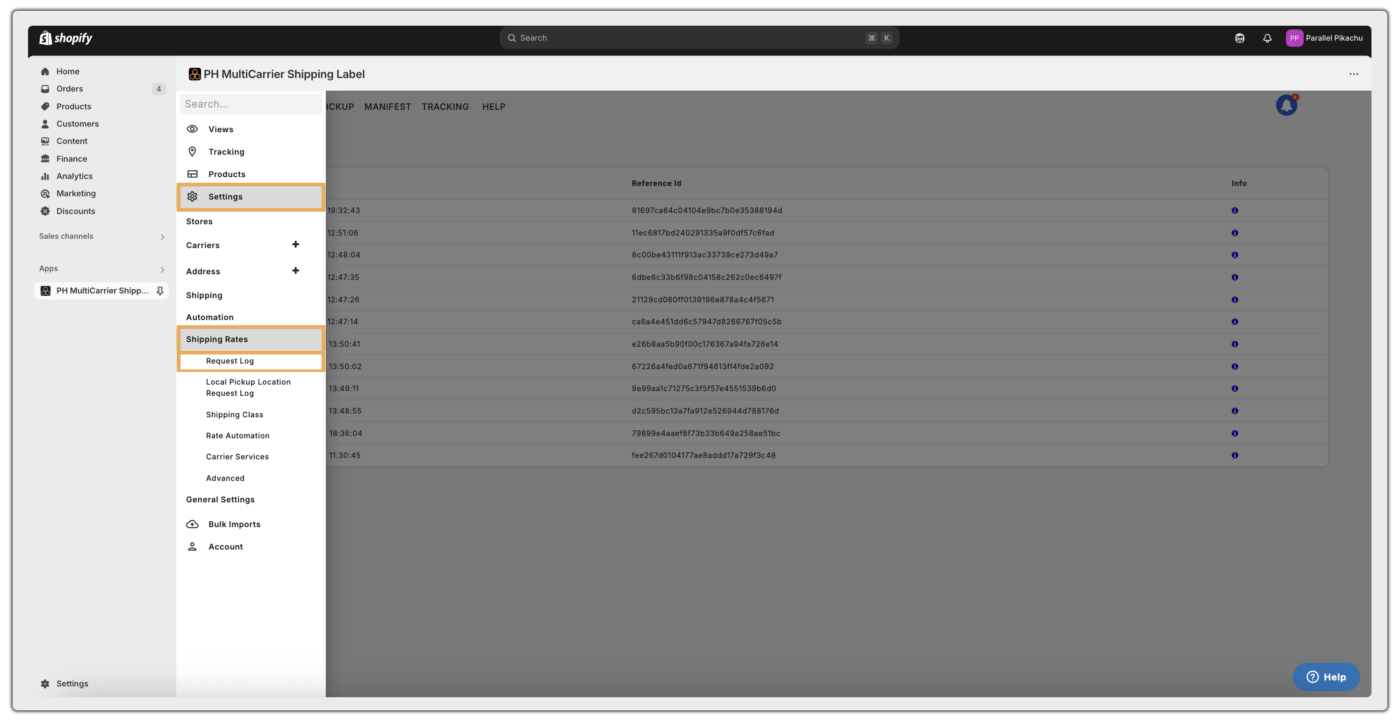
For more details, refer to the section on – Understanding the Request Log Summary
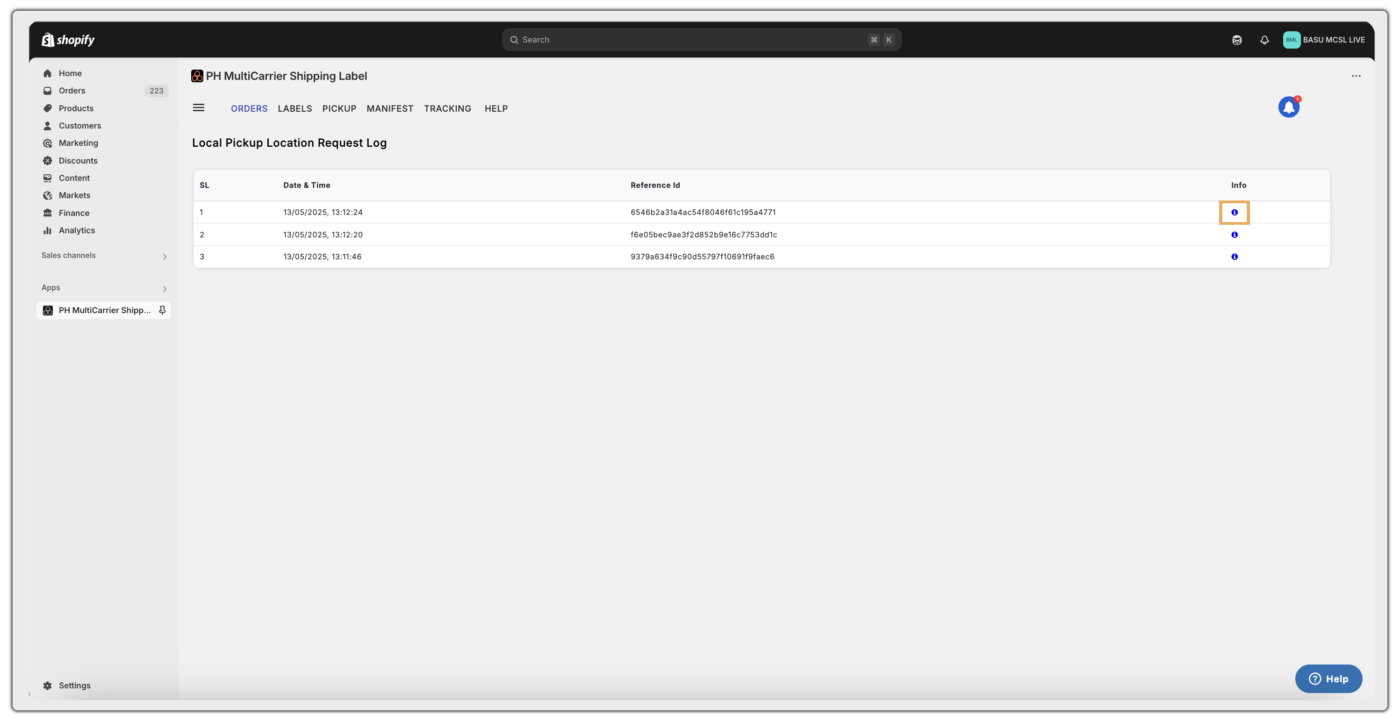
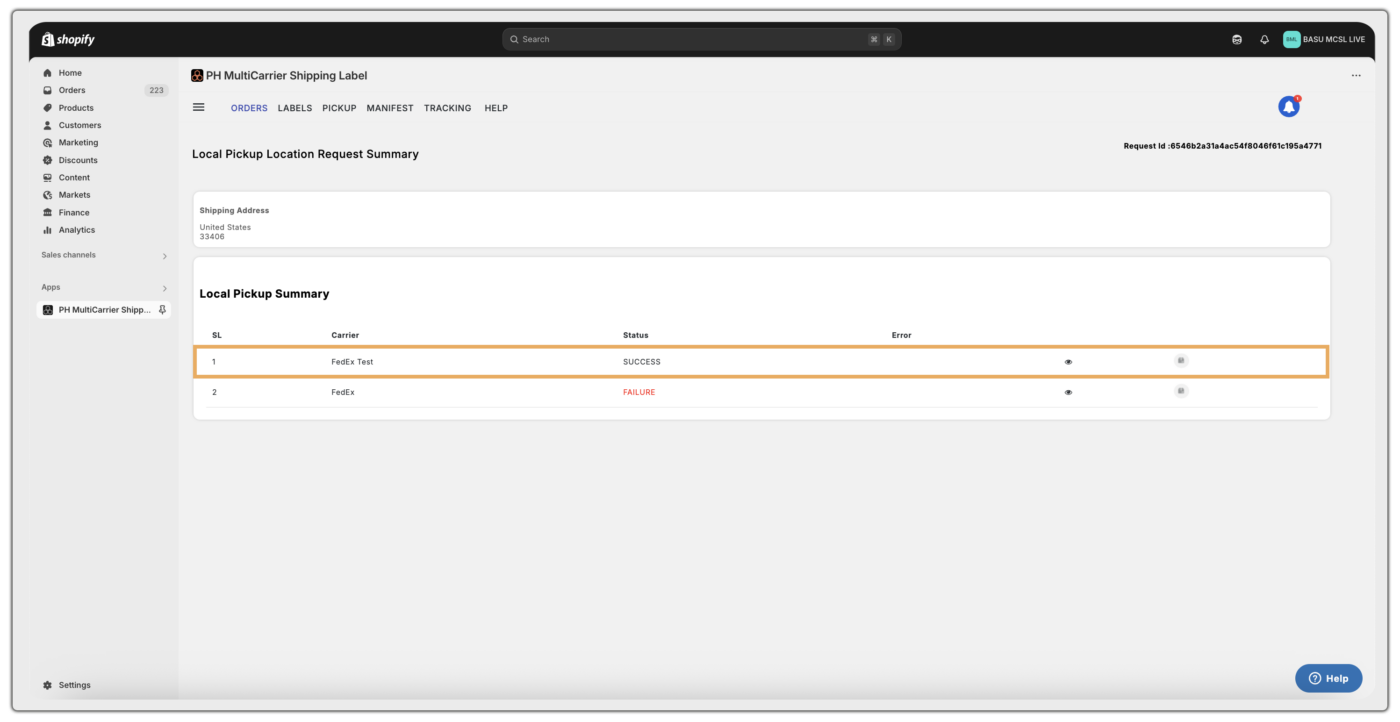
Local Pickup Location Request Log
This section provides details of the transaction made at checkout by selecting a Hold at Location/Service Point, and is applicable only for FedEx and PostNord carriers.
Below are the images showing the path to view the transaction details of FedEx Hold at Location transaction.
How “Hold at Location” Works:
- When a customer adds a product to the cart, a “Hold at Location” section appears on the cart page.
- The customer must enter their country and postal code.
- Based on the input, the nearest pickup location will be displayed automatically.
- After the order is placed, the transaction details can be found under Local Pickup Location Request Log in the app.

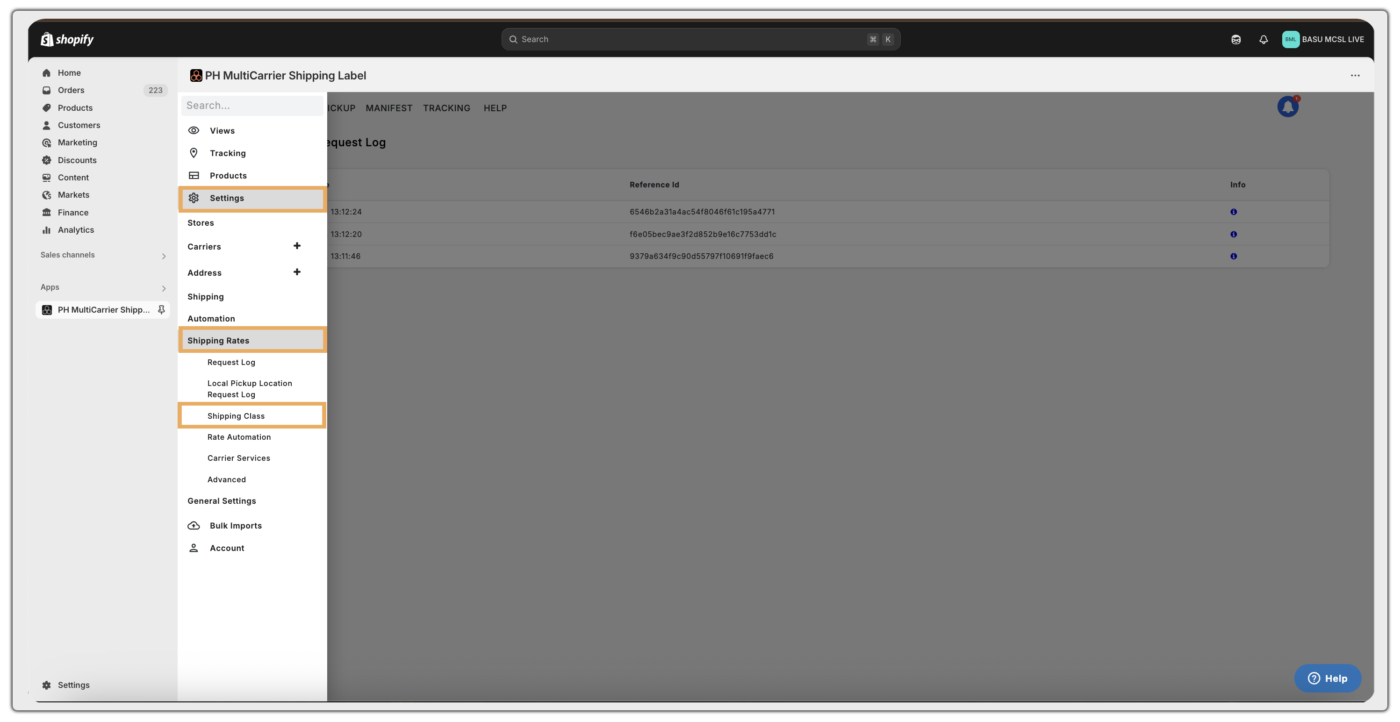
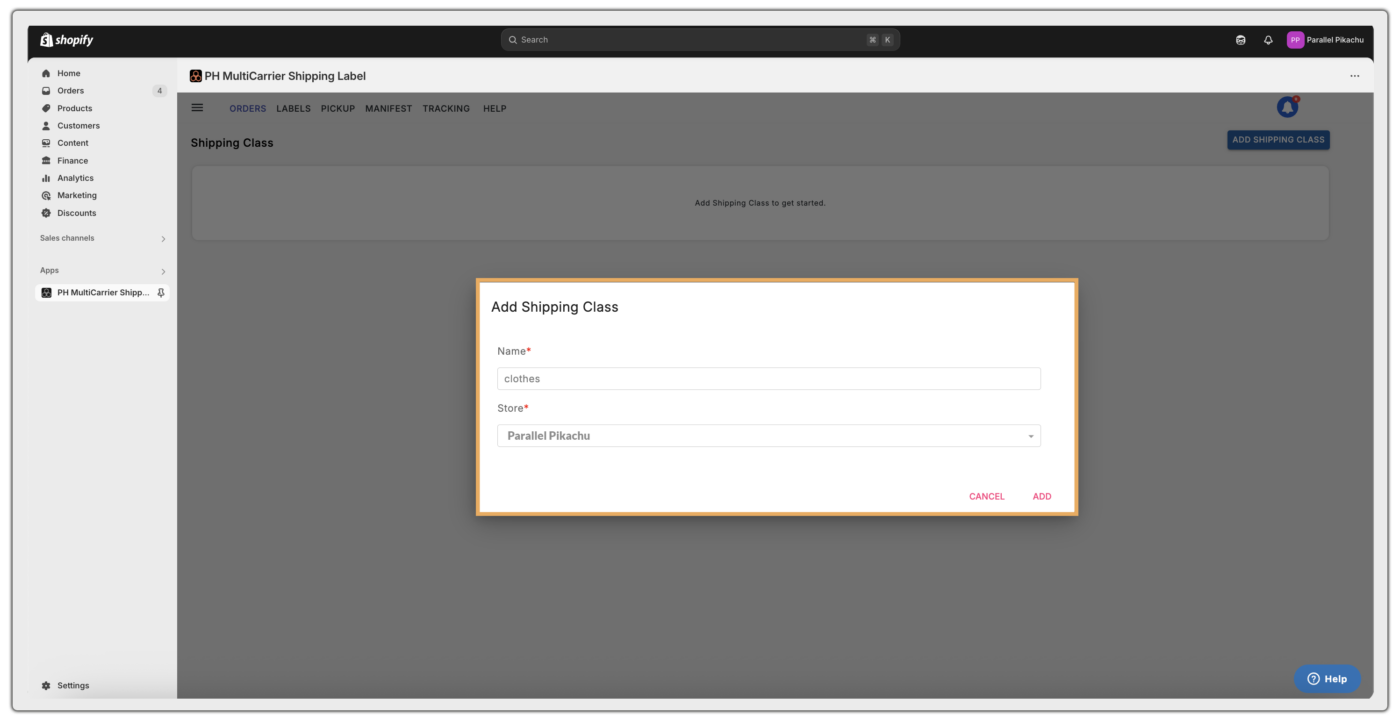
Shipping Class
A product shipping class is a category used to group products with similar shipping requirements, helping to apply specific shipping rates or rules more efficiently during checkout. It simplifies rate calculations based on size, weight, or shipping method.
Example: If you sell both mugs and furniture on your Shopify store, you can assign:
- “Fragile Items” shipping class to mugs
- “Bulky Items” shipping class for furniture
Using the Shopify Multi-Carrier Shipping Label app, different shipping rules can be configured:
- Mugs (Fragile Items) shipped using USPS with protective packaging.
- Furniture (Bulky Items) shipped using FedEx Freight with palletised handling.
This setup ensures accurate rate calculation and carrier selection tailored to the product type.
To add a Shipping Class in the app, navigate to ☰ Menu > App Settings > Shipping Rates > Shipping Class > Add Shipping Class > Assign the Class added to the Products in Shopify.

Rate Automation
Shipping rules for displaying rates at checkout are added by default when a carrier is connected. In this section, you can add the shipping rate automation rules by navigating to ☰ Menu > App Settings > Shipping Rates > Rate Automation.
These rate automation rules ensure accurate shipping rates are shown to customers based on specific conditions during checkout:
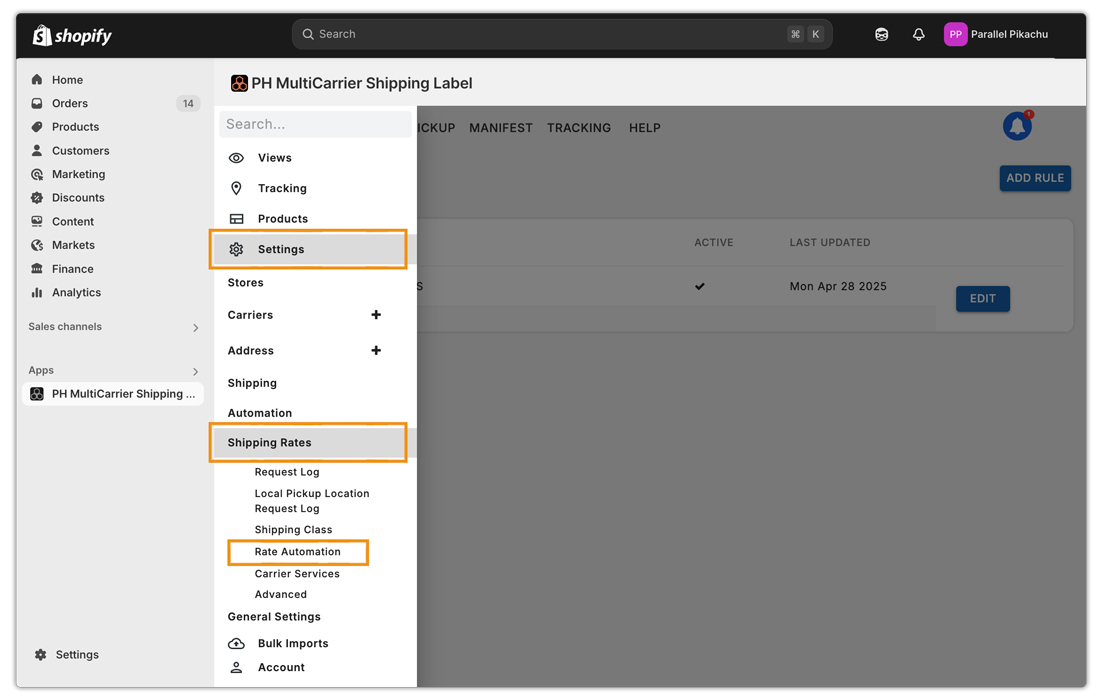
- Automation Criteria
- Action Details
The configuration options are largely the same as those in the Automating Label Generation section, with a few additional features specific to Rate Automation, highlighted below.
1. Automation Criteria:
- Product Shipping Class – This helps in showing carrier service rates at checkout for a particular product type that is available in the shipping class created.
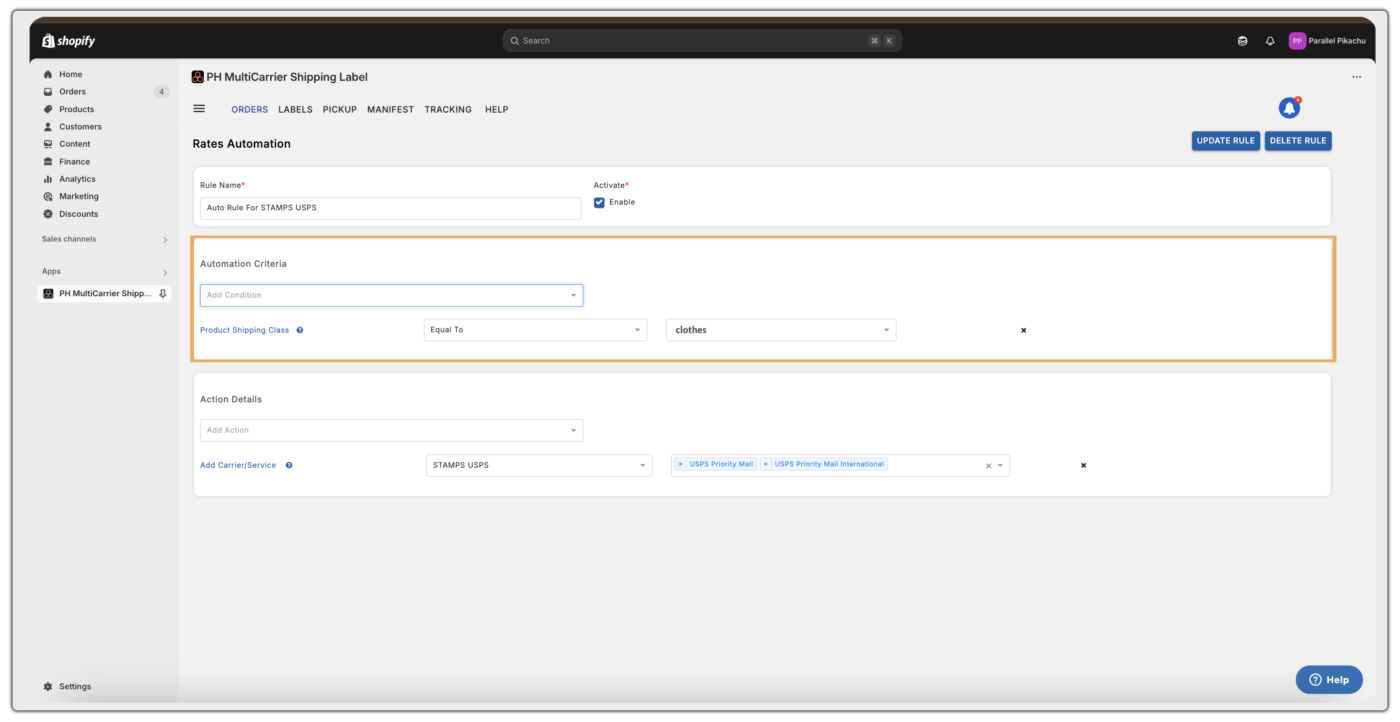
2. Action Details:
Shipping Rate Configuration
- Add Flat Rate – This lets you add extra fees, give discounts, or offer free shipping on top of the regular shipping cost.
- Add Flat Rate Quantity – This lets you add extra fees, give discounts, or offer free shipping on top of the regular shipping cost, based on how many products are in the order.
- Adjust Shipment Price – Helps in adding a Handling Fee or providing a Discount to the actual Shipping Rate
- Adjust Shipment Price Based on Order Cost – Helps in adding a Handling Fee or providing a Discount, based on the Order Cost, to the actual Shipping Rate
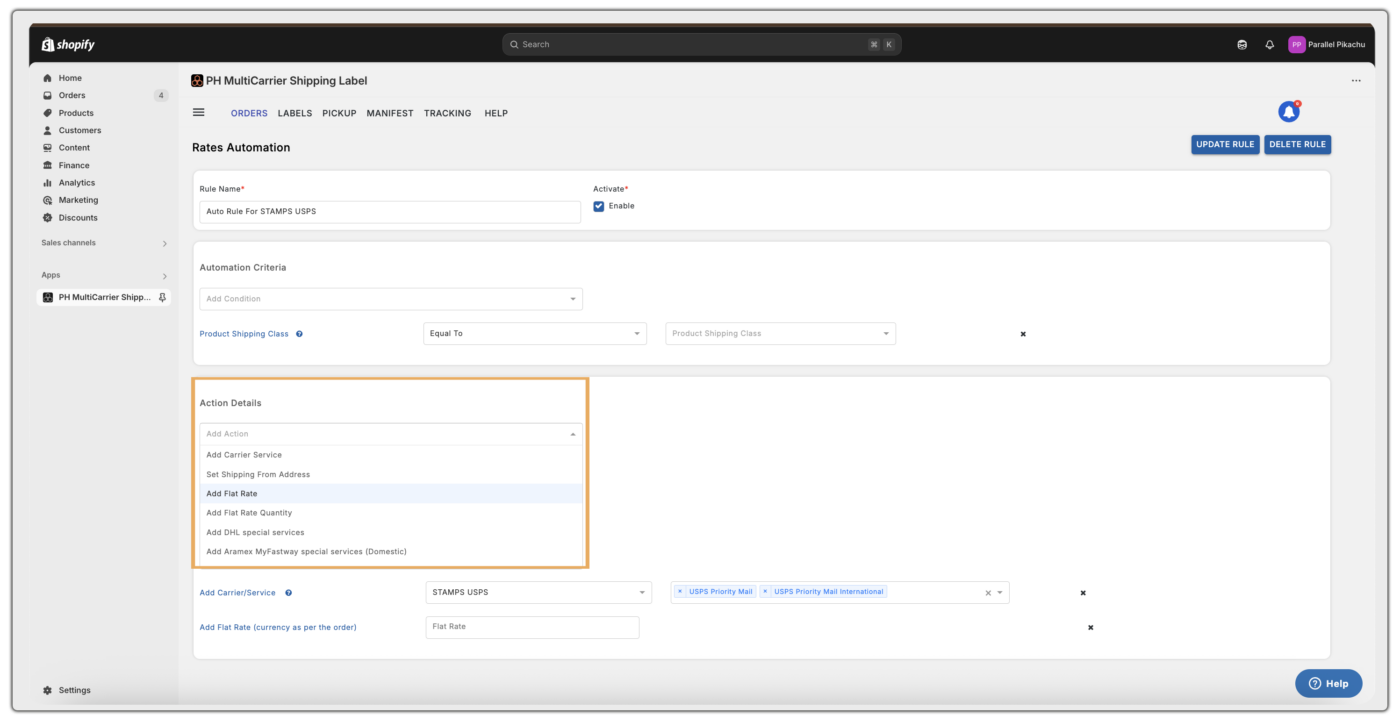
Carrier Services
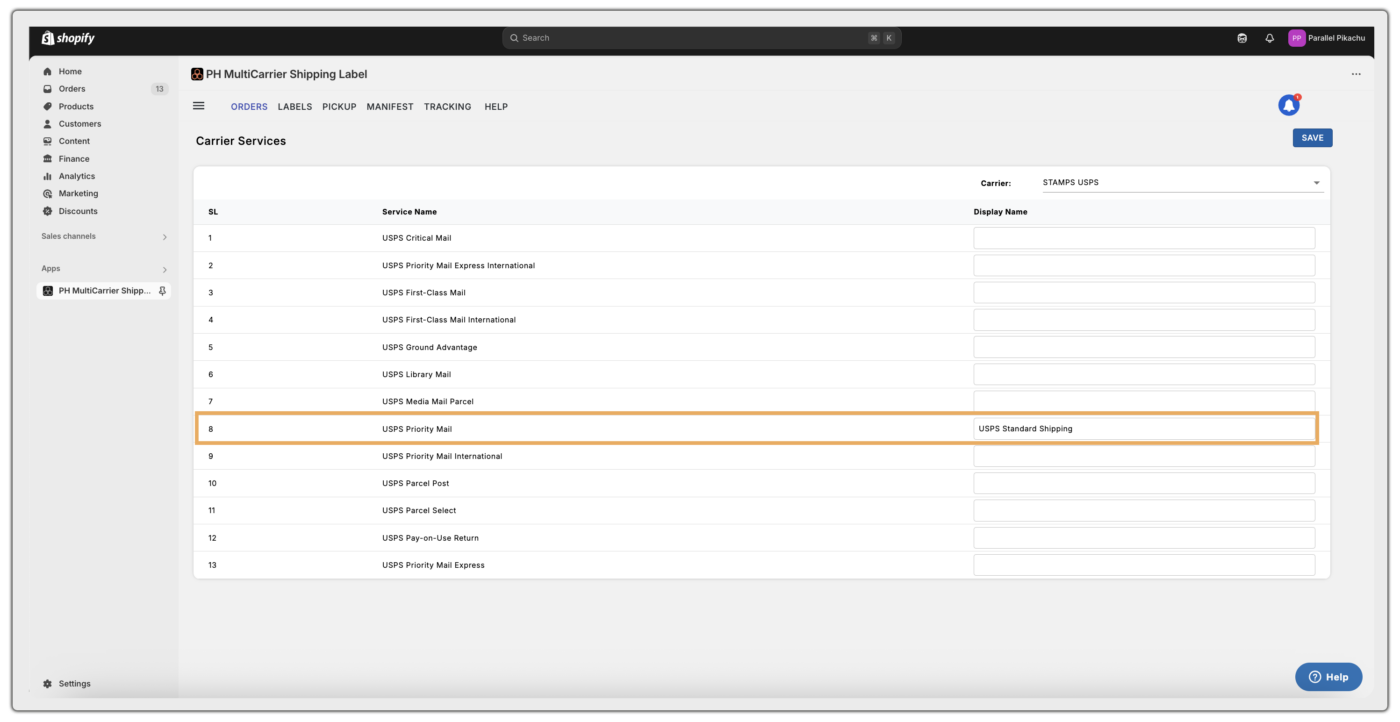
In this section, you have a provision to change the display name of the carrier services and show the updated name on the checkout page. To add a custom carrier service name, navigate to:
☰ Menu > App Settings > Shipping Rates > Carrier Services
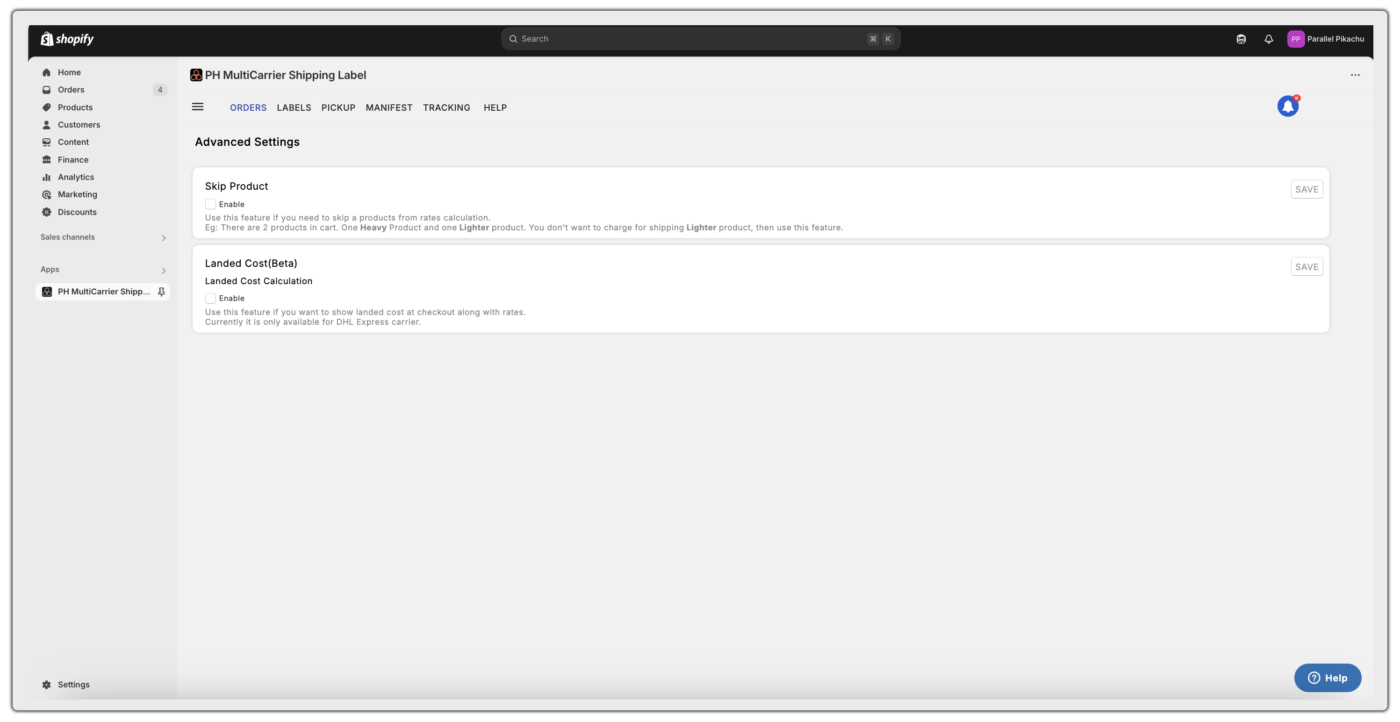
Advanced Settings
In this section, you have two main options:
- Skip Products from Rate Calculation – Exclude specific products from shipping rate display (specifically for the products available in different shipping classes).
- Add Landed Cost (DHL Express) – Include customs and handling estimates in checkout quotes.

Optimizing Your Shipping and Printing Configurations
Use this section to set up your primary shipping, label printing, tracking, and tax configurations. It forms the foundation of your shipping workflow and helps streamline daily operations. To find the general settings, navigate to:
☰ Menu > App Settings > General Settings

This portion contains the following:
- Tax IDs
- Print Settings
- Tax Invoice
- Tracking
- Shipping
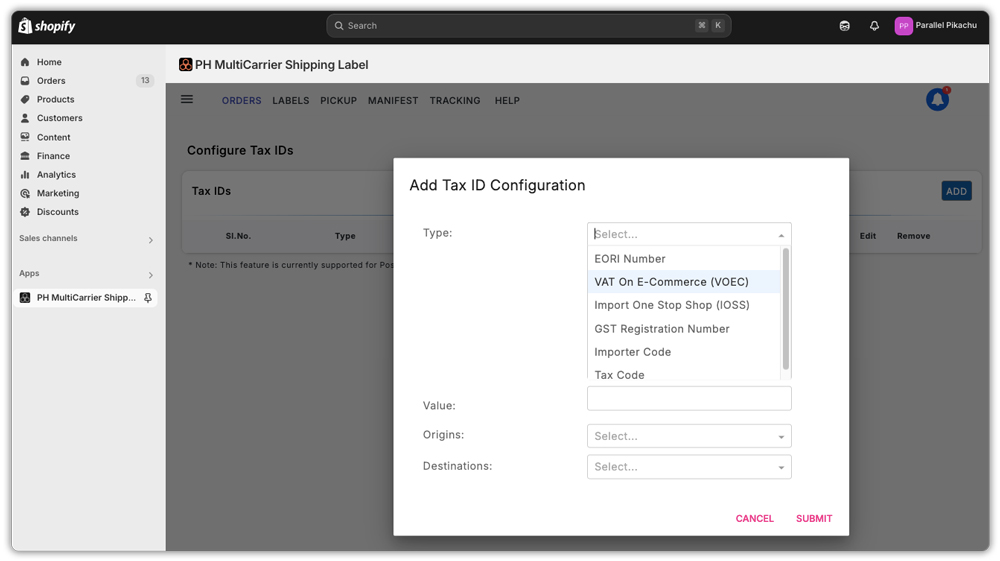
Add Tax IDs
You can use this section to set up Tax IDs and add the type of tax, its value, origin, and destination based on your country’s rules. This feature is available only for PostNord, Sendle, and Amazon Shipping.
Available Tax types:
- EORI Number:
A unique number required for importing/exporting goods to/from the UK or EU. - VAT on E-commerce:
Value Added Tax (VAT) that sellers must collect and pay for online sales, especially in cross-border sales. - Import One Stop Shop (IOSS):
A system used in the EU that simplifies online sellers to report and pay VAT. - GST Registration Number:
Used in regions like India and Australia for Goods and Services Tax. - Importer Code:
A code assigned to businesses/ individuals who regularly import goods, for customs tracking. - Tax Code:
A set of numbers and letters used by governments to calculate how much tax a person/ business needs to pay.
Document Print Settings
In this section, you can set up what documents need to be printed.
Choose which documents to print for each order and how many copies you want.
If you turn on all the options here, then clicking “Download All Documents” will print all the selected documents together.
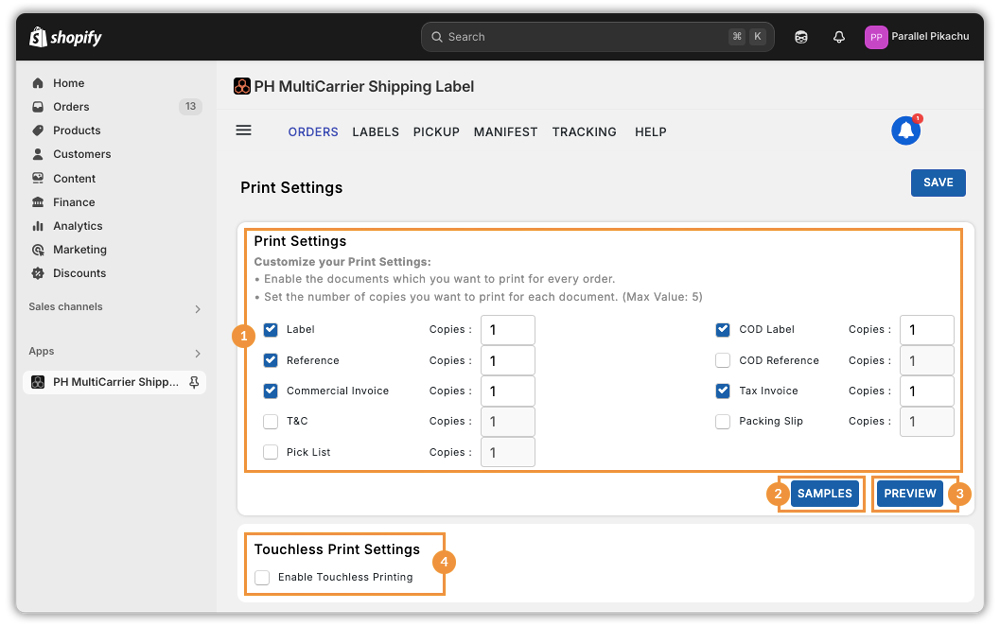
1. The documents that can be printed
- Label: A label is a document with shipping details that is attached to a package for delivery.
- Reference: A reference is a custom note or identifier added to a shipment to help track or recognise the order.
- Commercial invoice: A commercial invoice is a document that shows details of items being shipped internationally, used for customs clearance.
- T&C: T&C stands for Terms and Conditions, which are the rules and guidelines that users must agree to follow when using a service or product.
- Picklist: A picklist is a document or list used to identify and gather items from inventory for order fulfilment.
- COD Label: A COD (Cash on Delivery) label is a shipping label that indicates the payment for the goods will be collected upon delivery.
- COD Reference: A COD Reference is a unique identifier used to track and manage Cash on Delivery payments for a specific shipment.
- Tax Invoice: A tax invoice is a document issued by a seller to a buyer, detailing the goods or services provided and the taxes charged on them.
- Packing Slip: A packing slip is a document that lists the items included in a shipment, used to verify the contents of a package.
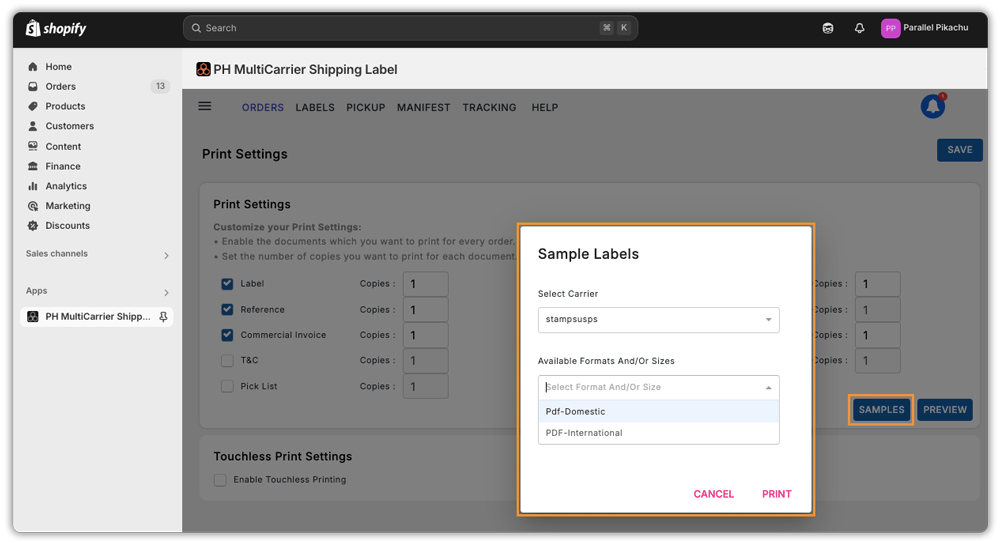
2. Sample Labels
The samples option is to print sample labels by selecting the carrier and available format or sizes.
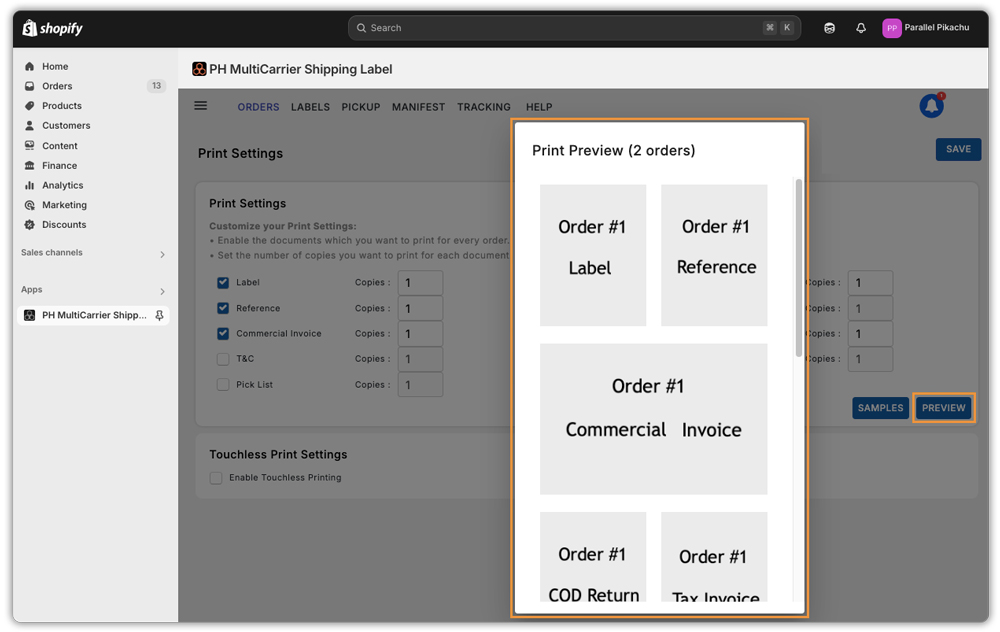
3. Print Preview
The Print Preview option lets you preview shipping documents for 2 selected orders before printing. This helps you check the layout and details (like labels and invoices) to make sure everything looks right before you print or download them.
4. Touchless Print Settings
With Touchless Printing, you can print shipping labels automatically using your printer. Once set up, labels print instantly—no clicks needed—making order fulfillment faster and easier.
You can refer to – Set up automatic Touchless label printing, for more details.
Print Tax Invoice
A tax invoice is an official document that outlines the details of a sale, including product information, tax amounts, seller, and buyer details. It helps customers claim tax credits and is essential for business records.
You can choose an Order Invoice Template that best fits your needs. You also have the option to include your digital signature, which will appear on the invoice.
Available Invoice Templates:
You can customise your tax invoice in the following formats:
- 4×6 – Compact invoice, ideal for thermal printers and small packages.
- Large – Full-sized invoice, suitable for detailed information and A4 printing.
- 4×6 with Taxes – Small invoice that includes tax details.
- International Invoice (India only) – Meets FedEx and DHL international shipping requirements for Indian merchants.
- Custom Tax Invoice – Fully customizable format that can be tailored to your brand and business needs.

Customising a Tax Invoice
Customising your tax invoice helps align it with your brand, enhances professionalism, and improves customer experience. It also supports compliance with legal requirements and makes it easier to manage sales and tax records.
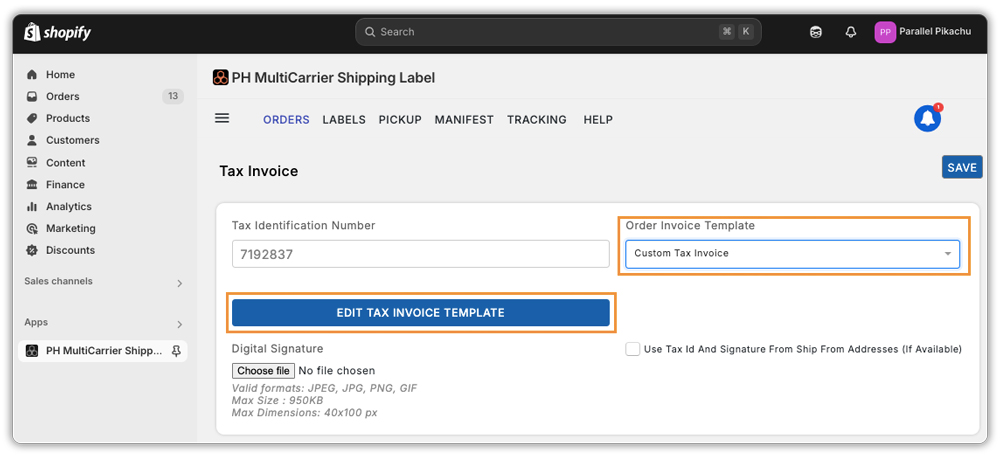
How to Edit a Tax Invoice Template
To customise your tax invoice:
- Go to Settings in the app.
- Click General > Tax Invoice.
- Under Order Invoice Template, select Custom Tax Invoice.
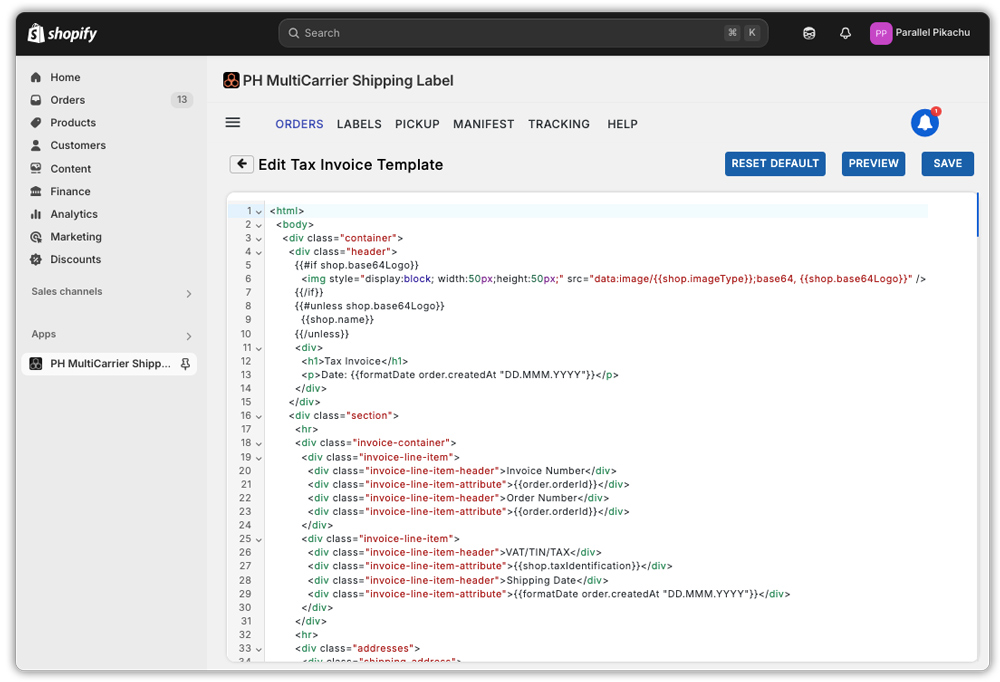
- Click on Edit Tax Invoice Template to open the editable template.
You can modify or rearrange the fields like – Order details, Invoice details, Store address, Product information, Customer addresses, Additional notes or branding messages, Tax ID / Tax ID type, Digital signature, or company logo.
You can preview your changes before saving. Once you’re happy with the layout, click Save.
Adding your company logo to the invoice strengthens your brand identity and builds customer trust.
Order Tracking
The tracking feature keeps your customers informed about their order status in real-time. Once an order is shipped, the app automatically sends tracking emails with updates like In Transit, Out for Delivery, and Delivered, so customers always know where their order is.
Customising the Tracking Email Template
You can personalise the tracking email to match your brand and messaging style. The app lets you send tracking details, like the tracking number and shipping status, in the Order Completion email.
Here’s how the email template editor works:
- Subject Line: Set the subject line using placeholders like $order.orderNumber$ and $shop.name$ to include the order number and store name automatically.
- HTML Email Template: This is where you can customise the email’s content and design using HTML/CSS. Great for advanced users or developers.
- Email Preview: See a real-time preview of your email. It shows sample details like the tracking number, delivery status, shipping method, a thank-you message, and support contact info.
- Buttons:
- Reset Default – Revert to the original default email format.
- Save – Save any changes you’ve made.
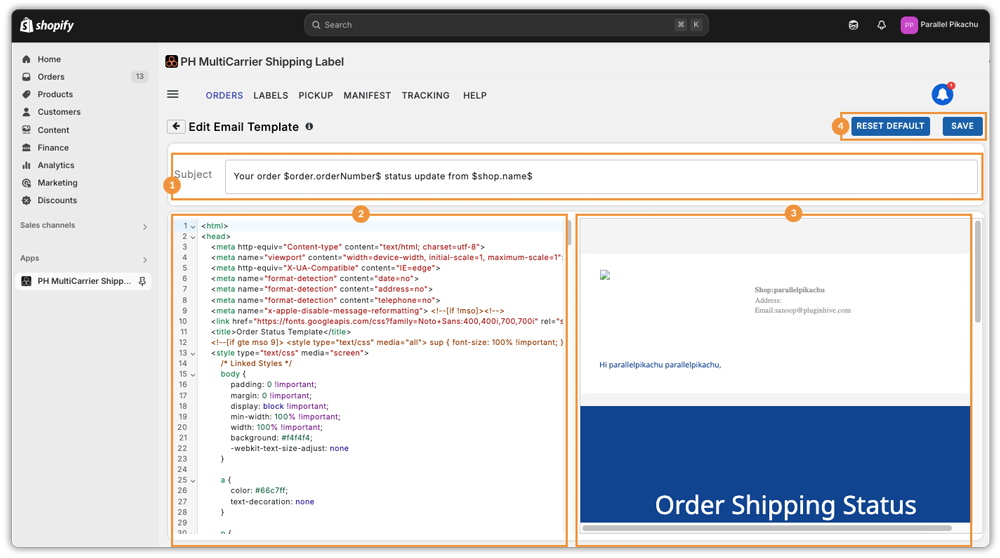
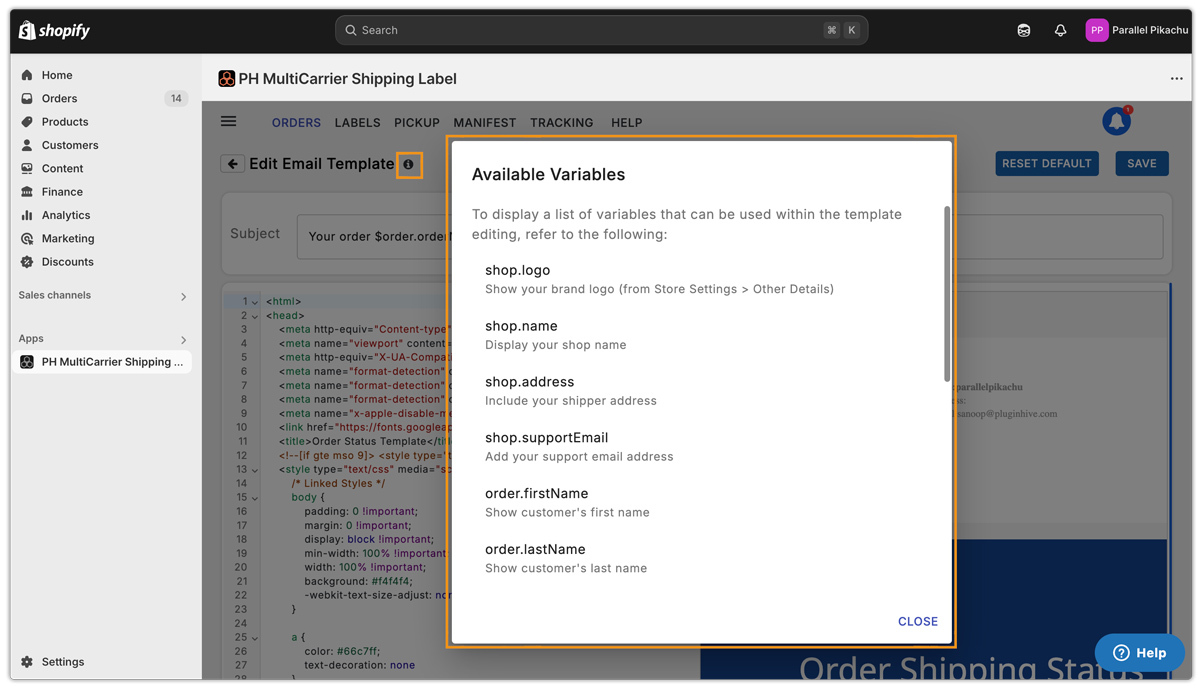
The information (i) icon next to ‘Edit Email Template’ provides a list of variables you can use while customizing the template. Simply click it to view all available variables.
In short, this feature helps you design and preview the shipping update emails sent to your customers when their order status changes.
Order Confimation Emails
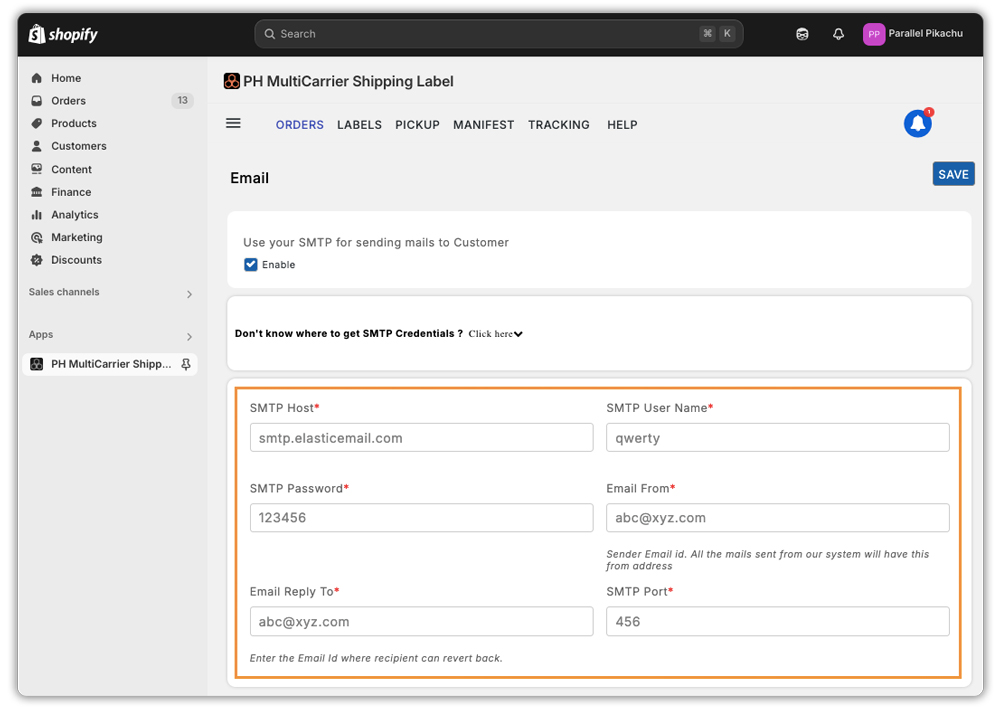
This feature lets you connect your own email server (using SMTP – Simple Mail Transfer Protocol), so all order-related emails, like shipping updates and invoices, are sent from your own email address instead of a generic one. This helps build trust and keeps your branding consistent.
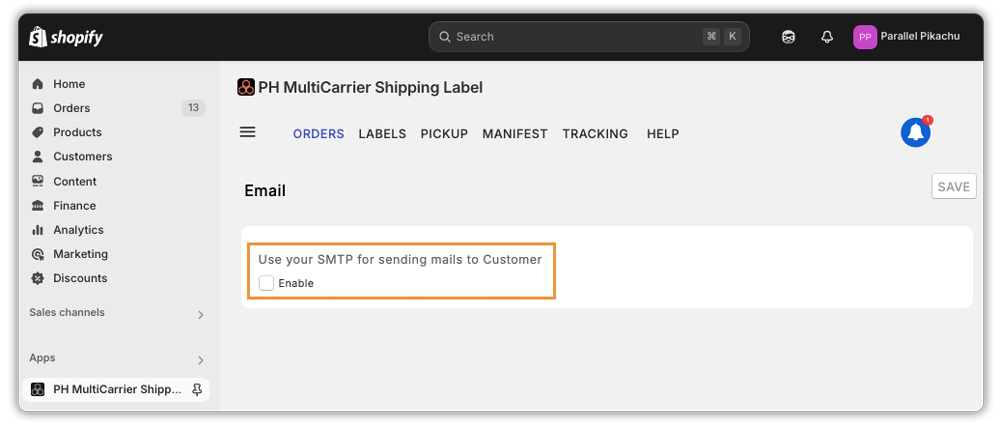
How to Enable
- Tick the checkbox to enable the feature.
- You’ll need to enter SMTP credentials, which you can get from popular email services like Mailgun or SendGrid.
Required Details
- SMTP Host: The server used to send emails (e.g., smtp.gmail.com)
- SMTP Username: Your email ID or login name
- SMTP Password: Your login password or app-specific password
- Email From: The email address shown as the sender
- Email Reply-To: The email address where replies should go
- SMTP Port: The port for sending emails (usually 465 or 587)
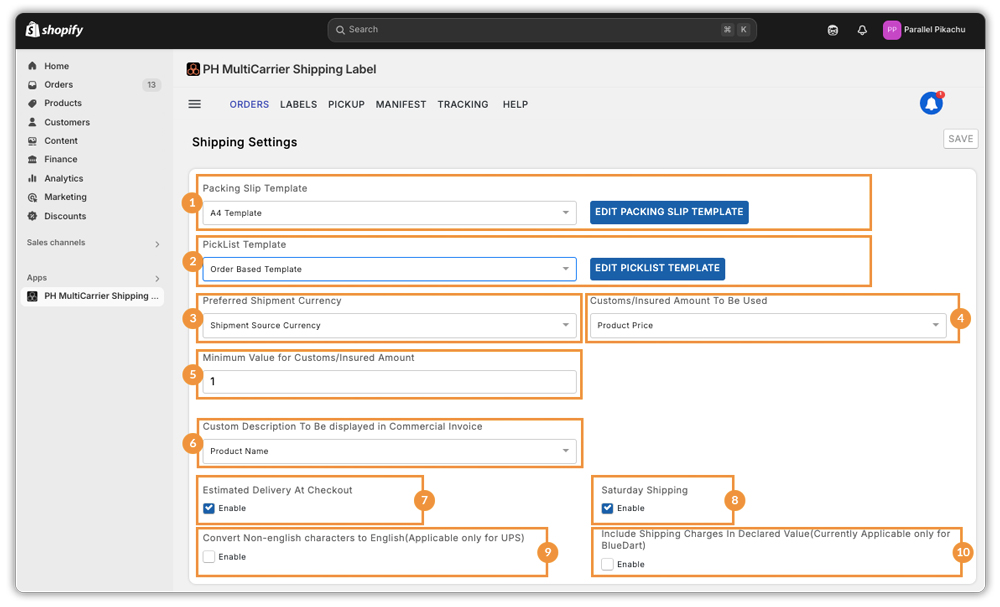
Customize Shipping Options
This section lets you customise key shipping options to better suit your business needs. You can edit templates, set currency, manage customs values, and fine-tune delivery settings. Below is a quick breakdown of each option:
- Packing Slip Template: A format used to print the list of items in a shipment. It helps the customer and shipper know what’s inside the package. You can edit this template to match your branding and preferred layout by clicking on “Edit Packing Slip Template”.
- Picklist Template: A layout used for the list of items that need to be picked from inventory before packing. Helps in organising the packing process. This template can be customized based on your workflow and team preferences. Click on “Edit Picklist Template” to edit.
- Preferred Shipment Currency: Lets you choose which currency should be used for shipping costs (e.g., USD, INR, etc.).
- Minimum Value for Customs/Insured Amount: Sets the lowest value to declare for customs or insurance, even if the product price is lower. Useful for international shipping.
- Custom Description To Be Displayed in Commercial Invoice: Lets you decide what to show (like product name or category) in the invoice used for customs clearance in international shipments.
- Estimated Delivery At Checkout: When enabled, customers can see the expected delivery date before they place an order.
- Convert Non-English Characters to English (Applicable only for UPS): This feature changes any foreign language characters to English so that UPS can process shipping labels without errors.
- Customs/Insured Amount To Be Used: Allows you to pick what value (like product price or declared value) should be used for customs or insurance when generating labels.
- Saturday Shipping: When turned on, it allows your shipping carrier to deliver packages on Saturdays, too.
- Include Shipping Charges in Declared Value: Enable this option to include shipping charges in the declared value for insurance purposes (currently only works with BlueDart).
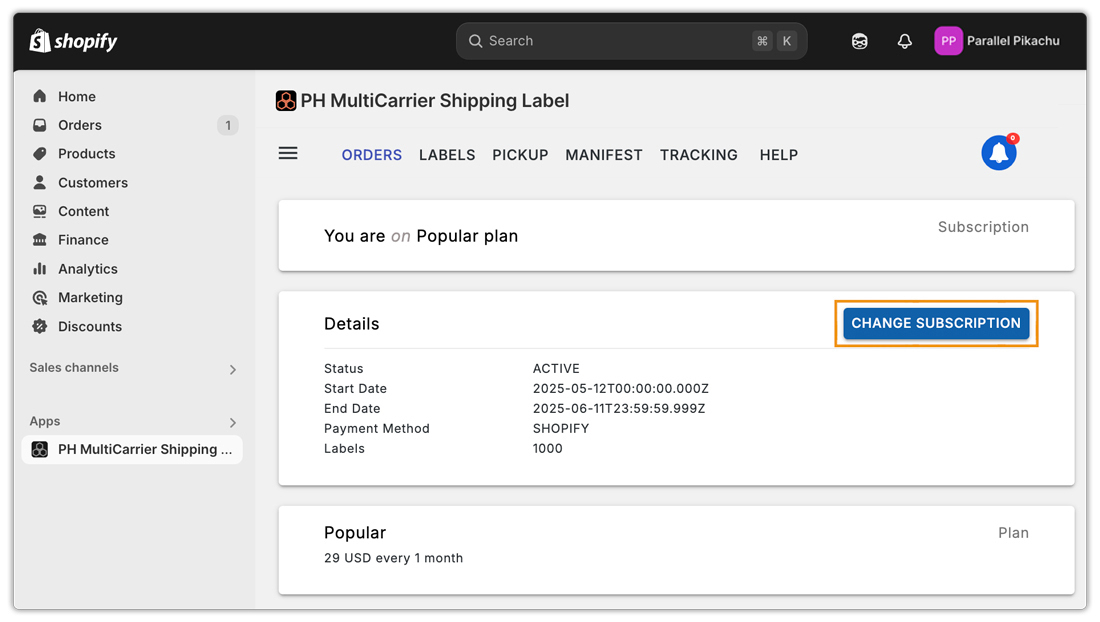
Managing App Subscriptions
To manage your app subscription, check out the two options below by navigating to ☰ Menu > Account.
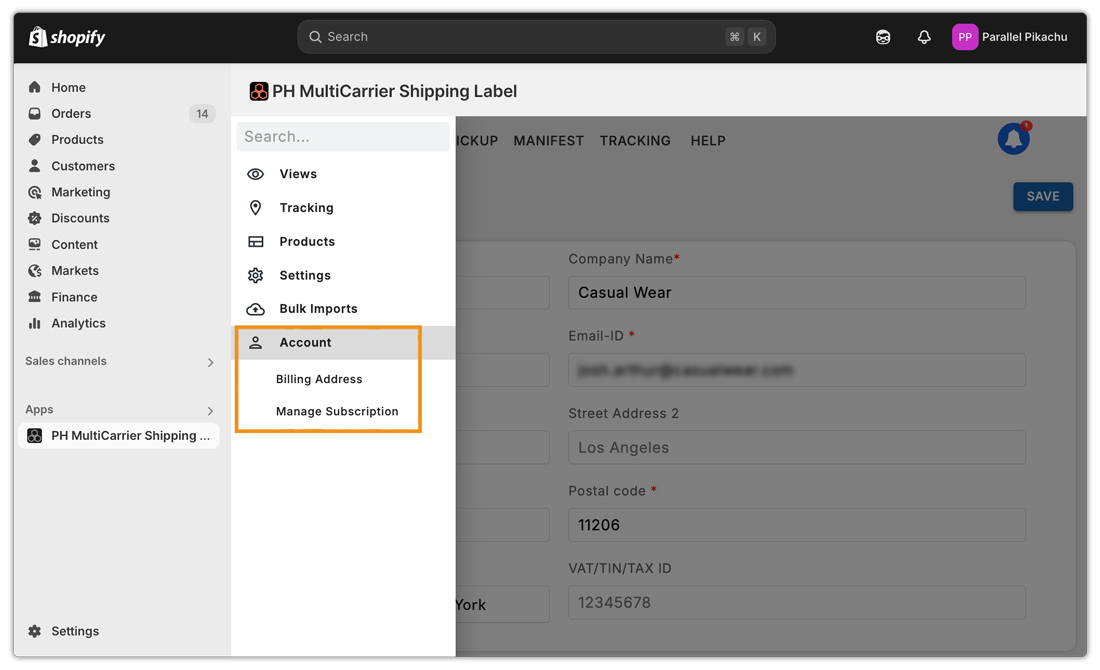
1. Billing Address
- The billing address is linked to your payment method (credit card, debit card, or payment account).
- It’s used to verify payments, not for shipping orders.
- By default, your store location is saved as the billing address.
To update the billing address or change the time zone, navigate to:
☰ Menu > Account > Billing Address.
2. Manage app subscription:
- This option lets you change your current subscription plan based on your business needs.
- You can upgrade or downgrade your plan anytime.
- To modify your subscription, navigate to:
☰ Menu > Account > Manage Subscription > Change Subscription.
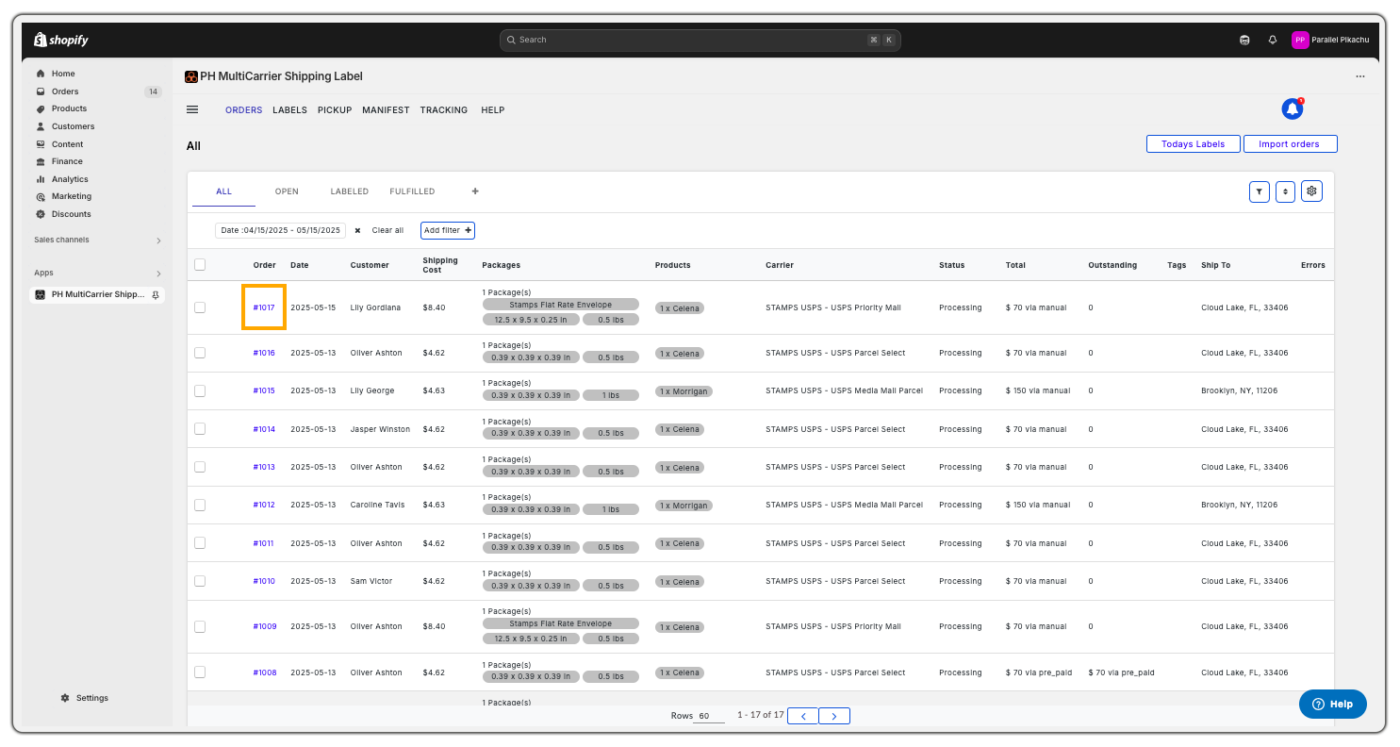
Understand the Orders Grid
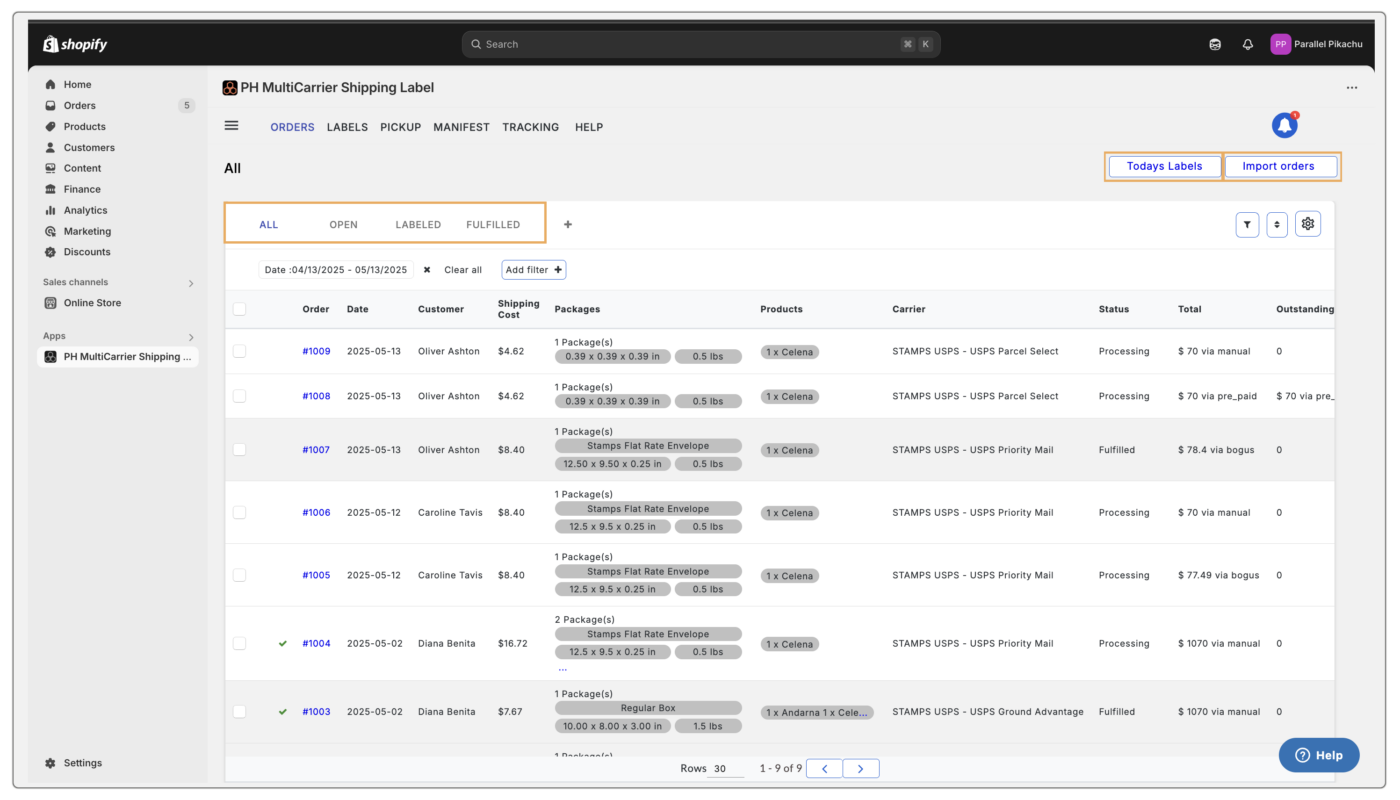
The Orders Page serves as the central dashboard for managing all your shipments, labels, pickups, and tracking activities. With robust filtering, sorting, and batch processing capabilities, this page is designed to streamline your order fulfillment process and improve operational efficiency.
Headers Available
- Orders
- Labels
- Pickup
- Manifest
- Tracking
- Help
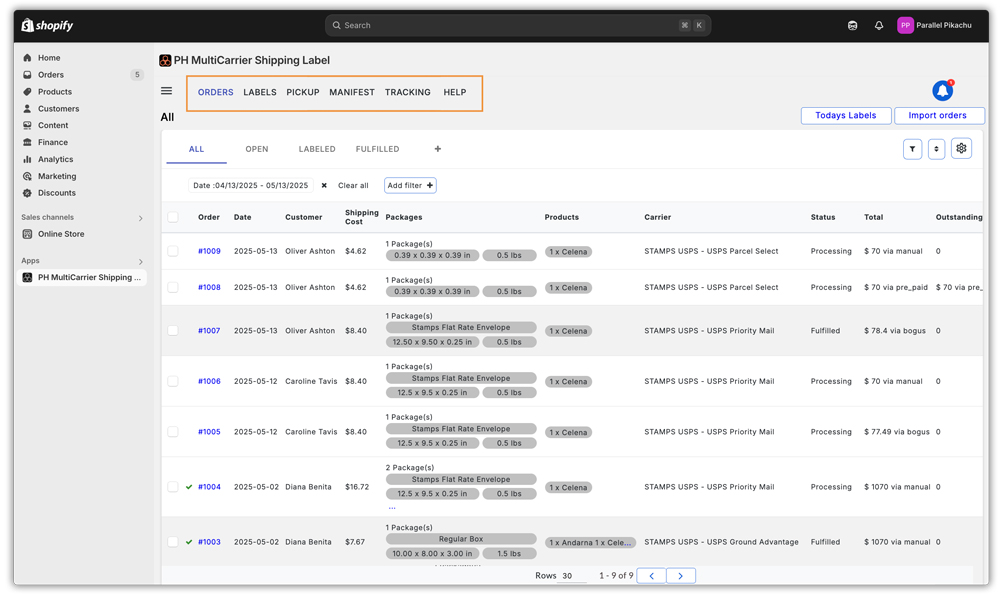
1. Orders
The Orders header allows you to view, filter, edit, and process all your imported orders. It acts as the control panel for managing shipping, packaging, fulfilment, and other logistics, offering a comprehensive set of tools.
Import Orders
By default, orders will be automatically imported. However, if you see any delay or notice that an order hasn’t been imported, you can manually initiate the import using the Import Orders button.
Today’s Labels
This view lets you see all the shipping labels that have been created today for quick access, allowing you to perform all post-label actions quickly and efficiently.
For example, if you generate labels for 20 orders in a day, you can:
- View how many succeeded, failed, or are pending
- Print all labels or download individual ones
- Request a pickup or fulfil orders directly from here
- Print a Pickup List for all orders.
This section is especially useful for reviewing all the labels you have processed that day.
View Options
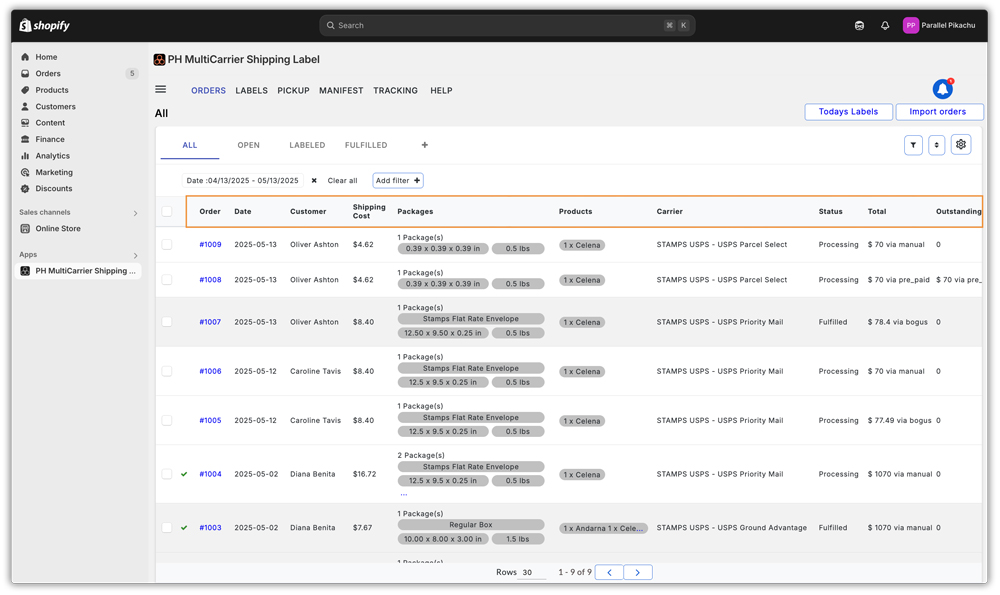
At the top of the Orders page, you’ll find four viewing tabs to help you quickly access orders based on their shipping lifecycle:
- All – Displays all imported orders regardless of their status.
- Open – Shows orders that have not yet been processed or labelled.
- Labelled – Displays all orders for which shipping labels have already been generated.
- Fulfilled – Displays orders that have been marked as fulfilled, either via the app or manually.
These tabs let you jump straight to relevant orders without manually applying filters each time.
Filters
The “Add Filter” button is available across all views, allowing precise control over which orders you want to view using the following criteria:
- Order ID – Search and filter orders based on the order IDs, you can use the comma as a separator (ex: 1001,1002 or #1001, #1002)
- Name – Filter by customer name.
- SKU – Narrow down based on product SKU.
- Status – Filter by order status, such as Open, Labelled, Fulfilled, etc.
- Country – Filter based on the destination country.
- Date – Choose from Today, Last Day, This Month, Last Month, or use a Custom Date Range.
- Phone – Search by customer phone number.
- Carrier – Filter based on the shipping carrier assigned to the order.
- Tags – Use Shopify tags or custom tags to filter orders.

Custom Filter Options
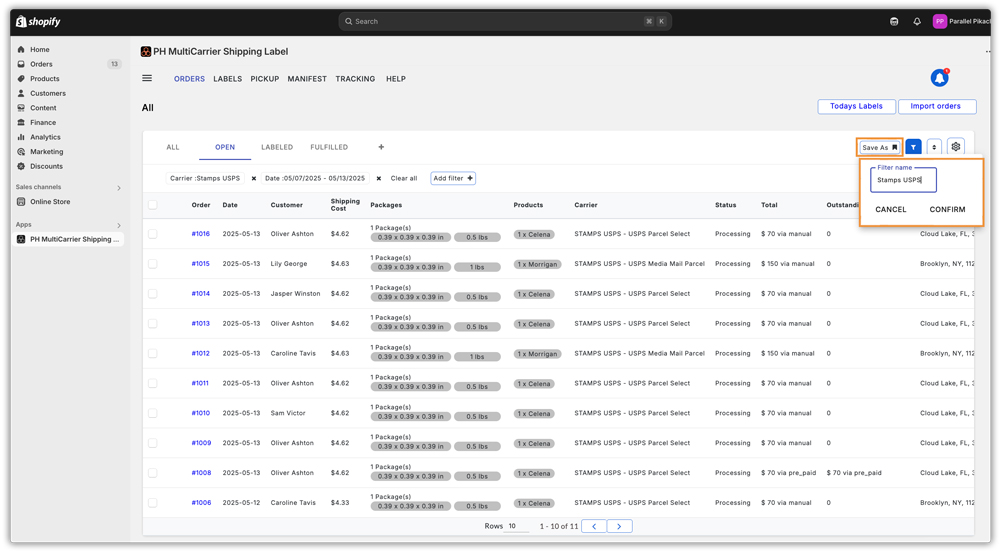
You can also create and reuse custom filters easily:
- Use “Save As” to save your current filter view.
- Click the “+” (Plus) icon next to the filter view dropdown to create a new saved view.
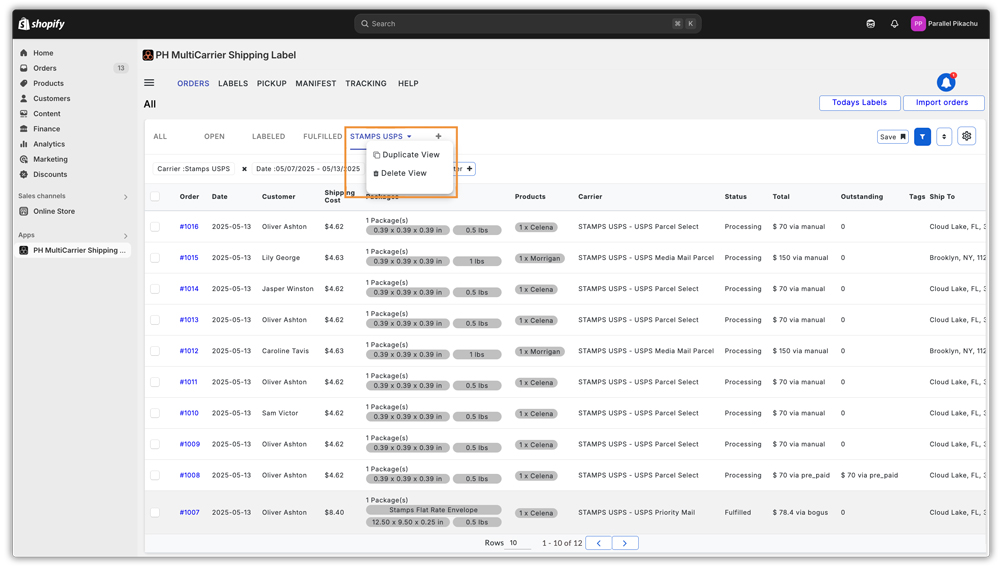
- Delete/Duplicate View: If you want to duplicate a view to include additional filters while keeping the original, or if you decide to permanently remove a view, you can use the Delete or Duplicate options accordingly.
For example, if you have integrated two shipping carriers, say, Stamps, USPS, and UPS, and want to view orders based on the carrier, you can use the Carrier filter to create and save a filtered view. This allows you to quickly access and compare orders shipped via Stamps, USPS, and UPS.
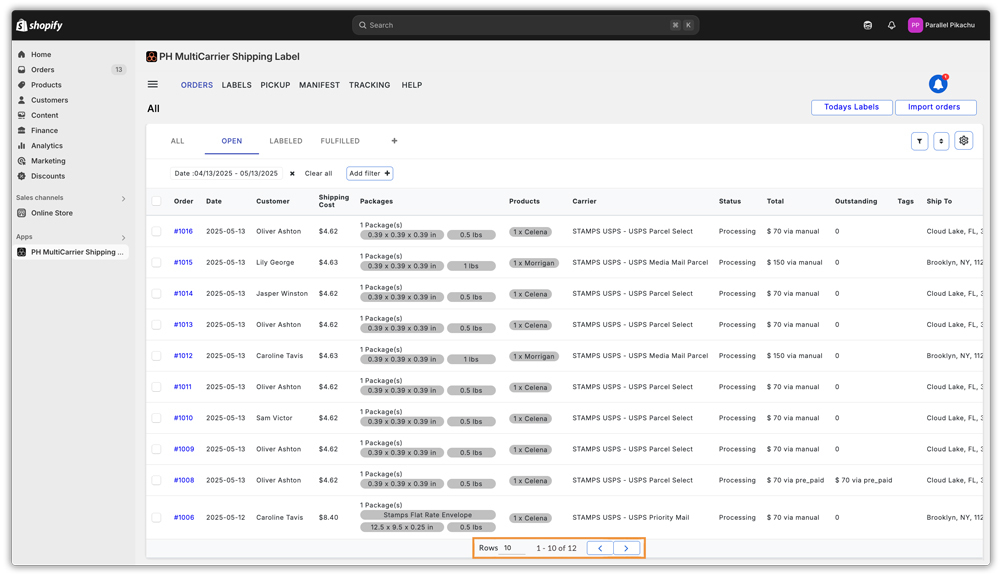
Order Table Columns
The grid layout displays a comprehensive view of every order with the following default columns:
- Order ID – Clickable to view detailed Order Summary.
- Date – Shows when the order was imported or created.
- Customer – Customer’s name.
- Shipping Cost – Calculated cost based on the selected package, carrier, and service.
- Packages – Shows weight, dimensions, and number of boxes.
- Products – Displays product names and their quantities.
- Carrier – Shipping carrier and service assigned.
- Status – Current order status in the app (Initial, Processing, Label Created, Fulfilled, Label Failed and Return Created).
- Total – Total order value along with payment type (COD, Prepaid, or Manual).
- Outstanding – Any pending payment value.
- Tags – Shopify or app-specific tags.
- Ship To – Shipping address of the customer.
- Errors – Any order-level issues (e.g., failed address validation).
- Weight – Total shipment weight.
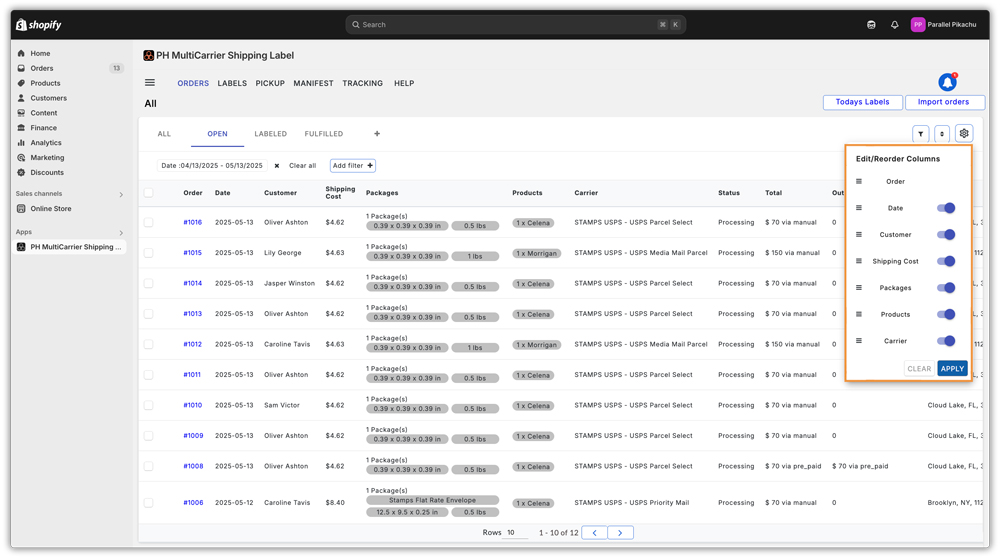
Edit/Reorder the Tabular Columns:
You can customise the table columns to suit your needs by enabling or disabling specific columns. Simply click the Settings icon, as shown below.
Order Rows and Pagination
You can control how many orders appear on each page with the following pagination settings:
10, 20, 30, 40, 50, 60, 100
This helps manage bulk orders efficiently and improves usability for large catalogues.
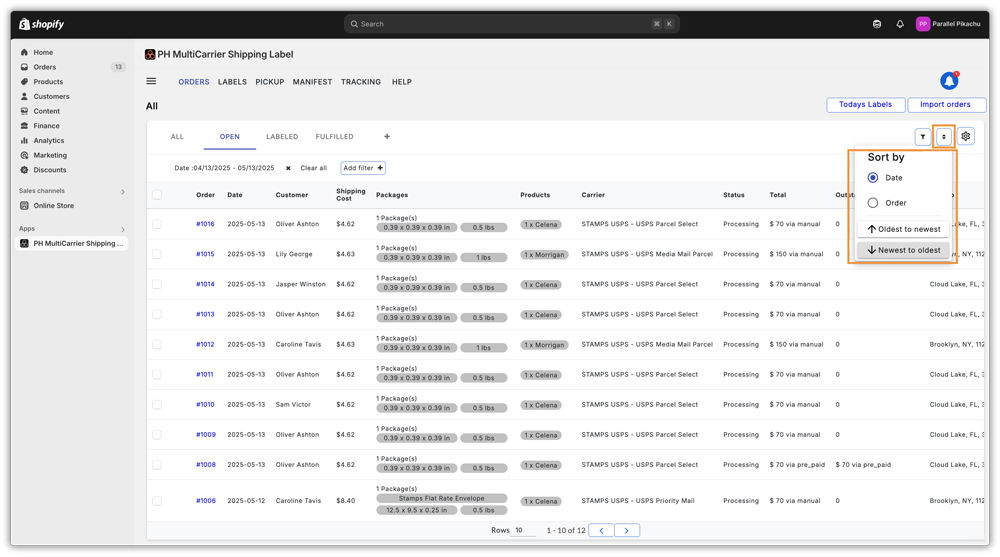
Sorting
Sort orders by Order Date:
- Oldest to Newest
- Newest to Oldest
By default, the system displays orders from the last month, but this can be customised using filters.
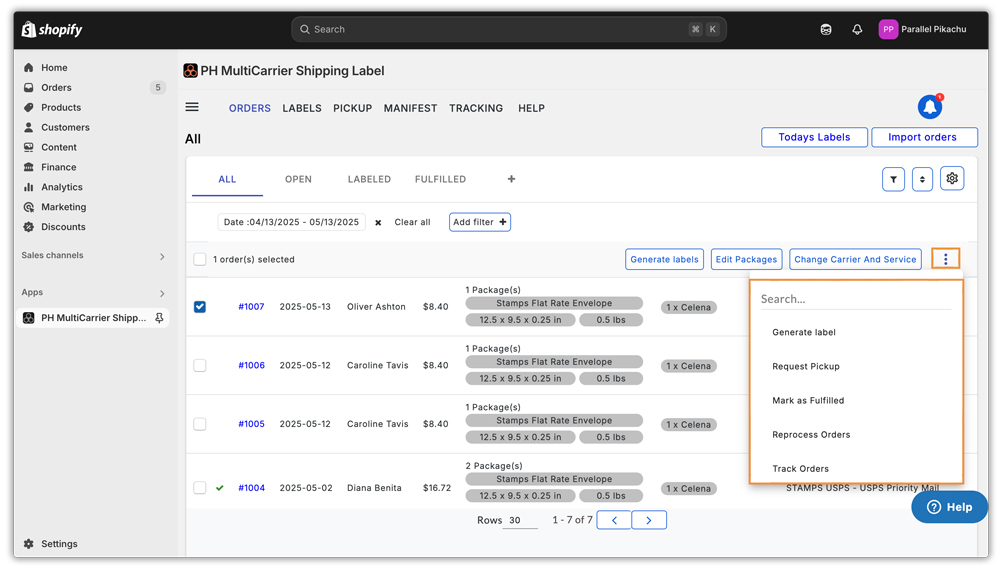
Quick Actions (On Order Selection)
When multiple orders are selected, additional tools become available.
The available action buttons depend on:
- The page view (All, Open, Labelled, Fulfilled)
- The status of the selected orders
Quick Actions
Depending on selected orders and their statuses, the following action buttons appear:
- Generate Label – Creates a shipping label for orders that are in Processing Status and updates the order status to “Label Created”.
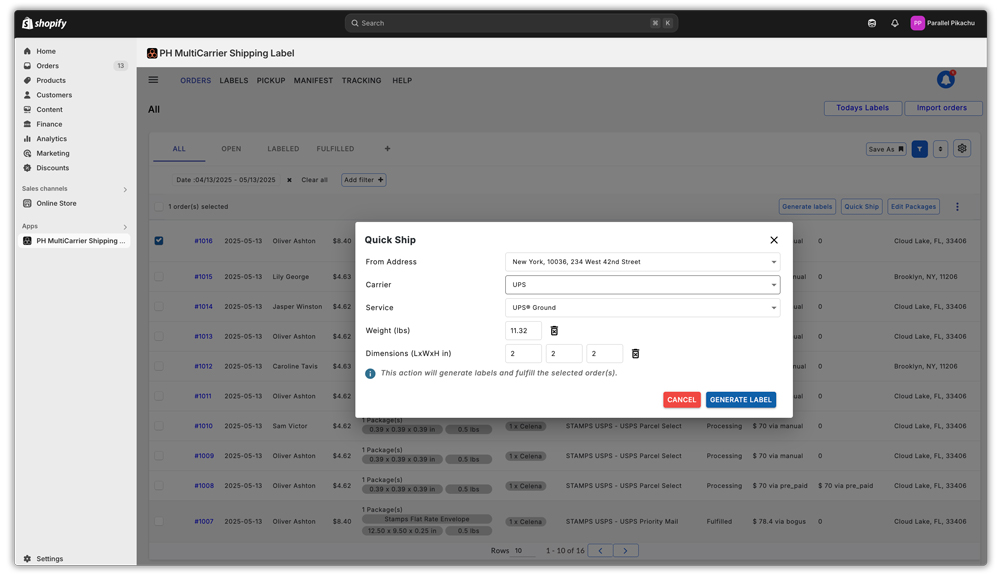
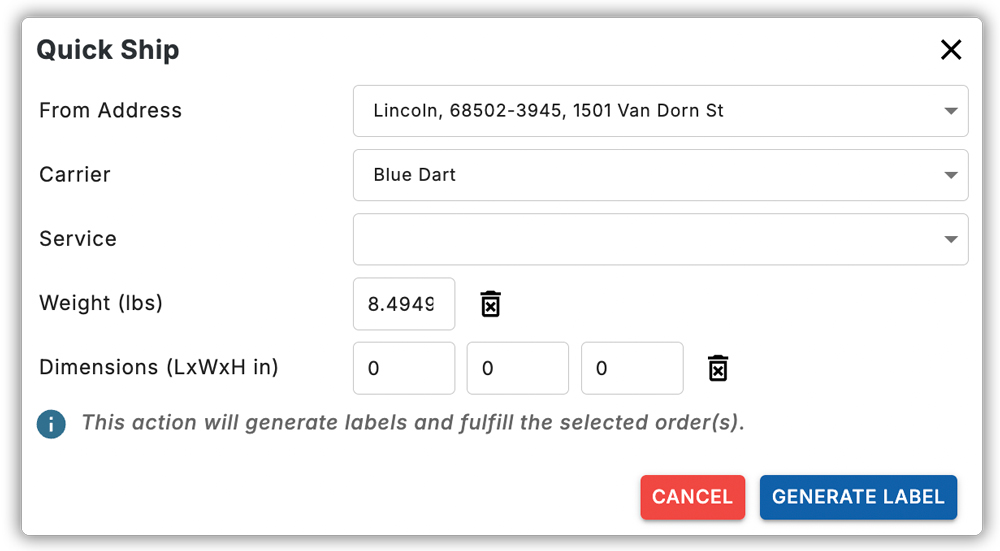
- Quick Ship- Allows you to process multiple single-package orders in one go. You can modify the From Address, Carrier, Service, Weight & Dimensions in this section. Once modified, you click on Generate Label to create a label and fulfill orders automatically
- Edit Package – Allows you to add/remove boxes, modify box contents, adjust weight/dimensions, and this is applicable only for one order at a time
- Request Pickup – Schedules a carrier pickup for the order. The order then appears under the Pickup header.
- Print Documents – Shows a dropdown of options to print all documents which include – Label, Tax Invoice, Packing Slip, Pick List, or All options at once.
Available Print Options:
- Label – Prints shipping label(s) for selected order(s) or batch.
- Packing Slips – Lists shipment items; useful for the warehouse and customers.
- Tax Invoice – Official invoice with pricing and tax details.
- Pick List – Consolidated product list for efficient picking.
- Commercial Invoice – Required for international shipping; includes product, value, and origin details.
- All – Prints all selected documents together in one click.
Only enabled documents will be printed when using the All option.
- Mark as Fulfilled – Pushes the tracking number to your store (e.g., Shopify) and updates the order status to Fulfilled
For Example:
Selecting orders in Processing status on the All tab shows:
- Generate Label
- Quick Ship
- Edit Package
Selecting an order in the Label Created state shows:
- Request Pickup
- Print Documents
- Mark as Fulfilled
Here’s what the Quick Ship option looks like:
Order Status in the App:
- Initial – This status appears when an order is unable to be processed due to unmatched rules or errors (e.g., carrier not offering any rate). If no rules applied or if a label is cancelled, the order resets to Initial. After changes are made, use “Prepare shipment” or “Reprocess order” to resume; this will then update the order status to Processing.
- Processing – Orders that are ready to be processed.
- Label Created – Orders for which a label has been generated.
- Fulfilled – Orders fulfilled in the app.
- Label Failed – Indicates a failure from the carrier during label generation.
- Returned Created – Indicates that a return label is created.
Keep in Mind:
If you make any changes to app settings, make sure to “reprocess orders” using the Reprocess button available in More actions.
2. Labels (Label Batches)
This section displays the details of the shipping labels that have been created for various orders, including the status of label generation and shipment. It keeps track of the label batches you’ve created.
Filters
- Filter by Date Range to view relevant batches
Batch Columns
- Date – When labels were created
- Shipment Type – Forward or Return
- Result – Shows how many labels succeeded or failed
- Status – Completed or Pending
- Print – Print all labels in the batch or download individual ones
Advanced Options
Selecting batches enables:
- Print Documents (Labels, Packing Slip, Tax Invoice, Pick List individually or together)
- Request Pickup
- Mark as Fulfilled
Ellipsis Menu (⋮) Allows
- Print the Pick List for the selected batch
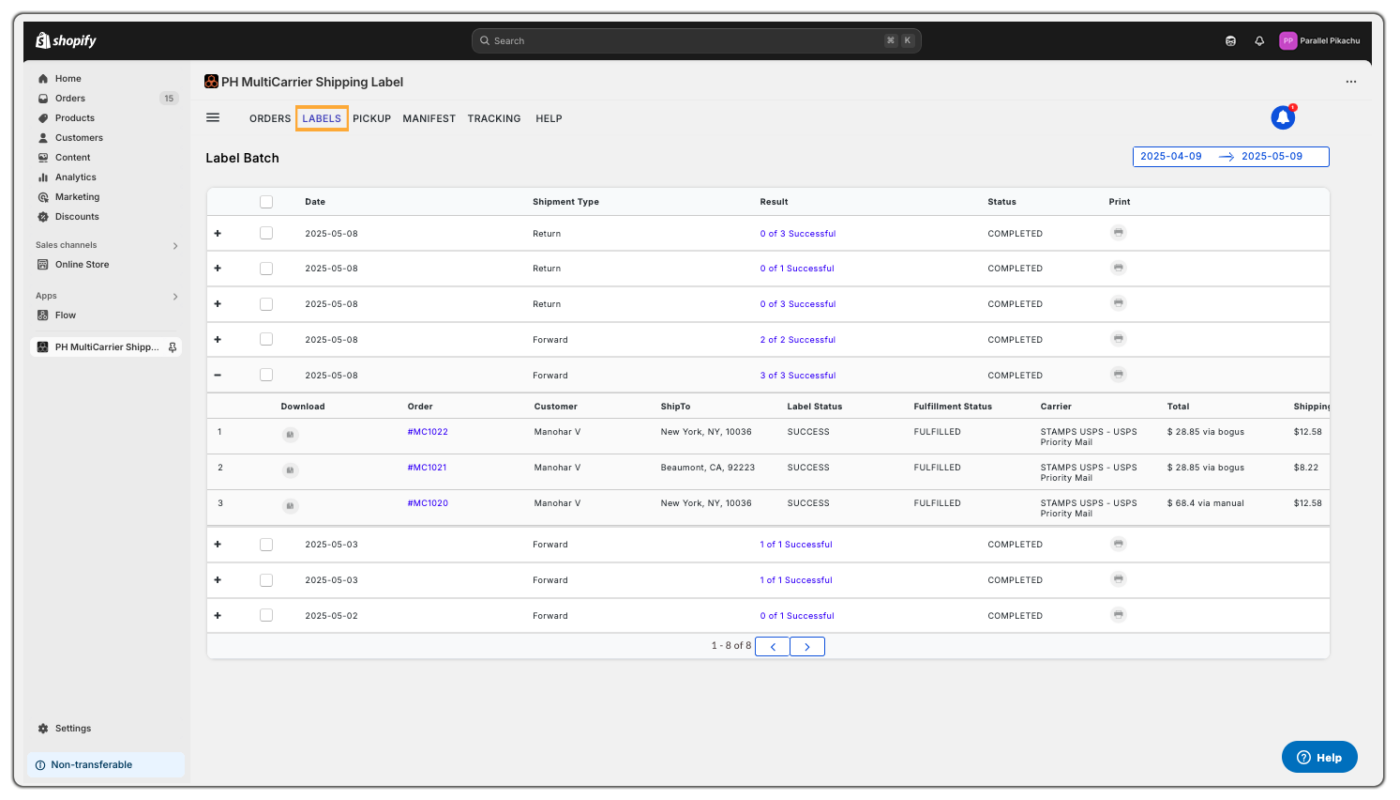
This section is especially useful for reviewing large groups of orders processed together.
3. Pickup
This section helps you manage and monitor all pickup requests submitted through the system.
Once you generate shipping labels, you can either request a pickup or mark orders as fulfilled.
Filters
- Date Range: Filter pickup requests based on a specific date range.
- More Actions: Use the “More actions” menu to mark orders as fulfilled if needed.
Pickup Grid Columns
- Date: Shows when the pickup was requested
- Shipment Type: Indicates whether the shipment is Forward or Return
- Carrier: Displays the shipping carrier used
- Address: Ship-from address selected for the pickup
- Order ID: Linked order associated with the pickup request
- Status: Indicates the status of the pickup – Completed or Failed.
- Pickup No. : Unique identifier for the pickup request
- XML Data: View pickup request data in XML format by clicking the ‘eye’ icon.
Pickup Management Options
Based on the pickup request status, you’ll get the following available actions:
- Retry: If the request fails, an error message will appear. You can retry the request after resolving the issue.
- Cancel: Cancel the pickup request if you plan to drop off the packages yourself.
- Modify: Make changes to the order details even after the pickup request has been scheduled.
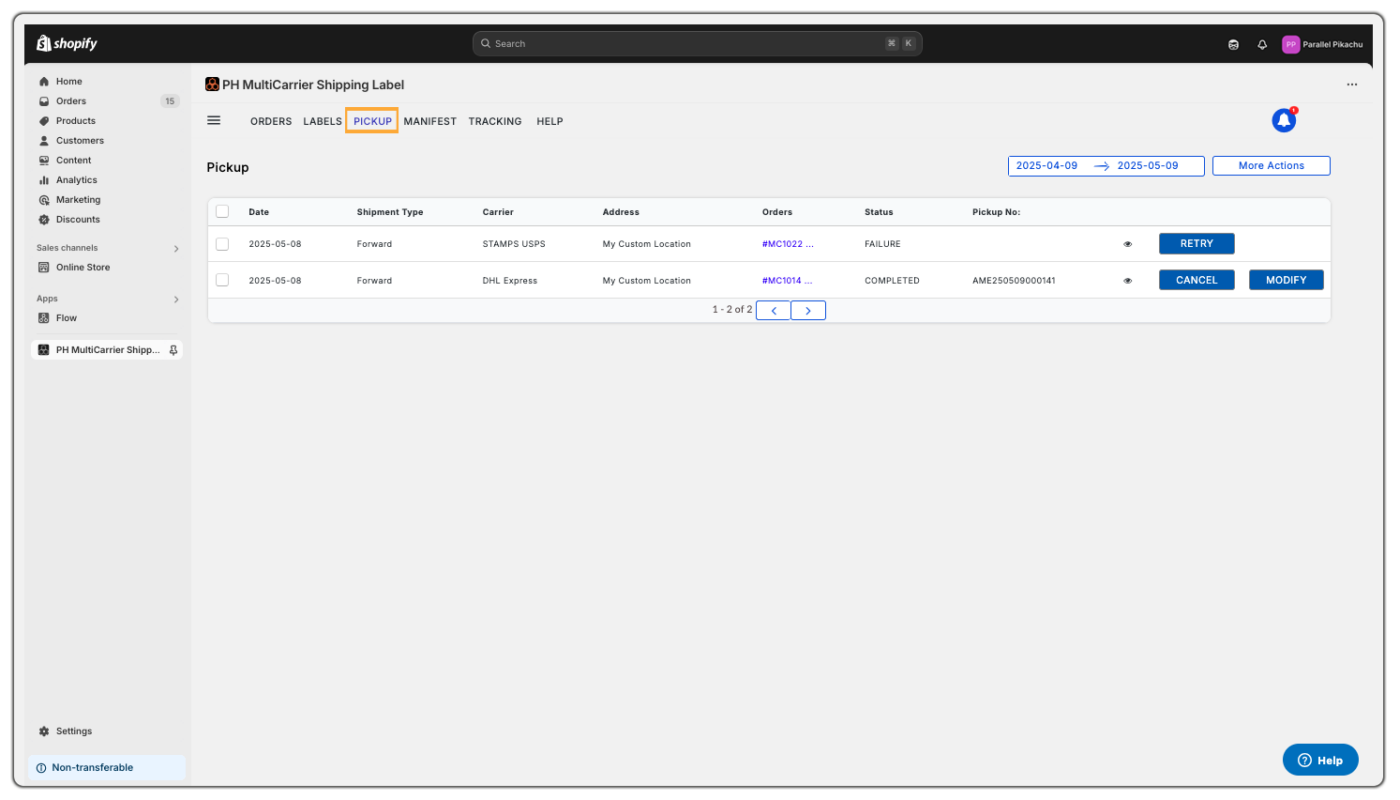
This section ensures you can easily manage and monitor all your scheduled pickups.
4. Manifest
This section allows you to track and print shipping manifests for all fulfilled orders.
A Manifest is a summary document generated after fulfilment, containing key shipment details such as order numbers, AWB (Air Waybill) numbers, and barcodes.
- It consolidates shipping information for the carrier into one document.
- The manifest barcode can be scanned to confirm or process all parcels together, saving time by avoiding individual scans.
- Includes essential information like payment details, order numbers, and label barcodes for easy reference during parcel handover.
Filters
- Date Range: Filter manifests based on creation date.
Manifest Grid Columns
- Date: Shows when the manifest was generated
- Carrier: Indicates the shipping carrier associated with the orders
- Address: Displays the ship-from address used for the manifest
- Orders: Number of orders included in the manifest
- Status: Shows whether the manifest is Pending or Completed
- Print: Print the generated manifest for physical handover
- Carrier Manifest: Displays the carrier-specific version if available
- Debug: Helps troubleshoot issues related to manifest generatio

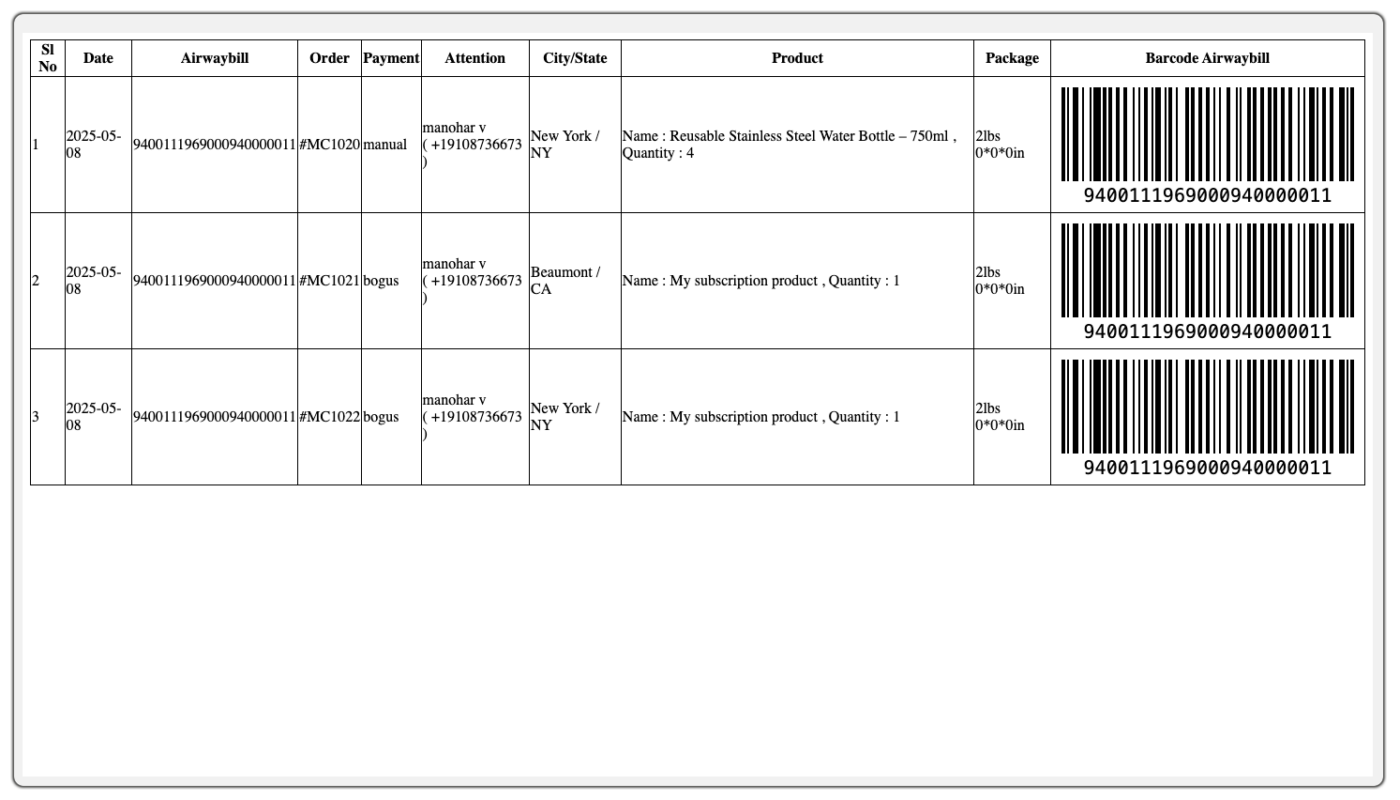
This is especially helpful when handing over multiple packages to the carrier.
5. Tracking
This section provides real-time shipment updates for all fulfilled orders.
The Tracking tab helps your fulfillment team or admin easily monitor delivery progress, investigate delays, and share status updates with customers.
- Displays tracking statuses such as Initial (label generated, not scanned), In Transit, Out for Delivery, and Delivered
- Clicking the tracking number opens a timeline view showing the shipment’s full history
- Useful for customer support, quick verifications, and internal follow-ups
Filters
- Date Range: Filter tracking updates by shipment date
- Tracking Status: View shipments based on their current status (e.g., In Transit, Delivered)
Tracking Grid Columns
- Order: Clickable link to view the order’s summary
- Store: Name of the store associated with the order
- Carrier: Displays the shipping carrier and service used
- Destination: Country where the package is being delivered
- Expected Delivery: Estimated delivery date provided by the carrier
- Status: Real-time tracking update of the shipment
- Info: Displays internal notes or any pending actions related to the shipment
Use the Retrack button to manually fetch the latest tracking status from the carrier.
This makes it easy to share updates with customers or investigate any delivery issues.
6. Help
This section offers quick access to setup guides, feature documentation, and customer support resources.
If you need assistance or clarification while using features like Orders, Labels, Pickup, Manifest, or Tracking, this is your go-to tab. It’s designed to help you troubleshoot issues, understand functionalities, and make the most of the platform with ease.
Understanding the Menu View Section in the App
The View section in the PH Multi Carrier Shipping Label app helps you monitor and manage your shipment workflow more efficiently.
Located under the “Views” tab in the app’s main menu, it includes 14 sections that track different shipping statuses, including Orders, Labels, Pickup and Manifest, which are covered above separately. The other set of options in Views tab are:
- Processing
- Label Created
- Store Fulfilment failed
- Returs
- Orders for Later
- Labels Failed
- Returns Failed
- Order Cancelled
- Not to Ship
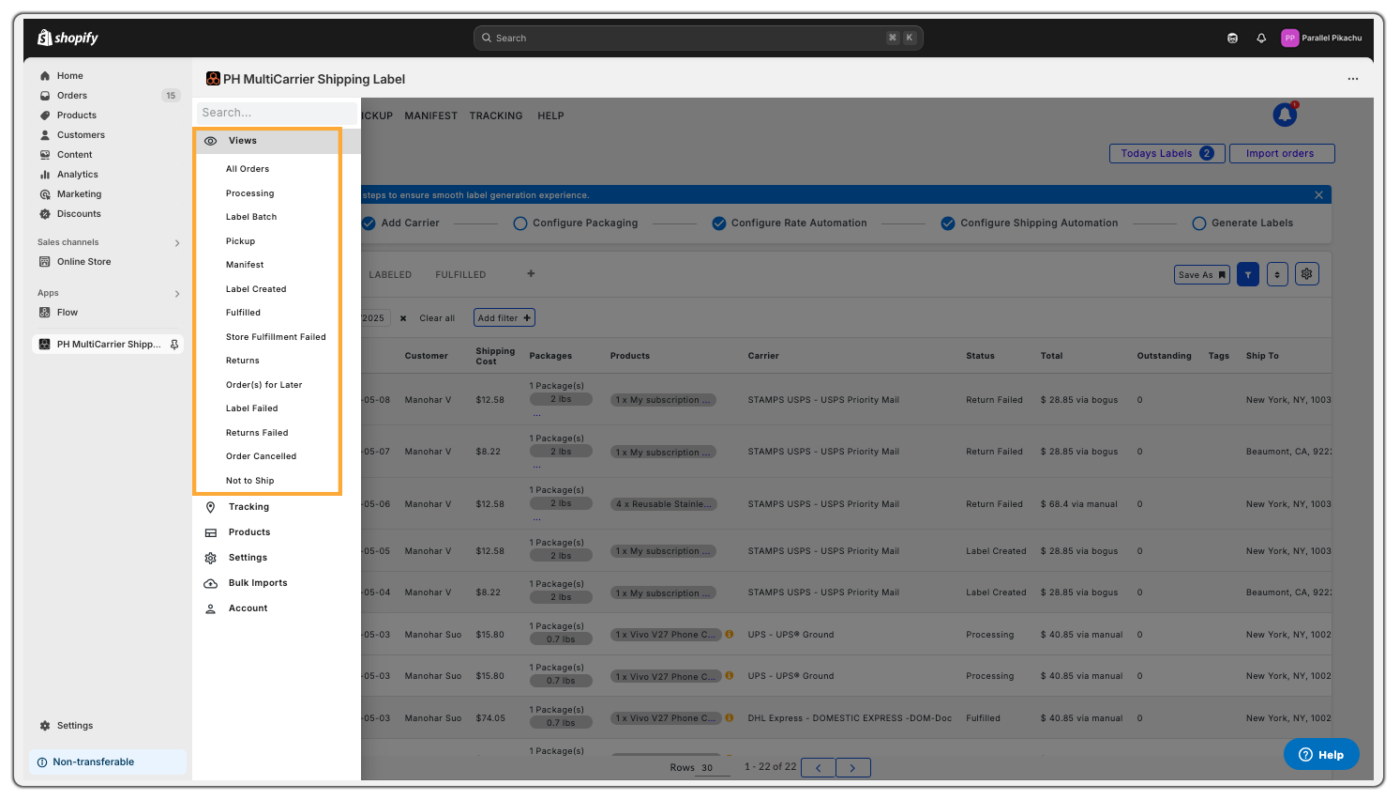
Here are the sections within the View category:
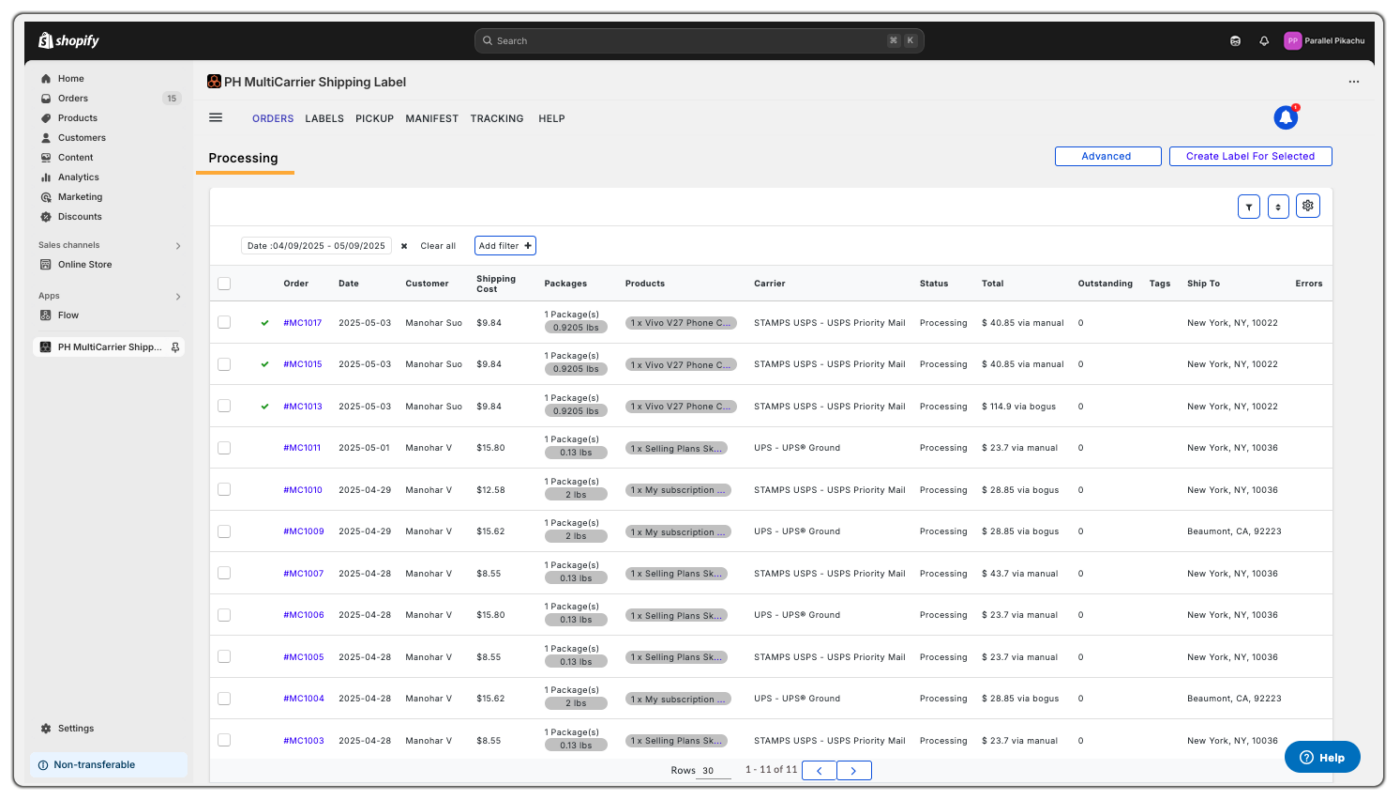
Processing
This section displays all orders still in the processing stage, meaning labels have not yet been created. Here, you can:
- Generate labels
- Edit packaging
- Add special services
Store Fulfilment Failed
Sometimes, after a label is generated, the app may not be able to fulfil the order in Shopify. When that happens:
- The Fulfilment Summary will show a clear error message explaining what went wrong (e.g., missing permissions or required info)
- Once the issue is identified, you can fix it and reattempt fulfilment from the app
This section helps you resolve fulfilment failures quickly so customers receive tracking updates without delay.
Return
Track all orders with return labels created.
- Helps manage and monitor reverse shipments
Orders for Later
You can set a future shipping date for specific orders. These orders will appear in this section:
- Useful for scheduling shipments and monitoring upcoming fulfilment
- Helps avoid accidental label generation before the intended ship date
Label Failed
Orders for which forward shipping labels failed to generate due to missing or invalid information will be listed here:
- Detailed error messages will help you understand why the label failed
- You can correct the necessary information and retry the label generation
Return Failed
This section shows orders where the return label generation failed. Common reasons include invalid return addresses or missing required data:
- Use this section to troubleshoot and fix issues with reverse shipments
Order Canceled
Shows orders that have been cancelled in Shopify.
- Marked with a red line to avoid confusion
- Prevents accidental label generation
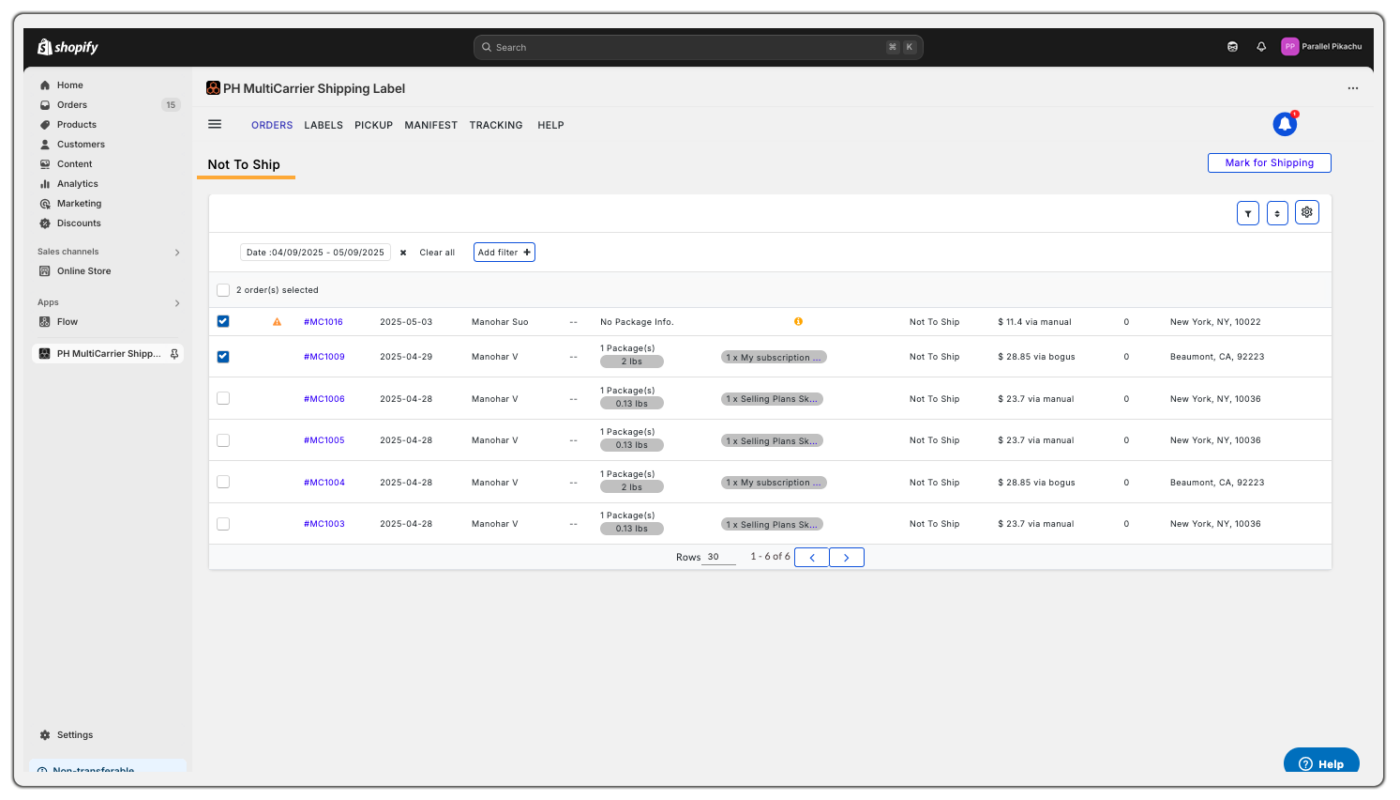
Not to Ship
Used for orders that don’t require shipping (e.g., local pickup or external fulfilment).
- Can be re-enabled later for shipping if needed
- Mark as “Not to Ship” to hide them from the All Orders view
Advanced/More Actions on the Order Grid
Order Processing and Editing Options in the Order Grid of the App
Clicking the ellipsis (⋮) beside an order opens a full list of order-specific operations:
- Generate Label: Initiates the shipping label generation for the selected orders with the assigned carrier/service based on the package configuration.
- Request Pickup: Schedules a pickup request with the carrier using the pre-configured ship-from location.
- Mark as Fulfilled: Marks the order as fulfilled in the app, which in turn fulfils the Shopify Orders with the tracking number generated for the label(s).
- Reprocess Orders: Re-evaluates the shipping, packaging and automation rule data in case of changes, and assigns the updated data to the order, ensuring accurate rate/service selection and order processing.
- Quick Ship: The “Quick Ship” functionality enables users to rapidly generate shipping labels and fulfil all the selected orders directly from a single interface. This streamlines the shipping process by minimising data entry and allowing immediate label creation.
Workflow Summary:
- The user selects the shipping origin, carrier, and service level.
- Input weight and optionally dimensions.
- Clicks Generate Label to:
- Produce a shipping label.
- Mark the associated order(s) as fulfilled.
Benefits:
- Simplifies and accelerates the shipping process.
- Reduces manual effort by combining labelling and fulfilment in one step.
- Offers flexibility through the carrier and service dropdowns.
6. Track Orders: Allows tracking of the shipment using the carrier’s tracking number directly from the app.
7. Edit Packages: Modify the package details (weight, dimensions, box type) associated with the order before generating the label.
8. Fulfil Manually: Used when a label has been generated outside of the app and the order has to be manually fulfilled using the tracking number.
9. Change Carrier and Service: Switch to a different carrier or service manually before generating the label.
10. Prepare Shipment: Used when the Order is in Initial Status. This will initiate the backend process to prepare data for label generation or rate estimation.
If the order details like shipping address, etc, and matching shipping automation rules are present, then the Order will move to Processing Status.
11. Set Ship From Address: Change the origin address (warehouse/sender address) from the pre-configured list of addresses configured in the app to use as Ship From Address for the order.
12. Cancel Shipment: Void the label and cancel the shipment if already been generated.
It can only be used if the Order is in Label Created Status.
Some Carriers, like Australia Post MyPost Business and Canada Post Non-Contract Account users, will not be able to cancel the labels from the app due to carrier restrictions.
13. Change Status to Initial: Resets the order status to Initial in the app to allow reprocessing from scratch.
14. Mark as Not to Ship: Excludes the order from shipping workflows and moves them to the Not To Ship section in the app. Useful for cases like orders having digital products or for store pickups.
15. Change Shipping Date: Adjust the scheduled shipping date for the order.
16. Create Return Label: Generates a return shipping label for the fulfilled orders from the app.
17. Enable Saturday Delivery: Activates the Saturday delivery option (if supported by the selected carrier/service).
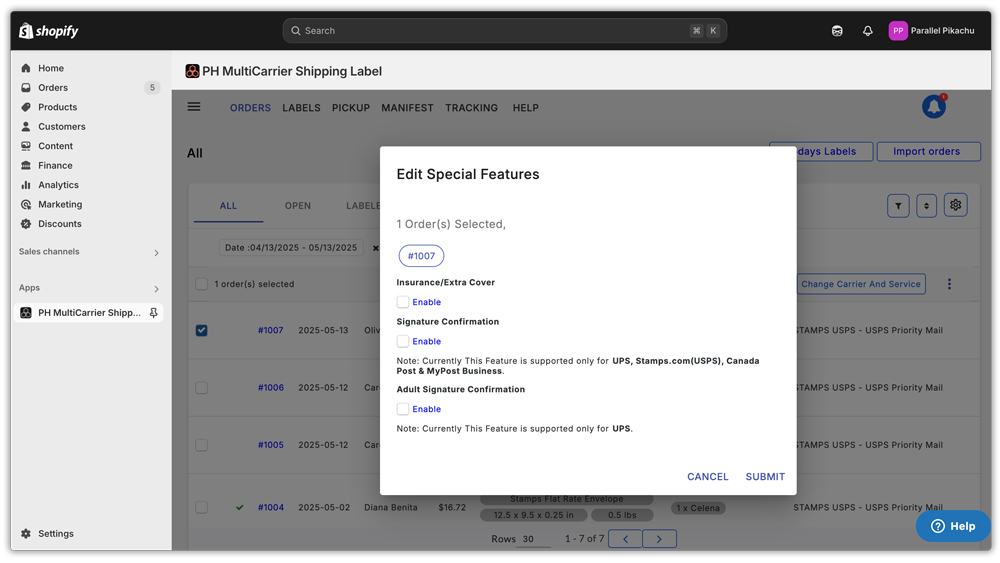
18. Edit Special Features: Add or edit additional shipment features like insurance, delivery signature confirmation, etc.
19. Validate Shipping Address: Checks and corrects the recipient address using carrier address validation.
20. Confirm Address Changes: Applies any address corrections identified during validation or manual edits.
21. Download Tax Invoice: Downloads the tax invoice for the orders that have been processed using the app, reflecting charges and taxes.
22. Regenerate Tax Invoice and Packing Slip: Regenerates a new copy of the tax invoice and packing slip with updated details.
23. Download Documents: Downloads all shipment-related documents in a zip file (e.g., invoice, commercial invoice, shipping labels).
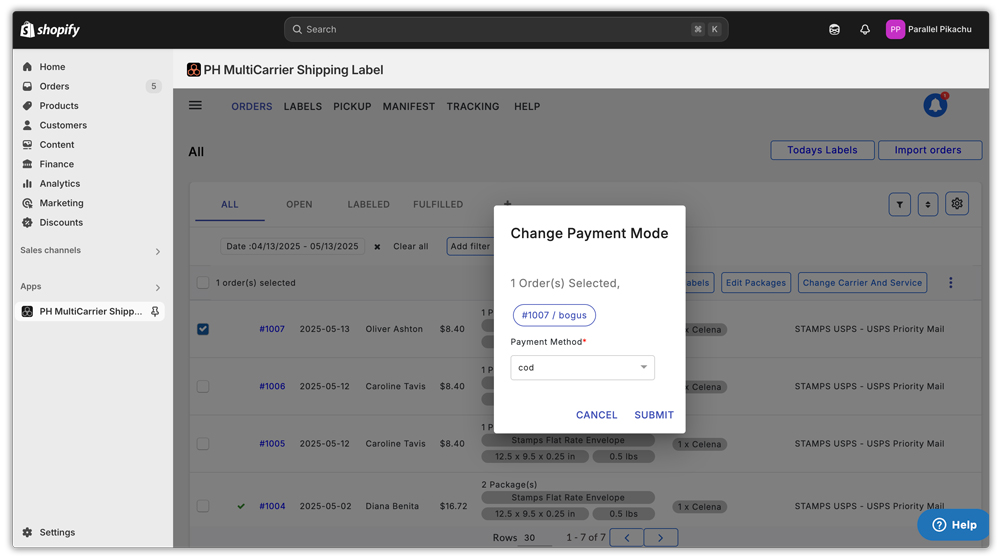
24. Edit Payment Type: Change the payment method for the shipment, like switching between Prepaid and COD. Useful for Carriers like BlueDart, which support Cash on Delivery (COD) shipping.
25. Download the Packing Slip: Download the generated packing slip to include with the shipment.
26. Print Picklist: Opens the picklist of items in a PDF file in a new tab, which can be used for printing using the printer. Used in order to assist with warehouse picking.
27. Download Labels: Bulk download all labels associated with the order.
28. Print Return Label: Prints the previously generated return label.
29. Print Labels: Opens the Labels for the Order in a PDF file in a new tab, which can be used for printing using the printer.
30. Print Packing Slips: Opens the Packing Slip for the Order in a PDF file in a new tab, which can be used for printing using the printer.
31. Print Tax Invoice: Opens the Tax Invoice for the Order in a PDF file in a new tab, which can be used for printing using the printer.
32. Print Commercial Invoice: Opens the Commercial Invoice (used for international shipments) for the Order in a PDF file in a new tab, which can be used for printing using the printer.
33. Print All Documents: Prints all available documents at once for that order.
34. Edit Customer Reference in Label: Allows you to edit the custom reference field printed on the shipping label.
35. Edit Mapped Order Meta: Let’s you edit custom metadata fields that are mapped to the order.
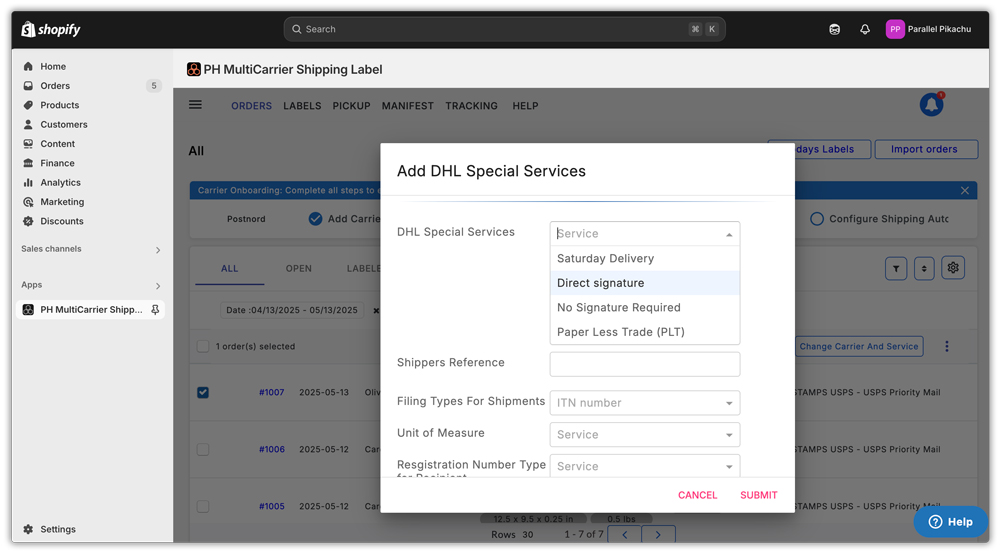
36. Add DHL Special Service: This option allows the user to configure and submit DHL special shipment services. It includes:
- Shipper’s reference number.
- Selection of filing types for shipments (ITN number)
- Specification of the unit of measure.
- Selection of registration number type for the recipient.
- Options to enable:
- Saturday Delivery
- Direct Signature
- No Signature Required
- Paperless Trade (PLT)
37. Add PostNord Special Service: This option enables users to add extra services to a PostNord shipment, including:
- Selecting additional services from a dropdown list like Insurance, Indoor Delivery, Return to Sender, etc.
- Choosing a category of item for CN22/CN23 documentation, like Gift, Returns, Sale of Goods, etc.
- Adding CN23 document details like Sender Customs ReferenceId, Importer Reference, Postal Charges Amount and Currency, etc.

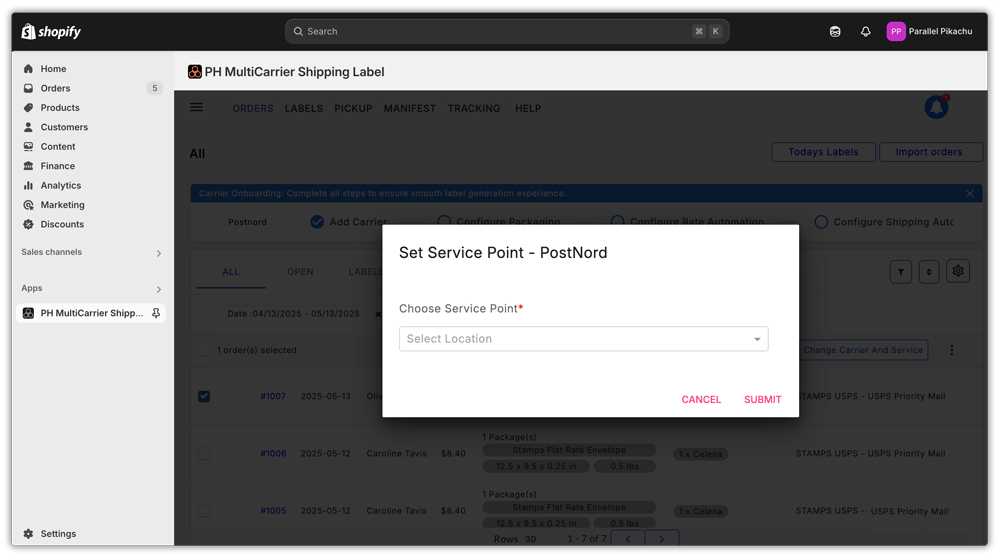
38. Set Service Point for PostNord: Allows the user to set a specific service point for PostNord deliveries based on the shipping address. Used with a specific service that supports Service Points.
39. Add FedEx Special Services: Provides options to configure additional FedEx shipment preferences:
- Add Insurance.
- Enable Delivery Signature.
- Choose shipment charge payer (Sender, Recipient or Third Party)
- Set the duties payment type (Sender, Recipient or Third Party)
- Specify the purpose of shipment (e.g., Sold).
- Define terms of sale (e.g., Delivered Duty Paid).
- Select Freight Special Services (e.g., Liftgate Delivery, Liftgate Pickup, etc.)
- Enable additional services:
- Non-Standard Container
- Saturday Pickup
- Include Shipping in Commercial Invoice
- Include Tax and Miscellaneous in Commercial Invoice
- Enable Importer Of Record
- Enter Recipient Customs ID.

40. Set Hold-At Location Point: Allows the user to define a specific hold-at-location point for a FedEx shipment based on the shipping address.
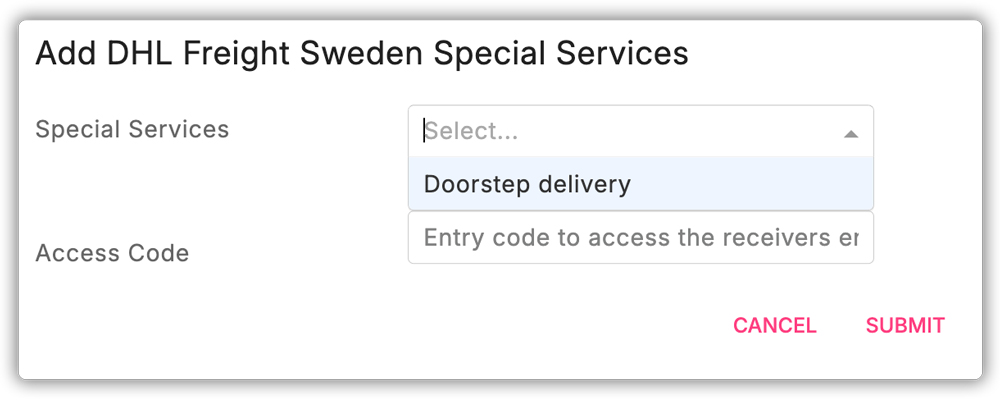
41. Add DHL Freight Sweden Special Services: Set Special Service like Doorstep Delivery for DHL Freight Sweden.
42. Set Service Point DHL Sweden: Allows the user to define a specific service point for a DHL Freight Sweden shipment based on the shipping address. Used with a specific service that supports Service Points.
These options ensure granular control over order processing, allowing workflows to be tailored to your needs.
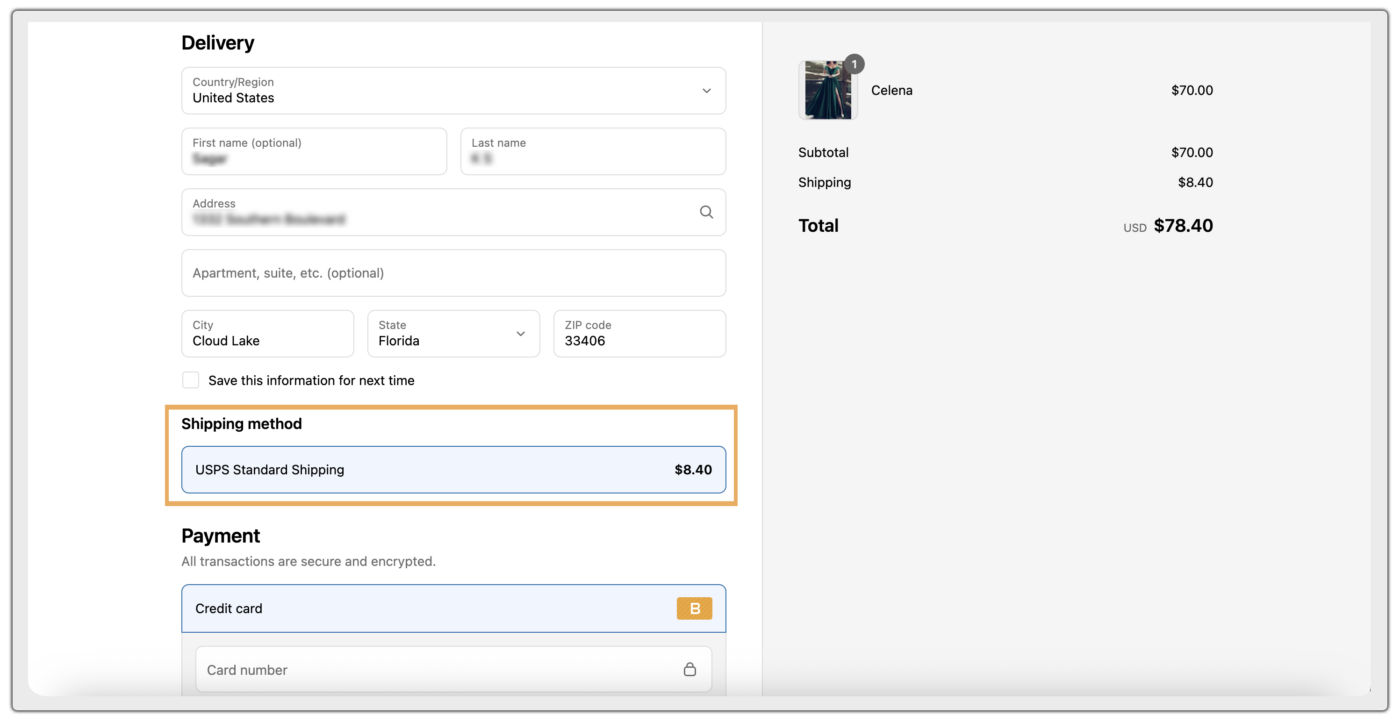
Display Live Rates at Checkout
Store Checkout Integration with PH Multi-Carrier App
Your Shopify store can display live USPS shipping rates at checkout using the PH Multi-Carrier Shipping Label app, integrated with your Stamps.com USPS account.
Customers can choose from services like:
- USPS Priority Mail
- USPS Priority Mail Express
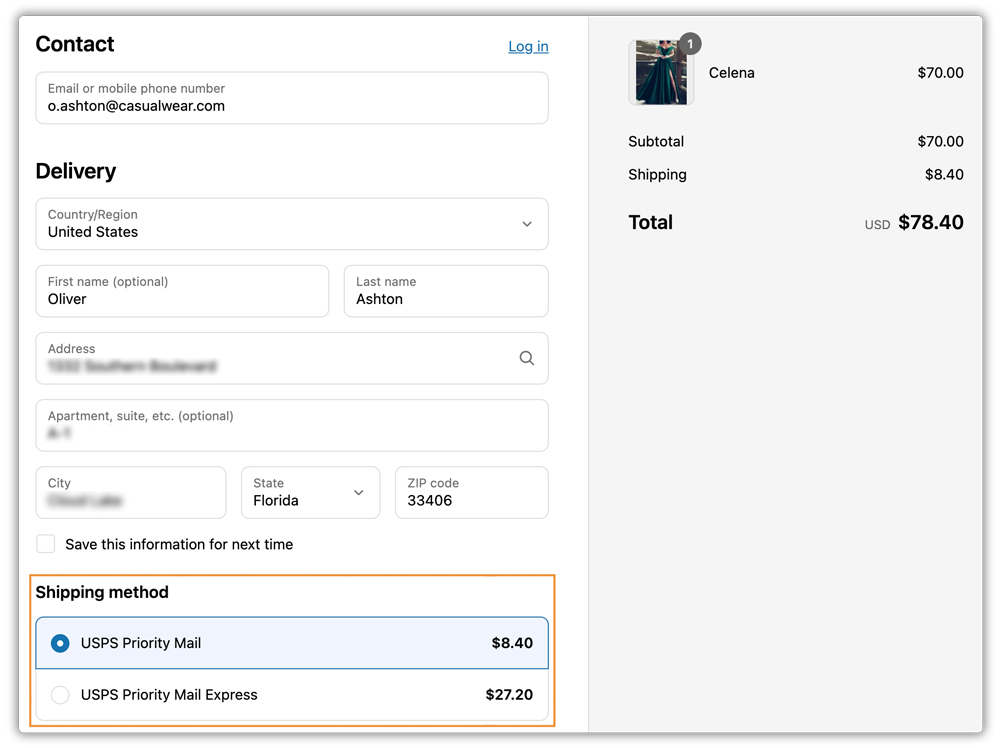
Keep In Mind
Enable Carrier Calculated Shipping (CCS):
To show real-time rates at checkout, Carrier Calculated Shipping (CCS) must be enabled on your Shopify plan.
Without CCS:
- The app can’t send live rates to checkout
- Customers will only see flat rates defined within Shopify
- Accurate pricing and service options may be lost
How to get CCS:
Can be added (paid) to lower-tier plans by contacting Shopify support
Included with Shopify’s Advanced or Plus plans
How to Verify Shipping Rates via Request Log
To verify the rates shown at checkout:
- Go to Shopify Admin
- Navigate to the PH Multi Carrier Shipping Label App
- In the sidebar, go to Settings > Shipping Rates > Request Log
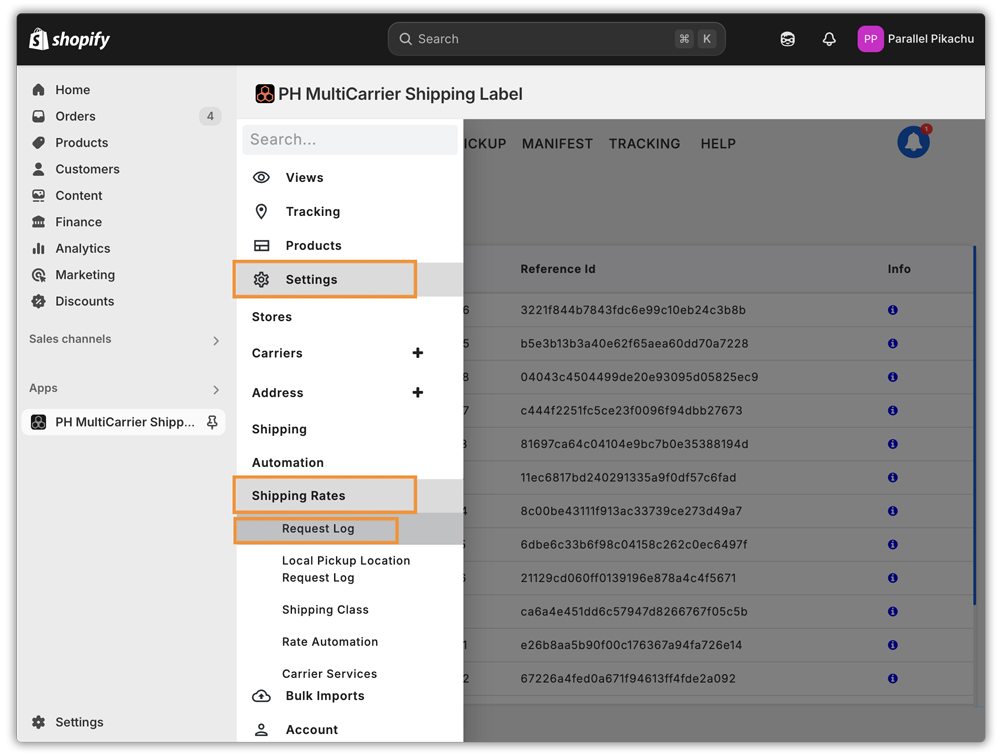
This section displays all real-time shipping rate requests sent from your checkout.
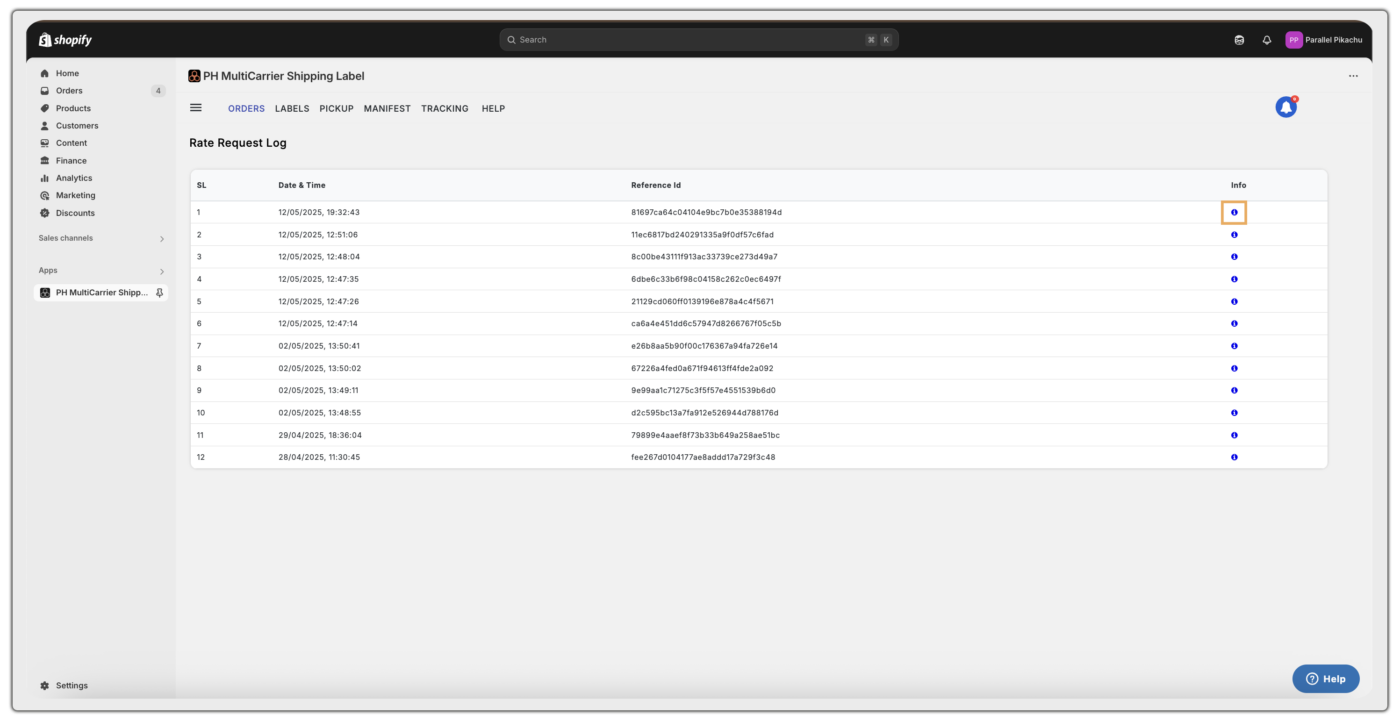
Accessing Specific Rate Logs
In the Request Log page:
- Click on the “i” icon under the “Info” column to open the detailed log related to the selected request.
- Logs are listed chronologically with a unique Reference ID
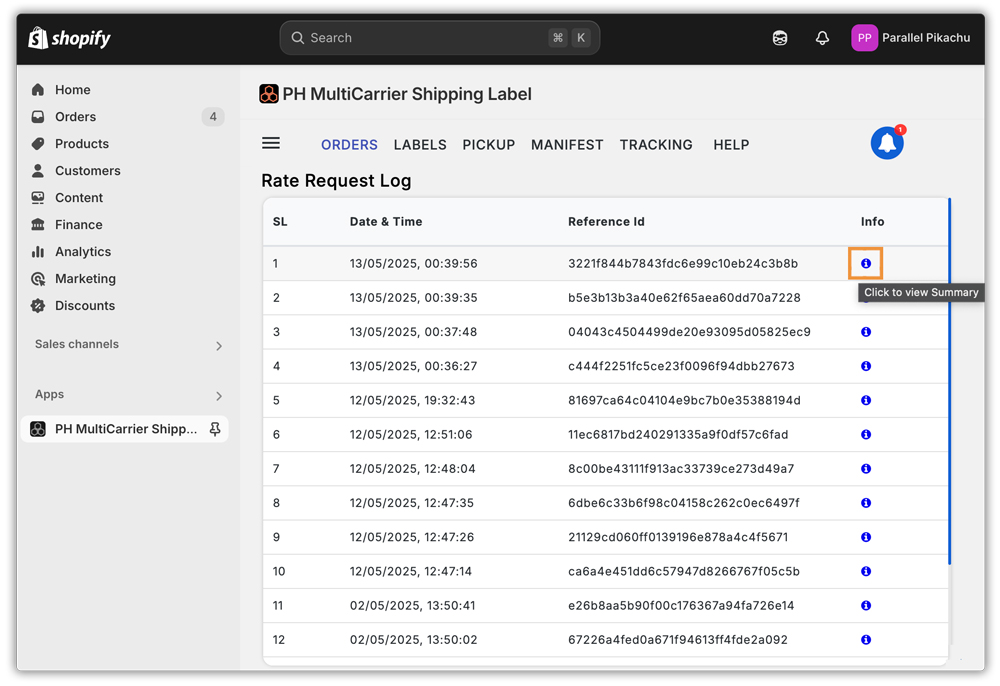
This opens a complete breakdown of the shipping rate request used during checkout.
Understanding the Log Details
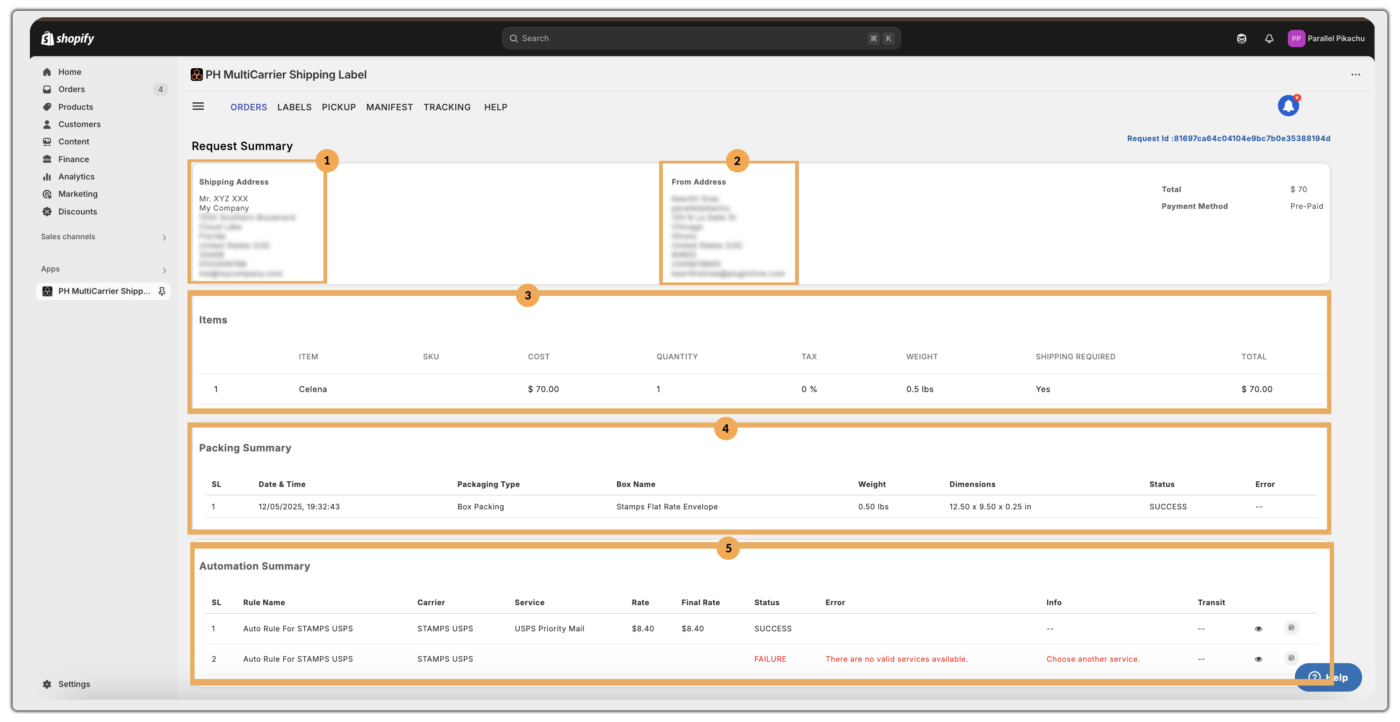
Each rate log contains the following key sections:

Request Summary:
1. Displays Shipping Address (Recipient address):
This is the address provided by the customer at checkout. Verify the shipping address and ensure that the address is within the serviceable area of the carrier that you have chosen so that there is no extra charge added.
2. Displays From Address (Shipper address)
Verify the “from address” and ensure that the correct location is set as the default address if you have multiple “from addresses”, and make sure it is correct.
3. Items Summary
- Shows product details such as SKU, quantity, cost, weight, and total
4. Packing Summary
The Packing Summary section provides detailed information about how the products in the order were packed based on the configured packing method. It shows:
- Date & Time when the packing was done.
- Packaging Type used (e.g., Box Packing, Weight-Based, etc.).
- Box Name to identify the specific box used from the predefined packaging settings.
- Weight and Dimensions of the packed box are critical for calculating accurate shipping rates.
- Status indicating if the packing was successfully processed.
This section ensures transparency in how the shipment was prepared.
5. Automation Summary
- Shows Rate Automation rules applied (e.g., “Auto Rule for STAMPS USPS”)
- Lists the carrier, service, rate, and final rate. The Final Rate is what is shown on checkout from the app.
- Status and error indicators confirm successful rate retrieval
Multiple USPS service options are listed here, with actual rate calculations used during checkout.
Generate Shipping Labels One by One
Generate Labels One by One with Quick Ship
Efficient order fulfillment is key to running a successful eCommerce business. The PH Multi Carrier Shipping Label App offers the Single Label Generation Process (SLGP) using the Quick Ship feature to make label creation fast and easy for individual orders.
With Quick Ship, you can:
- Configure shipment details
- Generate shipping labels
- Fulfill orders
All from a single screen, helping reduce errors and save time.
This streamlined approach reduces manual steps, minimises errors, and ensures that shipping operations remain fast and accurate.
How to Generate a Label – Using Quick Ship
Navigate to Orders View
Click on the order number for which you need to generate a label.
Order Page Overview
After selecting an order, you’ll be directed to the Order Page. It has various sections, namely:
- Rate Summary
- Order Summary Details
- Recipient address
- Billing Address
- Packing Summary

Order Summary Details
This section captures the essential information needed to process and generate a shipping label. It includes:
- Fulfilled from: The warehouse or shop location address fulfilling the order.
- Carrier: Shipping service provider selected.
- Service: Specific delivery method under the carrier.
- Package: Type of packaging selected for the shipment.
- Weight (lbs): Weight of the package.
- Dimensions (L×W×H in): Box dimensions entered manually.
- Order Cost: Total cost of the order.
- Balance: Balance due.
- Paid: The Amount paid by the customer.
- Signature Required: A checkbox option for requiring delivery confirmation via signature.
Use this section to confirm all shipping details before label generation.
Generate Label and Fulfill
- Click the “Generate Label & Fulfil” button.
- Generate Label & Fulfil: Once all details are verified, this button initiates label creation and order fulfilment.

Printing Documents After Fulfilment
Once an order is fulfilled, click on Print Documents to access and print various shipping-related documents.
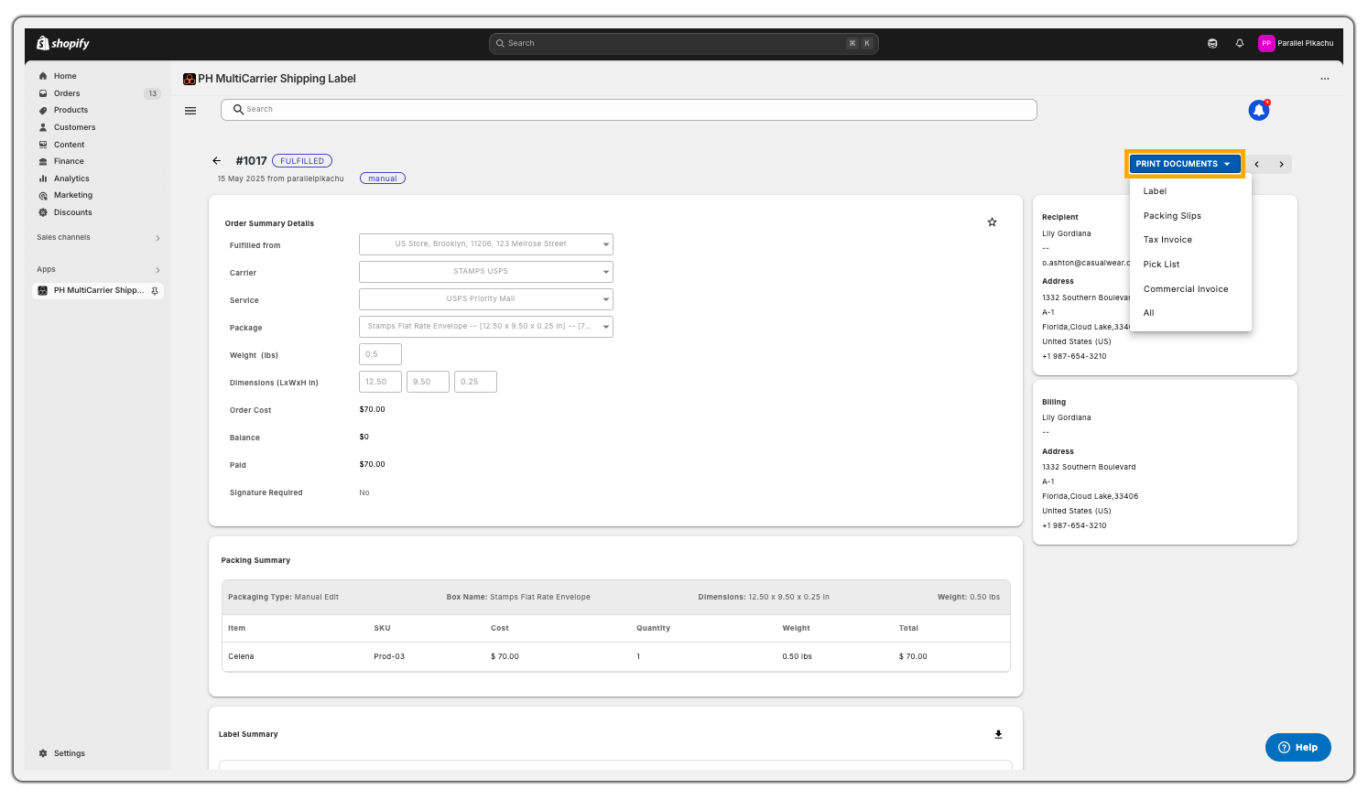
Below is the label generated for the order above:
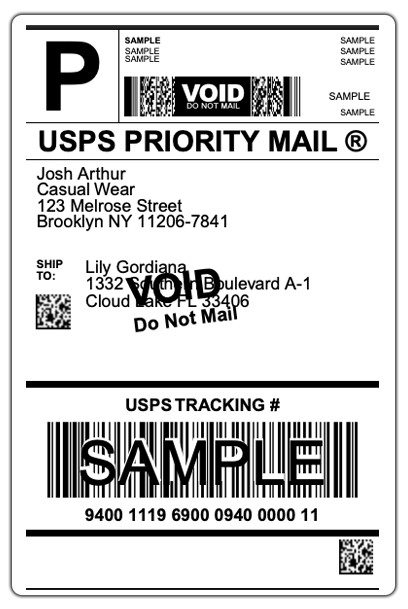
Available Print Options:
- Labels – Prints the shipping label provided by the carrier.
- Packing Slips – Prints the packing slip generated by the app.
- Tax Invoices – Prints the tax invoice generated by the app.
- Pick List – Prints a pick list for order picking (generated by the app).
- Commercial Invoice – Prints the commercial invoice for international shipments (provided by the carrier).
- All – Prints all of the above documents in a single batch.
The Single Label Generation (SLGP) process using the Quick Ship interface in the PH Multi Carrier Shipping Label App helps your team to:
- Ship orders faster
- Minimize errors
- Improve customer satisfaction
Always double-check order details before generating labels, and use the available print options to keep your fulfillment process organized and efficient.
Generate Labels One by One without Quickship
In manual shipping workflows, businesses can verify and customise each shipment for accuracy and compliance. The Single Label Generation Page (SLGP) is ideal when automated Quickship isn’t suitable, especially for orders with special packaging, international rules, or personalisation.
Accessing the Order Page
Steps to begin the process of generating a label:
- Click on the Order Number to open the specific order’s detail page.
- Go to the Orders View.
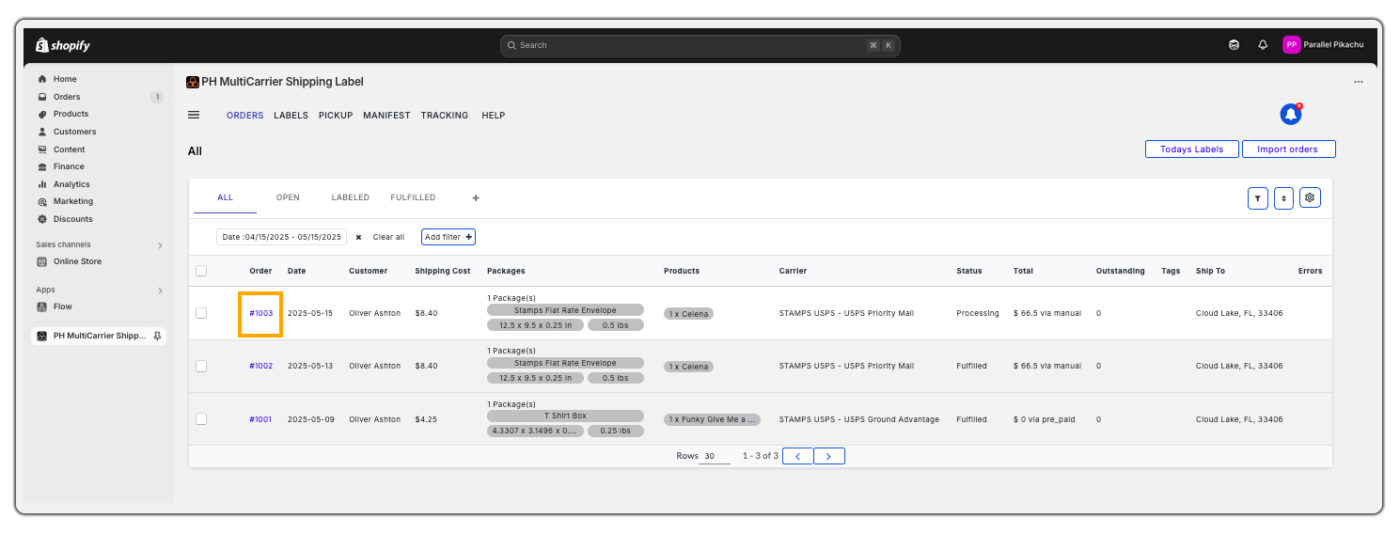
Order Information
The order page includes the following order information sections:
- Fulfilment Location
- Rate Summary
- Recipient and Billing Information
- Order Cost Summary
- Packing Summary
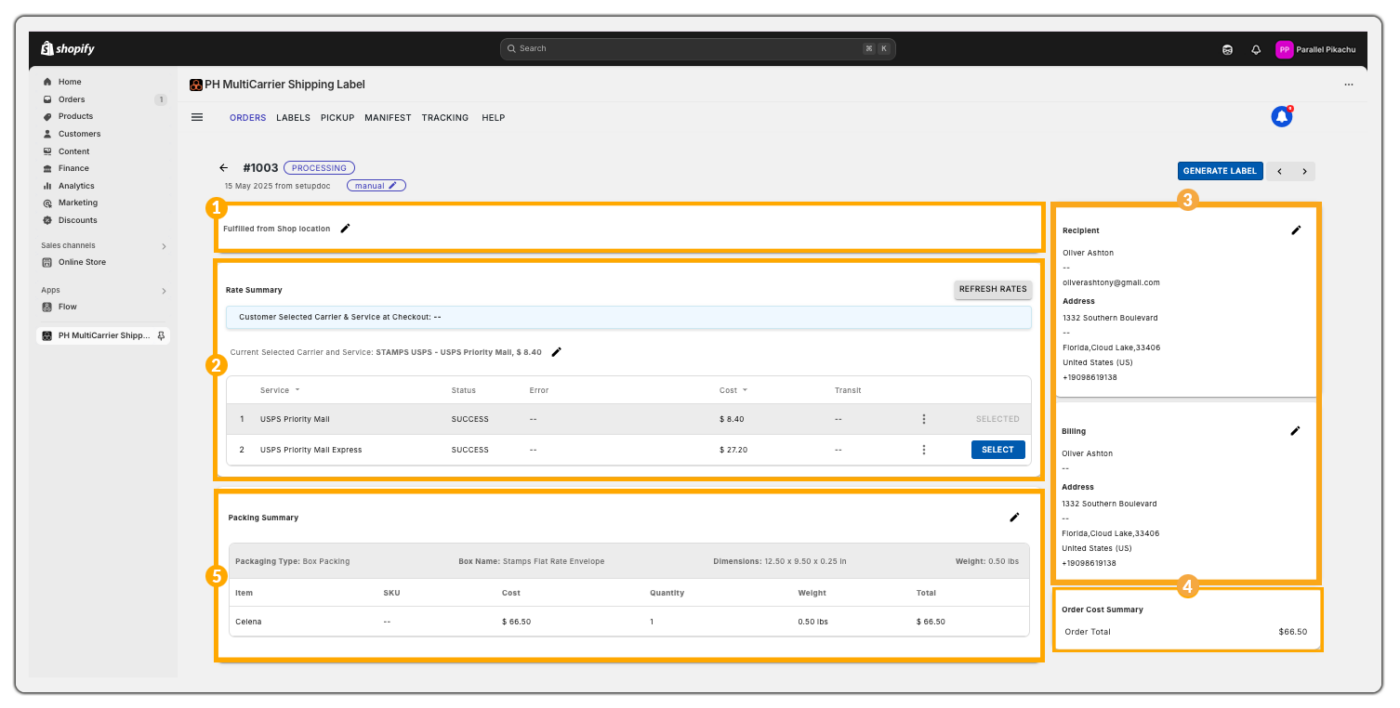
1. Fulfilment Location
Defines where the order ships from. Choosing the correct location ensures correct shipping calculations and expected delivery timelines.
2. Rate Summary
- Customer Carrier Selection at Checkout – Indicates if the customer chose a specific shipping carrier during checkout.
- Selected Carrier and Service – Displays which carrier and service were selected, with editable options for updates.
- Shipping Options Table – Provides a list of available carriers and services, showing cost and delivery time.
Purpose: Helps choose the best value option for shipping.
3. Recipient & Billing Information
- Recipient – Shows the destination address. Can be updated if errors or changes are needed.
- Billing – Displays the payment address for the order. Editable like the recipient info.
4. Order Cost Summary
Displays the order subtotal (excluding shipping). This helps merchants confirm item totals before proceeding.
5. Packing Summary
Details how the order is packed. Packaging affects shipping rates, safety, and delivery.
- Packaging Type – Explains whether it’s a box, envelope, custom pack, etc.
- Box Name – Refers to predefined packaging types used in fulfilment systems.
- Dimensions – Length, width, and height of the package – vital for shipping calculations.
- Weight – Shows the total package weight, including box and contents.
Item Table Overview
This section outlines what items are packed and their values:
- Item – Product description or title
- SKU – Stock Keeping Unit, helps with inventory tracking
- Cost – Price assigned to the item
- Quantity – How many units are packed
- Weight – Weight of the item
- Total – Price × Quantity
Edit Option: Use the pencil icon to make changes to quantities, box assignments, or weights before generating the label.
Package Summary Table
Gives a breakdown of all boxes used in the shipment:
- Sequence No. – Order of the package if there are multiple
- Box Name – The label of the box configuration
- Quantity – Number of identical boxes in the shipment
- Weight (lbs) – combined weight of box and contents
- Price (USD) – Value or declared cost of the box contents

Action Links:
Quick tools to modify the package list:
- REMOVE – Delete a box that was added by mistake.
- EDIT – Change box contents or details.
- ADJUST – Fine-tune parameters like weight or dimensions.
Footer Actions:
Used to manage changes made to the packing setup:
- ADD – Add a new package or box row
- RESTORE – Undo recent changes and revert to the last saved version
- CANCEL – Discard changes without saving
- SAVE – Confirm and apply your edits
Generating and Printing the Shipping Label
Once you verify all order and packing details:
- Click Generate Label to create the shipping label using the selected carrier and service.
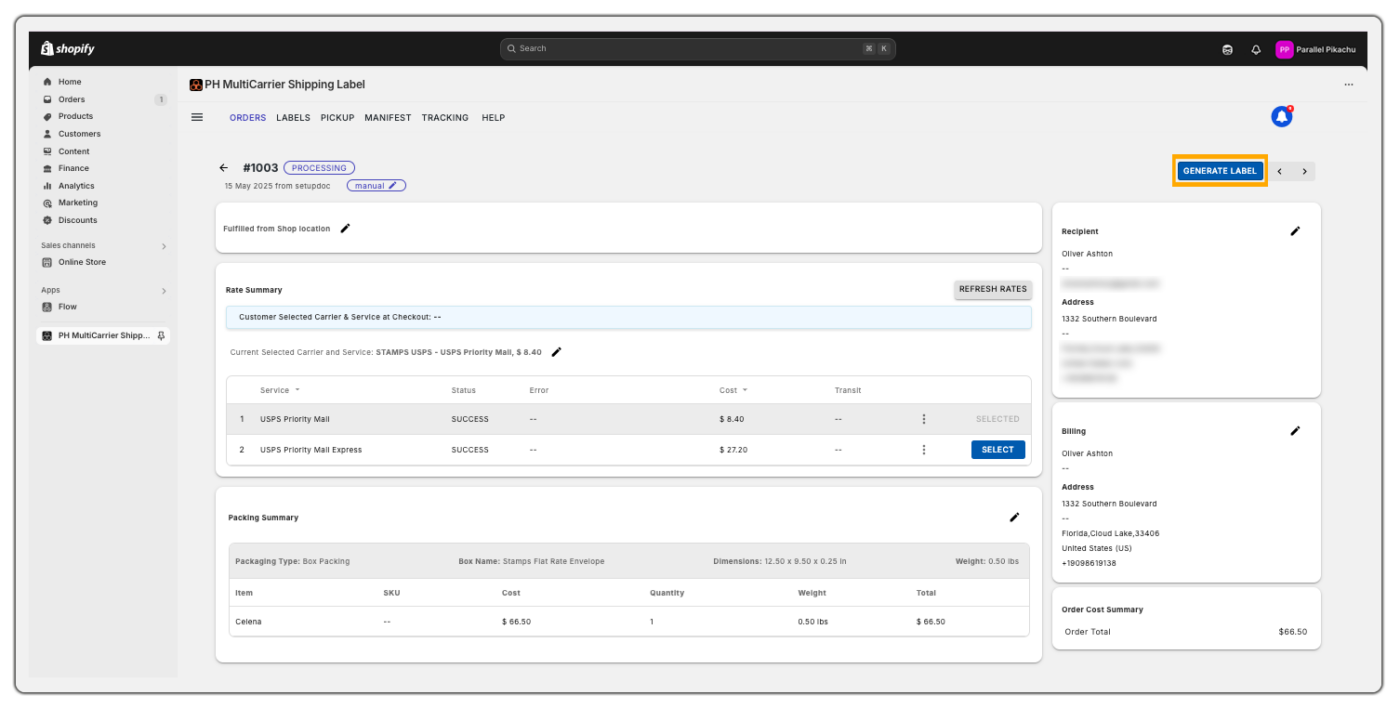
- Use PRINT DOCUMENTS to access shipping papers.
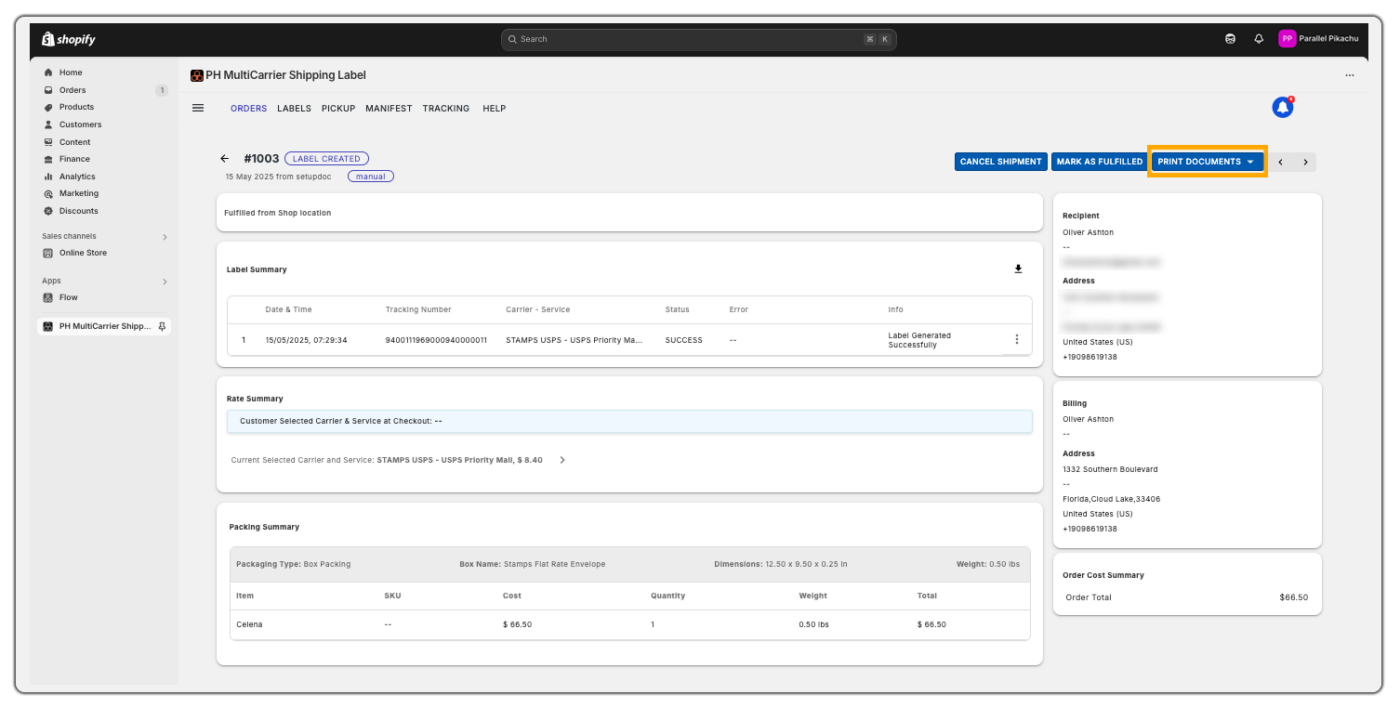
Here’s a sample label printed:
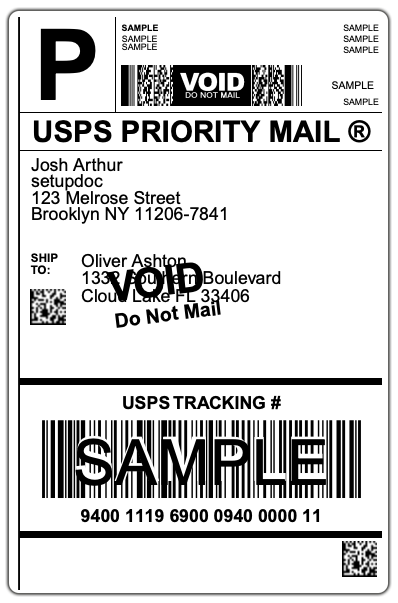
Available Print Options:
- Labels – Prints the shipping label provided by the carrier.
- Packing Slips – Prints the packing slip generated by the app.
- Tax Invoices – Prints the tax invoice generated by the app.
- Pick List – Prints a pick list for order picking (generated by the app).
- Commercial Invoice – Prints the commercial invoice for international shipments (provided by the carrier).
- All – Prints all of the above documents in a single batch.
Cancel Shipment
Need to make corrections?
Use CANCEL SHIPMENT to void the current label and restart the process.
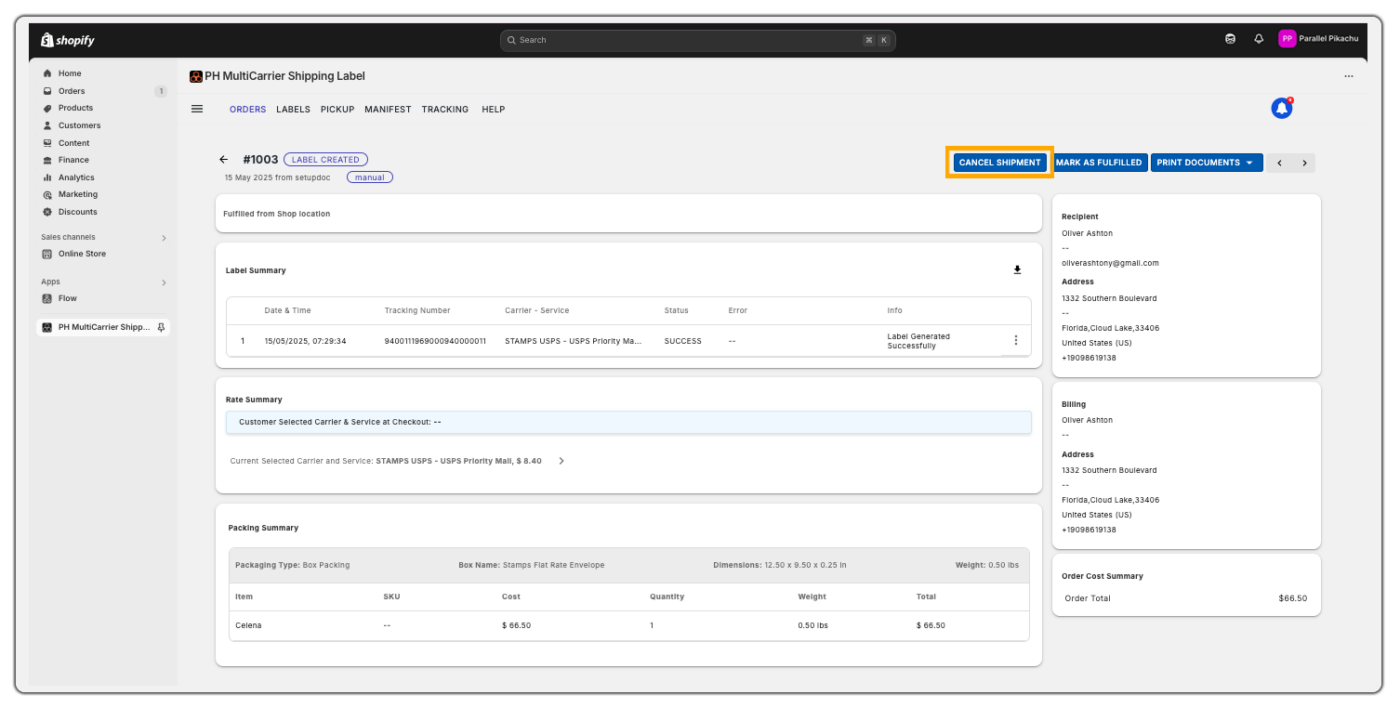
After printing the label:
Fulfil the Order
- Click MARK AS FULFILLED to update the order as shipped in Shopify.
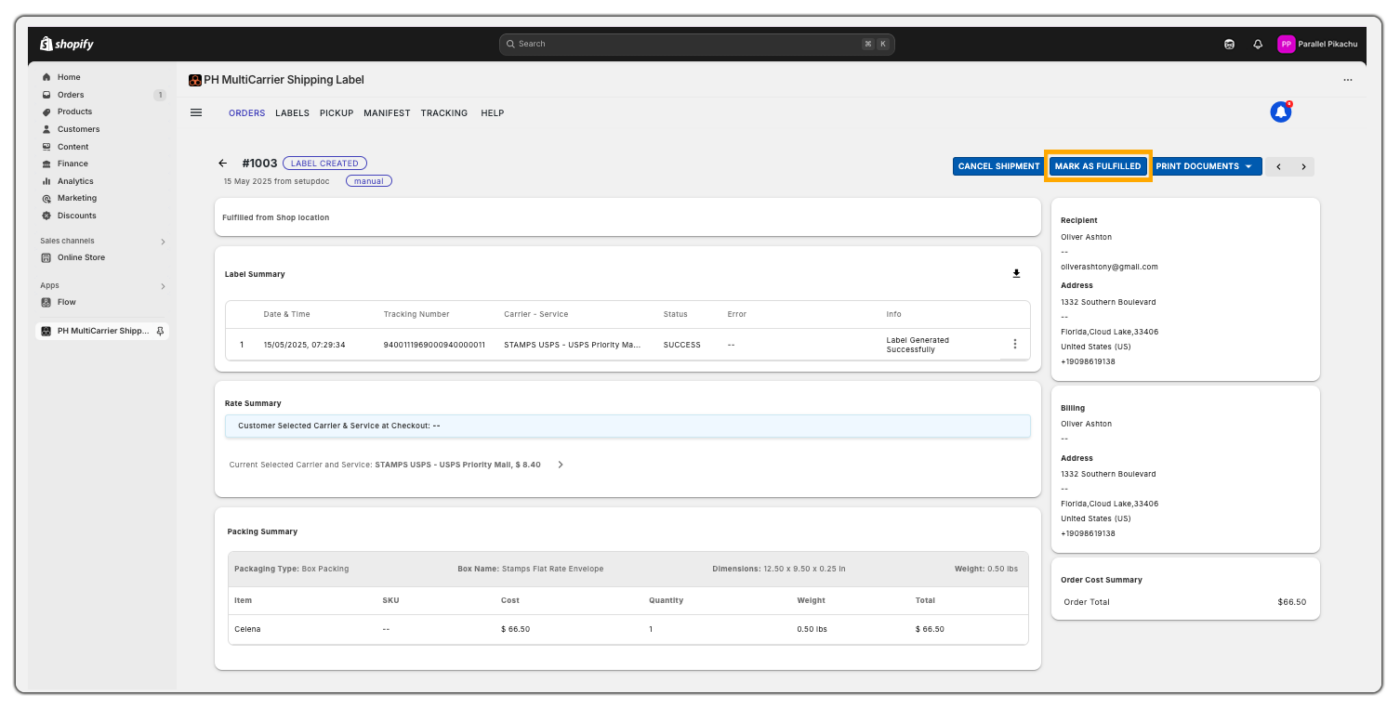
- The system will record the tracking number and change the status to FULFILLED.

Additional Features
- Tracking History is automatically available once the order is marked fulfilled.
- Next Order Navigation: Easily move to the next order using the arrow button on the Order page.
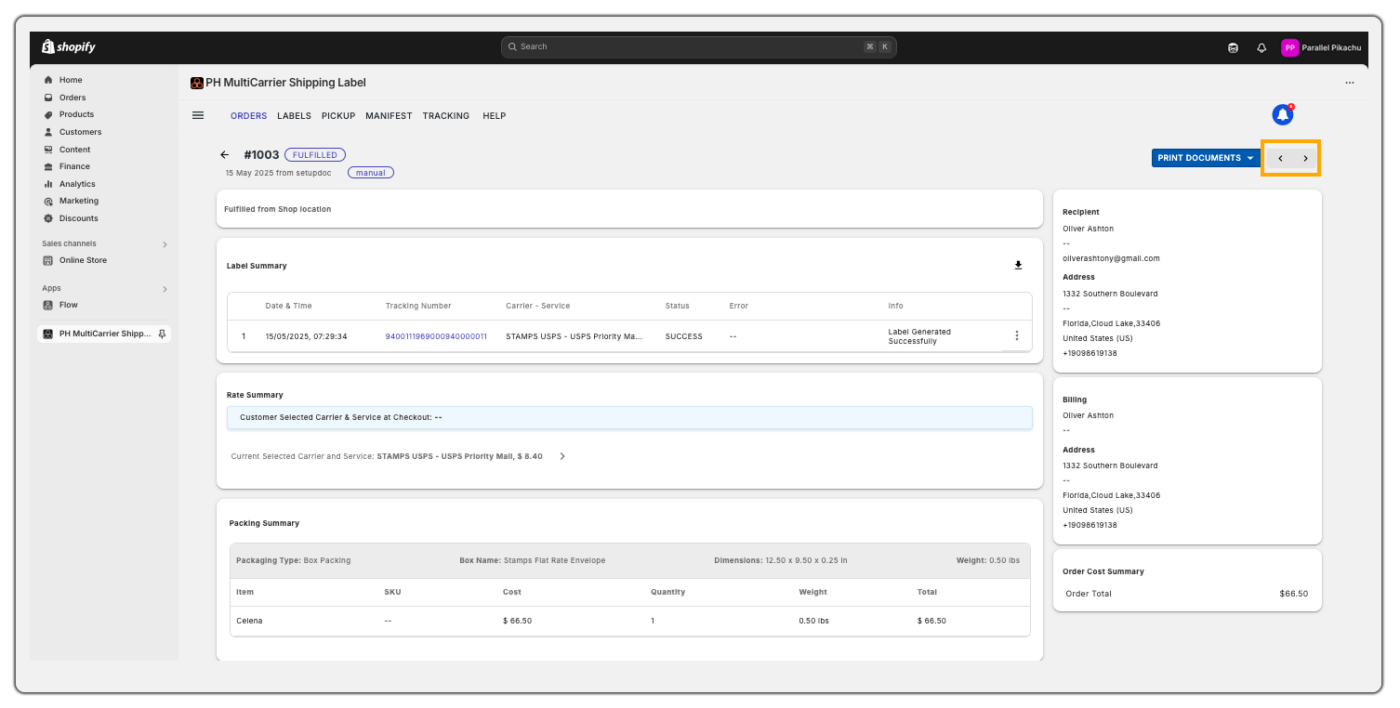
Manual label generation via SLGP offers merchants full control over how packages are handled and shipped.
This method is perfect for:
- Customized orders
- International shipments
- Manual verification before fulfilment
It ensures accuracy, flexibility, and a better customer experience by allowing shipping to be handled on a case-by-case basis.
Generate Shipping Labels in Bulk
Before proceeding with bulk label generation, we recommend reviewing the Understand the Order Grid section to ensure you’re familiar with the order flow.
To Generate Labels in Bulk:
- Navigate to the Open tab in the app.
- Verify the package details and shipping cost for each order.
- Select the checkboxes next to the order IDs you want to process.
- Click to generate labels. You’ll be redirected to the Label Batch page to track the progress.
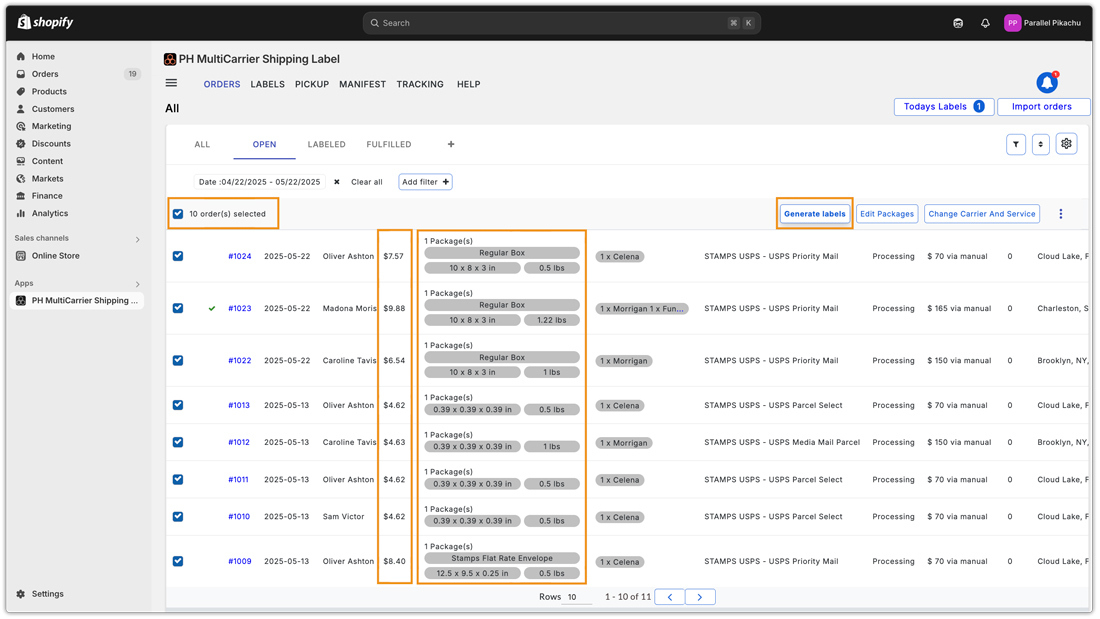
On the batch page, you’ll see the current status of the label generation process (e.g., 1 of 10 means 1 label is created and 9 are in progress). Typically, each label takes just a second to be generated.
You can either wait for the batch to complete or return to the Order Grid to begin processing another set of orders. Previously created batches will continue in the background without affecting your workflow.
Label Status Indicators:
- Success – Label has been successfully created.
- Processing – Label is being generated.
- Initial – Label generation is yet to start.
- Failure – Label creation failed (if any issues occur).
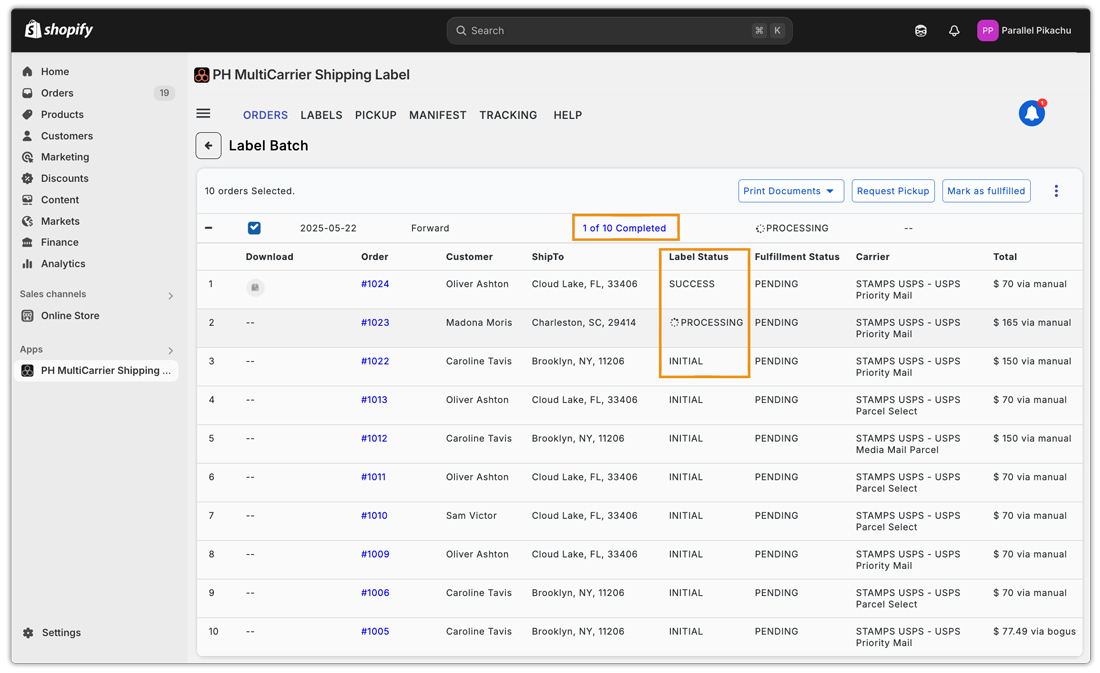
To Print Labels & Other Documents:
Once labels are generated:
- Select the checkbox next to the batch.
- Click Print Documents.
- Choose to print shipping labels or other necessary documents based on your needs.
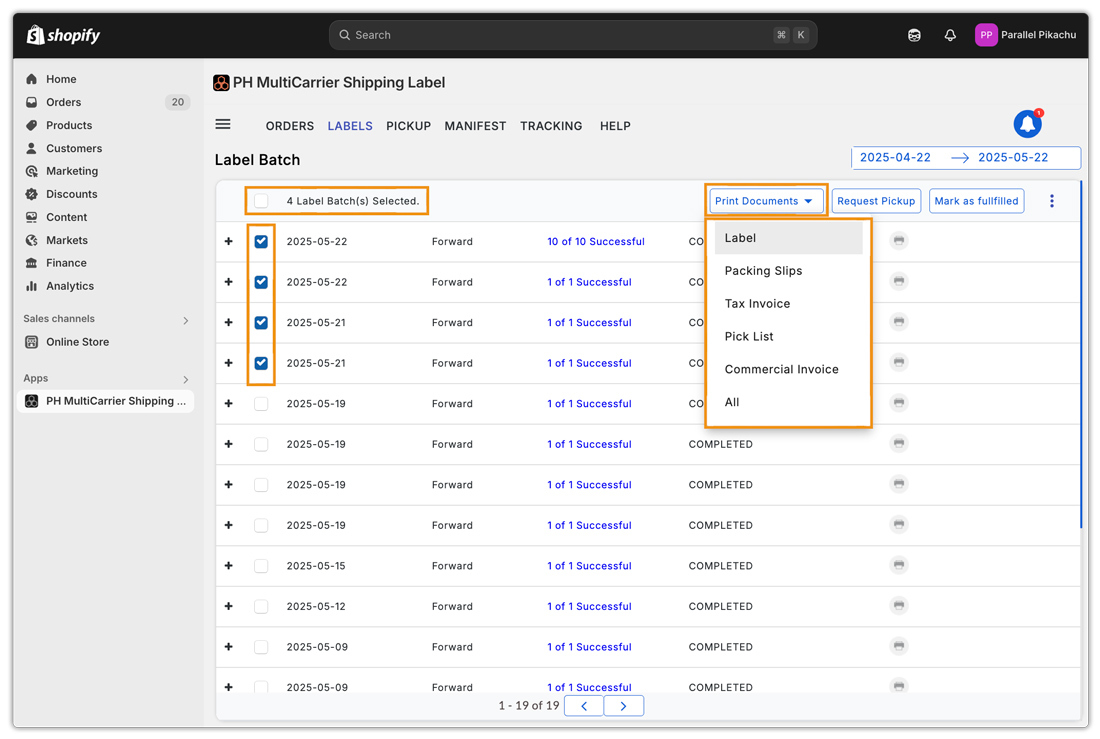
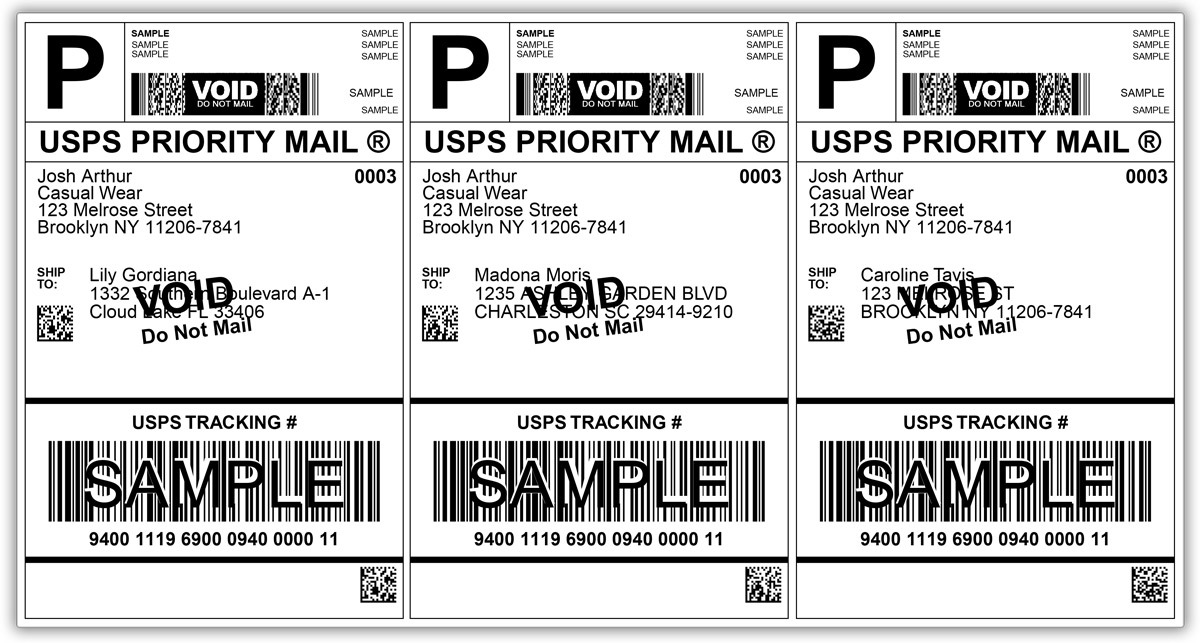
To Fulfill Orders & Request Pickup:
To fulfill orders in Shopify:
- Select the batch(es).
- Click Mark as Fulfilled.
To request a pickup:
- Select the relevant batch(es).
- Click Request Pickup.
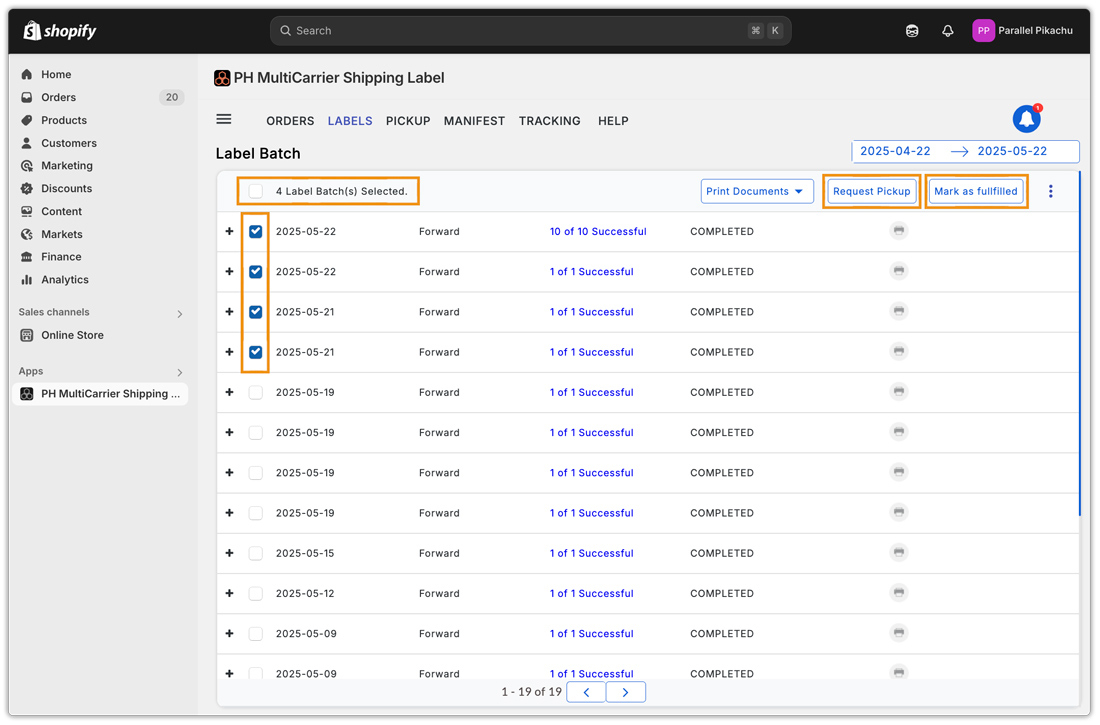
The actions Print Documents, Request Pickup, and Mark as Fulfilled can be performed independently at any time. There’s no required sequence or restriction.
The PH Multi-Carrier Shipping Label app transforms how you manage shipping within your Shopify store by offering a powerful all-in-one solution. From displaying accurate real-time rates at checkout to printing shipping labels, managing carrier pickups, easily tracking shipments, and handling international shipping requirements, the app covers every step of the shipping process with precision and flexibility.
Whether you’re running a small store or managing high-volume fulfilment, the app adapts to your needs through customisable packing methods, advanced automation rules, and integration with over 30+ global carriers. It simplifies shipping for both domestic and international orders, helping you save time, avoid costly errors, and deliver a seamless customer experience.
The app streamlines the shipping workflow within Shopify, helping merchants reduce manual effort, minimise errors, and deliver a faster, more reliable fulfilment experience for their customers