Setting Up WooCommerce Australia Post MyPost Business Plugin
This tutorial is a quick guide to help you set up the PH Australia Post MyPost Business Plugin for WooCommerce on your WooCommerce store. With this plugin, you can display live Australia Post MyPost shipping rates on the WooCommerce cart/checkout page, print Australia Post MyPost Business shipping labels, track your orders in real time, and much more.
In this Guide
- Download, Install, and Activate the plugin
- Activate The Plugin License
- Navigate to Australia Post MyPost Business Plugin Settings
- Connect Your MyPost Business Account
- Verify Product Settings
- Add Shipper Address Details
- Display Australia Post MyPost Business Shipping Rates
- Configure Australia Post MyPost Business Shipping Services
- Configure Australia Post MyPost Business Package Settings
- Print Australia Post MyPost Business Shipping Labels
- Printing Your First MyPost Business Shipping Labels
- Print Shipping Labels in Bulk
- Print Individual Shipping Labels for Multiple Packages
- Generate Australia Post MyPost Business Labels Automatically
- Add or Remove Packages Within an Order Shipment
- Configure Australia Post MyPost Business Label Format
- Enable Business Name as Shipper Name on The Labels
- Enable Signature on Delivery
- Assign Default Shipping Services
- Set Up Australia Post MyPost Business Shipment Tracking
- How to Set up MyPost Business for International Shipping?
- Configure Advanced Settings in Australia Post MyPost Business Plugin
1. Download, Install & Activate The Plugin
After purchasing the PluginHive’s WooCommerce Australia Post MyPost Business Plugin, download the .zip file from API DOWNLOADS by logging into the MY ACCOUNTS page.
Log in as the WordPress Admin in your online store.
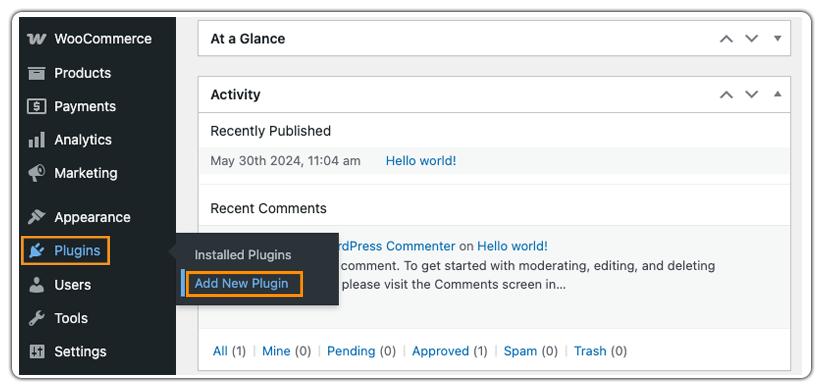
Navigate to Plugins > Add New, as shown in the image below.
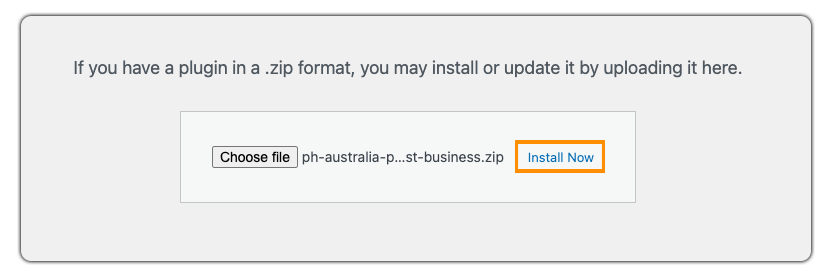
Upload the plugin to the WooCommerce Store.
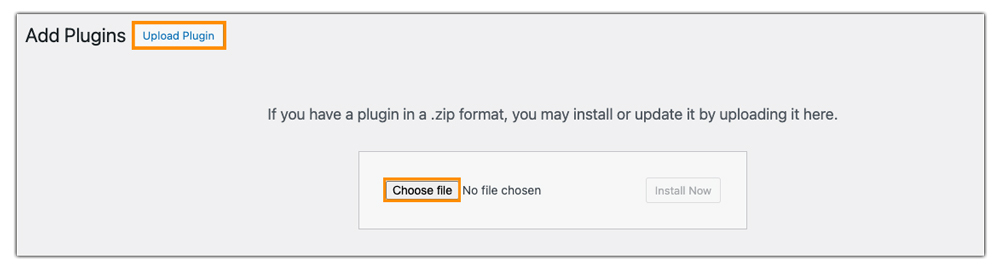
Once it has been uploaded, click Install Now.
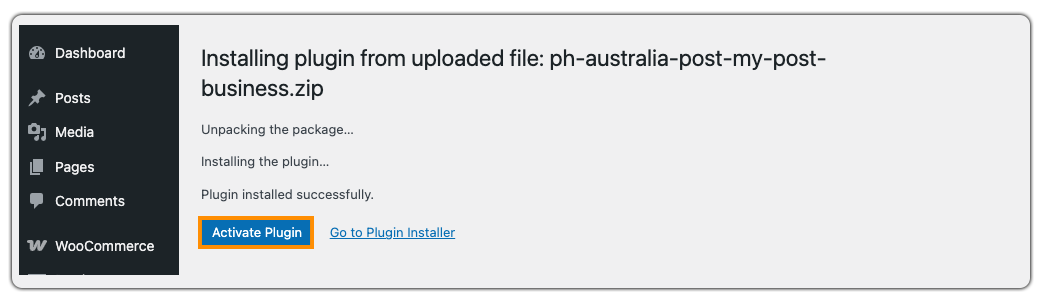
Once the plugin is installed successfully, click Activate Plugin to start using it.
2. Activate the Plugin License
To activate the license key, you need to enter the Product Order API Key and the Product ID used for the purchase. Get the API Key and Product ID from the My Account> API KEYS section.
Without an active plugin license, the customers will not be able to utilize the plugin functionality, and the plugin will stop functioning. Hence, our team strongly recommends activating the license & renewing it promptly when it expires to avoid any disruption in the shipping capabilities.
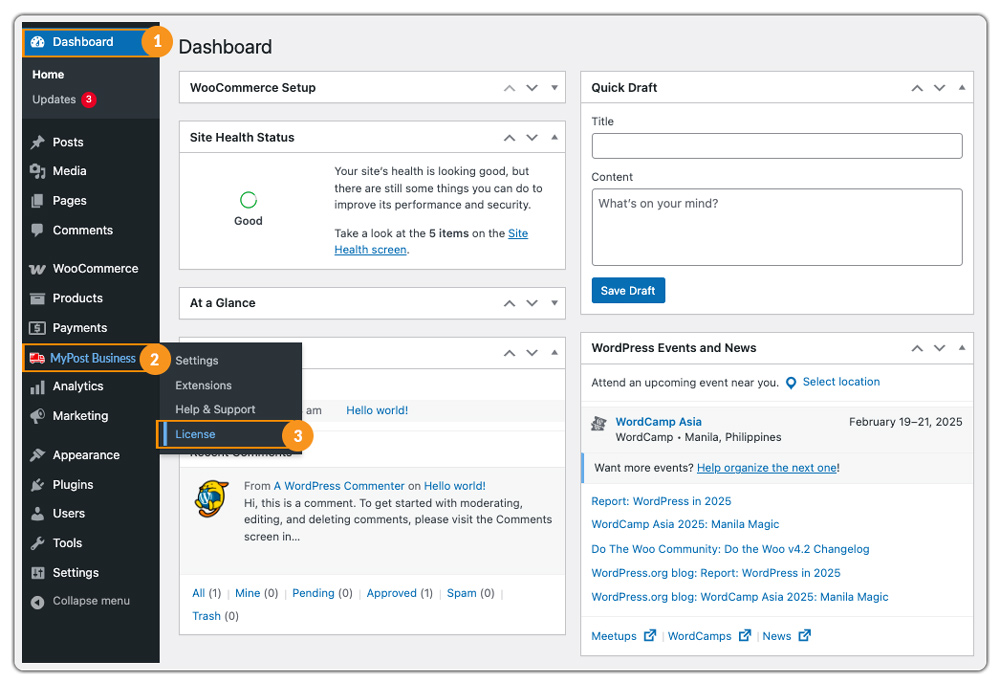
Now, go to Dashboard > Australia Post > License
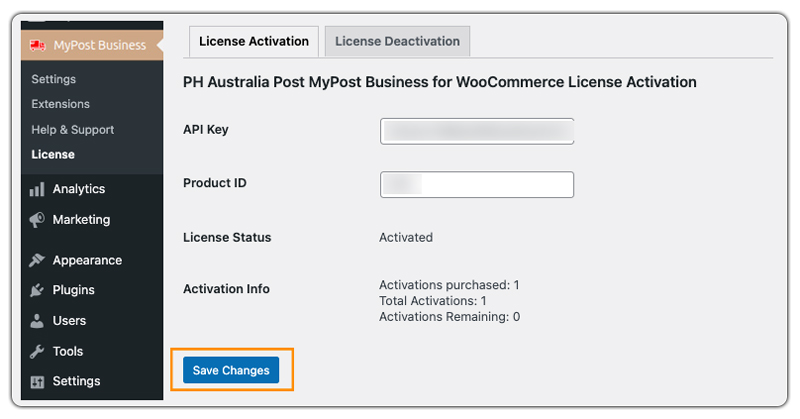
Click on License Activation. Enter the following on the license activation page:
- Provide your API Key and Product ID Credentials
- Click on Save Changes
- Your API Key Status is now Activated
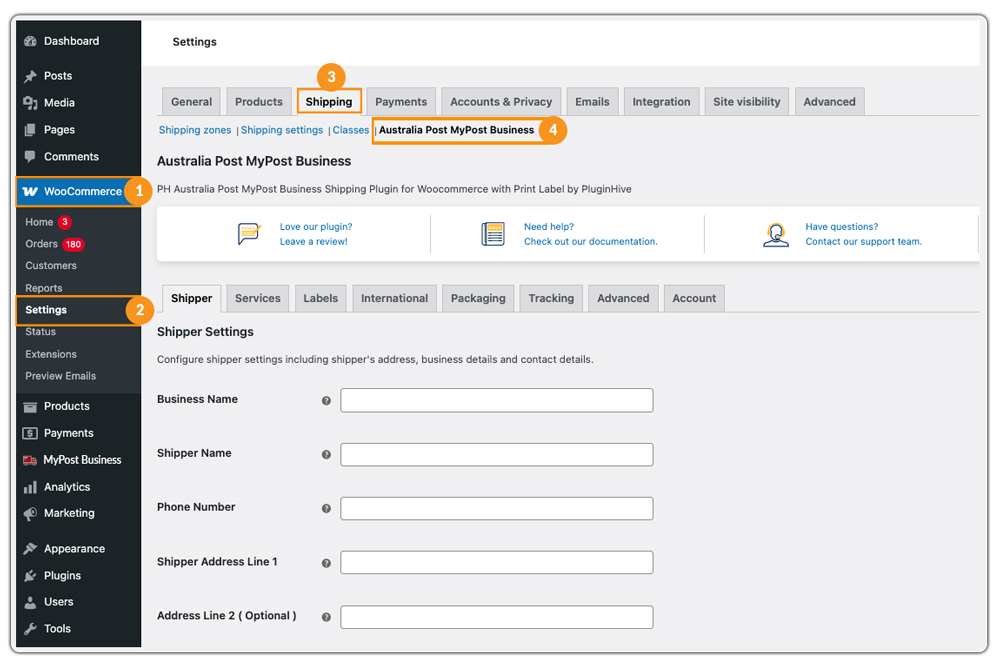
3. Navigate to Australia Post MyPost Business Plugin Settings
After installing and activating the plugin, a new shipping method, ‘Australia Post MyPost Business’, is added to the WooCommerce Shipping settings. Now you can configure the Australia Post MyPost Business Shipping method according to your requirements. You can navigate to settings in two ways, as shown below:
Navigate to Plugins > Installed Plugins > PH Australia Post MyPostBusiness Plugin > Settings

Or, Navigate to Australia Post > Settings

Navigate to WooCommerce> Settings > Shipping > Australia Post MyPost Business
After entering to MyPost Business settings, you need to connect your account.
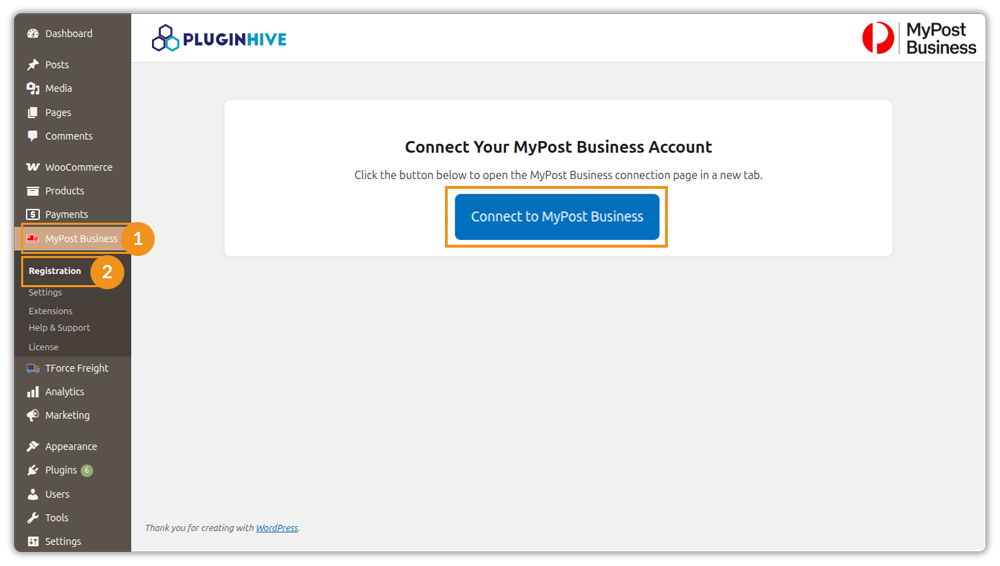
4. Connect Your MyPost Business Account
To connect your myPost Business account, go to WordPress Dashboard > MyPost Business > Registration and click on Connect to MyPost Business.
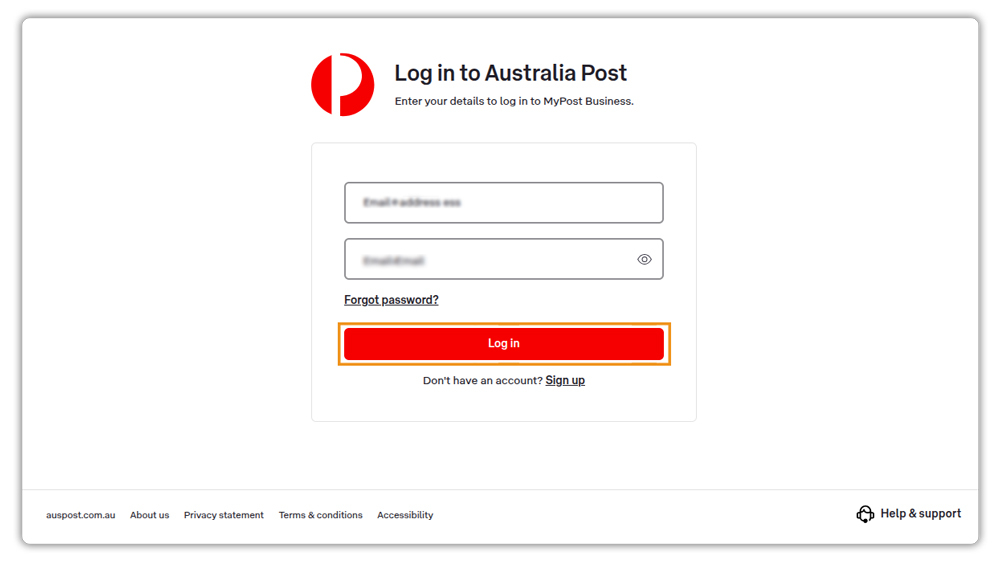
Enter the email ID and password of your MyPost Business account, then proceed to log in.
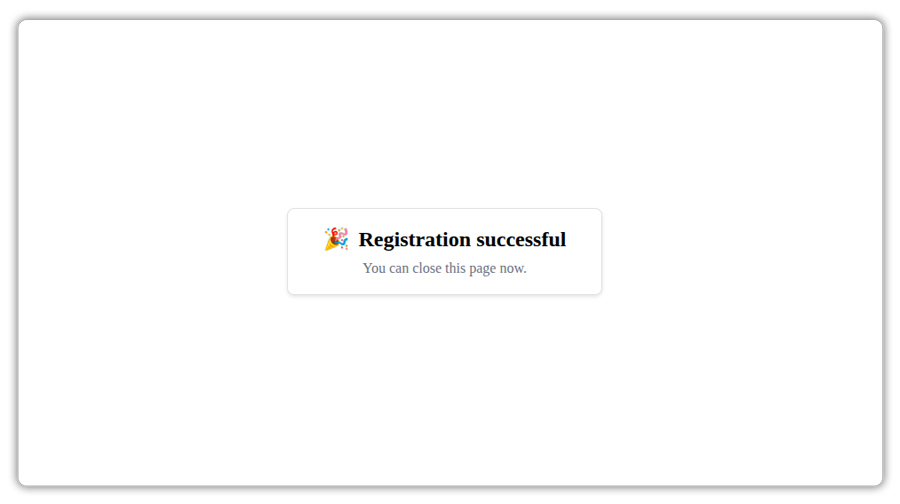
Once done, you’ll see a message “Registration successful”. You can close this tab.
Return to your WordPress dashboard. You’ll now see a message saying MyPost Business Account Connected, along with your account number and connection date. By default, the Stored Account option will be selected.
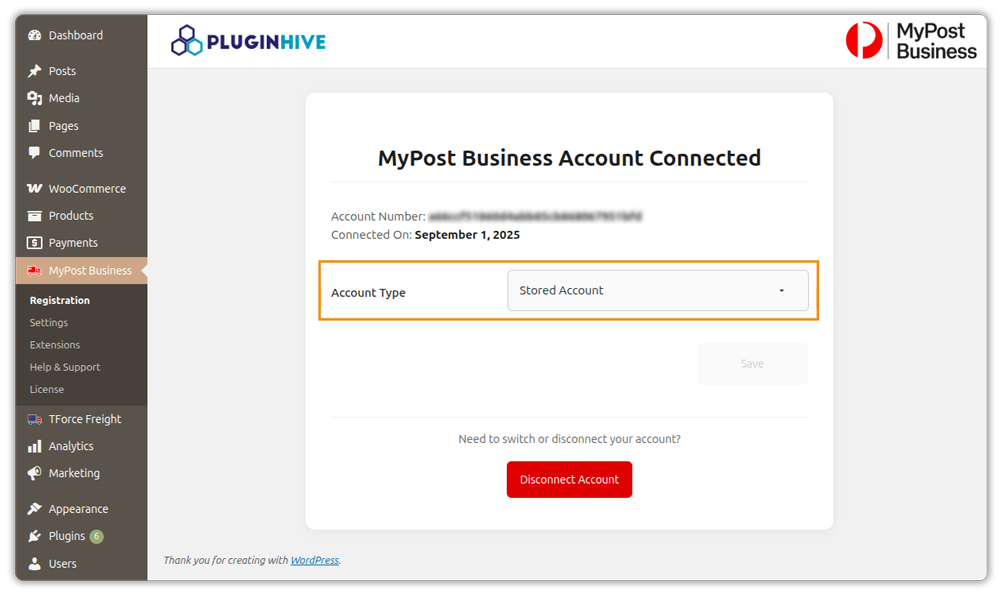
You can choose your Account Type from the dropdown:
- Stored Account
- Charged Account
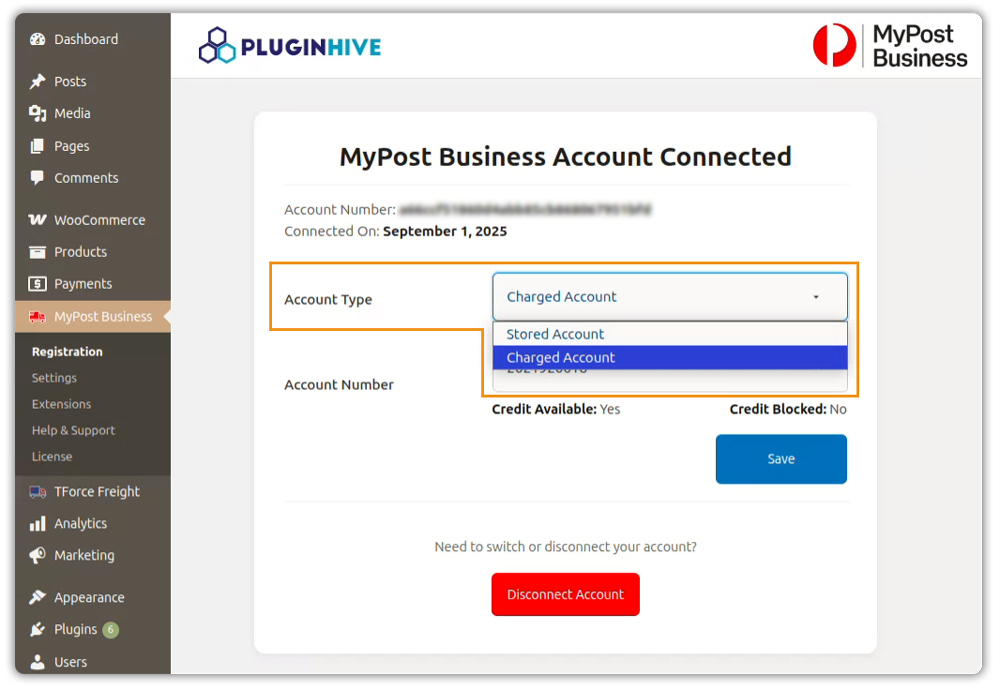
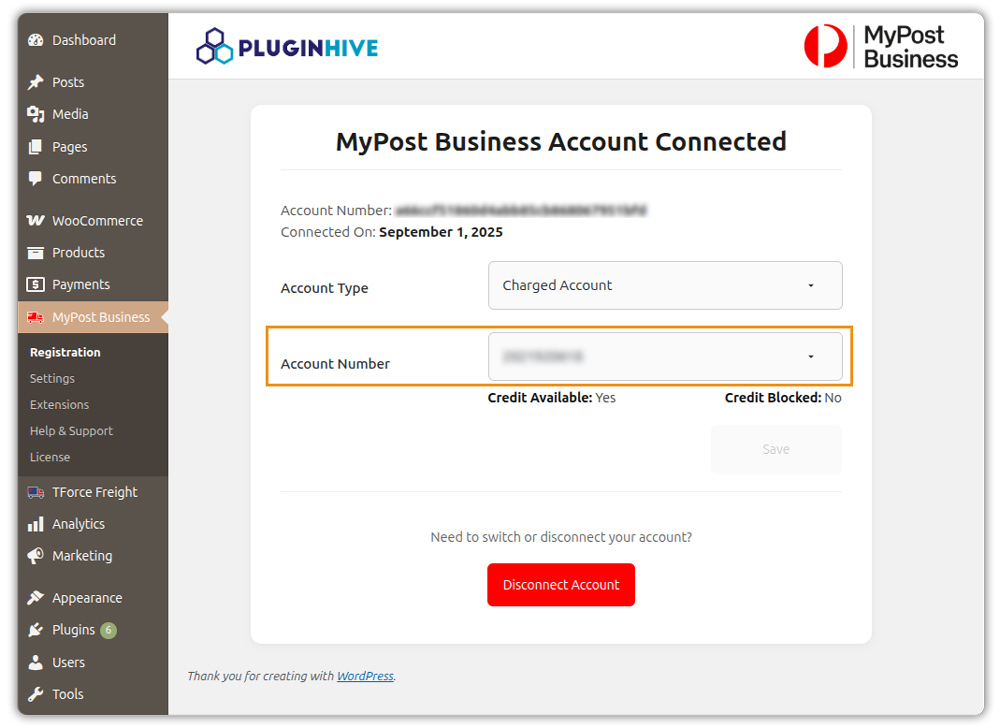
If you select Charged Account, choose your account number from the list. You’ll also see whether Credit is Available and if it’s blocked.
Click Save to confirm.
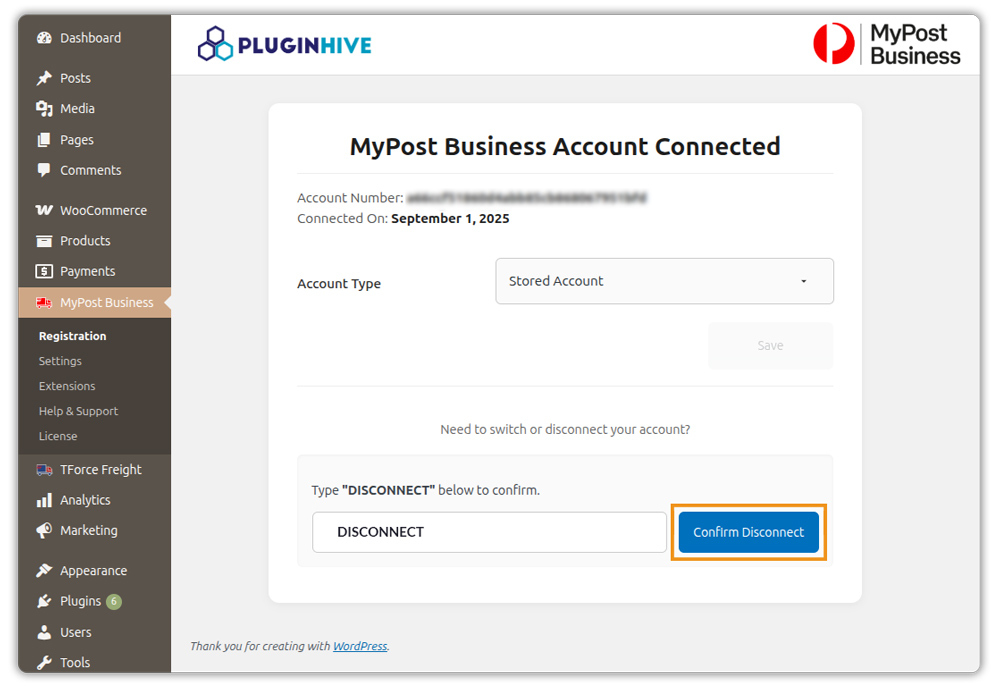
If you ever need to switch or remove your account, click Disconnect Account. Type DISCONNECT in the confirmation box and click Confirm Disconnect.
5. Verify Your Product Settings
To obtain accurate Australia Post MyPost Business shipping rates, it is mandatory to provide specific product details, such as product weight & dimensions, type, and country of manufacture.
Add Product Weight and Dimensions
Navigate to WooCommerce Dashboard > Products and select the product of your choice, and click on Edit
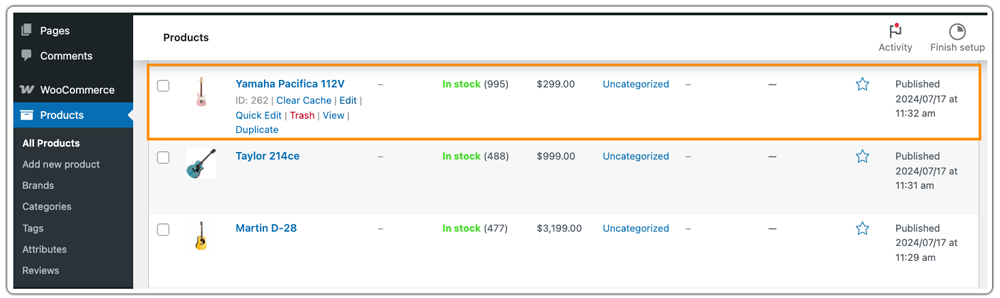
Under the Edit Product section, go to Product Data > Shipping settings. Provide the Product Weight and Dimensions in the fields as shown in the image.
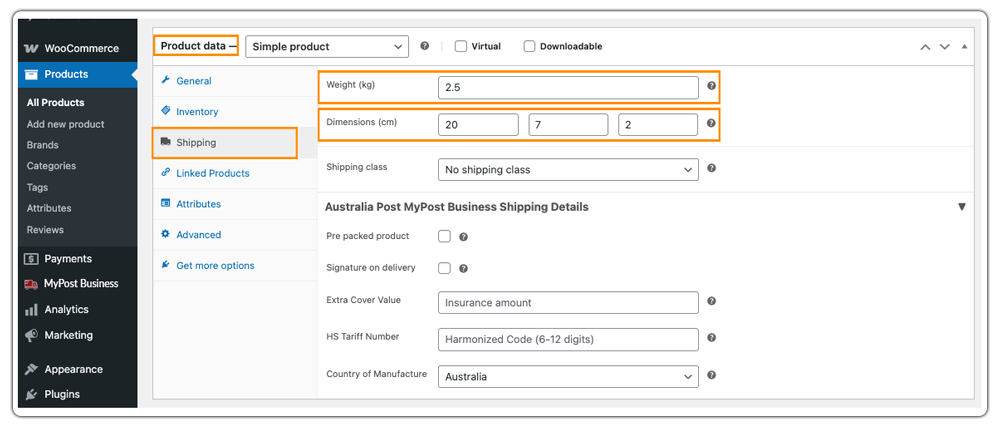
Assign details of the following fields with respect to the product:
- Weight: Product weight needs to be assigned here
- Dimensions: The Dimensions of your product need to be assigned here
- Shipping Class: If you have specific shipping classes assigned to your product, provide them in this field
- Pre-Packed Product: Enable this if the product is already packed and ready to ship.
- Signature on Delivery: Select this option if a signature is required upon delivery.
- Transit Cover Value: Specify the insured value to cover potential shipping damages.
- H.S. Tariff Number: It is essential to provide tariff number details if your order involves international shipping
- Country of manufacture: Here, the Country of Manufacture would be Australia.
Set Up Product Weight and Dimensions in Plugin Settings
For Australia Post MyPost Business, the product dimensions must meet specific minimum requirements to ensure accurate shipping calculations. At least two dimensions of the product should be greater than or equal to 5 cm, while the remaining dimension (height) should be at least 0.1 cm. Additionally, the minimum weight for a single product/ package must be at least 0.1 kg.
To configure minimum weight and dimensions:
- Go to WooCommerce > Settings > Shipping > Australia Post MyPost Business.
- Click on the Packaging tab.
- Set the default weight and dimensions
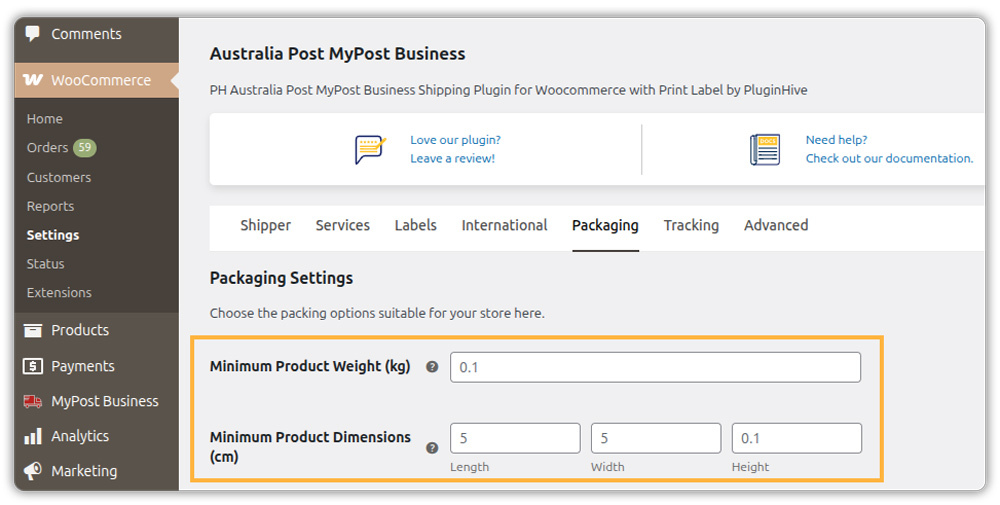
If no dimensions are provided for a product, the system will assume 5 cm × 5 cm × 0.1 cm. If any product dimensions fall below these limits, the minimum values will be applied automatically.
6. Add Shipper Address Details
Provide the address details where your order will be shipped. This can be your store address, shipping warehouse address, etc.
- Select WooCommerce > Settings > Shipping > Australia Post MyPost Business
- Go to the Shipper tab

- Business Name: Enter the company name to be printed on the shipping label and invoice.
- Shipper Name: Provide the sender’s name for the shipping label and invoice.
- Phone Number: Enter the contact phone number to be printed on the shipping label and invoice.
- Shipper Address Line 1: Primary address line to be printed on the shipping label and invoice.
- Address Line 2 (Optional): Additional address details if needed.
- Postal Code: Enter the sender’s postcode for accurate delivery.
- Suburb: Specify the suburb to be printed on the shipping label and invoice.
- State: Provide the sender’s state to ensure proper shipment routing.
7. Display Australia Post MyPost Business Shipping Rates
Get Real-Time Shipping Rates at Cart/Checkout
Accessing Australia Post MyPost Business Real-Time Shipping Rates
- Select WooCommerce > Settings > Shipping > Australia Post MyPost Business
- Select Services tab
- Enable RealTime Rates as shown below

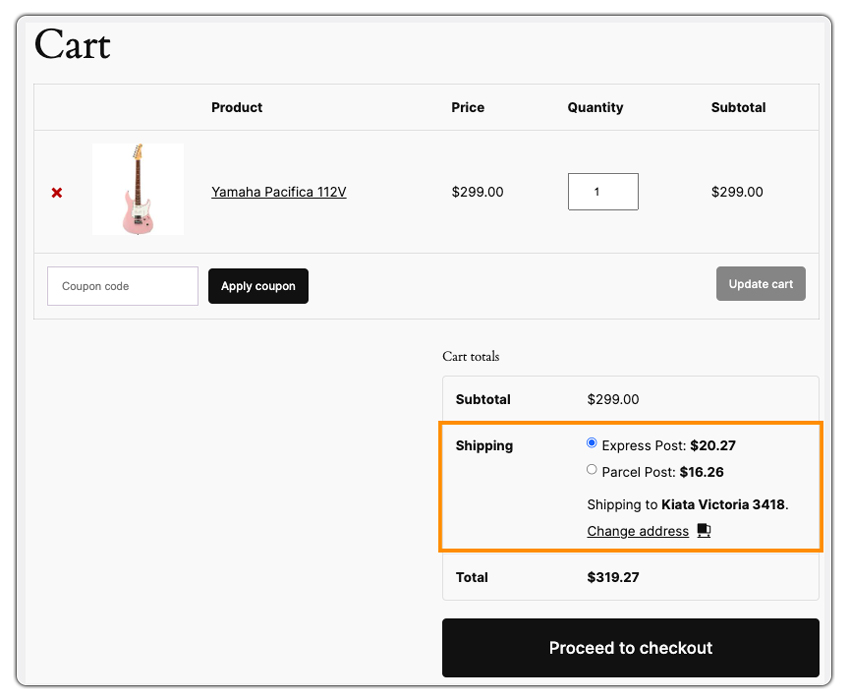
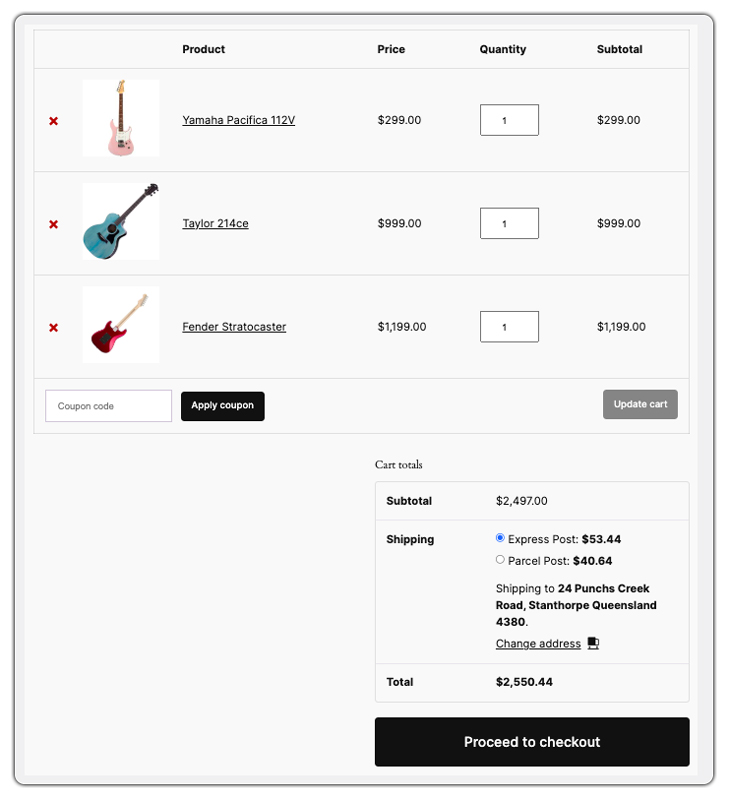
The Australia Post MyPost Business rates are shown in the cart as follows:
Add Fall Back Rate
This field indicates the shipping cost, which is taken as the default cost if Australia Post MyPost Business does not fetch any rates. This allows the customer to check out even if Australia Post MyPost Business returns no matching rates. Leave it blank to disable.

Enable Extra Coverage:
To enable transit coverage,
- Go to WooCommerce > Settings > Shipping > Australia Post MyPost Business
- Select Shipper
- Enable Transit Coverage

For added security when shipping an item, you can opt for Extra Cover. This protects against loss or damage up to the declared value of your item (up to $5,000) while it is in transit with Australia Post.
- Extra Cover is free for the first $100 of coverage.
- Beyond $100, it costs $2.50 for each additional $100 of coverage, up to a maximum of $5,000.
For example, let’s calculate for a $300 Item:
- Coverage for $0 – $100 → $0
- Coverage for $101 – $200 → $2.50
- Coverage for $201 – $300 → $5.00
- Total Extra Cover cost: $5.00
If your item is valued over $500, a $2.95 Signature on Delivery fee applies (except for Registered Post, where it’s already included).
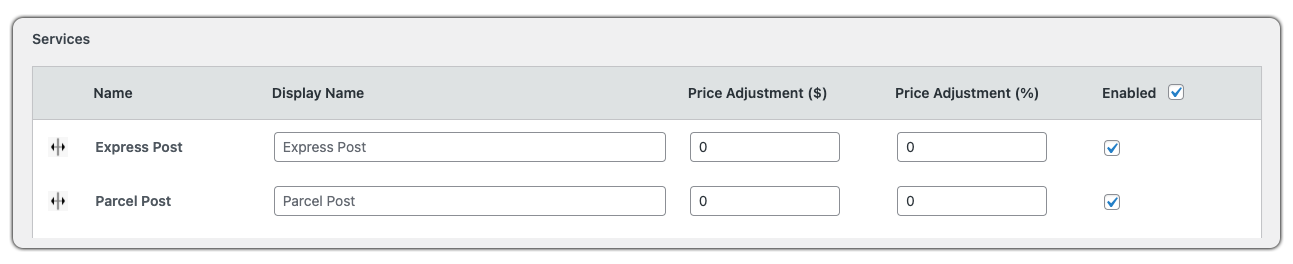
8. Configure Australia Post MyPost Business Shipping Services
Australia Post MyPost Business provides different kinds of shipping methods that suit the different needs of the customer.
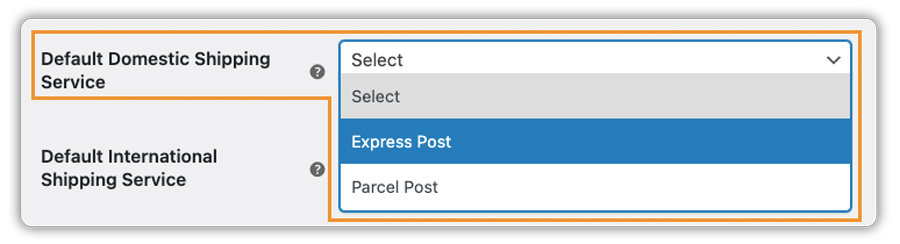
Australia Post MyPost Business Domestic Services
Domestic services supported by our plugin are as follows:
- Express Post
- Parcel Post
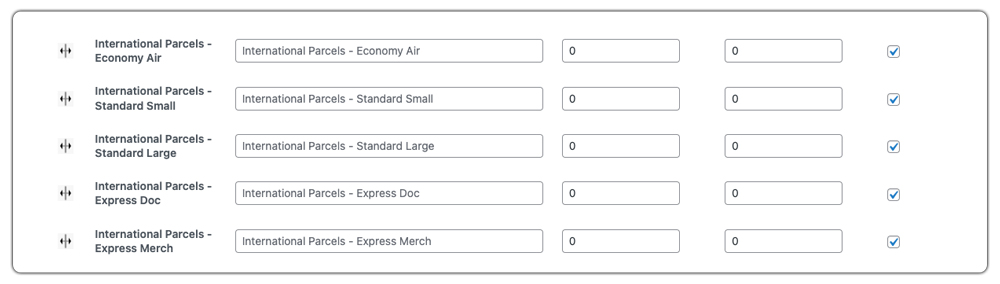
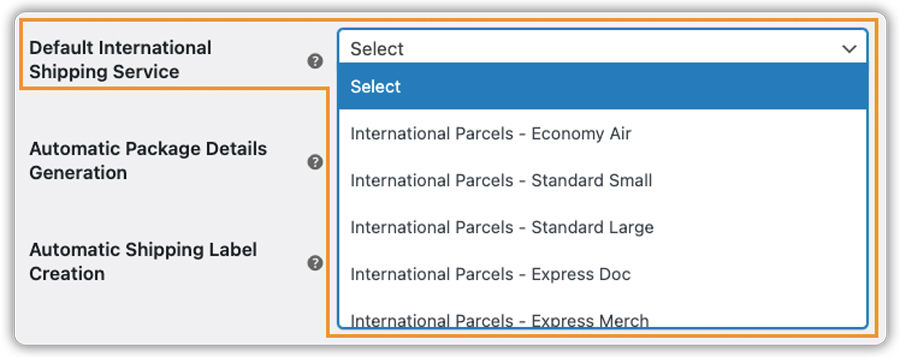
Australia Post MyPost Business International Services
International services supported by our plugin are as follows:
- International Parcels – Economy Air
- International Parcels – Standard Small
- International Parcels – Standard Large
- International Parcels – Express Doc
- International Parcels – Express Merch
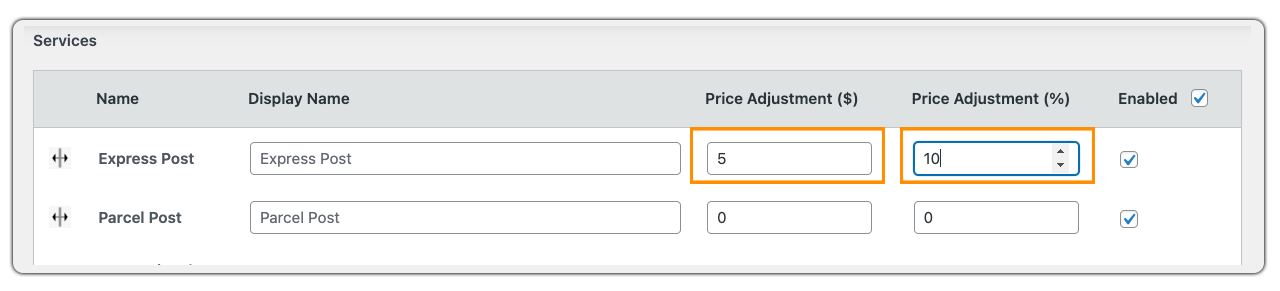
Adjust Shipping Rates
You can adjust the shipping price by adding or subtracting an amount from the actual shipping cost. Use the minus sign (–) to subtract. Adjustments can be applied in percentage (%) or fixed amount ($) for each service.
Let’s assume the shipping cost for Parcel Post is $10.
Scenario 1: Fixed Price Adjustment ($)
- Price adjustment applied: $5
- Total displayed cost: $15 (10 + 5)

Scenario 2: Percentage-Based Adjustment (%)
- Price adjustment applied: 10%
- 10% of $10 = $1
- Total displayed cost: $11 (10 + 1)

Scenario 3: Both Fixed ($) and Percentage (%) Adjustment
- Price adjustment applied: $5 and 10%
- 10% of $10 = $1
- Total displayed cost: $16 (10 + 5 + 1)
Display MyPost Business Shipping Services Based on Shipping Zones
If you want to show Australia Post MyPost Business shipping services based on your customer zones, follow these steps:
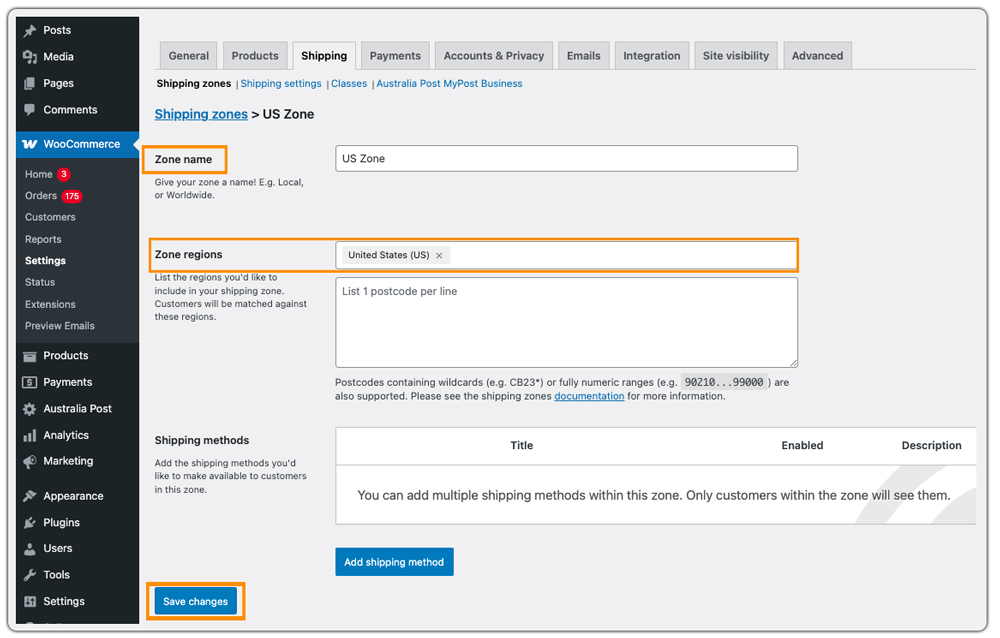
Go to WooCommerce Settings and then Shipping > Shipping Zones > Add Zone
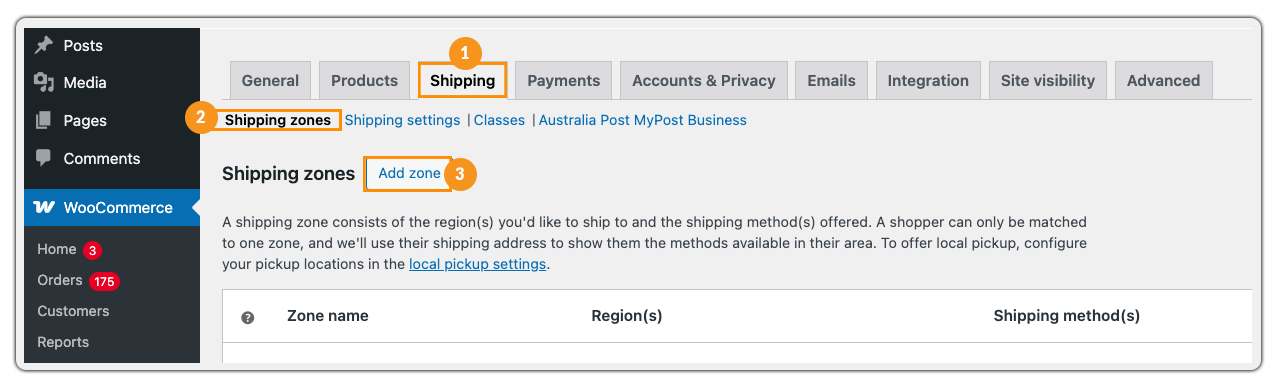
Give your zone a name and select the shipping regions where you want to offer MyPost Business service, and then click on Save Changes.
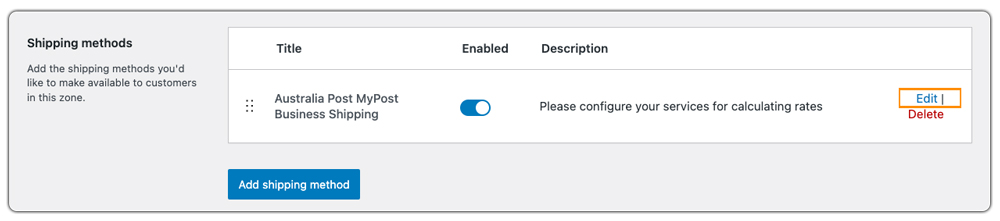
Click on Add Shipping Method and select Australia Post MyPost Business, and click on Continue.

Click on Edit in the Australia Post MyPost Business section.
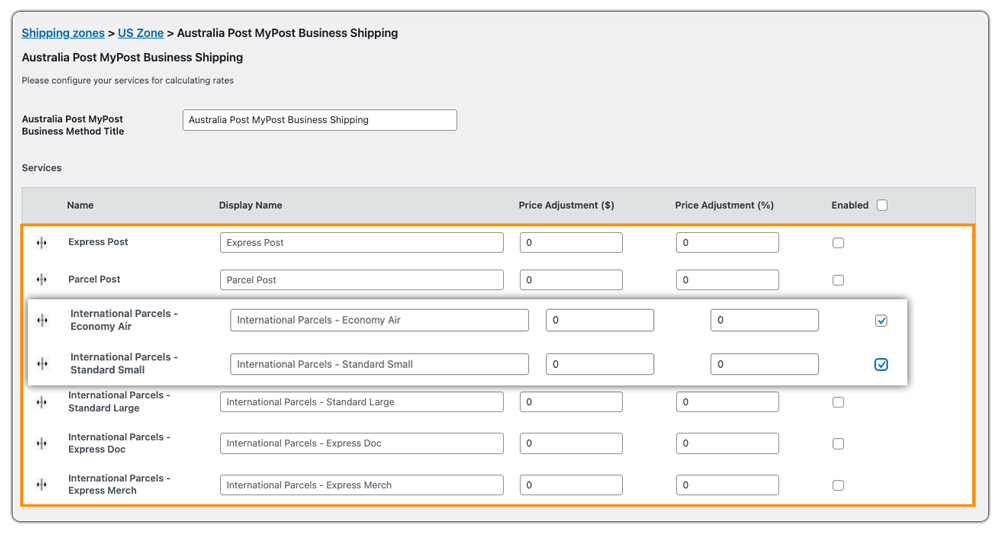
Select the MyPost Business shipping services you want to offer in that zone. Click on Save Changes.
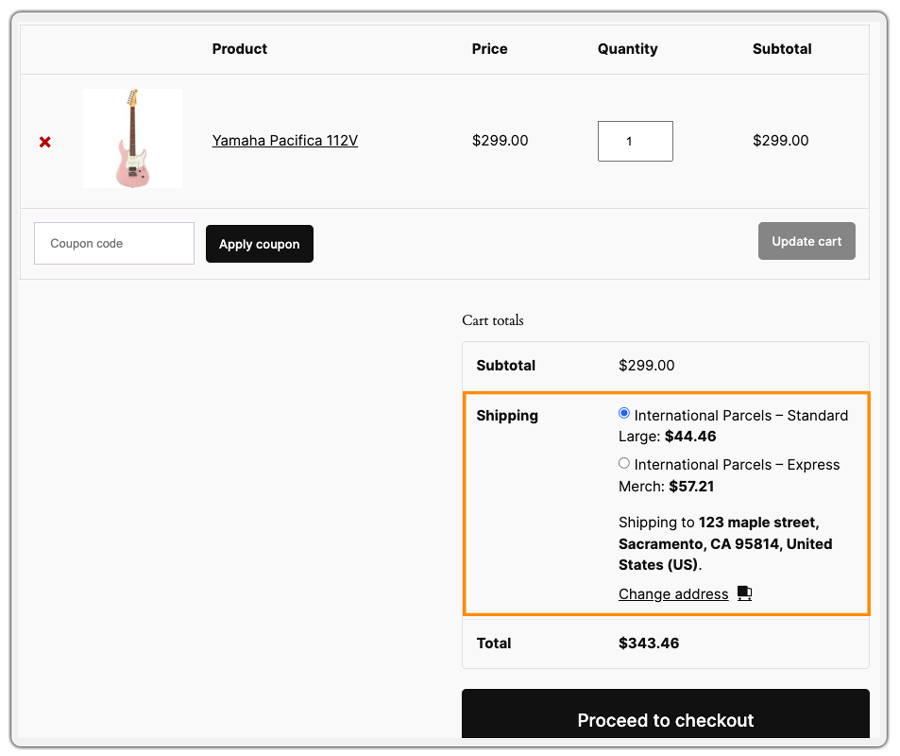
Now, at WooCommerce checkout, Australia Post MyPost Business shipping services will be displayed based on the customer’s region.
For example, if a customer enters an address in the US, the Australia Post MyPost Business services selected for that region will be shown at checkout.
9. Configure Australia Post MyPost Business Package Settings
WooCommerce Australia Post MyPost Business Plugin has three primary packing options available.
- Go to WooCommerce > Settings > Shipping > Australia Post MyPost Business
- Select Packaging
- Select the suitable Parcel Packing option in the drop-down

The three options to pack parcel(s) using our plugin are as given below:
Pack Products Individually
In this option, each item in the cart is packed separately. The total Shipping cost is calculated by adding the shipping cost for each item. Hence, labels are also generated separately.
For example, the shipping cost of Item X is $10. If the customer adds two units of item X to the cart, then the total shipping cost is $10 x 2, which is $20. In this case, two labels are generated.
Pack Products Using Australia Post MyPost Business Boxes
If packing items individually does not suit your business, you can define the required box sizes under the Box Dimensions section in Australia Post MyPost Business. All cart items will be packed into custom boxes based on your defined dimensions, and the best-fit box will be automatically selected. This method is recommended for efficient shipping.
Pack Products Purely Based on Weights
In this option, the weights of all the cart items are summed up and passed to the Australia Post MyPost Business API to get rates. You just need to define a Max Weight, which determines the maximum weight that can be packed in a single package. All products up to the Max Weight will be packed inside a single package, and once the Max Weight is reached, the plugin will automatically create a new package. Also, you can choose whether you want to pack heavier items first or lighter items.
Australia Post MyPost Business Boxes
Correct packaging is essential for your shipment to arrive at its destination on time and in good condition. You can choose from the box packaging options offered by Australia Post MyPost Business. The available options are listed below:
- MyPost Business Flat Rate Satchel Small
- Dimensions: 35.5 cm x 22.5 cm x 1 cm
- Weight Limit: 5 kg
- Best for: Documents, accessories, and lightweight items.
- MyPost Business Flat Rate Satchel Medium
- Dimensions: 39 cm x 27 cm x 1 cm
- Weight Limit: 5 kg
- Best for: Clothing, books, or bulkier soft items.
- MyPost Business Flat Rate Satchel Large
- Dimensions: 40.5 cm x 31.5 cm x 1 cm
- Weight Limit: 5 kg
- Best for: Electronics, office supplies, and packaged goods.
- MyPost Business Flat Rate Satchel Extra Large
- Dimensions: 51 cm x 44 cm x 1 cm
- Weight Limit: 5 kg
- Best for: Larger or multiple items, bulky apparel, or medium-sized gadgets.
- MyPost Business Flat Rate Box Small
- Dimensions: 22 cm x 16 cm x 7 cm
- Weight Limit: 5 kg
- Best for: Small fragile items, cosmetics, or specialty goods.
- MyPost Business Flat Rate Box Medium
- Dimensions: 24 cm x 19 cm x 12 cm
- Weight Limit: 5 kg
- Best for: Packaged food, books, or small home essentials.
- MyPost Business Flat Rate Box Large
- Dimensions: 39 cm x 28 cm x 14 cm
- Weight Limit: 5 kg
- Best for: Multiple small items, heavier goods, or eCommerce orders.
- MyPost Business Flat Rate Box Extra Large
- Dimensions: 44 cm x 27.7 cm x 16.8 cm
- Weight Limit: 5 kg
- Best for: Bulkier items, electronic devices, or business shipments.
You can change the inner dimensions, but not the outer dimensions of the box, as it is predefined.

Custom Box Dimensions:
These box dimension settings apply when using the Pack into boxes with weights and dimensions option.
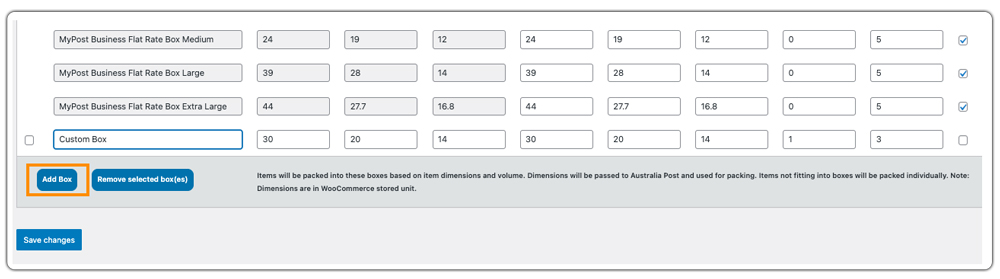
In this option, you can define the inner dimensions of your boxes. The inner dimensions refer to the space available inside the box where the products will be packed.
- Inner Dimensions: These are the internal measurements of the box that will be used to pack your items. By defining these dimensions, you can ensure your products fit properly and are securely packed.
- Outer Dimensions: These refer to the total external size of the box, including its thickness. Outer dimensions are important for calculating shipping rates, as carriers consider the full size of the package.
By setting up the right dimensions, you can reduce wasted space, which helps to minimize shipping costs and ensure your products arrive safely.
10. Print Australia Post MyPost Business Shipping Labels
After setting up the Australia Post MyPost Business Configuration Settings, your customers will be able to see all available Australia Post MyPost services listed on the Cart page. Once configured, the customer can choose the desired shipping option based on their preferences and proceed to checkout.

Printing Your First MyPost Business Shipping Labels
You can print the label in a particular format based on your Australia Post MyPost Business Configuration settings.
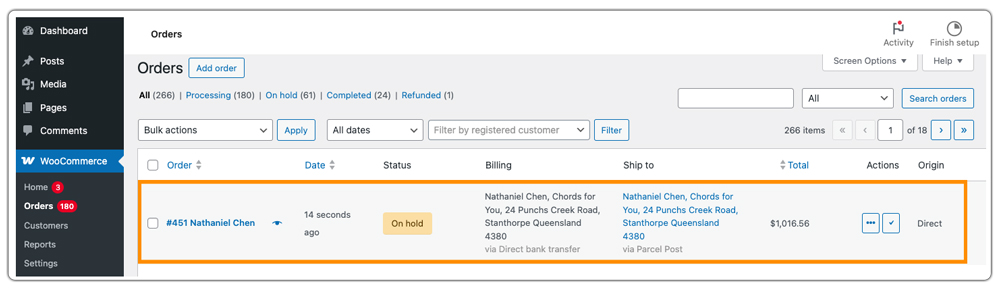
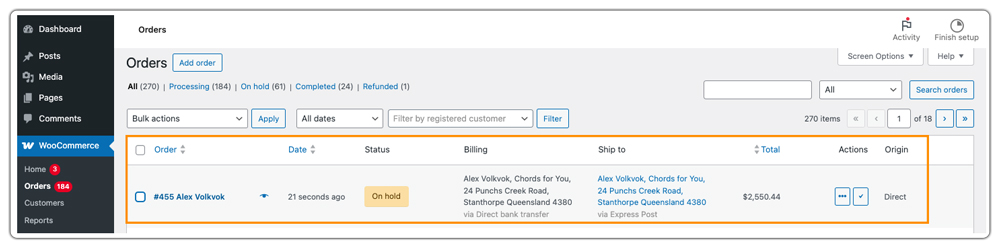
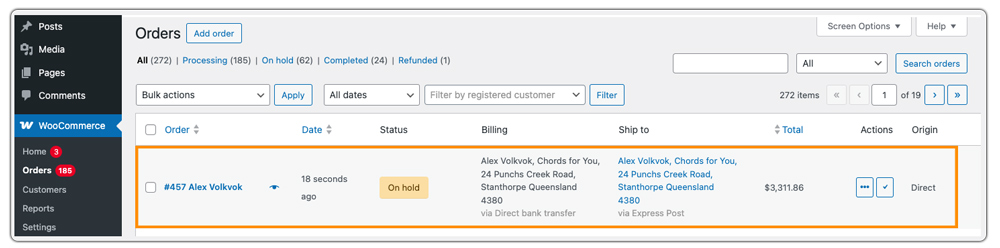
- Navigate to Dashboard > WooCommerce > Orders.
- On the order page, click the Order for which you want to create and print the label.
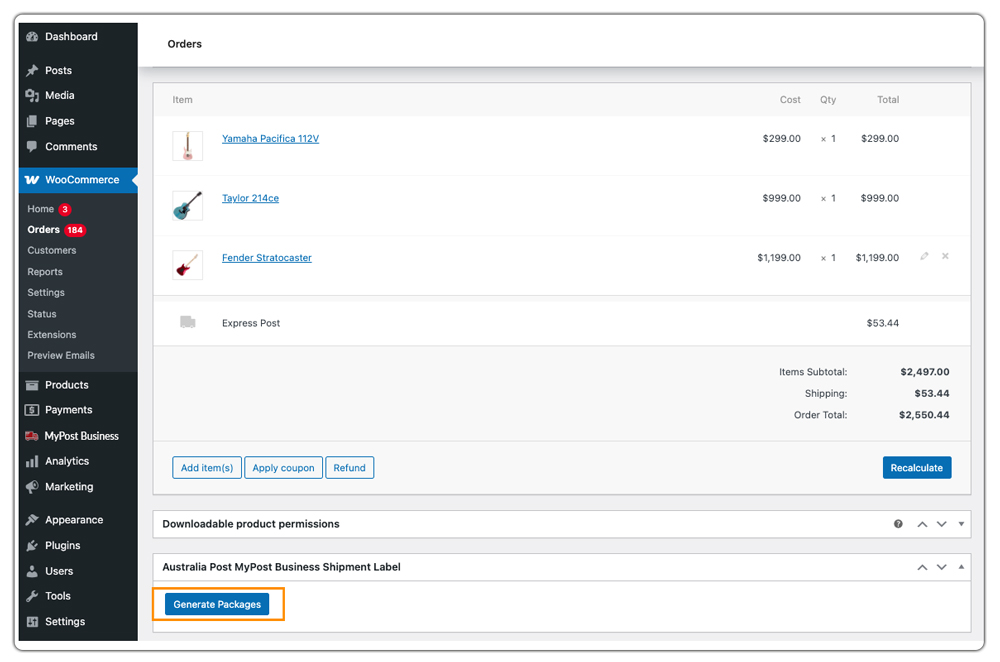
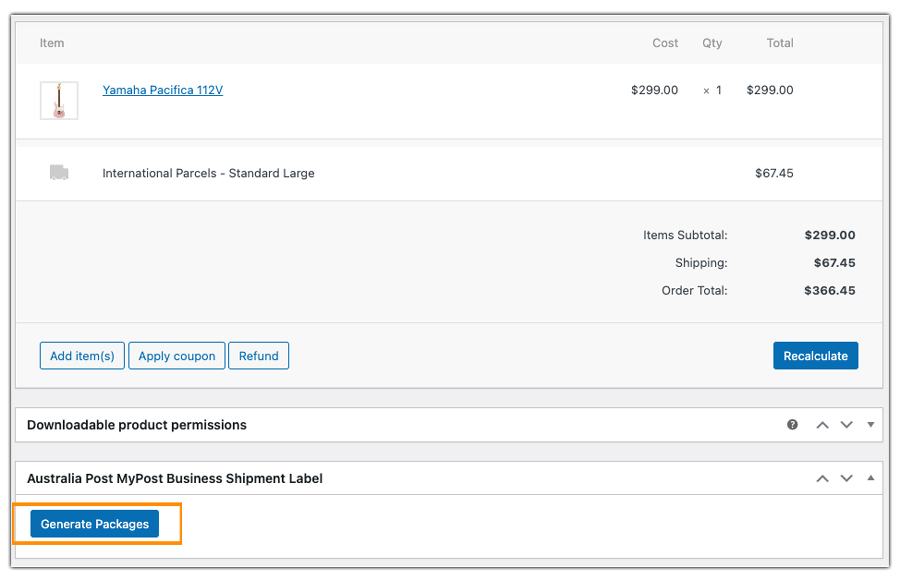
Click on Generate Packages. It will generate a package based on the Parcel Packing Method that you have set up in the plugin settings.
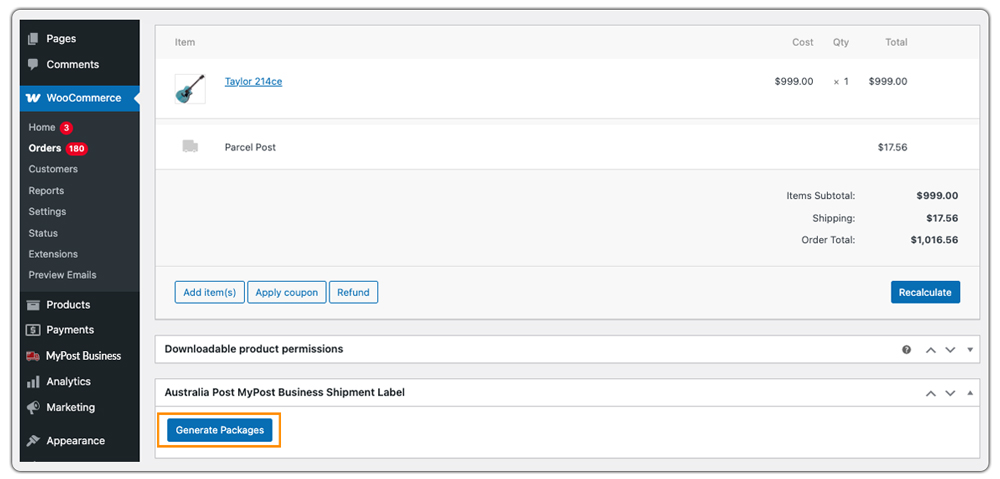
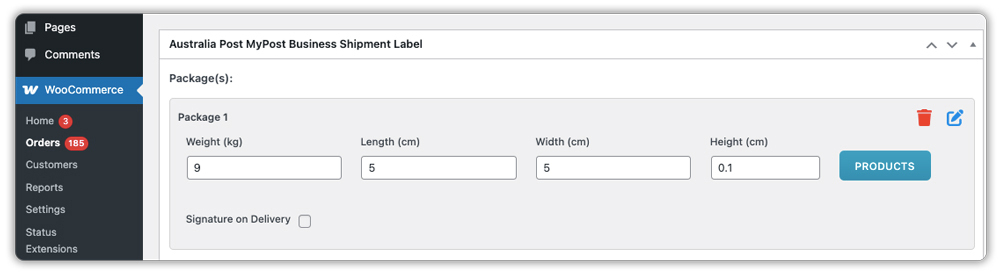
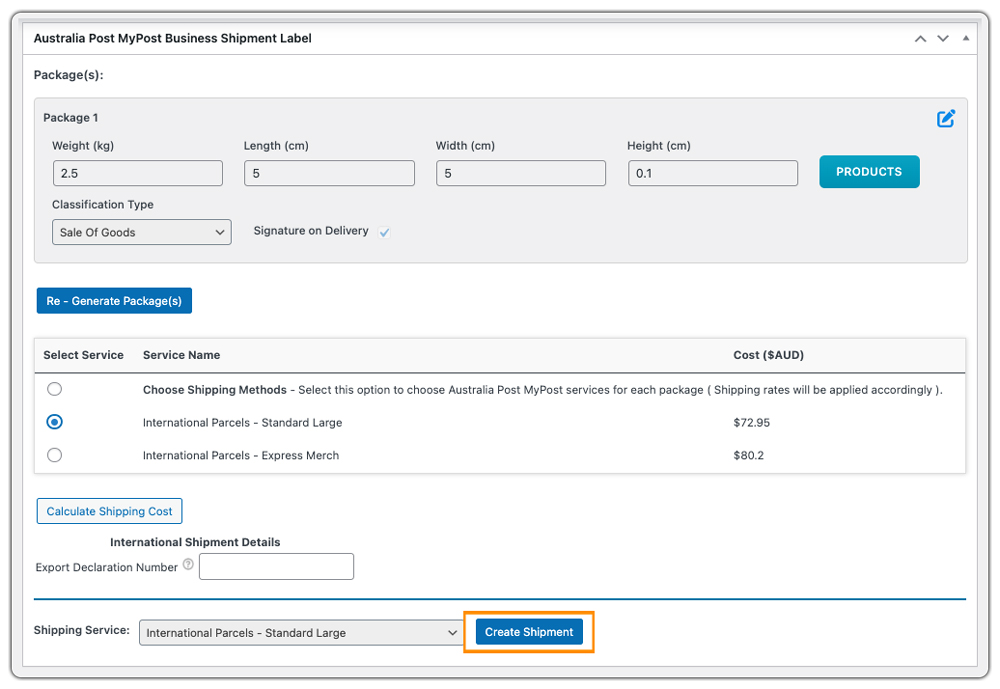
Once the package is successfully created, the following options will be available to you.
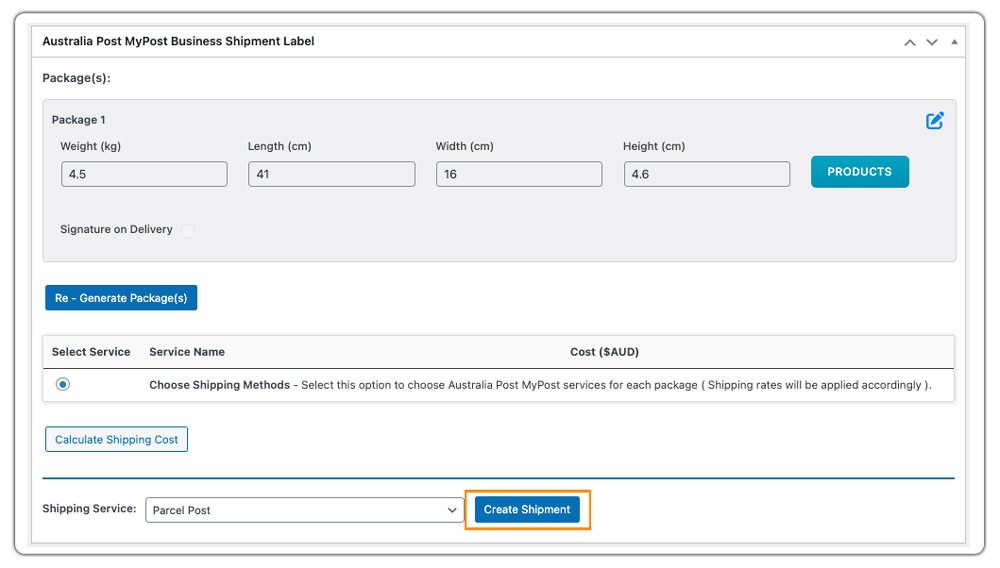
- Edit Package: Suppose you want to ship your product where you require multiple packages/ boxes, the following option allows you to manually add custom box packages to your order. You can also provide package weight and dimensions, and assign the Insurance value and Australia Post MyPost Business shipping service for your packages accordingly.
- Calculate Shipping Cost: It allows you to calculate real-time shipping rates on the order page in order to compare different Australia Post MyPost Business shipping rates and assign the cheapest or fastest Australia Post MyPost Business shipping services to the packages. This way, you can compare shipping rates and generate shipping labels for any available shipping service for the destination address.
Once you are done with the packages, click on Create Shipment to generate an Australia Post MyPost Business shipping label for the current order.
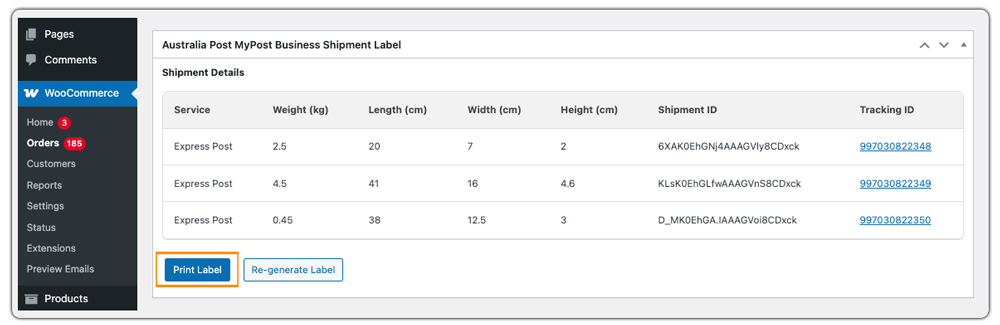
After clicking the Create Shipment button, the shipment tracking ID automatically gets generated in the tracking box. Print Label buttons become available for printing.
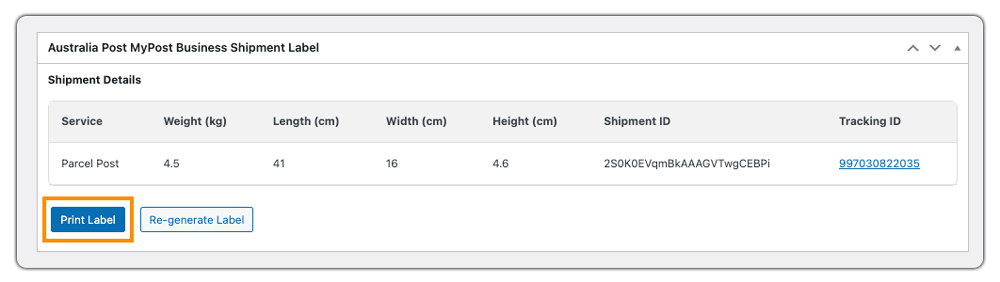
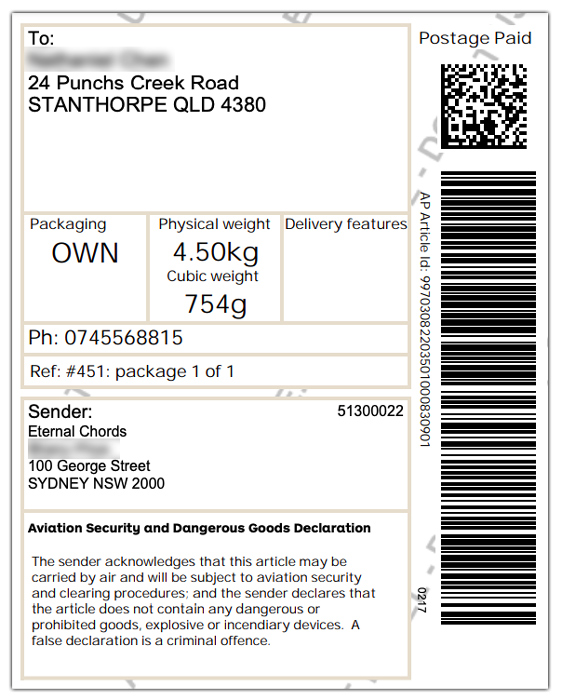
Sample Australia Post MyPost Business Shipping Label
All generated shipping labels are stored in your WooCommerce site’s database. These labels are automatically downloaded as a file and can be printed multiple times.
Print Shipping Labels in Bulk
Once multiple orders are placed, the plugin will be ready to generate shipping labels for all of them. Simply follow these steps:
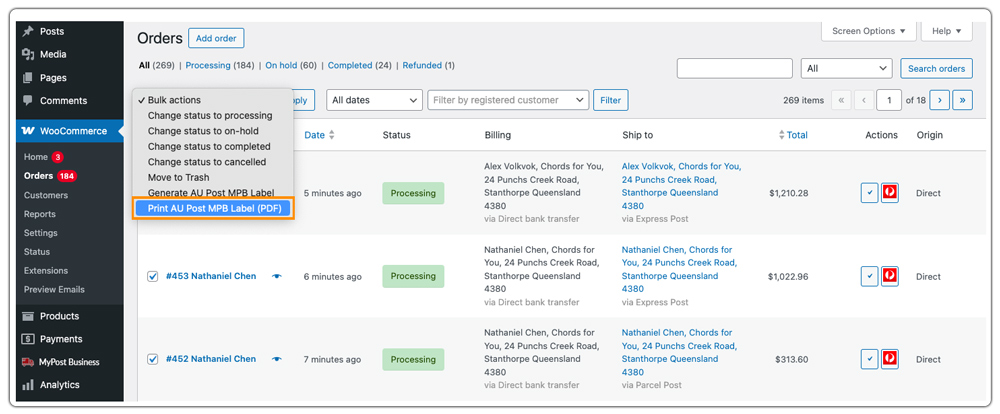
Go to the Orders page, where you’ll see a list of all the orders placed. Select the orders for which you want to create shipping labels.
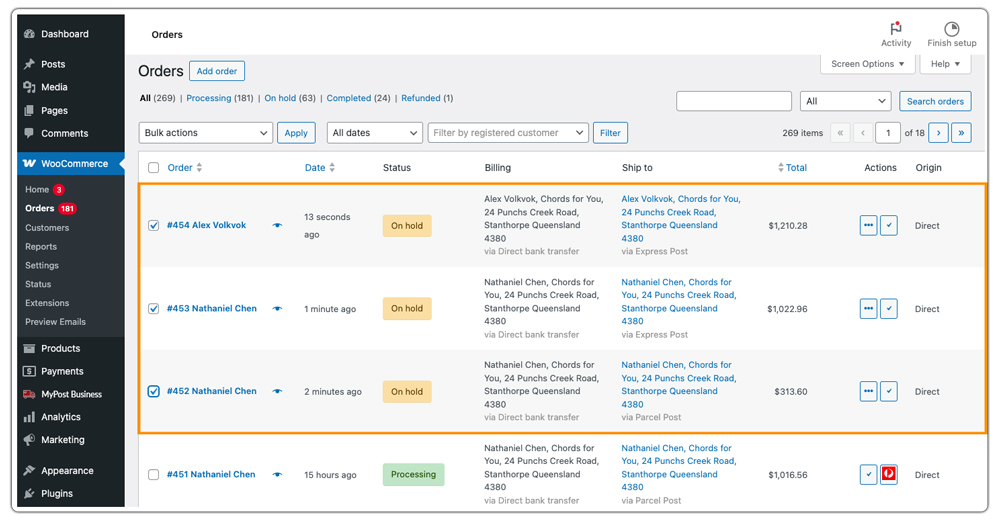
Choose Generate AUPost MPB Labels from the Bulk Actions dropdown and click Apply. The plugin will generate shipping labels for all selected orders.
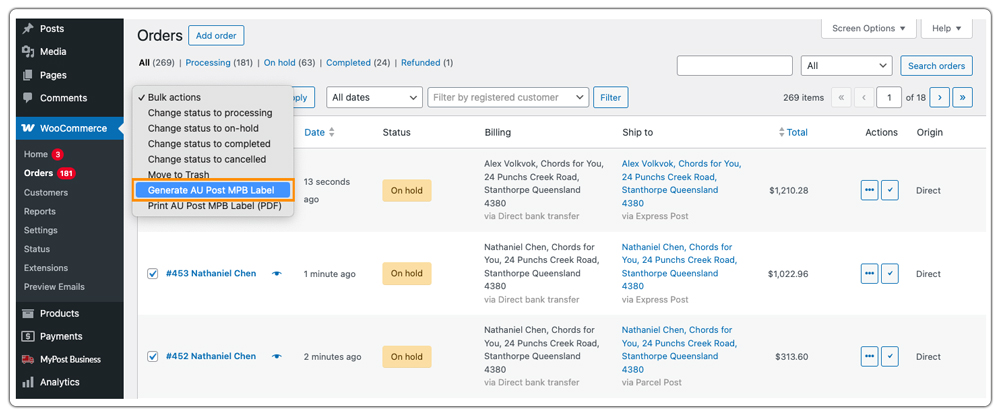
Finally, select the order you want to print a shipping label for and click the Print AUPost MPB Label option and Apply.
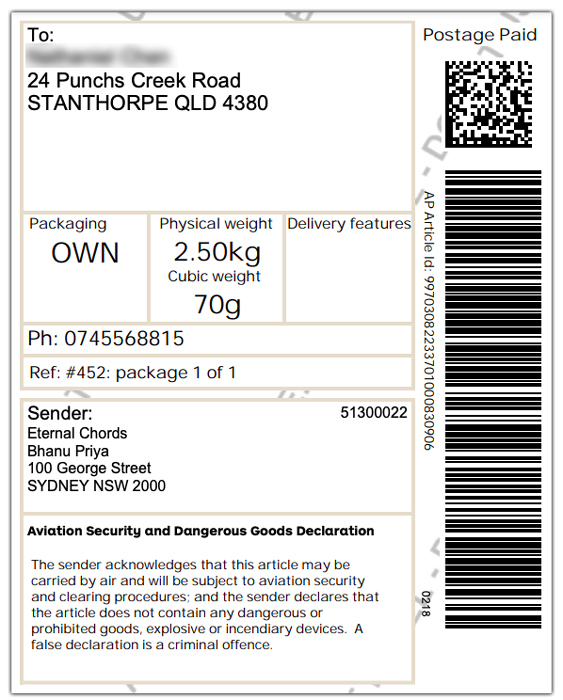
Label for Order 1
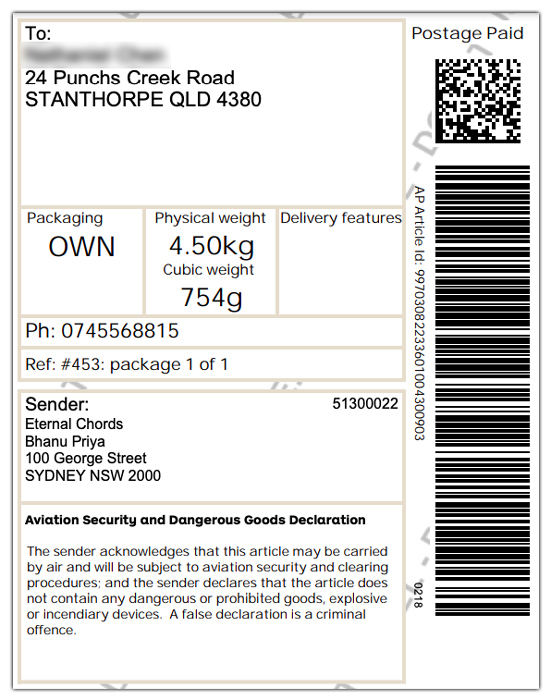
Label for order 2
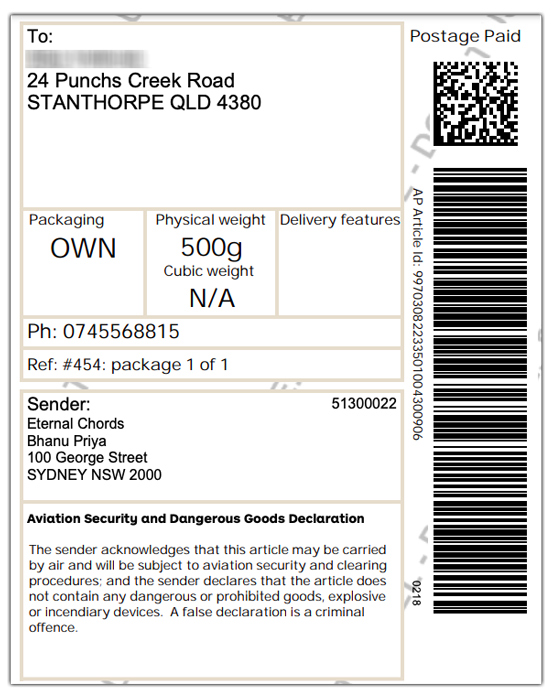
Label for Order 3
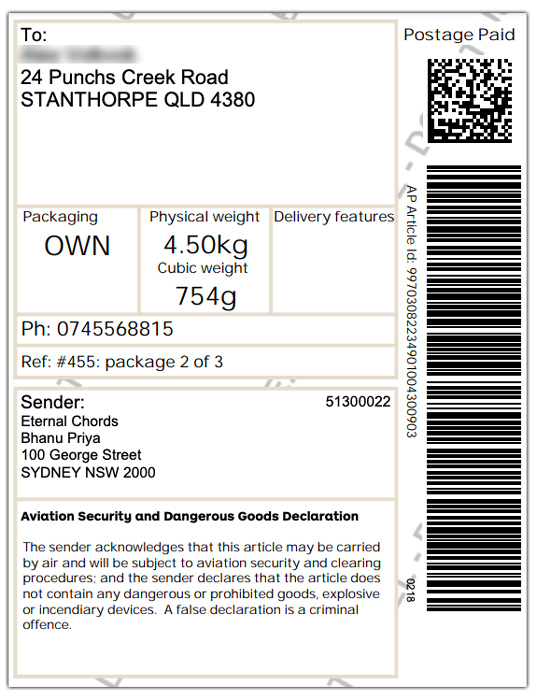
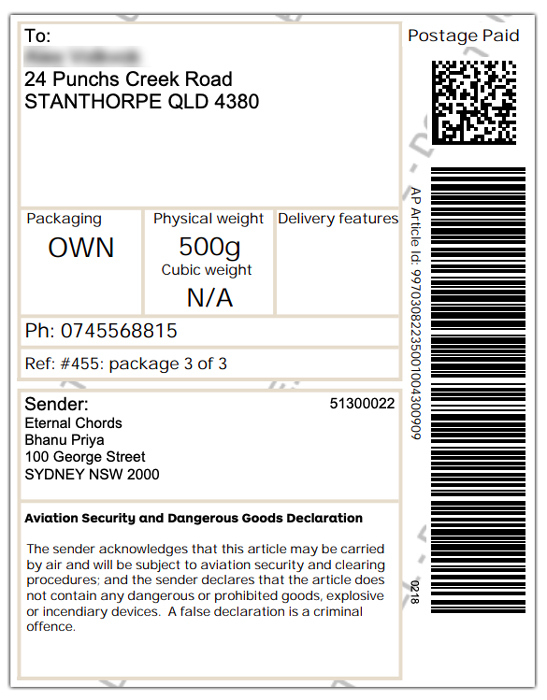
Print Individual Shipping Labels for Multiple Packages
Sometimes, you may need to use multiple boxes/packages to pack the products in a single order. Follow the steps to print an individual label for multiple packages.
Add multiple products to the cart and place the order.
Once the order is placed, go to the Orders page and select the order.
Click on Generate Package.
The system will create multiple packages for the different products.
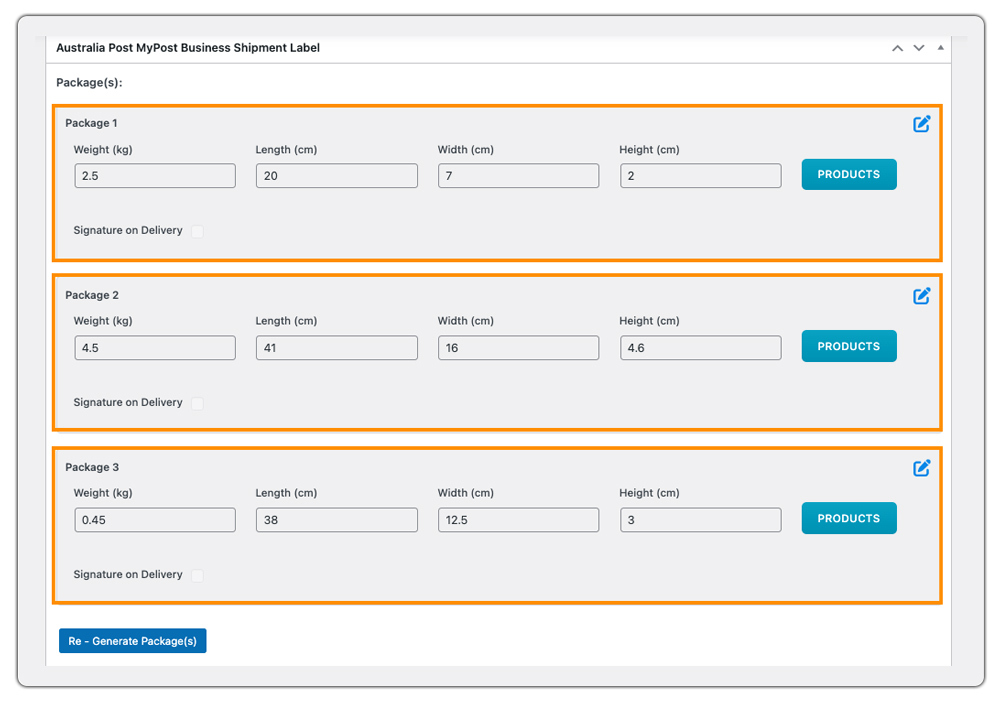
After that, click on Create Shipment.

You can now print the labels for each package.

Generate Australia Post MyPost Business Labels Automatically
To print shipping labels automatically with Australia Post MyPost Business:
Go to WooCommerce Settings > Shipping > Australia Post MyPost Business > Labels
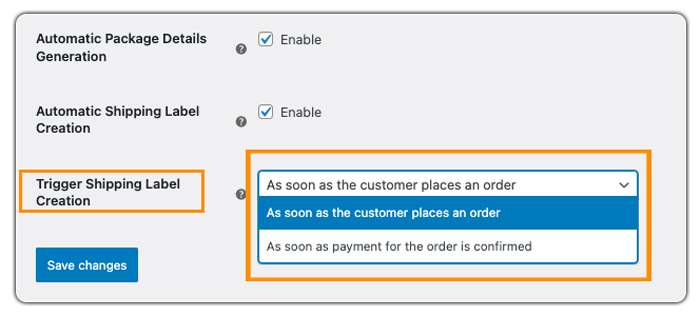
Enable the following options:
- Generate Packages Automatically After the Order is Received
- Generate Shipping Labels Automatically After the Order is Received

You can set up automatic shipping label generation based on order status. Labels can be triggered:
- As soon as payment for the order is confirmed
- Default – As soon as the customer places an order
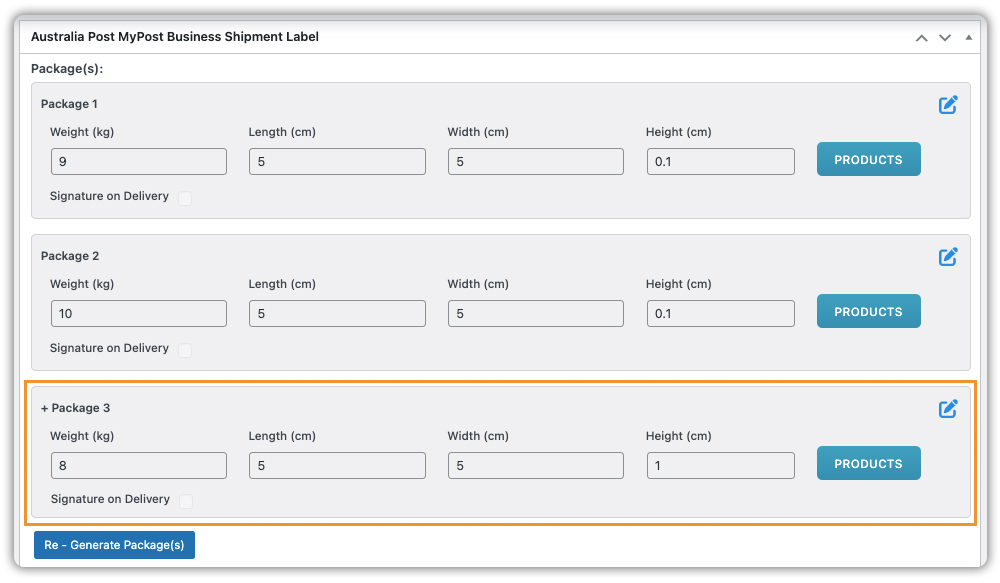
Add or Remove Packages Within An Order Shipment
This setting is particularly useful when you have orders containing multiple products or packages. You will have two options available: Add Packages and Remove Packages.
To add a package, go to the order where you want to add packages.
After generating the package, you will get an Edit button next to the order.
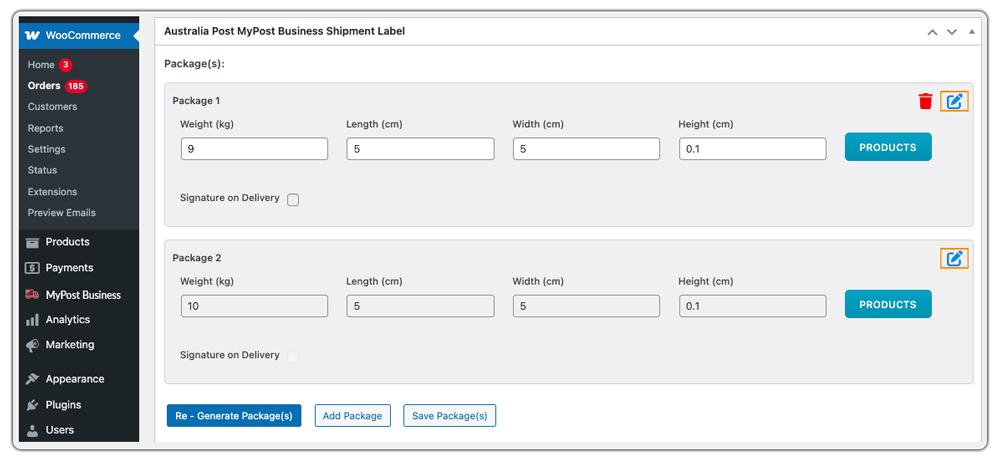
Click on the product, after which you will be able to select and remove the product from that specific package.
Then Click on Save.
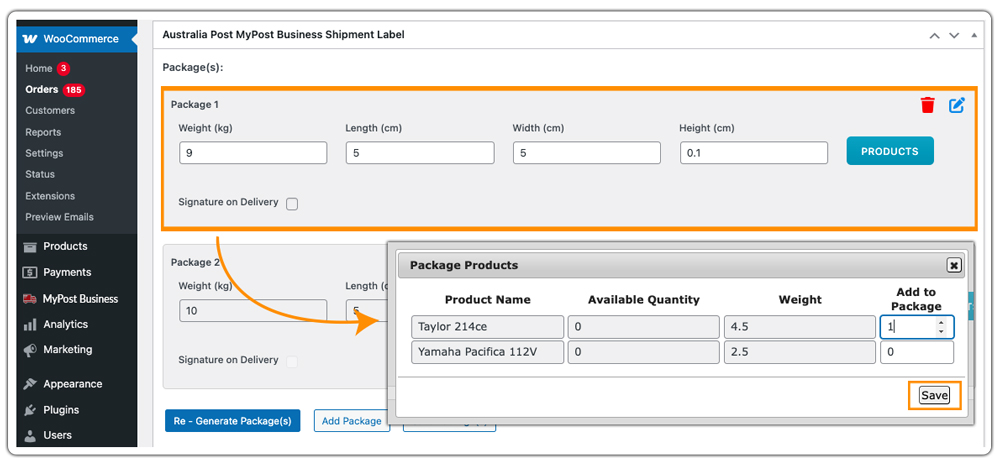
Click on Add Package to place the selected product(s) into the newly created package.
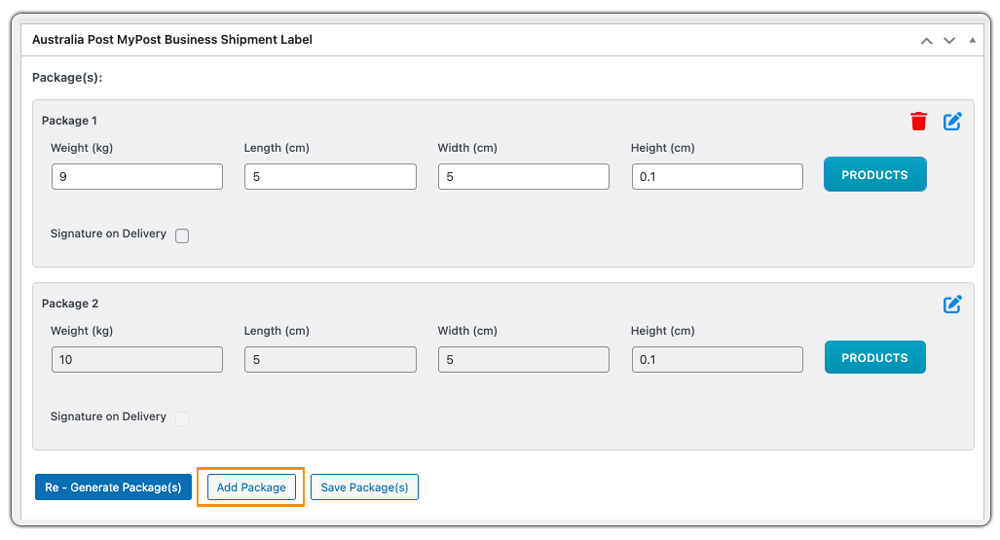
Add product(s) and enter the required dimensions and weight for the newly added package. Click on Save Package(s).

A new package is ready.
You can follow the same process for box packing as well, where you select the product(s) and reassign them to a new box.
Remove Packages:
If you no longer need certain packages, simply click on Delete to remove it. This option allows you to streamline the order by deleting unnecessary packages.
However, make sure that before proceeding to create the shipment, all the products must be assigned to specific packages.
Configure Australia Post MyPost Business Label Format?
Australia Post MyPost Business plugin for WooCommerce provides different label formats to suit various printing preferences. You can choose the format based on your printer type and shipping method.
To configure Australia Post MyPost Business Label Format,
Go to WooCommerce > Settings > Shipping > Australia Post MyPost Business > Labels

Both Express Post and Parcel Post shipments support the following label formats:
- A4-1pp – Prints one label per A4 page.
- A4-4pp – Prints four labels per A4 page.
- Thermal Label A6 1pp – Prints a single A6-sized label, ideal for thermal printers.
Business Name as Shipper Name on The Labels

Enable this setting in the plugin to display your business name as the shipper name on labels.
Enable Signature on Delivery

Australia Post MyPost Business will automatically add Signature on Delivery for packages valued over $500. If a signature is required for lower-value shipments, you may need to manually enable the option during shipping label creation.
Assign Default Shipping Services
The PH Australia Post MyPost Business Plugin for WooCommerce lets you set default shipping services for both domestic and international orders.
Default Domestic Shipping Service: Choose a default shipping option for orders within Australia.
Default International Shipping Service: Set a default option for international orders.
11. Set up Australia Post MyPost Business Tracking
Enable Australia Post MyPost Business Tracking
- Navigate to WooCommerce > Settings > Shipping > Australia Post MyPost Business.
- Then go to the Tracking tab
In the tracking settings, you will find a dropdown with three options:
Disable Tracking Notification for Customer
The tracking number will be generated and available in the admin panel, but it will not be shared with customers. This is useful if you prefer to manage tracking internally.
Hide Tracking in My Account
- When enabled, tracking details will not be visible in the customer’s My Account > Order History section.
- Customers won’t see tracking numbers or shipment statuses in their accounts.
Customize Tracking Message
You can customize the tracking message that is sent to customers. This allows you to personalize the notification with order details, estimated delivery time, or additional instructions, enhancing customer communication.
Enable Live Tracking
Live tracking provides real-time shipment updates. When enabled, customers can click on their tracking number to track their order directly on the Australia Post website.
Also you can customise the liver tracking header.
12. How to Set up MyPost Business for International Shipping?
If you are planning to ship internationally, you can enable Australia Post MyPost Business International Shipping services within the WooCommerce Australia Post plugin.
Print Labels For International Shipments
- Select WooCommerce > Settings > Shipping > Australia Post MyPost Business.
- Navigate to the International tab.
- Enable Commercial Invoice
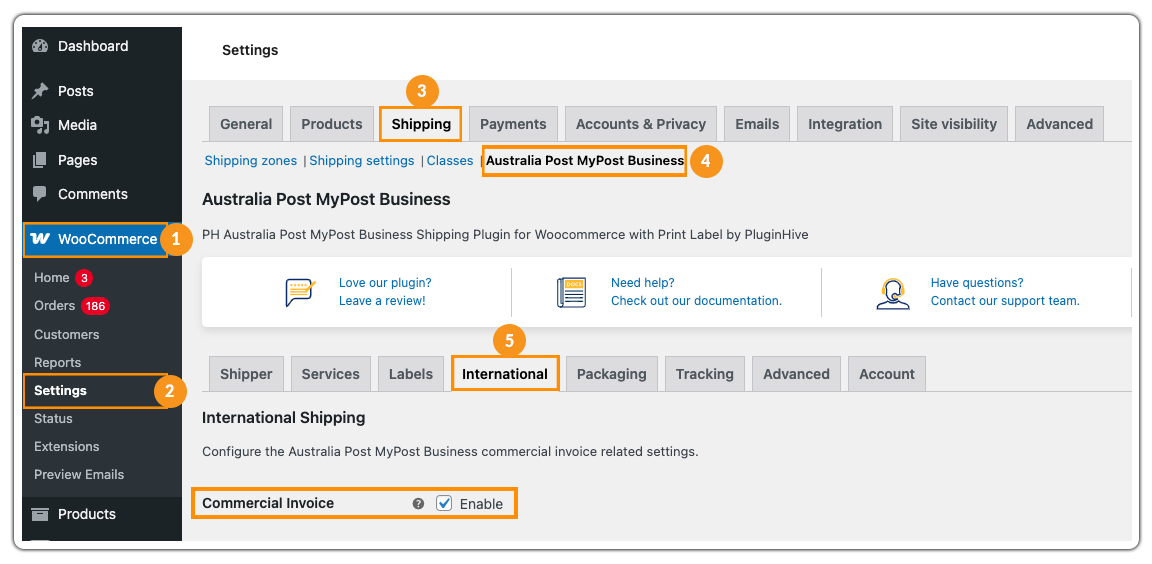
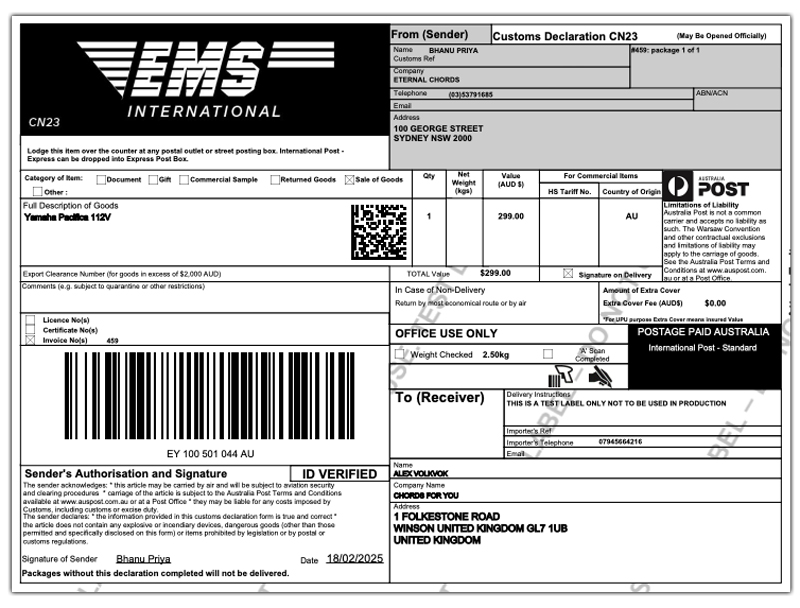
A commercial invoice (CN22/ CN23 forms) is required for all international shipments with Australia Post MyPost Business. Enabling the commercial invoice option ensures that invoices are printed along with your shipping labels. These invoices provide essential details for customs clearance and tax calculations. The shipping label and commercial invoice (CN22/ CN23 forms) will be printed on the same page for convenience.
To print Labels for International Shipments,
Add a product to your WooCommerce cart and provide an international shipping address.

After placing the order, go to the Orders section. Click on the order you want to generate the label for.
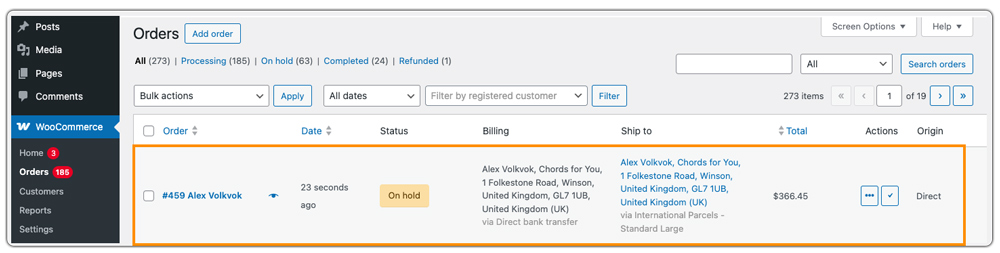
Click Generate Package.
Click Create Shipment.
Click on Print Label.

Label & Commercial Invoice:
Additional Options For International Shipments
Classification Type
The classification type specifies the category under which the goods being shipped fall. This classification helps customs authorities assess duties and taxes accurately. You can select the required option from the Purpose Of Shipment drop-down list and the options available are as given below:

- Gift: Any shipment containing articles to be given as an unsolicited gift, from one private individual to another private individual, which is not being shipped by a business nor consigned to a business.
- Sample: Any shipment containing articles that are sent free of charge that has been marked or mutilated, or otherwise made unsuitable for sale or use except as commercial samples, being shipped with the view of soliciting an order or as a mock-up to further an existing order from the foreign entity.
- Document: Shipments containing documents such as contracts, papers, and other non-commercial items.
- Return: Articles being returned to the sender, often due to an error or unsatisfactory condition.
- Sales of Goods: Shipments containing goods being sold by the shipper as part of a business transaction.
- Others: If selected, you must provide a description of the goods being shipped.
Export Declaration Number

For international shipments that require export declarations, the Export Declaration Number (EDN) must be provided in the shipment details. Any goods that require permission to export must be reported on the export declaration, regardless of their value. Additionally, goods valued at $2000 or more, exported from Australia, must be declared to Australian Customs Services using the EDN.
Configure Advanced Settings in Australia Post MyPost Business Plugin
Once you have configured the settings of the Australia Post MyPost Business plugin, you can explore the advanced settings to further customize the plugin’s functionality for your store.
Show All Services in Order Page
Enabling this setting will show all services in the create label drop-down. To configure this,
- Navigate to WooCommerce > Settings > Shipping > Australia Post MyPost Business.
- Go to the Advanced tab.
- Enable the Show All Services in Order Page option.
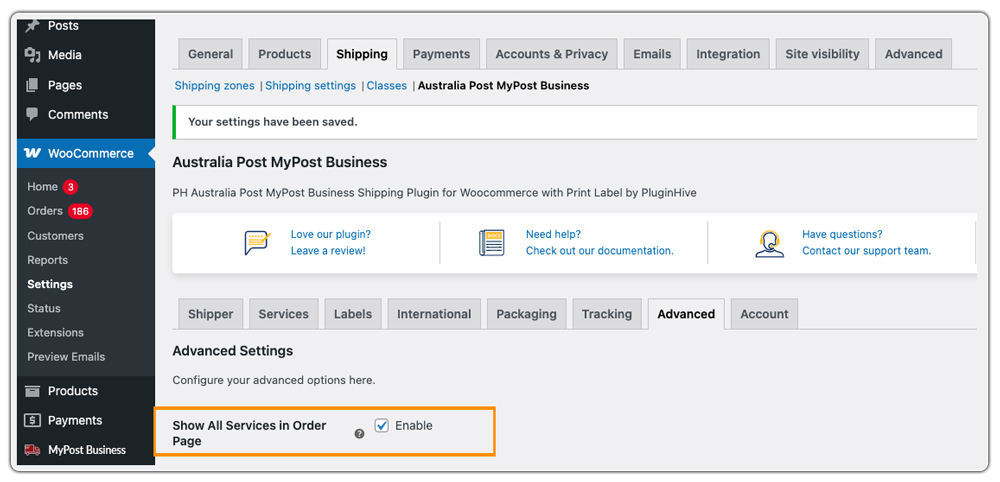
This will show all the available shipping services in the order details, giving you a clear overview of the selected shipping method.
Debug Mode

The Debug Mode option is useful when troubleshooting issues with the plugin. Enabling this mode provides detailed logs of the plugin’s operations, which can help identify any issues related to Australia Post MyPost Business rates, label generation, or shipping updates. The debug information is logged, allowing you or support teams to investigate and resolve issues quickly.
Change Order Status After Label Creation
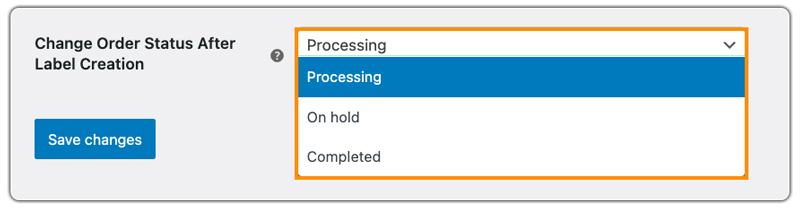
This setting allows you to automatically change the order status after a shipping label is generated. For example, once the shipping label is created, the plugin can automatically mark the order as “Processing” or “Shipped” in WooCommerce. This saves you from having to manually update the order status, streamlining your order management process and improving efficiency.