Setting Up PH ODFL Shipping For WooCommerce
This step-by-step guide explains setting up ODFL shipping using the PH ODFL Shipping Plugin for WooCommerce, to display real-time ODFL freight rates on the cart and checkout pages, generate shipping labels, manage pallets and freight shipments, and track orders directly from your WooCommerce store.
Whether you’re setting up ODFL shipping for the first time or improving your existing configuration, this guide covers everything you need to connect your ODFL account and enable accurate freight rate calculation in WooCommerce.
In This Guide
- Download, Install & Activate the Plugin
- Activate the Plugin License
- Navigate to PH ODFL Shipping Plugin Settings
- Connect Your ODFL Account and Add Shipper Details
- Verify Product Settings
- Display ODFL Freight Rates
- Configure ODFL Shipping Services
- Configure ODFL Freight Packaging Settings
- Print ODFL Freight Shipping Labels
- Set up ODFL Shipment Tracking
- Set up ODFL Special Services
- Debug Settings
1. Download, Install & Activate The Plugin
After purchasing the PH ODFL Shipping for WooCommerce plugin, download the .zip file from API DOWNLOADS by logging into the MY ACCOUNT page.
Log in as the WordPress Admin in your WooCommerce store.
Navigate to Plugins > Add New Plugin, as shown in the image below.

Upload the plugin to your WooCommerce store by selecting the ODFL plugin .zip file.
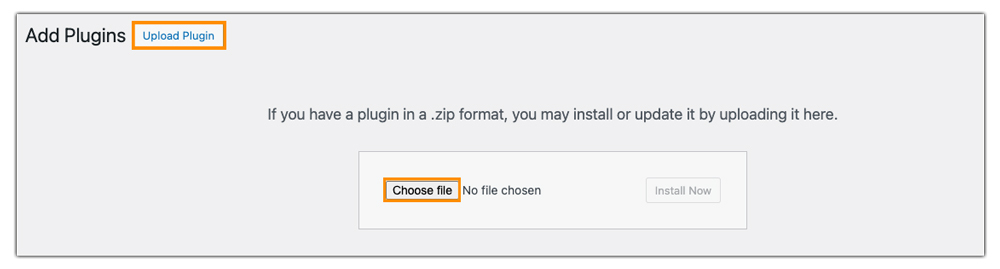
Once you upload it, click Install Now.

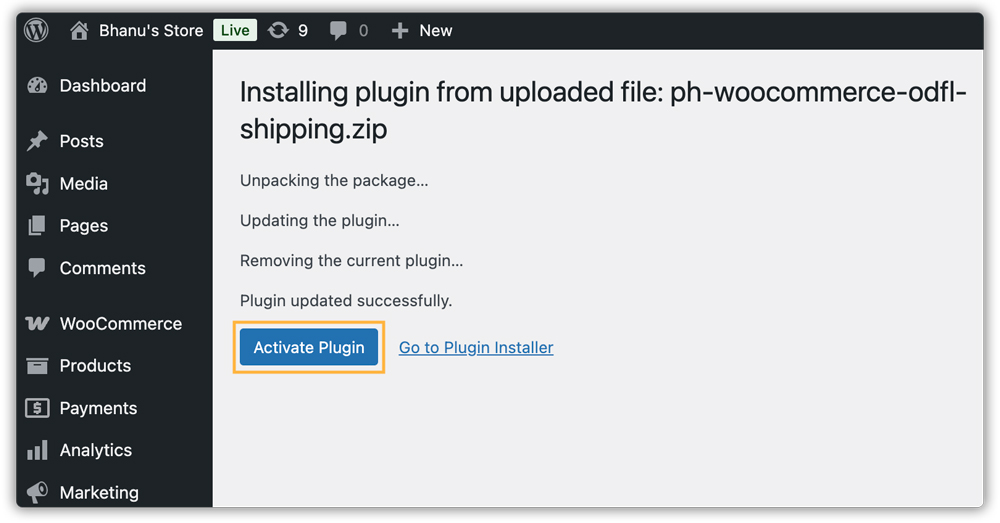
Once you install the plugin successfully, activate the plugin to start using it.
2. Activate the Plugin License
To activate the license key, you need to enter the API Key and the Product ID used during the purchase. You can get the API Key and Product ID from the My Account > API KEYS section on PluginHive.
Without an active plugin license, customers will not be able to use the plugin functionality, and the plugin will stop functioning. Our team strongly recommends activating the license and renewing it promptly when it expires to avoid any disruption in shipping capabilities.
Now, go to Dashboard > ODFL > License.
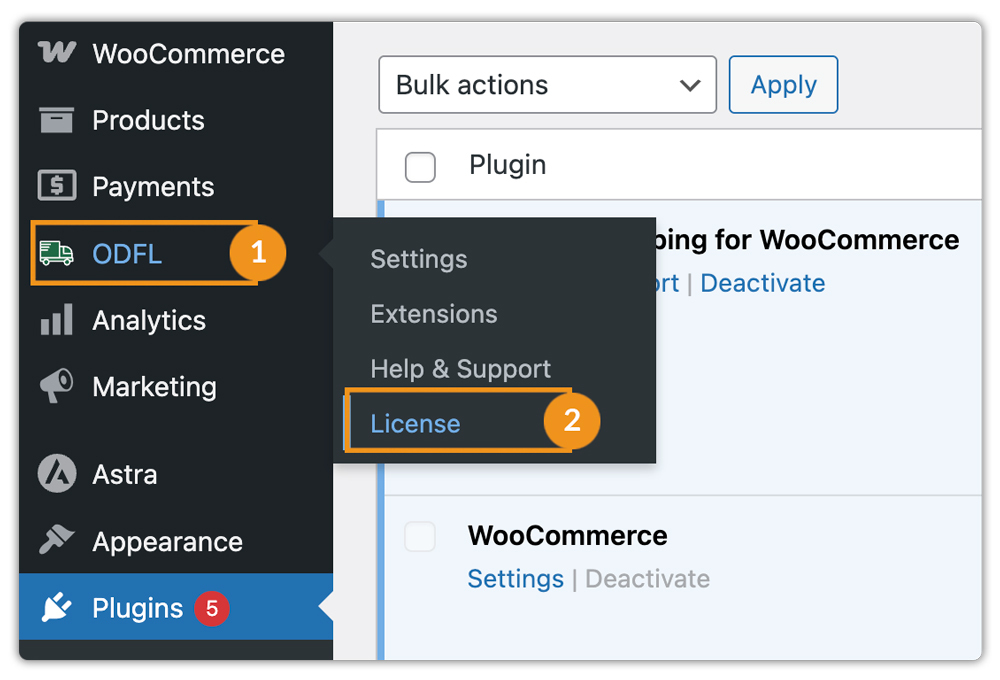
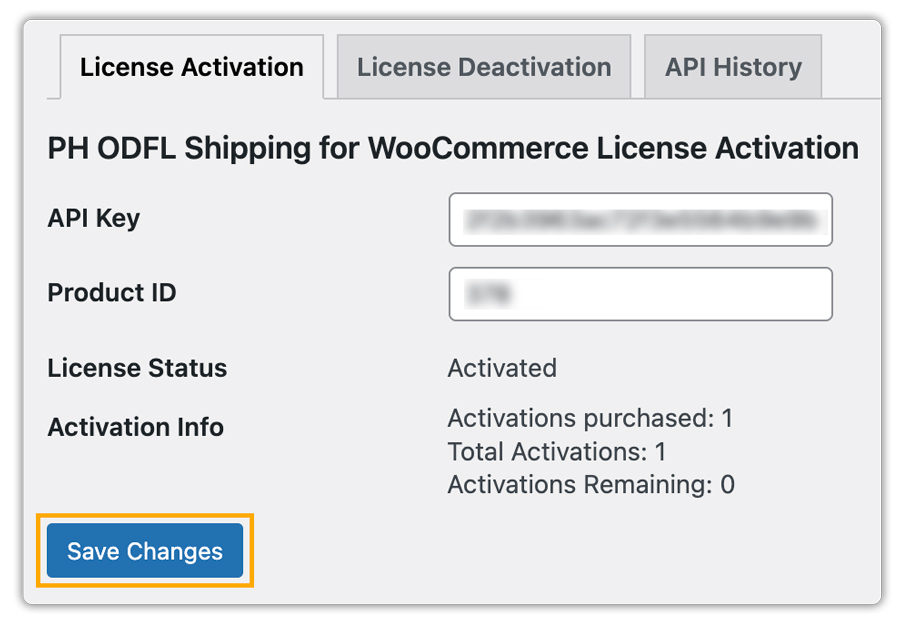
In the License Activation tab. Enter the following on the license activation page:
- Provide your API Key and Product ID Credentials
- Click on Save Changes
- Your API Key Status is now Activated
3. Navigate to ODFL Plugin Settings
After you install and activate the plugin, WooCommerce adds a new shipping method called ODFL to the shipping settings. You can then configure this method according to your specific requirements. You can access the settings in two ways:
Navigate to Plugins > Installed Plugins > PH ODFL Shipping for WooCommerce > Settings

Or, navigate to ODFL > Settings from the WordPress dashboard.

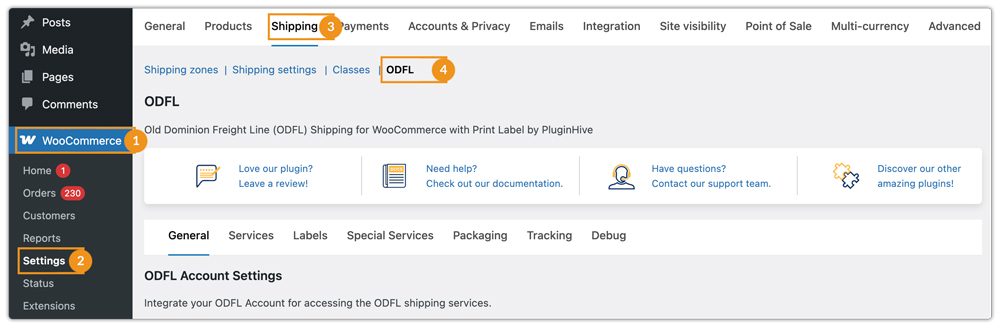
Navigate to WooCommerce > Settings > Shipping > ODFL
After entering the ODFL plugin settings, you need to connect your ODFL account.
4. Connect Your ODFL Account and Add Shipper Details
You need to integrate your ODFL Account to access real-time ODFL freight services.
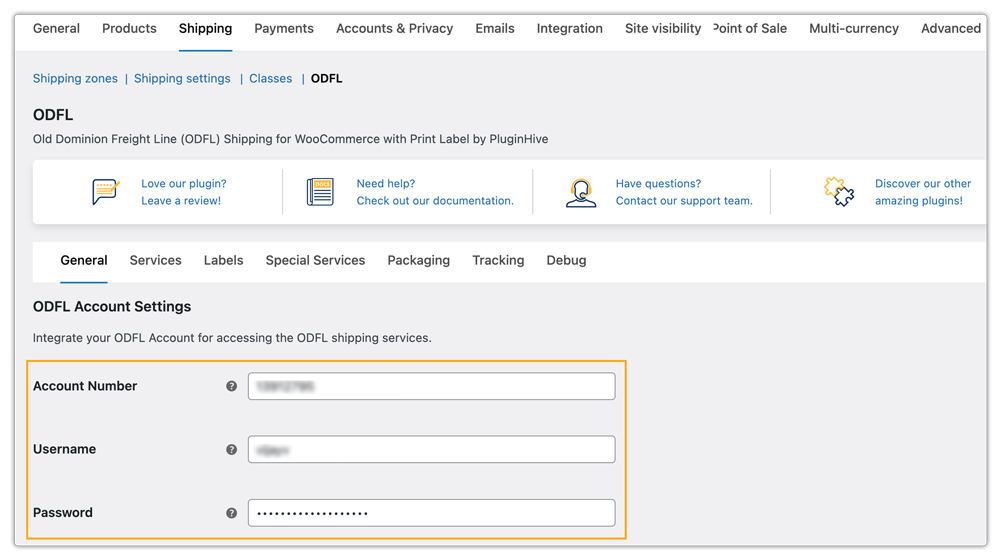
In WooCommerce settings, go to Shipping > ODFL > General.
Under the ODFL Account Settings, provide the following details:
- Account Number– Enter your ODFL account number.
- Username– Enter the username linked to your ODFL account.
- Password– Enter the corresponding account password.
After you enter your ODFL account credentials, configure the Shipper Settings to ensure the system generates shipments correctly.

Fill in the fields as follows:
- Company Name: Enter the name of your company as registered with ODFL.
- Shipper Name: Enter the contact person responsible for shipments.
- Email: Provide a valid email address for shipment notifications.
- Phone Number: Enter the shipper’s contact number.
- Shipper Address Line 1: Enter the primary address of your shipping location.
- Address Line 2 (Optional): Add a secondary address line if necessary (suite, floor, etc.).
- City: Enter the city of your shipping address.
- Postal Code: Provide the postal code for the shipper’s address.
- State: Select the state from the dropdown menu.
- Country: Choose your country (ODFL ships to and from the US, Canada, and Mexico only).
Add Freight Billing Option
To configure how freight charges are billed for shipments, go to WooCommerce > Settings > Shipping > ODFL > General.
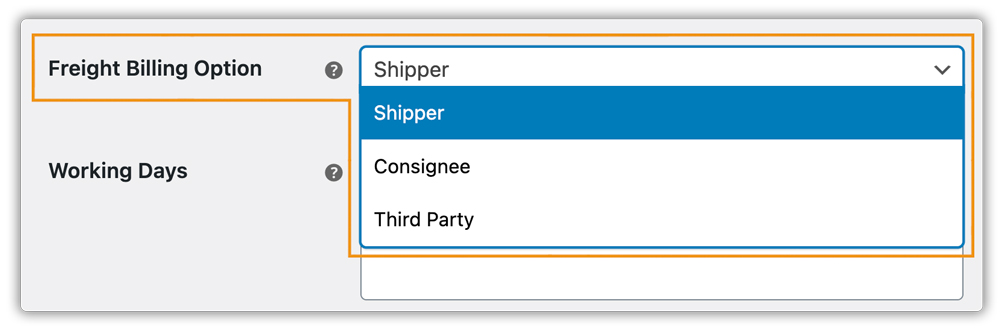
In Freight Billing, select one of the following options:
- Shipper: As the shipper, you are responsible for paying for shipping.
- Consignee: The receiver pays for shipping.
- Third-Party: Charges are billed to a third-party account.
If you select Third-Party, you need to provide the following details for the account, such as:
- Name
- Phone Number
- Address Line 1
- Address Line 2 (Optional)
- City
- Postal Code
- State
- Country
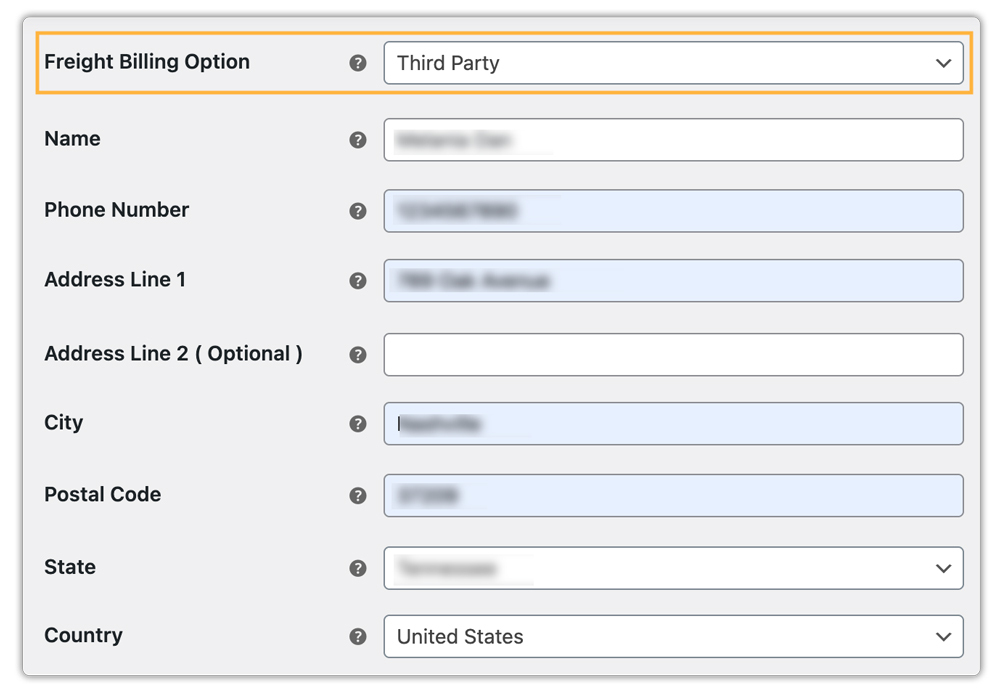
Providing these details ensures that the freight charges are billed correctly to the designated account.
Select Working Days
In Working Days, select the days your warehouse processes shipments. This will be used for shipping rates and labels.

Once you fill in all the information correctly, click Save Changes to apply the settings. This connects your ODFL account and sets up the shipper details.
5. Verify Product Settings
To ensure accurate ODFL freight rates, it is essential to provide specific product details such as product weight and dimensions.
Add Product Weight and Dimensions
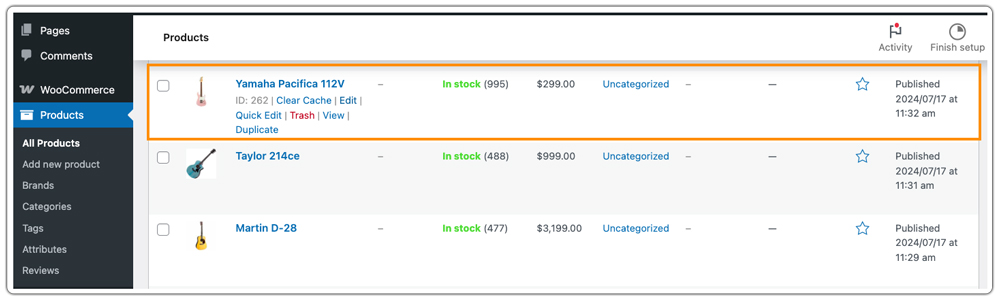
Navigate to WooCommerce Dashboard > Products, select the product you want to configure, and click Edit.
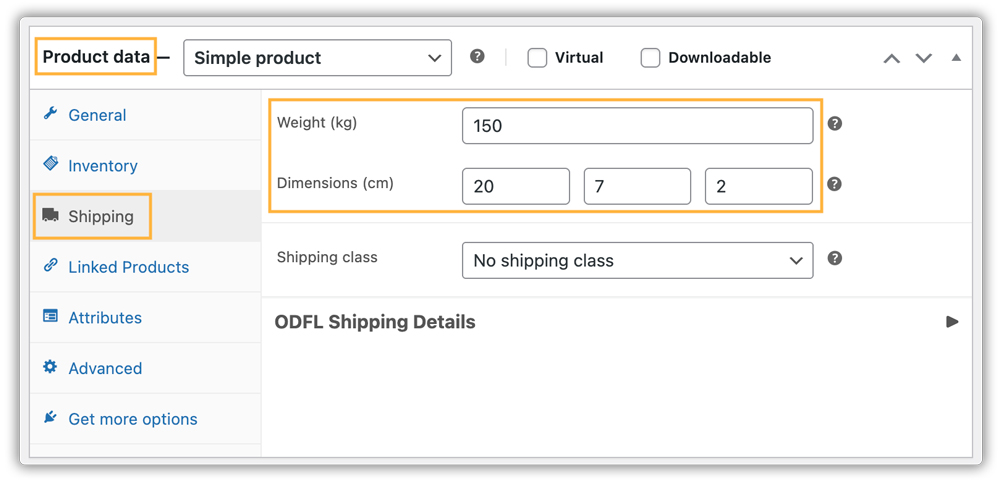
Under Product Data > Shipping, provide the following details:
- Weight: Enter the product weight (minimum 0.001 kg).
- Dimensions: Enter the product dimensions (Length, Width, Height – minimum 0.003 cm each).
- Shipping Class: Assign a shipping class if applicable.
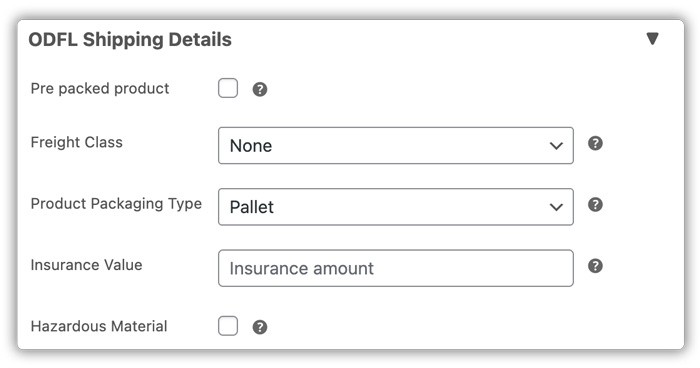
Under ODFL Details, provide additional freight-related information:
- Pre-Packed Product: Enable if the product is already packed and ready to ship.
- Freight Class: Select the appropriate freight class for the product.
- Product Packaging Type: Specify the type of packaging used.
- Insurance Value: Enter the insured value for the product.
- Hazardous Material: Indicate if the product contains hazardous materials.
Click Update to save the product settings.
Configure Weight and Dimensions in Plugin Settings
Go to WooCommerce > Settings > Shipping > ODFL > Packaging tab. Set the Minimum Product Weight and Minimum Product Dimensions.
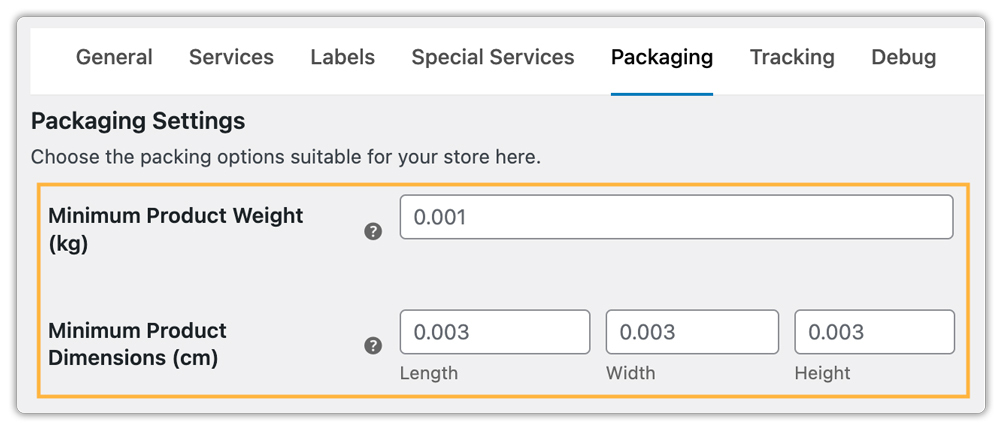
The Minimum Product Weight cannot be less than 0.001 kg, and the Minimum Product Dimensions for Length, Width, and Height cannot be less than 0.003 cm. These minimum values are based on weight in kilograms (kg) and dimensions in centimeters (cm) and may vary depending on the units you select in your WooCommerce store settings.
If no dimensions are provided for a product, or if any dimension is below these minimum values, the plugin will automatically apply the minimum weight and dimensions to ensure accurate ODFL shipping rate calculations.
6. Display ODFL Freight Rates
ODFL Live Freight Rates at Cart/Checkout
To display real-time ODFL freight rates on your store:
- Go to WooCommerce > Settings > Shipping > ODFL.
- Click on the Services tab.
- Enable Real-Time Rates.
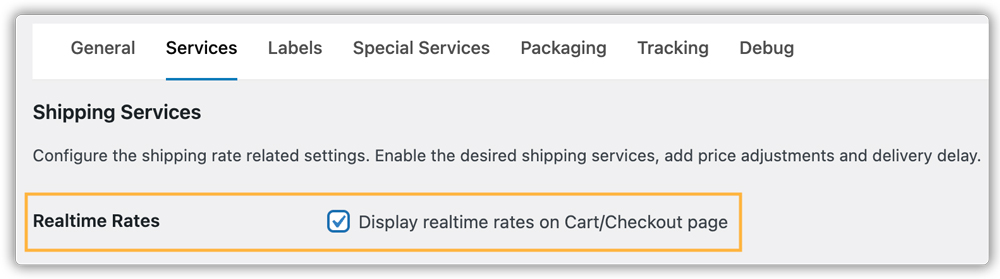
Once enabled, ODFL freight rates will be displayed automatically on the cart/checkout pages, allowing customers to see accurate shipping costs based on the product weight, dimensions, and destination.

Add Fallback Rate Option
The Fallback Rate is used as a default shipping cost if ODFL fails to fetch real-time rates. This ensures that customers can still complete their checkout even if live rates are unavailable. In the Services tab, locate the Fallback Rate field. Enter the default shipping cost you want to apply.

Leave the field blank if you do not wish to use a fallback rate.
This setup ensures customers always see shipping options at checkout, and orders can be placed even if there is a temporary issue fetching live ODFL rates.
Set Currency Conversion Rate
If your store currency is different from USD, you need to provide the conversion rate so that ODFL rates can be calculated correctly.
- In the Service tab, locate the Currency Conversion Rate (to USD) field.
- Enter the conversion rate from your store currency to USD.

If your store already uses USD, a default value of 1 will be applied automatically.
8. Configure ODFL Shipping Services
ODFL provides different freight services to meet the varied shipping needs of your customers. You can configure these services, adjust rates, and display estimated delivery dates for each service.
ODFL LTL Freight Options
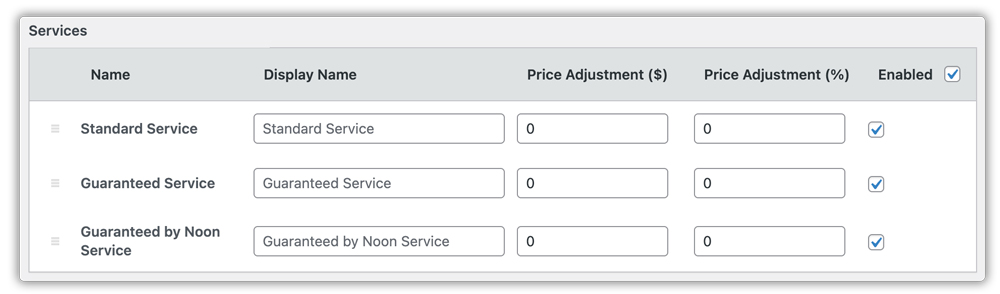
The plugin supports the following ODFL LTL freight services:
- Standard Service
- Guaranteed Service
- Guaranteed by Noon Service
You can enable or disable these services based on your store’s shipping requirements.
Offering multiple service options ensures accurate shipping methods for different freight types and customer preferences.
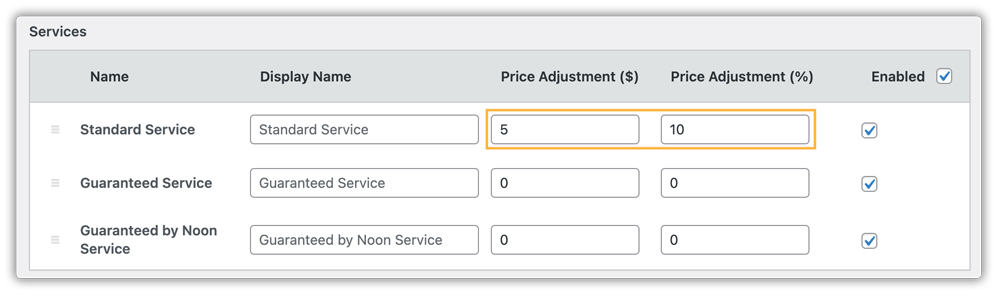
Rate Adjustments and Surcharges
You can modify the shipping rates for each ODFL service by adding or subtracting an amount from the actual shipping cost. Adjustments can be applied as a fixed amount ($) or a percentage (%).
For example, if the Standard Service costs $10:
- Fixed Amount Adjustment ($): Adding $5 will display the total cost as $15.
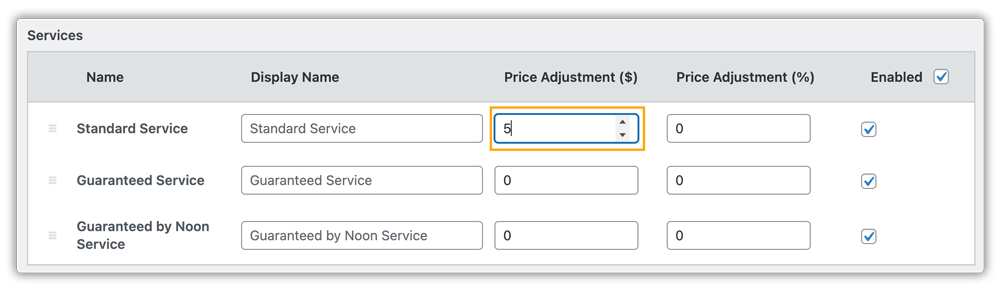
- Percentage-Based Adjustment (%): Adding 10% will display the total cost as $11.
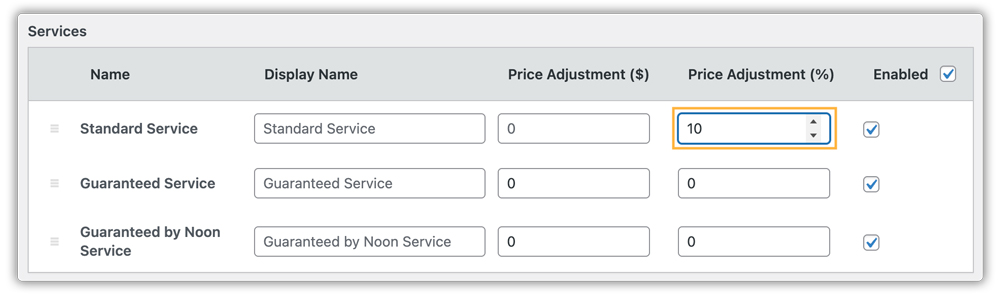
- Both Fixed and Percentage Adjustment: Adding $5 and 10% will display the total cost as $16.
These adjustments allow you to account for additional handling fees, surcharges, or promotional discounts.
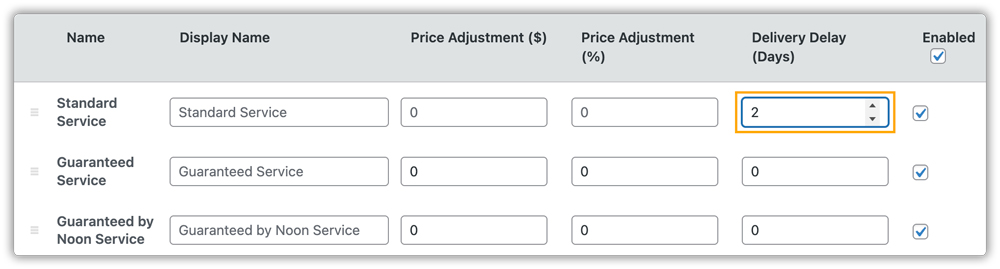
Display Estimated Delivery Date
In the Service tab, enable the Estimated Delivery Date option. This allows you to display the expected delivery date for each service on the cart and checkout pages.

Once enabled, a new column appears in the service list to configure Delivery Delay (Days). You can add extra days for specific services if needed.

For example, a 2-day delay is applied to the Standard Service.
In the cart, the estimated date shows as 29th September 2025, but for Standard Service, it updates to 1st October 2025 as it is delayed by 2 days.
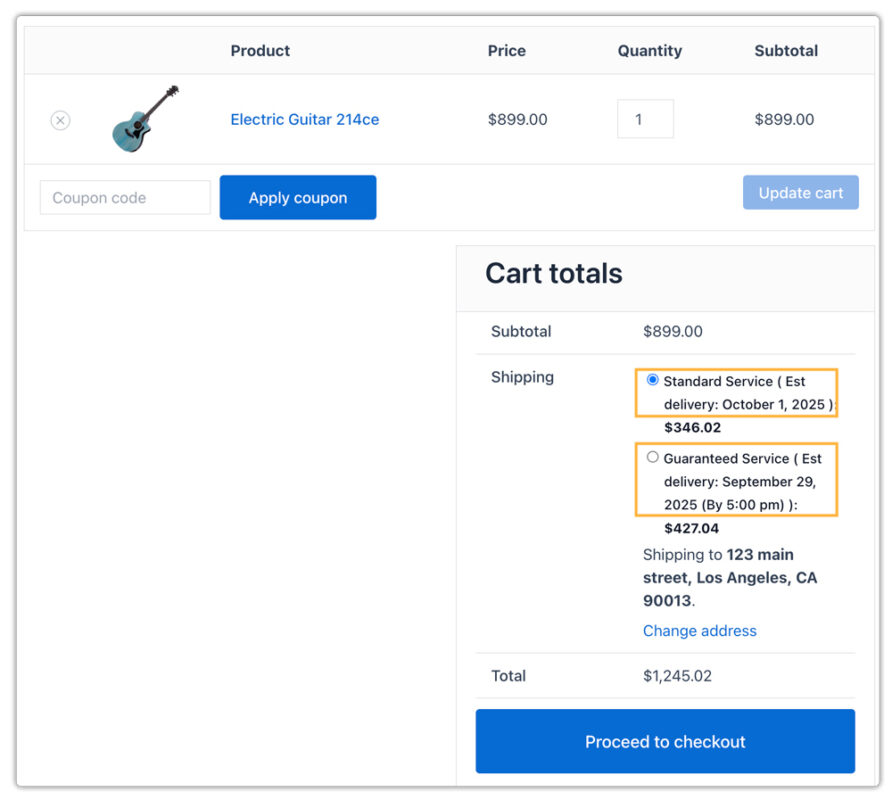
This ensures customers see accurate delivery expectations and allows you to manage service-specific delays easily.
8. Configure ODFL Freight Packaging Settings
The PH ODFL Shipping for WooCommerce plugin allows you to define how products are packed and shipped using Old Dominion Freight Line’s LTL (Less-than-Truckload) services.
- Go to WooCommerce > Settings > Shipping > ODFL
- Click on the Packaging tab
- Choose your desired Parcel Packing Method
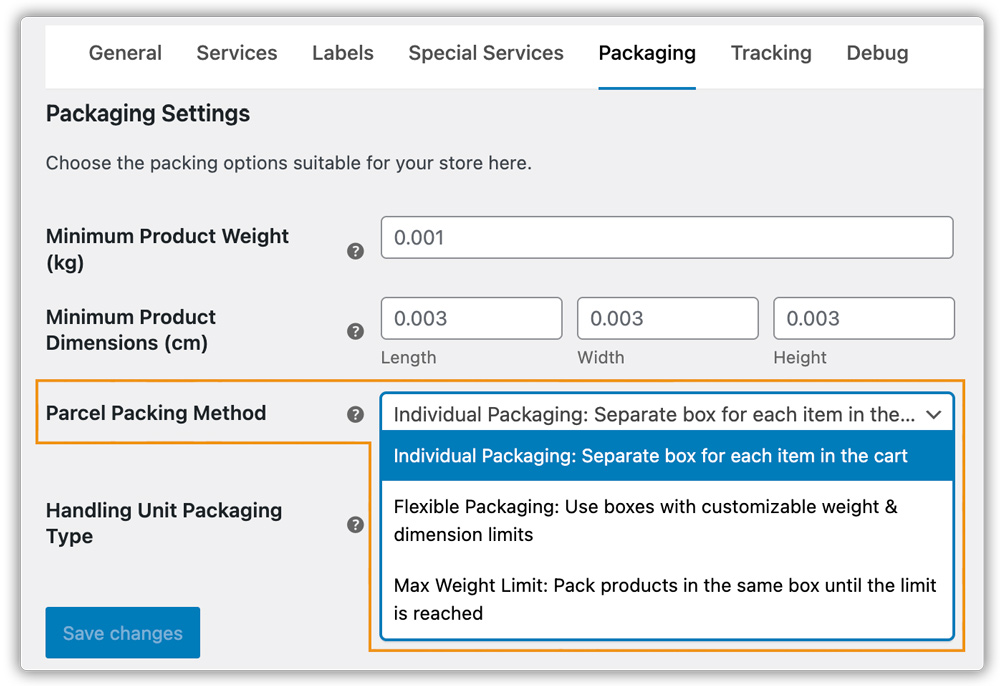
Pack Products Individually
Each item in the cart is shipped in its own separate package.
- Shipping cost is calculated per item.
- A separate shipping label is generated for each product.
In the Handling Unit Packaging Type, select how products are grouped for shipping (e.g., pallet, crate, bundle). This defines how the carrier handles and labels each shipment unit.
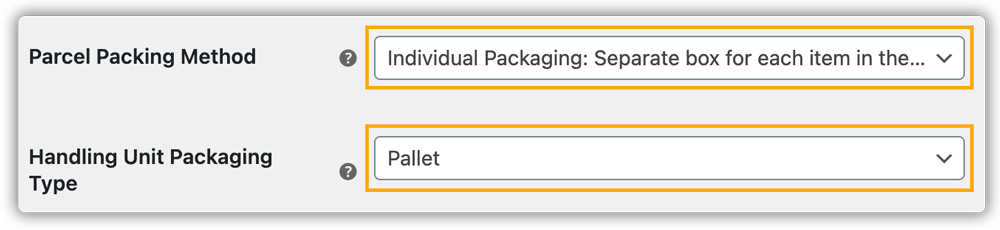
Example:
If a customer buys 2 laptops, with Pack Products Individually → each laptop ships in its own box with 2 labels. With Handling Unit Packaging (pallet) → both laptops go on one pallet with 1 label.
Flexible Packaging (Custom Dimensions & Weight Limits)
Flexible Packaging allows you to pack items using boxes with custom dimensions and weight limits.
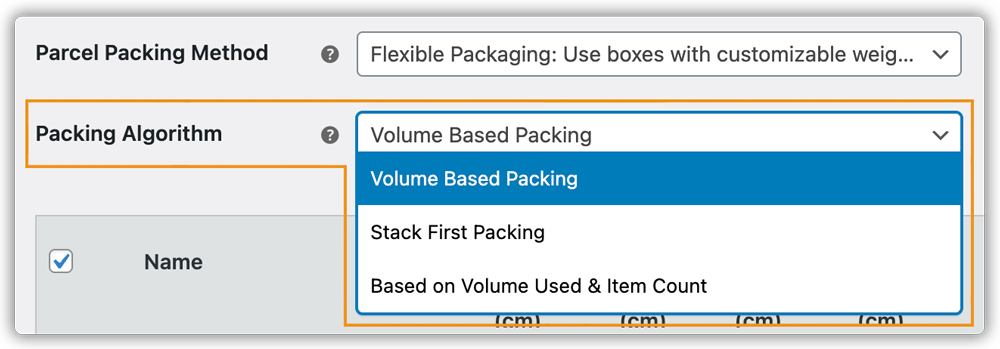
In Parcel Packing Method, select Flexible Packaging to use your own box sizes and maximum weights.
Packing Algorithm: Choose how items are packed:
- Volume-Based Packing – Packs items purely based on the available box volume.
- Stack-First Packing – Packs items considering both volume and item count. This method prioritizes stacking items efficiently.
Volume & Item Count-Based Packing – Packs items based on a combined calculation of volume used and number of items. This balances space with item limits to prevent overfilling.
To add custom boxes, click Add Box and enter the box details such as inner and outer dimensions, box weight and maximum weight, maximum quantity of items per box, and packaging type.
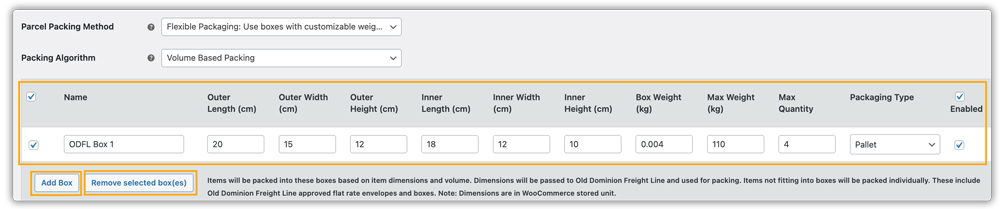
To remove a box, select the box and click Remove Selected Box(es).
Items That Don’t Fit: Items exceeding the defined box dimensions or weight are packed individually.
Max Weight Limit Packing
Max Weight Limit Packing allows you to control how items are grouped into packages based on weight limits.
In Parcel Packing Method, select Max Weight Limit, where items are packed in the same box until the maximum package weight is reached.
Enter the necessary details such as:
- Box Weight: The weight of the empty box or handling unit itself.
- Max Package Weight: The maximum allowable weight per package, including items and the box.
- Max Package Quantity: Maximum number of items allowed in a single package.
- Packing Process: Pack heavier items first (or lighter items first if preferred).
- Handling Unit Packaging Type: The type of unit used for packing (e.g., pallet, crate, bundle).

Example Use Case:
If you have a box that weighs 2 kg and a max package weight of 30 kg, and you are shipping four items weighing 12 kg, 10 kg, 6 kg, and 4 kg:
- The first package will include the 12 kg and 10 kg items (2 kg box + 12 kg + 10 kg = 24 kg).
- The second package will include the 6 kg and 4 kg items (2 kg box + 6 kg + 4 kg = 12 kg).
Both packages stay well under the 30 kg limit, and by packing heavier items first, you keep the shipment stable. Up to 20 such boxes can be grouped on a pallet as a handling unit.
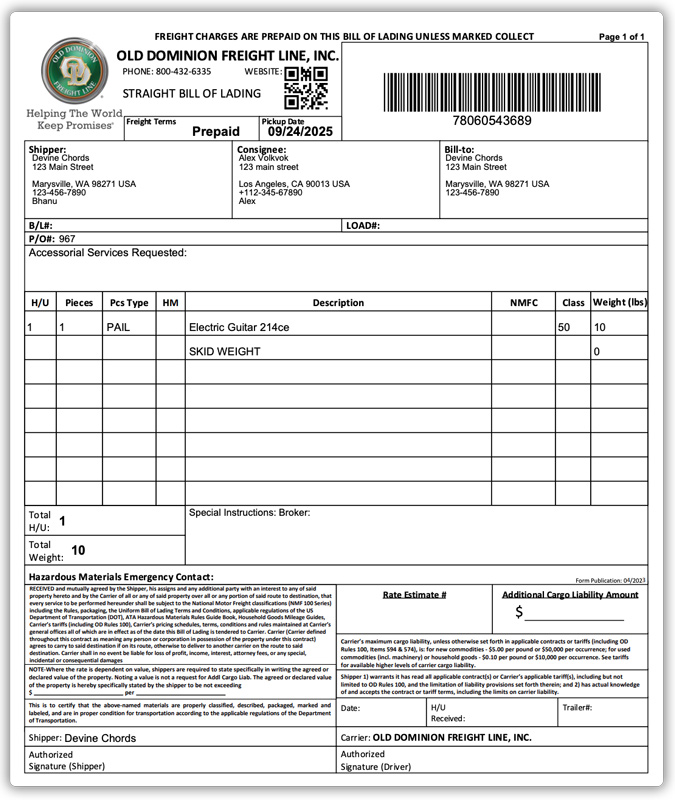
9. Print ODFL Freight Shipping Labels or Bill Of Lading (BOL)
After setting up the ODFL Configuration Settings, your customers will be able to see all available ODFL shipping services on the Cart page. Customers can choose their preferred service and proceed to checkout.

Printing First ODFL Shipping Label
Navigate to Dashboard > WooCommerce > Orders.
On the order page, click the order for which you want to create and print a shipping label.

Click Generate Packages. The system will create a package based on the Parcel Packing Method you set in the plugin settings.

Once the you generate the package, you’ll see several options:
- Edit Package: Add multiple boxes/packages to an order, provide package weight and dimensions, and assign insurance or a specific ODFL shipping service for each package.
- Calculate Shipping Cost: Compare real-time ODFL shipping rates for the order and assign the fastest or cheapest service before generating the shipping label.
- ODFL Special Services:
- Special Instruction – Add specific handling or delivery instructions for the shipment.
- Total Insurance Amount (USD) – If you have enabled insurance in the plugin settings, it will show here in USD. You can modify the value as needed.
- Reference Number Type – Assign a reference, such as a PO/ BOL Number, for tracking or internal use.
- Custom BOL Number – If you choose to use a BOL number, add a custom Bill of Lading (BOL) number to match your internal documentation or tracking system.
- Accessorial Services – Include additional services like liftgate, residential delivery, etc.
- Choose the desired ODFL service and click Create Shipment to generate an ODFL shipping label.
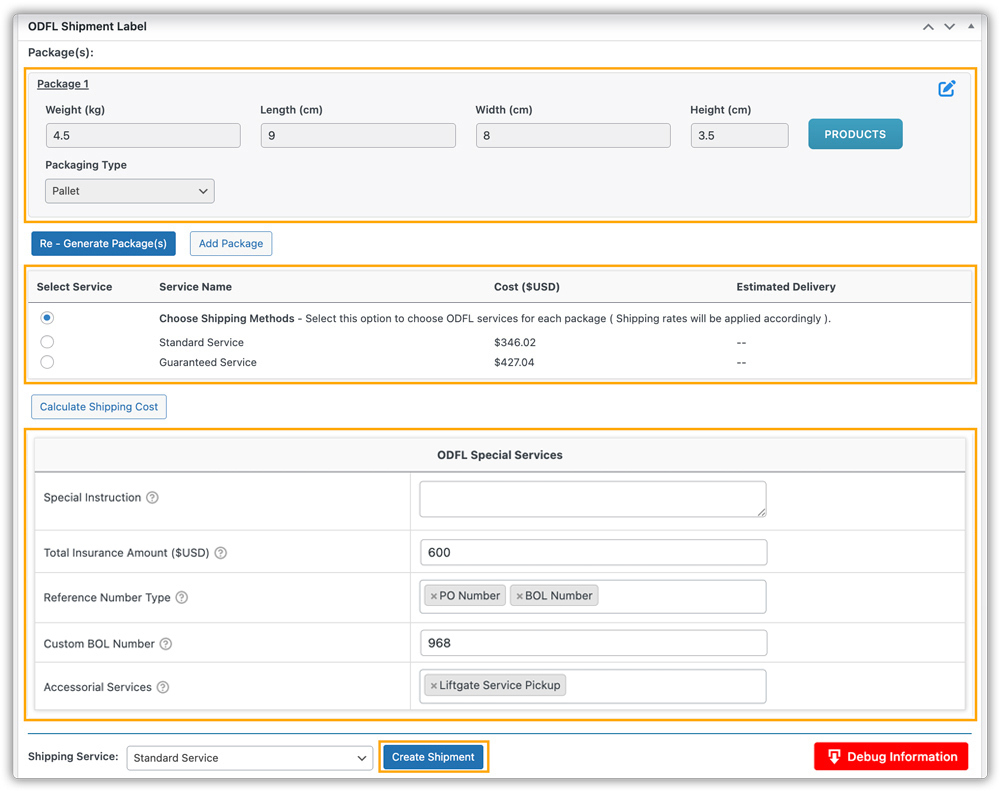
The Print Label button will appear to print the label that is BOL. You can also download the shipment details by clicking on the Debug Information button for your records.

The system stores all generated shipping labels in your WooCommerce database and allows you to print them multiple times.
Add or Remove Packages Within an Order
This setting is particularly useful when you have orders containing multiple products or packages. You will have two options available: Add Packages and Remove Packages.
To add a Package, go to the order where you want to add packages.

After generating the package, an Edit button will appear next to each package, which lets you edit that package.
Click on the PRODUCTS to select or remove them from the specific package and save.

Click Add Package if you want to place the selected product(s) into the newly created package and save the package(s).

If you no longer need certain packages, click the delete icon to remove them.

Before creating the shipment, make sure all products are assigned to specific packages.
Additional Label Settings
Use the plugin’s Label Settings to configure how ODFL shipping labels are generated and what information appears on them.
- Go to WooCommerce > Settings > Shipping > ODFL
- Click on the Label tab
Reference Number Type: Choose the type of reference to appear on the label. Options include:
- PO Number – Use your purchase order number as the reference.
- BOL Number – Use the Bill of Lading number automatically generated by ODFL. In Custom BOL Number, you can enter a custom BOL number for the shipment.

Special Instruction: Add specific handling or delivery instructions for the shipment, such as “Fragile,” “Handle with Care,” or any other notes for the carrier.

Default Shipping Service: Set a default ODFL service to appear on labels, so you don’t have to select it manually for every order. You can also choose None if you want to select services per order.

Show All Services for Label Selection: Enable this option to display all available ODFL shipping services when generating labels, allowing you to choose the fastest or cheapest service for each shipment.

10. Setup ODFL Shipment Tracking
To set up ODFL Shipment Tracking,
- Navigate to WooCommerce > Settings > Shipping > ODFL
- Go to the Tracking tab.
In the tracking settings, you will find several options:
Disable Tracking Notification for Customers
When enabled, the tracking number will be generated and available in the admin panel, but it will not be shared with customers in the order completion mail.
Hide Tracking in My Account
When enabled, tracking details will not be visible in the customer’s My Account > Order History section.
Customise Tracking Message
You can customise the tracking message that is sent to customers. This allows you to personalize the notification with order details, estimated delivery time, or additional instructions, enhancing customer communication.
11. Setup ODFL Special Services
Navigate to WooCommerce > Settings > Shipping > ODFL, then go to the Special Services tab.
Here, you can configure additional options to enhance your shipments, such as insurance, freight class, and accessorial services.
Add Insurance
- Enable Insurance to provide additional cargo liability coverage for your shipments.
- This ensures that in case of loss or damage, your shipment is protected according to the declared value.

Select Freight Class
Select the appropriate Freight Class for your shipment.
- For example, Class 50 is commonly used for general shipments.
- Choosing the correct freight class ensures accurate shipping rates and compliance with ODFL requirements.

Add Accessorial Services
Accessorial Services are additional shipping options that you can enable for specific delivery or pickup needs.
Available services include:
- Liftgate Service Delivery
- Must Notify Consignee
- Inside Delivery
- Inside Pickup
- Residential/Non-Commercial Delivery
- Residential/Non-Commercial Pickup
- Liftgate Service Pickup

Even if you enable services like Liftgate Delivery and Inside Delivery here, customers must still check the respective option during checkout to apply them.
After selecting the required options, click Save Changes to apply your special service settings.
ODFL Hazmat Shipping
The ODFL Hazardous Material (HazMat) shipping service allows WooCommerce store owners to ship products classified as hazardous safely and compliantly.
To enable HazMat shipping for a product, go to WooCommerce > Products and edit the desired product.
In Product Data > Shipping > ODFL Shipping Details, check the Hazardous Material option.

Fill in the following fields:
- Hazardous Material – Enable HazMat for the product.
- Hazmat Class – Specify the hazard class of the material.
- Division Number – Enter the division or subclass, if applicable.
- Flammable Liquid – Indicate if the material is flammable.
- UN/NA Number – Enter the United Nations or North American identification number for the hazardous material.
- Hazmat Proper Name – Official shipping name, e.g., Adhesive.
- Hazmat Technical Name – Technical description, e.g., Ethyl acetate and toluene mixture.
- Packing Group – Specifies hazard level (I, II, or III).

When a customer places an order for this product, the appropriate shipping rates will be displayed, and you can generate the ODFL HazMat shipping label directly.
12. Debug Settings
Debug Mode
Enable Debug Mode to help troubleshoot issues with the plugin.
- When enabled, this mode generates detailed logs of the plugin’s operations, including rate calculations, label generation, and shipping updates.
- The debug logs can be reviewed by you or shared with support teams to identify and resolve any problems quickly.
Silent Debug Mode
Silent Debug Mode works similarly to Debug Mode but runs in the background without displaying debug information on the WooCommerce interface.

By following this guide, you can improve your checkout experience and manage ODFL freight shipments more efficiently. Make sure to regularly review your plugin settings and ODFL account configuration to maintain accurate rates and avoid shipping issues.