
Setting Up USPS Shipping Plugin for WooCommerce
This step-by-step guide explains how to set up the PH USPS Shipping Plugin for WooCommerce with Print Label to display real-time USPS shipping rates, generate shipping labels, and enable order tracking directly from your WooCommerce store.
Whether you’re configuring the plugin for the first time or optimizing your existing setup, this guide covers everything from connecting your USPS account to enabling live rates and label printing. You can follow the complete setup process or jump to specific sections based on your requirements.
In this Guide
- Download, Install, and Activate the Plugin
- Activate The Plugin License
- Register your USPS Account
- Navigate to USPS Plugin Settings
- Verify your Product Settings
- Add Shipper Address Details
- Display USPS Shipping Rates
- Configure USPS Shipping Services
- Display Estimated Delivery Dates on Cart/Checkout
- Configure Packaging Settings
- Printing USPS Shipping Labels
- Printing Your First USPS Shipping Label
- Print USPS Shipping Labels for Multiple Orders in Bulk
- Print Individual Shipping Labels for Multiple Packages
- Print Shipping Labels Automatically
- Add or Remove Packages Within a USPS Order
- Cancel USPS Shipping Label
- Configure USPS Label Format
- Show All Services in Order Page
- Add Customer Reference Number
- Set Up USPS Shipment Tracking
- How to Set up USPS International Shipping
- How to Set up USPS Special Services
- Debug Setting
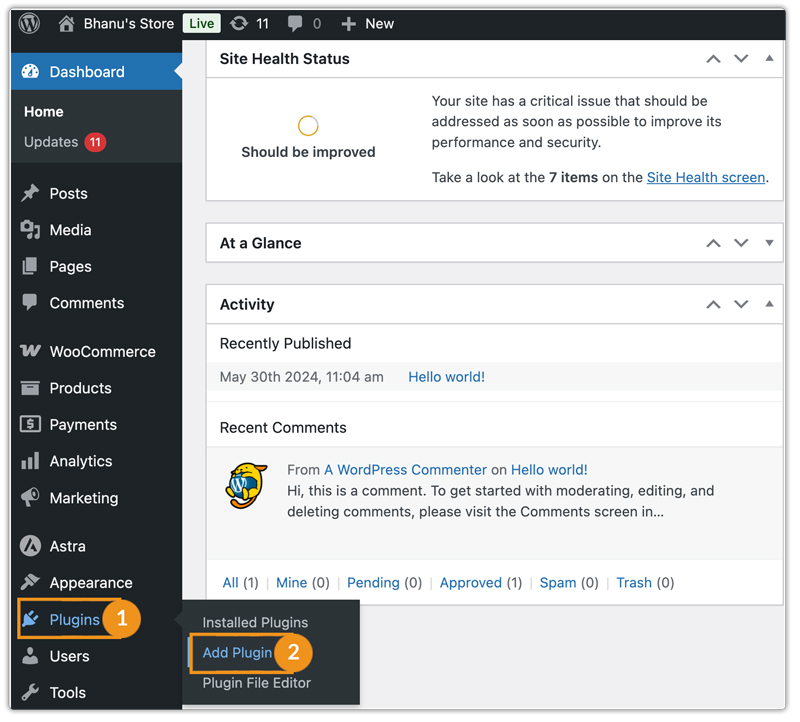
1. Download, Install, and Activate the Plugin
After purchasing the PH USPS Shipping for WooCommerce Plugin, download the .zip file from API DOWNLOADS by logging into the MY ACCOUNTS page.
Log in as the WordPress Admin in your online store.

Navigate to Plugins > Add Plugin in your WordPress Dashboard to upload the downloaded WooCommerce USPS Shipping Plugin.
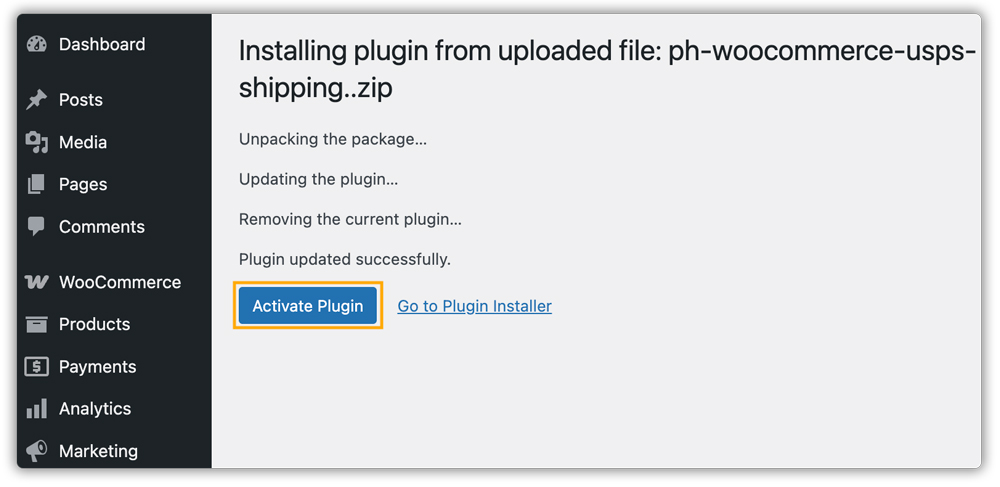
Upload the plugin to your WooCommerce Store.

After uploading the plugin zip. file, click on Install Now.

Once installation is complete, activate the Plugin to use it on your WooCommerce store.
2. Activate the Plugin License
To activate the license key, you need to enter the Product Order API Key and the Product ID used for the purchase. Get the API Key and Product ID from the My Account> API KEYS section.
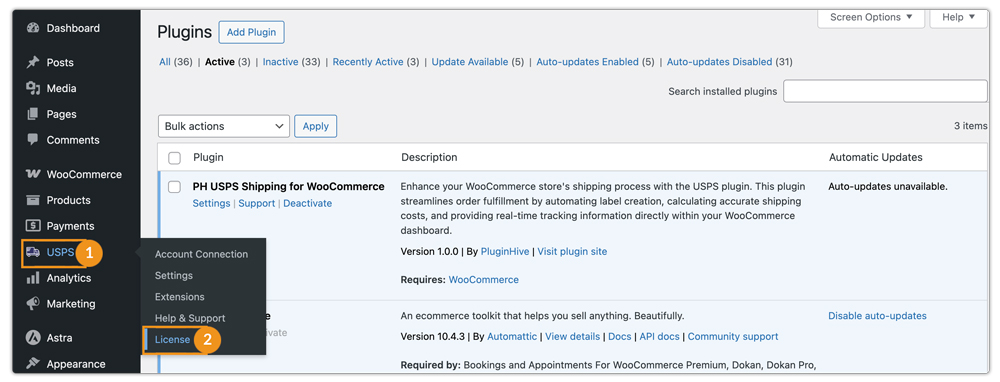
To activate the license in your store, go to Dashboard > USPS > License.
Under the License Activation, enter your API Key in the respective fields and click Save Changes.
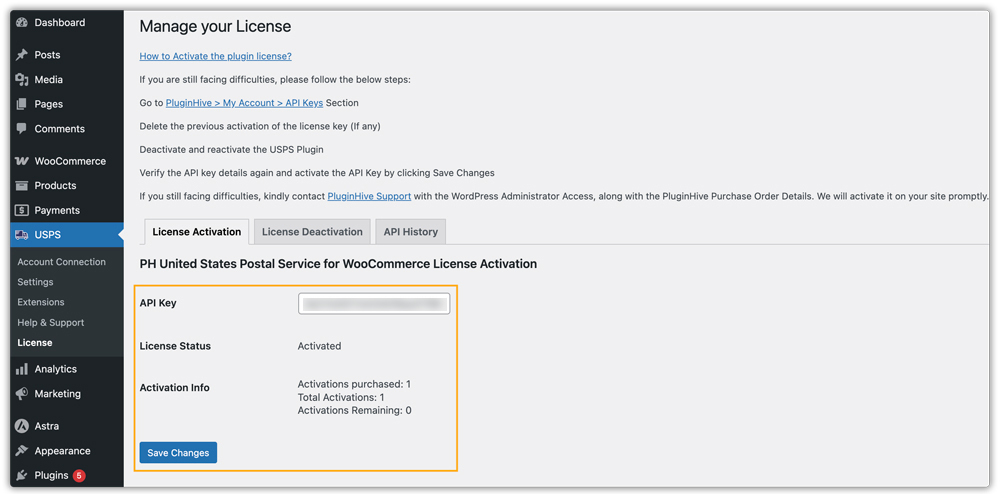
Once saved, your API Key status will show as Activated, and the plugin is fully functional.
- Without an active plugin license, customers will not be able to use the plugin functionality, and the plugin will stop working.
- We strongly recommend activating the license immediately and renewing it promptly when it expires to avoid any disruption in your USPS shipping capabilities.
3. Register your USPS Account
To use USPS live rates, tracking, and label generation in WooCommerce, registering and connecting a USPS account is required.
If you don’t already have a USPS account, refer to this guide – How to Create a USPS Account and Integrate It With WooCommerce to create one before proceeding.
Follow these steps to register and connect your USPS account.
Go to Dashboard > USPS> Account Connection.
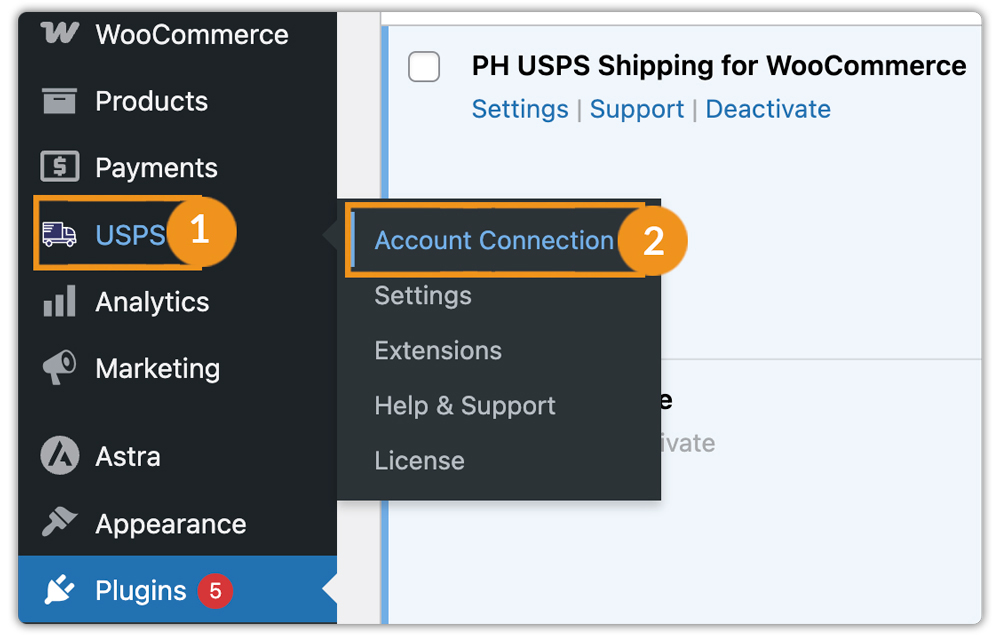
You will be taken to the USPS Account Registration Terms and Conditions page. Read the terms carefully, check the agreement box, and proceed.

Next, click “Connect to USPS” to link your USPS account with your WooCommerce store.

You will then be redirected to the USPS Login page, where you can log in using your Username and Password.

This step is optional. If you have enabled multi-factor authentication on your account, you need to enter the passcode sent to your registered email address and click Submit to verify your account.
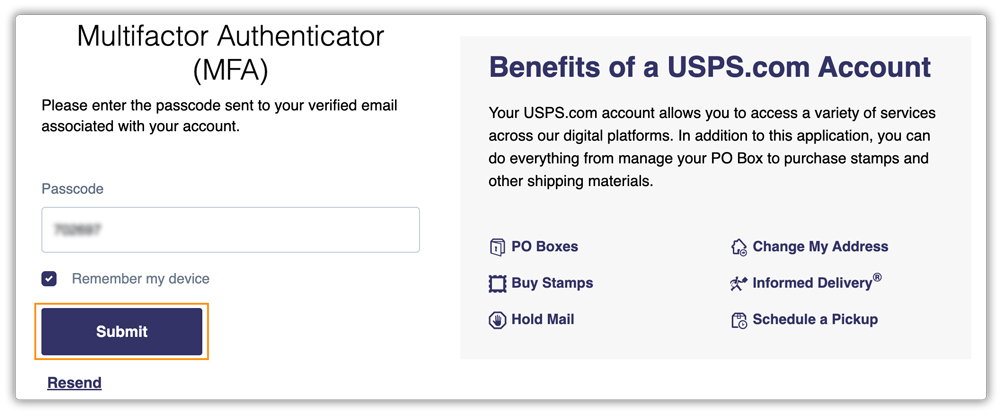
Once verified, click on Authorize and Continue to allow WooCommerce to access your USPS account securely.

After authorization, your registration will be successful.

You will now be prompted to Confirm Your USPS Account Details. Select your account credentials from the dropdown menu and click on Confirm and Continue.
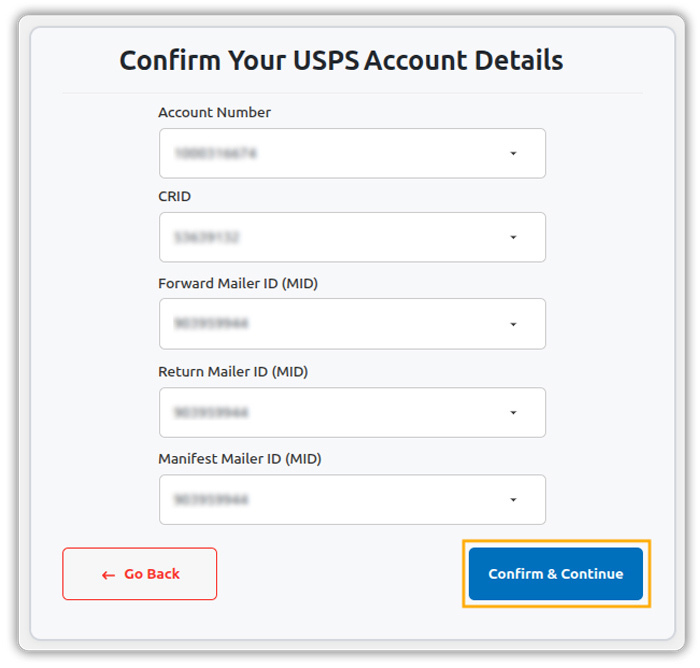
If needed, you can click Go Back to restart your registration.
Once confirmed, you’ll see a message indicating that your USPS account has been connected successfully. If needed, you can disconnect your account at any time by clicking on Disconnect.

To confirm the disconnection, simply type DISCONNECT in the prompt and proceed.
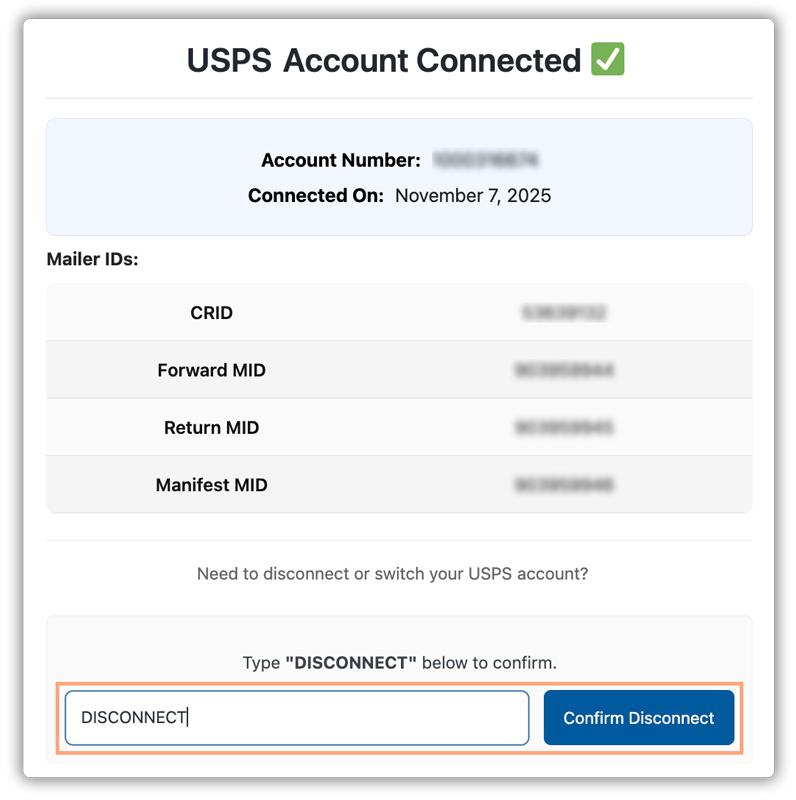
You can reconnect your USPS account whenever required by following the same process.
4. Navigate to USPS Plugin Settings
After you install and activate the plugin, WooCommerce adds a new shipping method called USPS to the Shipping settings. You can configure this method based on your requirements. You can access the settings in two ways:
Navigate to Plugins > Installed Plugins > PH USPS Shipping for WooCommerce > Settings.

Or, navigate to USPS > Settings in your WordPress Dashboard.
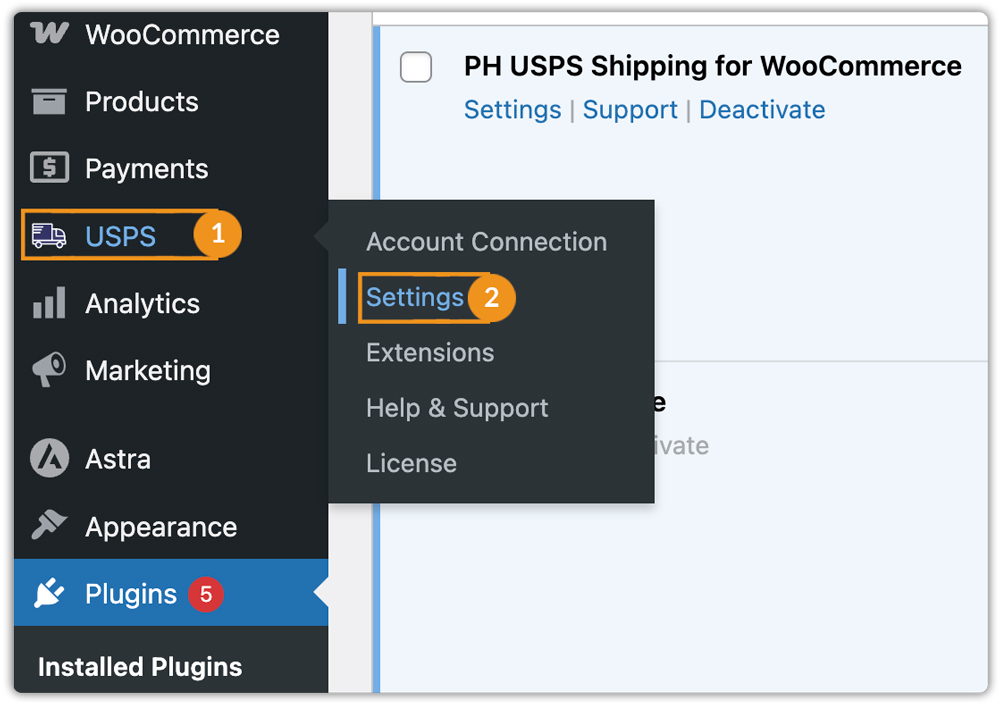
Alternatively, go to WooCommerce > Settings > Shipping > USPS.

After opening the USPS plugin settings, you will be able to configure general settings, rates, label generation, and more.
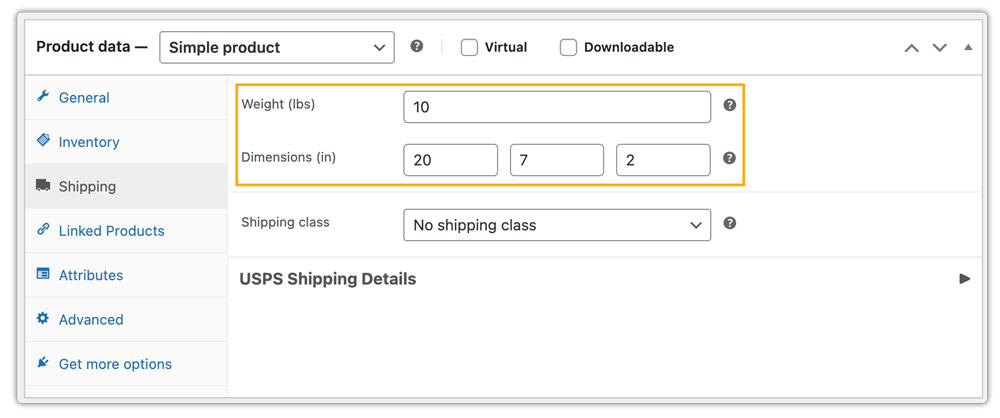
5. Verify Your Product Settings
To obtain accurate USPS shipping rates, it is mandatory to provide specific product details, such as product weight and dimensions.
Add Product Weight and Dimensions
Navigate to WooCommerce Dashboard > Products, edit the product you want to configure.

Under the Edit Product section, go to Product Data > Shipping and provide the Product details.
- Weight: Enter the product’s weight here.
- Dimensions: Enter the product’s length, width, and height.
- Shipping Class: If you have specific shipping classes assigned, select them here.
Assign the other in USPS Shipping details, such as:
- Pre-Packed Product: Enable if the product is already packed and ready to ship.
- Certified Mail: Enable if you want USPS to provide proof of mailing and delivery.
- Signature on Delivery: Select if a signature is required upon delivery.
- H.S. Tariff Number: Provide tariff number details for international shipments.
- Country of Manufacture: Enter the country where the product is manufactured.

Set Product Weight/Dimension Unit
For USPS, the product dimensions and weight must meet minimum requirements to calculate accurate shipping rates:
To configure minimum weight and dimensions in the plugin:
- Go to WooCommerce > Settings > Shipping > USPS.
- Click on the Packaging tab.
- Set the minimum weight and dimensions according to your store’s needs.

If no dimensions are provided for a product, the system assumes 5 cm × 5 cm × 0.1 cm. Any product dimensions below the minimum will automatically be adjusted to these values.
6. Add Shipper Address Details
Provide the address details where your orders will be shipped from. This can be your store address, shipping warehouse address, or any location that handles outgoing packages.
Go to WooCommerce > Settings > Shipping > USPS > Shipper tab
Enter the following details:
- Shipper First Name: Enter the sender’s first name to appear on the shipping label and invoice.
- Shipper Last Name: Enter the sender’s last name for identification on the shipping label and invoice.
- Company/Firm Name: Enter the business name associated with the shipment, if applicable.
- Email: Enter the sender’s email address for contact purposes.
- Phone Number: Enter a contact phone number to appear on the shipping label and invoice.
- Shipper Address Line 1: Primary address line for the shipping label and invoice.
- Address Line 2 (Optional): Additional address information if needed.
- Postal Code: Enter the postcode for accurate delivery.
- City: Specify the city to appear on the shipping label and invoice.
- State: Provide the sender’s state to ensure proper shipment routing.

Click Save Changes.
When using USPS, the country must always be set to “United States (US)” for accurate label generation and shipping calculations.
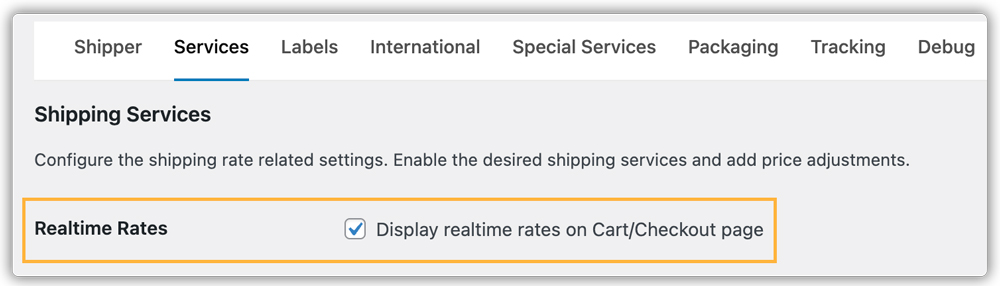
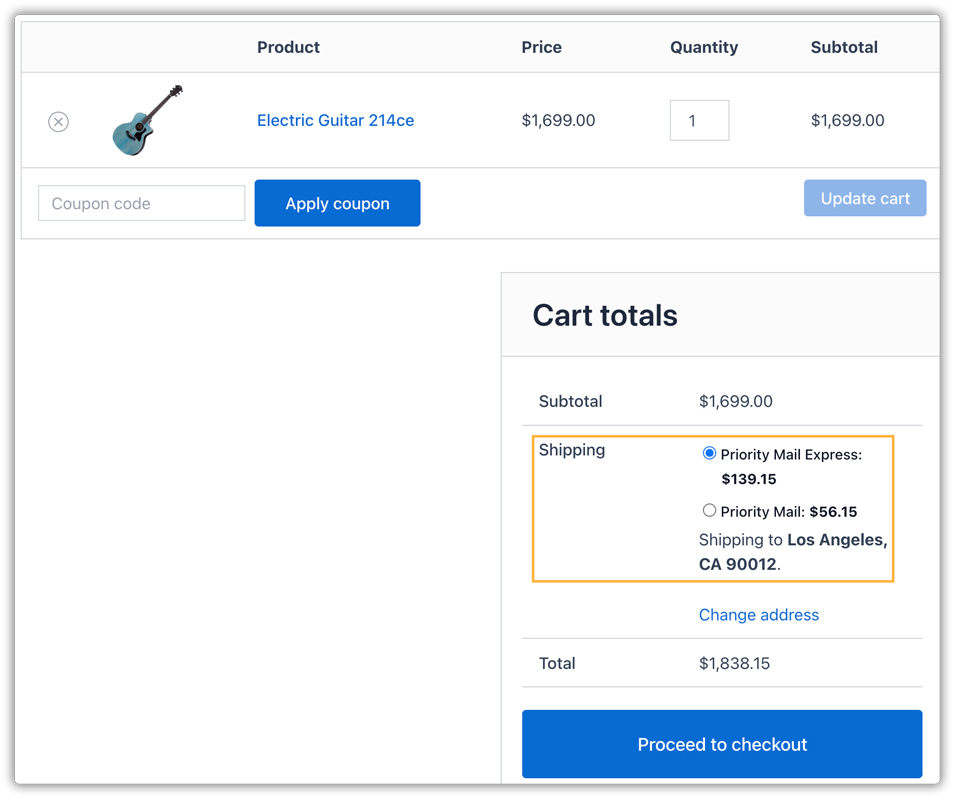
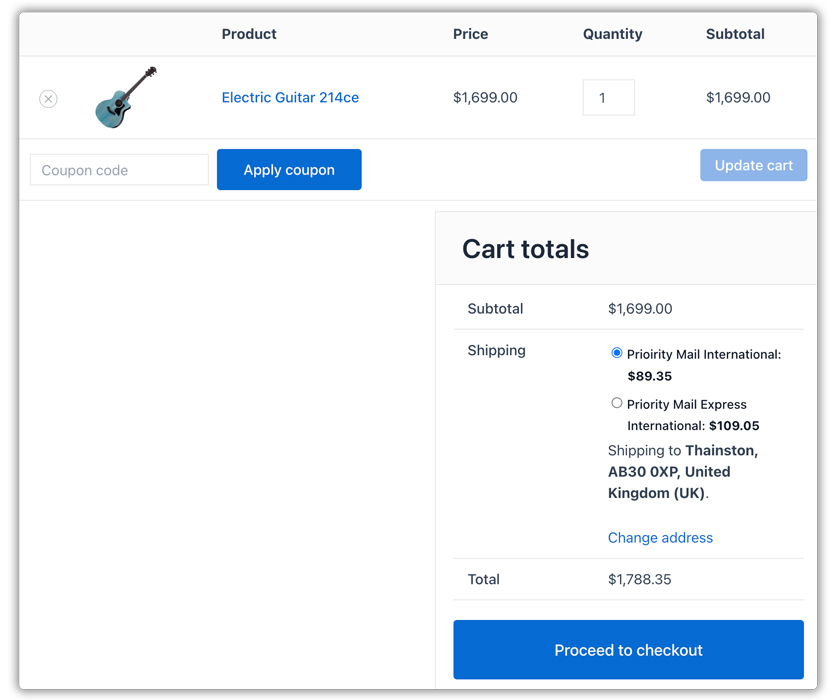
7. Display USPS Shipping Rates
WooCommerce store owners can display real-time USPS shipping rates at the cart and checkout to provide accurate costs to customers and improve the checkout experience.
Enable Real-Time Rates
Go to WooCommerce > Settings > Shipping > USPS > Services tab.
Enable Real-Time Rates to fetch current USPS shipping rates automatically.
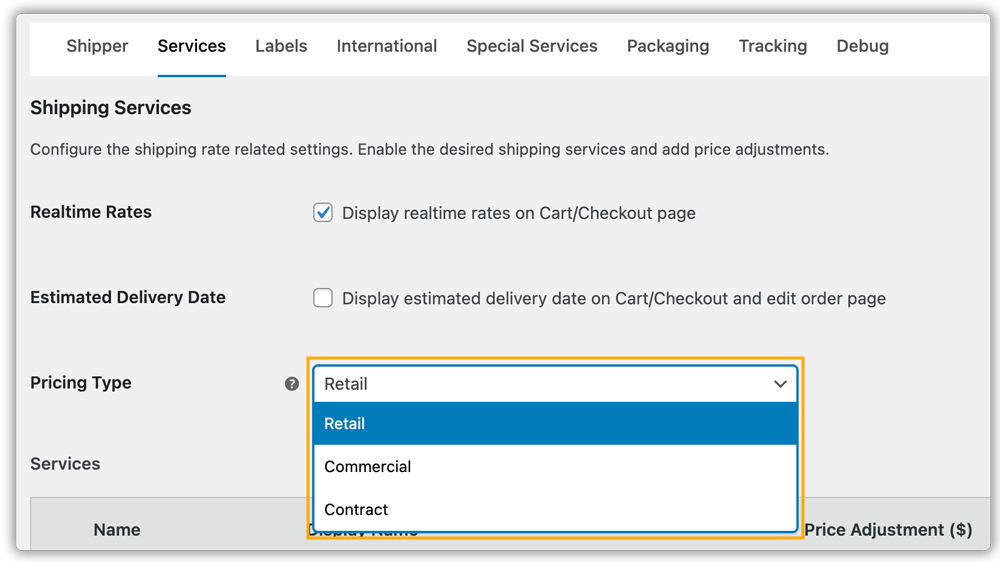
Select Types of Rates to Display
When fetching USPS rates, you can choose among:
- Retail Rates: Standard USPS rates applied to individual shipments.
- Commercial Rates: Discounted rates available for high-volume shippers with a USPS business account.
- Contract Rates: Custom-negotiated rates for large-volume or corporate accounts.
After configuring all the settings, you will be able to see real-time USPS shipping rates at the cart and checkout pages.

Add FallBack Rate
The Fallback Rate is used if USPS does not return any shipping rates for the order to ensure customers can complete checkout even if real-time rates fail.

Leave blank to disable fallback.
Add Currency Conversion Rate
If your store sells in a currency different from USD, set the conversion rate so USPS rates display correctly at checkout.

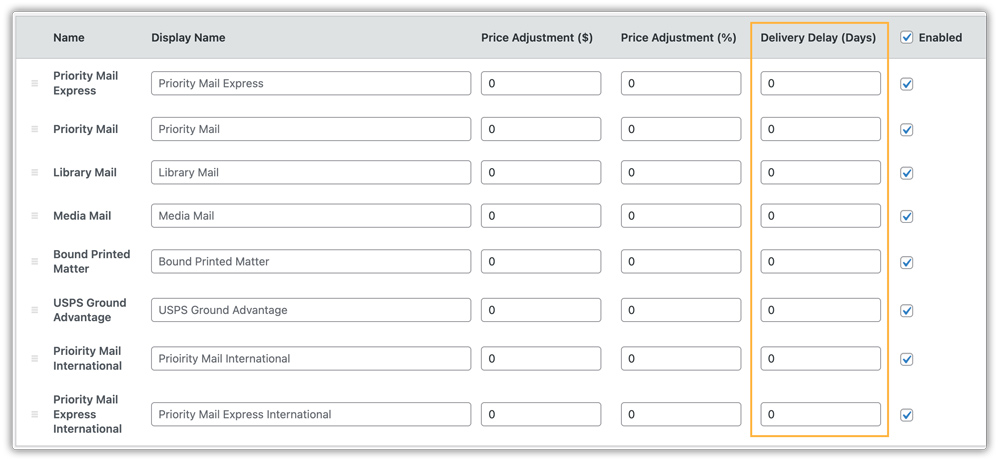
8. Configure USPS Shipping Services
Configure USPS shipping services in WooCommerce > Settings > Shipping > USPS > Services tab, to offer accurate delivery options for domestic and international shipments.
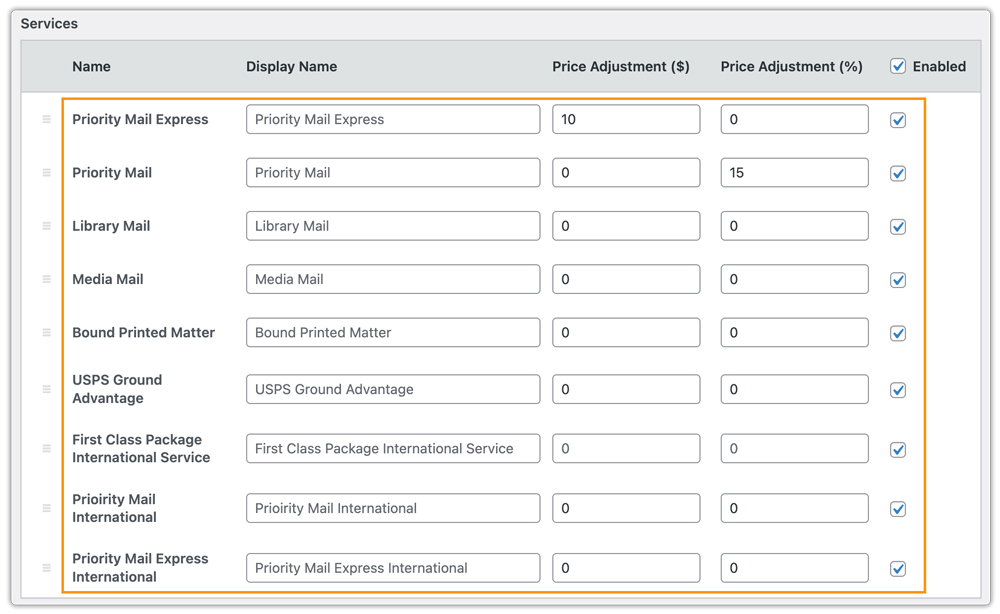
USPS Domestic Services
Available domestic services include:
- Priority Mail Express
- Priority Mail
- Library Mail
- Media Mail
- Bound Printed Matter
- USPS Ground Advantage
USPS International Services
Available international services include:
- First Class Package International Service
- Priority Mail International
- Priority Mail Express International
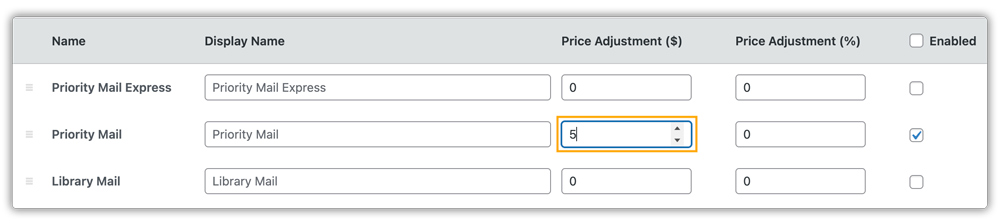
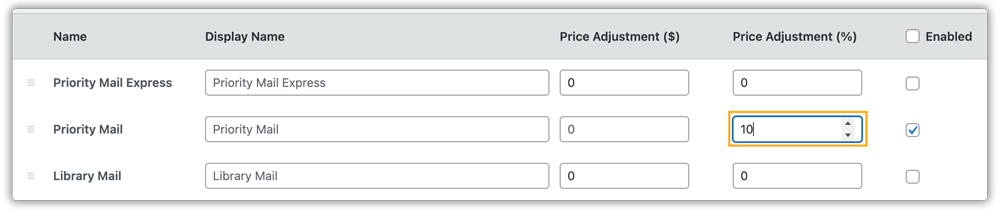
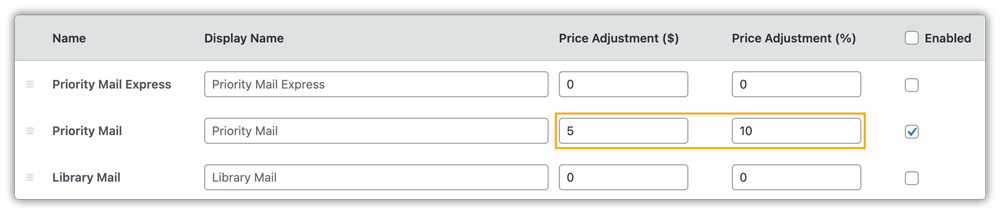
Adjust Shipping Rates
You can adjust USPS shipping prices by adding or subtracting an amount from the actual shipping cost. Use the minus sign (–) to subtract. Adjustments can be applied as a fixed amount ($) or percentage (%) for each USPS service.
Let’s assume the shipping cost for Priority Mail is $10.
1: Fixed Price Adjustment ($)
- Price adjustment applied: $5
- Total displayed cost will be: $15 (10 + 5)
2: Percentage-Based Adjustment (%)
- Price adjustment applied: 10%
- 10% of $10 = $1
- Total displayed cost will be: $11 (10 + 1)
3: Both Fixed ($) and Percentage (%) Adjustment
- Price adjustment applied: $5 and 10%
- Total displayed cost will be: $16 (10 + 5 + 1)
Display USPS Shipping Services Based on Shipping Zones
To show USPS services based on customer regions:
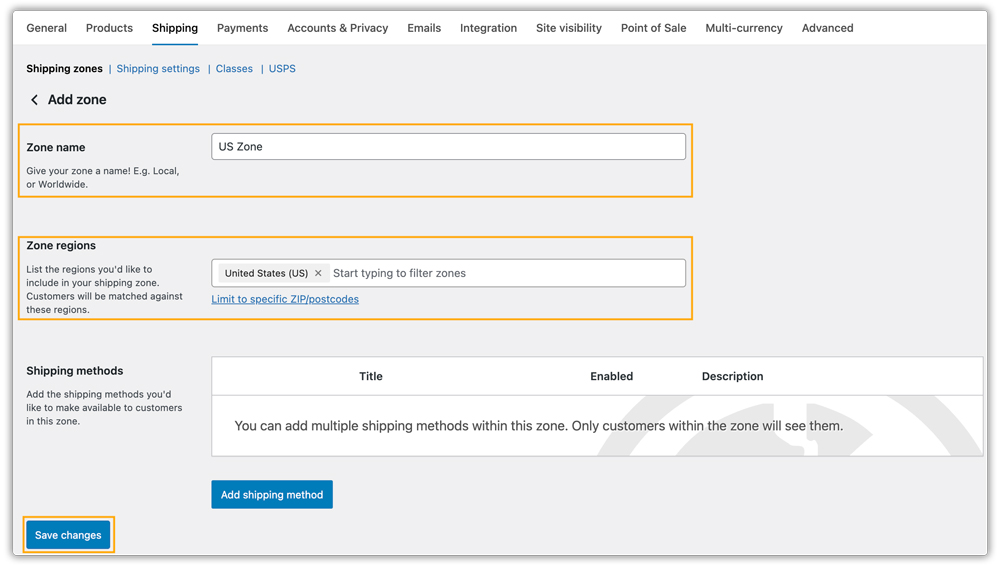
- Go to WooCommerce > Settings > Shipping > Shipping Zones > Add Zone
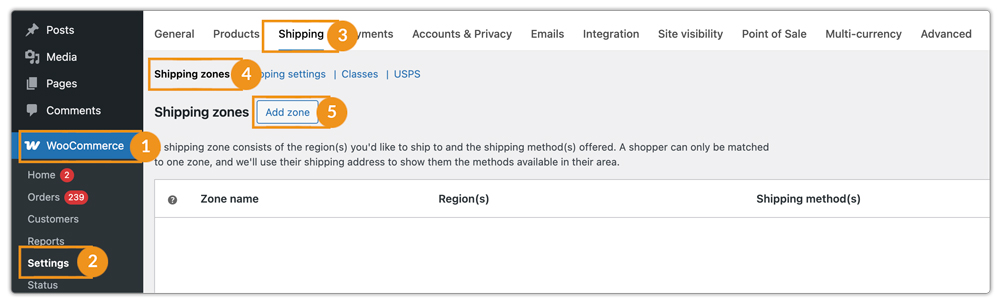
- Give it a name, select the preferred region(s) and click Save Changes.
- Click Add Shipping Method, choose USPS, and click Continue.
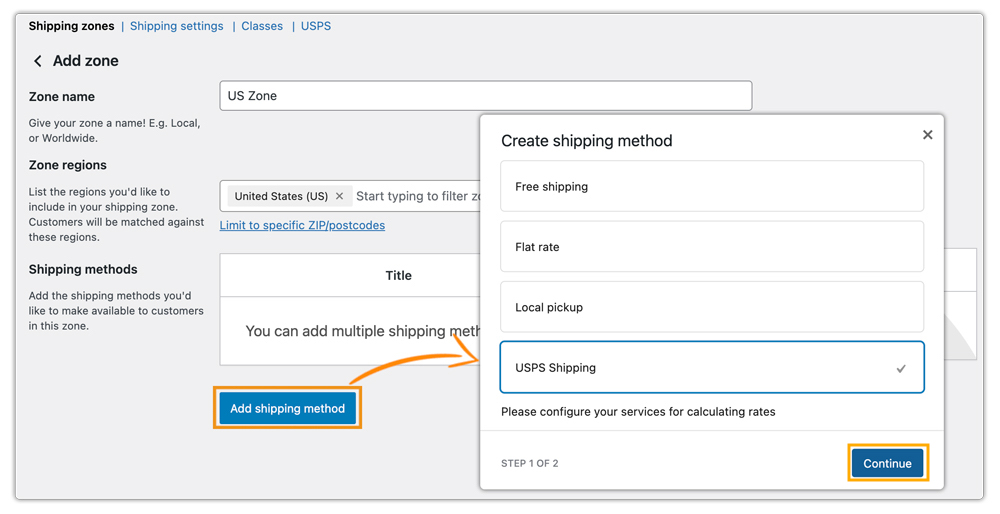
- Click Edit under the USPS Shipping section.

- Select the USPS service(s) for that zone and click Save Changes.

Now, at cart/ checkout, the selected USPS services applicable to the customer’s zone will be displayed.
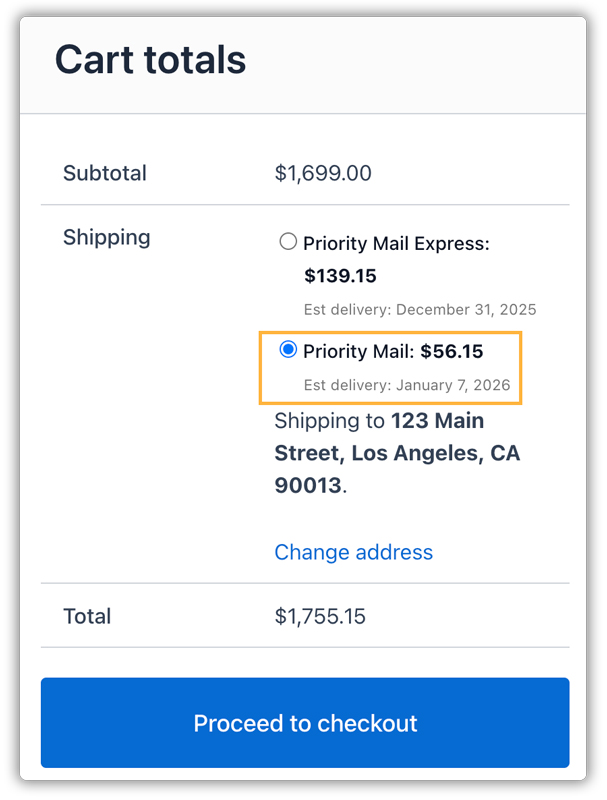
9. Display Estimated Delivery Dates on Cart/Checkout
With the USPS Shipping for WooCommerce Plugin, you can display the expected delivery date for each USPS service directly on the cart and checkout pages.
Configure Estimated Delivery Date Settings
Go to WooCommerce > Settings > Shipping > USPS > Service tab.
Enable the Estimated Delivery Date option.

Once enabled, a new column appears in the service list where you can configure Delivery Delay (Days). This allows you to add extra days for specific USPS services if needed.
Show Estimated Delivery Date
For example, if you add a 2-day delay for USPS Priority Mail, the system automatically adjusts the displayed delivery date on the cart and checkout pages.

If the normal estimated delivery is January 5, 2026, for the delayed service, it will show January 7, 2026.
10. Configure Packaging Settings
The Plugin allows you to define how products are packed and shipped using USPS services.
- Go to WooCommerce > Settings > Shipping > USPS.
- Click on the Packaging tab
- Select your preferred parcel packing method.
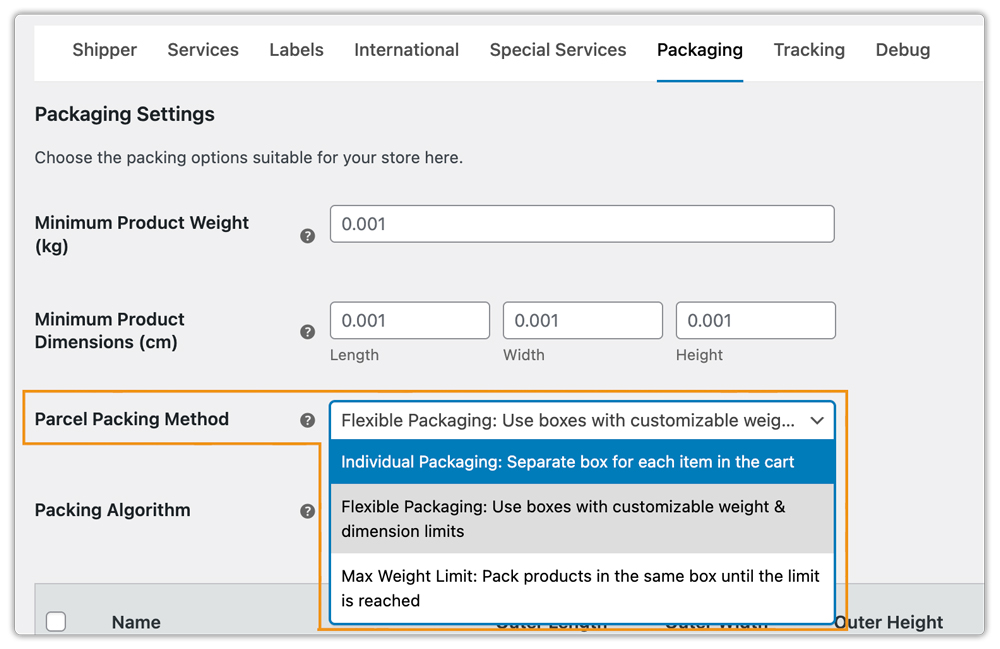
Pack Products Individually
Each item in the cart is shipped in its own separate package. Shipping cost is calculated per item. A separate shipping label is generated for each product.

Example: If a customer buys 2 laptops. Each laptop ships in its own box with 2 labels.
Pack Products Using USPS Boxes
The Plugin allows you to pack items using USPS Flat-Rate Boxes and Envelopes, or your own customizable boxes.
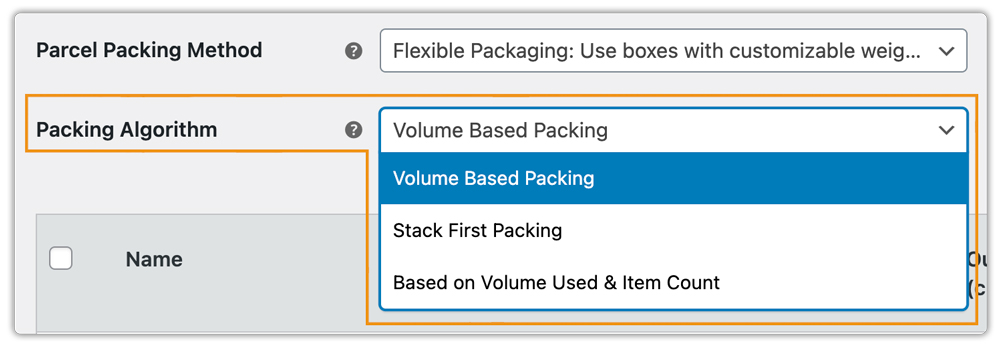
In the Packaging setting and select Flexible Packaging: Use boxes with customizable weight & dimension limit.
Use the Packing Algorithm to determine how items are packed:
- Volume-Based Packing: Packs items based purely on box volume.
- Stack-First Packing: Considers both volume and item count to pack efficiently.
- Based on Volume Used & Item Count: Balances space and item limits to avoid overfilling.
You can choose from the list of USPS Flat Rate packaging options for domestic and international shipments:

Add Custom Box
To add custom boxes, click Add Box and enter the following details:
- Outer Length, Width, Height
- Inner Length, Width, Height
- Box Weight (kg)
- Maximum Quantity of Items per Box
- Maximum Weight per Box (kg)
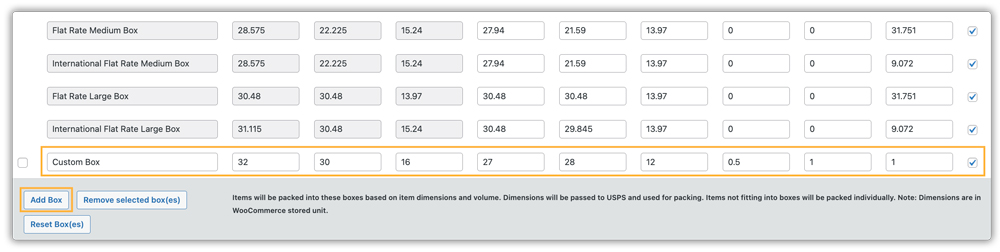
You can remove selected boxes or reset all boxes using the respective buttons.
Pack Products Purely Based on Weight
This method packs items in the same box until the maximum package weight is reached.
Enter the following details:
- Box Weight: Weight of the empty box
- Max Package Weight: Maximum allowable weight, including items and box
- Max Package Quantity: Maximum number of items per package
- Packing Process: Choose whether to pack heavier or lighter items first

11. Printing USPS Shipping Labels
After setting up the USPS Configuration Settings, customers can view all available USPS shipping services on the Cart and Checkout pages. They can select their preferred service and place the order.

Printing Your First USPS Shipping Label
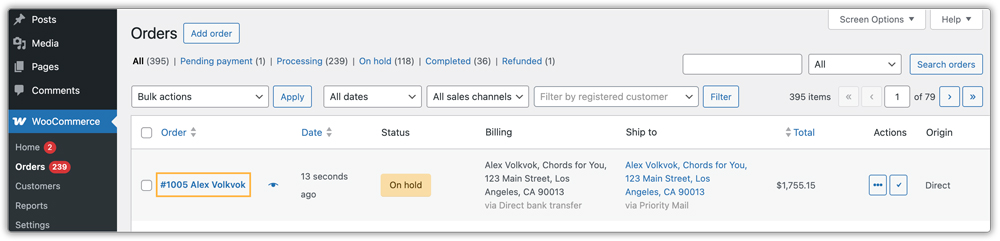
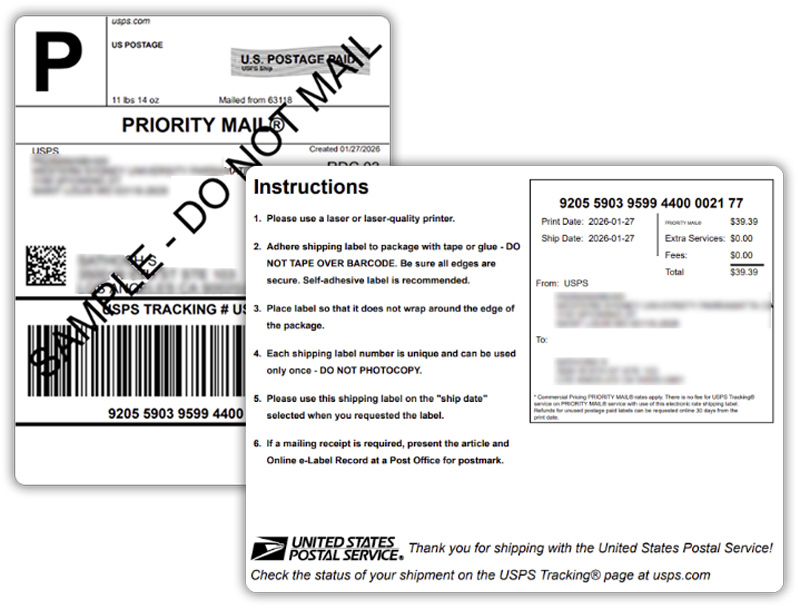
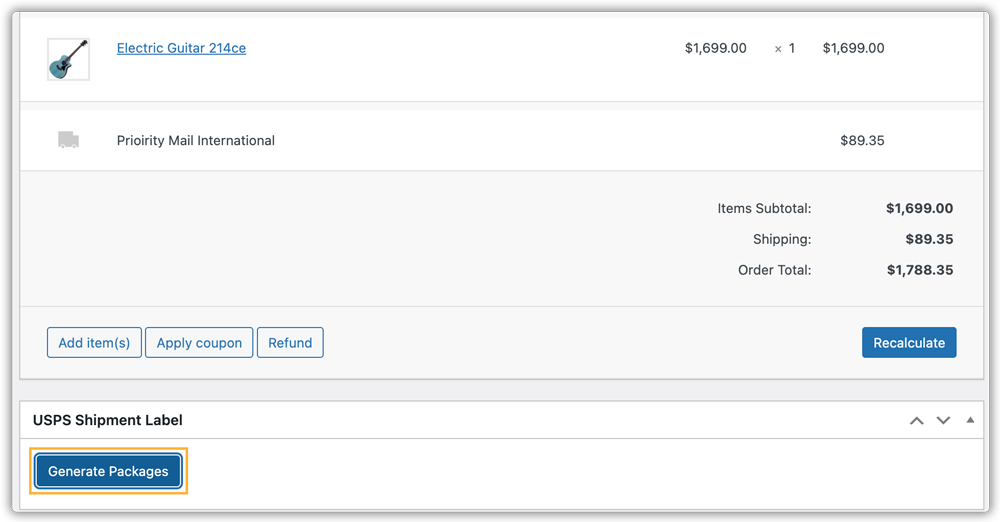
Once an order is placed, you can easily create and print the shipping label directly from your WooCommerce dashboard.
Navigate to WooCommerce > Orders. Click on the specific Order Number for which you want to generate the USPS label.
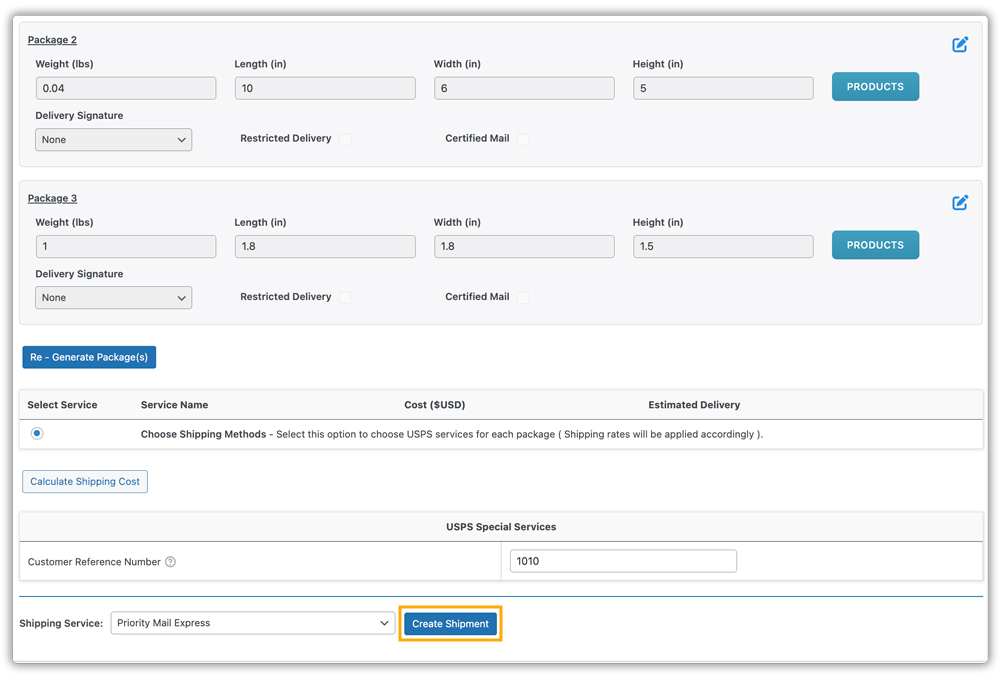
Click on Generate Packages – this will create a package based on the Packaging settings.
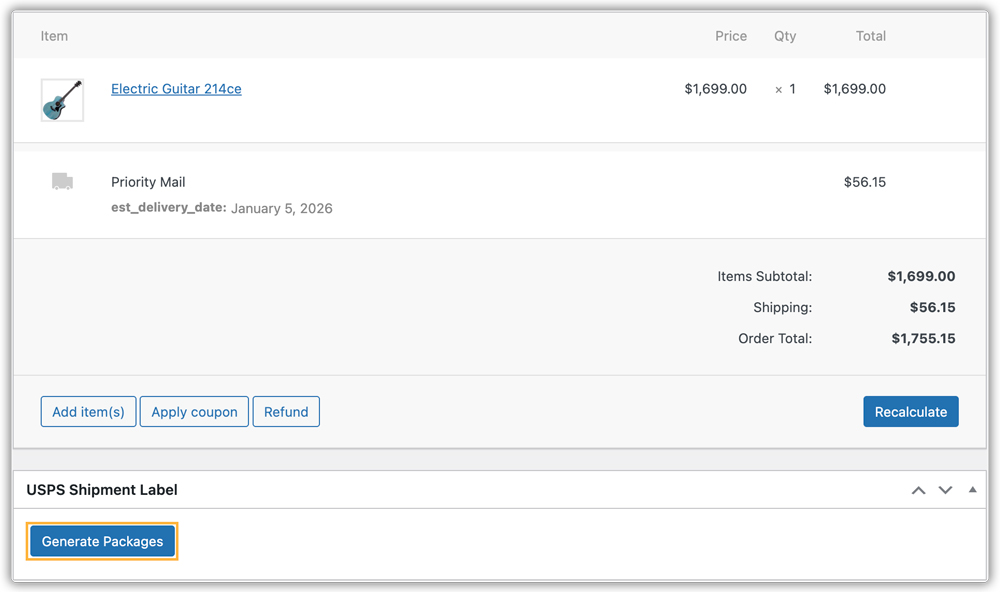
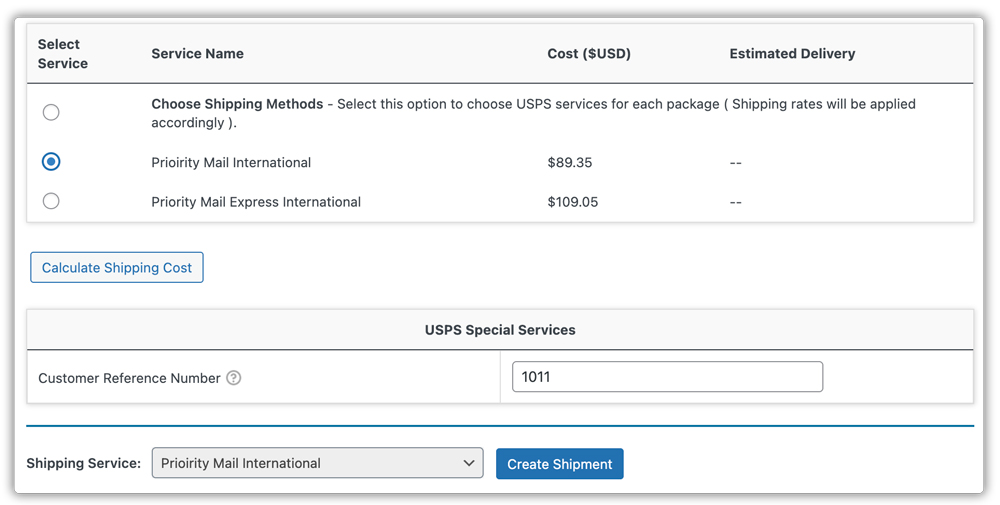
Once the package is successfully created, the following options will be available to you:
- Edit Package: This option allows you to manually add custom box packages to your order. You can also provide package weight and dimensions, and enable options such as Delivery Signature, Restricted Delivery, or Certified Mail for your packages as needed.
- Calculate Shipping Cost: This allows you to calculate real-time shipping rates on the order page to compare different USPS shipping rates. This way, you can select the most suitable service and generate shipping labels for any available USPS shipping option based on the destination address.
- USPS Special Services: Here you can enter a Customer Reference Number, such as order ID, customer ID, invoice number, etc, to print on the shipping label.
Once you are done with the packages, click Create Shipment to generate a USPS shipping label for the current order.

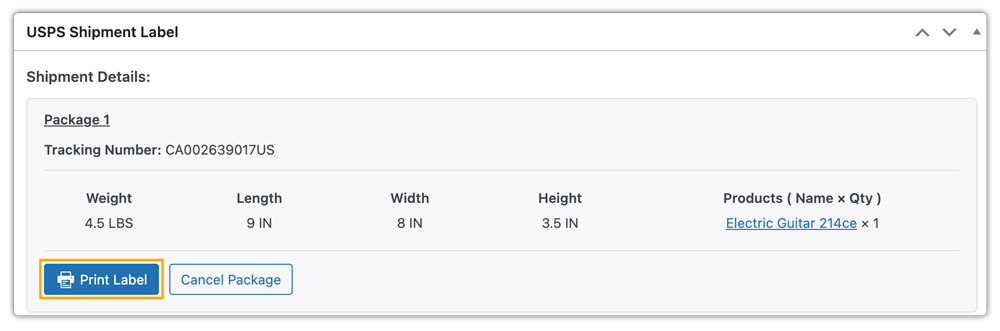
After clicking the Create Shipment button, the shipment tracking ID automatically gets generated in the tracking box. Print Label buttons become available for printing.
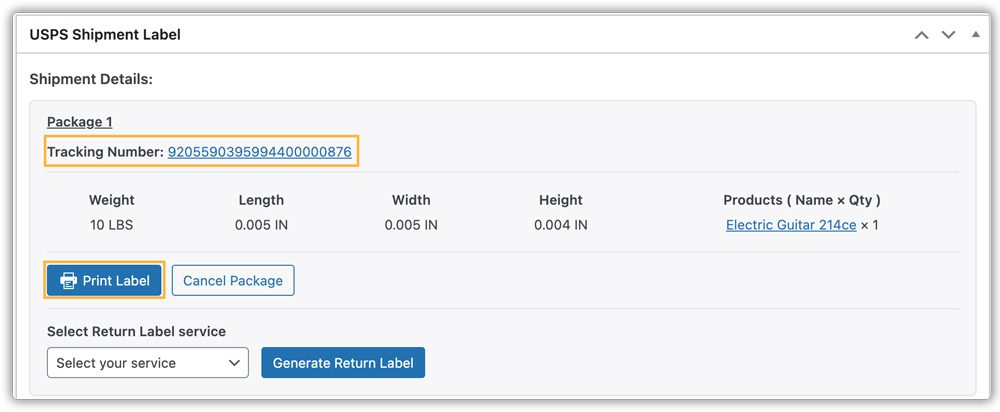
All generated shipping labels are stored in your WooCommerce site’s database. These labels are automatically downloaded as a file and can be printed multiple times.

Here, the receipt appears on the same page.
If you want the receipt to be printed separately, follow these steps before creating a shipping label:
- Go to WooCommerce → Settings → Shipping → USPS → Labels.
- Under the Domestic Receipt Format, you will see three options:
- Not Required: No receipt will be generated or printed.
- Same Page (Along with the label): The receipt will be printed on the same page as the shipping label, as shown in the image above.
- Separate Page: The receipt will be generated on a different page from the label.
- Select Separate Page.
- Save the settings.

Then, while printing a label, you will get another option called Print Receipt, as shown in the image. Click on Print Receipt to print the receipt.

Here, both the label and the receipt are printed separately.
Print USPS Shipping Labels in Bulk
Once customers place multiple orders, the USPS Shipping plugin lets you generate and print shipping labels for all of them in one go.
Go to the Orders page, select the list of orders for which you want to create USPS shipping labels.
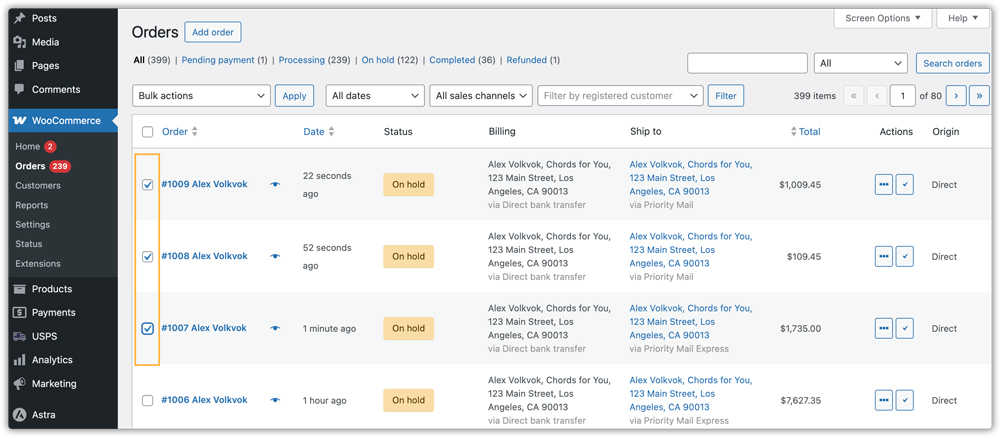
From the Bulk Actions dropdown, choose Create USPS Label and click Apply. The plugin will automatically generate USPS shipping labels for all the selected orders.

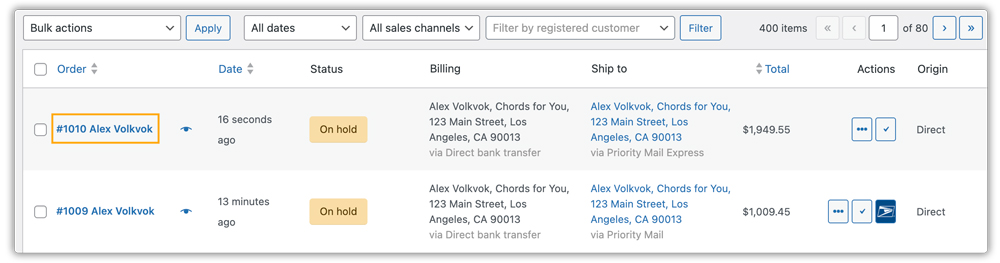
Once the labels are generated, select the orders, choose Print USPS Label from the Bulk Actions dropdown, and click Apply. You can also print the label one by one by clicking on the USPS icon for each order.

Labels are printed.

If you want the receipt separately, you can select Separate Page in the Domestic Receipt Format before creating the USPS shipping labels. Then you can bulk print all the receipts at once by clicking on Print USPS Receipts (PDF) as shown in the image.

Here are the receipts printed for the bulk order.

Print Individual Shipping Labels for Multiple Packages
When an order contains multiple products and goes into multiple packages, you can generate separate USPS labels for each package.

Go to WooCommerce > Orders and open the order.
Click Generate Packages to create individual packages.

The system will create multiple packages for the different products. Once ready, click Create Shipment to generate USPS labels for all the packages.
You’ll see options to print each label using the Print Label button.
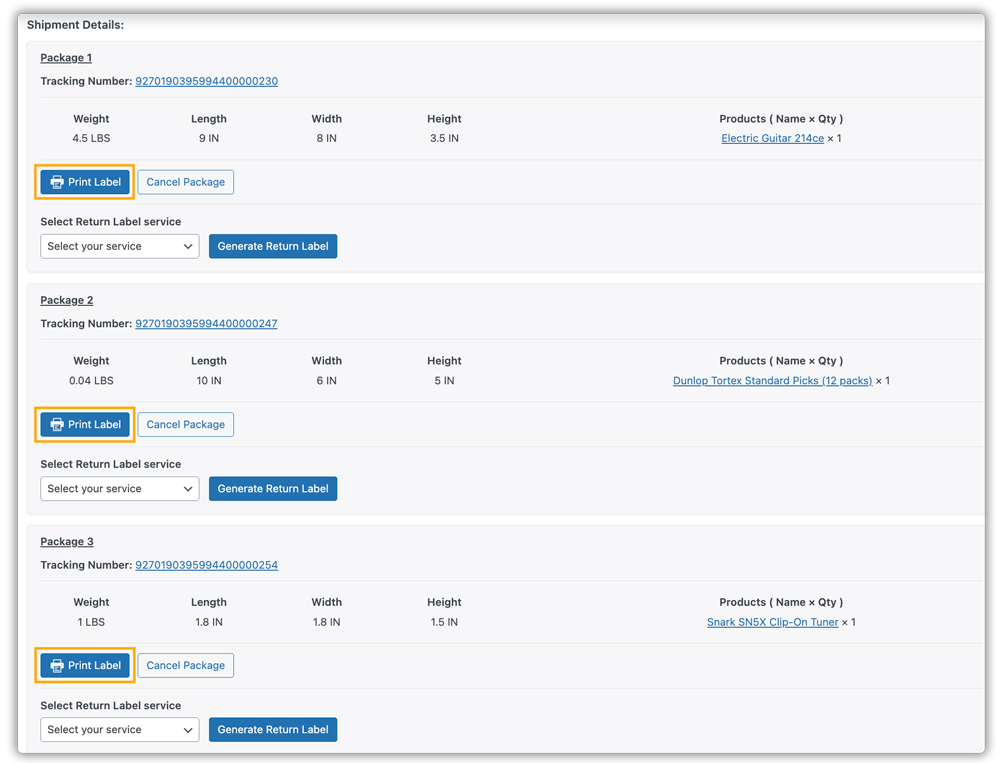
Labels are printed for each package.

Print Shipping Labels Automatically
To automate USPS label generation:
Go to WooCommerce > Settings > Shipping > USPS > Labels.
Enable the following options:
- Automatic Package Details Generation
- Automatic Shipping Label Creation
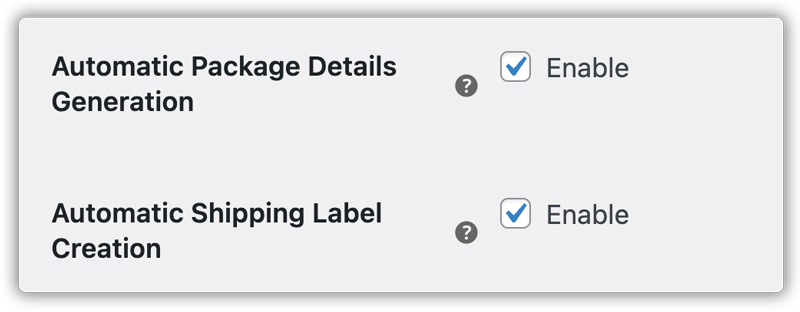
Choose when to Trigger Shipping Label Creation, either when the order is placed or when payment is confirmed.

Assign a Default USPS Domestic Service and Default USPS International Service for automatic label creation.

Once you configure it, the system automatically generates USPS labels when an order is placed and lets you download them directly from the orders page.
Add or Remove Packages Within a USPS Order
This feature is especially useful when handling orders that contain multiple products or require separate packages.
Go to the order where you want to manage packages and generate a package for that order.

After you generate the packages, an Edit button appears next to each package. This lets you modify package details.
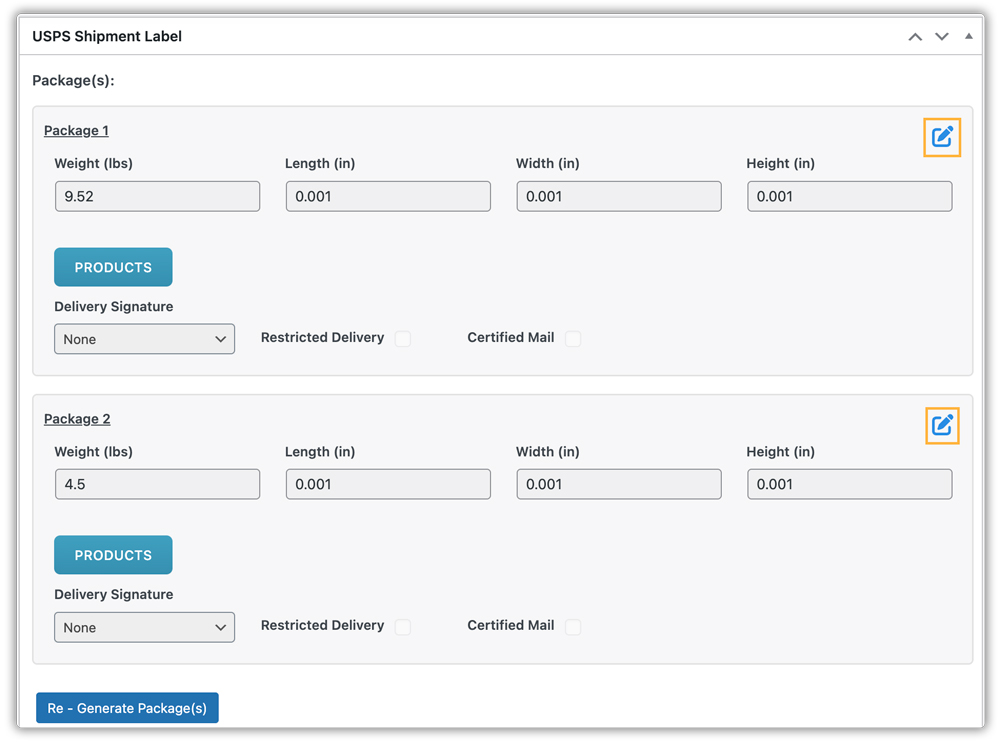
Click on the PRODUCTS option to select or remove items from a specific package, then save your changes.

To create a new package, click Add Package and place products.

Add the dimensions and weight for the newly added package. Click on Save Package(s).
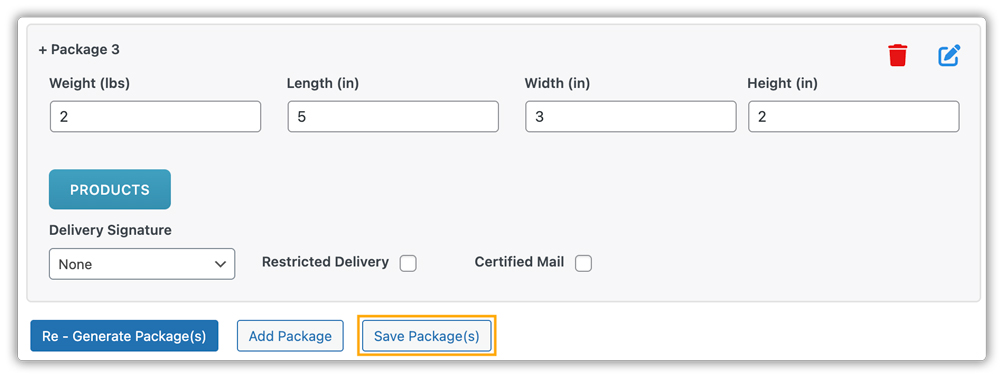
Now you can see a new package has been added. If you no longer need a particular package, click the delete icon to remove it.

Before creating the USPS shipment, ensure that all products are correctly assigned to a specific package.
Cancel USPS Shipping Label
If you need to cancel a shipment after creating the USPS label, you can cancel it directly from the order page.
Go to the Orders page and select the order for which the USPS label was generated. Click Cancel Package.
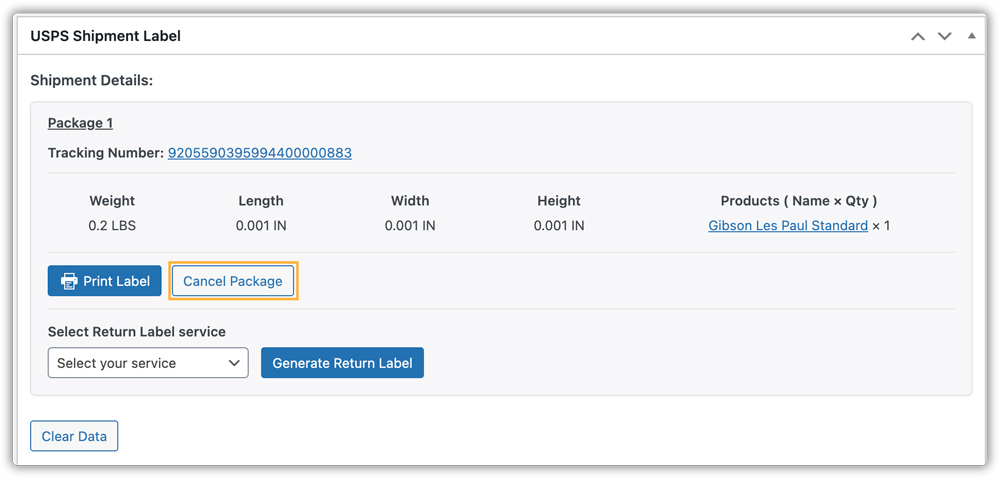
Confirm the cancellation by clicking OK when the pop-up appears, asking, “Are you sure you want to cancel this package?”

The package will be cancelled, and no additional charges will apply. You can also clear the package data if needed. You can clear the data by clicking on Clear Data.

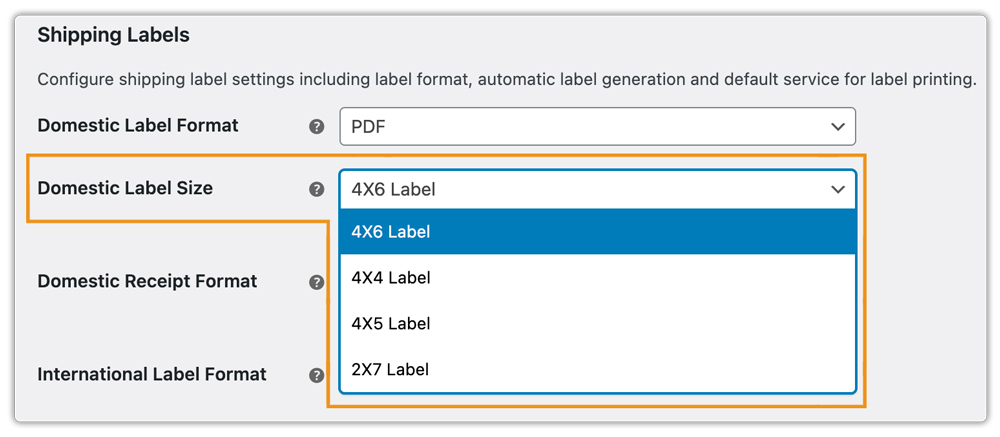
Configure USPS Label Format
You can choose the format for USPS shipping labels based on your printer type and preferences.
Go to WooCommerce > Settings > Shipping > USPS > Label Settings.
In the Domestic Label Format, choose your preferred format from the dropdown for USPS domestic shipping label.
- PDF: Standard format for laser and inkjet printers.
- TIFF: High-quality raster format.
- JPG: Compressed image format for easy printing.
- PNG: High-quality image label, suitable for standard printers.
- GIF: Compatible image format for basic label printing.
- SVG: Vector format, scalable without losing quality.
- ZPL 203 DPI: Zebra Printer format for thermal printing.
- ZPL 300 DPI: High-resolution Zebra Printer format.
- Label Broker: Use only if a label broker service is enabled.
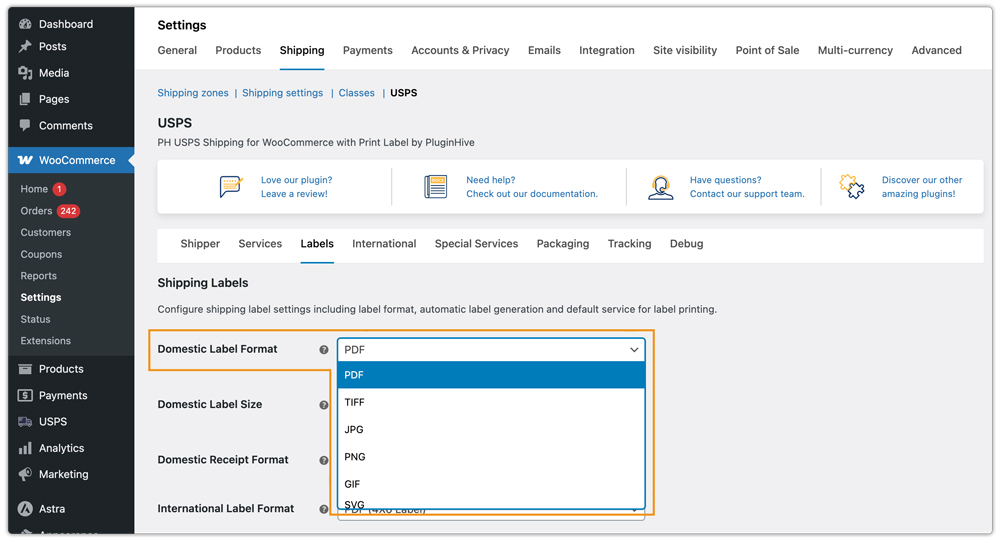
Similarly, in the International Label Format, choose the format for USPS international shipping label.
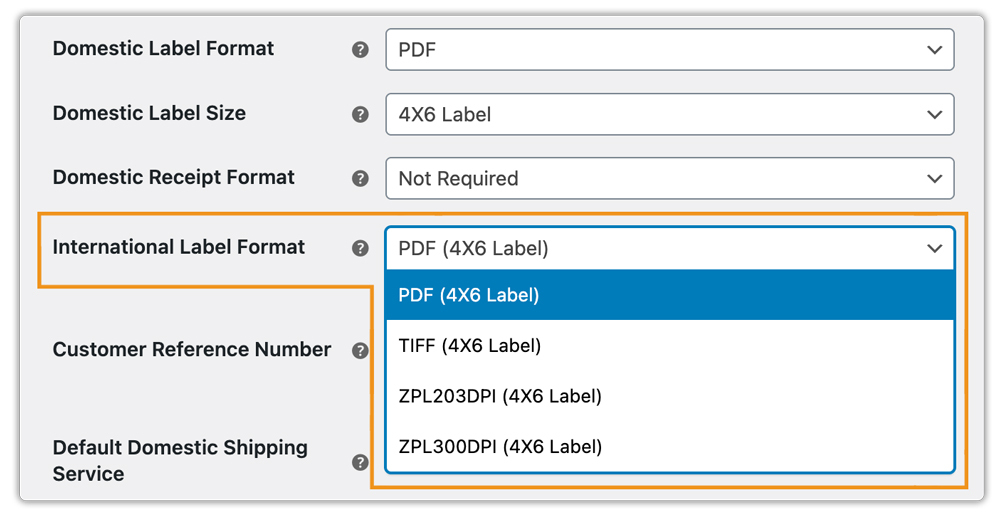
Select the label size to be printed.
Show All Services in Order Page
Enabling this setting will show all services in the create label drop-down. To configure this,
- Navigate to WooCommerce > Settings > Shipping > USPS.
- Go to the Label tab.
- Enable the Show All Services in Order Page option.

Add Customer Reference Number
Enter your Order, Invoice, Customer, or RMA numbers. These appear on the shipping labels for easy tracking.

12. Set Up USPS Shipment Tracking
To set up USPS shipment tracking for your WooCommerce store, follow these steps:
- Go to WooCommerce > Settings > Shipping > USPS
- Click on the Tracking tab.
Disable Tracking Notification for Customer
The system generates the tracking number, displays it in the admin panel, and does not share it with customers. Use this option if you prefer to manage tracking internally.
Hide Tracking in My Account
Enable this option to hide tracking details from the customer’s My Account > Order History section. Customers will not see tracking numbers or shipment statuses in their accounts.
Customize Tracking Message
You can personalize the tracking message sent to customers, including order details, estimated delivery time, or additional instructions, improving communication and transparency.
13. How to Set up USPS International Shipping
To configure USPS international shipping, go to WooCommerce > Settings > Shipping > USPS and navigate to the International tab.
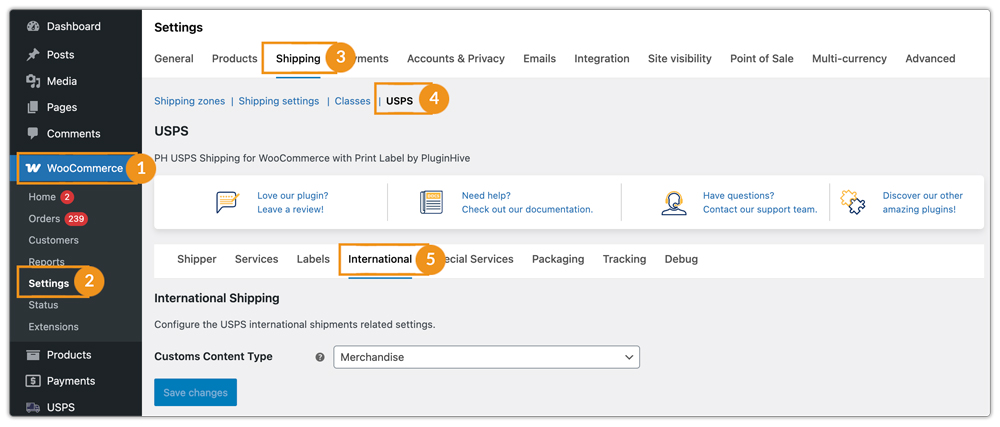
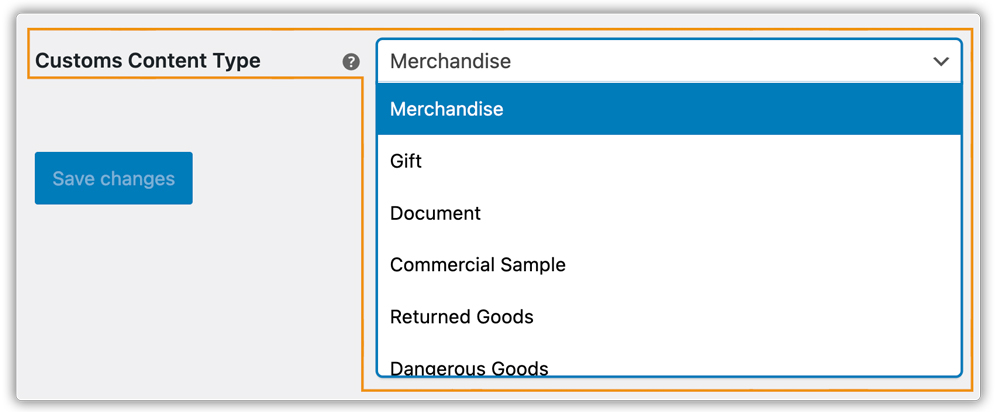
Define Custom Content Type
Define the content type for your international shipment, such as Merchandise, Documents, Gift, or Sample, to ensure compliance with USPS shipping regulations.
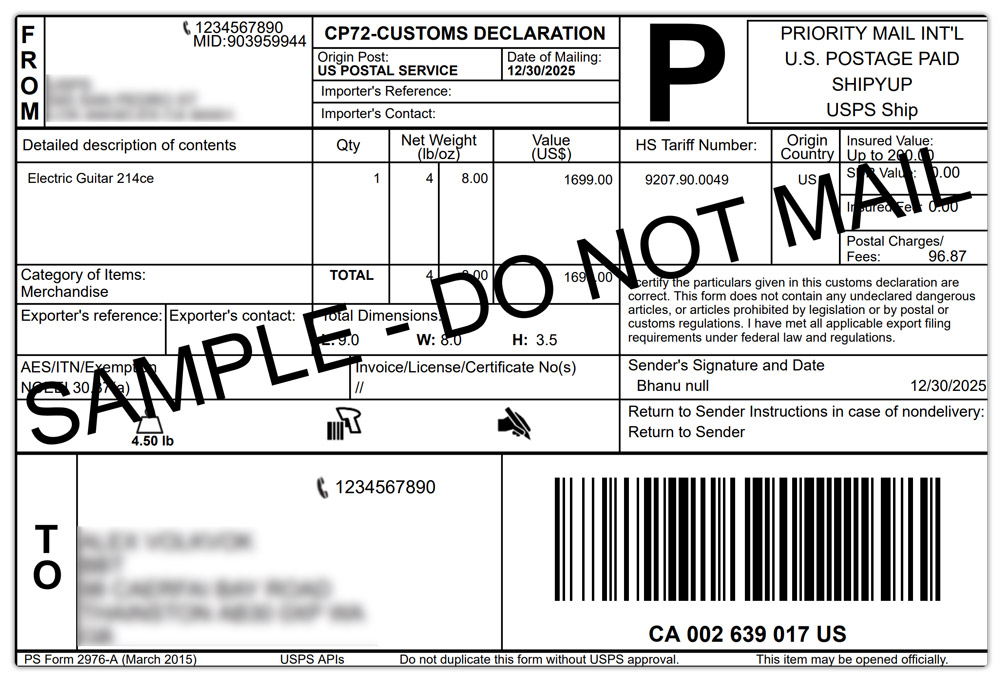
Commercial invoices (CN22/CN23 forms) are mandatory for all international shipments. Enabling this option ensures that the invoice is printed along with your USPS shipping label, providing necessary details for customs clearance, duties, and taxes. The shipping label and commercial invoice will be printed on the same page for convenience.
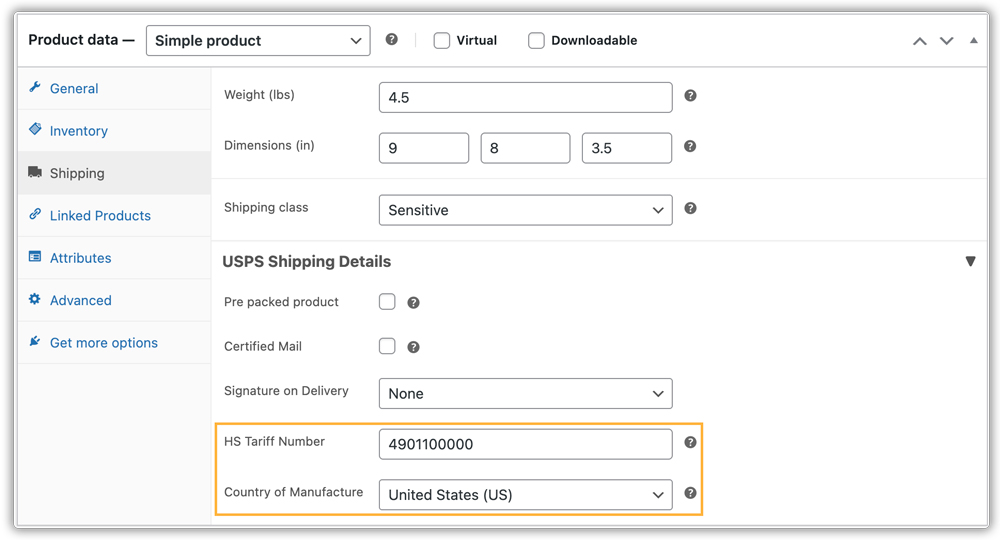
Product Level Settings for International Shipments
Make sure the product dimensions and other details are accurate. Set the HS Tariff Number and Country of Manufacture required for international shipping.
Print CN22/23 Forms For USPS International Shipping
To print international forms, add a product to the WooCommerce cart and provide an international shipping address.
After placing the order, go to Orders, select the order, and click Generate Package.
Click Create Shipment to generate the USPS international shipment.
Click Print Label to print the shipping label along with the commercial invoice (CN22/23 form).
The information appears on the commercial invoice, and customs uses it for proper classification.
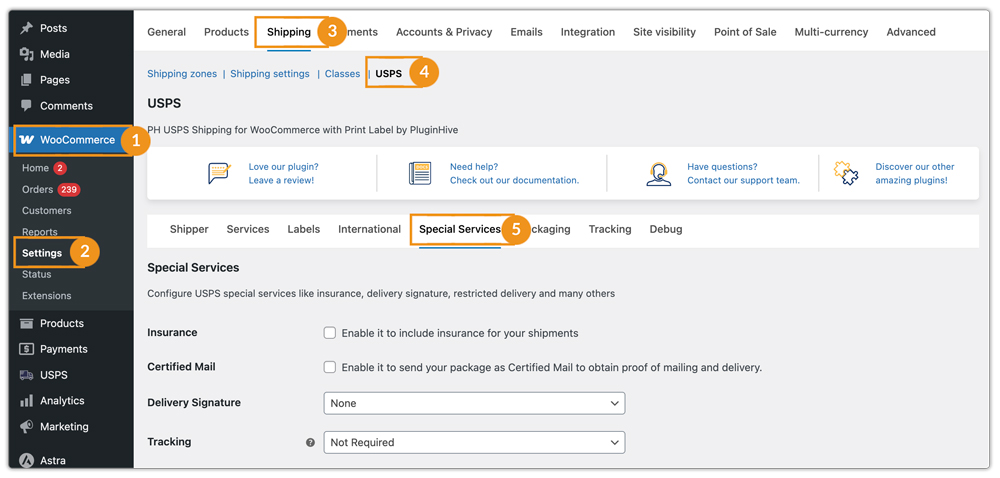
14. Set Up USPS Special Services
The WooCommerce USPS plugin allows you to enable and configure various special services to meet specific shipping requirements for both domestic and international orders.
Go to WooCommerce > Settings > Shipping > USPS and navigate to the Special Services tab.
Add USPS Insurance
Enable USPS Insurance to protect your packages against loss or damage and allow you to file claims if any issues occur during transit.

USPS Certified Mail
Use Certified Mail to provide proof of mailing and delivery. USPS generates a unique tracking number and sends you a confirmation once the package is delivered.

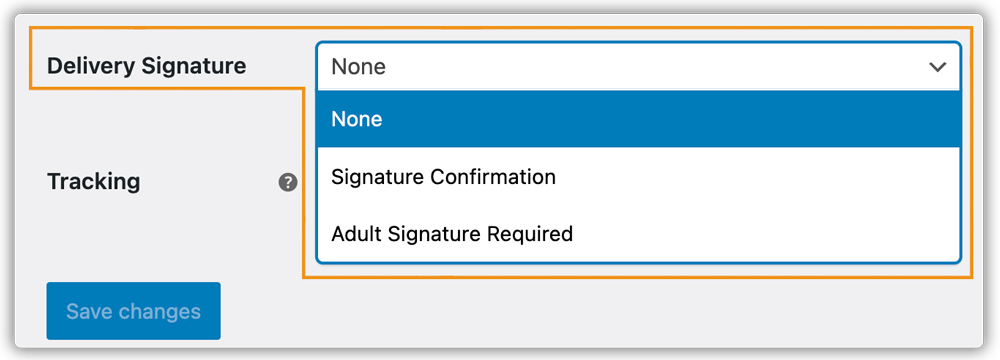
USPS Delivery Signature
Require a signature upon delivery to enhance security. Options include:
- Signature Confirmation
- Adult Signature Required (for age-restricted shipments)
Enable Restricted Delivery
Along with insurance/ certified mail/delivery signature, for sensitive or high-value shipments, you can enable Restricted Delivery as well, to ensure that only the specified recipient (or their authorized agent) can sign for and receive the package.

Set Tracking Duration
USPS tracking provides shipment updates for a defined period depending on the service selected. You can choose from options such as:
- Not Required
- Tracking Plus 6 Months
- Tracking Plus 1 Year
- Tracking Plus 3 Years
- Tracking Plus 5 Years
- Tracking Plus 7 Years
- Tracking Plus 10 Years
- Tracking Plus Signature 3 Years
- Tracking Plus Signature 5 Years
- Tracking Plus Signature 7 Years
- Tracking Plus Signature 10 Years
Select the appropriate duration to match your shipping requirements and customer needs.
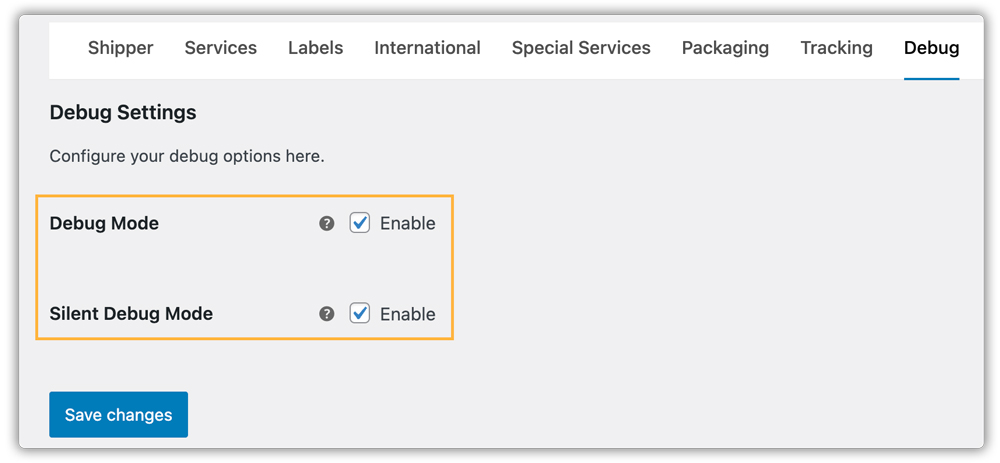
15. Debug Setting
- Enable Debug Mode to troubleshoot issues with the USPS plugin. When enabled, it generates detailed logs of plugin operations, including rate calculations, label generation, and shipment updates.
- Silent Debug Mode works like Debug Mode but runs in the background without showing debug information on the WooCommerce interface.
By following this guide, you can automate your USPS shipping workflow and improve the overall checkout and delivery experience for your customers. Make sure to regularly review your plugin settings and USPS account configuration to maintain accurate rates and avoid shipping issues.